
Life E29068 (MD 29078) - Home Theater MEDION - Free user manual and instructions
Find the device manual for free Life E29068 (MD 29078) MEDION in PDF.


| Product Type | Home Theater DVD/HDD Recorder |
| Power Supply | 230V ~ 50/60Hz, 35W |
| Supported Disc Formats | DVD, DVD+R, DVD+RW, DVD-R, DVD-RW, VCD, SVCD, CD-Audio, CD-R, CD-RW, JPEG-CD, MP3-CD, DivX-CD |
| Recording Disc Formats | DVD+R, DVD+RW |
| Regional Code | 2 (Europe) and 0 (all regions) |
| Hard Disk Drive | Integrated, capacity not specified |
| Maximum Titles | 49 per medium (DVD and HDD combined) |
| Timer Recordings | Up to 8 programmed recordings |
| Audio Output | Dolby Digital, DTS, MPEG via digital outputs; 5.1 analogue outputs |
| Video Output | SCART (RGB), S-Video, Composite (Cinch), Component (Y, Cb/Pb, Cr/Pr) |
| Progressive Scan | Supported via component outputs |
| NICAM Support | Yes |
| VIDEOPlus+ | Supported for easy programming |
| Remote Control Batteries | 2 x AAA (1.5V) |
| Safety Instructions | Read manual before use; keep away from moisture; do not open device; use dry soft cloth for cleaning |
| Repairs | Do not attempt self-repair; contact service centre |
| Dimensions | Not specified in manual |
| Weight | Not specified in manual |
Frequently Asked Questions - Life E29068 (MD 29078) MEDION
User questions about Life E29068 (MD 29078) MEDION
0 question about this device. Answer the ones you know or ask your own.
Ask a new question about this device
Download the instructions for your Home Theater in PDF format for free! Find your manual Life E29068 (MD 29078) - MEDION and take your electronic device back in hand. On this page are published all the documents necessary for the use of your device. Life E29068 (MD 29078) by MEDION.
USER MANUAL Life E29068 (MD 29078) MEDION
SAFETY INSTRUCTIONS ....4
GENERAL INFORMATION 6
PREPARATION 9
CONNECTIONS AND CONNECTION OPTIONS 10
Operation from device and remote control 18
On/off switch 18
Set menu language and country 19
Channel scan 19
Setting the date and time 19
Change programme presets/edit channels 20
DVD AND CD PLAYBACK 23
Inserting a disc 23
Setting the volume 23
Playback functions (DVD, VCD, CD, DIVX, MPEG4) 23
Search functions 24
Repeat functions 24
AUDIO and SUBTITLE MENU (DVD) 25
Picture functions 26
MENU/PBC and TITLE (DVD) 26
PBC function (VCD 2.0 only) 26
Summary of playback settings - DISPLAY 27
TV/DVD 27
Setting bookmarks - BOOKMARK (DVD) 28
Audio CDs and MP3 CDs 28
Playing back JPEG CDs 30
Playing back MPEG4 and DIVX files 30
RECORDING TO DVD/HARD DISK 31
Manual recording 31
Automatic recording ("TIMER" menu) 34
VIDEOPlus+ programming 36
Close programming 37
OPENING TITLE MENUS/VIEWING + EDITING RECORDINGS 38
Open title menus 38
DVD title menu 38
DVD title options 39
Editing DVD recordings during playback 41
Editing hard disk recordings 41
Watch TV at a different time (TIME SHIFT) 42
Copying MP3/JPEG/DIVX/MPEG4 data to the hard disk 42
SETTINGS IN THE SETUP MENU 44
SYSTEM menu 44
"VIDEO" menu 45
AUDIO menu 46
"SECURITY" menu 49
"RECORD" menu 51
DISC Menu 52
TROUBLESHOOTING 54
TECHNICAL DATA 56
COUNTRY CODES 57
SAFETY INSTRUCTIONS

About these instructions
Please read these instructions carefully before using the device. Note the warnings on the device and in the operating instructions
Always keep the operating instructions close to hand. If you sell the device or give it away, please ensure that you also pass on these instructions.
Keep electrical equipment out of reach of children
Never allow children to use electrical devices unattended.
If swallowed, batteries may endanger life. For this reason, keep the radio and batteries out of reach of children. If a battery is swallowed, please obtain immediate medical assistance.
Keep plastic packaging out of the reach of children. There is a risk of suffocation.
Setting the device up safely
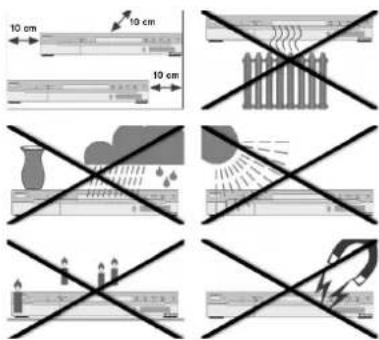
Place the device on a sturdy, level surface. It is not designed for use in rooms that are very humid (e.g. bathrooms). Always ensure that
☐ the ventilation slots are uncovered so as to ensure there is adequate ventilation;
☐ there are no direct heat sources (e. g. heaters) that could affect the device,
□ the device is not in direct sunlight;
☐ you avoid contact with liquids and water (e. g. do not place vases on the device);
□ the device is not placed close to magnetic fields (e. g. televisions or other loudspeakers);
□ naked flames, such as lit candles, are not placed near the device.
☐ If the device is taken from a cold to a warm location condensation may form in the device. Wait a few hours before operating the device.
☐ Do not jolt or shake the device. Impacts may damage the sensitive electronics.
Ensure that the mains power socket is easily accessible.
Only connect the device to a power point (230 V \~ 50 Hz) that is easy to reach and is close to the place where you have set the device up. The power socket must be freely accessible so that you can unplug the device quickly if necessary.
To avoid tripping hazards, please avoid using extension cables.
Never undertake your own repairs
If the plug, power line or the device is damaged or if liquids or foreign bodies enter the device, remove the plug immediately from the socket.
- Do not use the device if the mains plug, cable or device itself is damaged.
▶ No objects should get into the device, e. g. through the ventilation slots. They could touch parts that conduct electricity or damage the device's components.
- When unplugging the device, always pull the mains plug from the socket, never pull on the cable.
Never try to open and/or repair the device yourself. There is a risk of electric shock. If there is a defect contact our Service Centre or other suitable specialist workshop.

Thunder storms
Unplug the device and pull out the aerial if you are away for a long period of time or there is a storm.
The DVD/HDD recorder
The DVD player is a class 1 laser product. The device has a safety system that prevents dangerous laser rays escaping from the device during normal use. In order to avoid injury to the eyes, never manipulate or damage the unit's security system.

Cleaning the device
Before cleaning, pull the plug out of the mains socket. Use a dry, soft cloth to clean the device. Avoid the use of chemical solutions and cleaning products because these may damage the device's surface and/or labels.
GENERAL INFORMATION
About DVDs


A DVD – Digital Versatile Disc – is a digital medium for storing information. DVDs are marked with one of the symbols shown here.
There are different types of DVD with different storage capacities depending on how the information is stored.
DVD structure

Languages and subtitles
Video DVDs are divided into titles and chapters. A DVD may contain several titles, which may in turn be made up of several chapters. The titles and chapters are each numbered sequentially
The first title of a DVD usually comprises licence details and manufacturer's information. The next title is usually the film itself. Other titles may include such items as "making of" documentaries, film previews or information on the actors.
Up to eight languages and subtitles in as many as 32 different languages can be stored on DVDs. Any combination of languages and subtitles can be selected for playing back discs.
Regional codes
For reasons connected with global DVD sales strategy, a code has been developed for DVDs that allows the recording to be played only on devices purchased in a particular region.


This code is based on a system that divides the world into six regions. As Europe is in Zone 2, your DVD player will only play DVDs that have the regional code 2. The regional code is printed on the DVD packaging (refer to the following logo).
Apart from DVDs with the regional code 2 the unit will only play DVDs with the regional code 0 (suitable for any DVD player).

If you have problems when playing certain DVDs make sure that the DVD has the regional code 2 or 0.

Important note on blank DVD discs:
Your recorder can write two different types of blank DVD discs:
DVD+RW: DVD+ReWritable discs can be written several times. They can be played on other DVD devices without prior finalisation (refer to "Finalise DVD", P. 46).
DVD+R: DVD+R discs (which can only be written once) cannot be played on other DVD devices without prior finalisation. It is possible to delete a recording on a DVD+R disc but it can then not be overwritten.
DiVX and MPEG4
MPEG4 is a compression technology for multimedia/video data ("MPEG" = "Moving Picture Experts Group").
DiVX is a brand name for a video compression-decompression technology based on the MPEG4 format. This player uses DiVX 4 and DiVX 5 technology to ensure that the peak bit rate (short-term peak) never exceeds 10,000 kbps.
MP3 format
The MP3 format is a compression format used for audio data. The MP3 format was developed to substantially reduce the size of audio data.
MP3 files can only be played if they have been saved with the file extension *.mp3. Unlike traditional audio CDs, MP3 CDs can be subdivided into directories (folders, albums) and files (tracks, titles) – just like a data CD on your computer.
NICAM
NICAM (Near Instantaneous Compounded Audio Multiplex) is a method of digitally transferring stereo sound that is used in Commonwealth countries, Scandinavia and Belgium. In addition to a stereo signal it is also possible to receive two different audio languages. Via the NICAM settings you can therefore select between stereo and mono reception and two audio languages.
NTSC and PAL
NTSC and PAL are television standards for depicting frames on the TV. This is because – in contrast to cinema films, which are shown on the projector lens with 24 images per second on a strip of film – the image on TV and video must also be divided into frames so that the human eye can perceive a moving picture.
NTSC (National Television System Committee) works with a 60 Hz image frequency, i.e. 60 frames per second are displayed, and this corresponds to 30 full images. NTSC is used in the US and Japan and produces 525 TV lines.
PAL (Phase Alteration Line), in contrast, works with a 50 Hz image frequency (although there are now also PAL standards with 60Hz), this produces 25 full images made up of 50 frames per second. PAL is the TV standard that is used throughout Europe (except France where the standard is SECAM), Australia, China, Singapore and Malaysia. It produces 625 TV lines.
PROGRESSIVE SCAN
On a DVD the film is available as information from full images as for a cinema film. PROGRESSIVE SCAN is an image format that uses this and produces the film in 50 full images instead of 50 frames per second. This
reduces flickering images to a minimum and displays movements in a more fluid manner.
The requirement for playing back in the PROGRESSIVE SCAN format is that your TV can also process it.
If your TV has a so-called "Progressive Scan" function use the component outputs to connect the DVD/HDD recorder to the TV so that you receive the best image quality.
The PROGRESSIVE SCAN does not work with a SCART connection.
Surround sound formats
Trademarks
"Dolby", "Pro Logic", and the "DD" symbol are registered trademarks of Dolby Laboratories.
"dts" is a trademark of DTS Technology, LLC.


Dolby Digital 5.1
In Dolby Digital sound format the audio material is saved digitally.. In this instance, up to five separate full-frequency audio channels (front left and front right, centre, rear left and rear right) as well as an effect or depth channel (5.1) are stored separately. Discs and media recorded in the Dolby Digital format are marked with the trademarks shown here.
Because each channel is completely independent, a realistic, almost "three-dimensional" effect is produced, creating the impression of distance, movement, and relative position in the room.
dts (Digital Theater Systems)
The dts abbreviation is used for a less frequently used sound format in which up to 6 (5.1) separate channels are saved to a sound medium. Discs and media recorded in the dts format are marked with the trademarks shown here.
Your DVD/HDD recorder can read this audio data in Dolby-Digital 5.1 format and dts format and transfers it for decoding to the digital outputs ("DIGITAL OUT"). However, it can not playback the sound of a dts sound medium itself.
VIDEO Plus+

VIDEO Plus+ is a simple programming aid for video recording devices. Simply enter the programming number listed for the programme in your TV guide. The DVD/HDD recorder then adopts the start and duration of the recording in the timer. VIDEOPlus+ and PlusCode are registered trademarks of Gemstar Development Corporation. The VIDEOPlus+ system is produced under licence from the Gemstar Development Corporation.
VPS/PDC
The PDC (Programme Delivery Control) or VPS (Video Programming System) signal monitors the start and duration of a TV recording. If a TV programme should start earlier or lasts longer than stated in the guide the DVD/HDD recorder still switches itself on and off at the correct time. The VPS/PDC times for a programme are found in your TV guide. If you programme a recording time that varies from the VPS/PDC time you must switch the PDC function off.
PREPARATION
Unpacking the device
Remove all packaging materials including the film on the front of the unit.

WARNING!
Do not let children play with the plastic wrapping. There is a risk of asphyxiation!
Check package contents
When unpacking, ensure that the following parts are included:
□ DVD/HDD recorder
□ SCART cable
☐ AV cable (white, red and yellow cinch plugs)
☐ Component cable (green, blue and red cinch plugs)
□ Aerial cable
□ Power cable
Remote control
☐ 2 x batteries (AAA size, 1.5V)
□ DVD+RW disc (blank DVD)
☐ Operating instructions and guarantee documents
Inserting the batteries into the remote control
Two 1.5 V batteries (AAA size) are supplied for the remote control.
▶ Open the battery compartment by sliding the panel on the back of the remote control in the direction of the arrow.
▶ Insert the batteries so that the negative end is placed next to the springs.
▶ Close the battery compartment.

WARNING!
The batteries supplied should not be charged, disassembled, thrown into a fire, or short-circuited.
If swallowed, batteries may endanger life. For this reason keep the batteries and remote control out of reach of children. If a battery is swallowed, please obtain immediate medical assistance.

natural_image
Three-step diagram showing a battery with an arrow indicating the process, no text or symbols present.Dispose of batteries in an environmentally appropriate way

Do not put used batteries in the household rubbish. Please return the batteries to a collecting point or specialist dealer for disposal.
CONNECTIONS AND CONNECTION OPTIONS
The DVD/HDD recorder can be connected in various ways to other input and output devices:
□ to a television
□ to an amplifier/receiver
□ to a video recorder
□ to other audio/video devices

Make sure that all devices are switched off before connecting them. Only connect the units to the mains when the other connections are complete.
Notes on the connections
☐ Most of the cables have coloured pins. To make installing the device easier, always use the pin and the connector socket with the same colour when connecting two devices together.
☐ If the aerial cable from your aerial or cable system is connected to the DVD/HDD recorder, and another aerial cable connects the recorder to the television set, you can watch TV channels even when the DVD/HDD recorder is in standby mode.
☐ The DVD/HDD recorder should not be indirectly connected to the television set via a video recorder as this will significantly impair the quality of the picture.
Connecting the aerial cable

If you connect the DVD/HDD recorder to a TV you must create an aerial connection between the TV, DVD/HDD recorder and aerial so that the device can receive and record TV programmes.
The following connection examples require an aerial connection and only image and sound transfer types to the TV or external devices have been listed.
Connect the aerial cable that leads to the wall socket to the aerial input (ANTENNA IN) on the DVD/HDD recorder.
Connect a second aerial cable (e.g. the one supplied) to the aerial input (ANTENNA IN) on the television and the aerial output (ANTENNA OUT) on the DVD/HDD recorder.
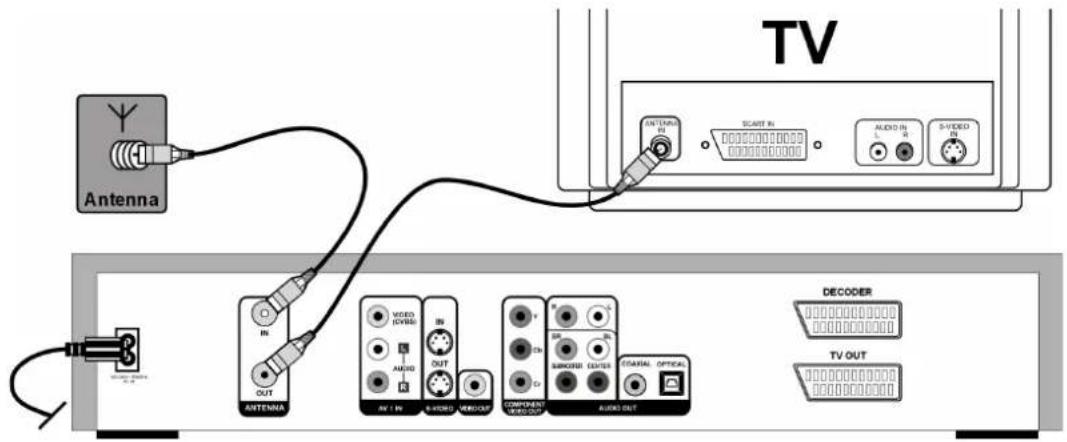
Connecting the TV
With a SCART cable
The SCART cable is the simplest connection between the DVD/HDD recorder and the TV.
As long as your television can process RGB signals you will get a very good quality image from this option.

Select the relevant SCART input for this connection to your TV.
With S-VIDEO and audio cinch cable
If your TV does not have a SCART connection you can also connect it to the S-VIDEO output via an S-VIDEO cable (S-VIDEO OUT) on the DVD/HDD recorder. This will provide good image quality.
To transfer the sound you can use an audio cinch cable (red/white) or the AV audio cable supplied (red/white).

With cinch (AV) cables
If your TV has neither a SCART connection nor a S-VIDEO socket you can also connect the DVD/HDD recorder with an audio cinch cable (red/white) and a video cinch cable (yellow) to the AUDIO/VIDEO IN socket of the TV (AUDIO OUT/VIDEO OUT socket on the DVD/HDD recorder).
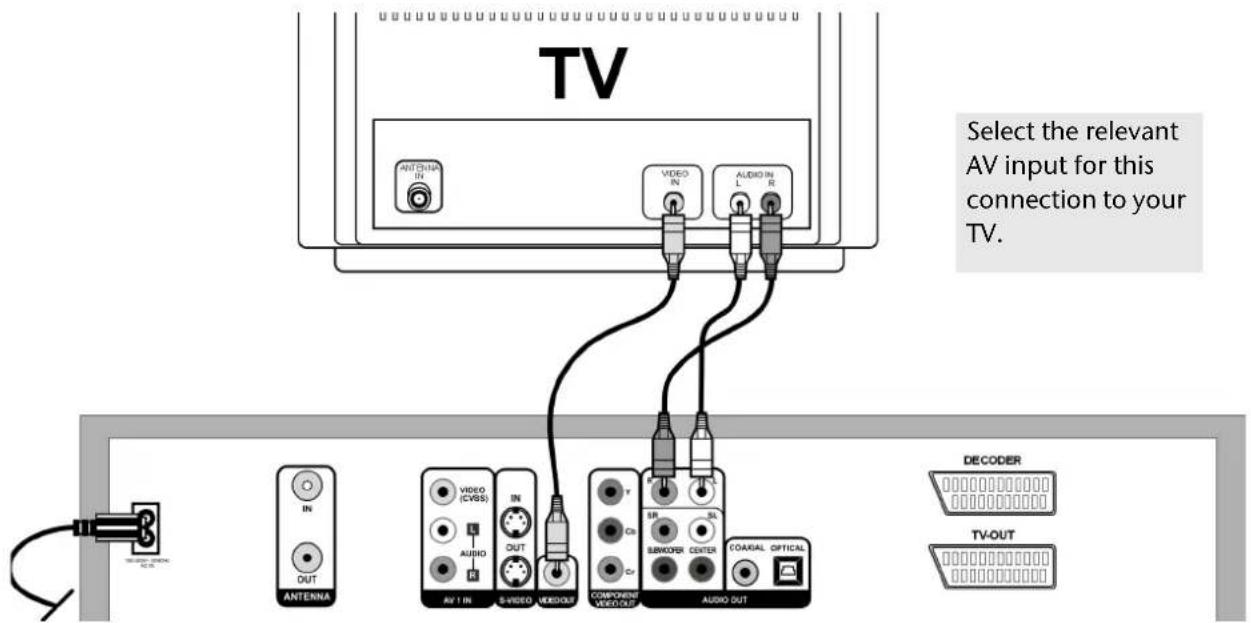
About the component connections
If your television has a "Progressive Scan" function the best image quality will be achieved via the component outputs (Y, CB/PB, Cr/Pr on the rear of the device). An increased image frequency is created using the Progressive Scan procedure. This reduces flickering images to a minimum and displays movements in a more fluid manner.
It goes without saying that your TV must be able to process this format for it to be used. The Progressive Scan transfer only works when connecting the component connections (COMPONENT VIDEO OUT) with a three-pole component cable (red/blue/green). The PROGRESSIVE SCAN does not work with a SCART connection.
To transfer the sound you can again use the audio cinch cable (red/white):

To playback the Progressive Scan image you have to press the NTSC/PAL button on the remote control to select the Progressive Scan format.
You can only select this format if the YCrCb On menu option is activated in the SETUP > VIDEO > Video Output menu.
Only activate this point if your TV has the "Progressive Scan" function otherwise the picture goes black.


Instead of the TV you can also connect a projector, for example.
Connecting another external audio or video device
Connecting an audio device
You can also connect another audio device, such as a minidisc player or cassette recorder, to the DVD/HDD recorder, e.g. to record the sound from this device to the DVD/HDD recorder. To do so connect an audio cinch cable (red/white) to the external device's AUDIO OUT socket and the audio socket (AV1 IN) on the DVD/HDD recorder.
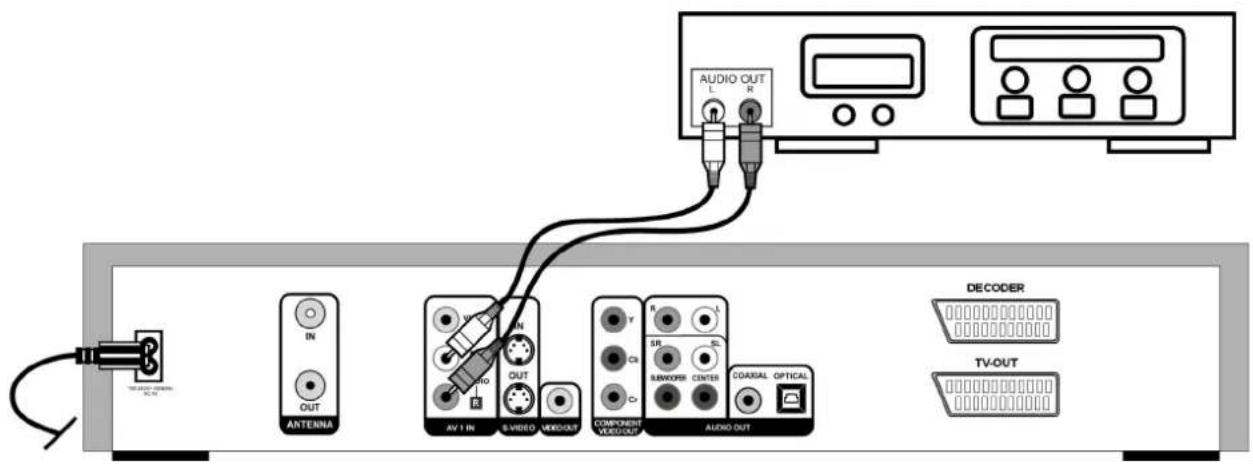
Connecting video devices
You can also use your DVD/HDD recorder to record signals from another video device, such as a SAT receiver, video camera, video recorder or DVD player. To do so connect the external video device to the SCART input on the DVD/HDD recorder (DECODER):

You can also connect a decoder or set-top box (e.g. a Canal+ decoder) to the SCART input. To do so set theDECODER entry in the SETUP>CHANNEL SETUP menu to ON ("Decoder", Page 22).
Connecting a video camera
There are audio and video inputs on the front of the device to enable you to connect such items as a video camera easily.
Connect the AV output sockets on the video camera to the inputs on the DVD/HDD recorder. You can use the following cable connections:

Audio and video cinch cables

Audio cable and S-video cable

Firewire cable
Home cinema connection
5.1 speaker system
C = Centre speaker connection
R= Right front speaker
L = Left front speaker
SW = Subwoofer
SR = Left surround speaker
SR = Right surround speaker
One benefit of DVD is saving and playing back multi-channel sound. Your DVD/HDD recorder can playback 5.1 sound on home cinema systems with a 5.1 speaker system. To do so connect the device to an amplifier with a 5.1 input. You can use both the analogue and digital outputs for this purpose.
Analogue sound transfer
Connect the audio cinch cable for the speakers with the 5.1 output on the DVD/HDD recorder and the relevant inputs on the amplifier.
To transfer the image you can use the connection options described in the "Connecting the TV" chapter:

flowchart
graph TD
    A["Antenna"] -->|IN| B["Video (S stereo)"]
    A -->|OUT| C["Audio"]
    A -->|AV IN| D["Video OUT"]
    D --> E["TV OUT"]
    E --> F["Decoder"]
    E --> G["TV OUT"]
    F --> H["OFFICIAL"]
    G --> H
    H --> I["Video IN"]
    I --> J["C"]
    I --> K["R"]
    J --> L["SW"]
    J --> M["L"]
    J --> N["S"]
    J --> O["SL"]
    J --> P["RS"]
If the AUDIO SETUP on the DVD/HDD recorder is not correctly set up for your AV amplifier/receiver the sound may not be transferred to the centre speaker (this usually outputs the voice on the DVD).
Digital sound transfer
Connect either a coaxial cable or an optical cable to the COAXIAL or OPTICAL output on the DVD/HDD recorder and the corresponding input on the amplifier. For image transfer you can again either use an S-Video cable, a video cinch cable or a SCART cable.

flowchart
graph TD
    A["Antenna"] --> B["AV 1 IN"]
    B --> C["3-Video"]
    C --> D["VIDEO OUT"]
    D --> E["COMPONENT VIDEO OUT"]
    E --> F["Audio"]
    F --> G["COAXIAL OPTICAL"]
    G --> H["TV-OUT"]
    I["SW"] --> J["L"]
    J --> K["C"]
    L["SL"] --> M["R"]
    N["SR"] --> O["Ground"]
INITIAL OPERATION
After you have correctly connected up your DVD/HDD recorder and the power supply has been connected, switch the television set on. Depending on the connection type, select the video channel (AV) or another reception channel that matches the connections you have made. Switch the DVD/HDD recorder on if you have not already done so. HELLO and then INSTALL is displayed on the screen

When you use the device for the first time the installation menu appears after you have switched the device on. The channels, language options and date/time settings are made here.
Please note that initial operation is cancelled if you press the OPEN/CLOSE button on the device or remote control. In this case start the channel search later via the SETUP>VIDEO>Channel Scan menu as described in Page 45, "Channel Scan".
Operation from device and remote control
You can activate the device's basic playback and recording functions by pressing the buttons on the device. The remote control, however, provides numerous advanced functions. In particular, you can only navigate through the setup menus using the remote control.

In this manual we refer to the remote control buttons. If reference is made to the controls on the DVD player itself, this will be clearly indicated.
On/off switch


When the device is connected to the mains it is in standby mode. The clock is displayed.
You switch the device on by pressing the STANDBY/ON button on the device or remote control.
Press STANDBY again to switch the device back to standby mode.
Set menu language and country
The window for setting the setup language will appear. Your country's language is set by default.
▶ Confirm your entry by pressing ENTER on the remote control or select another language using the arrow keys ▲ ▼
You can change the screen language later from SETUP> SYSTEM > Guide Language.
The second step is to select the country setting. The country setting affects the search for the TV signal. The default setting is United Kingdom.
▶ Select your country and confirm by pressingENTER.
▶ To expand the selection go to the last option and press the ▼ arrow key.
You can change the country setting later from SETUP> SYSTEM > Country Setup.

Channel scan
As a third step, the device starts an automatic channel scan. Each channel it finds is displayed briefly on the screen.
▶ Wait until the channel scan is complete. This takes a few minutes.

If you use a SAT receiver or
DVB-T box to receive TV programmes it will not find any channels.
You can cancel the scan by pressing ENTER.
You can subsequently repeat the channel scan from SETUP > VIDEO > Channel Scan.

Setting the date and time
Step four is to set the date and time. This is essential for programming recordings.
Automatic setting
The device automatically sets the correct time using the channel signal.
Simply confirm the Automatic option by pressing ENTER. After a few seconds a calendar appears with the current date and time.
▶ If you want to confirm the calendar use the ▶ arrow key to move to the √ field and confirm by pressing ENTER. Do not use the ▲ and ▼ arrow keys as these change the values (cf. next chapter).


Manual setting
A calendar is displayed: D = day; M = month; Y = year; H = hour; M = minute.
▶ Move around the calendar fields by pressing the ◀ and ▶ arrow keys.
▶ Change the value using the ▲ and arrow keys.
▶ Finally, move to the field and confirm the setting by pressing ENTER.
The initial setup is now complete and the device switches to TV mode.
The initial setup is now complete and the device switches to TV mode.
Change programme presets/edit channels

SETUP > CHANNEL SETUP
| PR | CH | ID |
| 01 | C02 | Ch1 |
| 02 | C04 | Ch2 |
| 03 | S10 | Ch3 |
| 04 | C11 | Ch4 |
| 05 | S17 | Ch5 |
| 06 | S18 | Ch6 |
| 07 | C12 | Ch7 |
After ending the automatic search process you can subsequently change the programme presets or adapt them to your TV.
If necessary stop any CD/DVD that is running to enter TV mode by pressing STOP twice (the screen displays the P entry for "programme" and a programme number, e. g. P01).
▶ PressPROGRAM on the remote control. The programme preset menu is displayed:
On the left side you can see the programme spaces PR, channel numbers CH (C = "Channel"; S = "special channel") and the channel name ID.
On the right hand side you can see the settings on the channel that is currently selected.
▶ Move the cursor bar using the▲or ▼row buttons to the programme space that you wish to edit or reprogram. The channel appears in the background.
▶ Use the arrow key to move to the right side of the menu.
Changing programme space
▶ Select the Progr Num menu option.
▶ Enter the desired programme space using the number buttons.
▶ Move to √ and confirm by pressing ENTER.
If the new programme space is already assigned an appropriate message appears with three options:
If you confirm the left selection the old space is overwritten with the new channel. The programme space of the moved channel remains free.
- If you confirm the middle selection the new programme is inserted at this point and all channels that follow this channel are pushed back one space.
- You cancel this process by choosing the right option.

TV-System (TV-Sys)
Here you select the TV standard for your region if no channels are found during channel search using the preset standard.
☐ PAL-I is the TV standard in Great Britain, Ireland and most Commonwealth countries.
PAL-DK is the TV standard in Eastern Europe and Russia
☐ PAL-BG is the TV standard in most Western European countries (e. g. Netherlands, Germany, Scandinavia) except France.
Mode and CH/MHz
From the Mode option you can switch between CH (for channel) or S_CH (for special channel) and frequency.
If you select Freq. the frequency of the selected channel is then displayed in the following option under MHz.
Using the number buttons you can now directly enter a channel frequency in order to add additional channels to the programme list or to manually edit existing channel frequencies.
Example
After initial setup a channel is located in programme space 4 with a transmission frequency of e. g. 217.25 MHz.
If you are not receiving this channel properly or at all press the PROGRAM button on the remote control and move the cursor bar with the ▲r arrow buttons to the programme space that you want to edit or reprogram. The channel appears in the background.
In the MODE menu option select the Freq. entry. The frequency of the selected channel is then displayed in the following option under MHz.
Now enter the channel frequency that your cable provider gave you for this channel (e. g. 219.25 MHz) using the number buttons.
Then move the cursor bar using the ▲ or ▼row buttons to the Fine Tune entry. Using the ◀ and ▼row keys you can edit the channel frequency up or down by steps of -16 to +16 so that the image improves.
You can find out the exact frequency from your cable provider or the TV channel itself.


Programme name (Ch. Id)
You have the option of giving the programmes a name that you yourself select.
▶ Move to the programme name and press the arrow button. An on-screen keyboard opens. The first letter of the current channel is active.
▶ Use the arrow keys to select the first character of the new name and confirm this by pressing ENTER.
▶ Repeat these steps for all the other characters.
If you want to delete something move to Clear (delete all) or BS (delete last letter). You delete the character that is currently highlighted by pressing Delete.
▶ To finish the entry move to Done and confirm by pressing ENTER.
Fine tuning
Using the and arrow keys you can fine tune the channel frequency up or down by steps of -16 to +16 so that the image improves.
Leave the programme preset menu
▶ Use the PROGRAM button to exit the programme preset menu.
Decoder
Select the ON setting if you receive a coded signal (e.g. from a Canal+ decoder) and have connected a decoder via the SCART connection.
Use the OFF setting for all other aerial and video signals.
DVD AND CD PLAYBACK
Inserting a disc
Make sure that there is about 15 cm of space in front of the disc compartment so that it can open without hindrance.
▶ Switch the unit on and press OPEN/CLOSE.
Insert a disc into the disc compartment with the title side upwards. Make sure to place the disc in the middle of the disk holder so that it does not stick when you close the compartment.
▶ Press theOPEN/CLOSE button. The disc compartment closes.
DVDs start playing automatically after a few seconds. The on-screen display depends on the type of disc (DVD, video CD, music CD, MP3 or JPEG CD) and its format.
You may need to press PLAY or a menu may appear in which you need to make a selection using the navigation keys.

Setting the volume
As a rule, you control the volume from the output device, (the TV for example).
▶ Within the volume set on the output device you can change the volume with the VOL buttons.
▶ Press theMUTE button to switch the sound off completely and on again. When mute is active a red bar appears on the lower edge of the screen.


Playback functions (DVD, VCD, CD, DIVX, MPEG4)
PLAY
▶ Press PLAY to start playback. The play icon is displayed on the screen.
PAUSE
▶ You can interrupt the play mode by pressing PAUSE. The pause icon is displayed on the screen!!
STEP (DVD and VCD only)
▶ Press STEP to move the stopped picture forward by one individual frame each time you press the button.
STOP
▶ Press STOP once to stop playback. If you now press PLAY playback continues from the same location.


Special screen message

If you try to activate a function that is not available in the current mode or does not exist on the disc, the following on-screen message appears. The message disappears after a few seconds.
▶ Press STOP again to switch the device to TV mode. If you now press PLAY playback continues again from where the disc was stopped.
Search functions
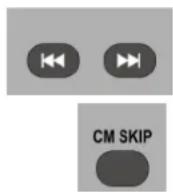
SKIP (DVD, VCD, CD)
During playback press the button to skip backwards or forwards (for DVDs: from chapter to chapter; for CDs: from title to title).
CM SKIP (DVD)
During playback press the CM SKIP ("Commercial Skip") button. Playback jumps forward around 30 seconds – approximately the length of a TV commercial.
Please note that on many DVDs it is not possible to skip over the titles/chapters before the actual film starts (license notes).
Fastforward (DVD, VCD, CD)

During playback, press the or button repeatedly to locate a particular section by fast-forwarding or rewinding. The fast forward symbol and level are displayed on the screen. You can select 2, 4, 8, 16, 30, 60 and 100x speed.
For CDs and VCDs you can only accelerate up to 16 times speed.
Press PLAY to return to the normal playback speed.

Slow motion (DVD, VCD)
During playback press the SLOW button. Playback is paused and the pause symbol Appears. Press the button repeatedly to move forwards or backwards in slow motion. The slow motion symbol and level are displayed on the screen. You can select 12 , 14 , 1/8, and 1/16x speed.
Press PLAY to return to the normal playback speed.
Repeat functions

Repeat 1/ALL (DVD, CD)
▶ During playback press the 1/ALLbutton to activate the repeat function:
1/ALL once: the current chapter (DVD, VCD) is repeated 1/ALL twice: the current title is repeated; 1/ALL three times: normal playback (OFF);

REPEAT A - B (DVD, CD)
You can repeat a section you have defined yourself.
During playback press theA-B button to set the start of the repeat sequence. The repeat symbol with the supplementA appears on the screen.
▶ Press theA-B button again to set the end of the repeat sequence. The A-B symbol appears on the screen. The defined section will now be repeated continuously.
▶ Press theA-B button a third time to end the repeat sequence.

It is not possible to use the REPEAT A-Bfunction for MP3-CDs.
AUDIO and SUBTITLE MENU (DVD)
If other languages are available on the DVD these two buttons are the quickest method of selecting other languages.

Please note, however, that this function has not been implemented on many DVDs.
Select audio language
▶ Press theAUDIO key repeatedly to select another language that is available on the DVD. The change is made immediately and does not need to be confirmed.

Select sub-title language
▶ Press the SUBTITLE key repeatedly to select another sub-title language stored on the DVD. The change is made immediately and does not need to be confirmed.
The message disappears after a few seconds.

Picture functions
MENU/PBC and TITLE (DVD)
| DVD menus DVDs usually have one or more menus stored on them and you can use these to navigate through the DVD. The names of these menus depend on the DVD; they may be called "DVD menu", "Disc menu", "Main menu", "Title menu", "Root menu" or "Master menu". In contrast, you call up the DVD/HDD recorder menu (SETUP menu) using the SETUP button. | |
| TITLE MENU/PBC | Using the TITLE and MENU/PBC buttons you can open the menus stored on the DVD during playback. You navigate through the items in the DVD menus using the arrow keys. Confirm each entry with ENTER. Please note that the menus that are available when you press a button will depend on the DVD. E. g. some DVDs only have one menu that appears for the two call-up methods. |
PBC function (VCD 2.0 only)

Some type 2.0 VCDs that have a title/chapter structure offer the option of playback control (PBC).
By pressing the MENU/PBC button you can switch on or off the extended functions for controlling the title/chapter. The possible functions are:
– Direct selection title/chapter
- SKIP functions
Please note that the precise functions available depend on the VCD.
Summary of playback settings - DISPLAY
▶ During playback press the DISPLAY button.
For DVDs a menu with the following entries appears:
TITLE: Current title / number of titles on the disk;
CHAPTER: Current chapter / number of chapters in the selected title;
TIME: Time elapsed;
AUDIO: The spoken language;
SUBTITLE: The selected subtitle language;
ANGLE: The current angle setting.
For VCDs a menu with the following entries appears:
PBC: PBC mode on or off;
TITLE (can only be selected if PBC mode is OFF): Current title /number of titles on the disc;
TIME (can only be selected if PBC mode is OFF): Time elapsed;
AUDIO: Sound output left, right or stereo.


Changing settings
▶ Use the ▲ and ▼ arrow keys to move the cursor from field to field.
▶ You can change your selection in any field by pressing the number or ◀ and ▶arrow buttons.
You can use the number buttons to make entries in the numerical fields. For example, you can enter a time for the film to start directly in the TIME field.
▶ PressDISPLAY again to close the menu.
TV/DVD
Press the TV/DVD button to hide the playback image or DVD/HDD Recorder recording and to display the picture on your TV.
This function is helpful if you can not switch your TV manually from AV to TV mode. If, for example, you are recording a programme and want to watch a different one at the same time on the TV, you can display the TV picture while the DVD/HDD recorder records in the background.
However, please note that the TV must be connected to an aerial for it to receive programmes.

Setting bookmarks – BOOKMARK (DVD)

During playback press the BOOKMARK button. The BOOKMARKmenu with eight positions is displayed. The first position is highlighted.
At the location in the film where you would like to set a bookmark press the ENTER button. The first position is filled with a "1".
▶ If you would like to set further bookmarks press the arrow key to move to the next position and press ENTERagain.
If you want to delete a bookmark select it using an arrow key and press CLEAR.
▶ To close the menu, pressBOOKMARK again.
Calling up a bookmark
▶ Open the BOOKMARKmenu again.
Press the or arrow keys to move to the bookmark where the film or CD should start and press ENTER. The menu disappears again after a few seconds.
Audio CDs and MP3 CDs

You control the playback of audio CDs and MP3 CDs via the file menu that is displayed after you insert a CD or MP3 disc.
Insert an MP3 disc or CD into the player. The file menu is displayed.
If necessary use the arrow button to move to the symbol for music playback (it becomes brighter) and confirm by pressing ENTER.
For audio CDs the file list is displayed on the left side. You can select a title by pressing the ▲ or ▼ow keys. Alternatively you can enter the number of the desired title using the number buttons. A note symbol is displayed before the title that is currently being played.
▶ PressPLAY to play the title.
Navigating on MP3 CDs
The tracks on MP3 CDs may be organised into folders.
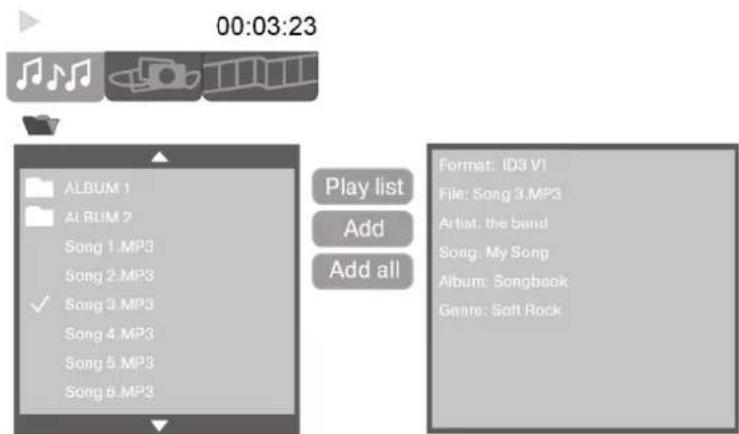
If available on the CD the top folder level is displayed on the left side.
▶ Select the desired folder and open it by pressingENTER.
▶ You return to the higher level by selecting the topmost entry and pressing ENTER.
When the MP3 files appear in the file list on the left side you can use the ▲ or ▼arrow buttons to select a title and play it back by pressing PLAY. Alternatively you can enter the number of the desired title using the number buttons. A note symbol is displayed before the title that is currently being played.
If you want to play all titles in succession, pressPLAY. All the titles in the open folder will be played.
The MP3 tags that are assigned when an MP3 CD is produced are displayed on the right side of the menu.
Direct selection using the number keys
▶ Press a number button to enter the three-digit number of the title you wish to play (i.e. 005 if you want to play title 5). After entering the last digit the recorder automatically plays the selected title.
Random playback (CD, MP3)
▶ Press the RANDOM button. The titles on the CD, MP3 or VCD are played back in a random order. On the top right of the screen the RANDOM symbol is displayed.
▶ PressRANDOM again to return to normal playback mode.
Program the playing order of titles
The programming function enables you to playback as many titles as you wish in a predefined order.
▶ Select the file list with the▲or ▼arrow buttons.
▶ PressENTER to add the title to the selection. A tick appears before the title.
▶ Use the same method to select other titles in the programmed list.
▶ Then use the arrow button to move to the Add entry and press ENTER. Now the list is saved. (You can add all the titles on the CD via the Add all entry)
▶ If you want to play the list go toPlay list and press ENTER.
During playback pressENTER to open the Delete and Delete all entries. You use these to delete individual titles or the complete list.
By pressingENTER again you open the normal file list.


Playing back JPEG CDs

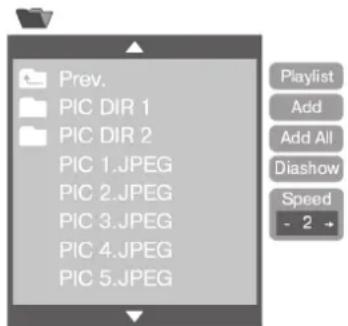
You can create a programmed list of images as describe in the "Audio CDs and MP3 CDs", Page 28 chapter.
You control the playback of JPEG CDs via the file menu that is displayed after you insert a JPEG CD.
▶ Insert a JPEG CD. The file menu is displayed.
If necessary use the arrow button to move to the symbol for image playback (it becomes brighter) and confirm by pressing ENTER.
▶ If the CD contains folders select the desired folder and open it by pressing ENTER.
▶ You return to the higher level by selecting the topmost entry and pressing ENTER.
When the image files appear in the file list on the left side the images are displayed in the preview window on the right.
▶ To display an image at full size pressPLAY.
▶ Go to the first image if you want to play each one in succession. Then select the Slide show option and press ENTER. The images in the open folder are shown in succession. The menu is displayed again after the last image.
▶ You can select the speed of the slide show in theSpeed entry field: 1 = highest speed; 3 = lowest speed. At speed "0" the image is stopped until you continue by pressing SKIP ▶▶▶.
▶ In full screen mode you can turn the image by 90^ by pressing the ◀ or ▶ buttons.
Playing back MPEG4 and DIVX files
You control the playback of MPEG4 or DIVX CDs via the file menu that is displayed after you insert a CD of this type.
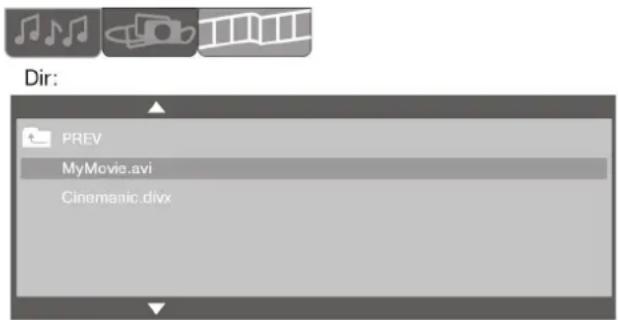
Insert an MPEG4 or DIVX CD into the player. The file menu is displayed.
If necessary use the arrow button to move to the symbol for film playback (it becomes brighter) and confirm by pressing ENTER.
▶ If the CD contains folders select the desired folder and open it by pressing ENTER.
In the summary of files on the CD and in the folder select a DIVX or MPEG4 film that you wish to view and confirm your selection by pressing ENTER or PLAY.
Your chosen film will now be played.

Please note that depending on the film not all playback functions may be supported.
RECORDING TO DVD/HARD DISK
DVD mode and HDD mode
With this device you can record to either the integrated hard disk or a DVD.
All sound signals are recorded in stereo when you record to the hard disk or DVD.
By pressing the HDD/DVD button on the remote control you choose between the two recording modes:
□ DVD: To record to DVDs;
☐ HDD: To record to the hard disk. In hard disk operation the hard disk indicator on the front of the device lights up.
You can only record DVDs to the hard disk if they were recorded on this device!

Manual recording
You can playback and write the following disk formats with your DVD/HDD recorder.
Writable formats:
The device can write blank DVD+R and DVD+RW discs.
Readable formats:
The device can read DVD Video, SVCD, DVD+RW, DVD+R, CD-R, DVD-RW, DVD-R, CD-RW, Audio-CD, MP3, JPEG, DivX and MPEG4 formats.
We cannot guarantee that DVDs you have written will be playable on other DVD devices. Please refer to "Finalise DVD", Page 52 on this.
Formatting discs
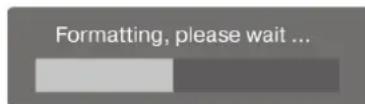
To record to an unused DVD+R or DVD+RW you first have to format the blank DVD in the recorder's drive. After you have inserted a blank DVD and the recorder has started the read process, a query as to whether the disc is to be formatted is displayed. This process is frequently also called initialising. Formatting usually takes around 1 minute.
▶ To start confirm theOK entry by pressing ENTER.
You can also open this function via the DISC>Format Disc menu.

Memory media: DVD+RW, DVD+R and hard disk
DVD+RW
DVD+RWs can be written and deleted again but repeated recording and deleting worsens the recording quality.
Please also note that you can delete a title on a DVD+RW but the memory space freed up can only be used in consecutive blocks.
The following graphic shows as an example that Title1 has been recorded and this takes up 20% of the DVD's memory capacity.
In the second example, Title2 was recorded and this takes up 30% of the memory capacity.
If, as in the third example, the first title is deleted the memory space is only available from the end of the second title, i.e. 50%.

bar_stacked
DVD-RECORDING STRUCTURE | Level | Title 1 (%) | Title 2 (%) | Title 3 (%) | |---|---|---|---| | 1 | 20 | 30 | 50 | | 2 | 20 | 30 | 50 | | 3 | 30 | 50 | 50 |It may not be possible to record to a DVD+RW that already contains recordings from another DVD/HDD recorder or a computer. If you are still able to record on a DVD+RW that was produced by another recorder your DVD/HDD recorder creates a new DVD menu. If the DVD+RW contains data that were produced by a computer it is deleted by the recorder.
DVD+R
DVD+R discs can only be written once and no other new recordings can be added after a DVD+R has been finalised. Finalising means making the DVD+R compatible for other devices so that they can be played on them (Refer to “Finalise DVD”, P. 52).
Hard disk drive (HDD)
You can delete recordings from the integrated hard disk and write new recordings to the hard disk at any time.

You can save up to 49 titles on the two media (DVD and hard disk).
Starting a manual recording
This is how to make a manual recording:
Press the HDD/DVD button to select whether you want to record to the hard disk or DVD.
If you want to record to a DVD insert a previously formatted DVD+R or DVD+RW disc into the recorder (Refer to "Formatting discs", P. 31). The DVD's title menu is displayed. Press the STOP button twice to change to the stop mode.
In the RECORD>RECORD QUALITY setup menu select the desired recording speed.
▶ Press theSOURCE button to select the input source from where you wish to record:
P1 : to record from the TV if there is an aerial connection (record from tuner). Use the CHANNEL buttons to select the channel from where you wish to record (P 1, P2, P 3 ...);
CVBS 1: for a device that is connected with the DVD/HDD recorder via the SCART IN socket or the AV 1 IN socket;
CVBS 2: for a device that is connected with the DVD/HDD recorder via the AV 2 IN socket (front of device);
S-VID1: for a device that is connected with the DVD/HDD recorder via the S-Video 1 socket;
S-VID2: for a device that is connected with the DVD/HDD recorder via the S-Video 2 socket (front of device);
SCART: for an external device that is connected to the DVD/HDD recorder only via the SCART cable (no aerial connection);
DV: for a device that is connected with the DVD/HDD recorder via the DV IN socket (digital video camera).
▶ PressRECORD on the remote control or front of the device to start the recording.
▶ You can pause and restart the recording by pressingPAUSE.
▶ PressSTOP to finish recording. Please wait until the "Please Wait ..." screen message disappears (after approx. 15-17 seconds). Your recording has now finished.
You can now playback the recording by changing to the DVD/HDD title menu by pressing PLAY or Title and starting playback from there (Refer to "Opening title menus/viewing + editing recordings", P. 38).

If you have recorded to a DVD+R please note that the DVD may not be playable on other devices until you have finalised it Refer to "Finalise DVD", P. 52.


If you use a SAT receiver or a DVB-T box, you have to select the channel on this device (not on the DVD/HDD receiver).


Notes on recording
The DVD/HDD recorder pauses the recording automatically if no signal is received from the connected video device. This may occur if, for example, a DVD player is switched off or there is no cable connection.
If you try to record from an external device which contains a copy-protected DVD/CD, it will not be possible to transfer data to the DVD/HDD recorder. The screen then shows the message: "DISC COPY PROTECTED PLEASE WAIT...". If this occurs switch the device off and on again.

Only files that you yourself have created or for which you have received the appropriate usage rights from the owner may be copied or coded with your DVD/HDD recorder. If you infringe these rights you could be liable to prosecution or subject to a claim from the owners.
Automatic recording ("TIMER" menu)

| ID | DATE | START | STOP | SOURCE | NICAM | QA | DEST |
| 1 | -/-/- | -/-/- | -/-/- | --- | --- | --- | --- |
| 2 | -/-/- | -/-/- | -/-/- | --- | --- | --- | --- |
| 3 | -/-/- | -/-/- | -/-/- | --- | --- | --- | --- |
| 4 | -/-/- | -/-/- | -/-/- | --- | --- | --- | --- |
| 5 | -/-/- | -/-/- | -/-/- | --- | --- | --- | --- |
| 6 | -/-/- | -/-/- | -/-/- | --- | --- | --- | --- |
| 7 | -/-/- | -/-/- | -/-/- | --- | --- | --- | --- |
| 8 | -/-/- | -/-/- | -/-/- | --- | --- | --- | --- |


You can programme up to 8 timed recordings with your DVD/HDD recorder. This is done as follows:
▶ Ensure that the time and date are set correctly and if necessary reset them from SETUP > SYSTEM > Set Time.
▶ If you want to record to DVD, insert a pre-formatted DVD+R or DVD+RW into the recorder.
▶ Check whether there is enough room on the DVD or hard disk.
▶ PressSETUP on your remote control to open the setup menu.
▶ Select the RECORD menu and confirm the Schedule Record option by pressing ▶
▶ Select the first free line if it is not already highlighted.
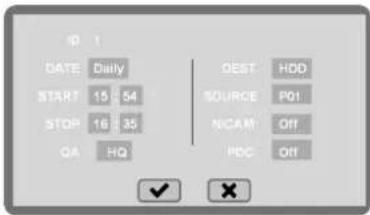
▶ Move the cursor to the date field with the arrow key. An entry field for the VIDEOPlus+ system opens.
▶ Confirm the entry field by pressing ENTERin order to move directly to the VIDEOPlus+ menu. If you do not want to use a VIDEOPlus+ number end the query by confirming the Xentry field by pressing ENTER. With regard to VIDEOPlus+ programming please refer to Page 36, "VIDEOPlus+ programming".
Set date for the recording (DATE)
▶ You move from field to field by pressing ◀ or . Set the day, month and year using the number buttons.
You can select a recording rhythm by pressing ▲ or . In this case the recorder does not record on a specific date; instead it takes the time settings from the stated recording rhythm. The potential recording settings are: Weekly Sun, -Sat, -Fri, -Thu, -Wed, -Tue, -Mon / Daily / Mon-Fri.
Set the start time for the recording (START)
▶ Use the◀or ▶buttons to move the cursor to the start field.
▶ Set the desired start time for the recording by pressing the▲or▼ of the number buttons.
Set the stop time for the recording (STOP)
▶ Use the ▶ or ▶ buttons to move the cursor to the stop field.
▶ Set the desired start time for the recording by pressing the ▲ or ▼ of the number buttons.
Set the recording quality (QA)
▶ Using the ◀ and ▶ buttons move the cursor to the QA. field and use the ▲ and ▼ buttons to select the picture quality for your recording.
You can read more about the various recording qualities in the "RECORD" menu", Page 51 section.
Set recording destination (DEST.)
Here you can select between HDD (hard disk drive) and DVD.
Set recording source (SOURCE)
▶ Move the cursor to the Source field and using the ▲ or ▼ buttons select a recording source:
P1 : to record from the TV if there is an aerial connection (record from tuner). Use the number buttons to select a channel from where you wish to record (P 1, P2, P 3 ...);
CVBS 1: for a device that is connected with the DVD/HDD recorder via the SCART IN socket or the AV 1 IN socket;
CVBS 2: for a device that is connected with the DVD/HDD recorder via the AV 2 IN socket (front of device);
S-VID1: for a device that is connected with the DVD/HDD recorder via the S-Video 1 socket;
S-VID2: for a device that is connected with the DVD/HDD recorder via the S-Video 2 socket (front of device);
SCART: for an external device that is connected to the DVD/HDD recorder only via the SCART cable (no aerial connection);
DV: for a device that is connected with the DVD/HDD recorder via the DV IN socket (digital video camera).
Set NICAM settings (NICAM)
If you have selected the TV as the recording source (P1, P2, P3...) you can select NICAM 1, NICAM 2 or NICAM OFF as the sound format.
NICAM 1
We recommend using the NICAM 1 setting as standard. When using NICAM 1 digital (NICAM) and analogue (FM) signals are received in the sound format used for the broadcast. The recorded sound format may be mono, stereo or the first channel of two-channel sound.
NICAM 2
For programmes in digital and analogue two-channel sound format you can set the second channel (usually a second audio language) for reception and subsequent broadcast via the NICAM 2 setting.
NICAM OFF
SelectNICAM OFF if you want to receive and record digital stereo signals in FM MonoFormat. Please note that for this setting both channels receive and output analogue two-channel sound. Thus it is unavoidable that both audio languages will be heard on the recording.
(About NICAM: Refer to "NICAM", P. 7)

If you use a SAT receiver or a DVB-T box, you have to select the channel on this device (not on the DVD/HDD recorder).
Activate PDC/VPS
▶ Use the or buttons to move the cursor to the PDC field.
Use the ▲r buttons to set the PDC function for the recording to On if you have used a PDC/VPS time from your TV guide.
Set the PDC function to Off if you do not want to use PDC/VPS time otherwise the recording may not start.
VIDEOPlus+ programming
You can open the VIDEOPlus+ programming menu either via the RECORD menu or by pressing the VIDEO+ button.
The following window opens:


Enter the VIDEOPlus+ number, which may have up to nine digits and is taken from the programme magazine, using the number buttons.
Then press the arrow button to change to the next window. A window for confirming the programme location from where the programme is to be recorded is displayed. Change the memory space using the and arrow keys.
Then confirm the field by pressing ENTER to adopt the setting.
Now set the recording quality in the QUALITY field using the ◀ and ▶ buttons.
▶ Set the destination for your recording to hard disk or DVD in the DEST. field.
▶ Set the sound channel for your recording in the NICAM field (Refer to "Set NICAM settings (NICAM)", P. 35).
▶ Set the PDC/VPS function in the PDC field to ON or OFF (Refer to "Activate PDC/VPS", P. 36).
In theSOURCE field you can again set the programme source from where the recording will be taken. The channel name is displayed below the programme space.
Close programming
When programming is complete move to the field and confirm by pressing ENTER. The recording data is transferred into the table.
| ID | DATE | START | STOP | SOURCE | QA | DEST |
| 1 | Daily | 15:54 | 16:38 | P01 | HQ | HDD |
| 2 | -/- | -- | -- | -- | -- | -- |
| 3 | -/- | -- | -- | -- | -- | -- |
| 4 | -/- | -- | -- | -- | -- | -- |
| 5 | -/- | -- | -- | -- | -- | -- |
| 6 | -/- | -- | -- | -- | -- | -- |
| 7 | -/- | -- | -- | -- | -- | -- |
| 8 | -/- | -- | -- | -- | -- | -- |
▶ Switch the unit to standby mode.

The automatic recording cannot start if the device is switched on. If you have forgotten to switch off the device a message appears just before the recording starts showing the remaining time until the programmed recording.
Deleting a programmed recording
To remove a programmed recording from the list, open the timer menu again. Move the cursor over the recording that you wish to delete. Press CLEAR on your remote control to delete the programme entry from the list.
A new window requests that you confirm the deletion. To do so move the cursor to the field and press ENTER. The entry is deleted from the list.
Stopping a programmed recording
To stop a recording that has already started press STOP during recording. You can also switch the device into standby mode to end a recording.


OPENING TITLE MENUS/VIEWING + EDITING RECORDINGS
Open title menus
Via the title menu you can display, edit and playback recordings that are on the hard disk or DVD.
DVD title menu


When you insert a formatted blank DVD the device switches automatically to the title menu.
In stop mode (2 x STOP) or after changing the mode (HDD/DVD) you open the title menu by pressing PLAY; during playback you open the title menu by pressing the TITLE button.

The topmost recording is highlighted.
Each recording is shown with a title image and the following information:
□ Ongoing number
□ Channel source
□ Recording date and time
□ Recording length
□ Recording quality
Disc info
Move the highlighting by pressing the button in the left column and confirm the Disc Info menu option by pressing ENTER to display the following information on the disk:
□ Disc type
□ Number of available titles
☐ Number of deleted titles
☐ The recording time available with the current recording quality.
☐ The total recording time available with the current recording quality. To hide the display confirm the OK field by pressing ENTER.
Multi Import and Multi Delete
▶ Select the Multi-Import entry to copy one or more titles to the hard disk.
▶ Select theMulti-Delete entry to delete one or more titles from the hard disk.
To do so highlight one or more titles that you want to overwrite by pressing ENTER. Highlighted titles are shown with a tick at the front.


▶ Select theMulti-Import entry to copy the selected titles to the hard disk.
▶ Select the Multi-Delete entry to delete the selected titles from the hard disk.

The Delete function deletes titles on a DVD+RW and on a DVD+R hides titles, i.e. in this case they are not really deleted and no free memory space is created.
DVD title options
In the right column select a title and press ENTER to display the available options for the recorded title.
Play - playback recordings
▶ If you want to play the recording directly press the PLAY button or confirm the Play entry in the recording options by pressing ENTER.
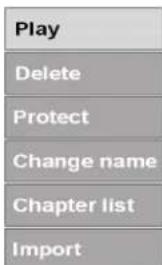
Delete - Delete a recording
The Delete function deletes titles on a DVD+RW and on a DVD+R hides titles, i.e. in this case they are not really deleted and no free memory space is created.
The following graphic explains deleting titles on a DVD+RW and releasing memory capacity:

bar_stacked
DVD-RECORDING STRUCTURE | Category | Title 1 (%) | Title 2 (%) | Title 3 (%) | |---|---|---|---| | 1 | 20 | 30 | 50 | | 2 | 20 | 30 | 50 | | 3 | 0 | 30 | 50 |The following graphic shows as an example that Title1 has been recorded and this takes up 20% of the DVD's memory capacity. In the second example, Title2 was recorded and this takes up 30% of the memory capacity. If, as shown in the third example, the first title is deleted the memory space is only available from the end of the second title, i.e. 50%.
- Open theDelete option by pressing ENTER and confirm the subsequent question with the Yes field by pressing ENTER. – The process ends after approx. 15 seconds and the selected title is deleted from the menu.
Protect titles
▶ Open the Protect option by pressing ENTER and confirm the subsequent enquiry in the Yes field by pressing ENTER.
Now the title can not be deleted and the title name can not be changed.
The entry changes to Unprotect. Use the same method to unprotect the title.

Change name
Here you can give the recording a different name.
▶ Confirm theChange name option by pressing ENTER. An on-screen keyboard is displayed.
To use the keyboard Refer to "Changing programme space", P. 20
Chapter List
Select this entry to open a summary of the individual chapters with the corresponding previews.
▶ PressENTERto show the options for an individual chapter.
Select thePLAYentry to play back the selected chapter directly.
▶ Select theHIDE entry to hide the chapter during playback.
To show the chapter end playback and open the chapter summary again. Hidden chapters are shown with white hatching. Press the ENTER button and select the UNHIDE entry to playback the selected chapter.
▶ If several chapters are to be displayed you can select the COMBINE entry to combine the current chapter with the next one.
Press RETURN to go back to the title menu.
Import - Copy title to the hard disk
Select the IMPORT entry to copy the selected titles to the hard disk.
▶ Ensure that there is adequate space on the hard disk and confirm the subsequent enquiry with YES by pressing ENTER.

You can only record DVDs to the hard disk if they were recorded on this device.
Editing DVD recordings during playback
By default titles are divided into 5 minute chapters during recording to help you to locate certain points. (You can change this default setting in SETUP > RECORD > DVD Auto Chap.)
During playback press the EDIT button to open the "Title Edit" menu.
Insert chapter
Use this option if you subsequently want to divide a recording into chapters to facilitate finding individual places.
▶ Select theInsert Chapter option.
- When the title reaches the place where you want a new chapter to start press ENTER.
The screen indicates that a new chapter was started.
Change thumbnail
You can change the image that is displayed as a thumbnail for the recording in the title menu.
▶ Play the title and go to the Change Thumbnail option.
▶ Play the title up to the point when you see the picture that you want to use as a thumbnail and press ENTER.
When you open the title menu again the title contains the image selected.

Upload to HDD
Inset Chapter
Change Thumbnail
Editing hard disk recordings
The hard disk (HDD) title menu is shown as follows (for two recordings) (the title that is currently selected plays in the background):
| NO. | DATE | TIME | LENGTH | QA | PROGRAM |
| 1 | 27/10/04 | 18:20:10 | 01:15:56 | HQ | Channel 9 |
| 2 | 02/11/04 | 20:00:00 | 00:15:00 | SQ | SBS |
▶ If you have made several recordings select the desired one by pressing an arrow key.
Press PLAY again to playback the recording.
The recordings on the hard disk can be deleted from the menu, copied to DVD or renamed.

▶ Open the title menu (see above).
In the menu select the entry that you want to edit and press the arrow key. You can also select several recordings. Selected items are marked with a tick.
The TITLE EDIT sub-menu is displayed.
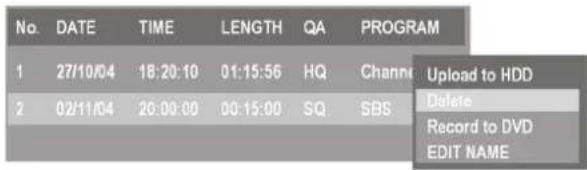

If you want to delete the title select the Delete entry and confirm the field by pressing ENTER.
To copy the title to a DVD select the Record to DVD entry and confirm the field by pressing ENTER.
If you want to change the name of the program from which you made the recording (e.g. to give your recording an individual title) select the EDIT NAME entry and press ENTER.
An on-screen keyboard is displayed. To use the keyboard Refer to "Changing programme space", P. 20.
▶ PressTITLE to return to the menu.
Watch TV at a different time (TIME SHIFT)


You can watch a TV programme at a different time by using the hard disk memory as a buffer.
▶ Select the HDD recording mode and select the TV channel that you wish to view later.
▶ Press theTIME SHIFT button to open the time shift mode.
To start the time shift press the PAUSEbutton. A still picture is displayed from the start of the time shift; the screen also shows the ongoing time.
When you want to see the broadcast pressPLAY. The screen indicates the time delay. At the same time the current broadcast is recorded to the temporary memory in the background.
Press the <buttons to search through the recording.
To cancel the function, pressSTOP. The recording is deleted immediately and is not shown in the title menu.
Copying MP3/JPEG/DIVX/MPEG4 data to the hard disk
Copying audio, image and video files
Insert an MP3-CD, JPEG-CD or a CD with DIVX/MPEG4 data into the DVD/HDD recorder.
If necessary open the file menu on the disk and use the ENTER button to highlight the title that you want to copy to the hard disk.
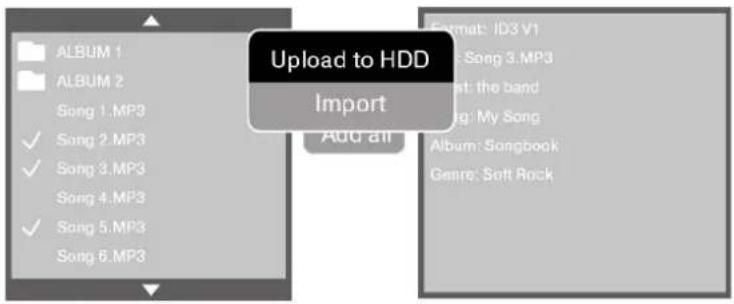
Press the EDIT button and confirm the IMPORT field by pressing ENTER.
The DVD/HDD recorder now starts to create folders for the selected files and to copy them to the hard disk. During copying the progress is shown via a progress bar.

You cannot copy copyright protected films or audio CDs to the hard disk.
Playing back audio, image and video files from the hard disk
▶ If necessary change to the HDD mode and use the MENU/PBC button to open the file menu. This menu is structured in the same way as the menus for MP3, JPEG and DivX/MPEG4 discs.
If files were copied the DVD/HDD recorder created a directory for each type of file. Open a directory to display the files contained in it.
▶ Press thePLAY button or ENTERto play back a file.
Press the EDIT button and select DELETE to delete the selected file. Select RENAME to change the name of the selected file. An on-screen keyboard is displayed; use this to rename the file as stated in "Programme name (Ch. Id)", Page 22.
SETTINGS IN THE SETUP MENU


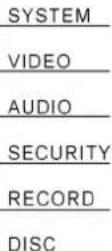
All settings are made in the SETUP menu, which you can open using the SETUPkey. The SETUP menu includes the SYSTEM, VIDEO, AUDIO, SECURITY, RECORD and DISC menus.
▶ You can select an entry by pressing the ▲ or ▼row keys.
▶ Use the ◀ and ▶arrow keys to change between the left, middle and right menus.
▶ To confirm a selection pressENTER.

All navigation options in the current menu are shown on the lower edge of the menu.
Press SETUP at any point to close the SETUP menu.

The DISC sub-menu can only be opened if there is a DVD+R or DVD+RW in the recorder and a recording has been made. Playback is paused when the SETUP menu is displayed. After ending setup playback is restarted
SYSTEM menu
![SETUP>SYSTEM Guide Language Set Time System Info Factory Reset Country Setup English Español Français Deutsch Italiano [SETUP]: EXIT](/content/2026/05/936130/images/e3c511f457db8f3593c5e04c9f0a47459f20941f178ae9a33026495a8c824571.jpg)
Guide Language
Select the menu language here (OSD – on screen display). The language changes occur after confirmation by pressing ENTER.
Date and time (Set time)
You can set the time and date here as described in the "Setting the date and time", Page 19 chapter. This is essential for programming recordings.
System Info
Here you can see the size of the hard disk and how much storage space has already been used.
Factory Reset
Here you can reset the device to the factory settings. Please note that afterwards you automatically carry out the four steps to set up the device as for initial operation;
Refer to "Initial operation", P. 18.
▶ To use the factory reset confirm START by pressing ENTER.
In the subsequent Perform Factory Reset" dialogue box go to the field and press ENTER. Press (✗) to cancel the process.
For the subsequent four steps please refer to "Set menu language and country", Page 19 onwards.

Please note that a new password is retained even after completing the factory reset.
Country Setup
You select here the country in which the DVD/HDD recorder is operated.
You can extend the list of countries by navigating to the top option by pressing ▲ or to the lowest option by pressing . ▼
"VIDEO" menu
![SETUP>VIDEO Channel Scan Channel Setup Screen Format Video Output Start [SETUP]: EXIT](/content/2026/05/936130/images/78622fd64e9cdfd1c5f657285e7a0dab42d78baab045cc014769db1dcb2ff042.jpg)
Channel Scan
You can start the channel scan here.
Normally the channel scan is carried out on initial setup; please also refer to "Changing programme space", Page 20.
Adding/deleting channels (Add/Del Channel)
You can reprogram the programme spaces and set the individual channels here.
The options are described in detail in the "Change programme presets/edit channels", Page 20 chapter.
Proportion (Screen Format)
4:3 letterbox: Select this setting to display a film in 16:9 format on a traditional TV with 4:3 format. The image is shown with a black bar at the top and bottom edges.
4:3 Pan Scan: Select this setting to display programmes in the normal 4:3 format on a 4:3 TV. 16:9 format programmes are shown full-screen without disturbing bars but the edges of the image are cut off.
16:9 Wide: Select this setting to output to a wide-screen TV in 16:9 format.


natural_image
Person performing a diving drill on water with spectators in the background (no visible text or symbols)Video output
The setting depends on how your TV (or other video device) is connected to the DVD/HDD recorder.
YCrCb: Select this setting only if the TV is connected to the DVD/
HDD recorder via the component connections and if the TV can display the Progressive Scan picture format (please also refer to "About the component connections", Page 13).
RGB: Select this setting if the TV is connected to the DVD/HDD recorder via a SCART cable and your TV support the RGB colour system.
YCrCb/RGB Off: Select this setting only if the TV is connected with the DVD/HDD recorder via the video cinch cable.

WARNING!
Never select the YCrCb setting for other connection types! This will produce a black screen!
AUDIO menu
![SETUP>AUDIO Speaker Setup Dolby Digital DTS MPEG Sampling Freq. Vocal DRC Equalizer • PCM Bitstream [SETUP]: EXIT](/content/2026/05/936130/images/3917077709f9379110974dfacf676be35be72d82227d65e86d0f99b01a6bd155.jpg)
In this menu you can set the format for the audio output that matches the output device (TV, amplifier, etc.)
Speaker Setup

In the Speaker Setup sub-menu you can set the size, volume, delay and frequency range for each individual channel.
Size
▶ Use the ▲ or ▼ arrow keys to select a speaker channel so you can set the virtual size. Press the ▲ and then use the ▲ or ▼ arrow buttons to set the size to SMALL or LARGE. If you choose NONE the channel is not changed.
In the Subwfr entry you can switch the subwoofer channel on or off.
Level
▶ Use the ▲ or ▼ arrow keys to select a speaker channel so you can set the volume. Press the ▲ and then use the ▲ or ▼ arrow buttons to set the volume from 0 dB to -10 dB.
Distance
▶ Use the ▲ or ▼ arrow keys to select a speaker channel so you can set the delay. This may be necessary for example if the speaker on which the sound is output is much closer in relation to the other speakers.
Press the arrow buttons and then use the arrow buttons to set the delay from 0 to 15 milliseconds.
CrossOvr
▶ Use the ▲ or ▼row keys to select a speaker set for which you want to set the frequency range. Press the ▲row buttons and then use the ▲ or ▼arrow buttons to set the frequency range from 80 to 200 Hz.
For example if you set the range for the front speakers to 200 Hz all frequencies under 200 Hz will be output via the subwoofer.
Return
Return to the main menu.
Dolby Digital
PCM: Select PCM (Pulse Code Modulation) if there is a connection to a digital amplifier/receiver. Your recorder will transmit the same audio formats as are stored on the disc by means of a PCM signal. In addition, an audio signal will be transmitted via the left/right outputs.
Bitstream: The DVD/HDD recorder outputs the raw data as Dolby Digital sound (default setting).
DTS
PCM: Please refer to "Dolby Digital" above.
Bitstream: The DVD/HDD recorder outputs the raw data as DTS sound (default setting).
MPEG
PCM: Please refer to "Dolby Digital" above.
Bitstream: The DVD/HDD recorder outputs the raw data as MPEG sound.
Sampling Frequency
48 kHz: Default setting.
96 kHz: Only for DVDs with corresponding sampling frequency.
Vocal
Switch this function to ON to mix the singing track of a karaoke CD into the stereo sound. For traditional CDs switch this function to OFF.
DRC ("Dynamic Range Control")
Off: The sound is reproduced without changes, i.e. loud passages and bass sounds are loud and quiet passages are quiet (cinema sound). This setting is only appropriate if nobody will be disturbed.
On: The volume difference is minimised, i.e. loud passages are quieter and quiet passages are louder. This setting is appropriate, for example, at night.
Equalizer
Press the arrow button to display the equalizer.
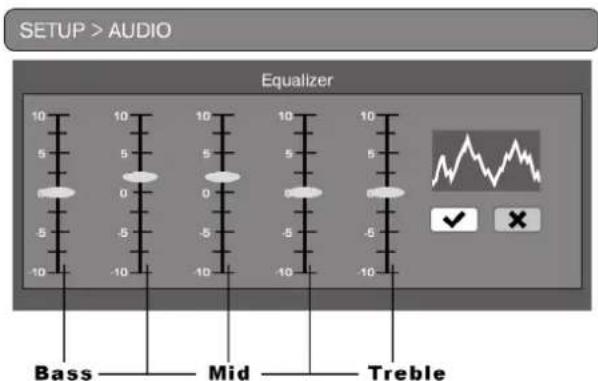
Using the ◀ and ▶ buttons select the individual controllers and use the ▲ and ▼ buttons to move the values for treble and bass up or down.
The left controller sets the bass, the middle one the middle frequencies and the right controller the treble. The other two controllers set frequencies between these ranges.
▶ Confirm the yield by pressing ENTERto adopt the equalizer settings for the sound output.
"SECURITY" menu
![SETUP>SECURITY Rating Set Password Country Code DivX(R) VOD • Unlock Level 8 (Adult) Level 7 Level 6 Level 5 Level 4 Level 3 Level 2 [SETUP]: EXIT](/content/2026/05/936130/images/5ba2110230d7cf9a6c1225372d1869b2334d24d1e637ec60098c3ea6fe34c65a.jpg)
Rating
Some DVDs and CDs are coded with encryption signals. DVDs can be subdivided into eight different authorisation classes. The assignment of a DVD to an authorisation class depends on which country code is set (refer to "Country Code" chapter below).
We list below the authorisation classes established by the Motion Picture Association:
UNLOCK: No parental control code
LEVEL 8
(Adult): only for adults;
LEVEL 7: not for young people under 17;
LEVEL 6: for young people under 17 parental supervision strictly recommended;
LEVEL 5: for young people under 17 parent supervision recommended;
LEVEL 4: parental supervision strictly recommended; some scenes not suitable for children under 13;
LEVEL 3: parental supervision recommended;
LEVEL 2: for all age groups;
LEVEL 1
(Kid): suitable even for small children.
For example, if you have inserted a DVD that is coded with authorisation class 7 (NC 17) or 8 (ADULT) and you have selected authorisation classes 1 to 6, a message appears and the viewer must enter a password. Parts of a DVD – certain scenes, for example – may also be encoded with an authorisation class or a range of authorisation classes.
Set Password
You can change the factory password here.
▶ Confirm the Change option. A four-digit "Password" field is displayed.
Enter the old password (the master password is:3308). A four-digit "Password" field is displayed.
▶ Enter four digits using the number buttons. A Verify password" field is displayed.
▶ Enter the new password again.
▶ To cancel the process, pressCLEAR.
If you want to delete the password select the Delete option and enter the valid password.

A new password is retained even if the power supply is interrupted or the factory reset option is used. If you forget your own password enter the master password 3308 so you can edit the authorisation classes again.
Country Code
You can see which country code is currently set and set a new country code. This affects the authorisation classes of coded DVDs (refer to "Authorisation" chapter above).
▶ To change the country code select a letter by pressing ▶ and use ▲ or ▼ to select a new letter.
A code comprising two letters is used for each country (refer to code table at the end of this manual).
DivX(R) VOD
The DivX registration code that you need to use the video-on-demand range at the DivX homepage (www.divx.com/vod) and various other providers is stored in this menu option. Video on demand files are usually video films that can be downloaded at a charge from a website. In order to be able to play these films with your DVD receiver you first have to set up a user account on the DivX homepage and state the registration code of your DVD receiver to register the device. A different registration is required for each DVD device that supports DivX. Please refer to the DivX homepage for more information.

Note: The registration code is only required if you have downloaded video-on-demand files to your PC and want to then play them back on the CD/DVD you used in your DVD receiver. The registration code is not required for traditional DivX files that are not video-on-demand files.
"RECORD" menu
![SETUP>RECORD Record Quality DVD Auto Chap Schedule Record HQ SP LP EP SLP : SELECT [SETUP]: EXIT](/content/2026/05/936130/images/09197787ad27bbb224136d9e2447208ce1e4c9af0cbee412fb8b85f31232a2ff.jpg)
Record Quality
You can set the quality of the next recording in this entry. You can choose between five possible recording speeds or qualities, whereby higher picture quality means lower recording capacity:
HQ (High quality) highest picture quality (60 minutes are available on the DVD);
SP (Standard play) very good picture quality (DVD) (120 minutes are available on the DVD);
LP (Long play) good picture quality (S-video) (180 minutes are available on the DVD);
EP (Extended play) better VHS picture quality (240 minutes are available on the DVD);
SLP (Super long play) VHS picture quality (360 minutes are available on the DVD);
▶ Select a recording format and confirm by pressing ENTER. The setting is saved and used for the next recording.
DVD Auto Chapter
You have the option of subdividing a recording automatically into chapters. This facilitates an overview during playback.
Off: No chapters are created automatically.
5 Min: Chapter markers are set around every 5 minutes.
10 Min: Chapter markers are set around every 10 minutes.
15 Min: Chapter markers are set around every 15 minutes.
In addition you can also set other chapter markers during the recording; Refer to "Insert chapter", P. 41.
Schedule Record
You open the programming table for automatically recording to DVD or hard disk here (Refer to "Automatic recording ("TIMER" menu)", P. 34).
DISC Menu
![SETUP>DISC Audio Language Subtitle Language Menu Language Auto Play Initialize DVD Finalize DVD Format HDD Scandisc HDD • Original English Spanish French German Italian Chinese Polish [SETUP]: EXIT](/content/2026/05/936130/images/4240d084aa8923cc51d7783df38c0511557de931baa24c965d04203ace019fd5.jpg)
Audio Language
You can select the default setting for the spoken language on the DVD here. If the DVD does not contain the selected language it is played back using the original language.
The setting for a current DVD can be changed during playback via theAUDIO or DISPLAY buttons.
Subtitle Language
Please select the default setting for the subtitle language, if available on the DVD, here.
Off: No sub-titles are displayed.
The setting for a current DVD can be changed during playback via the SUBTITLE or DISPLAY buttons.
Menu Language
You can select the default setting for the DVD menu language here.
Auto Play
On: When a DVD or VCD is inserted playback starts automatically (default setting).
Off: If you do not want the disc to start automatically set this to Off. Then you have to press PLAY to start the DVD/VCD.
Initialise DVD
This menu option can only be selected if a blank DVD has been inserted. It is only available for DVD+R.
During initialisation all saved data on the DVD is deleted and this memory space is no longer available.
Finalise DVD
This menu option can only be selected if a blank DVD has been inserted. It is only available for DVD+R.
Confirm your entry with ENTER to finalise recording on a DVD+R in order that you can also play it on other DVD players. You are then requested to confirm your entries with ENTER or to exit the FINALISE function.
Please note that a DVD+R which has been finalised can no longer be written on.
Format HDD
Here you can format the integrated hard disk.

Please note that the complete hard disk is deleted during formatting.
Check HDD (Scandisk HDD)
Here you can check the integrated hard disk if errors during recording occur or incorrect memory space information is provided.
To do so confirm the START entry by pressing ENTER and in the subsequent"P" dialogue box go to the √ field and press ENTER again. The hard disk will now be checked. If no error is found the display returns to the setup menu. If an error message is displayed customer services must check the hard disk.
Press (✗ to cancel the process.
TROUBLESHOOTING
If errors occur, check first whether you can correct the problem yourself. The following overview may help you.

Never try to repair the device yourself. Contact our service centre or other qualified personnel if a repair is necessary.
PROBLEM POSSIBLE CAUSE / REMEDY
GENERAL INSTRUCTIONS
The front control buttons do not work Firstly carry out initial setup as the buttons on the front of the device are locked until this has been carried out.
No standby display Check the mains connection: Is the plug firmly inserted in the mains socket?
The player does not work Press STANDBY/ON on the remote control or device. If the device has been disturbed by a storm, static charge or other external factor try the following: Press STANDBY/ON on the device (Standby mode). Then pull out the mains cable and plug it back in.
The disc does not play even though PLAY has been pressed, or stops again immediately Is the disc inserted with the title (printed) side facing upwards? Check whether the disc is damaged by trying another disc. If the disc is dirty, clean it carefully, wiping it from the centre to the edge with a soft, dry cloth.
Does the inserted disc have a format that can not be played? For commercial DVDs: Does the DVD have the correct regional code (2)? If condensation has formed in the device: give the player one to two hours to dry off.
The device does not respond to the remote control Check whether the batteries need changing and have been inserted correctly. Remove anything which may be blocking the signal between the infrared transmitter, the remote control and the device's sensor. Is the distance between the remote control and the player too great (over 7m)?
No picture Are the cable connections between the DVD and television correct and undamaged?
Is the television switched on?
Have you selected the video channel on the television?
Has the correct function been selected (DVD)?
Have you selected the correct video output on the DVD player?
Have you selected the YCrCb/RGB Off option in VIDEO-SETUP but the TV is connected to the DVD/HDD recorder via a SCART cable?
To restore the picture connect the video cinch output of the DVD/HDD recorder to the video cinch input of the TV (yellow cinch plug) and if necessary set the correct input on the TV.
Then in VIDEO-SETUP select RGB On again.
Do you need to carry out the channel scan again?
| Distorted picture | Check whether the DVD is dirty and if necessary clean it carefully, wiping it from the centre to the edge with a soft, dry cloth. Slight picture distortion is not a malfunction. |
| Highly distorted picture | Your DVD's standard may not match that of your TV (NTSC/PALbutton). |
| No colour | A video output signal has been selected that the TV does not support (NTSC/PAL-button). |
| Poor picture quality | |
| Incorrect image format (4:3, 16:9) | In the SETUP menu >VIDEO SETUP > Screen Format, check whether the format selected matches that of the TV set. |
| No sound Has the sound been switched off (MUTE)? | |
| Check the audio connections. | |
| Wrong audio output settings. | |
| The DVD playback is set to fast forward or slow motion. | |
| Sound too quiet Check the audio settings in the SETUP menu: has the correct sound format been selected? | |
DVD-RELATED PROBLEMS
| Wrong language wrong subtitle language | Change the language settings in the SETUP menu (DISC - SUBTITLE LANGUAGE) by using the SUBTITLE button, or in the DVD menu (MENU or TITLEbuttons.Check on the DVD cover or in the DVD menu whether the selected language is actually available on the DVD. |
| SKIP function does not work | Some DVDs disable the SKIP function for certain titles or chapters. |
| The camera angle cannot be changed. | Only a few discs allow camera angles to be selected and usually only for selected scenes on any one DVD. |
| You have forgotten the password. | Use the master password 3308. |
RECORDINGS
| It is not possible to play back a recorded DVD on a different DVD player. | The DVD+R was not finalised after recording (Refer to “Finalise DVD”, P. 52). |
| Recordings do not work. No disc has been inserted; the disc is write-protected. | |
| The format of the disc is wrong (DVD+R or DVD+RW). | |
| The disc already contains 49 titles. | |
| Another recording is taking place at the programmed time. | |
| The programmed time is in the past. | |
| All 8 memory spaces for the recording are occupied. | |
| The selected source is not issuing a signal. | |
| The DVD timed recording did not work | The device was switched on. The device must be in standby mode for timed recordings. |
REMOTE CONTROL
Does not work No batteries inserted or batteries are empty.
The remote control is not pointing towards the recorder.
TECHNICAL DATA
Voltage supply: 230V \~ 50/60Hz
Power consumption: 35W
Batteries for remote control: 2 X 1.5V R03 / LR03 TYPE AAA

Laser output: Class 1 laser product
Supported disc formats: DVD (Digital Versatile Disk), DVD+R, DVD+RW, DVD-R, DVD-RW;
VCD, SVCD, CD-Audio; CD-R, CD-RW, JPEG-CD, MP3-CD and DivX-CD
Recording disc formats: DVD+R; DVD+RW

There is no guarantee that a DVD+R or DVD+RW produced with your DVD/HDD Recorder will be playable on a different DVD player. If necessary read the other DVD player's manual and ensure that the device can playback DVD+R and DVD+RW formats.
When playing audio CDs please check the label.


Please note: These days there are many non standard CD recording and copy protection procedures as well as various blank CD-R and CD-RW discs. This can occasionally lead to read errors or delays. This does not mean the device is faulty.
Subject to technical changes.
COUNTRY CODES
You can enter these country codes in the SETUP under SECURITY > Country-Code to adapt the authorisation classes on coded DVDs to the country.
| AD Andorra BT Bhutan ET Ethiopia | |||||
| AE United Arab Emirates BV Bouvet Island | FI Finland | ||||
| AF Afghanistan BW Botswana FJ Fiji | |||||
| AG Antigua and Barbuda BY Belarus FK Falkland Islands | |||||
| Al Anguilla BZ Belize | FM Micronesia | ||||
| AL | Albania | CA | Canada | FO | Faroe Islands |
| AM | Armenia | CC Cocos Islands FR France | |||
| AN Dutch Antilles CF | Central Africa FX France (European Territory) | ||||
| AO | Angola | CD | Congo, Democratic Republic (formerly Zaire) | GA Gabon | |
| AQ | Antarctic | CG | Congo, Republic | GB | Great Britain |
| AR | Argentina | CH | Switzerland | GD | Grenada |
| AS | Samoa (American part) | CI | Ivory Coast (Côte d'lvoire) | GE | Georgia |
| AT | Austria | CK | Cook Islands | GF | |
| AU | Australia | CL | Chile | French Guyana | |
| AW | Aruba | CM | Cameroon | GH | Ghana |
| AZ | Azerbaijan | CN | China | GI | Gibraltar |
| BA | Bosnia Herzegovina | CO | Columbia | GL | Greenland |
| BB | Barbados | COM | Commercial | GM | Gambia |
| BD | Bangladesh | CR | Costa Rica | GN | Guinea, Republic |
| BE | Belgium | CS | Former Czechoslovakia | GP | Guadeloupe |
| BF | Burkina Faso | CU | Cuba | GQ | Equatorial Guinea |
| BG | Bulgaria | CV | Cape Verde Islands | GR | Greece |
| BH | Bahrain | CX | Christmas Islands | GS | South Georgia and the Southern Sandwich Islands |
| BI | Burundi | CY | Cyprus | GT | Guatemala |
| BJ | Benin | CZ | Czech Republic | ||
| BM Bermuda DE Germany | |||||
| BN | Brunei Darussalam | DJ | Djibouti | ||
| BO | Bolivia | DK | Denmark | KZ | Kazakhstan |
| BR Brazil DM Dominica LA Laos | |||||
| BS Bahamas DO Dominican Republic LB Lebanon | |||||
| LC St. Lucia | |||||
| LI | |||||
| LK Sri Lanka | |||||
| DZ | Algeria | GU | Guam | LR | Liberia |
| EC | Ecuador GW Guinea-Bissau | LS Lesotho | |||
| EE | Estonia | GY | Guyana | LT | Lithuania |
| EG | Egypt | HK | Hong Kong | LU | Luxembourg |
| EH Western Sahara HM Heard and McDonald Islands | LV Latvia | ||||
| ER Eritrea HN Honduras LY Libya | |||||
| ES Spain HR Croatia MA Morocco | |||||
| ET Ethiopia HT Haiti | MD Moldova | ||||
| FI | Finland | HU | Hungary | MG | Madagascar |
| FJ | Fiji | ID | Indonesia | MH | Marshall Islands |
| FK | Falkland Islands | IE | Ireland | MK | Macedonia (former Yugoslavian Republic) |
| FM | Micronesia | IL | Israel | ML | Mali |
| FO | Faroe Islands | IN | India | MM | Myanmar (Union) |
| FR France IQ Iraq | MN Mongolia | ||||
| FX | France (European Territory) | IR | Iran | MO | Macau |
| GA | Gabon | IS | Iceland MP North Marianas | ||
| GB | Great Britain | IT | Italy | MQ | Martinique |
| GD | Grenada | JM | Jamaica | MR | Mauritania |
| GE | Georgia | JO | Jordan | MS | Montserrat |
| GF | MT | Malta | |||
| French Guyana | JP | Japan MU Mauritius | |||
| GH Ghana KE Kenya MV Maldives | |||||
| GI | Gibraltar | KG | Kyrgyzstan | MW | Malawi |
| GL | Greenland | KH | Cambodia | MD | Moldova |
| GM | Gambia | KI | Kiribati | MG | Madagascar |
| GN | Guinea, Republic | KM | Comoros | MC | Monaco |
| GP | Guadeloupe | KN | QA | Qatar | |
| GQ Equatorial Guinea KP Korea, Democratic People's Republic (North Korea) | RE Réunion | ||||
| GR | Greece | KR | Korea, Republic (South Korea) | RO | Rumania |
| GS | South Georgia and the Southern Sandwich Islands | KW Kuwait RU | Russian Federation | ||
| GT | Guatemala | KY | Cayman | RW | Rwanda |
| SA | Saudi Arabia | ||||
| SB | Solomon Islands | ||||
| SC Seychelles | |||||
| KZ | Kazakhstan | MX | Mexico | SD | Sudan |
| LA | Laos | MY | Malaysia | SE | Sweden |
| LB | Lebanon | MZ | Mozambique | SI | Slovenia |
| LC | St. Lucia | NA | Namibia | SJ | Spitzbergen and Jan Mayen |
| LI | Liechtenstein | NC | New Caledonia | SK | Slovak Republic |
| LK | Sri Lanka | NE Niger SL Sierra Leone | |||
| LR Liberia NF Norfolk SM San Marino | |||||
| LS | Lesotho | NG | Nigeria | SN | Senegal |
| LT | Lithuania | NI | Nicaragua | SO | Somalia |
| LU | Luxembourg | NL | Netherlands | SR | Surinam |
| LV | Latvia | NO | Norway | ST | St. Thomas and Principe |
| LY | Libya | NP | Nepal | SV | El Salvador |
| MA Morocco NR Nauru SY Syria | ||||
| NT Neutral Zone | ||||
| SZ Swaziland TN Tunisia VI American Virgin Islands | ||||
| NU Niue TO Tonga VN Vietnam | ||||
| NZ New Zealand TP East Timor | VU Vanuatu | |||
| OM | Oman TR Turkey | WF Wallis and Futuna | ||
| PA Panama TT Trinidad and Tobago TC Turks and Caicos | ||||
| PE | Peru | TV | Tuvalu | TD Chad |
| PF | French Polynesia | TW | Taiwan | WS Western Samoa (Savaii, Upola) |
| PG | Papua New Guinea | TZ | Tanzania | YE Yemen |
| PH | Philippines | UA | Ukraine | YT Mayotte |
| PK | Pakistan | UG | Uganda | TG Togo |
| PL | Poland | UK United Kingdom (Great Britain and Northern Ireland) | TH Thailand | |
| PM | St. Pierre and Miquelon | US | United States of America | TJ Tajikistan |
| PN | Pitcairn | UY | Uruguay | TK Tokelau |
| PR | Puerto Rico | UZ | Uzbekistan | YU Serbia and Montenegro |
| PT | Portugal | VA | Vatican | ZA South Africa |
| PW | Palau | VC St. Vincent and the Grenadines | ZM Zambia | |
| PY Paraguay VE Venezuela a ZR Zaire | ||||
| TM | Turkmenistan | VG | Virgin Islands (British Part) | ZW Zimbabwe |
- SAFETY INSTRUCTIONS
- About these instructions
- Keep electrical equipment out of reach of children
- Setting the device up safely
- Ensure that the mains power socket is easily accessible.
- Never undertake your own repairs
- Thunder storms
- The DVD/HDD recorder
- Cleaning the device
- GENERAL INFORMATION
- About DVDs
- DVD structure
- Regional codes
- Important note on blank DVD discs:
- DiVX and MPEG4
- MP3 format
- NICAM
- NTSC and PAL
- PROGRESSIVE SCAN
- Surround sound formats
- Trademarks
- Dolby Digital 5.1
- dts (Digital Theater Systems)
- VIDEO Plus+
- VPS/PDC
- PREPARATION
- Unpacking the device
- WARNING!
- Check package contents
- Inserting the batteries into the remote control
- Dispose of batteries in an environmentally appropriate way
- CONNECTIONS AND CONNECTION OPTIONS
- Notes on the connections
- Connecting the aerial cable
- Connecting the TV
- With a SCART cable
- With S-VIDEO and audio cinch cable
- With cinch (AV) cables
- About the component connections
- Connecting another external audio or video device
- Connecting an audio device
- Connecting video devices
- Connecting a video camera
- Home cinema connection
- speaker system
- Analogue sound transfer
- Digital sound transfer
- INITIAL OPERATION
- Operation from device and remote control
- On/off switch
- Set menu language and country
- Channel scan
- Setting the date and time
- Automatic setting
- Manual setting
- Change programme presets/edit channels
- Changing programme space
- TV-System (TV-Sys)
- Mode and CH/MHz
- Example
- Programme name (Ch. Id)
- Fine tuning
- Leave the programme preset menu
- Decoder
- DVD AND CD PLAYBACK
- Inserting a disc
- Setting the volume
- Playback functions (DVD, VCD, CD, DIVX, MPEG4)
- PLAY
- PAUSE
- STEP (DVD and VCD only)
- STOP
- Special screen message
- Search functions
- SKIP (DVD, VCD, CD)
- CM SKIP (DVD)
- Fastforward (DVD, VCD, CD)
- Slow motion (DVD, VCD)
- Repeat functions
- Repeat 1/ALL (DVD, CD)
- REPEAT A - B (DVD, CD)
- AUDIO and SUBTITLE MENU (DVD)
- Select sub-title language
- Picture functions
- MENU/PBC and TITLE (DVD)
- PBC function (VCD 2.0 only)
- Summary of playback settings - DISPLAY
- Changing settings
- TV/DVD
- Setting bookmarks – BOOKMARK (DVD)
- Calling up a bookmark
- Audio CDs and MP3 CDs
- Navigating on MP3 CDs
- Direct selection using the number keys
- Random playback (CD, MP3)
- Program the playing order of titles
- Playing back JPEG CDs
- Playing back MPEG4 and DIVX files
- RECORDING TO DVD/HARD DISK
- DVD mode and HDD mode
- Manual recording
- Formatting discs
- Memory media: DVD+RW, DVD+R and hard disk
- Starting a manual recording
- Notes on recording
- Automatic recording ("TIMER" menu)
- Set date for the recording (DATE)
- Set the start time for the recording (START)
- Set the stop time for the recording (STOP)
- Set the recording quality (QA)
- Set recording destination (DEST.)
- Set recording source (SOURCE)
- Set NICAM settings (NICAM)
- NICAM 1
- NICAM 2
- NICAM OFF
- Activate PDC/VPS
- VIDEOPlus+ programming
- Close programming
- Deleting a programmed recording
- Stopping a programmed recording
- OPENING TITLE MENUS/VIEWING + EDITING RECORDINGS
- Open title menus
- DVD title menu
- Disc info
- Multi Import and Multi Delete
- DVD title options
- Protect titles
- Change name
- Chapter List
- Editing DVD recordings during playback
- Insert chapter
- Change thumbnail
- Editing hard disk recordings
- Watch TV at a different time (TIME SHIFT)
- Copying MP3/JPEG/DIVX/MPEG4 data to the hard disk
- Copying audio, image and video files
- Playing back audio, image and video files from the hard disk
- SETTINGS IN THE SETUP MENU
- SYSTEM menu
- Guide Language
- Date and time (Set time)
- System Info
- Factory Reset
- Country Setup
- "VIDEO" menu
- Adding/deleting channels (Add/Del Channel)
- Proportion (Screen Format)
- Video output
- AUDIO menu
- Speaker Setup
- Size
- Level
- Distance
- CrossOvr
- Dolby Digital
- DTS
- MPEG
- Sampling Frequency
- Vocal
- DRC ("Dynamic Range Control")
- Equalizer
- "SECURITY" menu
- Rating
- Set Password
- Country Code
- DivX(R) VOD
- "RECORD" menu
- Record Quality
- DVD Auto Chapter
- Schedule Record
- DISC Menu
- Audio Language
- Subtitle Language
- Menu Language
- Auto Play
- Initialise DVD
- Finalise DVD
- Format HDD
- Check HDD (Scandisk HDD)
- TROUBLESHOOTING
- PROBLEM POSSIBLE CAUSE / REMEDY
- GENERAL INSTRUCTIONS
- REMOTE CONTROL
- TECHNICAL DATA
- COUNTRY CODES
Brand : MEDION
Model : Life E29068 (MD 29078)
Category : Home Theater