
SLGLF150 - Indoor Garden SereneLife - Free user manual and instructions
Find the device manual for free SLGLF150 SereneLife in PDF.


| Product Type | Indoor Herb Garden with LED Grow Lights Panel |
| Brand | SereneLife |
| Model | SLGLF150 |
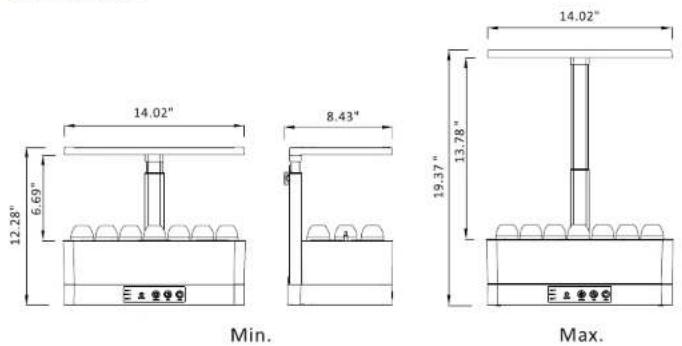
| Dimensions (L x W x H) | 14.02" x 8.43" x 19.37" inches |
| Power Supply | 24W, Input: 100-240V AC, 350mA, Output: 24V DC, 870mA |
| Working Temperature | 14 to 104°F (-10 to 40°C) |
| Storage Temperature | -13 to 149°F (-25 to 65°C) |
| LED Spectrum | 4000K |
| LED Lifespan | 25,000 hours |
| IP Rating | IP20 |
| Maximum Plant Height | Up to 12 inches |
| Number of Planting Spots | 11 |
| Light Timer Modes | 8h on/16h off, 16h on/8h off, 8h off/16h on |
| Brightness Levels | 100%, 60%, 30% |
| Height Adjustment | Yes, telescopic light post with screw lock |
| Water Level Indicator | Yes, with Min/Max marks |
| Water Shortage Reminder | Yes, signal light when water below Min level |
| Growing Medium | Smart Soils (pre-fertilized, lasts at least 3 months) |
| Included Accessories | Grow Deck, Light Panel, Light Post, Base, Tank, Adapter, 11 Planting Baskets, 11 Smart Soils, 11 Domes, 11 Spacer Lids, Indicator Tube, Water Level Stick, Nipper, 11 Shading Lids |
| Construction Materials | PC, Engineered ABS, 6063 Aluminum |
| Use | Indoor only, household/residential |
| Cleaning Instructions | Unplug before cleaning; use a damp, soft, clean cloth. Do not submerge electrical parts. |
| Safety Certifications | FCC Part 15 compliant |
Frequently Asked Questions - SLGLF150 SereneLife
User questions about SLGLF150 SereneLife
0 question about this device. Answer the ones you know or ask your own.
Ask a new question about this device
Download the instructions for your Indoor Garden in PDF format for free! Find your manual SLGLF150 - SereneLife and take your electronic device back in hand. On this page are published all the documents necessary for the use of your device. SLGLF150 by SereneLife.
USER MANUAL SLGLF150 SereneLife
Questions? Comments?
We are here to help!
Phone: (1) 718-535-1800
Email: support@pyleusa.com
serenelife™
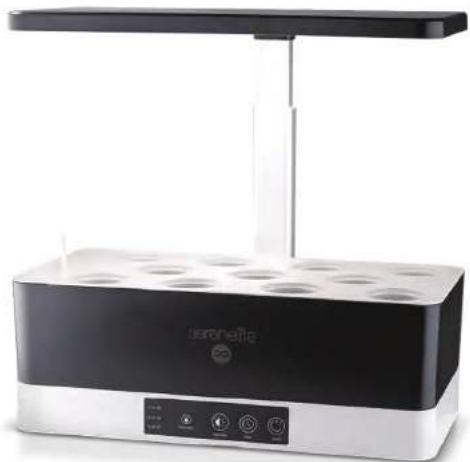
natural_image
Exterior view of a modern laboratory setup with a black and white tray, LED, and control panel (no visible text or symbols)* ★ ★ ◆ X
*○※□☆□□□□□□□
Indoor Herb Garden with LED Grow Lights Panel
User Manual
Read all instructions before using this Smart Indoor Garden.
IMPORTANT INSTRUCTIONS
- WARNING: To reduce risk of burns, fire, electric shock, or injury to people. Unplug from outlet before assembling, taking off or cleaning parts.
- Please take proper precautions when operating the Smart Indoor Garden near or by people requiring close supervision, children included.
- This device's safety is guaranteed only if these instructions are followed properly, therefore they should be kept for any future maintenance.
-
Never operate Smart Indoor Garden if it has a damaged cord or plug. If the cord or plug has been dropped, damaged or in water before, it may not working. If this happens, please contact customer service for assistance.
-
The cord or electrical components should not be exposed to any liquid or detergent.
-
Clean the indoor garden by using a damp, soft and clean cloth.
-
Do not use outdoors
-
Do not allow water to touch hot LED lighting module.
-
Keep indoor garden away from any direct sources of heat (stove, furnace vents etc.).
-
Do not place or submerge cord, plug, LED lighting panel in water or other liquid to clean it.
-
Electrical wiring must be in accordance with local regulations by qualified technicians.
-
This product is for household and residential use only. It is not approved for commercial applications.
-
If the cord you received is damaged, it must be replaced by manufacturer in order to avoid hazard.
-
Do not use Smart Indoor Garden for other intended use.
-
Any changes or modifications to this product are not expressly approved by the party responsible for compliance could void the user's authority to operate the equipment.
-
Statement: This device complies with part 15 of the FCC Rules. Operation is subject to the following two conditions: (1) This device may not cause harmful interference, and (2) this device must accept any interference received, including interference that may cause undesired operation.
DIMENSIONS
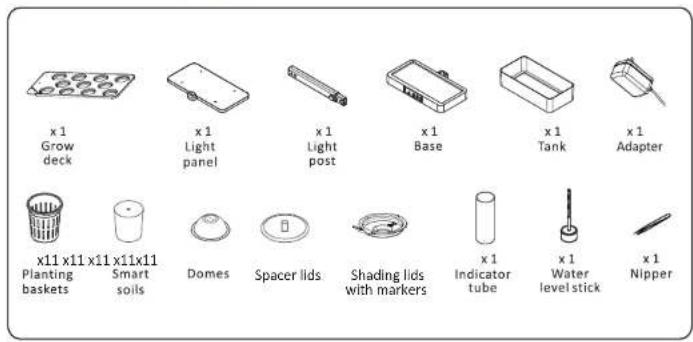
INCLUDED IN PACKAGE
Note:
The space lids are used to cover the holes on the grow deck where you don't want to grow anything sometimes and these lids can also efficiently prevent algae growth.
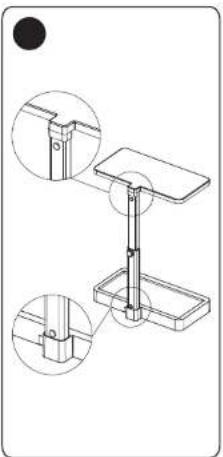
ASSEMBLY GUIDE
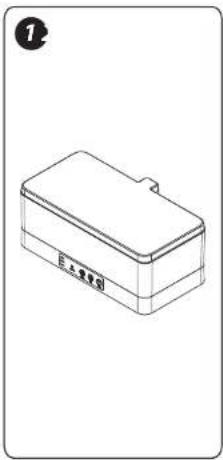
natural_image
Line drawing of a rectangular electronic component with a lid and base (no text or symbols)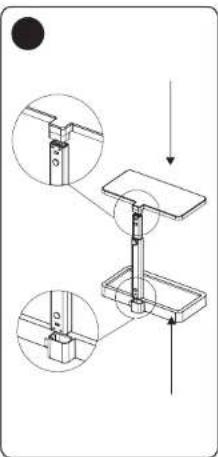
natural_image
Technical line drawing of a mechanical support structure with two circular inset views (no text or symbols)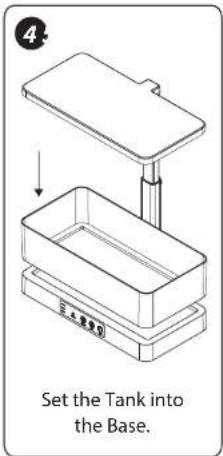
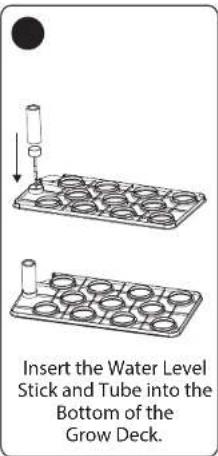
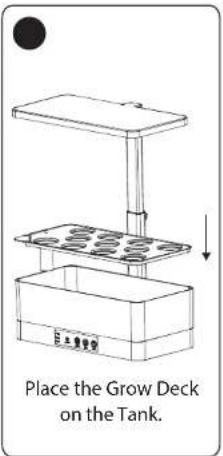
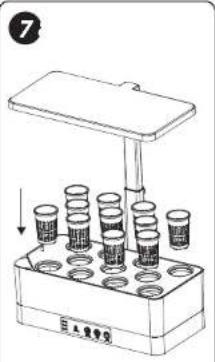
Put 11 Planting Baskets into the Grow Deck.
Small holes are on the top for seeds
Put 11 Smart Soils into the Planting Baskets.
natural_image
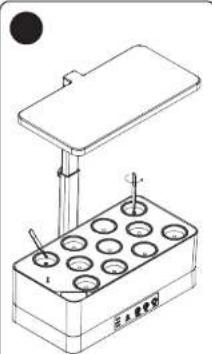
Technical line drawing of a laboratory setup with a tray, beaker, and test tube (no text or symbols)Put 2-3 seeds on top of the "Smart soil" by tweezer.
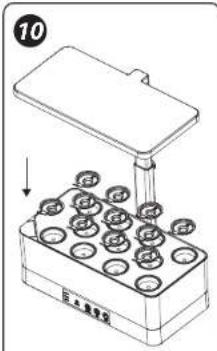
Add the shading lids
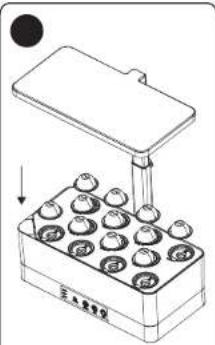
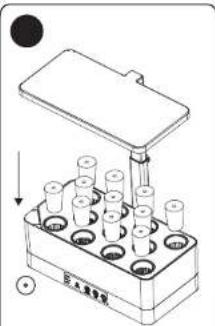
Keep all the Domes above the Baskets until your seedlings reach the Domes.
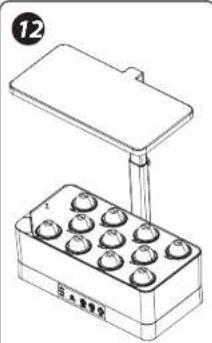
natural_image
Line drawing of a laboratory tray with numbered test tubes (no text or symbols on the tray itself)The domes can help keep warm and moist for your seedlings
ASSEMBLY GUIDE
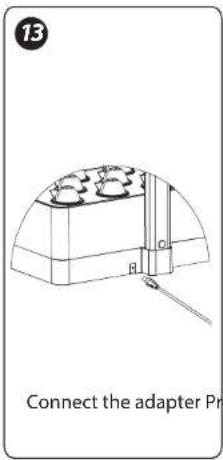
HOW TO RAISE AND LOWER THE LIGHT PANEL
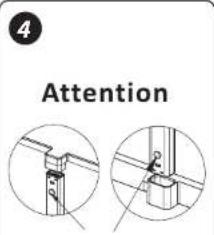
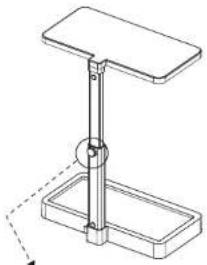
In order to raise or lower the light panel, you will need to loose the screw first, then adjust the upper part of the light post to raise or lower your light panel. Once you get the height you want, then tighten the screw to fix the light panel.
natural_image
Technical line drawing of a mechanical support structure with no visible text or symbolsNote:
When growing plants from seeds, the light panel should be set to the lowest position.
loose the screw to adjust the height of the light post to raise or lower the light panel.
CONTROL PANEL SETTINGS
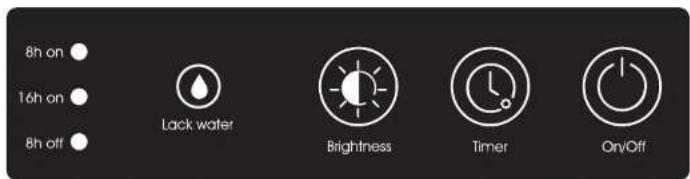

Lackwater
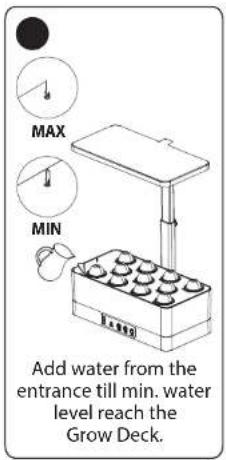
The 'lack water' signal light will turn on if the water level drops more than Minimum water level. For best growth, check the water level regularly and keep water above the Minimum water level. Don't wait for the 'Lack water' signal light to turn on.
Note: If you start planting from seeds and add water till Min. water level, even if the 'lack water' signal light is on, please ignore this for the first 10 days.

Timer
The pre-set mode is 24 hours on. You can press the 'Timer' button and select the mode you prefer the light to keep on.
8h on • : 8 hours on and 16 hours off light cycle
16h on •: 16 hours on and 8 hours off light cycle
8h off • : Light will turn on in 8 hours and then last for 16 hours light cycle
Note: When you change the mode, the cycle will be switched to the new one.

Brightness
Press the 'Brightness' button and select the brightness mode you prefer the light to have.
100% Brightness: Press the 'Brightness' button once.
60% Brightness: Press the 'Brightness' button again.
30% Brightness: Press the 'Brightness' button one more time.

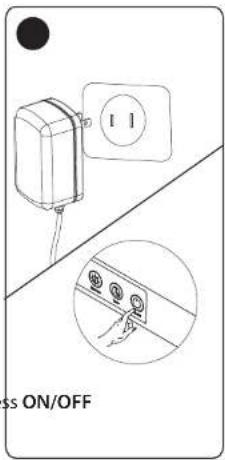
On/Off
Press the 'On/Off' button to temporarily turn on/off the light. The light will keep on if you don't choose any options on 'Timer'.
Also, turning off the light will not affect the timing of your light cycle you set before.
FUNCTIONS

OPTIMIZED SPECTRUM

3-MODE SMART TIMER

HEIGHT
ADJUSTABLE

3-STEP DIMMABLE

ALL YEAR AROUND

WATER SHORTAGE REMINDER

CONTROL BUTTON

SMART SOILS
(NO SEEDS)

TRANSPARENT
DOMES

WATER LEVEL
INDICATOR
SUITABLE PLANTS
Herbs: Basil, Parsley, Thyme, Mint, Sage, Chive, Dill etc.
Vegetables: Lettuce, Poblano Pepper, Micro Tom Tomato etc.
Flowers: Petunia, Lavender, Dianthus, Coreopsis, Gazania, Phlox etc.
GARDENING TIPS
1. What's the ideal temperature?
The ideal temperature is 65-76°F/16-24°C.
2. How and when to adjust the lighting panel?
Make the lighting panel at the lowest place of the light post when you start to germinate the seeds. And when the seedlings start growing and get taller, then keep the lighting panel 1"-2" above the plants to make sure they get the right amount of light.
3. When to remove the domes?
Remove the transparent domes when the seedlings nearly touch the domes.
4. How many seeds shall I plant per pod?
The quantity of seeds depends on the size of the seeds and the germination rate of the seeds. If the seeds are big and high germination rate, then you can put only 1 or 2. If it's small and has a low germination rate, then you should put 3-5 seeds.
Please don't forget to check the seed packet for information regarding temperature and days to germination. Make sure the packed date of the seeds is as new as it can be. If the seeds are old, they may not be able to be activated. After you get the seeds and use a few of them. It's better to keep seeds dry and cool. A temperature between 32° and 41°F is ideal, so your refrigerator can be a good place to store seeds.
5. How much water shall ladd into the tank when I plant from seeds?
When you plant from seeds, then add water level till the Min. water level, you don't need to add water within the first 10 days as seeds don't need much water at the beginning. When plants have more leaves and they will need more water, then add water below Min. water level but do not add too much water into the tank which exceeds the Max. water level mark on the indicator or higher than the Min. water level, both will hurt the plants' growth. Keep water level between the Min. and Max. Max is always a good choice.
6. How long will the nutrients in the smart soils last?
The smart soils themselves are already integrated with nutrients, the nutrients inside will last at least 3 months, so before no more extra plant food required.
7. What are these space lids for?
The spacer lids are used to cover the holes you don't want to grow anything or expand the distance between pods. These covers are also for inhibiting algae growth.
8. How to prune herbs like basilwhen they are tall?
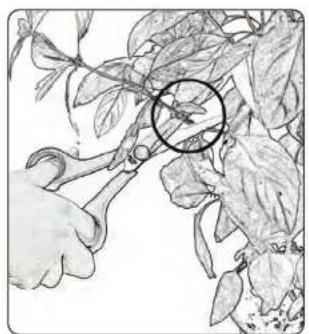
Follow the main stem back to the previous leaf set and cut right above the 5th set of leaves (see attached picture 1 and 2). Cut the herb back about 1/4 inch above a node (the place where leaves come out). Leave a few inches of leaves (3 pairs recommended) on the plant after pruning. Never take more than 1/3 of the plant when pruning. Pinching or cutting back basil plants regularly encourages full, bushy plants. Trim a basil plant every two to three weeks and pinch off the flower buds as soon as you see them.
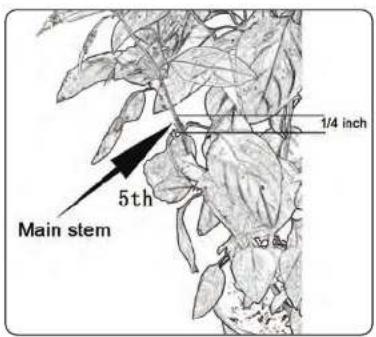
Picture 1
natural_image
Illustration of a hand pruning a leafy plant with a magnified circular detail (no text or symbols)Picture 2
9. What if I want more timer options?
If you are not satisfied with the 'Timer' modes you currently have and want more options. A good choice will be purchasing a smart plug online or offline, so you can feel free to set up your own mode. While you are using the smart plug, please make sure our light's mode is 24 hours on (press the 'Timer' button when the 3 modes have no signal light on) or the smart plug may not work as you expected.
FEATURES:
- With Water Stick on the Growing Deck
• Control Panel Settings: Lack Water, Brightness, Timer, and On/Off - Up to 11 Plants Grow at a Time
- Up to 12" Inches Tall with this Indoor Garden
- No Soil, No Mess
- Easy to Use
• Height Adjustment
• Automatically Turns Lights On and Off - LED Grow Lights
- For Indoor Use Only
• Energy Efficient LED Grow Lights for Faster Growth
■ Simple Reminders Take the Guesswork Out of Growing - Sprouts in Days, Harvest in Weeks, Enjoy for Months
WHAT'S IN THE BOX:
• (1) Grow Deck
• (1) Light Panel
• (1) Light Post
• (1) Base
• (1) Tank
• (1) Adapter
• (11) Planting Baskets
• (11) Smart Soils
• (11) Domes
• (11) Spacer Lids
• (1) Indicator Tube
• (1) Water Level Stick
• (1) Nipper
• (11) Shading Lids
CONSTRUCTION MATERIALS:
• Light Diffusor: PC
• Light Cover: PC and Engineered ABS
• Telescopic Rod: 6063 Aluminum
- Screw and Base: PC and Engineered ABS
TECHNICAL SPECS:
• Power Supply: 24W
- Working Temperature: 14\~104°F
• Storage Temperature: -13 \~149°F/85%
- Input Voltage: 100-240V AC
- Input Current: 350MA±10% (@120V/60Hz)
• Output Voltage: 24±10% V
• Output Current: 870±10% mA
- Spectrum: 4000K
• Frequency Response: 50/60Hz
• Life Time: 25,000 H
- IP Rate: IP20
• Product Dimensions (L x W x H): 14.02" x 8.43" x 19.37"-inches
- serenelife™
- Read all instructions before using this Smart Indoor Garden.
- IMPORTANT INSTRUCTIONS
- Note:
- Lackwater
- Timer
- Brightness
- On/Off
- FUNCTIONS
- SUITABLE PLANTS
- GARDENING TIPS
- What's the ideal temperature?
- How and when to adjust the lighting panel?
- When to remove the domes?
- How many seeds shall I plant per pod?
- How much water shall ladd into the tank when I plant from seeds?
- How long will the nutrients in the smart soils last?
- What are these space lids for?
- How to prune herbs like basilwhen they are tall?
- What if I want more timer options?
- FEATURES:
- WHAT'S IN THE BOX:
- CONSTRUCTION MATERIALS:
- TECHNICAL SPECS:
Brand : SereneLife
Model : SLGLF150
Category : Indoor Garden