
LP1018WNR - Air-conditioner LG - Free user manual and instructions
Find the device manual for free LP1018WNR LG in PDF.


| Product Type | Portable Air Conditioner |
| Brand | LG |
| Model | LP1018WNR |
| Cooling Capacity (BTU) | 10,000 BTU |
| Dehumidification Capacity | 2.5 pints per hour |
| Fan Speeds | 3 (High, Medium, Low) |
| Remote Control | Yes |
| Timer Function | 24-hour programmable timer |
| Installation Type | Window kit included |
| Dimensions (H x W x D) | 30.6 x 18.5 x 17.6 inches |
| Weight | 68.3 lbs |
| Power Supply | 115V, 60Hz |
| Power Consumption | 900 Watts (cooling) |
| Refrigerant Type | R-410A |
| Air Flow | 350 CFM |
| Noise Level | 54 dB (low fan) |
| Filter Type | Washable mesh filter |
| Maintenance | Clean filter every 2 weeks; drain water continuously |
| Safety Features | Auto shut-off, overheat protection, anti-tilt switch |
| Warranty | 1 year limited parts and labor |
Frequently Asked Questions - LP1018WNR LG
User questions about LP1018WNR LG
0 question about this device. Answer the ones you know or ask your own.
Ask a new question about this device
Download the instructions for your Air-conditioner in PDF format for free! Find your manual LP1018WNR - LG and take your electronic device back in hand. On this page are published all the documents necessary for the use of your device. LP1018WNR by LG.
USER MANUAL LP1018WNR LG
Read this owner's manual thoroughly before operating the appliance and retain it for future reference.
TYPE : PORTABLE AIR CONDITIONER
MODEL : LP0818WNR
LP1018WNR
LP1218GXR
TABLE OF CONTENTS
SAFETY INSTRUCTIONS
Important Safety Instructions....3
Electrical Safety....6
PARTS AND FEATURES
Key Parts and Components....7
HOW TO USE
Before Using the Air Conditioner....8
Control Panel and Remote....10
Operation....12
INSTALLATION INSTRUCTIONS
Preparing for Installation....13
Selection of Installation Location 14
Attaching the Hose and Diffuser 14
Window Vent Panel and Extensions....15
Installation in Vertical-Sliding Windows....16
Installation in Horizontal-Sliding Windows....18
CARE AND CLEANING
Emptying the Water Collection Tank....20
Cleaning the Case....21
Cleaning the Air Filter 21
Storing the Air Conditioner....22
TROUBLESHOOTING
Before Calling for Service 23
WARRANTY
LG Portable Air Conditioner Limited Warranty.....25
Arbitration Notice....26
THANK YOU!
Congratulations on your purchase and welcome to the LG family.
Your new LG Air Conditioner combines high-efficiency operation with portable convenience.
If you follow the operating and care instructions in this manual, your air conditioner will provide you with many years of reliable service.
SAFETY INSTRUCTIONS
READ ALL INSTRUCTIONS BEFORE USE
Your safety and the safety of others are very important.
We have provided many important safety messages in this manual and on your appliance. Always read and follow all safety messages.

This is the safety alert symbol.
This symbol alerts you to potential hazards that can kill or injure you and others.
All safety messages will follow the safety alert symbol and either the word WARNING or CAUTION.

WARNING
If you do not follow instructions, it could result in death or serious injury.

CAUTION
If you do not follow instructions, it could result in minor or moderate injury or damage to the product.
All safety messages will tell you what the potential hazard is, tell you how to reduce the chance of injury, and tell you what may happen if the instructions are not followed.
IMPORTANT SAFETY INSTRUCTIONS

WARNING
To reduce the risk of explosion, fire, death, electric shock, injury or scalding to persons when using this product, follow basic precautions, including the following:
Installation
- Before use, the appliance must be properly installed as described in this manual.
- Connect to a properly rated, protected, and sized power circuit to avoid electrical overload.
• Always plug into a grounded outlet. - Do not, under any circumstances, cut or remove the third (ground) prong from the power cord.
- When installing or moving the appliance, be careful not to pinch, crush, or damage the power cord.
- Do not modify or extend the power cord.
- Do not disassemble or modify the product.
- Adhere to all industry recommended safety procedures including the use of long-sleeved gloves and safety glasses.
- Use care when unpacking and installing. The edges of the product may be sharp.
- Disconnect the power cord or circuit breaker before installing or servicing the appliance.
- Keep packaging materials out of the reach of children. These materials can pose a suffocation risk to children.
- Store and install the product where it will not be exposed to temperatures below freezing or exposed to outdoor weather conditions.
- Do not store or use gasoline or other flammable vapors and liquids in the vicinity of this or any other appliance.
Operation
- Use this appliance only for its intended purpose.
- Never attempt to operate this appliance if it is damaged, malfunctioning, partially disassembled, or has missing or broken parts, including a damaged cord or plug.
- Repair or immediately replace all power cords that have become frayed or otherwise damaged. Do not use a cord that shows cracks or abrasion damage along its length or at either end.
- Do not run cord under carpets or mats where it could be stepped on and damaged.
- Keep the cord out from under heavy objects like tables or chairs.
- Do not place the power cord near a heat source.
- Do not use an adaptor or plug the product into a shared outlet.
- If you detect a strange sound, a chemical or burning smell, or smoke coming from the appliance, unplug it immediately, and contact an LG Electronics Customer Information Center.
- Never unplug the appliance by pulling on the power cord. Always grip the plug firmly and pull straight out from the outlet.
- Do not grasp the power cord or touch the appliance controls with wet hands.
- If water enters the product, turn off the power at the main circuit, then unplug the product and call for service.
- If the product has been submerged, contact an LG Electronics Customer Information Center for instructions before resuming use.
- Unplug the product when unused for long periods.
- Unplug the product before cleaning.
- In the event of a gas leak (propane gas, etc.) do not operate this or any other appliance. Open a window or door to ventilate the area immediately.
- This appliance is not intended for use by persons (including children) with reduced physical, sensory or mental capabilities, or lack of experience and knowledge, unless they have been given supervision or instruction concerning the use of the appliance by a person responsible for their safety.
- Do not tamper with controls.
- The interior of the product must only be cleaned by an authorized service center or a dealer.
- Do not use solvent-based detergent on the product. Doing so can cause corrosion or damage, product failure, electrical shock, or fire.
California Safe Drinking Water and Toxic Enforcement Act
This product contains chemicals known to the State of California to cause cancer and birth defects or other reproductive harm. Wash hands after handling.
SAFETY INSTRUCTIONS
CAUTION
To reduce the risk of minor injury to persons, malfunction, or damage to the product or property when using this product, follow basic precautions, including the following:
Operation
- This appliance is not intended for use as a precision refrigeration system. Do not use it for special purposes such as maintaining pets, food, precision machinery, or art objects.
- Make sure the air inlet and outlet are free from obstructions.
- Use a soft cloth to clean the appliance. Do not use waxes, thinners, or harsh detergents.
- Do not step on or place heavy objects on top of the appliance.
- Do not operate the appliance without the filter securely installed.
- Clean the filter every two weeks.
- Do not drink water drained from the appliance.
- If the batteries leak onto your clothes or skin, remove contaminated clothing and rinse skin thoroughly with soap and water. Do not use the remote if the battery has leaked.
- If the battery or the liquid inside it are ingested, do not induce vomiting or give food or drink. Contact a physician immediately.
ELECTRICAL SAFETY
WARNING
Electric Shock Hazard
Failure to follow these instructions can result in death, fire, or electrical shock.
• This unit must be properly grounded.
- Do not, under any circumstances, cut or remove the ground prong.
- If you do not have a properly grounded outlet, or if there is any doubt that the outlet is properly grounded, a qualified electrician should check the outlet and circuit, and, if necessary, install a properly grounded outlet.
- This air conditioner must be plugged into a grounded 60 Hz, 120 VAC outlet protected by a 15 amp time delay fuse or circuit breaker.
- This air conditioner must be installed in accordance with national wiring codes.
- Do not alter or modify the plug or cord of this air conditioner. If the power cord becomes worn or damaged, the cord should only be replaced by a qualified service technician using genuine replacement parts.
- Do not use an extension cord.
- Do not use an adapter with this appliance.
INTEGRATED CIRCUIT BREAKER
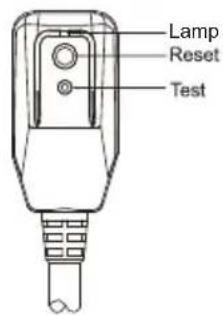
For additional safety, the power cord features an integrated circuit breaker. Test and reset buttons are provided on the plug case.
The circuit breaker should be tested periodically by pressing the TEST
button then the RESET button. If the TEST button does not cause the circuit breaker to trip, or if the RESET button will not stay engaged, unplug the air conditioner immediately and contact your LG service technician.
SAVE THESE INSTRUCTIONS
KEY PARTS AND COMPONENTS
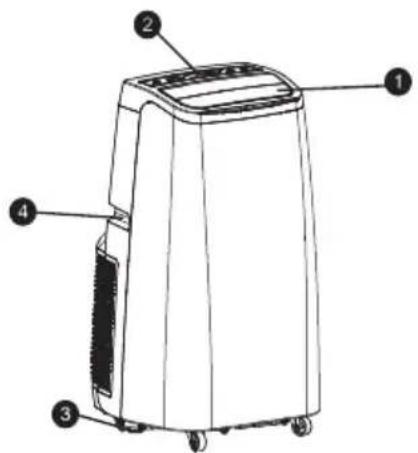
① AIR DISCHARGE
The adjustable louvered air discharge opens automatically when the air conditioner is turned on, and closes when it is turned off. It can also be set to oscillate to distribute air more evenly through the room.
2 CONTROL PANEL AND DISPLAY
Easy-to-read digital display shows the set temperature, and indicator lights show the operating mode. Simple push buttons make changing settings quick and easy.
3 SWIVELING CASTERS
Swiveling casters allow you to move the air conditioner easily on most floor surfaces.
4 INTEGRATED HANDLES
Integrated handles provide a convenient grip when lifting the air conditioner.
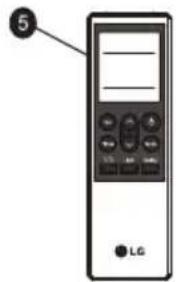
5 INFRARED REMOTE CONTROLLER
The remote controller allows you to adjust the temperature and operate most functions of the air conditioner from across the room.
6 BOTTOM DRAIN PORT
Before moving the air conditioner, drain the internal water in the collection tank completely using the bottom drain port.
7 AIR FILTER
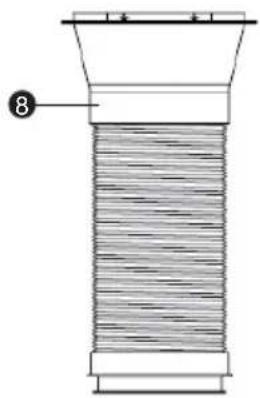
8 HOSE AND DIFFUSER
Use the diffuser and hose to connect the air conditioner to the window installation kit to vent exhaust air outside.
natural_image
Technical line drawing of a mechanical component with no visible text or symbols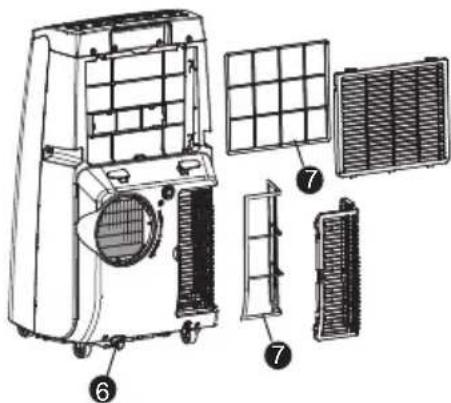
BEFORE USING THE AIR CONDITIONER
PREPARING FOR OPERATION
Refer to the Installation Instructions included in this manual before using the air conditioner. Once the air conditioner has been properly assembled and installed:
1 Plug the power cord into its own dedicated properly grounded outlet. Do not plug other appliances into the same outlet. Doing so could overload the outlet and create a fire hazard.
2 Make sure the air conditioner and cord are positioned where they do not create a tripping hazard and will receive adequate ventilation. Do not place the appliance near furniture or objects that could block the vent openings.
3 Make sure that any items that could be blown over or damaged by the airflow from the fan are out of the airflow path.
IMPORTANT:
- Do not remain in the direct airflow from the air conditioner for extended periods of time.
- When used at the same time as stoves, fireplaces, and other combustion devices, make sure there is a sufficient flow of fresh air into the room. Do not use in tightly enclosed spaces with these types of devices.
- This air conditioner is intended for household use as a consumer comfort appliance. Do not use it as a precision climate control system, or for purposes such as cooling precision equipment, food, pets, plants, artwork, etc. Such items could be damaged.
- Do not bend the hose downward when window installation kit is not applied. It may cause failure of air conditioner or performance deterioration.
UNPACKING THE AIR CONDITIONER
Remove and store packing materials for reuse. Remove any shipping tape before using the air conditioner. If the tape leaves behind any adhesive, rub a small amount of liquid dish soap onto it and wipe with a damp cloth. Do NOT use sharp instruments, alcohol, thinners, or abrasive cleaners to remove adhesive. They could damage the finish.
BEFORE USING THE AIR CONDITIONER
INSERTING BATTERIES IN THE REMOTE
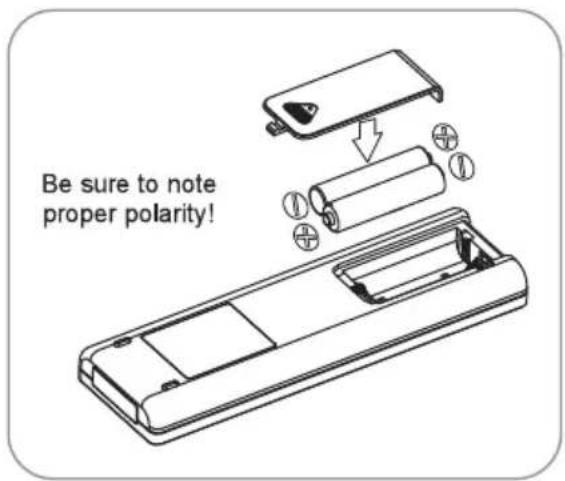
Before using the remote, install the provided AAA batteries.
1 Press and slide to remove the battery cover on the back of the remote.
2 Insert two new alkaline AAA batteries into the battery compartment, being sure to note the proper polarity.
3 Reattach the battery cover.
NOTE :
- Use only alkaline batteries. Do not use rechargeable batteries.
- When replacing batteries, always replace both batteries with new batteries. Do not mix old and new batteries. Do not mix alkaline, standard (carbon-zinc), or rechargeable (ni-cad, ni-mh, etc) batteries.
- If the air conditioner will not be used for an extended period of time, remove the batteries from the remote.
REMOTE STORAGE
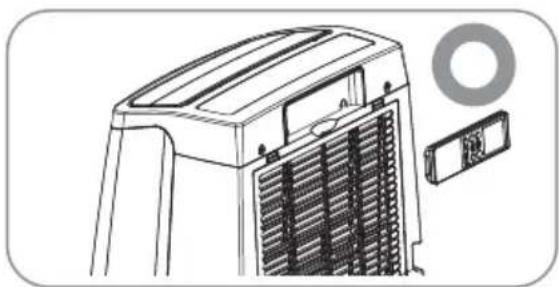
The air conditioner is designed with a convenient storage compartment for the remote.
NOTE:
When not in use, store the remote in the storage compartment with the buttons facing out.
natural_image
Technical line drawing of a car air conditioner unit with cooling fins and a circular component (no text or symbols)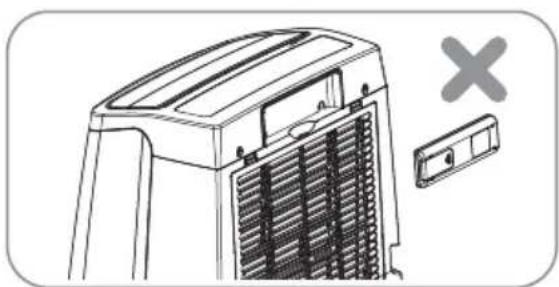
natural_image
Line drawing of a car air conditioner unit with ventilation grilles and a warning symbol (no text or labels)WARNING
- If the batteries leak onto your clothes or skin, remove contaminated clothing and rinse skin thoroughly with soap and water. Do not use the remote if the battery has leaked.
- If the battery or the liquid inside it are ingested, do not induce vomiting or give food or drink. Contact a physician immediately.
CONTROL PANEL AND REMOTE
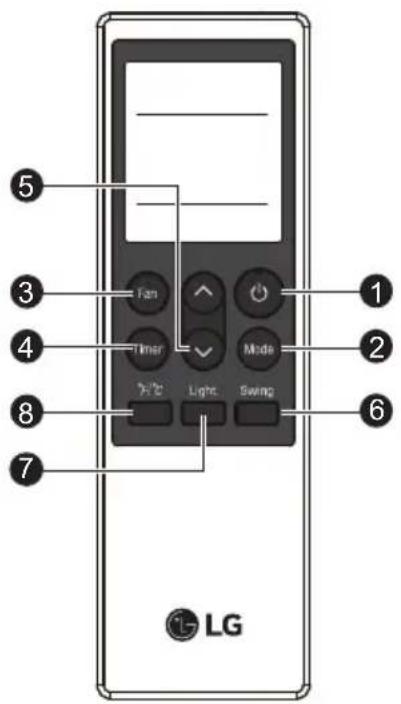
Operation of functions is the same when using the remote or the control panel, unless otherwise stated.
The remote and the control panel are not in sync.
For best results when using the remote, remember to check that all desired settings are correct on the remote as well as on the control panel.
NOTE:
The remote sensor is located on the front panel of the air conditioner. Point the remote from anywhere at the sensor.
The remote may not work if the sensor is in bright light or if there is not a clear path between the remote and the sensor.
Some functions may not be supported, depending on the model.
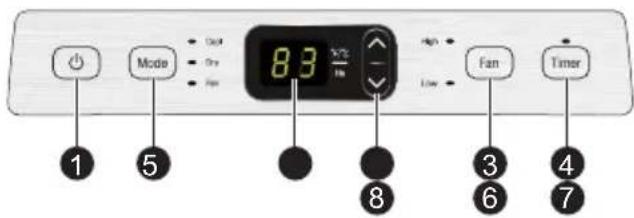
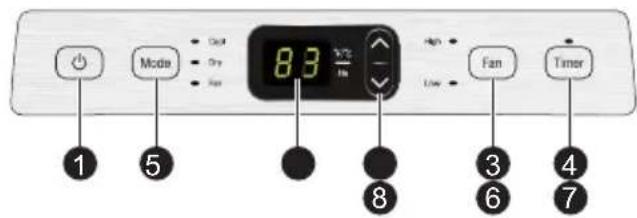
1 POWER
Turns the air conditioner on and off. A chime sounds to confirm you have turned it on or off.
2 MODE
Press this button repeatedly to toggle through and select the operating mode. Modes include Cool, Dry (dehumidify), and Fan. An LED illuminates to indicate the selected mode. The default mode is Cool. See the Operation section for more information.
3 FAN
Press repeatedly to toggle the fan speed between High and Low settings. An LED illuminates to indicate the selected fan speed. The fan speed can be changed in the Cool, and Fan modes. The fan speed is preset in the Dry mode. After pressing the button, there is a brief delay before the fan motor changes speed.
4 TIMER
Use the timer function to set the air conditioner to turn on or off at a desired time. See the Operation section for more information.
CONTROL PANEL AND REMOTE
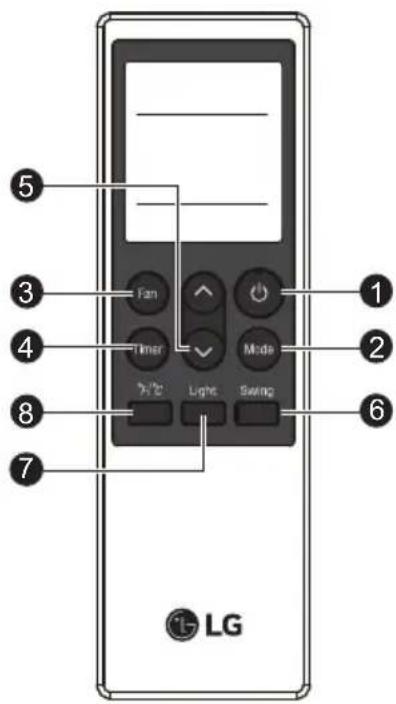
5 ▲ / ▼ (TEMP/TIMER)
In COOL mode, the / buttons adjust the set temperature up to 86^ or down to 60^ , in one-degree increments. When the TIMER function is selected, use the / buttons to adjust the delay time from 0 to 24 hours, in one-hour increments.
NOTE : In COOL mode, the thermostat in the air conditioner runs the compressor until the set temperature is reached, then cycles the compressor on and off to maintain the set temperature.
6 SWING
Sets the air discharge louvers to open and shut, circulating the air more effectively through the room. If the louvers do not move properly, unplug and plug in the power cord.
NOTE : Press and hold the Fan button on the control panel for 3 seconds to set Swing.
7 LIGHT
Turn on/off the Display screen.
NOTE : Press and hold the Timer button on the control panel for 3 seconds to set Light.
8 °C/°F
Remotely change units between ^ C and ^ F
NOTE : To change units from the control panel, press and hold the ∧ and ∨ buttons at the same time.
9 LED DISPLAY
LED display shows the set temperature, fan speed, or the selected TIMER delay.
LEDs illuminate to indicate the active Mode, fan speed, and other settings. An FL error code displays when the water drain tank needs to be emptied.
OPERATION
MODES
COOL
Compressor runs and cools the room. Use the / and FAN buttons to set the desired temperature and fan speed. The desired temperature can be set from 60^ to 86^ ( 16^ to 30^ ) in one-degree increments.
FAN
Fan circulates air but compressor does not run. Use the FAN button to set the desired fan speed to either High or Low.
DRY
Use the Dry mode to remove humidity from the room without additional cooling. This mode adjusts the room temperature and the fan speed automatically to maintain the optimal level of humidity.
RESTARTING THE AIR CONDITIONER AUTOMATICALLY
When the air conditioner is turned on again after a power failure, this function restores the previous Settings.
TIMER
Use the Timer function to turn the air conditioner ON/OFF automatically.
Setting the Air Conditioner to Turn ON
- Plug in the air conditioner and power it ON.
- Set the desired mode, temperature, fan speed, etc.
- Power OFF the air conditioner.
- Press Timer and use the ∧/∨ buttons to set the desired delay time until the air conditioner turns ON. The delay time can be set from 0 to 24 hours in one-hour increments.
- The Timer LED on the air conditioner illuminates, and the delay time appears on the remote and in the control panel.
- To cancel the Timer function, press Timer twice.
Setting the Air Conditioner to Turn OFF
- Plug in the air conditioner and power it ON.
- Set the desired mode, temperature, fan speed, etc.
- Press Timer and use the ∧/∨ buttons to set the desired delay time until the air conditioner turns OFF. The delay time can be set from 0 to 24 hours in one-hour increments.
- The Timer LED on the air conditioner illuminates, and the delay time appears on the remote. The delay time appears briefly in the control panel and is then replaced by the set temperature.
- To cancel the Timer function, press Timer twice.
NOTE: To check the remaining time, press Timer.
PREPARING FOR INSTALLATION
WARNING
The air conditioner is heavy! Use two or more people to lure to do so could result in back injury or other injuries.
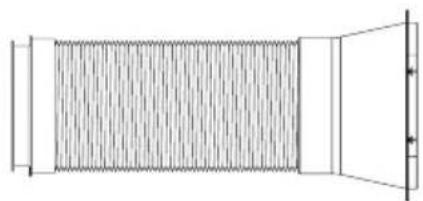
EXHAUST COMPONENTS
The following components are used for window venting. Not all components are used for every installation.
natural_image
Pure diagram of a rectangular structure with vertical divisions and an open top, no text or symbols present.Flexible Vent Hose DiffuserMounting
Bracket
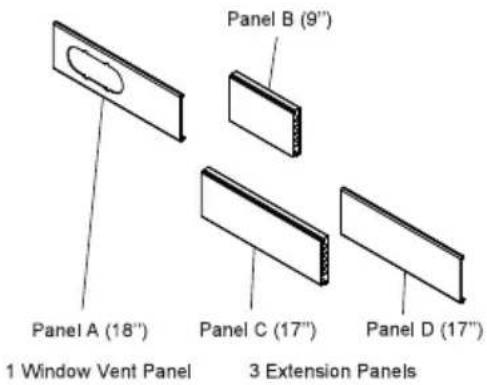
Window Installation Kit (includes 1 Window Vent Panel and 3 Extension Panels)
natural_image
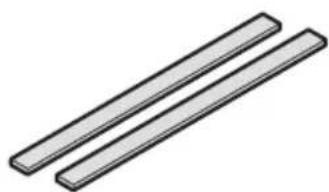
Two parallel gray bars with no text or symbols2 Type A Foam Seals (Adhesive)
natural_image
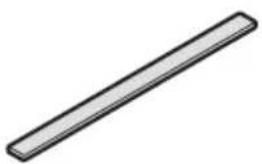
Simple 3D illustration of a diagonal line with no text or symbols1 Type B Foam Seal (Non-adhesive)
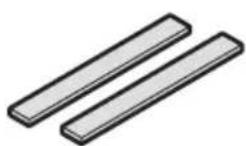
2 Type C Foam Seals (Adhesive type-Shorter)
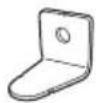
Security Bracket
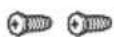
2 Type A Screws

1 Type B Screw

1 Type C Screw
INSTALLATION INSTRUCTIONS
SELECTION OF INSTALLATION LOCATION
1 Place the unit on a level floor.
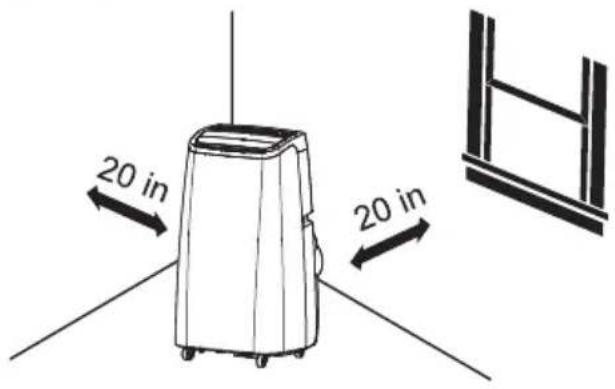
2 For best performance, allow at least 20 in of air space on all sides of the unit for good air circulation.
3 Place the unit near a window. The hose and diffuser will be used to connect the air conditioner to the window installation kit to vent exhaust air outside.
WARNING
The length of the exhaust hose is specially designed according to the specification of this product. Do not replace or extend it with your own private hose as this could cause malfunction.
ATTACHING THE HOSE AND DIFFUSER
Assembling the Mounting Bracket, Diffuser, and Vent Hose
- Use a pliers to extend the first four or five accordioned folds at both ends of the vent hose.
- To attach the mounting bracket to one end of the vent hose, insert the extended folds on one side of the vent hose between the ridges inside one side of the mounting bracket.
- Use a pliers to pull the folds on the opposite side of the vent hose up and between the ridges inside the opposite side of the mounting bracket.
- Tug the mounting bracket to make sure it is securely attached to the vent hose.
- To attach the diffuser to the other end of the vent hose, use a Phillips screwdriver to remove the four screws holding the grill on the end of the diffuser. Set the grill and screws aside.
- Insert the vent hose in the round end of the diffuser in the same manner as assembling the hose to the mounting bracket. (See steps 2 and 3.)
- Tug the diffuser to make sure it is securely attached to the vent hose.
- Reattach the grill on the diffuser, using the four screws removed in step 5.
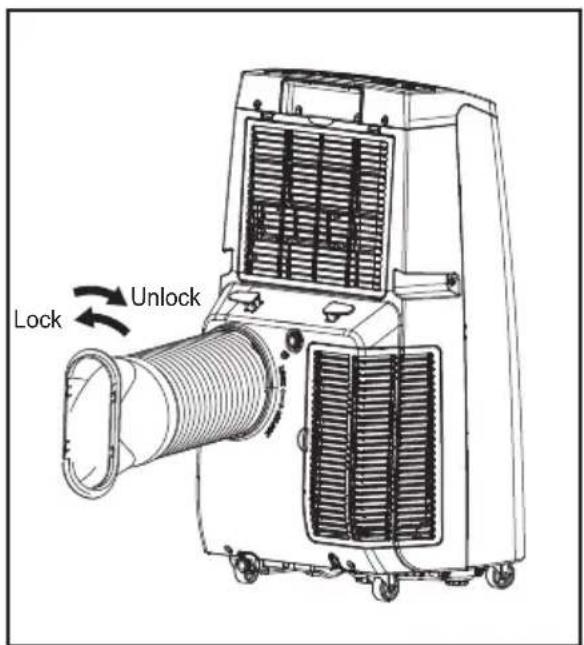
Attach the hose assembly onto the back of the air conditioner by inserting the edges of the mounting bracket behind the tabs at the top and bottom and sliding the mounting bracket to the left until it snaps into place.
WINDOW VENT PANEL AND EXTENSIONS
The window installation kit allows you to install the air conditioner in most vertical-sliding windows 18" to 50" wide, or horizontal-sliding windows from 18" to 50" high.
| Window opening\Panel | A18" | B9" | C17" | D17" | Fig. |
| 18" | √ | a | |||
| 19"-26" | √ | √ | b | ||
| 27"-34" | √ | √ | c | ||
| 35"-50" | √ | √ | √ | d |
- Select the panels required based on the window opening, as shown above.
- If the installation requires 2 or 3 panels, assemble the panels to the proper length and fix them in place with 1 type A screw.
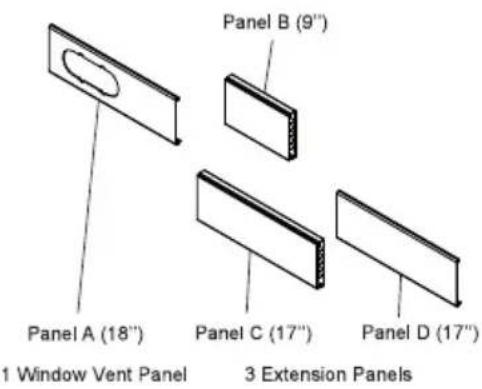
Window Installation Kit (includes 1 Window Vent Panel and 3 Extension Panels)
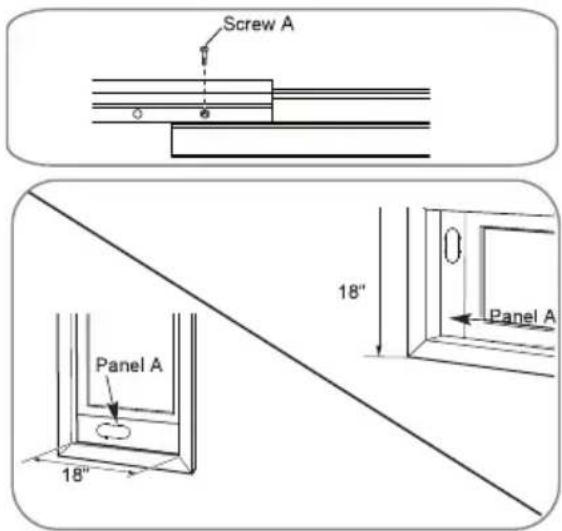
For an 18" window opening, use the window vent panel by itself.
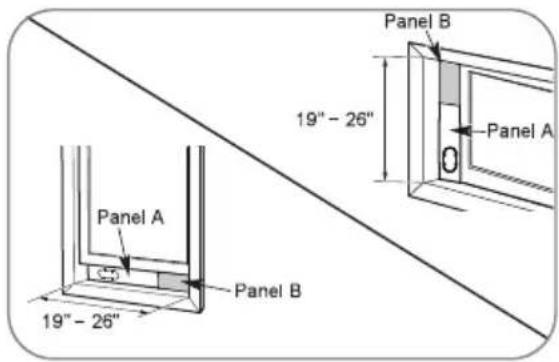
For window openings from 19" to 26", use the window vent panel (Panel A) and an extension panel (Panel B).
Fig. a Fig. b
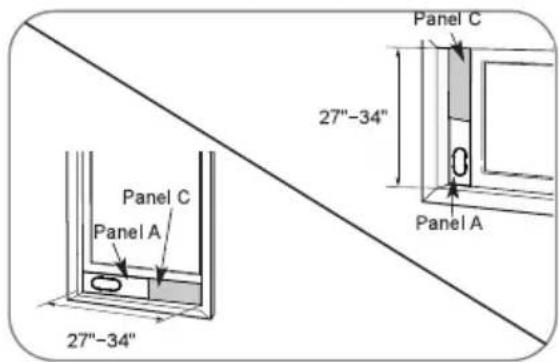
For window openings from 27" to 34", use the window vent panel (Panel A) and an extension panel (Panel C).
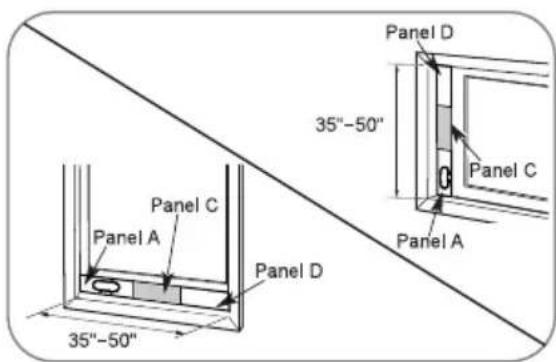
For window openings from 35" to 50", use the window vent panel and two extension panels (Panel C and Panel D)
Fig. c Fig. d
INSTALLATION INSTRUCTIONS
INSTALLATION IN VERTICAL-SLIDING WINDOWS
NOTE : The window installation kit can be used with vertical-sliding windows between 18" and 50" wide.
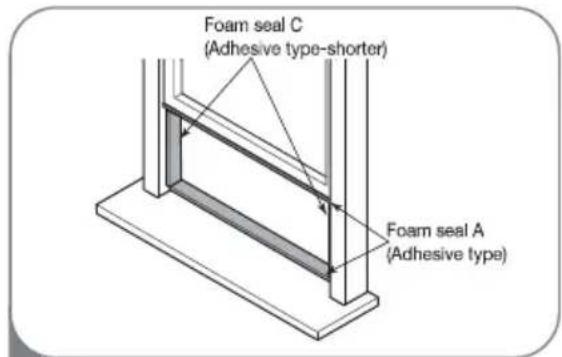
1 Cut the foam seal A (adhesive type) & C (adhesive type-shorter) to the proper length, and attach them to the window sash and frame.
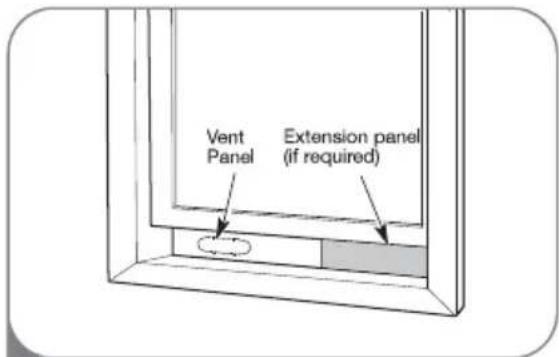
2 Insert the vent panel assembly, including extension panels, if needed, into the opening. Extend the extension panels, if used.
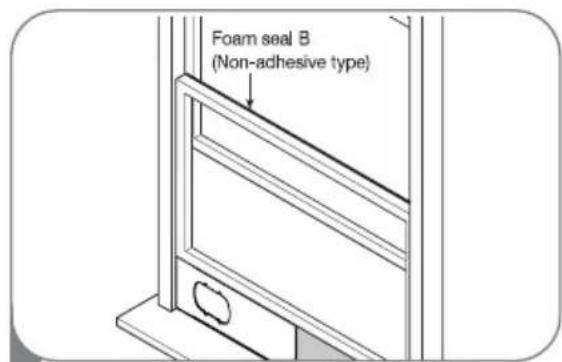
3 Cut the foam seal B (Non-adhesive type) to the window width. Stuff the foam seal B between the glass and the window to prevent air and insects from getting into the room.
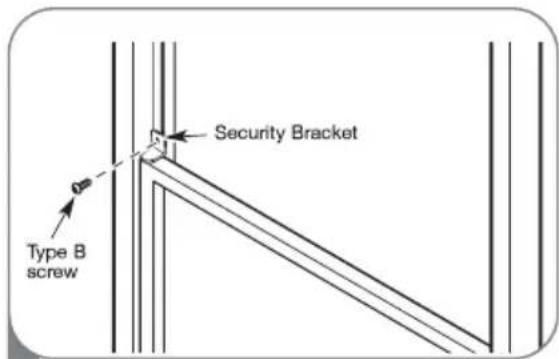
4 Install the security bracket with a type B screw as shown, it desired.
INSTALLATION IN VERTICAL-SLIDING WINDOWS
natural_image
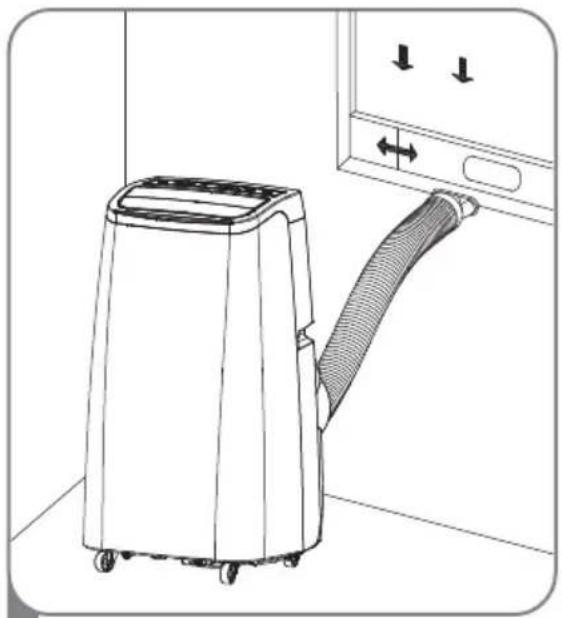
Line drawing of a portable air conditioner unit with a hose attached, showing airflow direction (no text or symbols)5 Insert the diffuser into the opening in the vent panel and slide it to lock it into place.
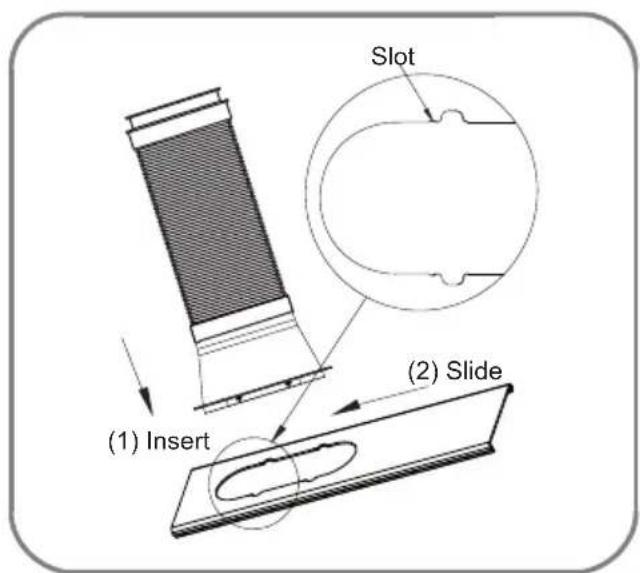
Align the tabs on the diffuser with the slots in the vent panel. Insert the diffuser into the opening in the vent panel and slide the diffuser to lock the tabs in place.
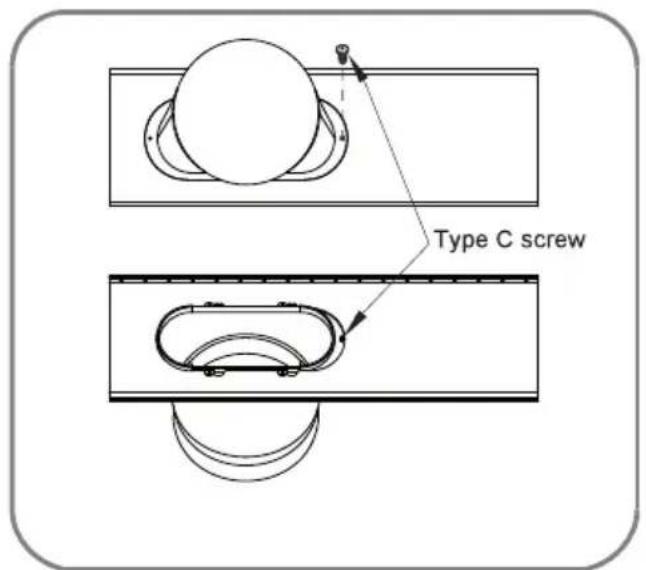
Insert the type C screw in the hole in the diffuser to prevent the diffuser from sliding out of the vent opening.
INSTALLATION INSTRUCTIONS
INSTALLATION IN HORIZONTAL-SLIDING WINDOWS
NOTE : The window installation kit can be used with horizontal-sliding windows between 18" and 50" tall.
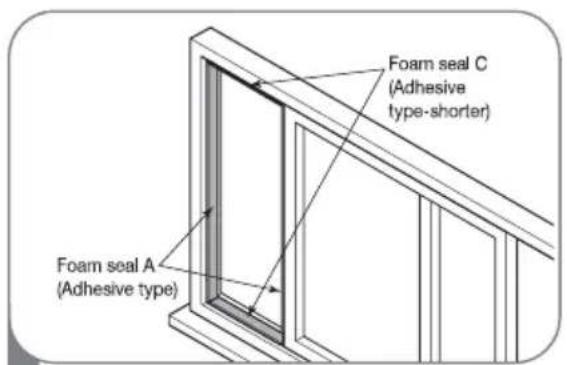
1 Cut the foam seal A (adhesive type) & C (adhesive type-shorter) to the proper length, and attach them to the window sash and frame.
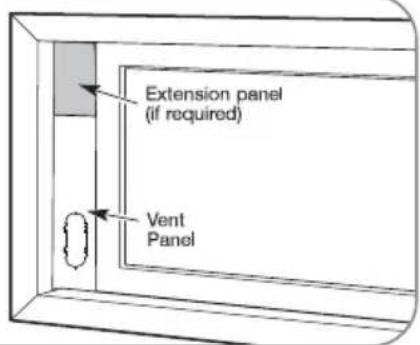
2 Insert the vent panel assembly, including extension panels, if needed, into the opening. Extend the extension panels, if used.
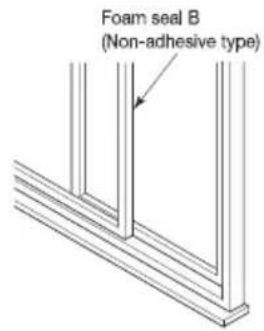
3 Cut the foam seal B (Non-adhesive type) to the window width. Stuff the foam seal B between the glass and the window to prevent air and insects from getting into the room.
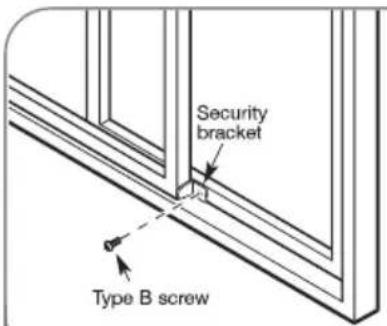
4 Install the security bracket with a type B screw as shown, it desired.
INSTALLATION IN HORIZONTAL-SLIDING WIDOWS
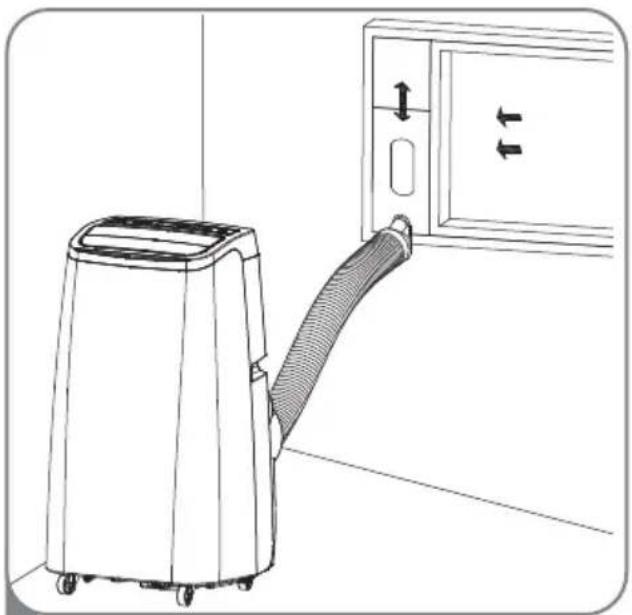
natural_image
Line drawing of a portable air conditioner next to a door with directional arrows indicating flow (no text or symbols)5 Insert the diffuser into the opening in the vent panel and slide it to lock it into place.
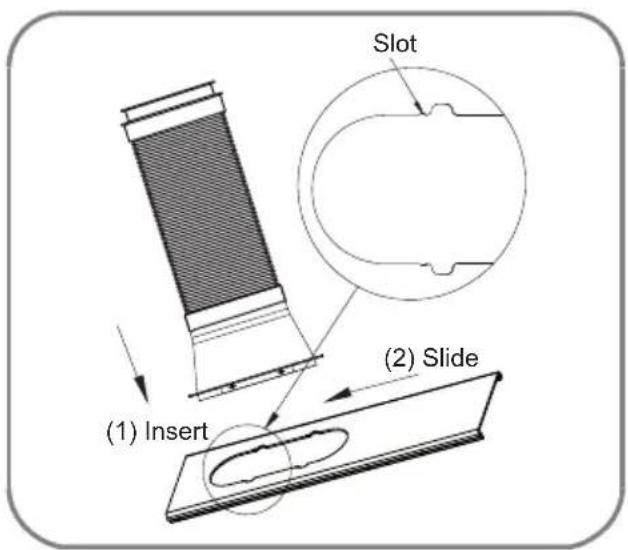
Align the tabs on the diffuser with the slots in the vent panel. Insert the diffuser into the opening in the vent panel and slide the diffuser to lock the tabs in place.
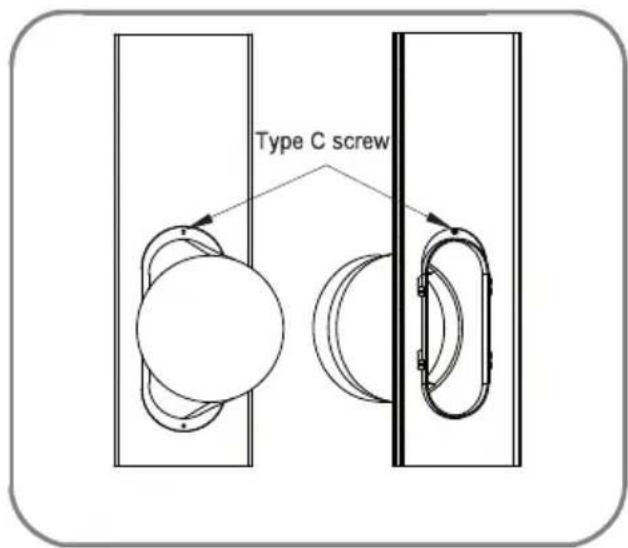
Insert the type C screw in the hole in the diffuser to prevent the diffuser from sliding out of the vent opening.
CARE AND CLEANING
Your air conditioner is designed for year-round operation with only minimal cleaning and maintenance.
For maximum efficiency, it is recommended that you have the cooling coils inspected and cleaned annually. Your local LG Authorized Service Center can provide this inspection and cleaning service for a nominal fee.
WARNING
- Unplug the air conditioner before cleaning or performing any maintenance or servicing.
- Be careful when cleaning coils or removing or reinstalling the filter—the cooling fins are sharp!
Failure to follow the above precautions could result in electric shock or personal injury.
EMPTYING THE WATER COLLECTION TANK
This product has a self-evaporative system. The condensing water will be recycled to cool the condenser. This not only improves saving efficiency, but also energy for you.
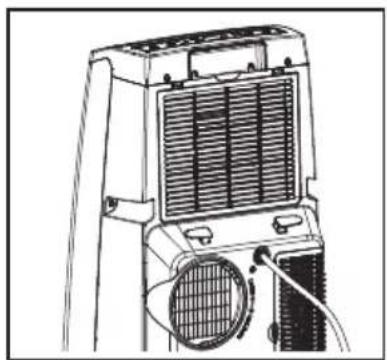
Using the Upper Drain Port (Dry Mode Only)
• This can be used when you need dehumidification in high humidity.
- The upper drain port is not used in the Cool or Fan mode.
- Remove the drain plug when using the Dry (dehumidifying) mode.
- Install a drain hose (12mm [1/2"] outer diameter) and place the open end of the hose over a drain or bucket or out the window.
natural_image
Line drawing of a portable air conditioner unit with ventilation grilles and cooling fans (no text or symbols)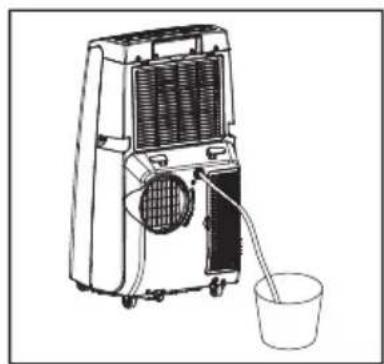
natural_image
Line drawing of an air conditioning device with a bucket and fan (no text or symbols)Using the Lower Drain Port
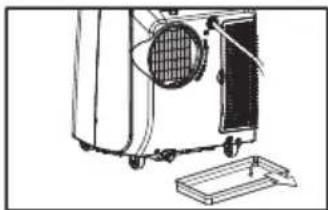
When the internal water collection tank is full, the LED display will show FL and the air conditioner will turn off until the tank is emptied.
- Unplug the air conditioner, disconnect the exhaust hose from the back, and move the air conditioner to a suitable drain location or outdoors. You may also place a pan under the drain that will hold up to 2 pints
of water.
- Remove the drain cap from the drain outlet.
- Once the water collection tank is drained, reinstall the drain cap, making sure it is on securely.
- Place the air conditioner in the desired location, reconnect the exhaust hose, and plug in the air conditioner.
natural_image
Line drawing of a refrigerator with wheels and a vent, no text or symbols presentNOTICE If the FL error appears in the display:
The water collection tank is full. Unplug the air conditioner, drain the tank, then plug the air conditioner back in and restart it.
NOTE: After the air conditioner is unplugged, it defaults to the Cool mode with a temperature setting of 72^ F ( 22^ C) once restarted.
CLEANING THE CASE
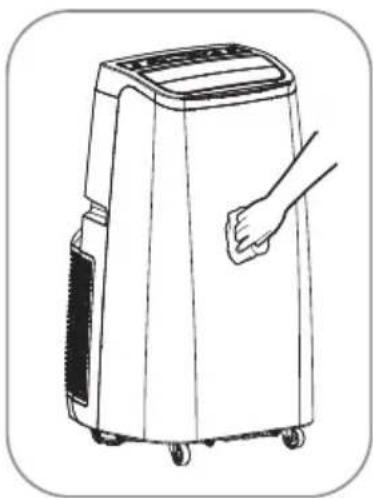
Wipe the case with a slightly damp cloth, then wipe dry with a dry cloth or towel.
• To prevent damage to the finish, do not use gasoline, benzene, thinner, etc., or any abrasive cleansers to clean the air conditioner; they may damage the finish.
- Never pour water onto or into the air conditioner. It could damage internal components and create a shock and fire hazard.
natural_image
Line drawing of a portable air conditioner with a hand touching the front panel (no text or symbols)CLEANING THE AIR FILTER
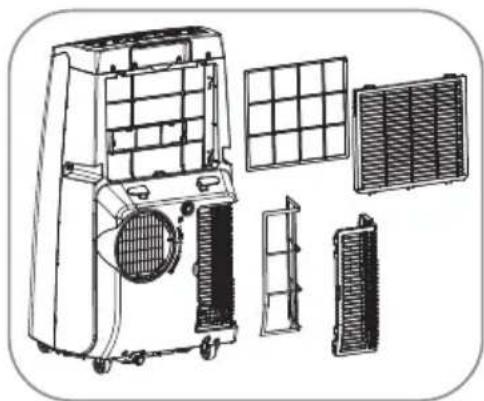
The air filters should be cleaned every two weeks; depending on indoor air quality, more frequent cleaning may be needed. A dirty air filter will decrease airflow and reduce efficiency.
Do not operate the air conditioner without the air filters in place.
① Pull out each air filter by the handle.
2 Use a vacuum cleaner to clean the filters. If the filters are heavily soiled, they can be washed in warm water using a mild detergent.
Do not use harsh cleaners or very hot water. Do not wash in a dishwasher.
3 Allow the filters to dry completely before reinstalling.
4 Reinsert the filters.
natural_image
Technical line drawing of an air conditioning unit with internal components (no text or symbols)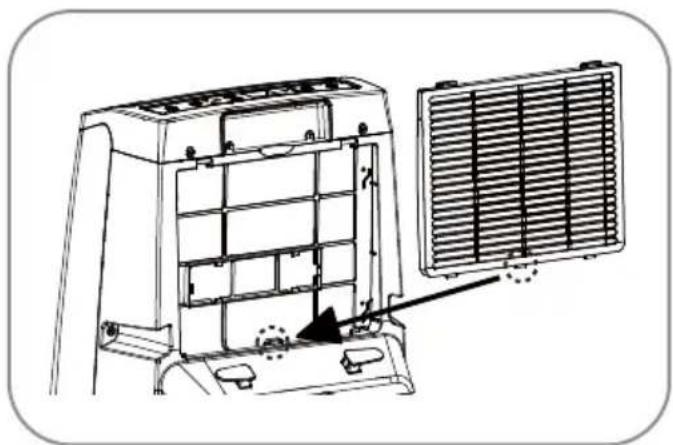
natural_image
Technical line drawing of a mechanical device with a side panel and heat sink, showing internal structure without any text or symbols.STORING THE AIR CONDITIONER
If the air conditioner will not be used for an extended period of time:
To drain the water collection tank completely, leave the bottom drain cap off long enough to allow any residual water to drain out. Once the tank is completely drained and no more water flows out, reinstall the cap.
2 Remove and clean the filters, allow them to dry completely, then reinstall them.
3 Remove the batteries from the remote.
4 Store the air conditioner in a cool, dry location, away from direct sunlight, extreme temperatures, and excessive dust.
Before using the air conditioner again:
1 Make sure the filters and drain cap are in place.
2 Check the power cord to make sure it is in good condition, with no cracks or damage.
3 Place new batteries in the remote.
4 Install the air conditioner as described in the Installation Instructions.
BEFORE CALLING FOR SERVICE
Before you call for service, review this list. It may save you time and expense. This list includes common occurrences that are not the result of a defect in workmanship or materials.
| Problem Possible causes | Corrective Action | |
| Air Conditioner does not start. | The air conditioner is unplugged. | Make sure the air conditioner plug is pushed completely into the outlet. |
| The fuse is blown/circuit breaker is tripped. | Check the house fuse/circuit breaker box and replace the fuse or reset the breaker. | |
| Power failure. | If power failure occurs, unplug the unit. When power is restored, wait 3 minutes to restart the air conditioner to prevent tripping of the compressor overload. | |
| The current interrupter device is tripped. | Press the RESET button located on the power cord plug. If the RESET button will not stay engaged, discontinue use of the air conditioner and contact a qualified service technician. | |
| FL appears in the display. | The water collection tank is full. Drain the tank and reset your settings. | |
| Room temperature is less than the set temperature. | This is normal. The air conditioner automatically shuts off when the room temperature equals or is less than the set temperature. Set the desired temperature to a level lower than the current temperature. | |
| Air Conditioner does not cool as it should. | Airflow is restricted. | Make sure there are no curtains, blinds, or furniture blocking the front of the air conditioner. |
| The temp control may not be set correctly. | Set the desired temperature to a level lower than the current temperature. | |
| The air filters are dirty. | Clean the filters at least every 2 weeks. See the Care and Cleaning section. | |
| The room may have been hot. | When the air conditioner is first turned on, you need to allow time for the room to cool down. | |
| Air Conditioner freezing up. | The cooling coils are iced over. | Ice may block the air flow and obstruct the air conditioner from properly cooling the room. Set the mode control at High Fan or High Cool. |
| Air Conditioner runs too often or too long. | Area to be cooled is too large for the air conditioner. | Consult your dealer for the air conditioner capacity necessary to cool the desired area. |
| Doors or windows are open. | Make sure doors and windows are closed. | |
| Noise when unit is cooling. | Air movement sound. This is normal. If too loud, set to lower Fan setting. | |
| Remote sensing deactivating prematurely. | Remote control not located within range. | Place remote control within 20 feet and 120^ radius of the front of unit. |
| Remote control signal obstructed. | Remove obstruction. | |
BEFORE CALLING FOR SERVICE
| Error Code | Corrective ActionPossible | |
| Code appears in the display. FL | Water tank is full. Drain water from the product through drain hole and reset settings. | |
| CH 01 CH 02 | Short/open circuit in thermistor. | Unplug the air conditioner and contact an authorized LG service center. |
LG PORTABLE AIR CONDITIONER LIMITED WARRANTY - USA
WHAT THIS WARRANTY COVERS:
LG Electronics U.S.A., Inc. ("LG") warrants your LG Portable Air Conditioner ("product") against defect in materials or workmanship under normal household use, during the warranty period set forth below, LG will, at its option, repair or replace the product. This limited warranty is valid only to the original retail purchaser of the product, is not assignable or transferrable to any subsequent purchaser or user, and applies only when the product is purchased through an LG authorized dealer or distributor and used within the United States ("U.S.") including U.S. Territories.
Note: Replacement products and repair parts may be new or factory-remanufactured and are warranted for the remaining portion of the original unit's warranty period or ninety (90) days, whichever is longer. Please retain dated receipt or delivery ticket as evidence of the Date of Purchase for proof of warranty (you may be required to submit a copy to LG or authorized representative).
WARRANTY PERIOD:
1 year from the Date of Purchase: Any internal/ functional Parts and Labor.
HOW SERVICE IS HANDLED: In-Home Service
In-home service will be provided during the warranty period subject to availability within the United States. In-home service may not be available in all areas. To receive in-home service, the product must be unobstructed and accessible to service personnel. If during in-home service repair cannot be completed, it may be necessary to remove, repair and return the product. If in-home service is unavailable, LG may elect, at our option, to provide for transportation of our choice to and from a LG authorized service center.
THIS LIMITED WARRANTY DOES NOT COVER:
- Service trips to deliver, pick up, or install the product or for instruction on product use.
- Replacing house fuses or resetting of circuit breakers, correction of house wiring or plumbing, or correction of product installation.
- Damage or failure caused by leaky/ broken/ frozen water pipes, restricted drain lines, inadequate or interrupted water supply or inadequate supply of air.
- Damage or failure caused by accidents, pests and vermin, lightning, wind, fire, floods or acts of God.
- Damage or failure resulting from misuse, abuse, improper installation, repair or maintenance. Improper repair includes use of parts not approved or specified by LG.
- Damage or failure caused by unauthorized modification or alteration to the product.
-
Damage or failure caused by incorrect electrical current, voltage, or plumbing codes.
-
Cosmetic damage, including scratches, dents, chips or other damage to the finish of the product, unless such damage results from defects in materials or workmanship and is reported to LG within seven (7) calendar days from the date of delivery.
- Damage or missing items to any display, open box, discounted, or refurbished product.
- Product where the original factory serial numbers have been removed, defaced or changed in any way.
- Repairs when product is used in other than normal and usual household use (e.g. rental, commercial use, offices, or recreational facilities) or contrary to the instructions outlined in the owner's manual.
- The removal and reinstallation of the Product if it is installed in an inaccessible location.
THIS WARRANTY IS IN LIEU OF ANY OTHER WARRANTY, EXPRESS OR IMPLIED, INCLUDING AND WITHOUT LIMITATION TO, ANY WARRANTY OF MERCHANTABILITY OR FITNESS FOR A PARTICULAR PURPOSE. TO THE EXTENT ANY IMPLIED WARRANTY IS REQUIRED BY LAW, THIS WARRANTY IS LIMITED IN DURATION TO THE TERM PERIOD EXPRESSED ABOVE. REPAIR OR REPLACEMENT AS PROVIDED UNDER THIS WARRANTY IS THE EXCLUSIVE REMEDY FOR THE CUSTOMER. NEITHER THE MANUFACTURER NOR ITS U.S. DISTRIBUTOR SHALL BE LIABLE FOR ANY INCIDENTAL, CONSEQUENTIAL, INDIRECT, SPECIAL, OR PUNITIVE DAMAGES OF ANY NATURE, INCLUDING AND WITHOUT LIMITATION TO, LOST REVENUES OR PROFITS, OR ANY OTHER DAMAGE, WHETHER BASED IN CONTRACT, TORT, OR OTHERWISE.
SOME STATES DO NOT ALLOW THE EXCLUSION OR LIMITATION OF INCIDENTAL OR CONSEQUENTIAL DAMAGES OR LIMITATIONS ON HOW LONG AN IMPLIED WARRANTY LASTS, SO THE ABOVE EXCLUSION OR LIMITATION MAY NOT APPLY TO YOU. THIS WARRANTY GIVES YOU SPECIFIC LEGAL RIGHTS AND YOU MAY ALSO HAVE OTHER RIGHTS THAT VARY FROM STATE TO STATE.
HOW TO OBTAIN WARRANTY SERVICE & ADDITIONAL INFORMATION:
Call 1-800-243-0000 or visit our website at www.lg.com.
Mail to: LG Customer Information Center (ATTN: CIC)
201 James Record Road, Huntsville, AL 35824
ARBITRATION NOTICE: THIS LIMITED WARRANTY CONTAINS AN ARBITRATION PROVISION THAT REQUIRES YOU AND LG TO RESOLVE DISPUTES BY BINDING ARBITRATION INSTEAD OF IN COURT, UNLESS YOU CHOOSE TO OPT OUT. IN ARBITRATION, CLASS ACTIONS AND JURY TRIALS ARE NOT PERMITTED. PLEASE SEE THE SECTION TITLED "PROCEDURE FOR RESOLVING DISPUTES" BELOW.
PROCEDURE FOR RESOLVING DISPUTES:
ALL DISPUTES BETWEEN YOU AND LG ARISING OUT OF OR RELATING IN ANY WAY TO THIS LIMITED WARRANTY OR THE PRODUCT SHALL BE RESOLVED EXCLUSIVELY THROUGH BINDING ARBITRATION, AND NOT IN A COURT OF GENERAL JURISDICTION. BINDING ARBITRATION MEANS THAT YOU AND LG ARE EACH WAIVING THE RIGHT TO A JURY TRIAL AND TO BRING OR PARTICIPATE IN A CLASS ACTION.
Definitions. For the purposes of this section, references to "LG" mean LG Electronics U.S.A., Inc., its parents, subsidiaries and affiliates, and each of their officers, directors, employees, agents, beneficiaries, predecessors in interest, successors, assigns and suppliers; references to "dispute" or "claim" shall include any dispute, claim or controversy of any kind whatsoever (whether based in contract, tort, statute, regulation, ordinance, fraud, misrepresentation or any other legal or equitable theory) arising out of or relating in any way to the sale, condition or performance of the product or this Limited Warranty.
Notice of Dispute. In the event you intend to commence an arbitration proceeding, you must first notify LG in writing at least 30 days in advance of initiating the arbitration by sending a letter to LG at LG Electronics, USA, Inc. Attn: Legal Department- Arbitration 1000 Sylvan Ave, Englewood Cliffs 07632. You and LG agree to engage in good faith discussions in an attempt to amicably resolve your claim. The notice must provide your name, address, and telephone number; identify the product that is the subject of the claim; and describe the nature of the claim and the relief being sought. If you and LG are unable to resolve the dispute within 30 days, either party may proceed to file a claim for arbitration.
Agreement to Binding Arbitration and Class Action Waiver. Upon failure to resolve the dispute during the 30 day period after sending written notice to LG, you and LG agree to resolve any claims between us only by binding arbitration on an individual basis, unless you opt out as provided below. Any dispute between you and LG shall not be combined or consolidated with a dispute involving any other person's or entity's product or claim. More specifically, without limitation of the foregoing, any dispute between you and LG shall not under any circumstances proceed as part of a class or representative action. Instead of arbitration, either party may bring an individual action in small claims court, but that small claims court action may not be brought on a class or representative basis.
Arbitration Rules and Procedures. To begin arbitration of a claim, either you or LG must make a written demand for arbitration. The arbitration will be administered by the American Arbitration Association ("AAA") and will be conducted before a single arbitrator under the AAA's Consumer Arbitration Rules that are in effect at the time the arbitration is initiated (referred to as the "AAA Rules") and under the procedures set forth in this section. The AAA Rules are available online at www.adr.org/consumer. Send a copy of your written demand for arbitration, as well as a copy of this provision, to the AAA in the manner described in the AAA Rules. You must also send a copy of your written demand to LG at LG Electronics, USA, Inc. Attn: Legal Department- Arbitration 1000 Sylvan Avenue Englewood Cliffs, NJ 07632. If there is a conflict between the AAA Rules and the rules set forth in this section, the rules set forth in this section will govern. This arbitration provision is governed by the Federal Arbitration Act. Judgment may be entered on the arbitrator's award in any court of competent jurisdiction. All issues are for the arbitrator to decide, except that issues relating to the scope and enforceability of the arbitration provision and to the arbitrability of the dispute are for the court to decide. The arbitrator is bound by the terms of this provision.
Governing Law. The law of the state of your residence shall govern this Limited Warranty and any disputes between us except to the extent that such law is preempted by or inconsistent with applicable federal law.
Fees/Costs. You do not need to pay any fee to begin an arbitration. Upon receipt of your written demand for arbitration, LG will promptly pay all arbitration filing fees to the AAA unless you seek more than \$25,000 in damages, in which case the payment of these fees will be governed by the AAA Rules. Except as otherwise provided for herein, LG will pay all AAA filing, administration and arbitrator fees for any arbitration initiated in accordance with the AAA Rules and this arbitration provision. If you prevail in the arbitration, LG will pay your attorneys' fees and expenses as long as they are reasonable, by considering factors including, but not limited to, the purchase amount and claim amount. Notwithstanding the foregoing, if applicable law allows for an award of reasonable attorneys' fees and expenses, an arbitrator can award them to the same extent that a court would. If the arbitrator finds either the substance of your claim or the relief sought in the demand is frivolous or brought for an improper purpose (as measured by the standards set forth in Federal Rule of Civil Procedure 11(b)), then the payment of all arbitration fees will be governed by the AAA Rules. In such a situation, you agree to reimburse LG for all monies previously disbursed by it that are otherwise your obligation to pay under the AAA Rules. Except as otherwise provided for, LG waives any rights it may have to seek attorneys' fees and expenses from you if LG prevails in the arbitration.
Hearings and Location. If your claim is for \25,000 or less, you may choose to have the arbitration conducted solely on the basis of (1) documents submitted to the arbitrator, (2) through a telephonic hearing, or (3) by an in-person hearing as established by the AAA Rules. If your claim exceeds \25,000, the right to a hearing will be determined by the AAA Rules. Any in-person arbitration hearings will be held at a location within the federal judicial district in which you reside unless we both agree to another location or we agree to a telephonic arbitration.
Opt Out. You may opt out of this dispute resolution procedure. If you opt out, neither you nor LG can require the other to participate in an arbitration proceeding. To opt out, you must send notice to LG no later than 30 calendar days from the date of the first consumer purchaser's purchase of the product by either: (i) sending an e-mail to optout@lge.com, with the subject line: "Arbitration Opt Out" or (ii) calling 1-800-980-2973. You must include in the opt out e-mail or provide by telephone: (a) your name and address; (b) the date on which the product was purchased; (c) the product model name or model number; and (d) the serial number (the serial number can be found (i) on the product; or (ii) online by accessing https://www.lg.com/us/support/repair-service/schedule-repair-continued and clicking on "Find My Model & Serial Number").
You may only opt out of the dispute resolution procedure in the manner described above (that is, by e-mail or telephone); no other form of notice will be effective to opt out of this dispute resolution procedure. Opting out of this dispute resolution procedure will not affect the coverage of the Limited Warranty in any way, and you will continue to enjoy the full benefits of the Limited Warranty. If you keep this product and do not opt out, then you accept all terms and conditions of the arbitration provision described above.
Memo

- TABLE OF CONTENTS
- SAFETY INSTRUCTIONS
- PARTS AND FEATURES
- HOW TO USE
- INSTALLATION INSTRUCTIONS
- CARE AND CLEANING
- TROUBLESHOOTING
- WARRANTY
- THANK YOU!
- READ ALL INSTRUCTIONS BEFORE USE
- Your safety and the safety of others are very important.
- WARNING
- CAUTION
- IMPORTANT SAFETY INSTRUCTIONS
- Installation
- Operation
- California Safe Drinking Water and Toxic Enforcement Act
- ELECTRICAL SAFETY
- Electric Shock Hazard
- SAVE THESE INSTRUCTIONS
- KEY PARTS AND COMPONENTS
- ① AIR DISCHARGE
- CONTROL PANEL AND DISPLAY
- SWIVELING CASTERS
- INTEGRATED HANDLES
- INFRARED REMOTE CONTROLLER
- BOTTOM DRAIN PORT
- AIR FILTER
- HOSE AND DIFFUSER
- BEFORE USING THE AIR CONDITIONER
- PREPARING FOR OPERATION
- IMPORTANT:
- UNPACKING THE AIR CONDITIONER
- INSERTING BATTERIES IN THE REMOTE
- NOTE :
- REMOTE STORAGE
- NOTE:
- CONTROL PANEL AND REMOTE
- POWER
- MODE
- FAN
- TIMER
- ▲ / ▼ (TEMP/TIMER)
- SWING
- LIGHT
- °C/°F
- LED DISPLAY
- MODES
- COOL
- FAN
- DRY
- RESTARTING THE AIR CONDITIONER AUTOMATICALLY
- TIMER
- Setting the Air Conditioner to Turn ON
- Setting the Air Conditioner to Turn OFF
- PREPARING FOR INSTALLATION
- EXHAUST COMPONENTS
- SELECTION OF INSTALLATION LOCATION
- ATTACHING THE HOSE AND DIFFUSER
- Assembling the Mounting Bracket, Diffuser, and Vent Hose
- WINDOW VENT PANEL AND EXTENSIONS
- INSTALLATION IN VERTICAL-SLIDING WINDOWS
- INSTALLATION IN HORIZONTAL-SLIDING WINDOWS
- INSTALLATION IN HORIZONTAL-SLIDING WIDOWS
- EMPTYING THE WATER COLLECTION TANK
- Using the Upper Drain Port (Dry Mode Only)
- Using the Lower Drain Port
- NOTICE If the FL error appears in the display:
- CLEANING THE CASE
- CLEANING THE AIR FILTER
- STORING THE AIR CONDITIONER
- BEFORE CALLING FOR SERVICE
- LG PORTABLE AIR CONDITIONER LIMITED WARRANTY - USA
- WHAT THIS WARRANTY COVERS:
- WARRANTY PERIOD:
- HOW SERVICE IS HANDLED: In-Home Service
- THIS LIMITED WARRANTY DOES NOT COVER:
- HOW TO OBTAIN WARRANTY SERVICE & ADDITIONAL INFORMATION:
- PROCEDURE FOR RESOLVING DISPUTES:
- Memo
Brand : LG
Model : LP1018WNR
Category : Air-conditioner