
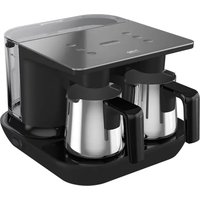
BKK 2700 - Coffee maker BEKO - Free user manual and instructions
Find the device manual for free BKK 2700 BEKO in PDF.


| Product Type | Turkish Coffee Machine |
| Brand | Beko |
| Model | BKK 2700 |
| Power Consumption | 2600 W total |
| Voltage / Frequency | 220-240 V~, 50-60 Hz |
| Induction Power | 3 x 800 W (2400 W) |
| Cup Heating Power | 90 W |
| Water Tank Capacity | Approx. 1.5 L (up to MAX level) |
| Maximum Cups per Batch | 9 cups (using 3 pots) |
| Coffee Type | Turkish coffee |
| Weight | 16 kg |
| IP Rating | IP X3 |
| Operating Temperature | 18-30°C |
| Noise Level | < 70 dB(A) |
| Safety Features | Residual current circuit breaker (30 mA), child safety, overheat protection, detection sensors |
| Cleaning | Weekly water system cleaning mode, wipe sensor glass, wash pots after each use |
| Included Accessories | 3 coffee pots, 1 coffee measure |
| Additional Technologies | SpinJet (automatic stirring), CookSensePro (professional brewing), Induction heating |
| Adjustable Feet | Yes |
| Cup Heating Surface | Yes (keeps cups at 40-45°C) |
| Water Supply | Manual fill or connection to demijohn/filtration system |
Frequently Asked Questions - BKK 2700 BEKO
User questions about BKK 2700 BEKO
0 question about this device. Answer the ones you know or ask your own.
Ask a new question about this device
Download the instructions for your Coffee maker in PDF format for free! Find your manual BKK 2700 - BEKO and take your electronic device back in hand. On this page are published all the documents necessary for the use of your device. BKK 2700 by BEKO.
USER MANUAL BKK 2700 BEKO
Keyf Professional Turkish Coffee Machine
User Manual

BKK 2700
EN - RU
CONTENT
1 Important safety and environmental instructions 6
1.1 General safety 6 1.2 Compliance with the WEEE Directive and disposal of the waste product....9 1.3 Compliance with RoHS Directive .....9 1.4 Package information 9
2 Use 10
2.1 Initial use 10 2.2 Filling the water tank 10 2.3 Connecting to a demijohn or water filtration system 11 2.3.1 Warnings 11 2.4 Coffee-making 11 2.4.1 Cancelling the coffee-making process .. 13 2.5 Amounts 13 2.6 Notifications 14
3 Fault notification 15
3.1 Notifications for errors arising from use .. 15 3.2 Notifications for appliance-related errors 15 3.3 Settings 16
4 Cleaning and care 17
4.1 Mode for cleaning the water system.....18
5 Technological features of the appliance 20
6 Before calling the service provider 20
Please read this user manual first!
These are the original instructions.
Dear Valued Customer,
Thank you for preferring this Beko appliance. We hope that you get the best results from your appliance which has been manufactured with high quality and state-of-the-art technology. Therefore, please read this entire user manual and all other accompanying documents carefully before using the appliance and keep it as a reference for future use. If you handover the appliance to someone else, give the user manual as well. Follow the instructions by paying attention to all the information and warnings in the user manual.
Remember that this user manual may also apply to other models. Differences between models are explicitly described in the manual.
Meanings of the Symbols
Following symbols are used in various sections of this manual:

Important information and useful hints about usage.

WARNING: Warnings against dangerous situations concerning the security of life and property.

Suitable for contact with food.

Do not immerse the appliance, the power cable, or the power plug in water or any other liquid.

Warning for electric shock.

Non-ionising electromagnetic radiation.

This appliance has been manufactured in environmental friendly modern plants without giving any harm to the nature.
Complies with the WEEE regulation. It does not contain PCB.

The values declared on the markings affixed to your appliance or in the other printed documents supplied with it represent the values obtained in laboratories pursuant to the relevant standards. These values may vary depending on the usage of the appliance and ambient conditions.
- Cup holder
- Cup heating system
- Water tank cover
- Water tank
- MAX level
- Coffee-making surface
- Adjustable foot
- Coffee measure
- Pot (x3)
- Error indicator light
- Water indicator light
- On/off and cup heating button
- Cup selection button (I-II-III)
Technical data
Power:
Total power: 2600 W
Voltage: 220-240 V~, 50-60 Hz
Induction power: 3 x 800W = 2400W
Induction operating frequency: 20 KHz
Degree of protection against
liquids: IP X3
Cup heating power: 90 W
Rated water inlet pressure:
Max: 4 bars - (0.4 MPa)
Min: 0.5 bars - (0.05 MPa)
Product weight: 16 kg
Technical and design modification rights are reserved.
1 Important safety and environmental instructions
This section contains safety instructions that will help protect from risk of personal injury or material damage.
Failure to follow these instructions voids any granted warranty.
1.1 General safety
- This appliance complies with the international safety standards.
- The product is used for commercial purposes.
- It is designed to be used by trained personnel indoors in the kitchens of commercial buildings such as cafés, hotels and motels.
- This product cannot be used by children, persons with reduced physical, sensory or mental abilities, or by persons who lack experience and knowledge.
- At the area where the product is used, children and persons with limited physical, sensory or mental abilities must be observed to ensure that they do not play with the product.
- Never attempt to dismantle or separate the mounted parts of the appliance.
- Only use the original parts or parts recommended by the manufacturer.
- Always place the product horizontally on a dry, non-skid, clean and flat surface. Make sure that there is at least 30 mm between the product and the walls/other appliances.
- Place the product only at locations that are found suitable by the authorised service personnel and where it can be seen/ergonomically used by the trained personnel.
- Make sure that no liquid is contacting the product at any side (bottom, top or both sides).
- Do not spray water or other liquids to clean the product.
- Do not put any other substances (milk etc.) into the water tank other than water.
- Never put hot water into the water tank.
- For hygienic and clean use, do not forget to apply the cleaning procedures given in the Cleaning and Care instructions once a week.
1 Important safety and environmental instructions
- The appliance is designed to operate at 18-30°C and 60% relative humidity. Make sure that the water in the appliance is within this range. If the water has frozen, wait for it to melt before using the appliance.
- Due to the manufacturing technology, steam and odour may arise in the heating element of the appliance during the initial use. This is normal for your appliance. It will return to normal after being used for a few times.
- The pot and the lower coffee-making surface it is placed get hot during use. For this reason, do not contact the coffee-making surface or the pot during and after use (until it cools down). Avoid contacting hot surfaces and hold the pot only by handle.
- Since the coffee-making surface of the product will be hot, do not leave objects made of plastic materials or other materials such as aluminium foil, and do not use this surface as a storage area.
- Before moving the product, make sure that it is unplugged.
- For additional protection, this product should be connected to a residual current circuit breaker of 30 mA maximum.
- Connect the appliance to a grounded outlet protected by a 16 ampere fuse.
- Do not use the appliance if the power cable or the appliance itself is damaged, contact authorised service provider. Repair and maintenance works of the appliance must be carried out by trained and authorised service providers only.
- Do not use the appliance with an extension cable.
- Water tank of the appliance is designed to be filled manually or to be connected to a water filtration system/demijohn by the service provider. Never connect it to the water mains.
- Do not expose or immerse the appliance in water or other liquids.
- Never touch the appliance or its plug with damp or wet hands.
- Prevent damage to the power cable by not squeezing, bending, or rubbing it on sharp edges. Keep the power cable away from hot surfaces and naked flame.
1 Important safety and environmental instructions
- Make sure that there is no danger that the power cable could be accidentally pulled or that someone could trip over it when the appliance is in use.
- Unplug the appliance before cleaning it and never clean it when it is in use. (Except for quick or intense cleaning).
- Weighted sound pressure level A is below 70 dB.
- Do not pull the power cable of the appliance to unplug the appliance from the outlet.
- Your mains power supply should comply with the information given on the rating plate of the appliance.
- Do not use the appliance in or near places where combustible or inflammable places or materials are present.
- Do not use the appliance next or close to heat resources (hob, grill, heater core, stove etc.).
- Keep the appliance away from steam resources and avoid using it in environments containing excessive steam.
- Do not use the pot on any other heater (such as a hob).
- WARNING: If there is a crack, breakage etc. on the coffee-making surface, immediately disconnect the product from the mains and do not use it.
- Only use the pot provided with the appliance; never make coffee with any other container.
- Do not leave metal objects (such as cutlery) on hot surfaces in the coffee-making areas since these objects get hot.
- Objects such as wristwatches, rings and spoons may get hot when they are close to hot surfaces. For this reason, make sure that they are away from the coffee-making surface when using the appliance.
- Do not use the appliance for any other purpose than preparing coffee and heating cups.
- Cleaning and user maintenance works must only be carried out by trained personnel.
- If you keep the package material, keep it away from children.
- To prevent possible dangers that might result from uncontrolled operation of the heater, the appliance must not be supplied through an external switching
1 Important safety and environmental instructions
system (such as a timer) or connected to a circuit that is regularly switched off/on via an auxiliary program.
- Make sure the appliance is kept in a place out of the reach of children.
- If you are using a pace maker, consult the manufacturer before using the appliance.
- If there is damage (crack, breakage etc.) on the coffee-making surface, immediately disconnect the product from the mains and do not use it.
- Only use the pot provided with the appliance.
- The appliance is equipped with technologic protection systems against any possible extraordinary situations on the induction heating surfaces; however, to avoid any possible danger, take out the pot after every coffee-making process and make sure that it is not seated on the locking mechanism until the next time you make coffee.
- Warning: Fit the pot in place only when you start the coffee-making process.
- If you are not using the product for a long time (e.g. at the weekend), switch it off and unplug.
1.2 Compliance with the WEEE Directive and disposal of the waste product
This product does not include harmful or prohibited materials specified in the "Regulation for Supervision of the Waste Electric and Electronic Appliances" issued by the Ministry of Environment and Urbanisation.

This symbol indicates that this product shall not be disposed with other household wastes at the end of its service life. Used device must be returned to official collection point for recycling of electrical and electronic devices. To find these collection systems please contact to your local authorities or retailer where the product was purchased. Each household performs important role in recovering and recycling of old appliance. Appropriate disposal of used appliance helps prevent potential negative consequences for the environment and human health.
1.3 Compliance with RoHS Directive
The product you have purchased complies with EU RoHS Directive (2011/65/EU). It does not contain harmful and prohibited materials specified in the Directive.
1.4 Package information

Package of the product is made of recyclable materials in accordance with our national legislation. Do not dispose the package waste with the domestic wastes or other types of wastes, take them to the collection points which are recommended by the local authorities.
2 Use
2.1 Initial use
Place the appliance vertically on a stable, flat, clean, dry and non-skidding surface.

WARNING: For wall-leaning use, keep a minimum of 30 mm distance between the appliance and the wall.

WARNING: Do not grab the cup holder when unpacking or carrying the appliance.

WARNING: Clean the appliance before first use. For cleaning instructions, see "Cleaning and care".
You can adjust the adjustable feet with screw to the desired height.
You can fill the appliance with water in 2 ways. You can open the cover of the water tank and fill it manually, or have the authorised service provider connect it to a demijohn/water filtration system.

WARNING: Do not connect the appliance directly to the mains supply.
2.2 Filling the water tank

Slightly press on the water tank cover (3) to open it and fill the water tank (4) with 1 liter of water minimum or up to the MAX level (5).


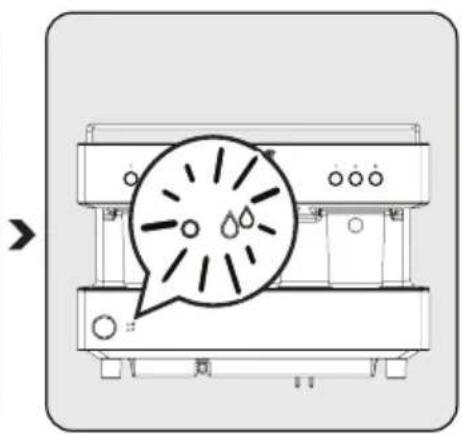
When the water in the water tank (4) is depleted, the water indicator light (11) will flash in blue, and all of the cup selection buttons (13) in red. In this case, you must fill the water tank until the warning lights go off.

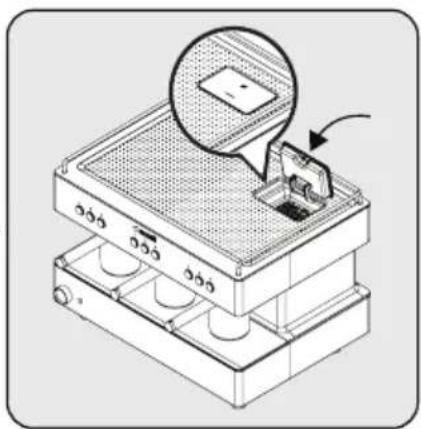
Slightly press on the water tank cover (3) to close it.
2 Use
2.3 Connecting to a demijohn or water filtration system
You can connect a demijohn pump (supplied externally) directly to the demijohn and the appliance to ensure that the water tank is filled automatically.
Please contact the authorised service provider for supply and connection.
2.3.1 Warnings
| Status Description Warning Status | indicator | ||
| Minimum water level | Fill the water tank with water. After completing the current coffee-making process, the appliance will not allow you to make another coffee until the water tank is refilled. If the appliance is connected to a demijohn, the external pump will start to fill it automatically. | The water indicator light will flash in blue. After that, the lights of all cup selection buttons will flash in red. |   |
| Maximum water level | The warning light will go off when the water tank is refilled. If the appliance is connected to a demijohn, the external pump will stop automatically. | The water indicator light will go off. When the pots are fitted in place, the lights of all cup selection lights will light in white. The appliance is now ready for use. |   |
2.4 Coffee-making

Plug in the appliance. Switch the operation button (12) to On position.

Pull out the pot (9) you will use from the coffee-making surface (6) and use the coffee measure (8) to fill it with the desired amount of coffee (for 3 cups maximum) and if you want, some sugar.

Push the pot (9) to its place on the coffee-making surface (6). A click will be heard. Operation buttons (13) will light up in white.
2 Use

For a tasty coffee, make sure that the coffee-making surface and the glass of the detection sensor are dry and clean.

WARNING: The coffee-making process will not start if you not fully fit the pot onto the coffee-making surface.

WARNING: The pot and the coffee in it will be hot after the process. To prevent the hot coffee from splashing, hold the pot by handle carefully and take it out.

Depending on the amount of coffee you will prepare, press one of the buttons for I, II or III persons on the front panel.
The light of the selected button will light in white.


When the coffee is ready, you will hear 3 beeps and the light of the button will flash in white.
Pull the pot from the coffee-making surface and pour it in cups.


The warm-keeping surface keeps your cups warm between 40-45°C. For this process, set the operation button to warm-keeping position.

You can use 3 pots to prepare 9 cups of coffee maximum at a time.

The upper surface will stay warm as long as the operation button is at the warm-keeping position.

For a tasty coffee, immediately take the pot (7) from the pot slot (3).
2 Use
2.4.1 Cancelling the coffee-making process

If you want to cancel the coffee-making process in progress, press and hold the selected number button (you have pressed to select the number of cups) for 3 seconds. All lights of the relevant compartment will turn red and a beep will be heard. Now you can remove the pot from the appliance. You can also take the pot from the coffee-making surface to cancel the process. All lights will turn red and a beep will be heard.

WARNING: When you cancel the process, it will be aborted. To make coffee again, you need to prepare it from scratch.
2.5 Amounts
This is an easy-to-use appliance designed to make Turkish coffee. You can prepare foamy Turkish coffee that suits to your tastes by using the amounts in the table. Following quantities are provided only for information purposes. You can adjust them as per your personal tastes.
| Recommended quantities of ingredients to prepare 1 cup of Turkish coffee | ||||
| Plain With little | sugar Medium Sweet | |||
| Coffee | x1 1 measure | x1 1 measure | x1 1 measure | x1 1 measure |
| Sugar | ○ | 1/2 sugar cube 1 sugar | cube 2 sugar cubes | ●● |
* We recommend you to use sugar cubes to easily adjust the amount of sugar.
2 Use
2.6 Notifications
| Status Description Warning Status | indicator | ||
| Ready mode | When the pots are fully seated, the appliance is ready for use. | All of the cup selection buttons used will light in white. |  |
| Cup selection | Use the amount selection buttons to select the number of cups and start the coffee-making process. | The selected cup selection button will light in white. |  |
| Coffee making | The appliance is preparing the coffee. | The selected cup selection button will light in white. |  |
| Ending the process | The appliance will end the coffee-making process. | The light of the selected cup selection button will flash in white and 3 beeps will be heard. |  |
| Timeout or overflow error | If no foam is detected during the coffee-making process or if the process has been started with no coffee, the process will time out. | All buttons on the station will flash in red. A long beep will be heard. To make coffee again, you need to prepare it from scratch. |  |
3 Fault notification
3.1 Notifications for errors arising from use
In the following situations, prepare your coffee from the beginning (see 2.4)
| Status Description Warning Status | indicator | ||
| Cancellation of coffee making process | If you press and hold the cup selection button for 3 seconds, the appliance will stop the coffee-making process. | All lights of the coffee-making section will turn red and a long beep will be heard. |  |
| Removing the pot | If you remove the pot during the coffee-making process, the appliance will stop the process. | All lights of the coffee-making section will turn red and a long beep will be heard. |  |

WARNING: Do not remove the pot while the pump is pumping water. Otherwise, water in the pot might splash.
3.2 Notifications for appliance-related errors
| Status Description Warning Status | indicator | ||
| Flowmeter fault | Flowmeter fault Fault sign will light in blue.The cup selection button number I will light in red. A long beep will be heard. |  | |
| Induction heater fault | Induction heater fault Fault sign will light in blue.The cup selection button number II in the center will light in red. A long beep will be heard. |  | |
| Coffee making sensor fault | Coffee-making sensor fault Fault sign will light in blue.The cup selection button number III at the end will light in red. A long beep will be heard. |  | |
3 Fault notification

In case of flowmeter and induction heater faults, contact the authorised service provider.

In case of coffee-making sensor fault, make sure that the sensor glass is clean. If the problem persists, contact the authorised service provider.
3.3 Settings

To enter the settings menu, make sure that the pots are not fitted.
| Status Description Warning Status | indicator | ||
| Entering the settings | Press and hold the cup selection buttons number 1 and 9 for 5 seconds. | All buttons will flash in white for 3 times and you will enter the settings. A beep will be heard. |  |
| Water volume adjustment | The cup selection buttons in the center (buttons no. 4 and 5): For a medium sized cup (60 ml), press the cup selection button no. I. For a large sized cup (70 ml), press the cup selection button no. II. | When you enter the settings menu, you will see that the cup volume is predefined as large sized cup (70 ml). The button number 5 will light in white. Additionally, the pots must not be fitted during this process, and after the water amount adjustment, you need to press and hold the buttons no. 1 and 9 for 5 seconds more to save the setting. |  |
| Exiting the settings | Press and hold the cup selection buttons number 1 and 9 for 5 seconds. | Warning lights will light in white and a beep will be heard. |  |
4 Cleaning and care

WARNING: Never use gasoline, solvent, abrasive cleaning agents, metal objects or hard brushes to clean the appliance.

WARNING: Never immerse the appliance or its power cable in water or in any other liquid.

WARNING: Do not wash any part of the appliance apart from the pots. Wipe with a damp cloth.

WARNING: Do not spray water or any liquid to clean the appliance.

Set the on/off button of the appliance to "off" position and unplug it. Wait for the appliance to cool down.

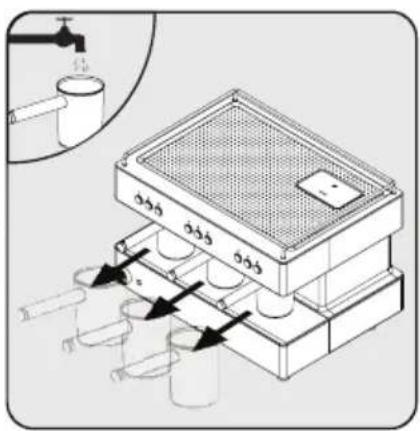
Remove the pots from the appliance. Hold under running water to clean.

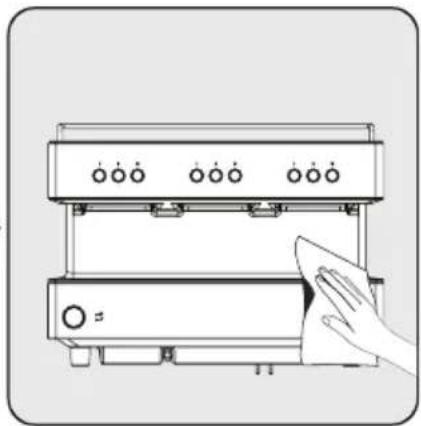
Use a damp, soft cloth and a little amount of mild cleaning agent to clean the outer surface and the coffee-making surface of the appliance.

For a tasty coffee, wash the pot after every use.
4 Cleaning and care

After every 15-20 uses, wipe the coffee-making detection sensor with a damp cloth.
4.1 Mode for cleaning the water system

WARNING: Apply the water system cleaning method given below once a week.
| Status Description Warning | Status indicator | ||
| Entering the cleaning mode | Remove the pots and press and hold the cup selection buttons number 1 and 9 for 5 seconds. | All buttons will flash in white for 3 times and you will enter the settings. A beep will be heard. |  |
| Fit all the pots in place and press and hold the cup selection button 9 for 5 seconds. | All buttons will flash in white, water warning and service lights will light in blue and water will be pumped to the pots. |  | |
 | |||
4 Cleaning and care
| Status Description Warning | Status indicator | ||
| Emptying the water tank | Water will be sent to the pots from the water tank automatically. When the pots are full, remove and empty all the pots. To continue emptying the tank, make sure that the pots are empty and fit them in place. Water will continue to be pumped to the pots from the water tank. This process will continue until the water tank is completely empty. | All buttons will continue flashing in white. Water warning and service lights will continue to light in blue. When the pots are full, white lights will light constantly and a beep will be heard for 3 seconds. |   |
| Ending the emptying process for the water tank | When the water tank is completely empty, water drawing process for the pots will automatically stop. | Warning lights will go off and the appliance will automatically return to the settings menu. | - |
| Rinsing | Before leaving the settings menu, fill the empty water tank with clean water at room temperature up to the maximum level. Fit all the pots in place and press and hold the cup selection button 9 for 5 seconds. Water will be sent to the pots from the water tank automatically. | All buttons will continue flashing in white. Water warning and service lights will light in blue. When the pots are full, white lights will light constantly and a beep will be heard for 3 seconds. |   |
| Finishing the rinsing process | When the water tank is completely empty, water drawing process for the pots will automatically stop. | Warning lights will go off and the appliance will automatically return to the settings menu. | - |
| Exiting the settings | Remove the pots and press and hold the cup selection buttons number 1 and 9 for 5 seconds. | All buttons will flash in white for 3 times and the appliance will leave the settings menu. A beep will be heard. Since the water tank is empty, the blue "no water" warning will flash and all the stations will flash in red. |  |
5 Technological features of the appliance

SpinJet
Automatic stirring system enabling foamy and ideal-consistent coffee

CookSensePro
Technology developed for professional use, allowing the user to prepare the ideal coffee

Additional safety system eliminating the necessity of watching the coffee while it is being brewed

Induction heating
Coffee-making technology that allows you to get the same taste and speed every time
6 Before calling the service provider

First check whether the appliance is plugged in or not.

Check whether there is any break or damage at the cable.

Clean the brewing detection sensor.

Check if there is enough water in the water tank.

Coffee machines
BKK 2700
EN

2 Operation

- KEYF PROFESSIONAL TURKISH COFFEE MACHINE
- CONTENT
- IMPORTANT SAFETY AND ENVIRONMENTAL INSTRUCTIONS
- USE
- FAULT NOTIFICATION
- CLEANING AND CARE
- TECHNOLOGICAL FEATURES OF THE APPLIANCE
- BEFORE CALLING THE SERVICE PROVIDER
- PLEASE READ THIS USER MANUAL FIRST
- MEANINGS OF THE SYMBOLS
- TECHNICAL DATA
- POWER
- GENERAL SAFETY
- COMPLIANCE WITH THE WEEE DIRECTIVE AND DISPOSAL OF THE WASTE PRODUCT
- COMPLIANCE WITH ROHS DIRECTIVE
- PACKAGE INFORMATION
- INITIAL USE
- FILLING THE WATER TANK
- CONNECTING TO A DEMIJOHN OR WATER FILTRATION SYSTEM
- WARNINGS
- COFFEE-MAKING
- CANCELLING THE COFFEE-MAKING PROCESS
- AMOUNTS
- NOTIFICATIONS FOR ERRORS ARISING FROM USE
- NOTIFICATIONS FOR APPLIANCE-RELATED ERRORS
- SETTINGS
- MODE FOR CLEANING THE WATER SYSTEM
- COFFEE MACHINES
- OPERATION
Brand : BEKO
Model : BKK 2700
Category : Coffee maker