
UNI3510U2 - Hard Drive StarTech.com - Free user manual and instructions
Find the device manual for free UNI3510U2 StarTech.com in PDF.


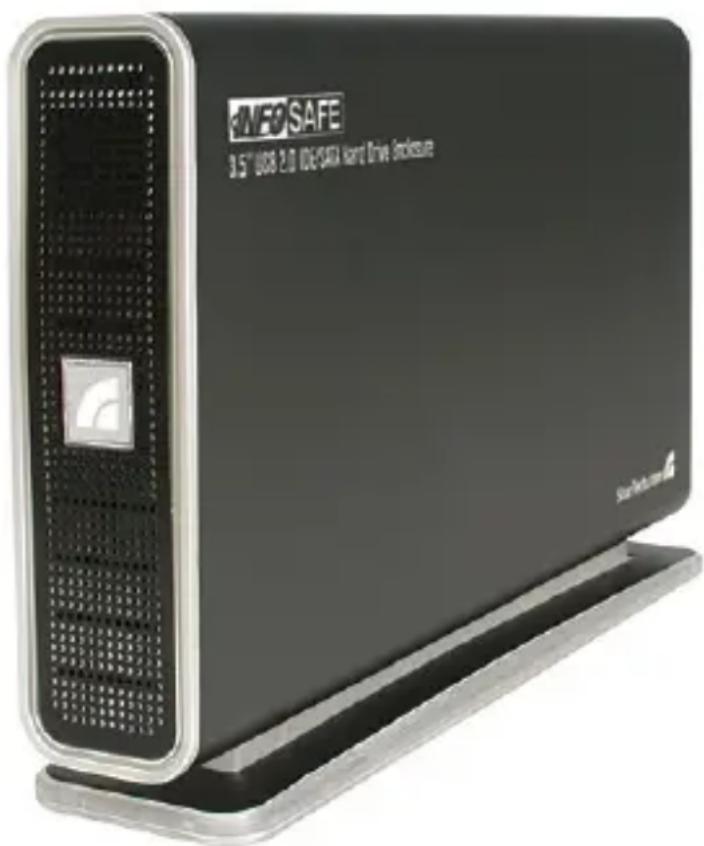
| Type of Product | 3.5" USB 2.0 to IDE/SATA Hard Drive Enclosure |
| Model | UNI3510U2 |
| Brand | StarTech.com |
| Dimensions (L x W x H) | 222 x 38 x 140 mm (7.8 x 1.34 x 4.94 in) |
| Weight | 749 g (26.4 oz) |
| Power Supply | Included AC power adapter (100-240V AC input, DC output) |
| Maximum Data Transfer Rate | 480 Mbps (USB 2.0 and SATA II) |
| Supported Drive Interfaces | IDE (66/100/133) and SATA I/II (SATA 150/300) |
| Drive Form Factor | 3.5-inch |
| Connectors | 1x SATA Data (7-pin), 1x SATA Power (15-pin), 1x IDE ATA (40-pin), 1x LP4 Power, 1x USB Type B |
| Operating Systems Supported | Windows 98SE, ME, 2000, 2003 Server, XP, Vista; Mac OS 9.0+; Linux |
| Construction Material | Solid metal |
| Driver Requirement | No driver installation required (for USB 2.0 hosts) |
| Safety Standards | UL, CE, FCC Class B |
| Package Contents | Enclosure, USB 2.0 cable, AC adapter, PCI Express adapter card, power cable |
| Warranty | 1 year limited |
| Compliance | FCC Part 15 Class B |
Frequently Asked Questions - UNI3510U2 StarTech.com
User questions about UNI3510U2 StarTech.com
0 question about this device. Answer the ones you know or ask your own.
Ask a new question about this device
Download the instructions for your Hard Drive in PDF format for free! Find your manual UNI3510U2 - StarTech.com and take your electronic device back in hand. On this page are published all the documents necessary for the use of your device. UNI3510U2 by StarTech.com.
USER MANUAL UNI3510U2 StarTech.com
IDE/SATA HDD Enclosure
UNI3510U2
FCC Compliance Statement
This equipment has been tested and found to comply with the limits for a Class B digital device, pursuant to part 15 of the FCC Rules. These limits are designed to provide reasonable protection against harmful interference in a residential installation. This equipment generates, uses and can radiate radio frequency energy and, if not installed and used in accordance with the instructions, may cause harmful interference to radio communications. However, there is no guarantee that interference will not occur in a particular installation. If this equipment does cause harmful interference to radio or television reception, which can be determined by turning the equipment off and on, the user is encouraged to try to correct the interference by one or more of the following measures:
Reorient or relocate the receiving antenna.
Increase the separation between the equipment and receiver.
Connect the equipment into an outlet on a circuit different from that to which the receiver is connected.
Consult the dealer or an experienced radio/TV technician for help.
Use of Trademarks, Registered Trademarks, and other Protected Names and Symbols
This manual may make reference to trademarks, registered trademarks, and other protected names and/or symbols of third-party companies not related in any way to StarTech.com. Where they occur these references are for illustrative purposes only and do not represent an endorsement of a product or service by StarTech.com, or an endorsement of the product(s) to which this manual applies by the third-party company in question. Regardless of any direct acknowledgement elsewhere in the body of this document, StarTech.com hereby acknowledges that all trademarks, registered trademarks, service marks, and other protected names and/or symbols contained in this manual and related documents are the property of their respective holders.
Instruction Manual
Table of Contents
Introduction 1
Features ....1
Package Contents ....1
Hardware Guide 2
Installation and Usage 2
Hard Drive Installation ....2
Connecting the Drive Enclosure to a Computer ....5
Disconnecting the Enclosure from the Computer 6
Windows XP/2000/2003 Server/Vista™ 6
Windows 98SE ......7
Mac OS....7
Troubleshooting 8
Specifications 9
Technical Support 10
Warranty Information 10
Introduction
Thank you for purchasing a StarTech.com 3.5" USB 2.0 to IDE/SATA Hard Drive Enclosure. Now, you can turn almost any 3.5" hard drive into a portable storage device! This hybrid, 3.5" USB 2.0 to IDE/SATA Hard Drive Enclosure provides broad compatibility with IDE (66/100/133) or SATA I/II (SATA 150/SATA 300) hard drives, making it the wise choice for a variety of uses including data backups, digital image storage, multimedia storage, or simply putting an "outdated" drive to good use.
Features
Compact, lightweight design•
Solid metal construction•
Supports data transfer rates of up to 480Mbps (USB 2.0, SATA II)•
No driver installation required•
Supported by Windows 98SE, ME, 2000, 2003 Server, XP and Vista™, • Linux, Mac OS 9.0 and higher
System requirements:
A USB enabled computer with an available USB port (USB 2.0 for peak performance)
Operating System: Windows® 98SE, ME, 2000, 2003 Server, XP and Vista™, Linux, Mac OS 9.0 and higher
Package Contents
1 x SATA/IDE to USB 2.0 External HDD Enclosure
1 x USB 2.0 Cable •
- 1 x AC Power Adapter
• 1 x PCI Express Adapter Card - 1 X Power Cable
Hardware Guide
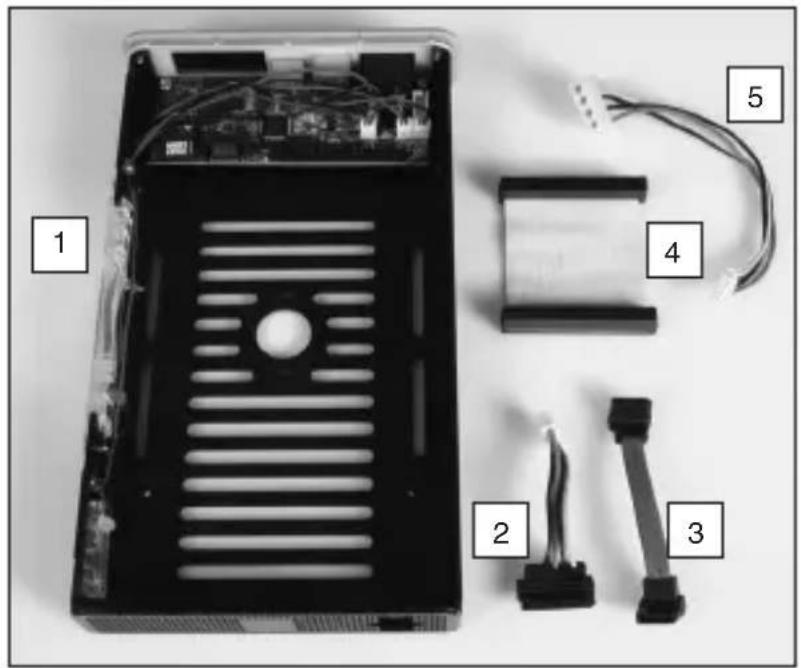
| 1 | Disk Mounting Tray |
| 2 | SATA Power Cable |
| 3 | SATA Data Cable |
| 4 | IDE Data Cable |
| 5 | IDE Power Cable |
Installation and Usage
WARNING: Hard drives require careful handling, especially when being transported. If you are not careful with your hard disk, lost data may result. Always handle your hard drive and storage device with caution.
Hard Drive Installation
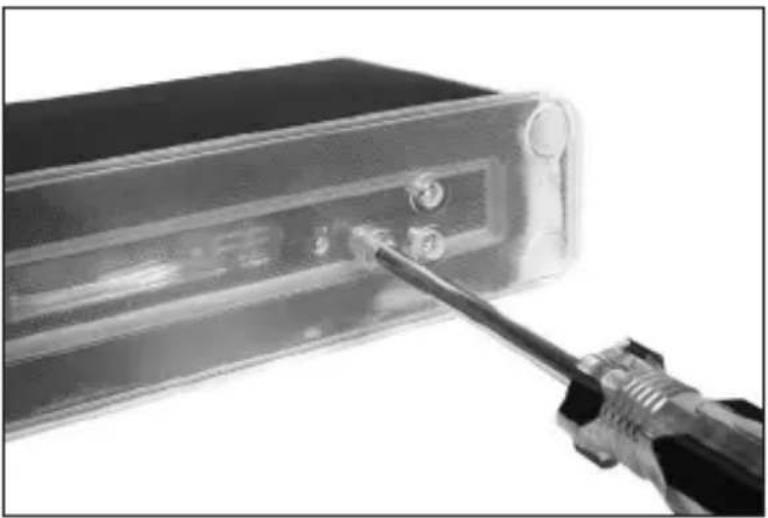
Remove the screw holding the Base Stand to the enclosure, and 1. separate it from the Enclosure, then slide the Disk Mounting Tray out of
Instruction Manual
the Enclosure:
natural_image
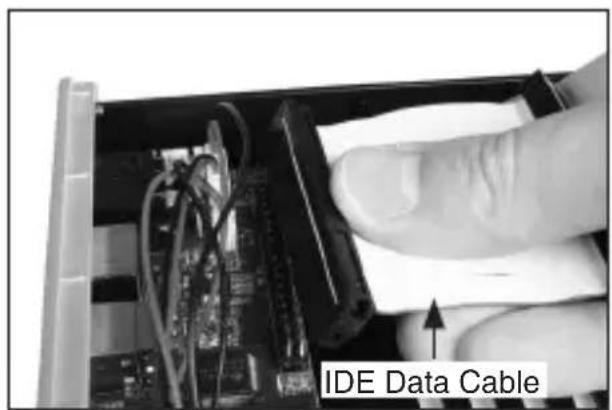
Close-up of a screwdriver inserted into a device component with a screwdriver tip (no visible text or symbols)Gently place the hard drive, label side up into the enclosure. Connect 2. the IDE or SATA Power and Data cables to the hard drive and to the controller board as appropriate. Please note that if you are installing a SATA drive in the enclosure, the IDE Data cable will need to be removed.
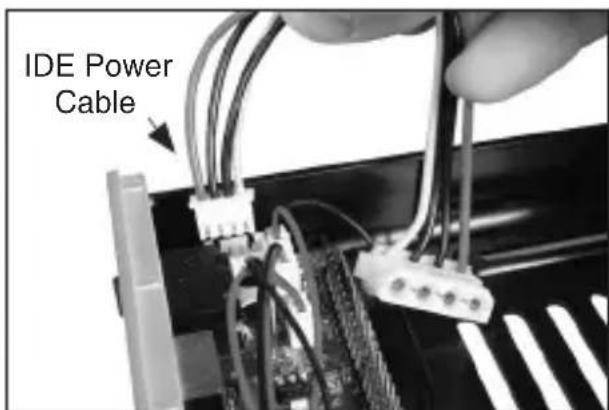
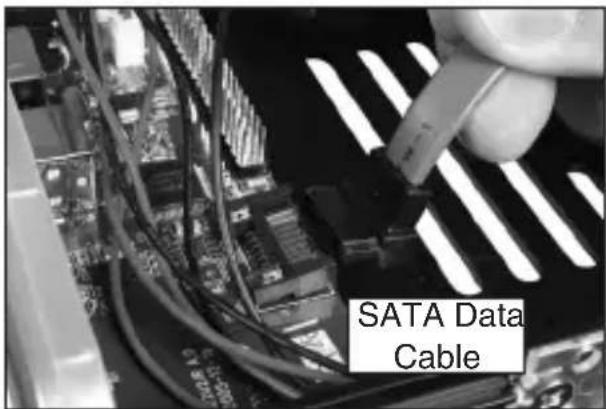
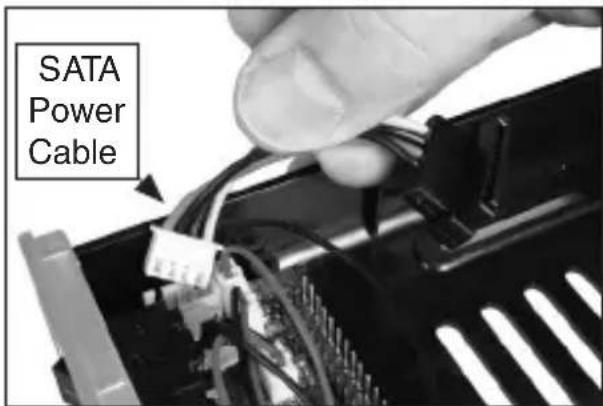
Instruction Manual
Fasten the hard drive to the Disk Mounting Tray, using the provided 3. screws.
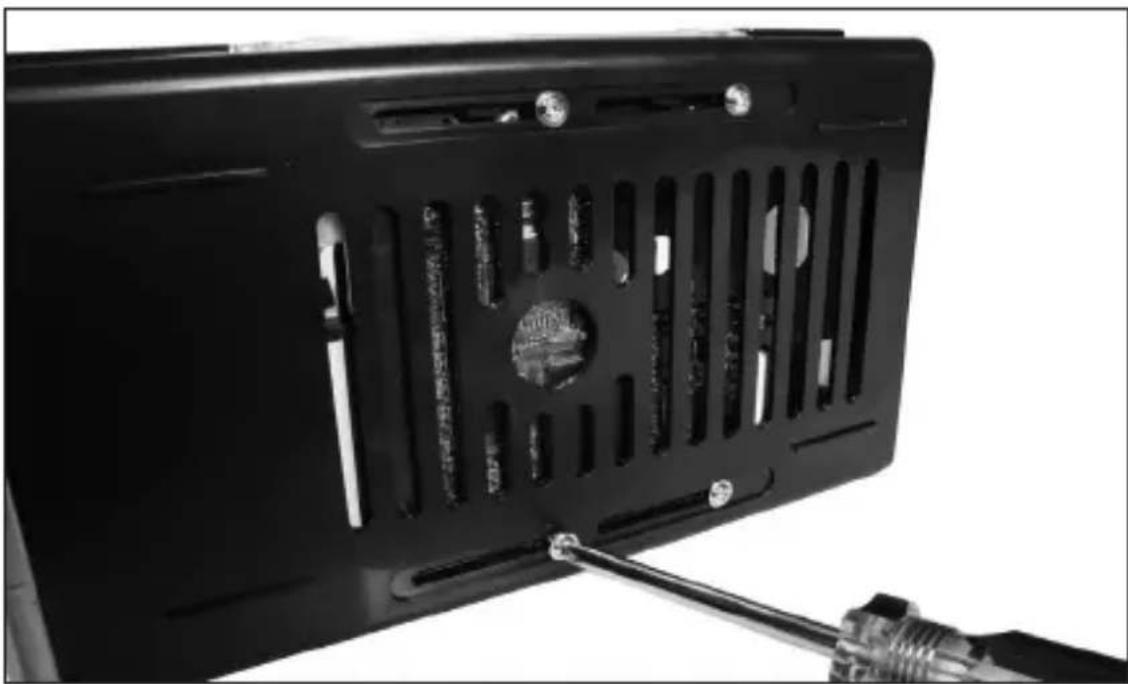
natural_image
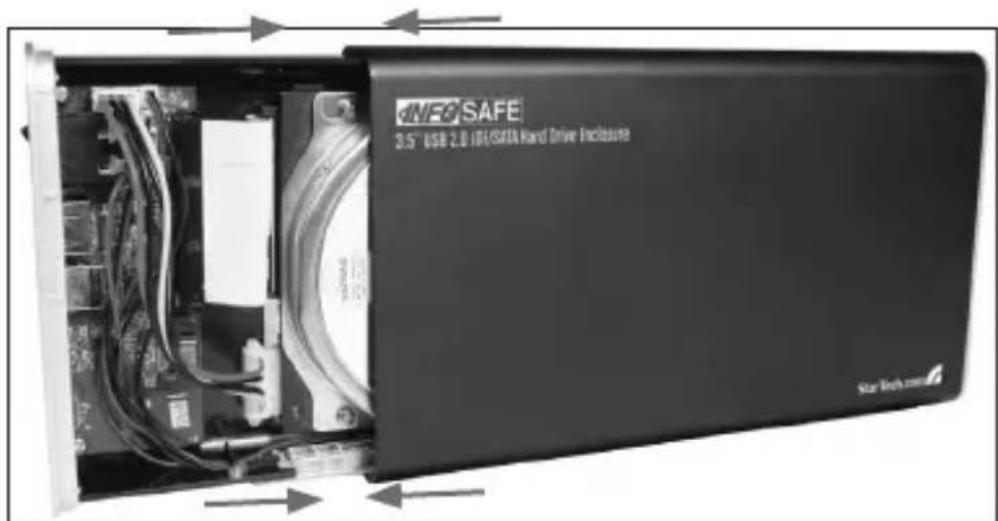
Close-up of a black plastic panel with ventilation slots and screwdriver inserted (no visible text or symbols)Slide the Disk Mounting Tray (with drive attached) back into the 4. Enclosure, so that the Enclosure is sealed.
Instruction Manual
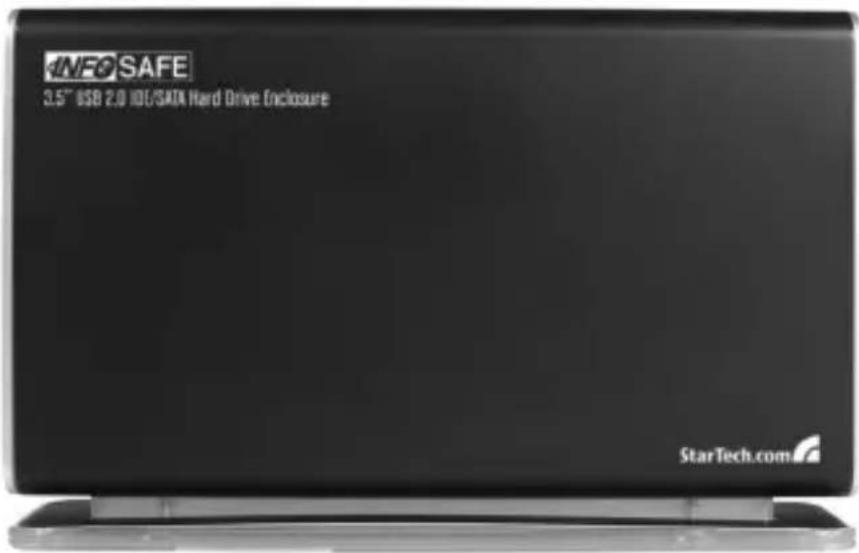
Re-fasten the Base Stand to the base of the Enclosure and replace the 5. screw removed in Step #1. Drive installation is now complete.
Connecting the Drive Enclosure to a Computer
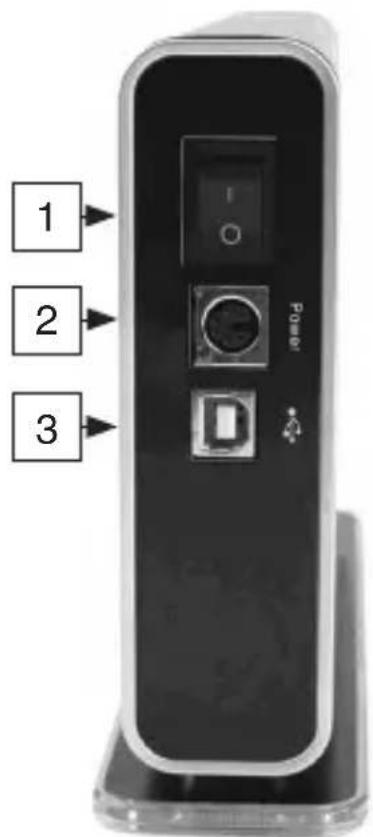
| 1 USB Type ‘B’ Port |
| 2 Power Port |
| 3 Power Switch |
Instruction Manual
Connect the AC Adapter cord to the DC Power Port on the rear panel 1. of the drive enclosure. Connect the remaining end of the adapter to an available electrical outlet.
Insert the Type 'B' connector provided by the USB cable into the USB 2. Type 'B' port on
the rear panel of the enclosure. Connect the remaining end to an 3. available USB port on the host computer.
Press the Power Switch to the ON position. 4.
Disconnecting the Enclosure from the Computer
WARNING: Do not disconnect any cables or power sources while the hard drive is active. This can result in data loss and possible damage to the hard drive.
WARNING: To prevent data loss, please ensure that all active applications are closed, prior to shutting down power to the drive.
Windows XP/2000/2003 Server/Vista™
Double-click on the Safely Remove Hardware icon, located in the 1. System Tray (typically located on the bottom right corner of the desktop).

Select USB Mass Storage Device from the list, and click on 2. Stop.
Select the drive to be disconnected, and click 3. OK.
-
Click on Close and turn the Power Switch on the enclosure to the OFF position.
-
It is now safe to disconnect the Enclosure from the computer, by removing the USB cable.
Instruction Manual
Windows 98SE
Close all applications.1.
Ensure the drive is not running, and move the Power Switch to the OFF 2. position.
Disconnect the USB cable from the computer.3.
Mac OS
Locate the Removable Disk icon associated with the drive you wish to 1. disconnect, and drag it to the Trash icon on your desktop.
When the disk icon disappears from the desktop, move the Power 2. Switch to the OFF position. You can now safely disconnect the USB or FireWire cable from your computer and the power cord from the electrical outlet.
Troubleshooting
Slow Data Transfer Rates between the External Drive and Host Computer:
Your computer may be operating at USB 1.1 speeds, if the correct drivers have not been installed for the USB Bus Controller. Please ensure that the latest drivers for your motherboard, or USB add-on card have been installed. If the host computer is unable to support USB 2.0, you may consider adding a PCI or PCI Express based add-on card to your computer. For more information regarding add-on cards, please see the section entitled Accessory Products from StarTech.com.
Windows won't allow me to safely remove my drive?
Often times, this is because the operating system is still reporting the drive as busy or in use. Be sure to close all applications before removing the drive connection from the host computer.
Delayed write failure on Windows XP
One of the most common causes of delayed write failures is that some of the required communication between the enclosure and the host is being blocked by a firewall.
Windows XP SP2 has a built-in firewall, that helps to secure the computer against outside intrusion. The firewall is enabled by default when Service Pack 2 is installed, which may block transfers to and from the drive enclosure. If this is the case, temporarily disable the firewall, and attempt a file transfer between the computer and the external drive. If the transfer is successful, configure the Windows Firewall to allow the USB connection. Be sure to enable the firewall, once troubleshooting is complete.
Instruction Manual
Specifications
| Maximum Supported Data Transfer Rate | 480Mbps (USB 2.0 and SATA II) |
| Connectors | 1x SATA Data 7 Pin Female1x SATA Power 15 Pin Female1x 40 Pin IDE ATA Female1x LP4 Female1x USB B Female |
| Supported Operating Systems | Microsoft Windows® 98SE, Windows VistaTM, Windows ME, Windows 2000, Windows XPMac OS 9.0 or higherLinux |
| Safety Standards | UL, CE, FCC |
| Product Dimensions | 222 x 38 x 140mm (L x W x H)7.8 x 1.34 x 4.94” |
| Product Weight | 749g (26.4oz) |
Technical Support
StarTech.com's lifetime technical support is an integral part of our commitment to provide industry-leading solutions. If you ever need help with your product, visit www.startech.com/support and access our comprehensive selection of online tools, documentation, and downloads.
Warranty Information
This product is backed by a one-year warranty. In addition, StarTech.com warrants its products against defects in materials and workmanship for the periods noted, following the initial date of purchase. During this period, the products may be returned for repair, or replacement with equivalent products at our discretion. The warranty covers parts and labor costs only. StarTech.com does not warrant its products from defects or damages arising from misuse, abuse, alteration, or normal wear and tear.
Limitation of Liability
In no event shall the liability of StarTech.com Ltd. and StarTech.com USA LLP (or their officers, directors, employees or agents) for any damages (whether direct or indirect, special, punitive, incidental, consequential, or otherwise), loss of profits, loss of business, or any pecuniary loss, arising out of or related to the use of the product exceed the actual price paid for the product. Some states do not allow the exclusion or limitation of incidental or consequential damages. If such laws apply, the limitations or exclusions contained in this statement may not apply to you.
StarTech.com Making hard-to-find easy!
StarTech.com has been making “hard-to-find easy” since 1985, providing high quality solutions to a diverse IT and A/V customer base that spans many channels, including government, education and industrial facilities to name just a few. We offer an unmatched selection of computer parts, cables, A/V products, KVM and Server Management solutions, serving a worldwide market through our locations in the United States, Canada, the United Kingdom and Taiwan.
Visit www.startech.com today for complete information about all our products and to access exclusive interactive tools such as the Cable Finder, Parts Finder and the KVM Reference Guide. StarTech.com makes it easy to complete almost any IT or A/V solution. Find out for yourself why our products lead the industry in performance, support, and value.
- IDE/SATA HDD Enclosure
- FCC Compliance Statement
- Use of Trademarks, Registered Trademarks, and other Protected Names and Symbols
- Instruction Manual
- Table of Contents
- Introduction 1
- Hardware Guide 2
- Installation and Usage 2
- Disconnecting the Enclosure from the Computer 6
- Troubleshooting 8
- Specifications 9
- Technical Support 10
- Warranty Information 10
- Introduction
- Features
- System requirements:
- Package Contents
- Hardware Guide
- Installation and Usage
- Hard Drive Installation
- Connecting the Drive Enclosure to a Computer
- Disconnecting the Enclosure from the Computer
- Windows XP/2000/2003 Server/Vista™
- Windows 98SE
- Mac OS
- Troubleshooting
- Slow Data Transfer Rates between the External Drive and Host Computer:
- Windows won't allow me to safely remove my drive?
- Delayed write failure on Windows XP
- Technical Support
- Warranty Information
- Limitation of Liability
- StarTech.com Making hard-to-find easy!
Brand : StarTech.com
Model : UNI3510U2
Category : Hard Drive