
TND Tablet 1050 - Tablet Rand McNally - Free user manual and instructions
Find the device manual for free TND Tablet 1050 Rand McNally in PDF.


| Product Type | GPS Navigation Tablet |
| Brand | Rand McNally |
| Model | TND Tablet 1050 |
| Display Size | 8 inches |
| Display Resolution | 1024 x 768 pixels |
| Touchscreen | Capacitive multi-touch |
| Operating System | Android 4.4 (customized) |
| Processor | 1.5 GHz quad-core |
| RAM | 1 GB |
| Internal Storage | 16 GB (expandable via microSD) |
| GPS | Built-in GPS with GLONASS |
| Wi-Fi | 802.11 b/g/n |
| Bluetooth | Bluetooth 4.0 |
| USB | Micro USB 2.0 |
| Audio | Built-in speaker and microphone |
| Battery | Li-ion 4000 mAh, up to 6 hours |
| Power Input | 5V/2A via micro USB |
| Dimensions | 8.4 x 5.3 x 0.45 inches (213 x 135 x 11.4 mm) |
| Weight | 12.3 oz (350 g) |
| Navigation Features | Turn-by-turn voice directions, truck routing, live traffic updates |
| Maps | Pre-loaded North America maps, lifetime map updates |
| Mount | Included suction cup mount for windshield or dash |
| Audio Output | 3.5 mm headphone jack |
| Care Instructions | Clean with a soft, dry cloth; avoid liquids |
| Safety | Use only approved charger; avoid extreme temperatures |
| Repair | No user-serviceable parts; contact Rand McNally support |
Frequently Asked Questions - TND Tablet 1050 Rand McNally
User questions about TND Tablet 1050 Rand McNally
0 question about this device. Answer the ones you know or ask your own.
Ask a new question about this device
Download the instructions for your Tablet in PDF format for free! Find your manual TND Tablet 1050 - Rand McNally and take your electronic device back in hand. On this page are published all the documents necessary for the use of your device. TND Tablet 1050 by Rand McNally.
USER MANUAL TND Tablet 1050 Rand McNally
FCC Compliance Statement
This device complies with part 15 of the FCC rules. Operation is subject to the following two conditions: (1) this device may not cause harmful interference, and (2) this device must accept any interference received, including interference that may cause undesired operation.
This equipment has been tested and found to comply with the limits for a Class B digital device, pursuant to part 15 of the FCC rules. These limits are designed to provide reasonable protection against harmful interference in a residential installation. This equipment generates, uses, and can radiate radio frequency energy and may cause harmful interference to radio communications if not installed and used in accordance with the instructions. However, there is no guarantee that interference will not occur in a particular installation. If this equipment does cause harmful interference to radio or television reception, which can be determined by turning the equipment off and on, the user is encouraged to try to correct the interference by one of the following measures:
- Reorient or relocate the receiving antenna.
- Increase the separation between the equipment and the receiver.
- Connect the equipment into an outlet that is on a different circuit from the GPS unit.
- Consult the dealer or an experienced radio/TV technician for help.
When using the device, ensure that the antenna of the device is at least 20 cm away from all persons.
IC Compliance Statement
This device complies with Part 15 of the FCC Rules and Industry Canada license-exempt RSS standard(s). Operation is subject to the following two conditions:
- This device may not cause interference, and
- This device must accept any interference, including interference that may cause undesired operation of the device.
This Class B digital apparatus complies with Canadian ICES-003.
IC Caution
Intentional or unintentional changes or modifications to the equipment not expressly approved by Rand McNally could void the user's authority to operate the equipment.
The Global Positioning System (GPS) is a constellation of satellites that a GPS receiver uses to calculate geographical positions. To determine a position, data from at least three satellites is required. To determine elevation, the data from four or more satellites is required. Accuracy of the positioning varies from 10 feet to several hundred feet, depending on vehicle placement and the surrounding environment.
Geographical terrain (such as mountains), man-made structures (such as highway overpasses, bridges, and tall buildings), as well as weather can interfere with the GPS signal. For best GPS reception, position the device and mount with a clear line of sight to the sky. Some vehicles may have a limited view of the sky due to metal sun shields or a metallized windshield coating.
Map data includes the geographical coordinates for address locations and points of interest (POIs). With GPS reception, your device calculates a route to your selected location.
Customer Support
Web:
randmcnally.com/support
Call toll-free:
877-446-4863
Service hours:
Monday through Friday, 7 a.m. to 6 p.m. CT (Except official holidays)
E-mail:
TNDSupport@randmcnally.com
Table of Contents
- Your Device .... 1
What's Included 2
Mounting the Tablet 3
TND™ Tablet 1050 Hardware.... 5
- Getting Started....6
Connecting to Wi-Fi....6
Registration 6
Navigating Your TND Tablet 1050....7
TND Tablet 1050 Settings....9
Android Settings 10
- Rand Navigation 2.0 11
Home Screen 11
Navigation Settings 12
Destination Search....16
Single-line Search 17
Guided Search 18
Guided Search: New Location Menu....19
Guided Search: Entering a New Location 20
My Trips....21
Multi-Stop Trips 22
Trails 23
History 24
Address Book Menu 25
Address Book: Contacts....26
Address Book: Groups 27
POIs 28
Filter POIs 29
POIs 30
Home and Work Locations.... 31
History & Bookmarks 32
Route Map Window....33
Exits 34
Route Options 35
Route Overview 36
Detour/Avoid 37
Weather....39
Traffic 40
Fuel 42
Virtual Dashboard....43
Fuel Logs 44
Junction View 45
Turn View 45
Truck Tools 46
-
TripMaker ^® 47
-
Motor Carriers' Road Atlas 48
-
Cameras 49
-
DriverConnect....50
-
More Information .... 51
Note: Some screens may appear slightly different depending on device model and software version.
Caution: Important Safety Information
Navigation
- Use this device at your own risk.
- Use this device only when it is safe to do so.
- Look at the display only when it is safe to do so.
- Traffic regulations always have priority over any instructions from the navigation system.
- Follow navigation system instructions only when local regulations and road traffic allow you do so.
- Make sure that the mount is securely mounted and properly adjusted before each trip.
- Note: If you do not understand the spoken instructions or are unsure of what to do next, refer to the navigation map on your navigation device.
Installation
- Make sure that the mount does not impair the driver's visibility.
- Do not attach the mount within the airbag deployment zone.
- When installing the mount, make sure that it does not pose a risk in the event of an accident.
- Do not run cables directly next to safety-relevant devices and power supplies.
• After installation, check all safety-relevant equipment. - Connect the wall charger to a 120V or 240V outlet only.
- Connect the vehicle charger to a 12V outlet only.
Device
- Do not use sharp-edged objects on the device touch screen.
- The device is not waterproof and is not protected against water damage.
- Protect the device from extreme temperatures. Operating temperature for the device is between 32 degrees F and 120 degrees F.
- Do not open the navigation device casing.
-
Do not attempt to replace the battery. Contact Rand McNally Customer Support with questions about the battery.
• Always follow local regulations when disposing of this device. -
Note: Make sure that there are no kinks in the cable and that it will not be damaged by any sharp objects.
- Note: Use only a moist cloth to clean the navigation device.
- Note: Do not pull the cable to unplug the unit.
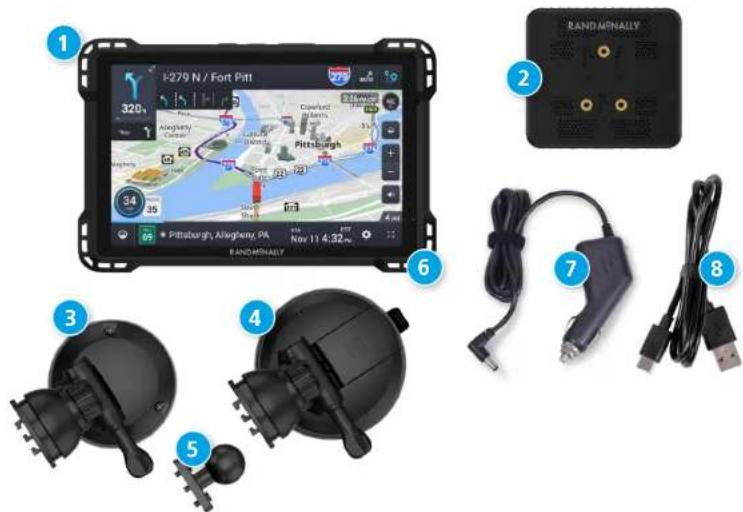
What's Included
10-inch truck navigation device with camera
2 Powered magnetic mount connector
Three mounts:
3 Screw down mount
4 Suction cup mount
5 Ball mount bracket
6 Removable guard
7 Vehicle charger (5V/5A)
8 USB-C cable
9 Anti-glare screen protector
10 Quick Start Guide

Mounting the TND™ Tablet 1050
Option 1: Screw Down Mount
Notes:
- Rand McNally recommends professional installation for this mounting option and is not responsible for any damages or consequences arising from the installation.
- Avoid gauges, HVAC, air bags, air bag covers and other items when drilling holes and attaching the mount to the vehicle.
-
You need to furnish your own screws.
• This mount also includes an adhesive option. -
Select an area with a line of sight to the sky and GPS satellites.
- Clean and dry the mounting area.
- Using the mount as a template, mark the three screw locations.
- Drill pilot holes (optional).
- Secure the mount in place with screws that you furnish.
- Adjust the angle of the mount.
- Plug the power cord into the mount and the vehicle's 12-volt power source.
- Snap the tablet onto the mount (using built-in magnet).

natural_image
Close-up of a black automotive brake caliper and suspension component (no visible text or symbols)Option 2: Suction Cup Mount
Note: Follow all local regulations governing the placement of the mount.
- Select an area with a line of sight to the sky and GPS satellites.
- Clean and dry the mounting area.
- Remove the suction cup protective film.
- Adjust the angle of the mount.
- Pull the suction cup lever up to release suction.
- Plug the power cord into the mount and the vehicle's 12-volt power source.
- Place and hold the mount suction cup against the mounting surface.
- Press the suction cup lever down until it snaps into place.
- Snap the tablet onto the mount (using built-in magnet).

natural_image
Black outdoor navigation device with attached-mounted sensor and rear-mounted head (no visible text or symbols)Mounting the TND™ Tablet 1050
Option 3: Ball Mount Bracket
The 1050 includes a ball mount that is compatible with third party mounting solutions.
- Secure the ball mount to the magnetic mount using the screws included in the package. Note that the screws in the package might look slightly different than the screws in these images.
- Snap the tablet on the mount (using built-in magnet).

natural_image
Black rectangular electronic device with a black knob and 'RAND MSNALLY' label, no readable text or symbols beyond the label.TND™ Tablet 1050 Hardware


Powering Up
Charge the device before using it on battery power.
Note: GPS navigation will work right out of the box even if you do not have internet access.
Connecting to Wi-Fi
When you first turn on your tablet, you'll be asked to select a Wi-Fi network to connect to the internet. A Wi-Fi connection is required to browse the web, download apps, and use internet-enabled features such as weather and traffic. Choose your wireless access point or hotspot from the list and type in your password. You can come back to this step later if you are in a place without internet access.
Warning: When using the magnetic mount in your vehicle, only use the mount's DC IN port for charging. Do not attempt to simultaneously charge the tablet from the magnetic mount and the tablet's USB port.

Registration
In the next step, you'll be prompted to register your tablet with Rand McNally. Your registration ensures that you have access to the latest information and updates, as well as Customer Support.
Navigating Your TND Tablet 1050

Android User Interface
1 Bluetooth®
2 Wi-Fi
3 Battery Meter and Charging Indicator
4 Current time
5 Back
6 Return to home screen
7 View open apps
Note: You can swipe down from the top of the screen to view the Android quick settings menu.
Navigating Your TND Tablet 1050

Main Menu
1 Rand Navigation
2 Driver Apps (HOS/ELD)
3 Truck Tools
4 Cameras
5 Gallery
6 Guided search
7 Settings
8 App tray
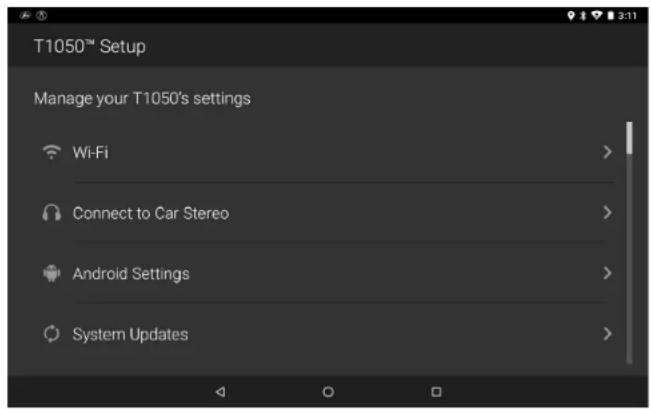

TND Tablet 1050 Settings
• Wi-Fi – Connect to a wireless network.
- Connect to Car Stereo – Connect your headphone output to a vehicle aux input.
- Android Settings– Opens the Android device settings screen.
• System Updates – Update your 1050.
- Data Repair – Fix missing or out-of-date files for your navigation system.
- About – View information about your device.
- Registration – Register your device.

Android Settings
- Network & Internet – Options for Wi-Fi, data usage, tethering, VPN, and Airplane mode.
- Connected devices – Options for Bluetooth, Cast, printing, and USB.
- Apps & notifications – Options for notifications, app permissions, default apps, and access.
- Battery – Displays battery life and power options.
- Display – Options for brightness, wallpaper, sleep timers, and size.
- Sound – Options for media, alarm, and notification volume, do not disturb, and default sounds.
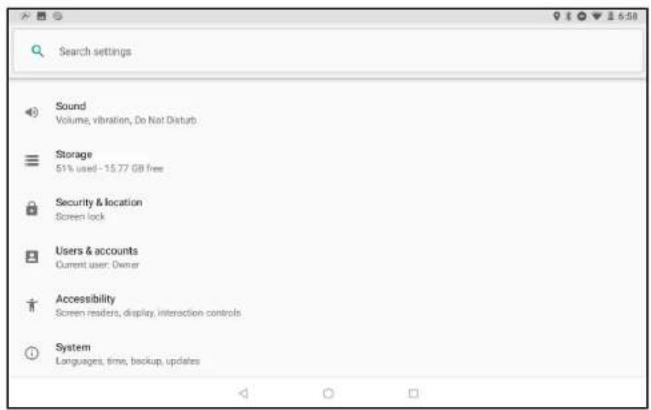
- Storage – Options for managing storage used by files and apps.
- Security & location – Options for setting screen lock preferences, location services, and other security settings.
- Users & accounts – Options for adding and managing user accounts and data synchronization.
- Accessibility – Options for screen readers, font sizes, magnification, and other ease-of-use settings.
- System – Options for language, time, and gesture settings, system information, and factory reset.
3. Rand Navigation 2.0
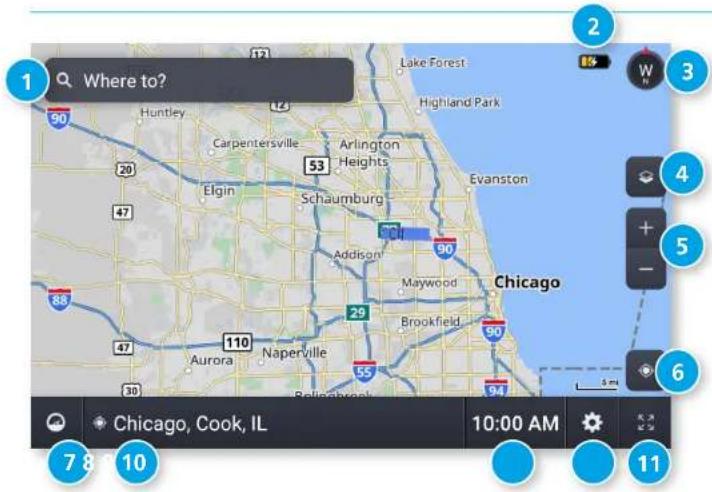
Rand Navigation
1 Single-line Search
Tap to enter a destination, address, or Point of Interest. You can access any destination from the single-line search.
2 Battery Meter
Displays battery power status and charging indicator.
3 Map View Mode
Tap to switch the map view between 3D map, North up, or Heading up.
4 Wi-Fi Connected Services
Tap to show fuel prices, weather and traffic on the map.
5 Zoom
Tap + or - to zoom in or out on the map.
6 Return to current location
If viewing another map area, tap this icon to return focus to your current location.
7 VirtualDashboard
Tap to view a variety of information concerning your current trip.
8 Street/Intersection/Location
Tap to toggle between the current street name, the upcoming intersection, or your current location.
9 Local Time/Elevation
Tap to toggle between displaying local time or elevation.
10 Navigation Settings
Tap to access settings such as: General, Truck Info, Route, Map, and Warnings.
11 Full Screen
Tap to change the view to full screen.
Navigation Settings
To access navigation settings, tap the gear icon in the bottom-right of the Rand Navigation Home Screen. After adjusting any settings, tap the Back icon in the upper-left to return to navigation.
| General Options | |
| Language | EnglishEspañolFrançaisFor the screen and spoken instructions. |
| Units | AutomaticMetric |
| U.S. Standard | |
| Clock 12-hour format24-hour format | |
| Note: Some tools and settings may not be available in car mode. | |
| Yard Time Zone Hawaii-Aleutian timeAlaska timePacific time | |
| Arizona | |
| Mountain timeCentral timeEastern timeIndiana (East)Atlantic (Canada) timeNewfoundland time | |
| Vehicle TypeBusCar/Light truck | Truck |
| Controls how routes are calculated. | |
TND™ Tablet 1050 User Manual 12
| General Options | |
| Load Prompt Always loaded | Enabled |
| When enabled, the system will ask if the truck is loaded or not every time you start a trip or a new leg. | |
| Mileage Log Car only Truck & car | Truck & bus Disabled |
| Custom POIs Tap to display the list of custom Points of Interest and control if they appear on the map. | |
| Touch Sound | Display Android System sound settings. |
| System Settings | Tap to display Android System settings. |
| Data Repair for your navigation system connection is required. | Tap to fix missing or out-of-date files An internet |
| System Update | Tap to perform system update. |
| Tutorial | View getting started tutorial. |
| Contact & About and customer support contact information. | Tap to show version information |
| Legal Notices | End user responsibilities and credits. |
- Rand Navigation 2.0
| Truck Info Options | Route | Options | |
| Hazmat Type NoneExplosivesGasesFlammable LiquidsFlammable SolidsOxidizersPoisonRadioactiveCorrosivesPIHOther | TrafficRecalculation | On/Off slider (requires Wi-Fi connection)AutoManual | |
| Preferred Route | Fastest routeShortest route | ||
| ETA Adjustment | ETA okIncrease ETA someIncrease ETA moreDecrease ETA someDecrease ETA more | ||
| Weight (Empty) Numeric value. | Click the pencil icon to enter a numeric value. | Set adjustments to your ETA due to weather or traffic conditions. You can add (increase) time to make the trip take longer or subtract (decrease) time to make the trip take less time. | |
| Weight (Loaded) Numeric value. | Click the pencil icon to enter a numeric value. | ||
| See Load Prompt in General preferences. | Turn Announcements | Set three distances at which you want to be warned about an upcoming turn.The first announcement will be the farthest from the turn and the third the closest to it. | |
| Height Click the pencil icon, and use the dials to select your vehicle's height. | |||
| Width Click the pencil icon, and use the dials to select your vehicle's width. | Junction Views | Set the distance before an upcoming maneuver at which the highway junction view screen appears. | |
| Trailers Straight48'53'DoubleTriple | Route Avoids | Select/de-select from the list of options:Tollways, Freeways, Ferries, Tunnels, Small roads, U-Turns, Cross country borders, Dirt roads. | |
| Number of Axles | Use the dial to select the number of axles. | Permanent Avoids | Tap to manage your list of areas and roads to permanently avoid. |
Day/Night Mode
Automatic
Day
Night
Route Color Tap a color to select.
Map View Mode Heading up
North up
3D view
Map Auto Zoom On/Off slider
Auto scale
Street scale
City scale
State scale
Set to street/city/state scale to specify the
maximum scale of the zoom.
Lane Guidance On/Off slider
When on, the map guides you to the
correct lane in preparation for upcoming
turns.
POI Icons On/Off slider
Select categories of icons to display on map.
Select restaurants, banks, and other
consumer POIs to display on the map.
Tap any category to fill in the square
and display those icons.
Map
OptionsMap
Options
Truck POI Icons
On/Off slider
Select icons to display on map.
Select travel centers, service, weigh
stations and truck POIs to display on
the map. Tap any category to fill in the
square and display those icons.
Address Book Icons
On/Off slider
Address book entries appear as pushpin
icons unless they are assigned to a group.
Truck Icon
Use the arrows to set the truck icon to
display when using the truck setting.
Use the provided colors to set the truck
icon color.
Bus Icon
Use the arrows to set the bus icon to
display when using the bus setting.
Use the provided colors to set the bus
icon color.
Car/Light truck Icon
Use the arrows to set the car icon to
display when using the car setting.
Use the provided colors to set the car
icon color.
Warnings Options
Warning Type None
Audio & visual
Visual only
Audio only
Auto Dismiss Warnings Never
After 2 seconds
After 10 seconds
After 30 seconds
Height and weight violations will
not be auto dismissed.
Curve Warnings On/Off slider
Click the pencil to manually edit,
or use the slider to set distance.
Hill Warnings On/Off slider
Click the pencil to manually edit,
or use the slider to set distance.
Engine Brake Warnings On/Off slider
Click the pencil to manually edit,
or use the slider to set distance.
Narrow Road Warnings On/Off slider
Click the pencil to manually edit,
or use the slider to set distance.
Construction Area On/Off slider
Click the pencil to manually edit,
or use the slider to set distance.
Warnings Options
Speed Limit On/Off slider
Set the amount over the posted limit at
which the warning appears.
Set a user-defined maximum speed to
be warned whenever the truck exceeds
that speed, regardless of posted
speed limits.
Speed Limit Change On/Off slider
Click the pencil to manually edit,
or use the slider to set distance.
Weigh Station On/Off slider
Click the pencil to manually edit,
or use the slider to set distance.
State/Province Border On/Off slider
Click the pencil to manually edit,
or use the slider to set distance.
Timezone Change On/Off slider
Toll Booth Alert On/Off slider
Click the pencil to manually edit,
or use the slider to set distance.
Maintenance On/Off slider

Destination Search
To access this window from the Rand Navigation Home Screen, tap Where to?
1 Single-line Search
Tap here to bring up a keyboard and start typing to search for a destination.
2 GuidedSearch
Tap to access the guided search options.
3 Points of Interest
Tap to search for a point of interest (POI), such as a travel center, restaurant, etc.
4 History
Tap to route to a recently entered location.
5 Bookmarks
Tap to view a list of saved locations.
6 Distance
Displays the distance to each destination in the list.
7 Back
Tap to return to the navigation screen.


Single-line Search
To access the single-line search window from the Rand Navigation Home Screen, tap Where to?
From this screen, you can tap in the search bar to bring up a keyboard and begin typing an address, point of interest, or any other destination type. The single-line search will return matching results below.
1 Address/Text Search
Search for addresses, streets, cities and points of interest.
- Address searches should include either a city or postal code.
- Avoid using punctuations.
- Avoid using street prefixes and suffixes.
2 MatchingResults
Destinations that match your search terms display here. The address, city, and state display to the left. The distance from your current location displays on the right. Tap a destination to begin navigation.
3 See on Map
Tap to view the listed destinations on a map in a split-screen view.
4 Selected Destination
Tap a destination from the list to select it. The address, coordinates, and Motor Carriers' Road Atlas reference page are displayed.
5 Navigate
Tap to begin navigation to the selected destination.
6 Back
Tap to return to the previous screen.
7 Go to Map
Tap to return to the navigation screen.
3. Rand Navigation 2.0

Guided Search
To access Guided Search, either tap Guided Search from the top-right of the Single-line Search screen, or tap the magnifying glass icon from the Main Menu.
1 New Location
Tap to route to a destination by address, city center, intersection, or latitude and longitude coordinates.
2 My Trips
Tap to review your saved trips.
3 History
Tap to review your recent destinations.
4 Address Book
Tap to select a destination from your Address Book.
5 POIs
Tap to begin a point of interest search.
6 Add Home
Tap to route to your stored Home location.
7 Add Work
Tap to route to your stored Work location.
8 Back
Tap to return to the previous screen.
9 Go to Map
Tap to return to the navigation screen.
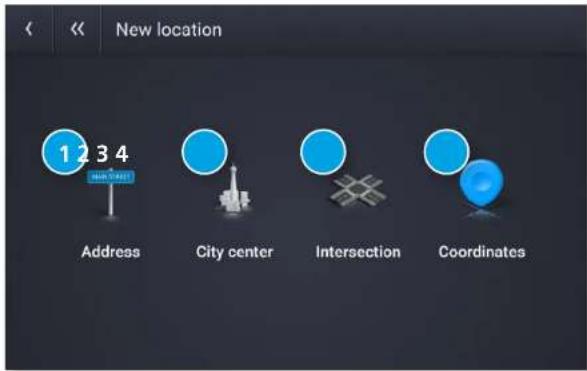
New Location Menu
1 Address
Navigate to an address by entering the city (or postal code), street, and house number.
2 CityCenter
Navigate to a city center.
3 Intersection
Navigate to the intersection of two roads within a specified city.
4 Coordinates
Navigate to a location by entering its numeric latitude and longitude.
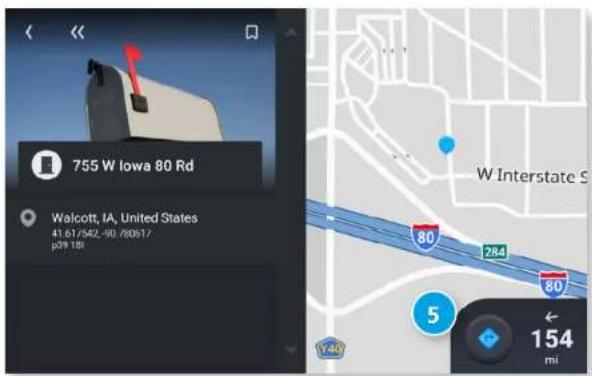
5 Navigate
Once you select your destination through the guided search, click the Navigate button to begin navigation.
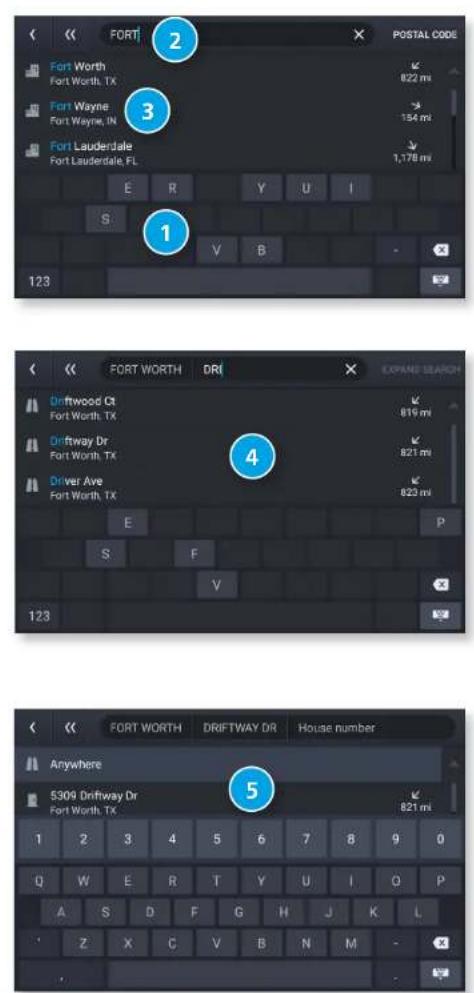
Entering a New Location
The Guided Search Keyboard helps you quickly locate your destination.
1 Auto-Complete Keyboard
As you key in characters, the keyboard only displays next possible letters or numbers. Letters and numbers that cannot be entered in sequence are disabled. Search results are displayed as you key in characters.
2 DestinationEntry
The top bar displays the current search entry.
3 Guided Search: City/Postal Code
Displays the available city/postal code selections based on the information you entered. Tap a result to advance.
4 Guided Search: Street
Displays the available street name selections based on the city you selected, and the information you entered. If the next letter in the street name cannot be selected on the keyboard, tap Expand Search to search a larger area. Tap a result to advance.
5 Guided Search: House Number
Displays the available house numbers based on the city and street selected, and the information you entered. Tap a result to advance.

My Trips
1 Multi-Stop Trips
Tap to view a list of saved multi-stop trips or to create a new one.
2 Trails
Use Trails to record a "bread-crumb" path where your truck travels.
3. Rand Navigation 2.0


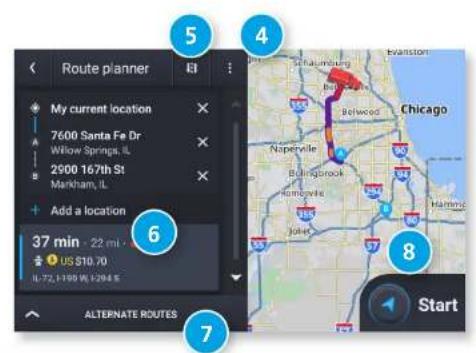
Multi-Stop Trips
Displays a list of recent destinations.
1 Tap to review and edit a saved trip.
2 Tap + NEW TRIP to create a new multi-stop trip.
3 Trip details:
Displays the stops along your trip.
Tap the X to remove a stop.
Tap + Add a Location to add a new stop.
4 Tap to view Route avoids, Route details, and Overview. Also tap to Save to My trips.
5 Tap to Reverse or Reorder your stops (manually or automatically).
6 Displays the travel time, traffic delays (if any), and estimated toll costs for the first leg of your trip.
7 Tap to compare and select alternate routes.
8 Tap to begin navigation.

Trails
Use Trails to record a "bread-crumb" path where your truck travels. The Trails feature is beneficial when traveling in areas where there is no marked road network.
1 Tap to open an existing trail.
2 Tap to record a new trail.
3 Tap to edit or delete a trail.
4 Tap to stop recording.
5 View details about the trail.
6 Tap to begin navigation. Routing to an existing trail will take you to the start of the trail. You can then follow the rest of the trail to your destination.
7 Tap to edit or delete the trail.
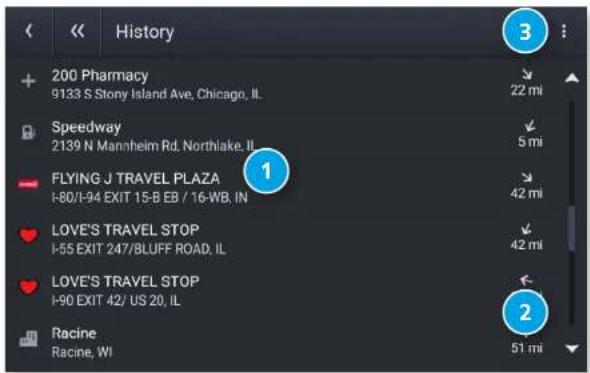
History
Displays a list of recent destinations.

Recent Destinations
Tap an entry in the list to navigate to the destination.

Distance
Displays the distance to each destination from your current location.

Options
Tap to access additional options:
- Edit: Allows you to select and delete an entry from the history list.
- Clear History: Deletes all entries.

Address Book Menu
Displays your saved bookmarks, contacts, and groups.
1 Bookmarks
Navigate to a saved address.
2 Contacts
Navigate to a stored address from a saved contact.
Note: Contacts are stored in the Contacts app. You can add contacts manually or import them.
3 Groups
Organize your bookmarks and contacts in groups.

Address Book: Bookmarks
4 Destinations
Tap a bookmark to navigate to the destination.
5 Alphabetic Organization
Tap a letter group to view bookmarks alphabetically. This is useful if you have a lot of bookmarks and they are difficult to find.
6 Options
Tap to search, sort, edit, add or delete bookmarks.
7 New bookmark
Tap to add a new bookmark.
3. Rand Navigation 2.0
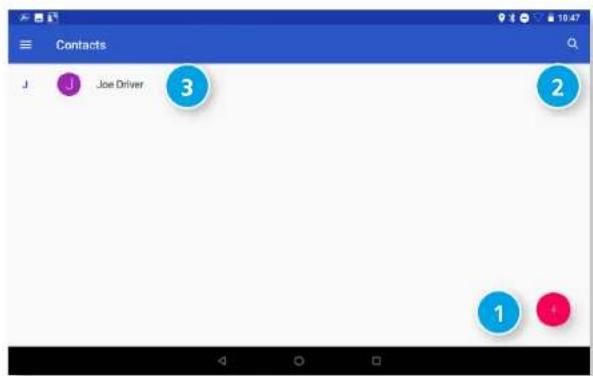
Address Book: Contacts
In order to use contacts for navigation, you first need to set them up in the Rand Navigation 2.0 app. You can add contacts manually or import them.
1 Add a New Contact
Tap to manually create a new contact.
2 Search
Tap to search for an existing contact.
3 Contacts
Tap a contact's name to view and edit information about that contact.

4 Create New Contact screen
Enter information about the contact.
Tap Save to save and return to the previous screen.
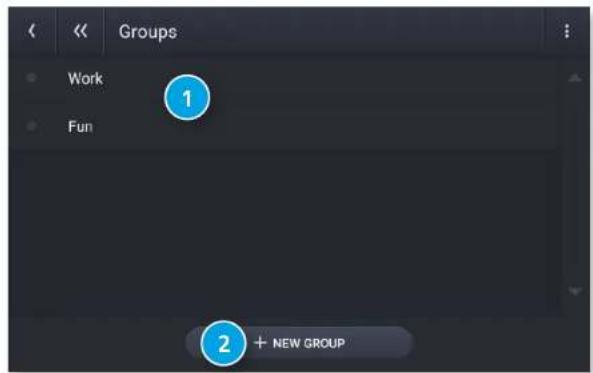
Address Book: Groups
Use Groups to organize your contacts and destinations into categories for easier searching.

Groups
Displays groups you have created.

NewGroup
Tap to create a new group.


Group Destinations
Displays the destinations stored in the selected group.
Tap a destination to begin navigation.

Group Options
Tap in the corner to edit or delete destinations in a group.

Add Location
Tap to add a new location to the group.
You can add a new address or select from your history, bookmarks, or POIs.

POIs
Displays Points of Interest (POIs) near your current location, near a specific location, along your intended travel route, or near your destination.
1 My Truck
Tap to display POIs near your current location.
2 Acity
Tap to display POIs near a specific city.
3 My route
Tap to display POIs along your route if you have one set.
4 My destination
Tap to display POIs near your destination if you have one set.
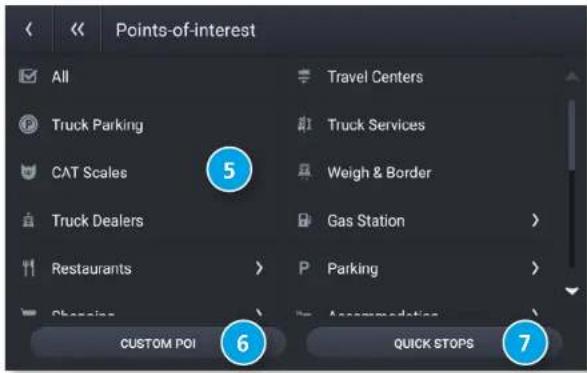
5 POI Categories
Tap to select the POI category.
Note: Some categories may have multiple subcategories.
6 Custom POI
Tap to display custom POIs from an import.
7 Quick Stops
Displays a list of commonly-searched POI categories.

Filter POIs
Truck-related points of interest such as Travel Centers and Truck Services can include several amenities. To review only the locations with particular amenities you can filter your search results.
1 Nearby Places
Lists destinations near your location that match the selected category.
2 Map
Displays destinations near your location.
3 Filter
Search for points of interest by available services.
4 Search
Search for points of interest by name.

5 Tap a checkbox for a subcategory to include it in your search.
6 Tap to clear the filters.
7 Tap to go back and view the filtered POI list.
Note: Filter selections will remain active until you clear them.
POIs
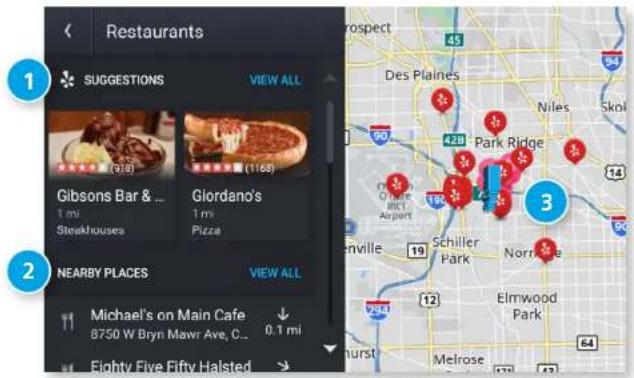
When you select a POI category, the system will display suggestions provided by Yelp (if available) and other nearby places.
Note: A Wi-Fi connection is required in order to display Yelp information.
1 Yelp Suggestions
Displays top-rated suggestions from Yelp. Tap a destination to view additional information and begin navigation.
2 Nearby, Along route or My destination
Displays matching POIs near the location specified along with the distance to each destination. Tap a destination to view additional information and begin navigation.
3 Map
Displays POIs near your truck, a city, your route, or your destination.
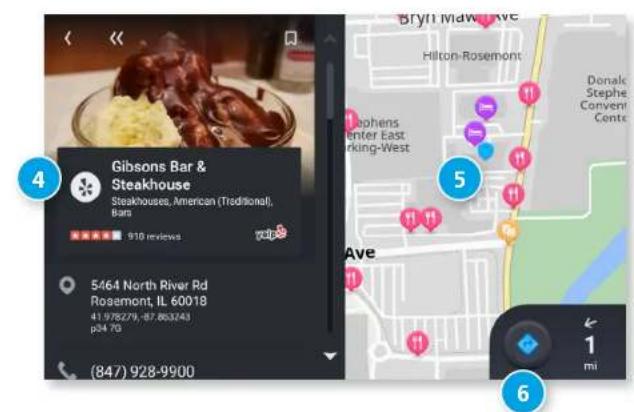
4 More information
Displays additional information about the POI, including Yelp review information, address and phone number. Tap the Reviews link to view reviews on yelp.com.
5 POI Destination
Displays the selected POI on the map, along with the locations of other nearby places.
6 Navigate
Tap to begin navigation to the selected POI.

Home and Work Locations
You can set bookmarks for a Home and a Work location. This is useful so you can quickly navigate to these destinations.
Tap Add Work or Add Home to set these locations.
1 Select Location
Tap New Location, History, or POIs to set a Home or Work destination from among these options.
2 Choose on Map
Tap to set your Home or Work location by selecting a point on the map.
3 Use Current Location
Tap to set your Home or Work location to your current location.

4 Create/Remove Bookmark
Use this button to create or remove a bookmark.
5 Home/Work Information
Displays information about your Home or Work location.
6 Navigate
Tap to navigate to Home or Work.

History & Bookmarks

History
Displays previous destinations. Tap a destination to begin navigation.
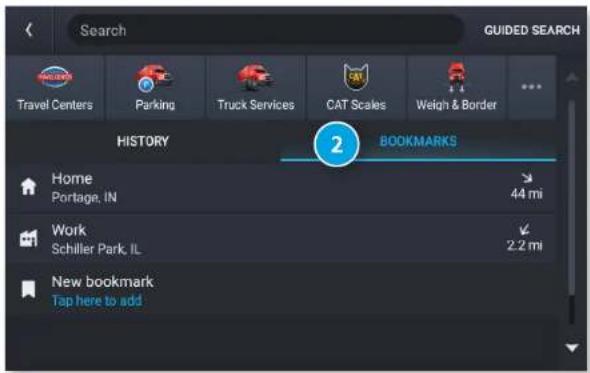

Bookmarks
Displays your saved locations. Tap a location to begin navigation.
Route Map Window

1 NextManeuver
Instructions for your next maneuver.
2 RoadName
Next maneuver street name or highway sign.
3 Exits
Check upcoming exits for food, gas, hotels and other places.
4 Route Options
Tap to display additional options, including adding a stop, detours, and ending navigation.
Tap to switch the map view: 3D map, North up, or Heading up.
7 Battery power status and charging indicator
8 Wi-Fi Connected Services
Tap to enable fuel prices, weather and traffic on the map.
Note: These options require a Wi-Fi connection.
9 ZoomIn/ZoomOut
10 Announcements
11 Distanceremainingtoyourdestination
Displays a progress bar indicating the distance remaining to your destination.
12 Expanded Map Display
Tap to remove additional options from the map screen.
13 Settings
Tap to open the Navigation Settings screens.
14 ETA/Time/Distance
Tap to toggle between displaying ETA, Yard ETA, Remaining Time, Yard Time, and Elevation.
15LocationView
Tap to toggle between displaying the current location by city, street name, or next cross street.
16 VirtualDashboard
Tap to view information about your current location, route, trips, and more.
17 Current Speed
Displays your current speed and turns red for speed warnings.
18 SpeedLimit
Posted speed limit for your vehicle setting.
Tap to open a screen to submit a speed limit correction.
19 Map
Displays the map, your current route, and your vehicle's current location.
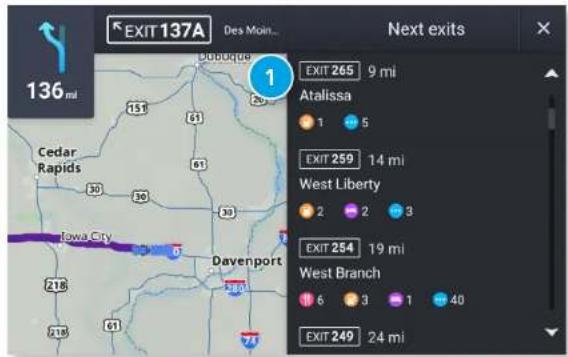
Exits
Slide out to show points of interest at upcoming exits. The list displays the distance to the next exit, exit name and number, and a count of available amenities.
1 Tap on an exit to display a list of POIs at the exit.

2 Tap the icon to display locations by category.
3 Tap on any item in the list to view additional information or to route to the POI.

Route Options
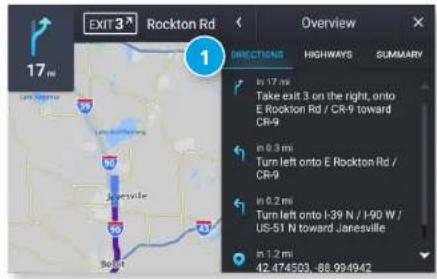
1 Route Overview
Displays the directions, highways, and summary of your trip.
2 SaveTrip Tap to save a new trip with different color settings and a note field.
3 AddStop Tap to add additional destinations to your route.
4 Detour/Avoid Tap to manage locations to avoid on the route and automatically calculate detours around them.
5 Route Settings
Tap to open the Route tab of the Settings screen.
6 Skip to Next Stop Tap to skip the next destination in your route and continue.
7 Stop Navigation Tap to cancel the current route and return to the home screen.
8 Exit Tap to close Route Options and resume navigation.
Directions Tab
Highways Tab

Summary Tab

Route Overview
Directions Tab
Displays the turn-by-turn directions for the current route.
2 HighwaysTab
Displays only the highways along your route, with the number of miles to travel on each.
3 Summary Tab
Displays the total travel time and distance for your route, as well as summaries for each leg of the trip for multi-stop trips.
3. Rand Navigation 2.0
Detour/Avoid
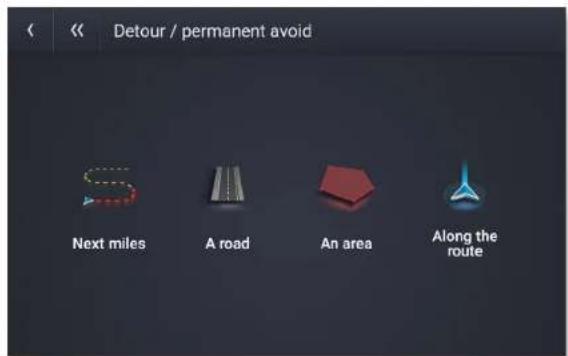
From Route Options, tap Detour/Avoid. There are four options available to set up detours and permanent avoids:
1 Next miles allows you to detour a certain number of miles. Use the slider to set the number of miles to detour/avoid.
2 A road allows you to avoid a specific road.
3 An area allows you to draw a polygon on the map to avoid.
4 Along the route allows you to select a step in your navigation to avoid.

When selecting next miles, use the slider to set the number of miles that are next along your route to avoid. Tap Detour to being using the new route.
Detour/Avoid
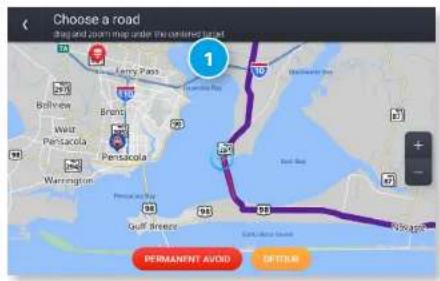
When selecting A road, zoom in and out on the map to center the target over the road to avoid. The road is highlighted in red. Tap Permanent Avoid to always avoid it. Tap Detour to avoid it on this trip only.

When selecting An area, tap on the map to set points for an area to avoid. Tap Permanent Avoid to always avoid it. Tap Detour to avoid it on this trip only.
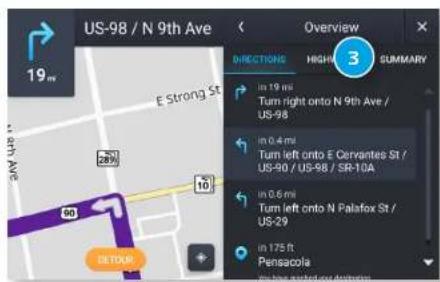
When selecting Along the route, select the step on the route you wish to avoid. Tap Detour to navigate around it.


Weather
When enabled, Weather displays current weather condition overlays on the map.
Notes:
- Requires a Wi-Fi connection.
- The refresh speed of the weather display is dependent on your connection speed. Weather information is updated every few minutes when a Wi-Fi connection is active.
- Weather display depends on active weather patterns and map zoom level.
To view current weather information and the three-day forecast for your location, tap the gear icon on the map screen and tap the Weather slider.
1 Tap to enable weather.
2 Tap to view details and enter settings.
3 Select to view weather at your current location or at your destination.
4 Current weather conditions at the selected location.
5 Three-day forecast for the selected location.
6 Tap to view and change weather overlay preferences such as layer opacity and weather type.

Traffic
To view traffic information, tap the gear icon on the map screen and then the Traffic slider. Traffic conditions will overlay on the map when traffic is enabled.
Note: Requires a Wi-Fi connection.
1 Tap to enable traffic.
2 Tap to view details and enter settings.

3 Select to view traffic flow, incidents, or all.
4 Current traffic conditions/incidents along your route.
5 Your distance to the traffic conditions/incidents.
3. Rand Navigation 2.0
Traffic Icons


Fuel
To view fuel price information, tap gear icon on the map screen and then the Fuel slider. Current fuel prices will overlay on the map at various stations when enabled and available.
Note: Requires a Wi-Fi connection.
1 Tap to enable fuel prices.
2 Tap to view details and enter settings.

3 Select to view fuel prices either nearby or along your route.
4 Displays the fuel stations based on the criteria you selected
5 Displays the distance to each station.
6 Sort by distance or price.
7 View and change fuel preferences such as fuel types and stations to display on the map.
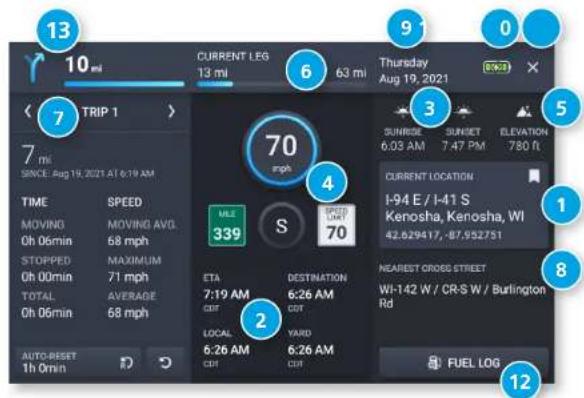
Virtual Dashboard
1 Current location.
2 Current times at the yard, current location and destination, as well as estimated time of arrival.
3 Sunrise and sunset times based on vehicle location (latitude/longitude) and time of day.
4 Current speed (above) and posted speed limit (below).
Note: Turns red when speed limit warning exceeded.
5 Elevation at current location.
6 Current leg progress.
7 Information for up to three trips. Includes odometer, time and speed information.
8 Nearest cross street.
9 Current day and date at your location.
10 Battery power status and charging indicator
11 Return to the route map.
12 Add fuel purchase information.
13 Distance to next maneuver.
3. Rand Navigation 2.0

Fuel Logs
- From the Virtual Dashboard, tap Add Fuel.
- Tap a field to enter information. You can edit the following fields: Date, Taxable, Fuel quantity, Fuel price, Total cost, Location, Station, Last odometer, and Current odometer. Distance, Current economy, and Average economy are calculated automatically based on your entries.
- Tap Save to record a fuel purchase.

Junction View
When on a route, Junction View displays when you have an upcoming maneuver. Set distance in Settings > Route. Once past the maneuver, Junction View closes and the previous window displays.
1 Signs to follow for the next maneuver. Includes exit number and highway name/number if applicable.
2 Distance to the upcoming maneuver. Distance decreases as you approach.
3 Lane assist arrow.
4 Return to previous window.

Turn View
Displays for upcoming turns. Set distance in Settings > Route.
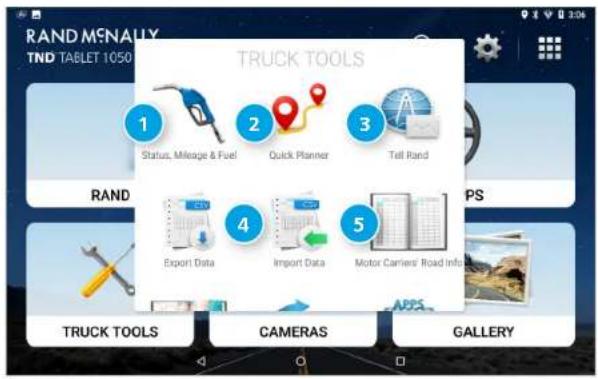

Truck Tools
To access, tap Truck Tools from the Main Menu.
1 Status, Mileage & Fuel
View driving information, mileage logs, and fuel purchase information.
2 QuickPlanner
Quickly calculate the distance, driving time, and cost to travel between any two cities or towns.
3 Tell Rand
Compose a message to send to Rand McNally.
4 Import Data & Export Data
Transfer address books, custom POIs, and saved trips from your old TND device or to a new one.
5 Rand Motor Carrier's Road Info
View Rand McNally's index of helpful roadside emergency contact information and truck regulations.
6 Rand Motor Carrier's Road Atlas
A digital version of Rand McNally's Motor Carriers' Road Atlas.
7 BackUp
8 Get Apps
Install third-party Android app stores (requires Wi-Fi).
9 Notes
10 Calendar
11 Calculator
12 Unit Converter
Quickly convert distance, weight, temperature, and many more.
4. TripMaker®
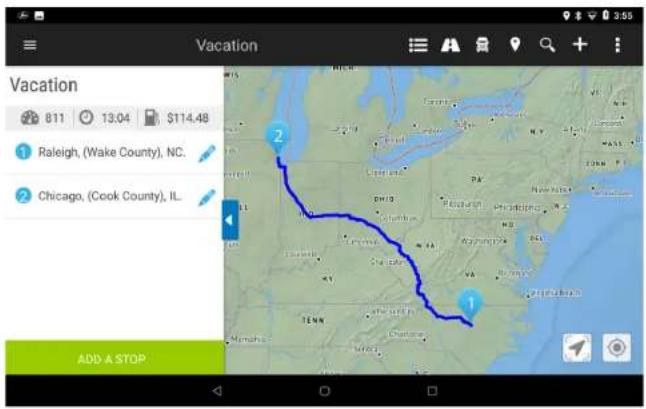
TripMaker
To access TripAdvisor, tap the App Tray icon on the home screen.
TripMaker is a trip planning app that allows you to easily browse the map and set up a multi-stop trip. Add via points and send your trip to the Rand Navigation 2.0 app for truck-friendly routing.
Please note that TripMaker does not provide truck routing.
View Help in the TripAdvisor app to learn more.
5. Motor Carriers' Road Atlas
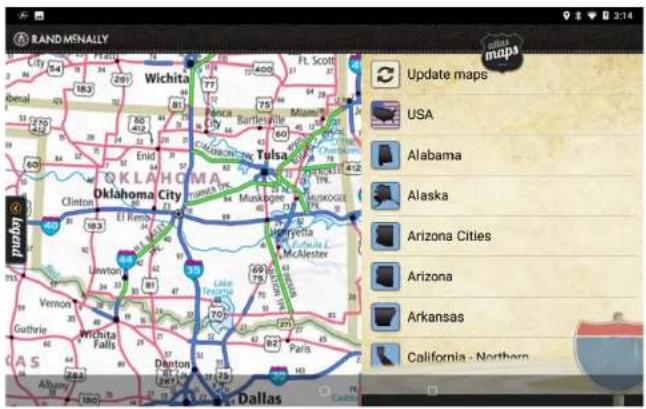
Motor Carriers' Road Atlas
A digital version of Rand McNally's Motor Carriers' Road Atlas.
Tap Maps at the top right to select pages by state.
Tap Legend at the left to view the map legend.
Swipe with one finger to move the center of the map.
Use two fingers to zoom in and out.

Cameras
Use the camera app to take pictures and videos, such as for inspection reports.
1 Take a photo.
2 Start or stop recording a video.
3 Adjust camera settings.
4 Adjust image settings.
5 Panoramic photo mode.
6 Gallery.
7 Turn on/off HDR capture for photos.
7. DriverConnect

DriverConnect
The DriverConnect app provides a fully-compliant electronic logbook solution. DriverConnect lets you track and log Hours of Services, Driver-Vehicle Inspection Reports, Fuel purchases, and more. Reports can be generated for roadside inspections.
The DriverConnect app connects to a Rand McNally Electronic Logging Device (ELD) over a Bluetooth connection. The app automatically syncs driving data from the ELD with the Rand McNally DriverConnect portal via a Wi-Fi or cellular transmission.
Visit randmcnally.com/category/e-logs for up-to-date information on compatible ELDs.
DriverConnect
Electronic Logs
Manage your logs anytime, anywhere
Gauges
Keep track of your vehicle metrics
HOS Timers, Messaging and more
SIGN UP
LOGIN
Sign Up or Log In
To use DriverConnect, you must log in with an existing account or create a new account. If you are part of a fleet, your Fleet Manager will provide login information for you.
Visit driverconnect.randmcnally.com to access the DriverConnect portal.
For more information
• Rand McNally Website randmcnally.com/trucking
• Support
randmcnally.com/support
• GPS accessories
store.randmcnally.com
• Facebook
facebook.com/randtrucking
Trademarks
Rand McNally, the Rand McNally logo, the globe logo, and IntelliRoute are registered trademarks and TND is a trademark of RM Acquisition LLC, d/b/a Rand McNally.
Travel center data provided by DC Book Co.
TruckDown is a registered trademark of TruckDown Info International, Inc.
Wi-Fi is a registered trademark of the Wi-Fi Alliance.
Weather data provided by VAISALA.
Fuel prices provided by OPIS.
Traffic information provided by INRIX, Inc.
© 2022 Rand McNally. © 2022 HERE. All rights reserved.
Rand McNally follows a continuous improvement process and reserves the right to provide enhancements that may not be reflected in the pictures and specifications in this manual.
The information contained herein may be changed at any time without prior notification. Neither this manual nor any parts thereof may be reproduced for any purpose whatsoever without the express written consent of Rand McNally, Inc., nor may it be transmitted in any form either electronically or mechanically, including photocopying, and recording. All technical specifications, drawings, etc. are subject to copyright law.
- FCC Compliance Statement
- IC Compliance Statement
- IC Caution
- Customer Support
- Table of Contents
- Caution: Important Safety Information
- Navigation
- Installation
- Device
- What's Included
- Three mounts:
- Mounting the TND™ Tablet 1050
- Option 1: Screw Down Mount
- Notes:
- Option 2: Suction Cup Mount
- Option 3: Ball Mount Bracket
- Powering Up
- Connecting to Wi-Fi
- Registration
- Android User Interface
- Main Menu
- TND Tablet 1050 Settings
- Android Settings
- Rand Navigation 2.0
- Rand Navigation
- Single-line Search
- Battery Meter
- Map View Mode
- Wi-Fi Connected Services
- Zoom
- Return to current location
- VirtualDashboard
- Street/Intersection/Location
- Local Time/Elevation
- Navigation Settings
- Full Screen
- Navigation Settings
- Day/Night Mode
- Map
- OptionsMap
- Options
- Truck POI Icons
- Address Book Icons
- Truck Icon
- Bus Icon
- Car/Light truck Icon
- Warnings Options
- Warning Type None
- Auto Dismiss Warnings Never
- Curve Warnings On/Off slider
- Hill Warnings On/Off slider
- Engine Brake Warnings On/Off slider
- Narrow Road Warnings On/Off slider
- Construction Area On/Off slider
- Speed Limit On/Off slider
- Speed Limit Change On/Off slider
- Weigh Station On/Off slider
- State/Province Border On/Off slider
- Timezone Change On/Off slider
- Toll Booth Alert On/Off slider
- Maintenance On/Off slider
- Destination Search
- GuidedSearch
- Points of Interest
- History
- Bookmarks
- Distance
- Back
- Single-line Search
- Address/Text Search
- MatchingResults
- See on Map
- Selected Destination
- Navigate
- Back
- Go to Map
- Guided Search
- New Location
- My Trips
- History
- Address Book
- POIs
- Add Home
- Add Work
- Back
- Go to Map
- New Location Menu
- Address
- CityCenter
- Intersection
- Coordinates
- Entering a New Location
- Auto-Complete Keyboard
- DestinationEntry
- Guided Search: City/Postal Code
- Guided Search: Street
- Guided Search: House Number
- My Trips
- Multi-Stop Trips
- Trails
- Multi-Stop Trips
- Trails
- History
- Recent Destinations
- Distance
- Address Book Menu
- Bookmarks
- Contacts
- Groups
- Address Book: Bookmarks
- Destinations
- Alphabetic Organization
- Options
- New bookmark
- Address Book: Contacts
- Add a New Contact
- Search
- Contacts
- Create New Contact screen
- Address Book: Groups
- Groups
- NewGroup
- Group Destinations
- Group Options
- Add Location
- POIs
- My Truck
- Acity
- My route
- My destination
- POI Categories
- Custom POI
- Quick Stops
- Filter POIs
- Nearby Places
- Map
- Filter
- Search
- Yelp Suggestions
- Nearby, Along route or My destination
- Map
- More information
- POI Destination
- Navigate
- Home and Work Locations
- Select Location
- Choose on Map
- Use Current Location
- Create/Remove Bookmark
- Home/Work Information
- History & Bookmarks
- Bookmarks
- NextManeuver
- RoadName
- Exits
- Route Options
- Battery power status and charging indicator
- Wi-Fi Connected Services
- ZoomIn/ZoomOut
- Announcements
- Distanceremainingtoyourdestination
- Expanded Map Display
- Settings
- ETA/Time/Distance
- 15LocationView
- VirtualDashboard
- Current Speed
- SpeedLimit
- Map
- Exits
- Route Options
- Route Overview
- Directions Tab
- HighwaysTab
- Summary Tab
- Detour/Avoid
- Weather
- Traffic
- Fuel
- Virtual Dashboard
- Fuel Logs
- Junction View
- Turn View
- Truck Tools
- TripMaker®
- TripMaker
- Please note that TripMaker does not provide truck routing.
- Motor Carriers' Road Atlas
- Motor Carriers' Road Atlas
- Cameras
- DriverConnect
- DriverConnect
- Sign Up or Log In
- For more information
- Trademarks
Brand : Rand McNally
Model : TND Tablet 1050
Category : Tablet