
WSC1215-T-B - Heating KING - Free user manual and instructions
Find the device manual for free WSC1215-T-B KING in PDF.


| Type of Product | Portable Electric Heater |
| Model | WSC1215-T-B |
| Brand | KING |
| Heating Element | Ceramic / Fan-Forced |
| Power Rating | 1500W (max) |
| Voltage | 120V / 60Hz |
| Dimensions (H x W x D) | 25 cm x 20 cm x 30 cm |
| Weight | 2.5 kg |
| Thermostat | Adjustable thermostat |
| Heat Settings | High (1500W), Low (750W), Fan Only |
| Safety Features | Overheat protection, Tip-over switch |
| Control Type | Manual dial / switch |
| Portability | Carrying handle |
| Noise Level | Low (≈40 dB) |
| Room Coverage | Up to 200 sq ft |
| Filter Type | Washable air filter |
| Maintenance | Clean filter monthly; wipe exterior with damp cloth |
| Warranty | 1 year limited warranty |
| Spare Parts Availability | Contact KING customer service |
| User Manual | Downloadable PDF from notice-facile.com |
Frequently Asked Questions - WSC1215-T-B KING
User questions about WSC1215-T-B KING
0 question about this device. Answer the ones you know or ask your own.
Ask a new question about this device
Download the instructions for your Heating in PDF format for free! Find your manual WSC1215-T-B - KING and take your electronic device back in hand. On this page are published all the documents necessary for the use of your device. WSC1215-T-B by KING.
USER MANUAL WSC1215-T-B KING
IMPORTANT INSTRUCTIONS

W Fan Force Electric Space Heater


natural_image
Front view of a white ventilation grille with uniform grilles and ventilation slots (no text or symbols visible)Figure 1
Covers all W Series models
! DANGER !
ELECTRIC SHOCK OR FIRE HAZARD
Read all wire sizing, voltage requirements and safety data to avoid property damage and personal injury.

WARNING

Read Carefully - These instructions are written in an effort to prevent potential difficulties that might arise during installation. Studying the instructions first may save you considerable time and money later. Observing the following procedures will keep installation time to a minimum. Save these instructions for future use .
IMPORTANT INSTRUCTIONS
When using electrical heating appliances, basic precautions should always be followed to reduce the risk of fire, electric shock and injury to persons, including the following:
-
Read all instructions before wiring or using this heater.
-
WARNING: This heater is hot when in use. To avoid burns, do not let bare skin touch hot surfaces. Keep combustible materials, such as furniture, pillows, bedding, papers, clothes, boxes, etc., and curtains at least 3ft (.9 m) from the front of the heater and keep them away from the sides and rear.
-
CAUTION: Extreme caution is necessary when any heater is used by or near children or invalids and whenever the heater is left operating and unattended.
-
Do not operate any heater after it malfunctions. Disconnect power at service panel and have heater inspected by qualified electrician for repair before reusing.
-
Do not use outdoors.
-
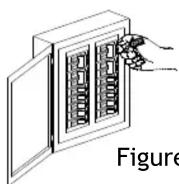
WARNING: To disconnect heater, turn controls to OFF, and turn OFF power to heater circuit at

Figure 2
main disconnect panel.
-
WARNING: Do not insert or allow foreign objects to enter any ventilation or exhaust opening as this may cause an electric shock, fire, or damage to the heater.
-
To prevent a possible of fire, do not block air intakes or exhaust in any manner.
-
A heater has hot and arching or sparking parts inside. Do not use it in areas where gasoline, paint, or flammable vapors or liquids are used or stored.
-
WARNING: Use this heater only as described in this manual. Any other use is not recommended by the manufacturer and may cause fire, electric shock, explosion or injury to people and or property.
SAVE THESE INSTRUCTIONS
W INSTALLATION INSTRUCTIONS
CAUTION!
Turn OFF all electrical power to install heater
Figure 2

DANGER

ELECTRIC SHOCK OR FIRE HAZARD
Read all wire sizing, voltage requirements and safety data to avoid property damage and personal injury.
Figure 3
Selecting A Location For Your Heater:
DO NOT install less than 6" (15cm) from vertical side walls or open edge of door. This heater must have an unrestricted airflow. DO NOT select a location where it is likely to be blocked by furniture, curtains, etc. Be sure the location selected allows sufficient space for the heater as shown by Table 1. DO NOT locate this heater in an area where combustible vapors, gases liquids, or excessive lint, dust or moisture is present.
Minimum Clearances for heater: Table 1
| Front TOP BOTTOM SIDES | |||
| 36 in | 12 in | 4 in | 6 in |
| 0.9 m 30.5 cm 10.2 cm 15.2 cm | |||
Zero clearance to insulation.
The wire and breaker sizing chart will give a general rule of installation size. Consult an electrician if you are not knowledgeable about wiring codes.
Wire and Breaker Sizing: Table 2
| Total Amps | Minimum AWG. Wire Size (Copper | Circuit Breaker or Fuse Size |
| 0 thru 12 #14 | 15 amp | |
| 12.1 thru 16 #12 | 20 amp | |
| 16.1 thru 24 #10 | 30 amp |
WIRING: Branch Circuit Connection
- Connect heater only to the voltage, amperage and frequency specified on the nameplate.
- Wiring procedures and connections shall be in accordance with all National and local codes having jurisdiction.
- Set the bag containing the grille and packet with two (2) grille screws aside.
- Loosen mounting screw and remove fan heater assembly.
- A knockout of 1/2 inch conduit size (7/8 inch / 2.2cm) is provided in the back and side of the heater for power to enter. Provide proper strain relief connectors for your wire entering the wallbox.
Rating Label Location

Figure 4
- Install wallbox a minimum of 6" from vertical sidewalls and 4" above floor. The front edge of wall can MUST extend 1/2" beyond finished wall surface.
- Secure wallbox to the 2 x 4 studs using the two (2) holes on the side of the wallbox. Secure to wall stud on opposite side if required.
- Connect supply wires, attach ground feed wire to the green ground wire with wire nuts.
- Reinstall heater assembly into wallbox with screw at top of interior.
- Install grille securely with screws provided in packet. Do not over tighten.
- Test unit by turning thermostat up past room temperature. You will see a puff of smoke as the elements are energized and the fan turns on. This is a normal burn off of manufacturing lubricants and will dissipate in 5 minutes.
- Heater will continue to run until the room temperature you set is reached and then turn itself off until the temperature drops again.
CAUTION - High temperature. Risk of fire, keep electrical cords, drapery, furnishings, and other combusti-
A bles at least 3 feet (0.9 m) from the front of the heater as well as away from the side and rear. To reduce the risk of fire, do not store or use gasoline or other flammable vapors and liquids in the vicinity of the heater.

Wiring Diagram
Figure 5
OPERATING INSTRUCTIONS
W Series Heater
king

This heater is equipped with a thermal overload Smart Limit Protection which disconnects elements and motor in the event normal operating temperatures are exceeded. If thermal overload trips due to abnormal operating temperatures, thermal overload shall remain open until manually reset by turning the heater OFF for fifteen minutes. Inspect for any objects on or adjacent to the heater that may cause high temperatures. After inspecting the heater, keep the power to the heater off for 10 minutes to reset the SLP thermal protector. If the SLP thermal protector shuts the heater off again, immediately turn the heater OFF at the circuit breaker and inspect the heater for possible fan motor failure or dirt and lint on the heating element. Repeat the starting procedure. DO NOT TAMPER OR REMOVE THIS THIS DEVICE.
General information and Guidelines:
This heater must be properly installed before it is used. DO NOT tamper with or change the operating of this heater. Service Personnel refer to Maintenance & Warranty section for service of any type.
Operation:
- This heater must be properly installed in accordance
with the National Electrical Codes (NEC) & local electrical codes before it is used.
- After the electric heater has been completely installed, all thermostats should be turned to LOW or NO HEAT. Turn ON breakers, wait 3 to 5 minutes and check to see that the heaters are not operating. If operating, disconnect power and check for improper wiring. If none are operating then turn thermostats to highest position and wait 3 to 5 minutes. Check to see that all heaters are operating. Should any not be operating, disconnect power and check wiring.
- Allow entire system to operate steadily for 1/2 hour. This should remove oily residue from manufacturing. (Some smoking may occur).
- Select the setting for comfort on all thermostats.
- A safety limit control is provided to turn off the heater automatically if it is blocked or otherwise overheats due to an abnormal condition. DO NOT bypass or remove this safety device from the electrical circuit-see Warning Figure 3 on page 2. During normal use, this safety control should not operate. If you find that this control is operating, make sure the heater is not being blocked. If it continues to cycle the heater off, disconnect power to heater and have it checked and repaired by a qualified electrician.
Table 3 Troubleshooting Chart for Electric Heaters
| SYMPTOM PROBLEM | SOLUTION | |
| Breaker Trips 1. Short Circuit2. Overloaded Circuit3. Improper Voltage | 1. Find source of short. Trace heater circuit and verify the heater is wire properly.2. Reduce wattage in circuit. Refer to circuit sizing table for maximum wattage.3. Verify the heater voltage matches the supply voltage. | |
| Heater not working 1. No Power2. Loose Connections3. Defective Limit | 1. Turn Breaker ON, turn thermostat ON, check that the breaker is position properly on panel bus-bar. A 2-Pole breaker must be connected to both bus-bars (A&B phase) to produce 240V power.2. Tighten wire connections.3. By-pass the limit to test. If heater works, replace the limit. | |
| Heater Smokes 1. Oil on Element2. Needs Cleaning | 1. It is normal for the element to burn off some light finishing oil used in the manufacturing process when first energized. Open windows and allow room to vent until it stops, usually within a few minutes.2. Remove any dust or dirt accumulations. | |
| Room Temperature does not match thermostat setting | 1. Thermostat affected by another heat source.2. Improper calibration | 1. Sunlight or other heat sources can affect the thermostat. Move the thermo stat to another location or remove the heat source.2. Remove cover and adjust calibration screw. |
| Room Temperature swings from too hot to too cold | 1. Defective or low quality thermostat | 1. Replace with a better quality thermostat. Anticipated thermostats are fairly accurate; an electronic thermostat is best. |
SAVE THESE INSTRUCTIONS
Maintenance & Warranty
Maintenance & Cleaning: Basic maintenance is listed below and should be performed annually. When necessary, any required servicing should be performed by qualified service personnel. Your heater will give you years of service and comfort with only minimum care. To assure efficient operation follow the simple instructions below.

WARNING: Turn the electrical power OFF at the electrical panel board (circuit breaker or fuse box) and lock or tag this panel board door to prevent someone from turning on power while you are working on this heater. Failure to do so could result in serious electrical shock, burns, or possible death.
Before cleaning this heater, the heating element of the heater must be cool. Figure 2
- Before removing grille, turn the electrical power OFF. Circuit breakers are often not marked correctly and turning the wrong breaker off could mean electricity is flowing to the heater, even if the heater does not appear to be working. If you are uncomfortable working with electrical appliances, unable to follow these guidelines, or do not have the necessary equipment, consult a qualified electrician. Once you verify the power is off completely, proceed to the next step.
- Remove screws and take off grille. Wash grille with hot soapy water and dry immediately
- Using a hair dryer or vacuum on blow cycle, hold the fan in place to prevent it from turning and blow debris back through the element. Do not touch element. Vacuum lose debris without touching the elements.
- Replace grille and secure with screws.
- Turn thermostat to desired setting.
- Turn power back ON at the electrical panel board.
Remote Wall Thermostat
Figure 6


Connection Diagram for Wall Mounted Single Pole Thermostat
- Red thermostat wire to black power supply wire.
- Black thermostat wire to black heater wire.
- White power supply wire to white heater wire.
- Connect all bare ground wires together.
Connection Diagram for Wall Mounted Double Pole Thermostat
- Connect the two red thermostat wires to the black and white power supply wires.
- Connect the two black thermostat wires to the black and white heater wires.
- Connect all the bare ground wires together.
Warranty Information
King Electrical Manufacturing Company will repair or replace, without charge to the original owner, any W Series heater found to be defective or malfunctioning within 1 year of installation. This warranty requires the owner or his agent install the equipment in accordance with the National Electrical Code, any other applicable heating or electrical codes, and the manufacturer's installation instructions. It further requires that reasonable and necessary maintenance be performed on the unit. Failure to properly maintain the unit will result in the warranty being voided. The company is not liable for abuse or misuse of product as may be finally determined by the company. The customer shall be responsible for all costs incurred in the removal or reinstallation of products, including labor costs and shipping costs incurred to return products to King Manufacturing. King Manufacturing will repair or replace, at our option, at no charge to the customer with return freight paid by King. King Manufacturing shall not be liable for consequential damages arising with respect to the product, whether based upon negligence, tort, strict liability or contract. No other written or oral warranty applies, nor any warranties by representatives dealers, employees of King, or any other person. All returns require a King Return Goods Authorization (RGA); Unauthorized returns will be refused. Do not return malfunctioning/defective products to store.
- IMPORTANT INSTRUCTIONS
- ! DANGER !
- WARNING
- SAVE THESE INSTRUCTIONS
- W INSTALLATION INSTRUCTIONS
- Selecting A Location For Your Heater:
- WIRING: Branch Circuit Connection
- OPERATING INSTRUCTIONS
- W Series Heater
- General information and Guidelines:
- Operation:
- Maintenance & Warranty
- Remote Wall Thermostat
- Warranty Information
Brand : KING
Model : WSC1215-T-B
Category : Heating