
407026 - Luxmeter Extech - Free user manual and instructions
Find the device manual for free 407026 Extech in PDF.


| Product Type | Heavy Duty Light Meter (Luxmeter) |
| Brand | Extech |
| Model | 407026 |
| Category | Luxmeter |
| Display | 3.5 digit (1999 count) LCD with contrast adjustment |
| Measurement Ranges (Lux) | 0-1,999 / 1,800-19,990 / 18,000-50,000 (3 ranges) |
| Measurement Ranges (Foot-candles) | 0-186.0 / 167-1,860 / 1,670-5,000 (3 ranges) |
| Accuracy | ± (4% + 2 digits) full scale |
| Sampling Rate | 0.4 seconds per reading approx. |
| Functions | Data Hold, Relative (%), MAX-MIN-AVG Recording, Light Source Selection (Tungsten/Daylight, Fluorescent, Sodium, Mercury), Zero Calibration, Auto Power Off, PC Interface |
| Sensor Type | Cosine and color corrected photo diode (CIE compliant) |
| Power Supply | 9V battery (rear compartment) |
| Battery Life | Approximately 200 hours (5 mA DC consumption) |
| Auto Power Off | After 10 minutes of inactivity (defeatable in record mode) |
| PC Interface | RS-232 serial port for data streaming (optional USB cable #407001-USB and software required) |
| Dimensions (Meter) | 180 x 72 x 32 mm (7.1 x 2.8 x 1.3 in) |
| Dimensions (Sensor) | 85 x 55 x 17.5 mm (3.3 x 2.2 x 0.7 in) |
| Weight | 320 g (0.71 lbs) |
| Operating Temperature | 32 to 122°F (0 to 50°C) |
| Humidity | <80% RH |
| Warranty | Limited 3-year warranty |
| Cleaning | Damp cloth with mild detergent; no abrasives or solvents |
| Battery Replacement | When low battery indicator (LBT) appears; use 9V battery, observe polarity |
| Accessories | Optional PC interface cable (407001-USB) and software (downloadable from FLIR support) |
Frequently Asked Questions - 407026 Extech
User questions about 407026 Extech
0 question about this device. Answer the ones you know or ask your own.
Ask a new question about this device
Download the instructions for your Luxmeter in PDF format for free! Find your manual 407026 - Extech and take your electronic device back in hand. On this page are published all the documents necessary for the use of your device. 407026 by Extech.
USER MANUAL 407026 Extech
Congratulations on your purchase of the Extech Heavy Duty Light Meter. This meter offers selectable lighting types, MAX-MIN-AVG recording, relative display mode, and PC interface. This professional meter, with proper care, will provide years of reliable service.
Description
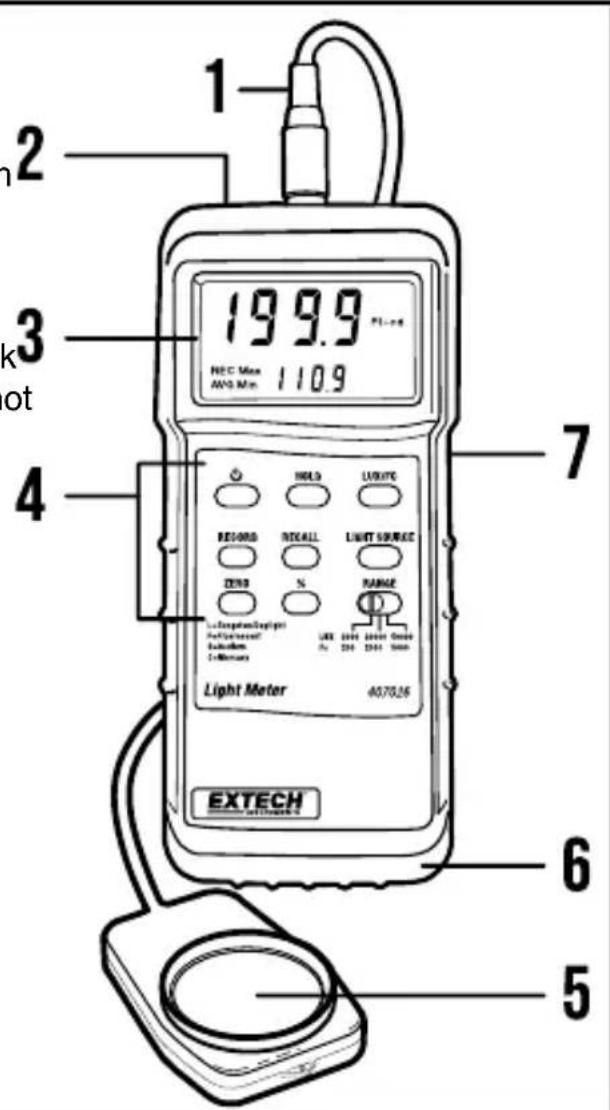
Meter Description
- Sensor connection
- PC interface port
- Display (LCD)
- Control buttons and range switch
- Sensor lens
- Protective holster jacket
- Display contrast adjustment
Notes: Battery compartment on back of meter. Protective sensor cover not pictured.
Display Description
| 1. Primary display for light measurement and relative (%) mode readings.2. Function indicators.3. Measurement units.4. Secondary display for MAX-MIN-AVG readings and lighting type icons. Also used to extend the primary display digits in the higher ranges (see Measurement Procedure section). | 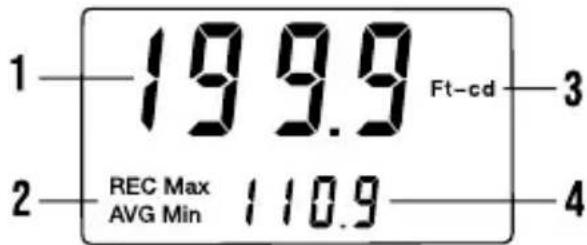 |
Button and Switch Descriptions
| Press to switch meter ON or OFF. | |
| HOLD Press to freeze the displayed reading. Press again to exit. | |
| LUX/FC | Press to change measurement units. |
| RECORD Press to access and exit the MAX-MIN-AVG mode. | |
| RECALL Press to step through MAX-MIN-AVG readings in Record mod | |
| LIGHT SOURCE | Press to step through the available lighting types. |
| ZERO With the sensor covered, press to zero the display. | |
| % | Press to store reading. Subsequent measurements will be c played as a percentage of the stored reading. Press again |
| RANGE Slide the switch to the desired range. | |
Operation
Meter Power
- Press the power button to switch the meter ON or OFF. If the display does not switch ON, replace the 9 V battery in the rea compartment.
- The meter switches OFF after 10 minutes of inactivity. To defeat this feature, press the RECORD button to put the meter in the recording mode.
Zero Calibration
Perform a zero calibration before each use, to ensure the highest accuracy.
- Place the supplied cover over the light sensor, effectively blocking all light to the sensor.
- Select the 2000 lux range using the RANGE switch.
- Press the ZERO button and verify that the meter reads zero.
- Remove the sensor cover from the light sensor.
Measurement Units
Press the LUX/FC button to select the desired unit of measure. The display icon, Lux or Ft-cd, will reflect the current setting.
Selecting Light Source
Press the LIGHT SOURCE button to select the type of lighting to measured. The display icon, shown on the lower display digits, will indicate the selected lighting type (see icon list below).
| L | Tungsten/Daylight |
| F Fluorescent | |
| S Sodium | |
| C | Mercury |
Measurement Procedure
Hold the light sensor toward the light to be measured. The light must cover the entire surface of the sensor dome to obtain an accurate reading. Pinpoint lighting, such as from LED lamps, cannot be measured correctly with this meter.
The display will indicate the light intensity value in lux or foot-candles. Note that since the main display is limited to a reading of 1999, the right-most digit in the 20,000 lux and 5,000 foot-candle ranges appears on the lower display. In the 50,000 lux range, the last two digits appear on the lower display.
For example, for a reading of 19,990, the last digit (0) will appear the lower display, and for a reading of 48,900, the last two digits (00), will appear on the lower display.
Adjust the display contrast, if necessary, as changes in viewing angle can obscure the reading. The contrast adjustment is located on the right side of the meter.
Range Selection
For the best accuracy, first select the highest range using the RANGE switch, then switch to the lower ranges, as necessary, to locate the best range.
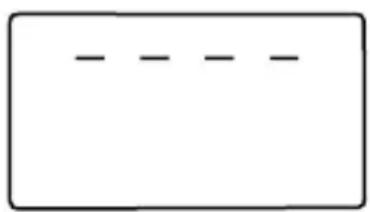
If the upper display area shows dashes, the measurement exceeds the maximum value for the selected range; select a higher range. the lower display area shows dashes, the input is too low; select lower range. See the diagram, below.
natural_image
Simple rectangular outline with three horizontal dashed lines inside, no text or symbols present.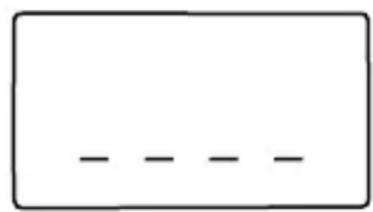
natural_image
Simple rectangular outline with a horizontal dashed line inside, no text or symbols present.Data Hold
Press the HOLD button to freeze the displayed reading. The DH icon will appear. Press HOLD again to return to normal operation; the DH icon will switch OFF.
Relative (%) Mode
In RELATIVE mode, a reference measurement is stored, and subsequent measurements are displayed as a percentage of the reference measurement.
Press the ‘%’ button to store the reference, 100% will be displayed. Light measurements will now be displayed as a percentage of the reference value.
For example, for a reference of 1000 lux, a 500 lux measurement will display as 50%, a 250 lux measurement will display as 25%, and a 2000 lux measurement will display as 200%.
Press the ‘%’ button again to return to normal operation.
Maximum (MAX), Minimum (MIN), Average (AVG) Recording
- Press the RECORD button to start recording. The REC icon will switch ON.
- Press the RECALL button to view the highest reading on the lower display digits (the upper display shows the actual reading) The MAX icon will appear.
- Use the RECALL button to step to the MIN (lowest reading), the AVG (average reading), and then back to the MAX reading.
- Press the RECORD button to return to normal operation. The REC icon will switch OFF.
PC Interface
To stream data from the meter to a PC, the optional 407001-USB cable is required. The 407001-PRO software is also required and can be downloaded from the link below. The software includes instructions for use.
www.flir.com/support-center/Instruments/extech-software-downloads/
Maintenance
Cleaning and Storage
To clean, wipe the meter and sensor with a damp cloth. A mild detergent may be used but do not use abrasives or solvents. Store the meter in a protective case or in the original packaging, and remove the battery and store separately.
Battery Replacement
When the low battery indicator appears (LBT), replace the battery as soon as possible.
- Remove the meter's rubber protective holster.
- Remove the rear compartment cover, using a coin or screw-driver, and remove the battery.
- Replace the 9 V battery, observing correct polarity.
- Ensure that the battery cover is secured before use.
Do not dispose of used batteries or rechargeable batteries in household waste.
Specifications
General Specifications
| Display | 3.5 digit (1999 count) LCD with contrast adjustment |
| Sample rate 0.4 seconds per reading (approx.) | |
| Ranges 0 to 50,000 lux (3 ranges)0 to 5000 foot-candles (3 ranges)Relative mode: 0 to 1999% | |
| Lighting types | Sodium, Daylight/Tungsten, Fluorescent, and Mercury |
| Sensor Cosine and color corrected photo diode (CIE compliant) | |
| MAX-MIN-AVG Recording | Record and recall maximum, minimum, average readings |
| Zero adjustment Front | panel button |
| Auto Power OFF After | 10 minutes of inactivity |
| PC interface RS-232 serial port for data streaming | |
| Operating conditions 32 to 122°F (0 to 50°C); <80% RH | |
| Power supply 9 V battery (rear compartment) | |
| Power consumption 5 | mA DC (200 hour battery life) approximately |
| Weight 0.71 lbs. (320 g) | |
| Dimensions | Meter: 7.1 x 2.8 x 1.3 in. (180 x 72 x 32 mm)Sensor: 3.3 x 2.2 x 0.7 in. (85 x 55 x 17.5 mm) |
Measurement Specifications
| Range Switch Display Range* Accuracy | |||
| Lux 2000 0 to 1 | 999 | ± (4% + 2 digits) full scale | |
| 20,000 1800 to 19,990 | |||
| 50,000 18,000 to 50,000 | |||
| Foot-candles 200 | 0 to 186.0 | ||
| 2000 167 to 1860 | |||
| 5000 1670 to 5000 | |||
| Relative mode 0 | to 1999% | ||
*Note that since the main display is limited to a reading of 1999, right-most digit in the 20,000 lux and 5,000 foot-candle ranges appears on the lower display. In the 50,000 lux range, the last two its appear on the lower display.
Appendix
Typical Light Levels
Foot-candle units are shown. For lux, multiply by 10.7639
| Ft-cd range | Location Ft-cd range | Location | |
| Factory Home | |||
| 2-7 Emergency | stairs 10-15 Washing | ||
| 7-15 Entrance | exits 15-20 Recreation | ||
| 15-30 Packing | work 20-30 Living room | ||
| 30-75 Production line | line 30-50 | Grooming | |
| 75-150 Inspection | work 50-150 | Reading | |
| 150-300 | Assembly area 100-200 | Sewing | |
| Office | Restaurant | ||
| 7-10 Emergency | stairs (indoor) | 7-15 | Stairways |
| 10-20 | Corridors | 15-30 Entrance, Rest rooms | |
| 20-75 Reception | area 30-75 | Kitchen, Dining | |
| 75-150 | Clerical work | 75-150 | Show window |
| 150-2000 | Computer, typing | ||
| Store | Hospital | ||
| 7-15 | Shopping area | 3-7 | Emergency stairs |
| 15-20 | Corridor, stairway | 7-10 | Stairway |
| 20-30 Reception | 10-15 | In-patient room | |
| 30-50 Product | displays 15-20 | Waiting room | |
| 50-75 Elevator | 20-75 | Exam room | |
| 75-150 | Show window, warehouse | 75-150 | Operating room |
| 150-300 | Storefront | 500-1000 | Eye inspection |
Conversion Factors
| Luminance (Visible Flux Density) | 1 lm/m ^2 = | 1 lux (lx) |
| 10-4lm/cm2 | ||
| 10-4phot (ph) | ||
| 9.290 x 10lm/ft2 | ||
| 9.290 x 10foot-candles | ||
| Luminance (Visible Flux Density per Solid Angle) | 1 lm/m2/sr = | 1 candela/m2 |
| Luminous Intensity (Visible Flux per Solid Angle) | 1 lm/sr = | 1 candela |
| Luminous Flux (Visible Flux) 1 lumen (lm) = | 1.464 x 10watts @ 555 nm | |
Customer Support
| Local Telephone Support List https://support.flir.com/contact | |
| Return Material Authorization (RMA) | https://customer.flir.com/Home |
| Customer Support https://support.flir.com/ContactService | |
| Technical Support https://support.flir.com | |
FLIR Systems, Inc. offers calibration and repair services for the Ex-tech brand products we sell. We offer NIST traceable calibration fo most of our products.
Limited 3-Year Warranty
FLIR Systems, Inc. warrants this Extech brand instrument to be free of defects in parts and workmanship for three (3) years from date purchase. To view the full warranty, please visit the site below.
https://www.extech.com/support/warranties
Website
http://www.flir.com
Customer support
http://support.flir.com
Copyright
© 2024, FLIR Systems, Inc. All rights reserved worldwide.
Disclaimer
Specifications subject to change without further notice. Models and accessories subject to regional market considerations. License procedures may apply. Products described herein may be subject to US Export Regulations. Please refer to exportquestions@flir.com with any questions.
Publ. No.: NAS100239
Release: AA
Commit: 100719
Head: 100719
Language: en-US
Modified: 2024-11-25
Formatted: 2024-11-25
- Description
- Meter Description
- Display Description
- Button and Switch Descriptions
- Operation
- Meter Power
- Zero Calibration
- Measurement Units
- Selecting Light Source
- Measurement Procedure
- Range Selection
- Data Hold
- Relative (%) Mode
- Maximum (MAX), Minimum (MIN), Average (AVG) Recording
- PC Interface
- Maintenance
- Cleaning and Storage
- Battery Replacement
- Specifications
- Appendix
- Typical Light Levels
- Customer Support
- Limited 3-Year Warranty
- Website
- Copyright
- Disclaimer
Brand : Extech
Model : 407026
Category : Luxmeter