
BKS 1351 K - Vacuum Cleaner BEKO - Free user manual and instructions
Find the device manual for free BKS 1351 K BEKO in PDF.


| Product Type | Bagless Canister Vacuum Cleaner |
| Model | BKS 1351 K |
| Brand | Beko |
| Rated Power | 1600 W |
| Maximum Power | 1800 W |
| Supply Voltage | 220-230 V~, 50/60 Hz |
| Net Weight | 5 kg |
| Gross Weight | 6.8 kg |
| Dust Container Volume | 2.5 L |
| Power Cable Length | 5 m |
| Filtration System | HEPA filter + Sponge filter + Air outlet filter |
| Type of Dust Collection | Bagless (dust container) |
| Suction Power Adjustment | Yes, via rotary knob on body |
| Telescopic Tube | Yes, adjustable length |
| Floor Brush | Parquet/Carpet brush with adjustable setting |
| Crevice Tool | Yes, included |
| Vertical Parking Function | Yes, with parking channel |
| Auto Cord Rewind | Yes, via power cable winding button |
| Protection Class | Class II (double insulation) |
| Safety Features | Thermal cut-out, do not use without filters |
| Maintenance | Washable HEPA and sponge filter; empty dust container when full indicator lights |
| Intended Use | Household only, not for industrial use |
| Warranty | Subject to terms, contact authorized service |
Frequently Asked Questions - BKS 1351 K BEKO
User questions about BKS 1351 K BEKO
0 question about this device. Answer the ones you know or ask your own.
Ask a new question about this device
Download the instructions for your Vacuum Cleaner in PDF format for free! Find your manual BKS 1351 K - BEKO and take your electronic device back in hand. On this page are published all the documents necessary for the use of your device. BKS 1351 K by BEKO.
USER MANUAL BKS 1351 K BEKO
BKS 1351 K
EN RU KK
01M-8835433200-1716-01

Please read this user manual first!
Dear Customer,
Thank you for preferring a Beko product. We hope that you get the best results from your product which has been manufactured with high quality and state-of-the-art technology. Therefore, please read this entire user manual and all other accompanying documents carefully before using the product and keep it as a reference for future use. If you handover the product to someone else, give the user manual as well. Follow all warnings and information in the user manual.
Meanings of the symbols
Following symbols are used in the various section of this manual:

Important information or useful hints about usage.

Warning for hazardous situations with regard to life and property.

Protection class for electric shock.

This product has been produced in environmentally friendly, modern facilities
CONTENTS
1 Important safety and environmental instructions 4-5
1.1 General safety 4
1.2 Compliance with the WEEE Directive and disposal of waste products.... 5
1.3 Package information 5
2 Your vacuum cleaner 6
2.1 Overview 6
2.2 Technical data....6
3 Operation 7-8
3.1 Intended use ....7
3.2 Attaching/removing the hose.....7
3.3 Attaching/removing the telescopic tube ...7
3.4 Attaching/removing the parquet/ carpet brush ....7
3.5 Adjusting the parquet/carpet brush .....7
3.6 Operation ....7
3.6.1 Adjusting the suction power 8
3.7 Accessories....8
3.8 Switching off the vacuum cleaner and parking feature ....8
3.8.1 Vertical parking.... 8
4 Cleaning and care 9-10
4.1 Emptying the dust container....9
4.2 Cleaning the filters....9
4.2.1 HEPA and sponge filter 10
4.2.2 Air outlet filter ..... 10
4.3 Storage....10
4.4 Handling and transportation.....10
1 Important safety and environmental instructions
This section contains safety instructions that will help protect from risk of personal injury or property damage.
Failure to follow these instructions invalidates the granted warranty.
1.1 General safety
- This appliance complies with the international security standards.
- This appliance can be used children aged from 8 years and above and persons with reduced physical, sensory or mental capabilities or lack of experience and knowledge if they have been given supervision or instruction concerning use of the appliance in a safe way and understand the hazards involved. Children shall not play with the appliance. Cleaning and user maintenance shall not be made by children without supervision.
- Do not use it if the power cable or the appliance itself is damaged. Contact an authorized service.
- Your mains power supply should comply with the information supplied on the rating plate of the appliance.
- The mains supply of the appliance must be secured with a minimum 16 A fuse.
- Do not use the appliance with an extension cord.
- In order to prevent the power cable from getting damaged, make sure that it doesn't get stuck, twisted or rub against sharp surfaces.
- Do not touch the appliance or its plug when it is plugged if your hands are damp or wet.
- Do not pull the power cable when unplugging the appliance.
- Do not vacuum flammable materials and when vacuuming cigarette ashes make sure that it got cold.
- Do not vacuum water or other liquid materials.
- Protect the appliance from rain, humidity and heat sources.
1 important safety and environmental instructions
- Never use the appliance in or near to combustible or inflammable places and materials.
- Unplug the appliance before cleaning and maintenance.
- Do not dip the appliance or it cable in water to clean it.
- Check the hose of the appliance regularly. Do not use if it is damaged and contact an authorized service.
- Do not attempt to dismantle the appliance.
- Only use the original parts parts recommended by the manufacturer.
- Do not use the appliance without filters; otherwise it can get damaged.
- When vacuuming the stairs, the appliance should be located below the user.
- If your store the package material, keep it out of the reach of children.
1.2 Compliance with the WEEE Directive and disposal of waste products
This product does not include harmful and prohibited materials specified in the "Regulation for Supervision of the Waste Electric and Electronic Appliances" issued by the Ministry of Environment and Urban Planning. This appliance conforms to the WEEE regulation. This product has been manufactured with high quality parts and materials which can be reused and are suitable for recycling. Therefore, do not dispose the product with normal domestic waste at the end of its service life. Take it to a collection point for the recycling of electrical and electronic equipment. Ask the local authority in your area for these collection points. Contribute to the preservation of environment and natural sources by taking the used products to the recycling points.
01.3 Package information

Package of the product is made of recyclable materials in accordance with our National Legislation. Do not dispose of the packaging materials together with the domestic or other wastes. Take them to the packaging material collection points designated by the local authorities.
2 Your vacuum cleaner
2.1 Overview

- Hose
- Suction power adjustment knob
- On/Off button
- Carriage handle
- Wheel
- Dust container removal button
- Dust container
- Hose cap
- Crevice tool
- Parquet/carpet brush
- Telescopic tube adjustment latch
- Telescopic tube
- Vacuum control
2.2 Technical data
Supply voltage : 220-230 V\~, 50/60 Hz
Rated power : 1600 W
Maximum power : 1800 W
Gross weight : 6.8 kg
Net weight : 5 kg
Dust container volume :2.5L
Power cable length : 5m
Technical and design modification rights are reserved.
The values which are declared in the markings affixed on your product or the other printed documents supplied with it represent the values which have been obtained in the laboratories pursuant to the pertinent standards. These values may vary according to the usage of the appliance and ambient conditions.
3 Operation
3.1 Intended use
The appliance was designed to be used in houses, and is not fit for industrial use.
3.2 Attaching/removing the hose
- To attach the hose (1) push the hose cap (8) in the direction of arrow until it is aligned with the housing.

- The tabs on the hose cap (8) must be seated correctly.
- To remove the hose (1) press on the tabs on the hose cap (8) and pull it.
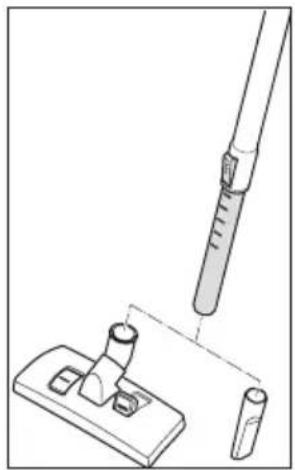
3.3 Attaching/removing the telescopic tube
- Attach the telescopic tube (12) to the handle.

- Pull the tube from the handle (12) to remove it.
3.4 Attaching/removing the parquet/carpet brush
You can install/ remove the telescopic tube (12) from/to the parquet/carpet brush (10) or crevice tool (9).
3.5 Adjusting the parquet/ carpet brush
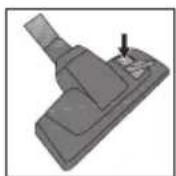
Press the adjustment latch located on the parquet/ carpet brush (10) and;
- Use "____" position for hard surfaces and parquet.

- Use " " for carpets.
3.6 Operation
-
Plug the appliance after pulling the power plug located at the back of the appliance.
-
Press on/off button (3) to switch on your appliance.
3 Operation
3.6.1 Adjusting the suction power
You can increase the suction power of the appliance by turning the suction power adjustment knob (2) located on the body of the appliance clockwise according to the type of the surface to be cleaned. To decrease the suction power turn the suction power adjustment knob counter-clockwise.
3.7 Accessories
Crevice tool

Suitable for the cleaning the surfaces which are difficult to clean, such as the areas remaining under the sofas and furniture.

WARNING: Do not make cleaning by using the handle's end part.
3.8 Switching off the vacuum cleaner and parking feature
- Switch off the appliance with the on/off button (3) and unplug it.
- Wind the power cable by pressing the power cable winding button.
3.8.1 Vertical parking
Insert the parking hook of the telescopic tube into the parking channel located at the bottom section of the appliance.

4 Cleaning and care
Switch off and unplug the appliance before cleaning it.

WARNING: Never use gasoline, solvent, abrasive cleaning agents, metal objects or hard brushes to clean the appliance.
4.1 Emptying the dust container
When the dust container full indicator is lit replace the dust bag.
- Press the dust container removal button (6) to remove the dust container (7) and remove the dust container.
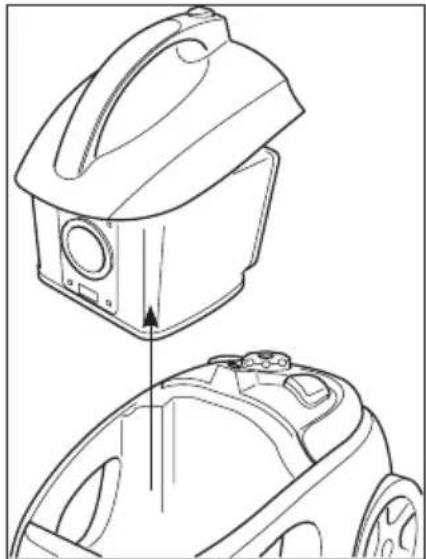
- Open the cover beneath the dust container.
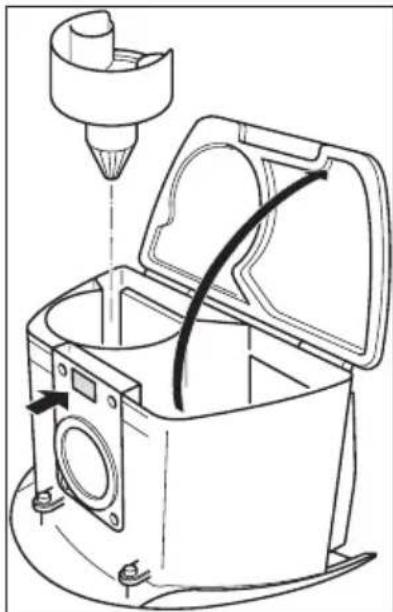
- 3 Empty the dust container and close the cover.
- Insert the dust container into its location.
4.2 Cleaning the filters
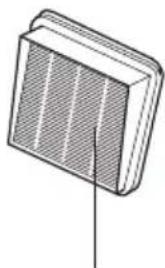
HEPA filter

Sponge filter

Air outlet
filter

WARNING: Do not use appliances producing hot air such as hair dryer or heater to dry the filters.

WARNING: Do not install the filters without completely drying them; otherwise smell of moisture may occur during the use, water can leak from the back of the appliance or the filters may get damaged.
4 Cleaning and care

WARNING: When the filters dry, replace them into their positions.
4.2.1 HEPA and sponge filter
- Press the dust container removal button (6) to remove the dust container (7) and remove the dust container.
- Remove the HEPA filter and sponge filter found at the back of the dust container.
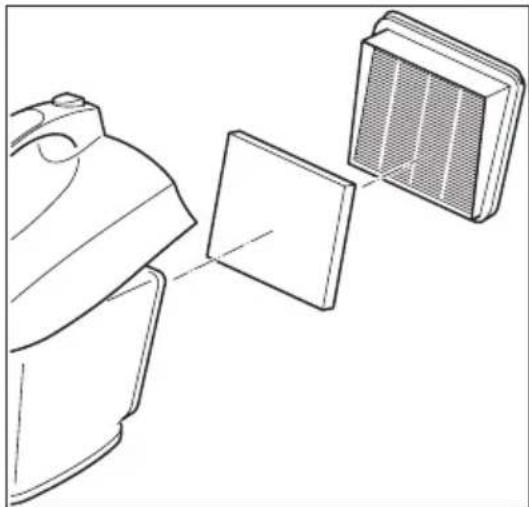
- Wash it under running water after shaking the filters off.
- Leave the HEPA filter to dry after washing it.
- After washing the sponge filter, gently wring it and leave it to dry.
4.2.2 Air outlet filter
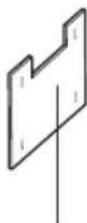
- Open the air outlet filter's cover located at the back of the appliance.

- Remove the air outlet filter.
- Reinstall it after shaking it off.
4.3 Storage
- If you do not intend to use the appliance for a long time, store it carefully.
• Pull the appliance's plug out. - Keep the appliance out of the reach of children.
4.4 Handling and transportation
- During handling and transportation, carry the appliance in its original packaging. The packaging of the appliance protects it against physical damages.
- Do not place heavy loads on the appliance or the packaging. The appliance may be damaged.
- Dropping the appliance may render it non-operational or cause permanent damage.
4 Очистка и уход
3
Пайдалану
4
Hepa cy3rici

Көбік
сүзгісі
Ауа шыбысы
сүзгіси

- PLEASE READ THIS USER MANUAL FIRST
- MEANINGS OF THE SYMBOLS
- CONTENTS
- 1 IMPORTANT SAFETY AND ENVIRONMENTAL INSTRUCTIONS 4-5
- 2 YOUR VACUUM CLEANER 6
- 3 OPERATION 7-8
- 4 CLEANING AND CARE 9-10
- 1 IMPORTANT SAFETY AND ENVIRONMENTAL INSTRUCTIONS
- 1.1 GENERAL SAFETY
- 1.2 COMPLIANCE WITH THE WEEE DIRECTIVE AND DISPOSAL OF WASTE PRODUCTS
- 01.3 PACKAGE INFORMATION
- 2 YOUR VACUUM CLEANER
- 2.2 TECHNICAL DATA
- 3 OPERATION
- 3.1 INTENDED USE
- 3.2 ATTACHING/REMOVING THE HOSE
- 3.3 ATTACHING/REMOVING THE TELESCOPIC TUBE
- 3.4 ATTACHING/REMOVING THE PARQUET/CARPET BRUSH
- 3.5 ADJUSTING THE PARQUET/ CARPET BRUSH
- 3.6 OPERATION
- 3.6.1 ADJUSTING THE SUCTION POWER
- 3.7 ACCESSORIES
- CREVICE TOOL
- 3.8 SWITCHING OFF THE VACUUM CLEANER AND PARKING FEATURE
- 3.8.1 VERTICAL PARKING
- 4 CLEANING AND CARE
- 4.1 EMPTYING THE DUST CONTAINER
- 4.2 CLEANING THE FILTERS
- 4.2.1 HEPA AND SPONGE FILTER
- 4.2.2 AIR OUTLET FILTER
- 4.3 STORAGE
- 4.4 HANDLING AND TRANSPORTATION
- 4 ОЧИСТКА И УХОД
- 3
- ПАЙДАЛАНУ
- 4
Brand : BEKO
Model : BKS 1351 K
Category : Vacuum Cleaner