
TCT63E - Cooker Tisira - Free user manual and instructions
Find the device manual for free TCT63E Tisira in PDF.


| Product Type | Built-in electric hob (ceramic glass) |
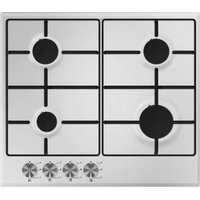
| Model | TCT63E |
| Brand | Tisira |
| Dimensions (W x D) | Approx. 600 x 510 mm (60 cm built-in stove) |
| Cutout Dimensions (W x D) | Refer to installation section: typical 560 x 490 mm |
| Number of Cooking Zones | 4 (two radiant, two dual/oval) |
| Power Supply | 220-240V AC / 380-415V 3N AC, 50/60Hz |
| Total Power Consumption | Up to 7200 W (depending on configuration) |
| Control Type | Touch control with slider or +/- keys |
| Residual Heat Indicator | Yes (H symbol) |
| Child Lock | Yes (temporary and permanent lock) |
| Keep Warm Function | Yes (optional, U symbol) |
| Auto Heating Function | Yes (R symbol) |
| Safety Features | Automatic shut-off after 20 seconds, hot surface warning, overheat protection (ER21) |
| Installation Type | Built-in (countertop cutout) |
| Minimum Distance to Side Walls | 50 mm |
| Minimum Distance to Hood | 600 mm (if installed) |
| Cleaning Instructions | Use soft cloth and glass cleaner; avoid abrasive pads or scrapers |
| Error Codes | ER03, ER20, ER21, ER22, ER31, ER36, ER40, ER47, U400 |
| Warranty | Refer to proof of purchase; contact Arisit Pty Ltd (Australia/NZ) |
Frequently Asked Questions - TCT63E Tisira
User questions about TCT63E Tisira
0 question about this device. Answer the ones you know or ask your own.
Ask a new question about this device
Download the instructions for your Cooker in PDF format for free! Find your manual TCT63E - Tisira and take your electronic device back in hand. On this page are published all the documents necessary for the use of your device. TCT63E by Tisira.
USER MANUAL TCT63E Tisira
IMPORTANT // Please ensure that you read through this manual prior to installation and use. This user manual contains important information to ensure optimal performance and keep you safe. Please retain your proof of purchase, as this will be needed in the event that you require a warranty service. Remember to keep this user manual for future reference.
t tisira
Content
Content 2
Warning & Safety Instructions 3-4
Product Overview 5
Product Specifications 6
Electrical Connection 6-7
Installation 8-9
Installation 10
Operation Instructions 11-31
Error Codes and Solutions 32
Maintenance and Cleaning 33
Troubles and Solution Proposals 33
Notes 34-35
Warning & Safety Instructions
IMPORTANT // To ensure best performance, avoid risk of damage or accidents. Please read the operating instructions prior to first time use.
Installation
Electrical Shock Hazard
- Disconnect the appliance from the mains electricity supply before carrying out any work or maintenance on it.
- Connection to a good earth wiring system is essential and mandatory.
- Alterations to the domestic wiring system must only be made by a qualified electrician.
- Failure to follow this advice may result in electrical shock or death.
Cut Hazard
• Take care - panel edges are sharp.
- Failure to use caution could result in injury or cuts.
Important safety instructions
- No combustible material or products should be placed on this appliance at any time.
- Please make this information available to the person responsible for installing the appliance as it could reduce your installation costs.
- In order to avoid a hazard, this appliance must be installed according to these instructions for installation.
- This appliance is to be properly installed and earthed only by a suitably qualified person.
- This appliance should be connected to a circuit which incorporates an isolating switch providing full disconnection from the power supply.
- Failure to install the appliance correctly could invalidate any warranty or liability claims.
Operation and Maintenance Electrical Shock Hazard
WARNING // If the surface is cracked, switch off the appliance to avoid the possibility of electric shock.
- Switch the cooktop off at the wall before cleaning or maintenance.
- Failure to follow this advice may result in electrical shock or death.
Health Hazard
- This appliance complies with electromagnetic safety standards.
- However, persons with cardiac pacemakers or other electrical implants (such as insulin pumps) must consult with their doctor or implant manufacturer before using this appliance to make sure that their implants will not be affected by the electromagnetic field.
- Failure to follow this advice may result in death.
Hot Surface Hazard
- Do not let your body, clothing or any item other than suitable cookware contact the ceramic glass until the surface is cool.
- Never leave metal objects (such as kitchen utensils) or empty pans on the cooktop as they can become hot very quickly.
WARNING // magnetisable metal objects worn on the body may become hot in the vicinity of the cooktop. Gold or silver jewellery will not be affected.
WARNING // Accessible parts may become hot during use. To avoid burns young children should be kept away.
- Handles of saucepans may be hot to touch. Check saucepan handles do not overhang other cooking zones that are on. Keep handles out of reach of children.
Warning & Safety Instructions
- Failure to follow this advice could result in burns and scalds.
Cut Hazard
- The razor-sharp blade of a cooktop scraper is exposed when the safety cover is retracted.
- Use with extreme care and always store safely and out of reach of children.
- Failure to use caution could result in injury or cuts.
Important Safety Instructions
- Never leave the appliance unattended when in use. Boil over causes smoking and greasy spillovers that may ignite.
- Do not place or leave any magnetisable objects (e.g. credit cards, memory cards) or electronic devices (e.g. computers, MP3 players) near the appliance, as they may be affected by its electromagnetic field.
- Never use your appliance as a work or storage surface.
- Never leave any objects or utensils on the appliance.
- Never use your appliance for warming or heating the room.
- After use, always turn off the cooking zones and the cooktop as described in this manual (i.e. by using the touch controls). Do not rely on the pan detection feature to turn off the cooking zones when you remove the pans.
- Do not allow children to play with the appliance or sit, stand, or climb on it.
- Do not store items of interest to children in cabinets above the appliance. Children climbing on the cooktop could be seriously injured.
WARNING // This appliance is not intended for use by persons (including children) with reduced physical, sensory or mental capabilities, or lack of experience and knowledge, unless they have been given supervision or instruction concerning use of the appliance by a person responsible for their safety.
WARNING // Children should be supervised to ensure that they do not play with the appliance.
- Do not repair or replace any part of the appliance unless specifically recommended in the manual. All other servicing should be done by a qualified technician.
- Do not use a steam cleaner to clean your cooktop.
- Do not place or drop heavy objects on your cooktop.
- Do not stand on your cooktop.
- Do not use pans with jagged edges or drag pans across the ceramic glass surface as this can scratch the glass.
- Do not use scourers or any other harsh abrasive cleaning agents to clean your cooktop, as these can scratch the ceramic glass.
- If the supply cord is damaged, it must be replaced by the manufacturer or its service agent or a similarly qualified person in order to avoid a hazard.
- Do not operate your cooktop by means of an external timer or separate remote-control system.
- This appliance is intended to be used in domestic households only.
Product Overview

- Heater Positions
- Glass or Metal Surface
-
Control Switches
-
Hotplate
- Ovaldual Heater
- Double Heater
Product Specifications

Cooktop Panel Visual of 30 cm

Cooktop Panel Visual of 45 cm

Cooktop Panel Visual of 60 cm
Electrical Connection
Get electrical connection of your appliance done to authorized person in line with the following scheme.

Electrical Connection
Electrical Connection and Safety
- Setting conditions of this appliance is indicated in tag or data plate.
- Your appliance should be plugged in a fuse appropriate for electric power. If necessary, it is recommended that installation is done by authorized service.
- Your appliance is configured in accordance with electrical supply of 220-240V AC/380-415V3N AC 50/60Hz.
- If main electrical network is different from these values, contact with your authorized service.
- Electrical connections of your appliance should only be made to the fuses having suitably wired grounding (grounded) system. If no convenient fuse is available in the place where your appliance is to be installed, contact with authorized service immediately. Manufacturing firm is not responsible definitely for the damages that fuses whose grounding is not made and connected to the appliance can cause.
- Plug of the appliance should be close to be accessed easily to the fuse whose grounding is made without use of extension cord.
-
Do not allow contacting the power cable of your appliance with hot regions. Similarly, keep away it from sharp edges and corners.
-
If feeder cord is damaged, this cord should be replaced either by manufacturer or its service agency or same degree qualified personnel in order to hinder a dangerous situation.
- Wrong electrical connection may give damage to the appliance. In this case, your appliance will remain out of guarantee scope. Electrical connection of your appliance should be done by authorized service.
- During operation of cooktop, some parts may be hot. When you also bring switches closed position, it may remain hot for a while. Children should be kept away every time and not be left without observation. Do not touch surface of cooktop while warning lights flashes. When you bring your appliance closed position, hot parts being still dangerous are stated with warning lights. (Vitroceran models).
Installation
- Turn the cooktop down and place on smooth ground.
- In order to prevent entrance of foreign substances and liquids between cooktop and counter, apply the paste given in package to the sides of lower guard of counter. For corners, curl paste and increase curls till filling corner gaps.
- Turn cooktop again and align with and place on counter.
- Fasten up your cooktop on counter by using the clamp and screws supplied.


natural_image
Technical line drawings of a heating or cooling system with three circular components and a separate schematic view (no text or symbols)
natural_image
Simple line drawing of a horizontal beam with two supports at both ends (no text or symbols)Figure 1
Installation
- When product is mounted on a drawer, if it is possible to touch lower side of product, this section should be separated with a wooden shelf.
- While mounting cooktop on a closet, as shown in the figure above, in order to separate between closet and cooktop, a shelf should be mounted. If it is mounted on a built-in oven, there is no need to do that.
- If your cooktop will be mounted next to right or left wall, the minimum distance between wall and cooktop should be 50 mm.
Correct Place For Installation:

Product is designed in accordance with the kitchen counters supplied from market. A safe distance should be left between the product and kitchen walls and furniture.
If hood/aspirator will be installed over your appliance, obey to the recommendation of hood/aspirator manufacturer for assembly height. (min. 60 cm) The gap that cooktop is to be placed on the counter should be cut in line with cooktop installation dimensions.
For installation of the product, the rules specified in local standards related to electricity should be complied.
Installation
Counter Cutting Sizes and Installation of Your Cooktop
NOTICE // Pay attention to the drawings and dimensions given below while making cooktop installation and adjusting counter cutting sizes.
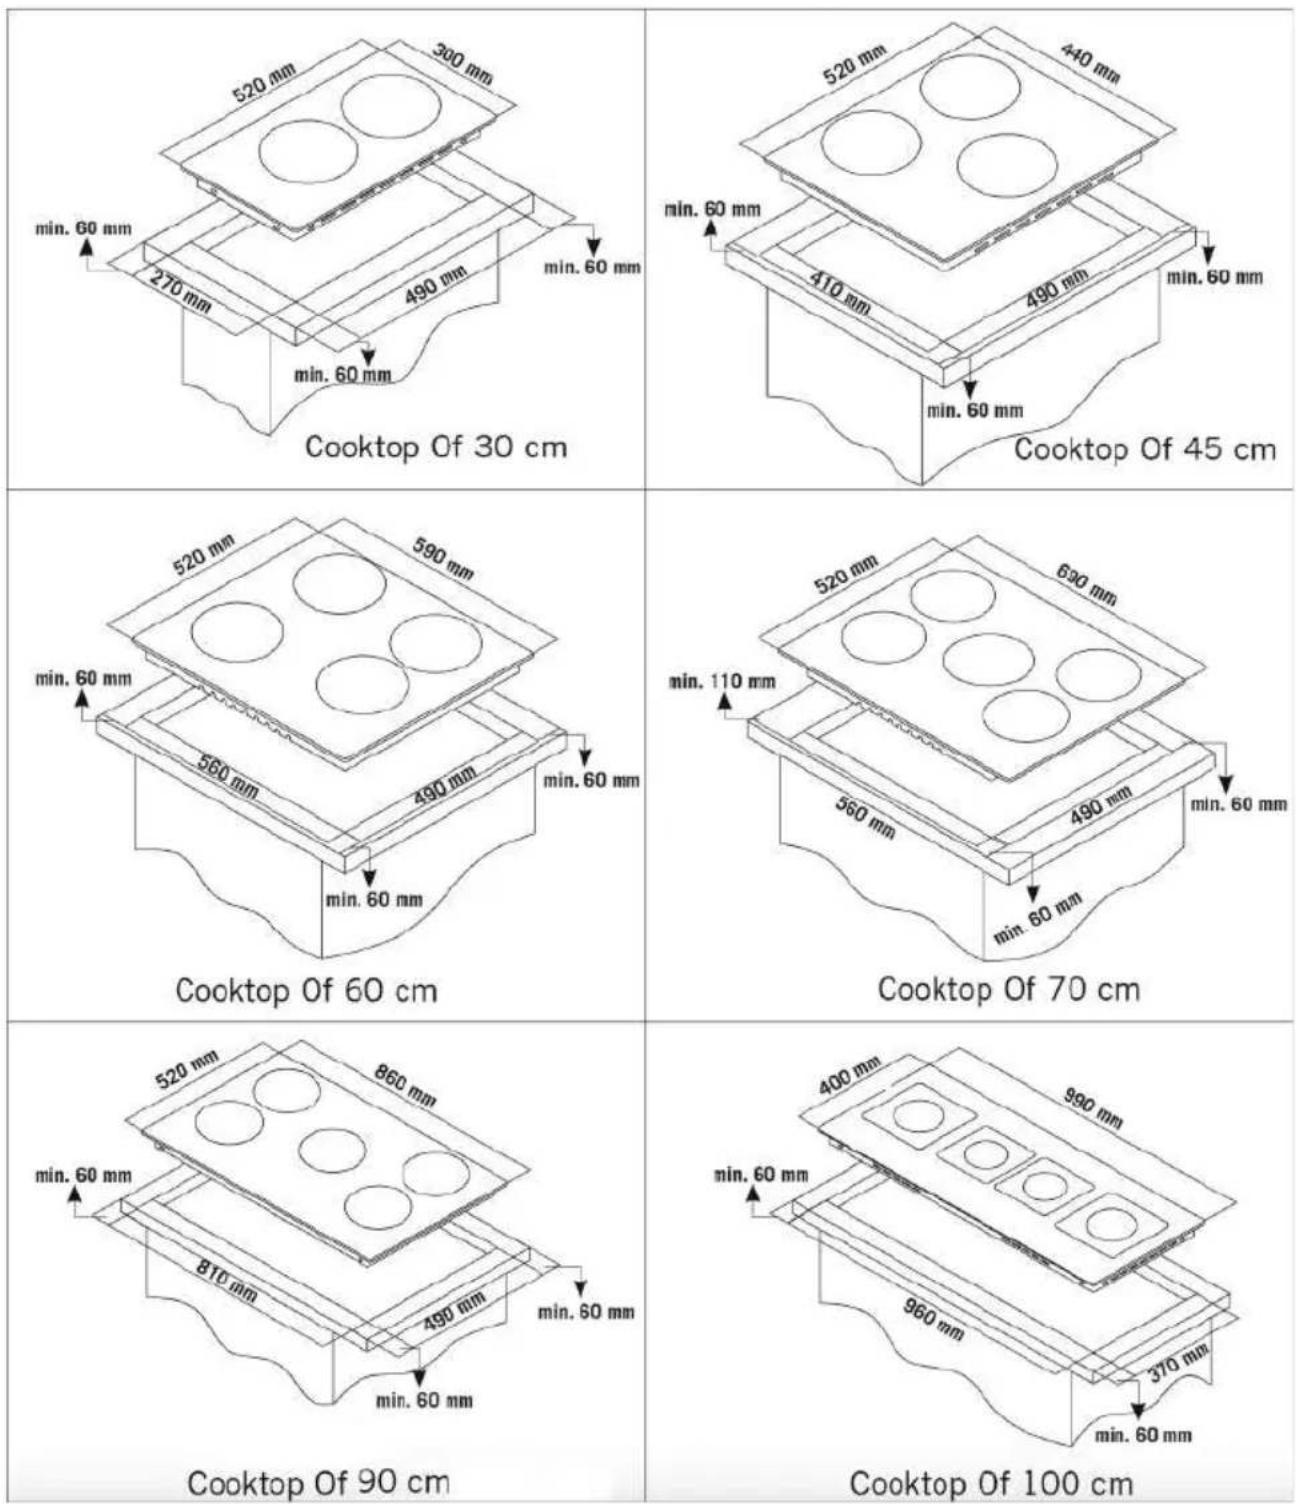
Operation Instructions
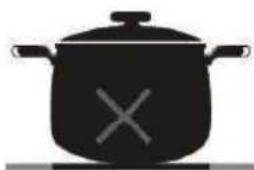
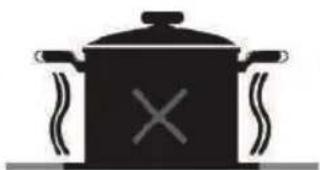
You can operate electric cooktops by turning the button on control panel you want to use to the level you desire. Cooktop powers as per levels are given in the following table.
| LEVEL 1 LEVEL 2 LEVEL 3 LEVEL 4 LEVEL 5 LEVEL 6 | ||||||
| 80 mm 200W 250W 450W --- --- | ||||||
| 145 mm 250W 750W 1000W --- --- | ||||||
| 180 mm 500W 750W 1500W --- --- | ||||||
| 145 mm Rapid 500W 1000W 1500W --- --- | ||||||
| 180 mm Rapid 850W 1150W 2000W --- --- | ||||||
| 145 mm 95W | 155W 250W 400W 750W 1000W | |||||
| 180 mm 115W 175W 250W 600W 850W 1500W | ||||||
| 145 mm Rapid 135W 165W 250W 500W 750W 1500W | ||||||
| 180 mm Rapid 175W 220W 300W 850W 1150W 2000W | ||||||
Electrical Heater Power Values Quick
| ∅140 mm ceramic heater 1200 W | |
| ∅180 mm ceramic heater 1800 W | |
| ∅140 / 250 mm ceramic heater 1800 W | |
| ∅120 / 180 mm ceramic heater 1700 W | |
| ∅220 / 300 mm ceramic heater 2400 W |

natural_image
Silhouette of a cooking pot with a checkmark inside, no text or symbols presentCorrect
natural_image
Silhouette of a cooking pot with a cross mark on its side (no text or symbols)Wrong
natural_image
Silhouette of a cooking pot with a cross mark on its side, placed on a surface (no text or symbols)Wrong

natural_image
Silhouette of a cooking pot with steam rising, no text or symbols presentWrong
Operation Instructions
Control Panel Overview For:

30cm Built in Stove
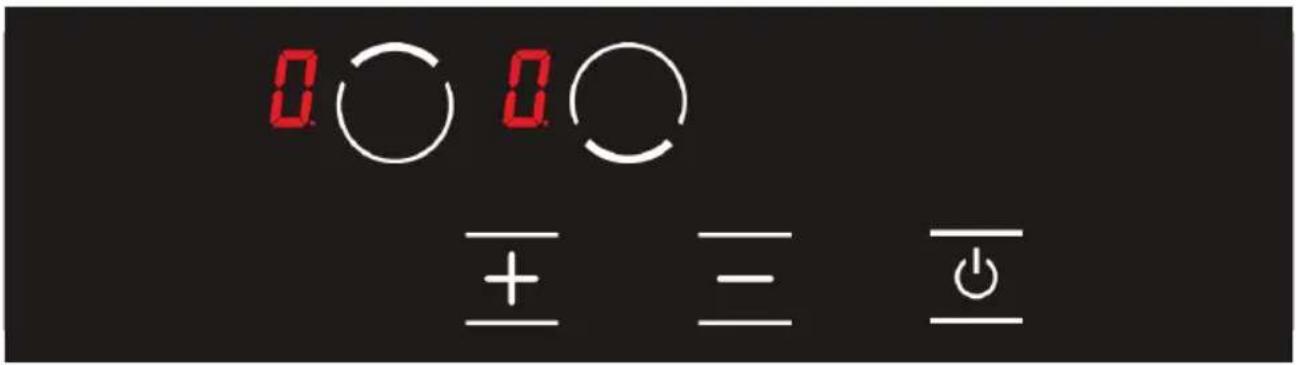
45cm Built in Stove
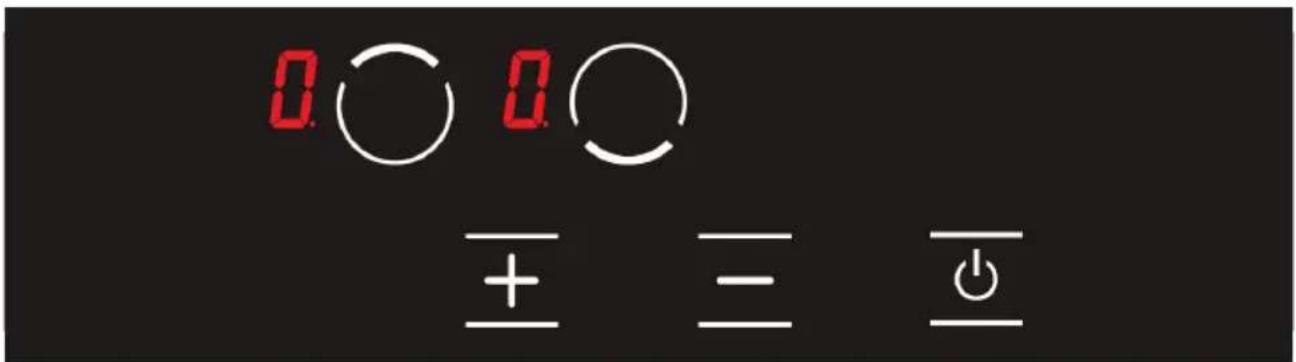
60cm - 70cm Built in Stove
Operation Instructions
60cm - 70cm Built in Stove
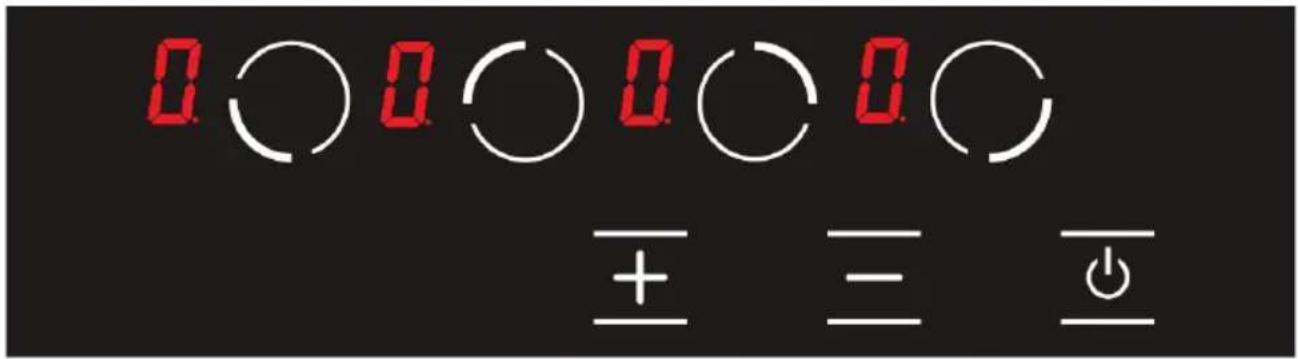
Lower left cooking area selection key
Upper left cooking area selection key
Upper right cooking area selection key
Lower right cooking area selection key
Plus key
Minus key
On / off key
Temperature display icon
Operation Instructions
Note // Unit becomes operational within 1 second after it is plugged to the mains. All LEDs and displays illuminate for 1 second.
Turning the Stove On

Unit is turned on by pressing the ⏻ key. The 🔊 icon is displayed on all displays. (See Fig. 1)
Figure 1
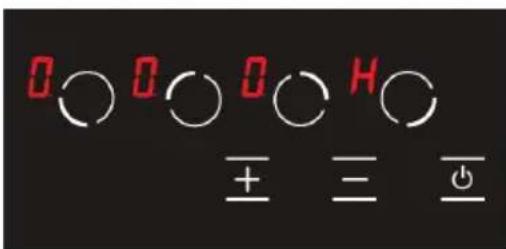
If the temperature of the glass over the hobs is above +60°C, H and B icons are displayed on the display of the relevant successively. (H = 0.5 seconds, B = 0.5 seconds) (See Fig. 2)
Figure 2
Turning the Stove On

natural_image
Pure electrical circuit symbols without any text or labelsUnit is turned off by pressing the ⏻ key. (see Fig. 3) You may turn off the unit by pressing the ⏻ key even if the child lock is active.
Figure 3
WARNING // Electronic components remain active for 20 seconds. If there is no cooking level within this period, unit switches to “off mode” automatically with a signalling sound.
Residual Heat Display

If the H icon on the display of the stove is illuminated, this means that the relevant hob is still hot. It may be used for heating a small amount of food. (See Fig. 4)
WARNING // Residual heat display is not illuminated, and thus it does not warn the user against heat in case of a power outage.
Figure 4
WARNING // Residual heat display of each cooking area remains active until the measured glass temperature is below + 60 °C.
Operation Instructions
Turning the Stove Cooking Areas On

Turn the stove on by pressing the button.
(See Fig. 5)
Figure 5

Press the relevant hob selection key. The icon shall be displayed in the relevant hob when you touch for the first time. (See Fig. 6)
Figure 6

Cooking level of the relevant hob may be set from 1 to 9 using the + and the - keys or from U to 9 as per the option of the stove. (See Fig. 7)
Figure 7
WARNING // If the hob selected is hot, icon shall be displayed instead of icon after the selection is made.
Keep Warm Function (Optional)
Keep warm function keeps the cooked food placed on a cooking area warm. The selected hob is operated with a lower power in this function. Keep warm function is also a cooking level.
To activate the keep warm function

Turn the stove on by pressing the button.
(See Fig. 8)
Figure 8
Operation Instructions

Press the relevant hob selection key once. The icon is displayed when you touch for the first time. (See Fig. 9)
Figure 9

Then, press the + key once. The ⬤ icon shall be displayed in the relevant hob with this touch. (see Fig. 10) Thus, the keep warm shall be activated.
Figure 10
Turning the Stove Cooking Areas Off :
Auto heating function allows the stove to be operated at full power for a specific period of time as per the cooking level selected.
Turning the Stove Cooking Areas Off :

natural_image
Pure electrical circuit symbols including circular and plus/minus signs without any text or labelsYou may turn the stove off by pressing the ⏻ button. (See Fig. 11)
Figure 11
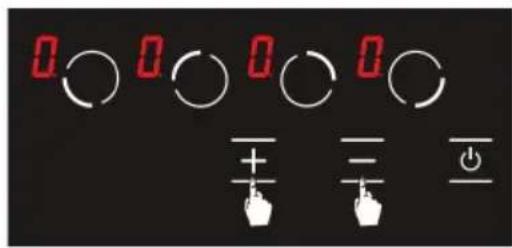
Using the + and - keys, bring the temperature on all hobs t 0. (see Fig. 12) Stove shall be turned off by itself after 20 seconds.
Figure 12

If any hob is still hot after 20 seconds, H symbol is displayed until the temperature of the relevant hob becomes lower than +60 °C. (see Fig. 13) No icon is displayed after the stove is turned off if the relevant hob is not hot.
Figure 13
Operation Instructions
Activating the Child Lock Function
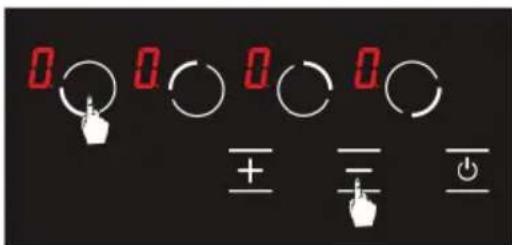
Press front left hob selection key Ⓞ and — minus key simultaneously, you shall hear a short warning signal at this time. (see Fig. 14) Then, remove your fingers from the stove control panel.
Figure 14

Press the front left hob selection key 📄 again. (See Fig. 15)
Figure 15
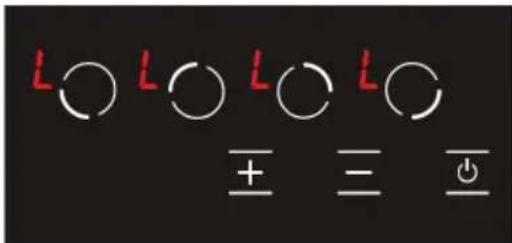
The child lock is activated at this time and the L icon is displayed on all hobs to indicate this condition. (see Fig. 16) The L and H icons are displayed alternatively if any hob is hot.
Figure 16
Deactivating the child lock until the stove is turned off ;
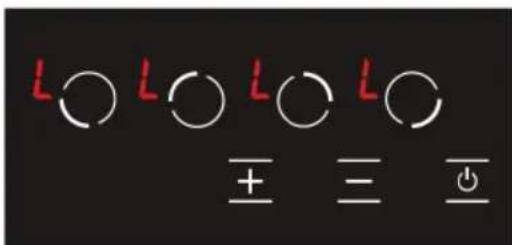
The H icon is displayed on all displays when the stove is on and the child lock is active. (see Fig. 17) The L and H icons are displayed alternatively if any hob is hot. You may turn the stove on or off with the ⏻ key only.
Figure 17

Press front left hob selection key ⏻ and — minus key ( ) simultaneously. (see Fig. 18) You shall hear a short warning signal at this time. Then, remove your fingers from the stove control panel.
Figure 18
Operation Instructions

The icon is displayed on all displays. (see Fig. 19) The and H icons are displayed alternatively if any hob is hot.
Figure 19
WARNING // Child lock is deactivated until the stove is turned off only with the steps performed in this section. In other words, child lock shall be activated again if the unit is turned off and on again. Thus, the child lock shall be activated whenever the stove is turned off and on.
Activating the Child Lock Completely

The H icon is displayed on all displays when the stove is on and the child lock is active. (see Fig. 12) The H and H icons are displayed alternatively if any hob is hot. You may turn the stove on or off with the ⏻ key only.
Figure 20

Press front left hob selection key ☐ and — minus key simultaneously. (see Fig. 21) You shall hear a short warning signal at this time. Then, remove your fingers from the stove control panel.
Figure 21

Press the key ☐ again. (see Fig. 22) This shall be performed right after the 2nd step. Child lock is deactivated permanently. In other words, child lock shall continue to be deactivated even if the unit is turned off and on again.
Figure 22

Unit switches to stand-by mode after these procedures. However, the H icon shall be displayed in case of a hot hob even if the unit switches to stand-by mode. (See Fig. 23)
Figure 23
WARNING // Child lock shall be deactivated in case of a power outage.
Operation Instructions
45cm Built in Stove






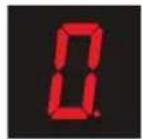
Upper left cooking area selection key
Upper left cooking area selection key
Upper left cooking area selection key
Plus key
Minus key
On / off key
Temperature display icon
Operation Instructions
Turning the Stove On
NOTE // Unit becomes operational within 1 second after it is plugged to the mains. All LEDs and displays illuminate for 1 second.

Unit is turned on by pressing the ⏻ key. The ⏻ icon is displayed on all displays. (See Fig. 1)
Figure 1
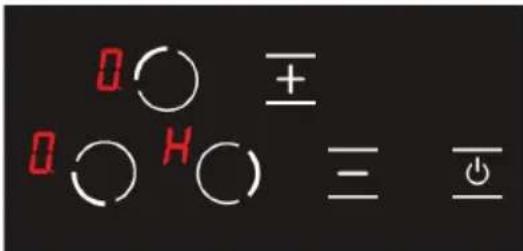
If the temperature of the glass over the hobs is above +60°C, H and D icons are displayed on the display of the relevant successively. (H = 0.5 seconds, B = 0.5 seconds) (See Fig. 2)
Figure 2
Turning the Stove Off
natural_image
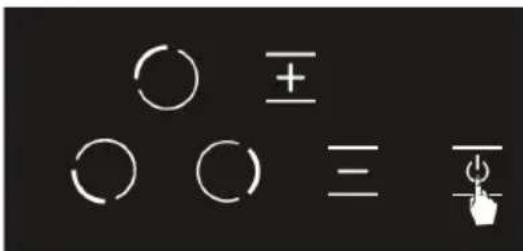
Pure electrical circuit symbols including three circles, plus, minus signs, and a cursor pointer (no text or labels)Unit is turned off by pressing the ⏻ key. (see Fig. 3) You may turn off the unit by pressing the ⏻ key even if the child lock is active.
Figure 3
WARNING // Electronic components remain active for 20 seconds. If there is no cooking level within this period, unit switches to “off mode” automatically with a signalling sound.
Residual Heat Display

If the H icon on the display of the stove is illuminated, this means that the relevant hob is still hot. It may be used for heating a small amount of food. (See Fig. 4)
WARNING // Residual heat display is not illuminated, and thus it does not warn the user against heat in case of a power outage.
Figure 4
WARNING // Residual heat display of each cooking area remains active until the measured glass temperature is below + 60 °C.
Operation Instructions
Turning the Stove Cooking Areas On

Turn the stove on by pressing the button. (See Fig. 5)
Figure 5

Press the relevant hob selection key. The icon shall be displayed in the relevant hob when you touch for the first time. (See Fig. 6)
Figure 6

Cooking level of the relevant hob may be set from 1 to 9 using the + and the - keys or from U to 9 as per the option of the stove. (See Fig. 7)
Figure 7
WARNING // If the hob selected is hot, icon shall be displayed instead of H icon after the selection is made.
Keep Warm Function (Optional)
Keep warm function 📤 keeps the cooked food placed on a cooking area warm. The selected hob is operated with a lower power in this function. Keep warm function is also a cooking level.
To activate the keep warm function

Turn the stove on by pressing the button. (See Fig. 8)
Figure 8
Operation Instructions
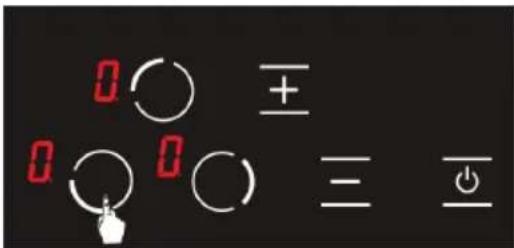
Press the relevant hob selection key once. The icon is displayed when you touch for the first time. (See Fig. 9)
Figure 9

Then, press the + key once. The U icon shall be displayed in the relevant hob with this touch. (see Fig. 10) Thus, the keep warm shall be activated.
Figure 10
Auto Heating Function
Auto heating function allows the stove to be operated at full power for a specific period of time as per the cooking level selected.
To activate the auto heating function

Turn the stove on by pressing the button. (See Fig. 11)
Figure 11

Using the + key, set the cooking level of the relevant hob as ☐. (See Fig. 12)
Figure 12

Then, when you press the + key again once, auto heating function is activated and the R icon is displayed on the screen. (See Fig. 13)
Figure 13
Operation Instructions

After setting the auto heating, you may set the cooking level desired using the + and - keys. (see Fig. 14) The R icon and the cooking level selected are displayed alternatively on the screen.
Figure 14
Turning the Stove Cooking Areas Off
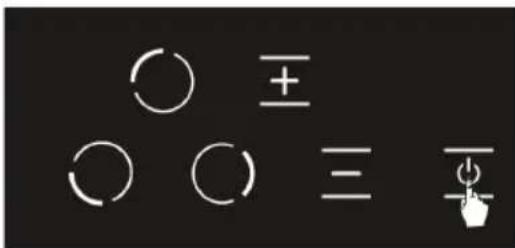
You may turn the stove off by pressing the ⏻ button. (See Fig. 15)
Figure 15

Using the + and - keys, bring the temperature on all hobs to 0. (see Fig. 16) Stove shall be turned off by itself after 20 seconds.
Figure 16
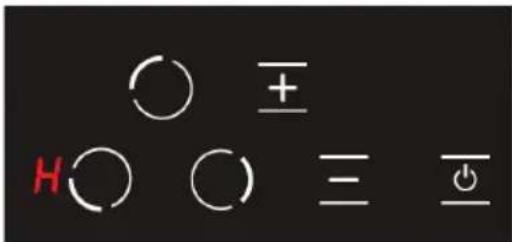
If any hob is still hot after 20 seconds, H symbol is displayed until the temperature of the relevant hob becomes lower than +60 °C. (see Fig. 17) No icon is displayed after the stove is turned off if the relevant hob is not hot.
Figure 17
Turning the Stove Cooking Areas Off To activate the child lock;

Press upper left hob selection key ⏻ and ⏱ minus key simultaneously you shall hear a short warning signal at this time. (see Fig. 18) Then, remove your fingers from the stove control panel.
Figure 18
Operation Instructions

Press the upper left hob selection key 📄 again. (See Fig. 19)
Figure 19

The child lock is activated at this time and the L icon is displayed on all hobs to indicate this condition. (see Fig. 20) The L and H icons are displayed alternatively if any hob is hot.
Figure 20
To deactivate the child lock until the stove is turned off;
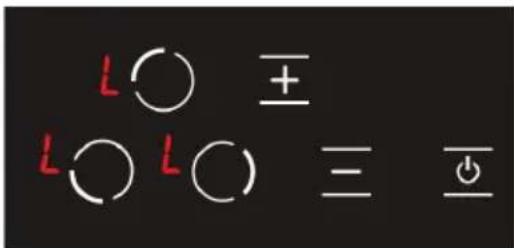
The H icon is displayed on all displays when the stove is on and the child lock is active. (see Fig. 21) The H and H icons are displayed alternatively if any hob is hot. You may turn the stove on or off with the ⏻ key only.
Figure 21

Press upper left hob selection key 🔒 and minus key simultaneously. (see Fig. 22) You shall hear a short warning signal at this time. Then, remove your fingers from the stove control panel.
Figure 22
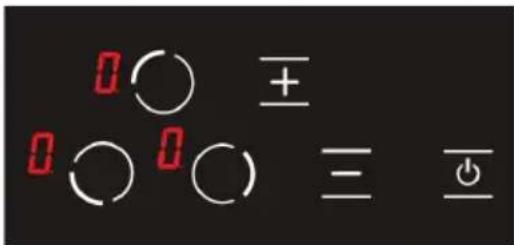
The 0 icon is displayed on all displays. (see Fig. 23) The 0 and H icons are displayed alternatively if any hob is hot.
Figure 23
WARNING // Child lock is deactivated until the stove is turned off only with the steps performed in this section. In other words, child lock shall be activated again if the unit is turned off and on again. Thus, the child lock shall be activated whenever the stove is turned off and on.
Operation Instructions
To Activate The Child Lock Completely

The L icon is displayed on all displays when the stove is on and the child lock is active. (see Fig. 24) The H and H icons are displayed alternatively if any hob is hot. You may turn the stove on or off with the ⏻ key only.
Figure 24
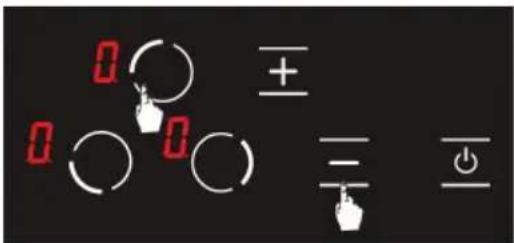
Press upper left hob selection key ⏻ and ⏱ minus key ( ) simultaneously. (see Fig. 25) You shall hear a short warning signal at this time. Then, remove your fingers from the stove control panel.
Figure 25
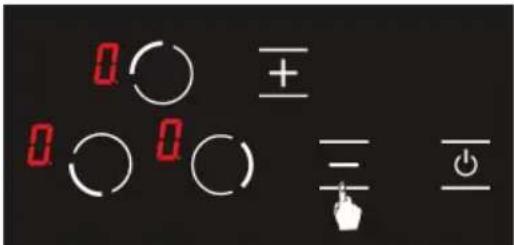
Press the key — again. (see Fig. 26) This shall be performed right after the 2nd step. Child lock is deactivated permanently. In other words, child lock shall continue to be deactivated even if the unit is turned off and on again.
Figure 26
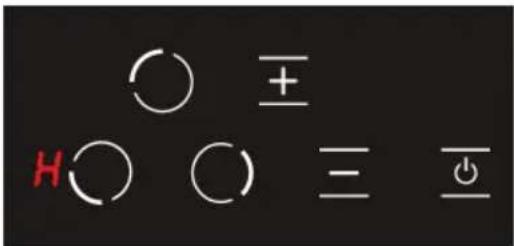
Unit switches to stand-by mode after these procedures. However, the H icon shall be displayed in case of a hot hob even if the unit switches to stand-by mode. (See Fig. 27)
Figure 27
WARNING // Child lock shall be deactivated in case of a power outage.
Operation Instructions
30cm Built in Stove





Upper cooking area selection key
Lower cooking area selection key
Plus key
Minus key
On / off key
Temperature display icon
Operation Instructions
To Activate The Child Lock Completely
NOTE // Unit becomes operational within 1 second after it is plugged to the mains. All LEDs and displays illuminate for 1 second.

Unit is turned on by pressing the ⏻ key. The f icon is displayed on all displays. (See Fig. 1)
Figure 1

If the temperature of the glass over the hobs is above +60°C, H and B icons are displayed on the display of the relevant successively. (H = 0.5 seconds, B = 0.5 seconds) (See Fig. 2)
Figure 2

Unit is turned off by pressing the ⏻ key. (see Fig. 3) You may turn off the unit by pressing the ⏻ key even if the child lock is active.
Figure 3
WARNING // Electronic components remain active for 20 seconds. If there is no cooking level within this period, unit switches to “off mode” automatically with a signalling sound.
Residual Heat Display

If the H icon on the display of the stove is illuminated, this means that the relevant hob is still hot. It may be used for heating a small amount of food. (See Fig. 4)
WARNING // Residual heat display is not illuminated, and thus it does not warn the user against heat in case of a power outage.
Figure 4
WARNING // Residual heat display of each cooking area remains active until the measured glass temperature is below + 60 °C.
Operation Instructions
Turning the Stove Cooking Areas On

Turn the stove on by pressing the button. (See Fig. 5)
Figure 5

Press the relevant hob selection key. The icon shall be displayed in the relevant hob when you touch for the first time. (See Fig. 6)
Figure 6

Cooking level of the relevant hob may be set from 1 to 9 using the + and the - keys or from U to 9 as per the option of the stove. (See Fig. 7)
Figure 7
WARNING // If the hob selected is hot, icon shall be displayed instead of H icon after the selection is made.
Keep Warm Function (Optional)
Keep warm function keeps the cooked food placed on a cooking area warm. The selected hob is operated with a lower power in this function. Keep warm function is also a cooking level.
To activate the keep warm function
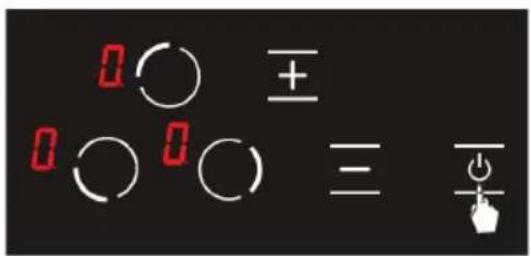
Turn the stove on by pressing the button. (See Fig. 8)
Figure 8
Operation Instructions

Press the relevant hob selection key once. The icon is displayed when you touch for the first time. (See Fig. 9)
Figure 9

Then, press the + key once. The H icon shall be displayed in the relevant hob with this touch. (see Fig. 10) Thus, the keep warm shall be activated.
Figure 10
Turning the Stove Cooking Areas Off :
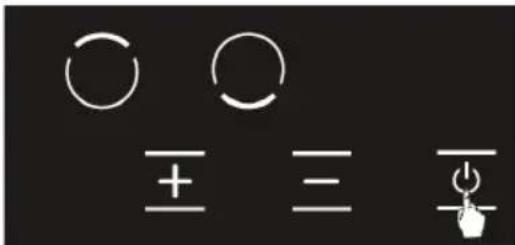
You may turn the stove off by pressing the ⏻ button. (See Fig. 11)
Figure 11

Using the + and - keys, bring the temperature on all hobs to 0. (see Fig. 12) Stove shall be turned off by itself after 20 seconds.
Figure 12

If any hob is still hot after 20 seconds, H symbol is displayed until the temperature of the relevant hob becomes lower than +60 °C. (see Fig. 13) No icon is displayed after the stove is turned off if the relevant hob is not hot.
Figure 13
Operation Instructions
Child Lock Function
To activate the child lock;

Press upper hob selection key 📊 and — minus key simultaneously, you shall hear a short warning signal at this time. (see Fig. 14) Then, remove your fingers from the stove control panel.
Figure 14

Press the upper hob selection key 📄 again. (See Fig. 15)
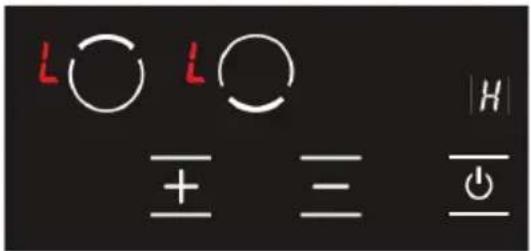
Figure 15
The child lock is activated at this time and the H icon is displayed on all hobs to indicate this condition. (see Fig. 16) The L and H icons are displayed alternatively if any hob is hot.
Figure 16
To deactivate the child lock until the stove is turned off ;

The H icon is displayed on all displays when the stove is on and the child lock is active. (see Fig. 17) The H and H icons are displayed alternatively if any hob is hot. You may turn the stove on or off with the ⏻ key only.
Figure 17

Press upper hob selection key ⏻ and minus — key simultaneously. (see Fig. 18) You shall hear a short warning signal at this time. Then, remove your fingers from the stove control panel.
Figure 18
Operation Instructions

The icon is displayed on all displays. (see Fig. 19) The and H icons are displayed alternatively if any hob is hot.
Figure 19
WARNING // Child lock is deactivated until the stove is turned off only with the steps performed in this section. In other words, child lock shall be activated again if the unit is turned off and on again. Thus, the child lock shall be activated whenever the stove is turned off and on.
To activate the child lock completely;

The H icon is displayed on all displays when the stove is on and the child lock is active. (see Fig. 20) The H and H icons are displayed alternatively if any hob is hot. You may turn the stove on or off with the ⏻ key only.
Figure 20

Press upper hob selection key ☐ and — minus key simultaneously. (see Fig. 21) You shall hear a short warning signal at this time. Then, remove your fingers from the stove control panel.

Press the ☐ key again. (see Fig. 22) This shall be performed right after the 2nd step. Child lock is deactivated permanently. In other words, child lock shall continue to be deactivated even if the unit is turned off and on again.
Figure 22

Unit switches to stand-by mode after these procedures. However, the H icon shall be displayed in case of a hot hob even if the unit switches to stand-by mode. (See Fig. 23)
Figure 23
WARNING // Child lock shall be deactivated in case of a power outage.
Error Codes and Solutions
Error codes, their probable causes and recommendations for solutions are provided in the chart below.
WARNING // The chart below is applicable for all models.
| Error Code | Error Description Potential | Cause for Error | Clearing Error |
| ER 03 & continuous signal sound | Constant use of buttons; control unit is disrupted after 10 seconds. | Water or cooking utensils on the glass over the control unit. | Clean the operating surface of the stove. |
| ER 20 | Flash fault ^ C error | Replace the electronic board. | |
| ER 21 | Excessive temperature | The ambient temperature for electronics is too high. | Allow the cooking surface to cool down. Check the temperature verification of the control unit. |
| ER 22 | Key evaluation fault. Control unit is turned after 3.5 - 7.5 seconds. | Short circuit or error in detection of keys. | Replace the electronic board. |
| ER 31 | Configuration data is incorrect. | --- New configuration is required. | |
| ER 36 | Temperature sensor error. | Short circuit or electronic board turns off. | Replace the electronic board. |
| ER 40 | Power supply is too low to turn on the appliance. | Primary PTC is too hot. | Disconnect the stove from power supply system. |
| ER 47 | Communication error between the electronic board configuration and the heaters. | No communication or faulty communication. | Make sure that the connection cable is connected correctly and functionally. |
| U 400 | Incorrect connection. | Control unit is connected incorrectly. | Connect the stove to correct mains voltage. |
Maintenance and Cleaning
Before starting to maintenance or cleaning, firstly unplug the plug supplying electricity to cooktop and turn down gas valve. If cooktop is hot, wait for cooling down.
- For the purpose that your cooktop has long and economic life, regular cleaning and maintenance should be performed on your cooktop.
- Do not clean your cooktop with scratching tools such as bristle brush, wire wool or knife. Do not use abrasive, scratching, acid materials or detergent.
- Following mopping parts of your cooktop with soapy cloth, rinse it, later rinse well with a soft cloth.
- Clean glass surfaces with special glass cleaning substances. As scratching of glass surfaces leads to breaking, while cleaning glass surfaces, do not use abrasive cleaners or sharp metal scrapers.
- Do not clean your cooktop with steamy cleaners.
- In the course of cleaning your cooktop, never use flammable materials such as acid, thinner and gas.
- Do not wash plastic and aluminium parts of your cooktop in dishwasher.
- Clean vinegar, lemon, salt, coke and similar acid and alkaline containing substances poured on your cooktop immediately.
Troubles and Solution Proposals
You can solve the troubles you can encounter at your product by checking the following points before calling technical service.
If cooktop does not operate
- Check if power cable of cooktop is plugged in.
- Examine with safe ways if electric exists on network.
- Audit fuses.
- Control whether damage is available on power cable.
Notes
Notes
CONTACT DETAILS
AUSTRALIA
ARISIT PTY LIMITED
40-44 Mark Anthony Drive
Dandenong South, VIC 3175
Australia
P // 1300 762 219
F // 03 9768 0838
consumer.care@arisit.com
NEW ZEALAND
ARISIT PTY LIMITED
PO Box 68-140
Newton, Auckland 1145
New Zealand
P // 09 306 1020
F // 09 302 0077
sales@aristonappliances.co.nz
Tisira is committed to ongoing research and development. Every effort has been made to ensure all information in this service manual is correct at time of going to print. Dimensions should be used as a reference only and actual dimensions should be taken from the physical product only.
Manufacturer reserves the right to change specifications without notice.
tisira
- Content
- Warning & Safety Instructions
- Installation
- Electrical Shock Hazard
- Cut Hazard
- Important safety instructions
- Operation and Maintenance Electrical Shock Hazard
- Health Hazard
- Hot Surface Hazard
- WARNING // Children should be supervised to ensure that they do not play with the appliance.
- Product Overview
- Product Specifications
- Electrical Connection
- Electrical Connection and Safety
- Operation Instructions
- Turning the Stove On
- Residual Heat Display
- Activating the Child Lock Completely
- Keep Warm Function (Optional)
- Auto Heating Function
- To Activate The Child Lock Completely
- Error Codes and Solutions
- Maintenance and Cleaning
- Troubles and Solution Proposals
- If cooktop does not operate
- Notes
- CONTACT DETAILS
- ARISIT PTY LIMITED
Brand : Tisira
Model : TCT63E
Category : Cooker