BPX635 - Leaf blower MTM - Free user manual and instructions
Find the device manual for free BPX635 MTM in PDF.


| Product Type | Leaf Blower |
| Brand | MTM |
| Model | BPX635 |
| Power Source | Petrol (2-Stroke Engine) |
| Engine Type | Single Cylinder 2-Stroke |
| Displacement | 30 cc |
| Ignition Type | CDI |
| Idle Speed | 3500 RPM |
| Maximum Engine Speed | 9000 RPM |
| Maximum Air Velocity | Approx. 450 km/h |
| Air Volume | Approx. 13 m³/min |
| Fuel Type | Non-ethanol unleaded petrol |
| Fuel Mixture Ratio | 40:1 (petrol:2-stroke oil) |
| Fuel Tank Capacity | 500 ml |
| Blower Type | Backpack |
| Included Items (Model BLWHNDMTMA6NK) | 1 Extension Tube, 1 Standard Nozzle, 1 Narrow Nozzle |
| Included Items (Model BLWHNDMTMA6WK) | 6 Extension Tubes, 1 Curved Nozzle, 1 Standard Nozzle, 1 Narrow Nozzle |
| Spark Plug Gap | 0.6 mm |
| Safety Distance | At least 20 m from bystanders |
| Recommended Protection | Face shield, hearing protection, non-slip shoes |
| Storage | Cool, dry place away from ignition sources |
Frequently Asked Questions - BPX635 MTM
User questions about BPX635 MTM
0 question about this device. Answer the ones you know or ask your own.
Ask a new question about this device
Download the instructions for your Leaf blower in PDF format for free! Find your manual BPX635 - MTM and take your electronic device back in hand. On this page are published all the documents necessary for the use of your device. BPX635 by MTM.
USER MANUAL BPX635 MTM
natural_image
Red BPX695 electric bower with black hose and warning label, placed on wet pavement (no text or symbols on device body)User Manual
[Revision 8.0 May 2022]
Safety
Safety messages are designed to alert you to possible dangers or hazards that could cause death, injury or equipment or property damage if not understood or followed. Safety messages have the following symbols:

You WILL be KILLED or SERIOUSLY INJURED if you do not follow instructions.

You CAN be KILLED or SERIOUSLY INJURED if you do not follow instructions.

You CAN be INJURED if you do not follow instructions or equipment damage may occur.
It is important that you read and understand the instruction manual before use and keep the manual in a safe place for future reference. Safety information presented here is generic in nature – some advice may not be applicable to every piece of equipment.
All safety precautions must be observed to reduce the risk of personal injury when operating the equipment.
The term "equipment" refers to your product, be it electrical mains, battery or petrol engine powered.
IMPORTANT – Handle the equipment safely and carefully.
BEFORE USE - If you are not familiar with the safe operation/handling of this equipment, or are in any way unsure of any aspect of suitability or correct use it for your application, you should complete training conducted by a person or organization qualified in safe use and operation of this equipment, including fuel/electrical handling and safety.
WARNINGS
- Read all safety warnings and all instructions. Failure to follow warnings and instructions may result in electric shock, fire and/or serious injury.
- Never run a petrol engine in confined areas.
- Do not operate the equipment in flammable or explosive environments, such as in the presence of flammable liquids, gases or dust. Engine and equipment may create sparks or heat that may ignite vapours, dust etc
- Keep clear of moving parts.
- This equipment may be a potential source of electric shock if misused.
- Do not operate the equipment if it is damaged, malfunctioning or is in an excessively worn state.
- Do not allow others to use the equipment unless they have read this manual and are adequately trained.
- When using the equipment, basic safety precautions detailed here must always be followed to reduce the risk of fire, electric shock, personal injury and material damage.
- When wiring electrically powered equipment, follow all electrical and safety codes.
- Ensure all power sources conform to equipment voltage requirements and are disconnected before connecting equipment.
General Work Area Safety
Work areas should be clean and well it.
Do not operate the equipment if bystanders, animals etc are within operating range of the equipment or the general work area.
Personal Safety
Keep packaging away from children - risk of suffocation! Operators must use the equipment correctly. When using the equipment, consider conditions and pay due care to persons and property.
Prevent unintentional starting of the equipment - ensure equipment and power source switches are in the OFF position before connecting or moving the equipment. Do not carry equipment with hands/fingers touching any controls. Remove any tools or other items that are not a part of the equipment from it before starting or switching on.
Stay alert and use common sense when operating equipment. Do not overreach. Keep proper footing and balance at all times. Do not use equipment when tired or under the influence of drugs, alcohol or medication. This equipment is not intended for use by persons with reduced physical, sensory or mental capabilities.
You must wear appropriate protective equipment when operating, servicing, or when in the operating area of the equipment to help protect from serious injury, including eye injury, inhalation of toxic fumes, burns, and hearing loss. Always wear eye protection. Protective equipment such as respirators, non-skid safety shoes, hard hat, hearing protection etc should be used for appropriate conditions. Other people nearby should also wear appropriate personal protective equipment. Do not wear loose clothing or jewellery, which can be caught in moving parts. Keep hair and clothing away from the equipment.
If devices are provided for the connection of dust extraction and collection facilities, ensure these are connected and properly used. Use of dust collection can reduce dust-related hazards.
General Care
Do not force the equipment. Use the correct equipment for your application. The correct equipment will perform better and be safer within its design parameters. Do not use the equipment if the ON/OFF switch malfunctions – any equipment that cannot be controlled with the ON/OFF switch is dangerous and must be repaired.
Use the equipment and accessories etc. in accordance with these instructions, taking into account working conditions and the work to be performed. Using the equipment for operations different from those intended could result in hazardous situations.
Before use, inspect the equipment for misalignment or binding of moving parts, loose components, damage or any other condition that may affect its operation. If damaged, have the equipment repaired by an authorized service centre or technician before use.
Always keep the equipment and accessories (cutting tools, nozzles, bits etc) properly maintained. Keep the equipment, controls and handles dry and free from dirt, oil and grease.
Store the equipment out of reach of children or untrained persons. To avoid burns or fire hazards, let the equipment cool completely before transporting or storing. Never place the equipment in places where there are flammable materials, combustible gases or combustible liquids etc.
The equipment is not weatherproof, and should not be stored in direct sunlight, at high ambient temperatures or locations that are damp or very humid.
Blower Use and Care
WARNINGS
- Always wear a face shield when operating the machine.
- Maintain a distance of at least 20m (60') between the operator and any bystanders, animals etc.
- Never blow debris in the direction of bystanders.
General Fuel Safety

Petrol/fuel/gasoline is extremely flammable – keep clear of naked flames or other ignition sources.
- Do not spill fuel. If you spill fuel, wipe it from equipment immediately – if fuel gets on your clothing, change them immediately
- Do not smoke near fuel.
• Always shut off the engine before refuelling. - Do not refuel a hot engine.
- Open the fuel cap carefully to allow any pressure build-up in the tank to release slowly.
• Always refuel in well ventilated areas. - Always check for fuel leakage. If fuel leakage is found, do not start or run the engine until all leaks are fixed.
General Service Information
- Have the equipment serviced or repaired at authorized service centres by qualified personnel only.
- Replacement parts must be original equipment manufacturer (OEM) to help ensure that equipment safety is maintained.
- Do not attempt any maintenance or repair work not described in this instruction manual.
- After use, the equipment and components may still be hot – allow the equipment to cool and disconnect spark plugs and/or electrical power sources and/or batteries from it before making adjustments, changing accessories or performing repair or maintenance.
- Do not make adjustments while the equipment is running.
- Perform all service related activities under suitable conditions, such as a workshop etc.
- Replace any worn, damaged or missing warning labels immediately.
- Do not clean equipment with solvents, flammable liquids or harsh abrasives.
DANGER
Using an engine or wood/charcoal/gas fuelled appliance indoors CAN KILL YOU IN MINUTES. Engine exhaust and wood/charcoal/gas fumes contain carbon monoxide. This is a poison you cannot see or smell.

NEVER use inside a building, home, garage, boat, caravan or tent EVEN IF doors and windows are open.

Only use OUTSIDE and far away from windows, doors, and vents.
Avoid other hazards - READ MANUAL BEFORE USE.
GENERAL:
- Do not operate in a hazardous location. Such areas include where there is a risk of explosion of petrol fumes, leaking gas or explosive dusts.
- Do not operate in a confined area where exhaust gases or wood/charcoal/gas fumes could reach dangerous concentrations.
PRODUCTS FEATURING AN ENGINE
- Follow all warnings in the section titled "GENERAL".
- Explosion hazard - never smoke while refuelling.
- Take care not to spill fuel. When refuelling the engine, ensure that the engine has been allowed to cool. Prevent spilling of fuel as this may also ignite with a hot engine.
- Never refuel while engine is running.
GENERATORS
- Follow all warnings in the sections titled "GENERAL" and "PRODUCTS FEATURING AN ENGINE".
- The output of this generator is potentially lethal. The generator should not be connected to a fixed electrical installation except by an appropriately licensed person.
- Not weatherproof – protect your machine. This machine is not weatherproof and should not be exposed to direct sunlight, high ambient temperature, damp conditions, wet conditions or high humidity conditions.
Table of Contents
Safety....2
Included Items....5
BLWHNDMTMA6NK 5
BLWHNDMTMA6WK....5
Spare Parts 6
Assembly 7
Adjusting the Backpack Harness and Control Handle....8
Fuel and Lubrication 8
Operation 9
Starting the Engine....9
Stopping the Engine....9
Operating the Blower....10
Maintenance 11
Checking, Cleaning or Replacing the Air Filter....11
Air Filter Inspection and Cleaning....11
Air Filter Removal/Installation 11
Cleaning the Fuel Filter 11
Spark Plug....12
Spark Plug Cleaning and Gap Checking....12
Spark Plug Removal/Installation 12
Storage....13
Removing from Storage....13
Troubleshooting.... 14
Specifications.... 15
Included Items

natural_image
Red and black portable air-bending machine with attached hose and propeller (no visible text or symbols)BLWHNDMTMA6NK
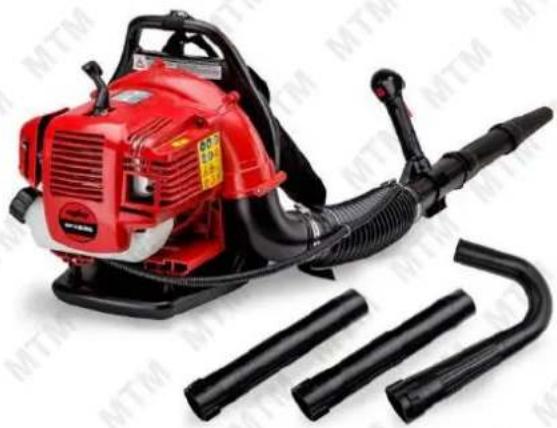
1x Extension Tube
1x Standard Nozzle
1x Narrow Nozzle
natural_image
Red and black electric-bulbizer with attached hose and three black tubing (no visible text or symbols)BLWHNDMTMA6WK
6x Extension Tubes
1x Curved Nozzle
1x Standard Nozzle
1x Narrow Nozzle
Spare Parts

Spare parts available for purchase, scan QR codes below:
QR Code SKU

natural_image
Red and black electric shock absorber with attached spray bottle and three tubes (no visible text or symbols)BLWHNDMTMA6NK

natural_image
Red and black electric-bulbizer device with attached blade (no visible text or symbols)BLWHNDMTMA6WK
Assembly
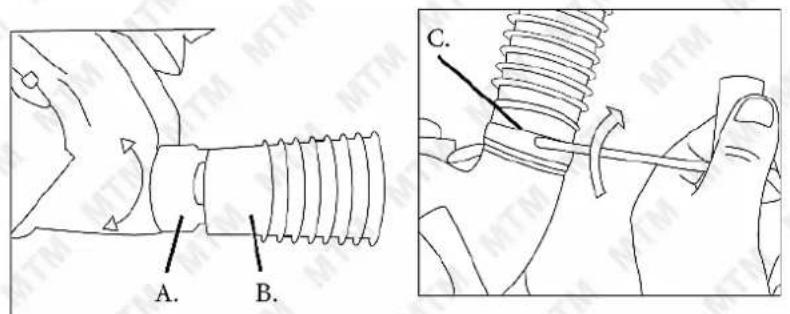
Note: Place the hose clamps over the flexible tube before connecting it. • Place the unit on a flat surface during assembly.
- Slide the flexible tube (B) over the fan outlet tube (A) and secure it using a hose clamp (C). Firmly tighten the clamp.
Note: Keep the throttle cable as straight as possible when connecting the blower tubes. • Ensure the hose clamp screw is positioned away from the operator.
- Slide the flexible tube (B) over the control tube (E).
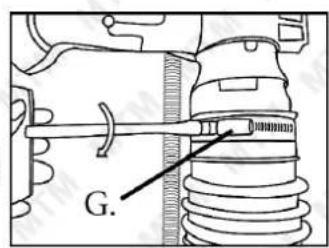
- Rotate the control tube so that the alignment mark (D) and throttle handle (F) are aligned, then secure the tubes using a hose clamp (G). Firmly tighten the clamp.
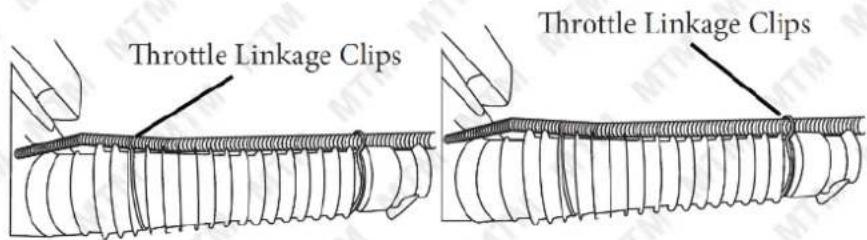
- Attach the throttle linkage clips to both ends of the flexible tube to secure the throttle cable.

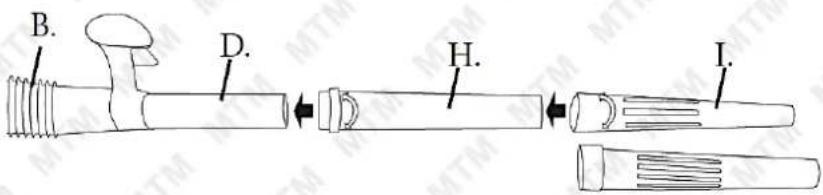
- Connect the intermediate tube (H) and air nozzle (I) by pushing them together and turning them clockwise so that they lock.
Adjusting the Backpack Harness and Control Handle
- Place the blower on your back by slipping arms through the shoulder straps as if you were putting on a jacket.
- Once adjustments have been made to the straps for user comfort, remove the blower from your back and place on a level ground in an upright position.
- Adjust the backpack harness and control handle position as required so that the unit is comfortable and easy to control.
Fuel and Lubrication


Petrol/fuel/gasoline is extremely flammable – keep clear of naked flames or other ignition sources. • The engine must be cool before refuelling. • Do not run the engine on un-mixed fuel or fuel that is not mixed at the correct ratio. Failure to use the correct fuel type / mixture may permanently damage the engine and void product warranty. • Mix the fuel thoroughly before adding to the unit. • Some conventional petrol blends use oxygenates such as alcohol or other compounds to meet emission requirements. This engine is designed to operate satisfactorily on any petrol for automotive use including these types of blends.
Adequately fill the fuel tank with the correct fuel type.
- Use non-ethanol unleaded mixed at a 40:1 ratio with 2-stroke engine oil (higher RON values and good quality 2-stroke oil will provide best engine performance). Do not use old or contaminated fuel/oil. Fuel/oil mix ratio examples are shown below.
Engine Idle Adjustment
In some cases due to operating conditions (altitude, temperature etc.) the engine may not idle reliably after fully warming up. If this occurs, a slight adjustment to the idle speed may be required.
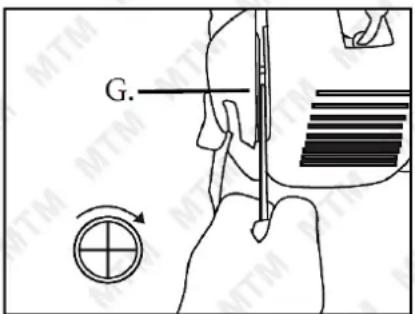
- Locate the carburettor idle adjustment screw (G).
- Use a Phillips or slotted-screwdriver to rotate the idle adjustment screw right (clockwise) 1/4 turn.
- Check the idle. If the engine still does not idle reliably, repeat step 2. If the engine still not idle or further adjustments are necessary, take the machine to an authorised service centre.
Operation
Video Tutorial:
User Guide

Starting the Engine
Video Tutorial:
Starting 2-Stroke Engines


Always pull the starter cord straight out. Pulling it at an angle will cause it to rub against the machine, which may damage it and wear it more quickly. • Allow the starter cord to retract slowly – do not let it "snap" back. This could cause the rope to snag or fray and also damage the starter assembly.
- Place the engine ON / OFF switch (A) in the "ON" ("I") position.
- If the unit is new, has just been re-fuelled or has not been used for a period of time, press the fuel primer bulb (B) repeatedly until it feels firm.
- Place the choke (C) in the most suitable position, depending on engine temperature and ambient temperature. For cold engines, use 🔒 "COLD" and for hot engines, use 🔒 "RUN".
- With the unit on the ground, hold the top handle and step on the bottom frame to steady it. To start the engine, slowly pull the starter cord until you feel it engage the engine, then pull rapidly. Repeat until the engine starts. If the engine does not start after more than 4 attempts, reduce the amount of choke and attempt to start the engine.
- Once the engine has started, allow it to warm up, gradually reducing choke until it is in the "RUN" position before using the machine.
natural_image
Close-up of a black handheld device with a red trigger and labeled component A (no text or symbols on the device itself)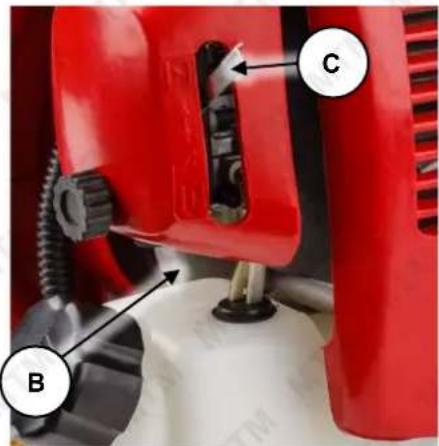
natural_image
Close-up of a red industrial machine component with labeled parts (B, C), no visible text or symbols beyond labelsIf the engine fails to start after repeated attempts, refer to Troubleshooting.
Stopping the Engine
Emergency Stopping Procedure
Place the engine ON / OFF switch in the "OFF" position.
Normal Stopping Method
For normal stopping, release the trigger and allow the engine to return to idling speed. Then place the engine ON / OFF switch in the "OFF" position.
Operating the Blower

Always wear a face shield when operating the machine. • Maintain a distance of at least 20m (60') between the operator and any bystanders, animals etc. • Never blow debris in the direction of bystanders.
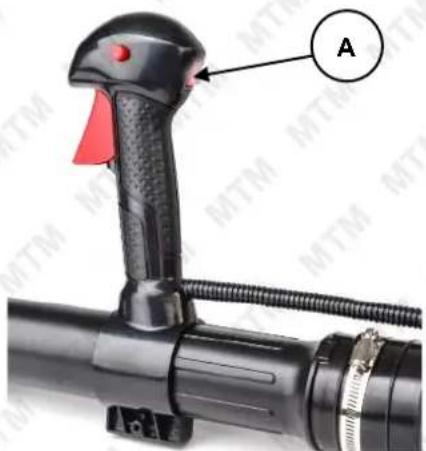
With the engine running, press and hold the lock-out button (A) button, then squeeze the throttle (B) to activate the blower and adjust engine speed.
The velocity of the air stream is dependent on engine speed – use the throttle to adjust engine speed / air velocity as required when using the machine.

- Stand at a distance away from debris that will easily allow you to control its direction as it is blown.
• Use rakes and brooms to loosen debris before blowing. In dusty conditions, slightly dampen surfaces.
Maintenance
Checking, Cleaning or Replacing the Air Filter
WARNING! Operating the machine without a functional air filter may cause severe engine damage and will void any warranty. • A dirty or oil saturated air filter will restrict air flow, which can be mistaken as fuel system problems. Check the condition of the air filter before adjusting engine idle speed, where applicable. • If the air filter is damaged (torn, broken, disintegrating), replace it.
The air filter is used to prevent dirt and other particles from possibly entering the engine and causing internal damage to it. The air filter requires regular maintenance as per the maintenance schedule.
Air Filter Inspection and Cleaning
Inspect the air filter for dirtiness and debris, damage etc. Clean or replace the filter element as necessary. To clean air filters:
- For foam filters, wash the filter in warm water and mild detergent, then rinse and allow to dry.
- Clean all other air filter assembly components using water and mild detergent, then dry them.
- For foam filters, place a few drops of clean engine oil on the filter then squeeze it a few times to spread the oil through the filter material and remove any excess oil.
Air Filter Removal/Installation
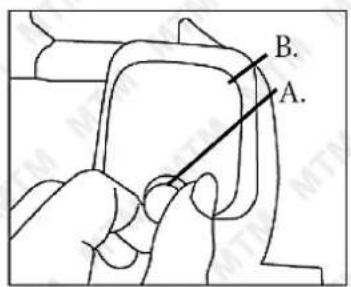
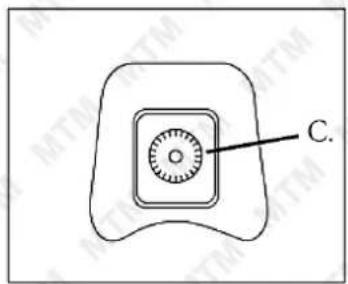
- Loosen the knob (A) holding the air filter cover in place.
- Remove the air filter cover (B) and lift the filter (C) from the air intake assembly.
Cleaning the Fuel Filter
Remove fuel from the tank and store it in an approved container before starting this procedure.
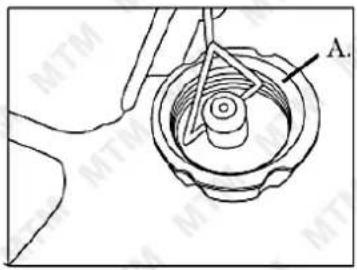
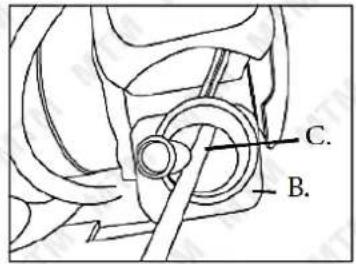
- Open the fuel cap to slowly release any pressure in the fuel tank, then remove the cap.
- Use a piece of wire to hook the fuel tube/filter (C), then pull the filter from the tank.
- Remove the fuel filter from the tube with a twisting motion.
- Ensure that the fuel tank vent (A) is clean. Clean the fuel filter of obstructions etc using petrol or solvent.
Never operate the blower without the fuel filter. Internal damage could result.

Spark Plug

If the spark plug is damaged (cracked insulator, broken or eroded electrodes etc), replace it. • Always use spark plugs of the same type as originally supplied.
The spark plug is used to ignite the air/fuel mixture inside the engine. The spark plug has electrodes on one end and an electrical terminal on the other. The spark plug requires regular maintenance.
Spark Plug Cleaning and Gap Checking
The spark plug should be checked and cleaned approximately every 6 months.
- Remove any carbon deposits on the spark plug (A) electrodes (B) with a wire brush.
- Clean the spark plug threads and the electrical terminal (C) on the top.
To check and adjust the spark plug "gap":
- Use "feeler" or "thickness" gauges (X) to measure the existing gap. The gauge must drag a little when being slid between the electrodes (2) – this means the measurement is fairly accurate.
- Adjust the gap to 0.6mm (0.025"). If the gap needs to be reduced, gently tap the electrode as required. If the gap needs to be increased, use pliers to gently pull the electrode as required.
- Measure the gap again and ensure it is within the specified range before re-installing the spark plug.
Spark Plug Removal/Installation
- Pull the electrical lead from the terminal on top of the spark plug.
- Clean the area around the spark plug so that no dirt or other material can enter the engine when the spark plug is removed.
- Use the spark plug tool to remove the spark plug (rotate left).
To re-install the spark plug:
- Place the spark plug in its hole and screw it in (rotate right) until "finger tight".
- Use the spark plug tool to tighten the spark plug approximately one quarter turn (do not over-tighten).
- Place the electrical lead over the spark plug terminal and push it down so that it connects firmly with the terminal

Storage
Failure to follow these steps may cause varnish to form in the carburettor. If this happens then the carburettor will have difficulty starting.
- Perform all the general maintenance recommended in the maintenance section of your user manual.
- Clean the outside surface of the blower.
- Drain fuel from the fuel tank.
- After the fuel is drained, start the engine.
- Run at engine at idle until it stops. This purges the carburettor of fuel.
- Allow the engine to cool.
- Remove the spark plug.
- Pour one teaspoon of clean 2-stroke oil into the combustion chamber. Pull the starter cord slowly several times to coat internal components. Re-install the spark plug.
- Store the machine in a cool, dry place away from sources of ignition (oil burner, water heater etc).
Removing from Storage
- Remove the spark plug.
- Pull the starter cord briskly several time to clear excess oil from the combustion chamber.
- Re-install the spark plug.
Troubleshooting
| Problem | Probable Cause | Corrective Action |
| Engine does not start, or starts but will not run | Incorrect starting procedures | Follow instructions in the user manual |
| Incorrect carburettor mixture | Have carburettor adjusted by an authorised service centre | |
| Fouled spark plug | Clean/gap or replace plug | |
| Empty fuel tank | Fill fuel tank with properly mixed fuel | |
| Primer bulb was not pressed enough | Press primer bulb fully and slowly ten times | |
| Engine starts, but has low power | Fuel filter is plugged | Replace spark arrestor screen |
| Incorrect lever position | Move to run position | |
| Dirty spark arrestor screen Replace spark arrestor screen | ||
| Dirty air filter | Remove, clean and reinstall filter | |
| Engine hesitates | Incorrect carburettor mixture setting | Have carburettor adjusted by an authorised service centre |
| Air filter is plugged | Replace or clean the air filter | |
| Old or improperly mixed fuel | Drain gas tank/add fresh fuel mixture | |
| Air filter is plugged | Replace or clean the air filter | |
| Fouled spark plug | Replace or clean the spark plug | |
| Incorrectly gapped spark plug | Clean/gag or replace plug | |
| Dirty air filter | Clean or replace air filter | |
| Smokes excessively | Incorrect carburettor mixture setting | Have carburettor adjusted by an authorised service centre |
Specifications
| Engine Type | Single cylinder 2-stroke |
| Displacement | 30cc |
| Idle Speed | 3500RPM |
| Maximum Engine Speed | 9000RPM |
| Ignition Type | CDI |
| Maximum Air Velocity | Approximately 450 km/h |
| Air Volume | Approximately 13m^3/min |
| Fuel Type | Non-ethanol unleaded |
| Fuel Capacity | 500ml |
| Fuel Ration | 40:1 (40 parts fuel to 1 part 2- stroke oil) |

Some experts believe that the incorrect or prolonged use of almost any product may cause serious injury or death. To help reduce your risk of serious injury or death, refer to the information below. For more information, see www.datastreamserver.com/safety
- Consult all documentation, packaging and product labelling before use. Note that some products feature documentation available online. It is recommended to print and retain the documentation.
■ Before each use, check the product for loose/broken/damaged/missing parts, wear or leaks (if applicable). Never use a product with loose/broken/damaged/missing parts, wear or leaks.
■ Products must be inspected and serviced (if applicable) by a qualified technician every 6 months. This is based on average residential use by persons of average size and strength, and on a property of average metropolitan size. Use beyond these recommendations may require more frequent inspections/servicing.
■ Ensure that all users of the product have completed a suitable industry recognised training course before being allowed access to the product.
The product has been supplied by a general merchandise retailer that may not be familiar with your specific application or description of application. Be sure to attain third-party approval from a qualified specialist for your application before use, regardless of any assurances from the retailer or its representatives.
This product is not intended for use where fail-safe operation is required. As with any product (for example, automobile, computer, toaster), there is the possibility of technical issues that may require the repair or replacement of parts, or the product itself. If the possibility of such failure and the associated time it may take to rectify could in any way inconvenience the user, business or employee, or financially affect the user, business or employee, then the product is not suitable for your requirements. This product is not intended for use where incorrect operation or a failure of any kind, including but not limited to, a condition requiring product return, replacement, parts replacement or service by a technician may cause financial loss, loss of employee time or an inconvenience requiring compensation.
- If this product has been purchased in error when considering the information presented here, contact the retailer directly for details of their returns policy, if required.

©2022 MTM. All rights reserved. No part of this document, including descriptive content, concepts, ideas, diagrams or images may be reproduced or transmitted in any form or by any means, electronic or mechanical, including photocopying, scanning or recording, or any information storage and retrieval system, without express permission or consent from the publisher.
- User Manual
- Safety
- WARNINGS
- General Work Area Safety
- Personal Safety
- General Care
- Blower Use and Care
- General Fuel Safety
- General Service Information
- DANGER
- GENERAL:
- PRODUCTS FEATURING AN ENGINE
- GENERATORS
- Table of Contents
- Safety....2
- Included Items....5
- Spare Parts 6
- Assembly 7
- Fuel and Lubrication 8
- Operation 9
- Maintenance 11
- Storage....13
- Troubleshooting.... 14
- Specifications.... 15
- Included Items
- BLWHNDMTMA6NK
- BLWHNDMTMA6WK
- Spare Parts
- Assembly
- Adjusting the Backpack Harness and Control Handle
- Fuel and Lubrication
- Engine Idle Adjustment
- Operation
- Starting the Engine
- Stopping the Engine
- Operating the Blower
- Maintenance
- Checking, Cleaning or Replacing the Air Filter
- Air Filter Inspection and Cleaning
- Air Filter Removal/Installation
- Cleaning the Fuel Filter
- Spark Plug
- Spark Plug Cleaning and Gap Checking
- Spark Plug Removal/Installation
- To re-install the spark plug:
- Storage
- Removing from Storage
- Some experts believe that the incorrect or prolonged use of almost any product may cause serious injury or death. To help reduce your risk of serious injury or death, refer to the information below. For more information, see www.datastreamserver.com/safety
Brand : MTM
Model : BPX635
Category : Leaf blower