CV355-30X-IP - Camera Marshall Electronics - Free user manual and instructions
Find the device manual for free CV355-30X-IP Marshall Electronics in PDF.


| Product Type | HD PTZ Camera |
| Model | CV355-30X-IP |
| Dimensions (W x H x D) | 186.71 x 67.0 x 67.0 mm |
| Weight | 1 kg |
| Power Supply | DC 12V (included power adapter) or PoE (IEEE 802.3af) |
| Lens | 30x optical zoom |
| Video Outputs | 3G-SDI, HDMI, Ethernet (3 streams) |
| Max Resolution | 1080p at 59.94/50 fps |
| Video Compression | H.265 (Main stream), H.264 (Sub streams) |
| Audio Input | 3.5mm Line/Mic |
| Audio Output | 3.5mm loop-through |
| Network Interface | Ethernet (RJ-45) with PoE |
| Control Interface | RS-232 (daisy-chain up to 7 cameras) |
| Tally Indicator | Yes, controllable via VISCA command |
| Pan/Tilt Control | Available via web UI or VMS software |
| Web Access | Yes, default IP 192.168.100.100 (admin/9999) |
| Supported Protocols | RTSP, RTMP, SRT, MPEG-TS |
| Mounting | 1/4"-20 UNC tripod screw (max 6 mm depth) |
| Operating Temperature | Not specified in manual (typical 0°C to 40°C) |
| Warranty | 2 years limited parts and labor |
Frequently Asked Questions - CV355-30X-IP Marshall Electronics
User questions about CV355-30X-IP Marshall Electronics
0 question about this device. Answer the ones you know or ask your own.
Ask a new question about this device
Download the instructions for your Camera in PDF format for free! Find your manual CV355-30X-IP - Marshall Electronics and take your electronic device back in hand. On this page are published all the documents necessary for the use of your device. CV355-30X-IP by Marshall Electronics.
USER MANUAL CV355-30X-IP Marshall Electronics
natural_image
Black Marshall CV355-30X-IP optical camera with lens and mounting holes (no visible text beyond branding)User Manual
Table of Contents
Safety Instructions 02
-
Package Contents 04
-
Function Introduction 04
2.1 I/O Functions Introduction 04
2.2 Tally Indicator Light Function Description 05
- Installation Instructions 05
3.1 Installation Basics 05
3.2 Connecting Devices 06
- Network Function Settings 09
4.1 Web System Requirements 09
4.2 Connecting Camera to Network 09
4.3 Web Page Function Description 12
-
Specifications 24
-
Troubleshooting 26
Warranty 27
Marshall
Safety Instructions
1. Operation
1.1 Please use the product in the recommended operating environment.
1.2 Do not place the product in tilted position.
1.3 Do not place the product on an unstable trolley, stand or table.
1.4 Do not use the product near water or source of heat.
1.5 Use attachments only as recommended.
1.6 Use the type of power source indicated on the product. If you are not sure of the type
of power available, consult your distributor or local electricity company for advice.
1.7 Always take the following precautions when handling the plug. Failure to do so may result in sparks or fire:
- Ensure the plug is free of dust before inserting it into a socket.
- Ensure that the plug is inserted into the socket securely.
1.8 Do not overload wall sockets, extension cords or multi-way plug boards to avoid potential risks.
1.9 Do not block the slots and openings in the case of the product. They provide ventilation and prevent the product from overheating.
1.10 Except as specifically instructed in this User Manual, do not open or remove covers, otherwise it may expose you to dangerous voltages and other hazards. Refer all servicing to licensed service personnel.
1.11 Unplug the product from the wall outlet and refer servicing to licensed service personnel when the following situations happen:
- If the power cords are damaged or frayed.
- If liquid is spilled into the product or the product has been exposed to rain or water.
2. Installation
2.1 For security considerations, please make sure the standard hanging rack you bought is in line with UL or CE safety approbations and installed by technician personnel approved by agents.
3. Storage
3.1 Do not mount camera where power cord can be stepped on, as this may result in fraying or damage to the lead or the plug.
3.2 Never push objects of any kind through cabinet slots. Never allow liquid of any kind to spill onto or into the camera body.
3.3 Unplug this product during thunderstorms, during electrical surges, or if it is not going to be used for an extended period of time.
3.4 Do not place camera or accessories on top-ohalobating equipment or heated objects.
Marshall
CV355-30X-IP Manual
4. Cleaning
4.1 Unplug all the cables before cleaning. Use a damp cloth for cleaning. Do not use liquid or aerosol cleaners or allow any liquids to enter camera body.
5. Remote Control (if applicable)
5.1 Using an incorrect battery type in the remote control may result in breakdown. Follow local instructions on how to dispose of used batteries.
Precautions
Warning: To reduce the risk of fire or electric shock, do not expose this camera to rain, moisture, debris or liquids.
If the HD camera will not be used for an extended time, unplug it from the power socket.

Caution: To reduce the risk of electric shock, do not remove cover (or back). No user-serviceable parts inside. Refer servicing to licensed service personnel. Please do not open it by yourself

This symbol indicates that this equipment may contain dangerous voltage which could cause electric shock.

This symbol indicates that there are important operating and maintenance instructions in this User Manual with this unit.
FCC Warning
This product has been tested and found to comply with the limits for a Class B computer device, pursuant to Article 15-J of FCC Rules. These limits are designed to provide reasonable protection against harmful interference in a residential installation.
This digital apparatus does not exceed the Class B limits for radio noise emissions from digital apparatus as set out in the interference-causing equipment standard entitled "Digital Apparatus" ICES-003 of Industry Canada.
Operation of this equipment in a residential environment could cause radio interference.
Marshall
1. Package Contents
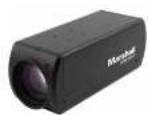
CV355-30X-IP Power Cord Power Adapter

2. Function Introduction
2.1 I/O functions Introductions
natural_image
Close-up of a black camera lens with blue and red buttons indicating specific parts (no text or symbols on the lens itself)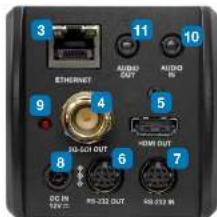
| No. Item. Function Descriptions | ||
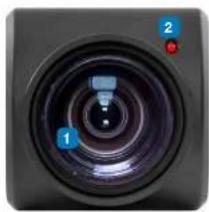
| 1 Lens 30x HD camera lens | ||
| 2 Tally indicator light Tally light displays status of the camera | ||
| 3 | Network port | Network port. Support routers or hubs (IEEE 802.3 af) with PoE power supply support |
| 4 | 3G SDI output | The factory setting for the output resolution is 1060P/60 |
| 5 HDMI output HDMI output port | ||
| 6 | RS232 output | RS232 output port. At most 7 cameras can be connected in a serial connection |
| 7 | RS232 input | RS232 input port. At most 7 cameras can be connected in a serial connection |
| 8 DC 12 V power connector | AC power supply connecting port | |
| 9 | Power indicator light | After power is on, the indicator light will display in red |
| 10 | Audio input | 3.5mm Audio Input supports Line level or Mic level Stereo/Mono input |
| 11 | Audio output | Loop-through 3.5mm Output |
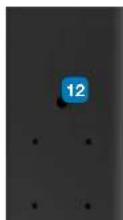
| 12 | Tripod screw holes | The camera is mounted on a (specification) 1/4", 20 UNC tripod deck |
www.marshall-usa.com3 4
Marshall
CV355-30X-IP Manual
2.2 Tally Indicator Light Function Description
2.2.1 The tally indicator light function may be enabled through the control of VISCA command.
The setting method is as follows:
Tally Mode: 8x 01 7E 01 0A 01 0p FF
p = 0 : OFF
p = 4 : On (half-brightness)
p = 5 : On (full-brightness)
3. Installation Instructions
3.1 Installation Basics
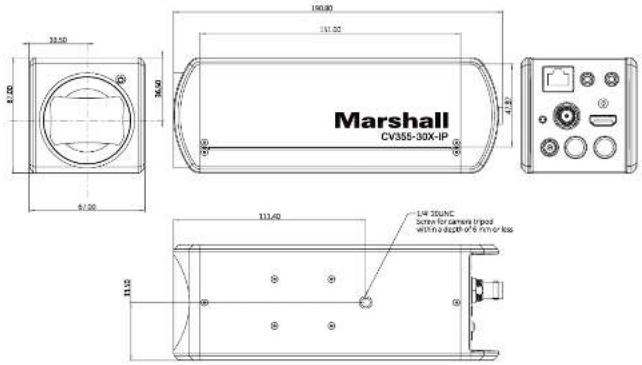
3.1.1 CV355-30X-IP Dimensions
Length x Width x Height : 186.71 x 67.0 x 67.0 mm
Weight
1 Kg
Marshall
3.2 Connecting devices
3.2.1 HDMI connection to display, switch, or media
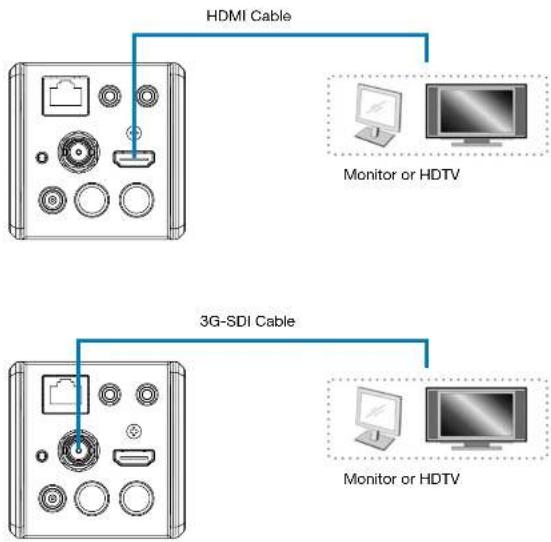
flowchart
graph TD
    A["Device 1"] -->|HDMI Cable| B["Monitor or HDTV"]
    C["Device 2"] -->|3G-SDI Cable| D["Monitor or HDTV"]
www.marshall-usa.com5 6
Marshall
CV355-30X-IP Manual
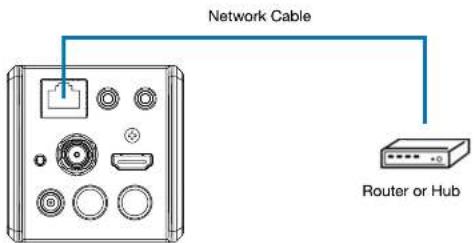
3.2.2 Connecting to Internet
For details of web page connection setting and description, please refer to Chapter 4 Network Function Settings Description.
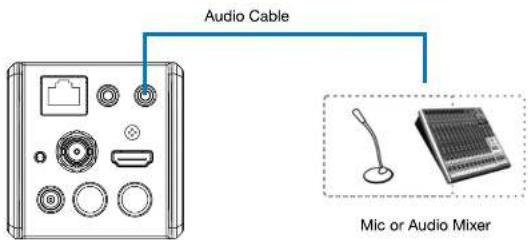
3.2.3 Connecting AUDIO IN
Marshall
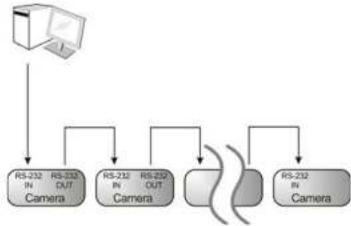
3.2.4 Connecting RS-232
• RS-232 serial connection
With RS-232 in/out, at most 7 Lumens cameras can be connected.
flowchart
graph TD
    A["Computer"] --> B["RS-232 IN Camera"]
    A --> C["RS-232 IN OUT Camera"]
    A --> D["RS-232 OUT Camera"]
    A --> E["RS-232 IN Camera"]
    B --> F["Processing Unit"]
    C --> F
    D --> F
    E --> F
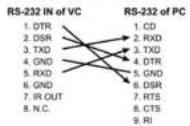
• RS-232 pin definition description
▼ RS-232 IN Pins Instructions
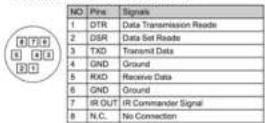
▼ RS-232 Connection Instructions
▼ RS-232 OUT Pins Instructions
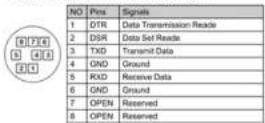
▼ RS-232 Connection Instructions
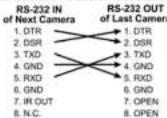
www.marshall-usa.com7 8
4. Network Function Settings
4.1 Web System Requirements
4.1.1 Web Browser :
- Internet Explorer 11 or above
- FireFox 66.0.3 or above
- Chrome 73 or above
• Edge 42.17134 or above
• Safari 12.1 or above
4.2 Connecting Camera to Network
4.2.1 Connecting to Internet
Two common connection methods are shown below
- Connecting via switch or router
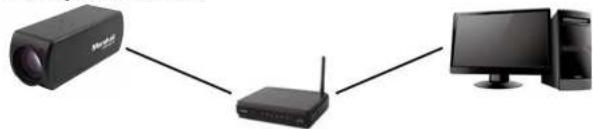
natural_image
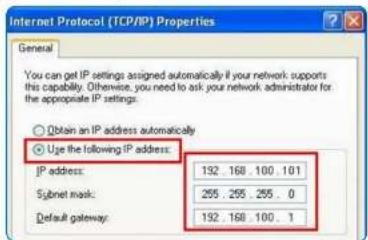
Three connected devices: a projector, a wireless router, and a desktop computer (no visible text or symbols)- If the camera is connected to the computer directly, the computer IP address must be modified to have the same network segment as the camera For example, the factory-preset default IP address of CV355-30X-IP is 192.168.100.100. The computer IP address must be set with the same subnet, such as 192.168.100.101, so that the computer can be connected correctly with the camera
- Connection Diagram
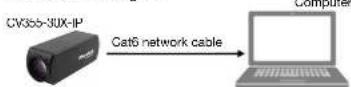
- Change network settings
4.2.2 Using Marshall VMS Software to View the Images
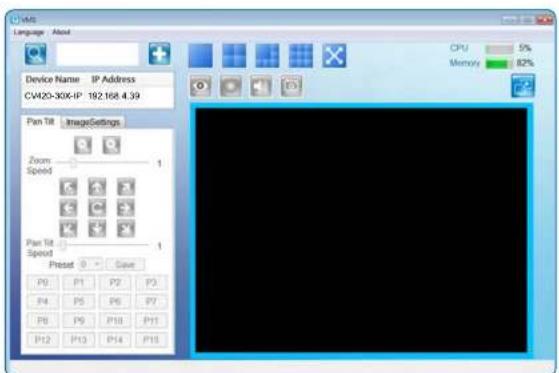
- The CV355-30X-IP DHCP initial setting is ON. If it is connected to the local area network (LAN), the camera IP can be retrieved via the following methods
- Install Marshall VMS software (Please download from the Marshall official website, www.marshall-usa.com)
- Open Marshall VMS software
- Search for the camera: Press [automatically search for the device] button to locate the CV355-30X-IP camera
- Click CV355-30X-IP in the list and start operation after connecting to network
Note: When using automatic search, the camera and computer must be in the same network segment, e.g.: 192.168.4.X
www.marshall-usa.com9 10
Marshall
CV355-30X-IP Manual
4.2.3 Using the Browser to View the Images
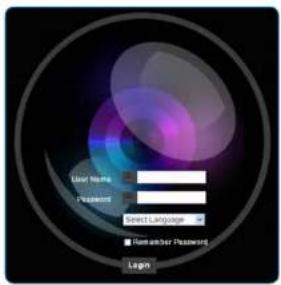
- Open the browser, and enter the URL of CV355-30X-IP in the IP address bar e.g.: http://192.168.100.100 (default IP address)
- Enter administrator's account and password Account: admin (Default) Password: 9999 (Default)
4.2.4 Using RTSP Player to View the Images
Besides the browser and VMS, other free software also can be used for RTSP connection, such as VLC, Quick Time, PotPlayer.
RTSP connection address formats are as follows:
• RTSP Main Streaming (1080P@H.265) => rtsp://camera IP:8554/hevc
• RTSP Sub1 Streaming (1080P@H.264) => rtsp://camera IP:8557/h264
- RTSP Sub2 Streaming (720P@H.264) => rtsp://camera IP:8556/h264
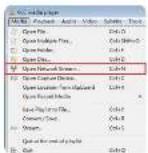
Example: Open VLC software and input the URL: rtsp://192.168.4.48:8557/hevc
| Network Protocol |
| Please enter a network URL: |
| rstp /192.168.100.150.8557/8264 |
Marshall
4.3 Web Page Function Description
4.3.1 Login Screen
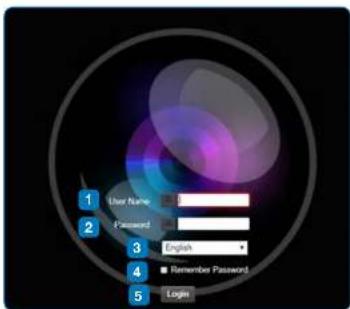
| No. | Item. Function Descriptions | |
| 1 | Username Enter user account name (default: admin) | |
| 2 | Password Enter user password (default: 9999) | |
| 3 | Language selection | The system currently supports English, Traditional Chinese, and Simplified Chinese |
| 4 | Remember password | Saves user account name and password to the browser. |
| 5 | Login Log into the administrator screen on the website | |
www.marshall-usa.com11 12
4.3.2 Viewing In Real Time
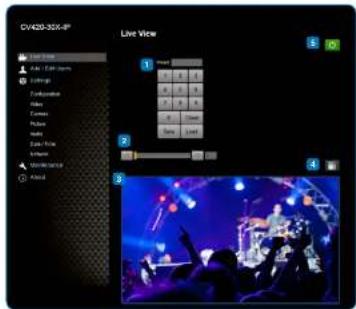
| No. Item | Function Descriptions | |
| 1 Preset | setting Select the number | first and then select SAVE or LOAD |
| 2 | Zoom ratio | Adjust the zoom-in or zoom-out ratio via scroll bar |
| 3 Preview window Display the screen currently captured by the camera | ||
| 4 Switch to Full Screen Switch the preview window to full screen | ||
| 5 Power button Turn on or turn off the camera power | ||
4.3.3 Account Management
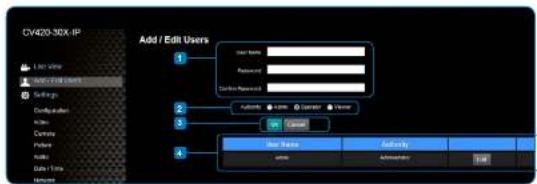
| No. Item. Function Descriptions | |||||
| 1 | Add user account | Enter a username and password to add a new user | |||
| 2 Permission setting Set the new account management permissions | |||||
| User Type | Admin | Operator | Viewer | ||
| View images Y | Y | Y | |||
| Settings | Y | Y | N | ||
| Account management | Y | N | N | ||
| 3 Applying setting Add the newly treated user to the account list | |||||
| 4 | List of accounts | Edit: Modify the user password and permissionsDelete: Delete the user account | |||
4.3.4 System Configurations 4.3.5 Video Settings
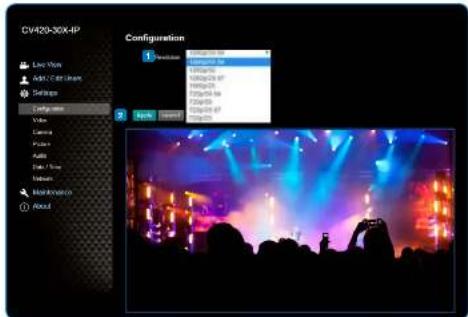
| No. Item | Function Descriptions | |
| 1 | Resolution | Set the resolution of the camera, resolutions supported by the camera are as follows:1080p/59.941060p/501080p/29.971080p/25720p/59.94720p/50720p/29.97720p/25After switching the resolution, the camera will restart. If there are no images on the website, please refresh the browser |
| 2 Apply | After the setting has been | modified, select this button to apply the setting |
Marshall
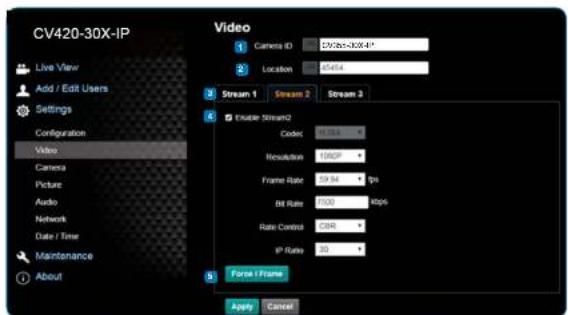
| No. Item, Function Descriptions | ||
| 1 | Camera name Modify the camera | nameCamera names are limited to 1-12 charactersPlease use a camera name by mixing uppercase and lowercase letters and numbers.Do not use "7" and "space" or special symbols |
| 2 | Camera location Modify the location | on of the camera, such as Meeting Room 1Camera locations are limited to 1-12 charactersPlease use a camera name by mixing uppercase and lowercase letters and numbers.Do not use "7" and "space" or special symbols |
| 3 | Streaming 1 / Streaming 2 / Streaming 3 | The CV356-3UX-IP supports 3 streaming outputs. Please refer to 4.3.5.1 Streaming Parameter Setting for relevant settings |
| 4 | Enable Streaming Confirm the steaming function | |
| 5 | Force I Frame | Check this item to insert IDR frame into specified series flow and apply its setting. User's setting will be reserved and displayed in GUI Interface |
4.3.5.1 Streaming Parameter Setting
| Function | Streaming 1 | Streaming 2 | Streaming 3 | |
| Encode Format H.265 | H.264 | |||
| Resolution | 1080P / 720P | 640 x 360 | ||
| Frame rate | Setting according to the supported resolution | |||
| Bit Ratio(kbps) | Range | 2,000-20,000 | 2,000-20,000 | 512-5,000 |
| Factory default | 7,000 | 7,000 | 1,000 | |
| Rate control | CBR / VBR | |||
| IP ratio | Setting according to the supported resolution | |||
www.marshall-usa.com15 16
4.3.6 Camera Settings 4.3.7 Picture Settings
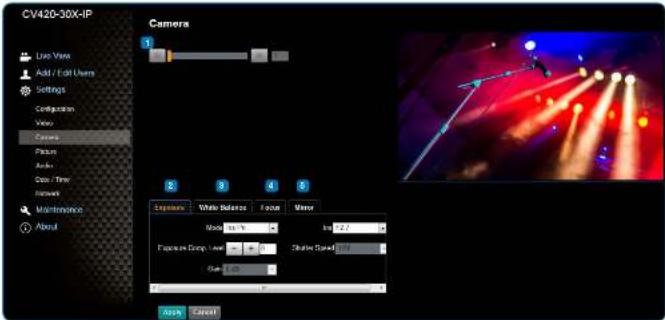
| No. Item | Function Descriptions | |
| 1 | Zoom ratio | Adjust the zoom-in or zoom-out ratio via scroll bar |
| 2 Exposure | Mode: Select exposure mode (Automatic/Shutter Priority/Aperture Priority/Manual)Exposure Comp. Level: Select exposure compensation levelGain: The gain limit is adjustable when the exposure mode is set to "Manual"Iris: The size of aperture is adjustable when the exposure mode is set to "Manual" or "Aperture Priority"WDR: Set the level of wide dynamic range (WDR) in order to obtain better images in dynamic lighting environments.Shutter Speed: The shutter speed is adjustable when the exposure mode is set to "Manual" or "Shutter Priority" | |
| 3 White balance | Mode: Select the color temperature modeAutoIndoorOutdoorOne Push WBATWMansulSodium LampOpen Push Trigger: One push color temperature is adjustable when the white balance mode is set to "One Push Trigger"Manual Red/Blue: Manually adjust blue/red color temperature | |
| 4 Focus | Mode: Select manus/automatic focusFocus Range: The focusing ranges is adjustable when the focus mode is set to "Manual"AF Sensitivity: Set automatic focus sensitivityAF Frame: Set automatic focus range | |
| 5 MIRROR | Mirror: Set the mode at which the image is mirrored and fipped. | |
Marshall
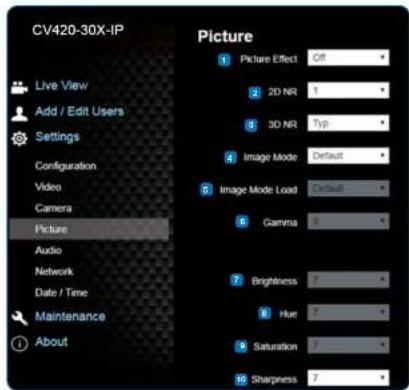
| No item | Function Descriptions | |
| 1 | Picture effect Set picture effect, Off / Film / Black and White | |
| 2 | 2D noise reduction settings | 2D noise reduction settings |
| 3 | 3D noise reduction settings | 3D noise reduction settings |
| 4 | Image mode The user may customize his/her desired image mode | |
| 5 | Image mode load* | When no custom setting is needed, reset the picture parameters back to the factory default by selecting this item |
| 6 | Gamma* | Gamma Level adjustment; Adjustable when the image mode is set to Custom |
| 7 | Brightness* | Brightness adjustment; Adjustable when the image mode is set to Custom |
| 8 | Contrast* | Contrast adjustment; Adjustable when the image mode is set to Custom |
| 9 | Saturation* | Saturation adjustment; Adjustable when the image mode is set to Custom |
| 10 | Sharpness* | Adjust the sharpness of the image |
*Setting only enabled when image mode set to custom
4.3.8 Camera Settings 4.3.9 Time Settings
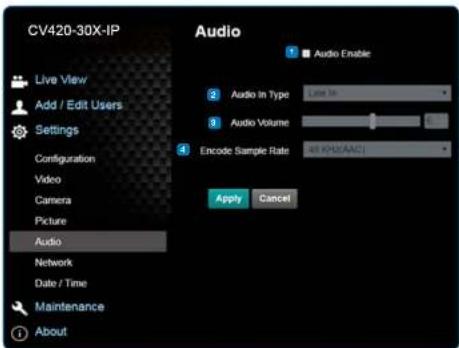
| No. Item | Function Descriptions | |
| 1 Open | audio Turn on / off sound | |
| 2 Sound | track effect setting | Set MIC In / Line In |
| 3 Audio | Volume Adjust Volume | |
| 4 Encode | sample rate Set Encode | sample rate• 48 KHz(AAC)• 44.1 KHz(AAC)• 16 KHz(G.711)• 8 KHz(G.711) |
Marshall
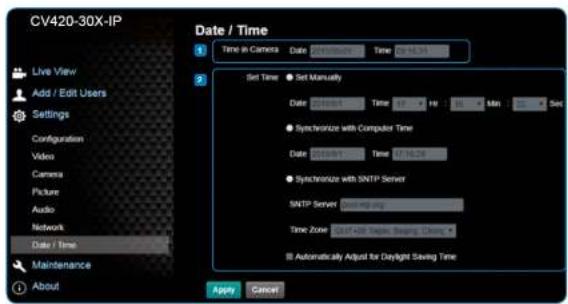
| No. Item. Function Descriptions | ||
| 1 Camera Time Display the date and time of the camera | ||
| 2 Set the Time • Set Manusily: Set time manually• Synchronize with computer time: Set the camera time according to the computer time• Synchronize with SNTP server: Set the camera time synchronously with the SNTP serverSNTP server address: Please change in network setting | ||
www.marshall-usa.com19 20
4.3.10 Network Settings 4.3.11 Maintenance and Updating Firmware
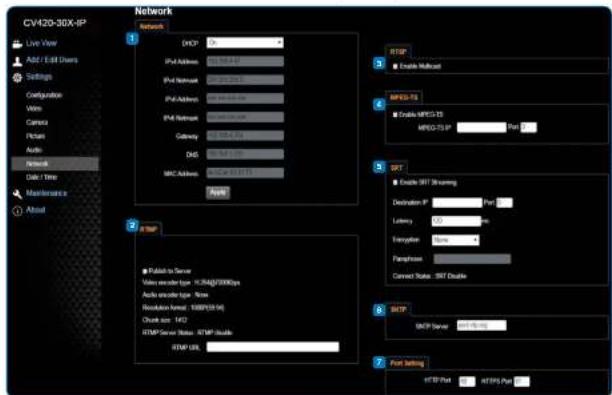
| No. Item | 1. Function Descriptions | |
| 1 | Network | Network setting of camera. Change of setting is available only when DHCP function is closed. |
| 2 | RTMP Setting | Copy the RTMP web address provided by the RTMP service platform and paste it to the RTMP connection address to publish the camera images on the RTMP service platform |
| 3 | RTSP Setting | To upload in YouTube for live streaming, the audio function must be turned on first |
| 4 MPEG-TS Setting Set MPEG-TS format | ||
| 5 | SRT Setting | 1. Set the field of SRT and then check the item to open STR streaming. After the SRT streaming is opened, it will be connected automatically upon startup2. The port number must be set in the range above 1024 with a maximum value of 9999. The following port has been used by the camera. Setting of the port may not connect correctly. 6554, 8556, 8557, 8060, 9090, 19353. Delay time is for 20 to 8000 microseconds. The default value is 120 microseconds |
| 6 SNTP Setting Set SMTP Server IP | ||
| 7 Port Setting Set HTTP port. The default Port value is 80Change of setting is available only when DHCP function of camera is closed | ||
Marshall
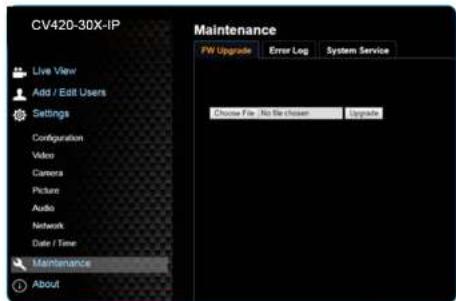
| No. | Item. Function Descriptions | |
| 1 | Firmware Update | The camera firmware may be upgraded via web page. For the upgrade method, please download the FW upgrade manual from Marshall website |
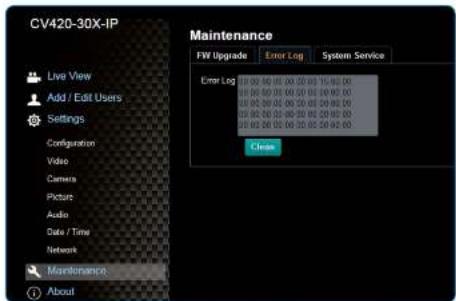
4.3.12 Incident/Error Logs
| No. Item. Function Descriptions | ||
| 1 | Error Logs | If the camera encounters errors, an error code log will be established |
www.marshall-usa.com21 22
4.3.13 Additional Maintenance Settings
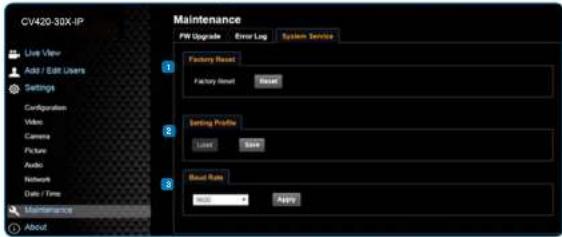
| No. Item | Function Descriptions | |
| 1 | Factory Reset | Select the reset button to resume the factory default setting as the web page setting |
| 2 Setting Profile The web page setting parameters can be exported from the computer and imported/ applied to another camera | ||
| 3 Baud Rate Set the camera Baud Rate for the use of connecting RS-202 communication | ||
4.3.14 About
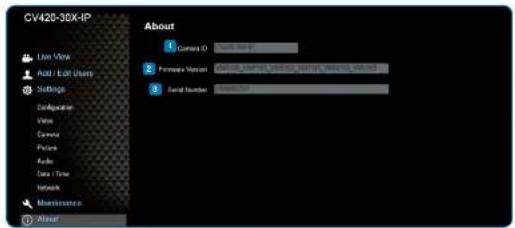
| No. Item | Function Descriptions | |
| 1 Camera | a ID Display the camera name | |
| 2 Firmware | ere Version Display the firmware version of the camera | |
| 3 Serial | Number Display the camera serial No. |
Marshall
6. Troubleshooting
This chapter describes problems you may encounter while using CV355-30X-IP. If you have questions, please refer to related chapters and follow all the suggested solutions. If the problem remains, please contact your distributor or the service center.
| No. Problem | Solution |
| 1 Boot without power signal | 1. Make sure you have plugged in the power cord.2. When using a PoE connection, ensure that the power supply supports IEEE 802.3af hubs |
| 2 There is no image output from CV355-30X-IP | 1. Check the power supply or PoE supply functions.2. Confirm the output signals are in streaming output.3. If the camera is connected to a monitor, confirm the monitor equipment supports 4K output4. Replace the cables and make sure they are not faulty. |
| 3 CV355-30X-IP Image is severely delayed | Please use 4K, 1080p or 720p 60/50 Hz signals rather than 25/30 Hz signals. |
| 4 RS-232 cannot be controlled | 1. Confirm the connection is correct (RS-232 Input / Output).2. Please make sure the Baud rate setting is the same as the control equipment. |
| 5 Whether the Internet can be used for operation | Please refer to Chapter 5 Network Function Description for the Internet usage or cell marshal tech support. |
Warranty
Marshall Electronics warranties to the first consumer that this device will, under normal use, be free from defects in workmanship and materials, when received in its original container, for a period of two years from the purchase date. This warranty is extended to the first consumer only, and proof of purchase is necessary to honor the warranty. If there is no proof of purchase provided with a warranty claim, Marshall Electronics reserves the right not to honor the warranty set forth above. Therefore, labor and parts may be charged to the consumer. This warranty does not apply to the product exterior or cosmetics. Misuse, abnormal handling, alterations or modifications in design or construction void this warranty. No sales personnel of the seller or any other person is authorized to make any warranties other than those described above, or to extend the duration of any warranties on behalf of Marshall Electronics, beyond the time period described above.
Due to constant effort to improve products and product features, specifications may change without notice.
Marshall
20608 Madrona Avenue, Torrance, CA 90503
Tel: (800) 800-6608 / (310) 333-0606 • Fax: 310-333-0688
www.marshall-usa.com
support@marshall-usa.com
- Table of Contents
- Safety Instructions
- Operation
- Installation
- Storage
- Marshall
- Cleaning
- Remote Control (if applicable)
- Precautions
- FCC Warning
- Package Contents
- Function Introduction
- Tally Indicator Light Function Description
- Installation Instructions
- Installation Basics
- Connecting devices
- Connecting to Internet
- Connecting RS-232
- Network Function Settings
- Web System Requirements
- Web Browser :
- Connecting Camera to Network
- Connecting to Internet
- Using Marshall VMS Software to View the Images
- Using the Browser to View the Images
- Using RTSP Player to View the Images
- Web Page Function Description
- Login Screen
- Troubleshooting
- Warranty
Brand : Marshall Electronics
Model : CV355-30X-IP
Category : Camera