
FDB126RBB - Dishwasher FRIGIDAIRE - Free user manual and instructions
Find the device manual for free FDB126RBB FRIGIDAIRE in PDF.


| Product Type | Built-in Dishwasher |
| Brand | Frigidaire |
| Model | FDB126RBB |
| Dimensions (Approx.) | 24" W x 34.5" H x 24" D |
| Electrical Requirements | 120 V, 60 Hz, 15 A (20 A with disposer) |
| Water Pressure Range | 20 - 120 psi |
| Minimum Incoming Water Temperature | 120°F (49°C) |
| Wash Cycles | Pots & Pans, Normal Wash, Light Wash, Rinse/Hold, Plate Warmer |
| Energy Options | Hot Dry / Heat Dry, Cool Dry / Air Dry |
| Detergent Dispenser | Covered main wash cup plus uncovered pre-wash cup |
| Rinse Aid Dispenser | Liquid rinse aid dispenser with adjustable setting |
| Water Usage (Approx.) | 1.2 - 8.4 gallons per cycle depending on cycle |
| Cycle Time (Approx.) | 10 - 109 minutes including dry time |
| Overfill Protector | Located in left front corner of tub |
| Heat Element | Heating element for drying (do not touch during/after use) |
| Safety Features | Child safety (keep away during operation), electrical grounding required, door removal when discarding |
| Material | Steel tub interior, plastic and metal components |
| Care and Cleaning | Wipe exterior with mild detergent; interior self-cleaning; clean overfill protector and drain air gap periodically |
| Warranty | 1 year limited warranty (parts and labor) |
Frequently Asked Questions - FDB126RBB FRIGIDAIRE
User questions about FDB126RBB FRIGIDAIRE
0 question about this device. Answer the ones you know or ask your own.
Ask a new question about this device
Download the instructions for your Dishwasher in PDF format for free! Find your manual FDB126RBB - FRIGIDAIRE and take your electronic device back in hand. On this page are published all the documents necessary for the use of your device. FDB126RBB by FRIGIDAIRE.
USER MANUAL FDB126RBB FRIGIDAIRE
natural_image
Illustration of a smiling tractor with open trunk and fork hands, no text or symbols presentRecord All Information For Future Reference
Brand: Purchase Date:
Model #:
Serial #:
(see Features page for location)
Questions? 1-800-944-9044
(United States)
1-866-213-9397
(Canada)
Visit our Web Site at www.frigidaire.com
Product Registration Card
Please fill in completely, sign and return promptly!
Safety
Instructions ...... 2

Operating
Instructions 3-4
Preparing and
Loading Dishes...... 4-5

Dishwasher Dispenser
and Detergents 6-7

Factors Affecting
Performance 7

Care and
Cleaning 8
Solutions to Common
Dishwashing Problem .....9-10

Consumer Services
Warranty & Service 12
Versión en español
Important Safety Instructions
⚠ WARNING
This symbol will help alert you to such dangers as personal injury, burns, fire, and electrical shock.
⚠ WARNING
To reduce the risk of fire, electrical shock, or injury when using your dishwasher, follow basic precautions including the following:
- Read all instructions before using your dishwasher.
- Use your dishwasher only as instructed in this Use and Care Manual.
- Instructions appearing in this Use and Care Manual are not meant to cover every possible condition and situation that may occur. Practice common sense and caution when installing, operating and maintaining any appliance.
- DISHWASHER MUST BE ELECTRICALLY GROUNDED. Read the Installation Instructions for details.
- This dishwasher is designed to operate on regular house current (120 V, 60 Hz). Use a circuit equipped with a 15 ampere fuse or circuit breaker. Use a 20 ampere fuse if dishwasher is connected with a food waste disposer.
- Do not operate dishwasher unless all enclosure panels are in their proper place.
- Remove the door to the washing compartment when removing an old dishwasher from service or discarding it.
- Keep young children and infants away from dishwasher when it is operating.
- Do not let children abuse, sit, stand or play on door or racks of a dishwasher.
- Use only detergents and rinse agents recommended for use in a dishwasher.
- Store dishwasher detergent and rinse agents out of the reach of children.
- Do not wash plastic items unless marked "dishwasher safe" or the equivalent. Check with manufacturer for recommendations, if not marked. Items that are not dishwasher safe may melt and create a potential fire hazard.
- If the dishwasher drains into a food disposer, make sure disposer is completely empty before running dishwasher.
- Disconnect electrical power to dishwasher before servicing.
• Repairs should be done by a qualified technician.
- Do not tamper with controls.
- Do not touch the heating element during or immediately after use.
- When loading items to be washed:
- Locate sharp items and knives so that they are not likely to damage the door seal or tub.
- Load sharp items and knives with the handles up to reduce the risk of cut-type injuries.
- Under certain conditions, hydrogen gas may be produced in a hot water system that has not been used for 2 weeks or more. HYDROGEN GAS IS EXPLOSIVE. If hot water system has not been used for such a period, before using dishwasher, turn on all hot water faucets and let water flow from each for several minutes. This will release any accumulated hydrogen gas. HYDROGEN GAS IS FLAMMABLE. Do not smoke or use an open flame during this time.
- Do not store or use combustible materials, gasoline or other flammable vapors and liquids in the vicinity of this or any other appliance.
SAVE THESE INSTRUCTIONS
Printed in U.S.A.
Operating Instructions
Getting Started
- Load dishwasher (See Preparing and Loading Dishes).
- Add detergent (See Dishwasher Dispenser & Detergents).
- Add rinse aid, if needed (See Rinse Aid).
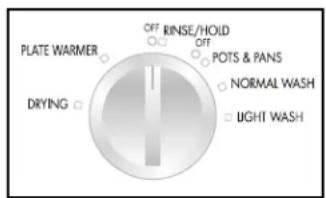
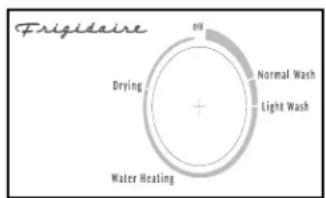
- Turn dial clockwise to select cycle (See Wash Cycle Selections).
- Select desired energy OPTIONS (See Energy Options).
- Run hot water faucet nearest dishwasher until water is hot. Turn water off.
- To start, close door to latch.
Wash Cycle Selections
Note: Not all cycles available on all models.
Pots & Pans
For pots, pans, casseroles and dinnerware with dried-on or baked-on soils:
- Turn dial to POTS & PANS.
- Select desired OPTIONS.
Normal Wash
For regularly soiled dishes and silverware:
- Turn dial to NORMAL WASH.
- Select desired OPTIONS.
Light Wash
For lightly soiled or pre-rinsed dishes and silverware:
- Turn dial to LIGHT WASH.
- Select desired OPTIONS.
Rinse/Hold
For rinsing dishes that will be washed later:
• DO NOT USE detergent.
- Turn dial to RINSE/HOLD.
Plate Warmer
For warming dishes and serving plates before serving hot foods.
- Load clean plates and dishes to be warmed.
- Turn dial to PLATE WARMER.
- Select HOT DRY option.
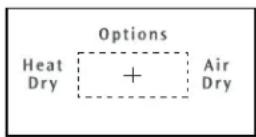
Energy Options
Hot or Heat Dry Option
HOT or HEAT DRY option provides faster drying since the heating element is on during the drying portion of the cycle.
The HOT or HEAT DRY option in combination with rinse aid will give you excellent drying results. The energy to use HOT or HEAT DRY costs pennies per cycle. You may turn off the HOT or HEAT DRY option, however you will have items in your dish load that will not be dry at the end of the cycle.
Cool or Air Dry Option
COOL or AIR DRY option saves electricity since the heating element is off during the drying portion of the cycle. To speed drying process, open the door slightly after the cycle is complete.
Some water droplets may remain on door and tub and in areas where dishes touch silverware basket and rack.
With either option, you may see water vapor coming from vent during drying portion of cycle.
The drying option may be changed at any time during the cycle and affects only the drying period.
Water Heating Delay
This dishwasher is equipped with a thermostat to ensure that the water is heated to the proper temperature to deliver optional cleaning and drying results. The knob/timer on the dishwasher may pause at approximately the 7pm position. The dishwasher is not “stuck” here, but is simply heating the water to the proper temperature before advancing. If the dishwasher holds this position on every cycle, then the incoming (house) water temperature may be low. A minimum water temperature of 120F is recommended to avoid this water heating delay.
Note: Features and appearance may differ depending on the model you selected.
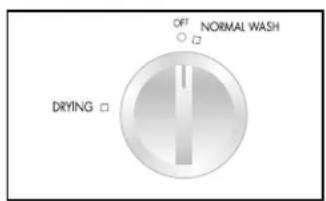
| Cycle Chart | |||
| Cycles Water | (approx.) | Time(approx.) | Washes/Rinses |
| Wash | gal.5.7 imp. gal.26.1 liters | 109 min.*6.9 | 2 washes 4 rinsesNormal |
* Includes dry time.
| Cycle Chart | |||
| Cycles Water | (approx.) | Time(approx.) | Washes/Rinses |
| Pans | 8.4 gal.7.0 imp. gal.31.8 liters | 103 min.*Pots2washes 5 rinses | |
| Normal Wash | 7.2 gal.6.0 imp. gal.27.3 liters | 95 min.* | 2 washes 4 rinses |
| Light Wash | gal.5.0 imp. gal.22.7 liters | 89 min.*6.0 | 1 wash 4 rinses |
| Rinse/Hold | 1.2 gal.1.0 imp. gal.4.5 liters | 10 min. | 1 rinse |
| Plate Warmer | 14 min. | ||
* Includes dry time.

Preparing and Loading Dishes
Dish Preparation
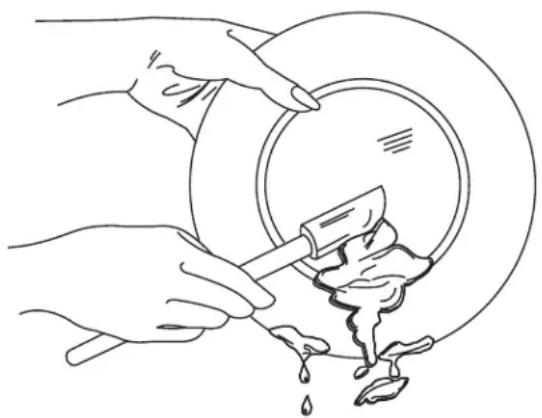
Scrape away large pieces of food, bones, pits, toothpicks, etc. The continuous filtered wash system will remove remaining food particles. Burned-on foods should be loosened before loading. Empty liquids from glasses and cups.
Foods such as mustard, mayonnaise, vinegar, lemon juice and tomato based products may cause discoloration of stainless steel and plastics if allowed to sit for a long period of time. Unless the dishwasher is to be operated at once, it is best to rinse off these food soils.
- Load racks so that large items do not prevent the detergent dispenser from opening.
- Check manufacturer's recommendations before washing items in question.
- If the dishwasher drains into a food disposer, be sure disposer is completely empty before starting dishwasher.
natural_image
Line drawing of hands using a spatula to clean or wash liquid from a bowl (no text or symbols)
Preparing and Loading Dishes
Loading the Top Rack
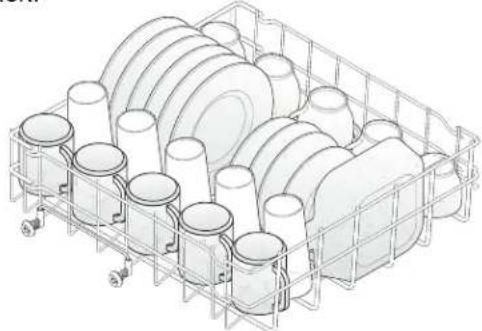
The top rack is designed for cups, glasses, small plates, saucers and bowls.
Load glasses in top rack. Damage may occur if placed in bottom rack.
Load plastic items in top rack only. Melting may occur if placed in bottom rack.
Load items with open ends facing down for better cleaning and draining.
Damage may occur if delicate items touch each other during dishwasher operation.
Long-handled knives and utensils can be placed in top rack.
natural_image
Isometric line drawing of a multi-tiered storage unit with cylindrical and curved compartments (no text or symbols)Loading the Bottom Rack
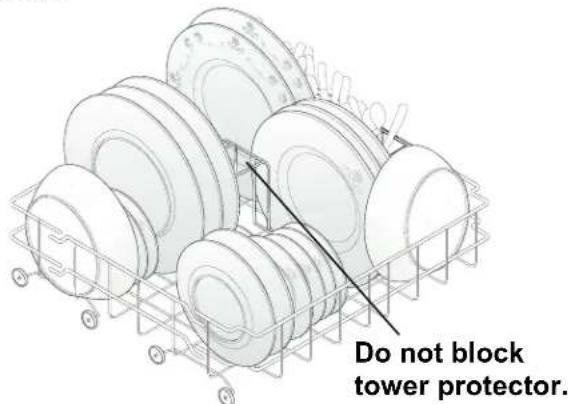
Place plates and platters so that they do not touch.
Place bowls, casseroles and sauce pans with the soiled surface facing down or toward the center. Tilt slightly for better drainage.
Be sure pan handles do not protrude through the bottom of the rack and block the spray arm rotation.
Loading the Silverware Basket
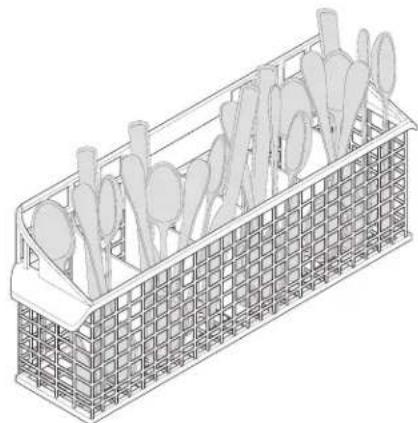
Mix spoons, forks and knives to prevent nesting. Mixing items gives better cleaning and drying.
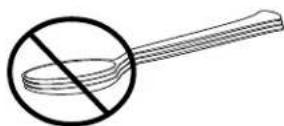
For safety, load sharp knives and forks with handles up.
Be sure nothing protrudes through bottom of basket or rack to block the spray arm.
Do not mix silver and stainless to avoid damaging the silver finish.
natural_image
Isometric line drawing of a wire cage filled with plant-like objects (no text or symbols)Note: Silverware basket may vary by model.
Filling the Detergent Dispenser
The detergent dispenser has one covered and one uncovered cup. Detergent in the uncovered cup falls into the dishwasher when the door is closed. The covered cup opens automatically to release detergent.
- Use only fresh automatic dishwashing detergent. Other detergents will cause oversuding.
- When using automatic dishwashing detergent tabs, place one tab in main wash cup and close.
- Add detergent just before starting cycle.
- Store detergent in a cool, dry location. Moist or caked detergent will not dissolve properly.
CAUTION
The use of industrial grade detergent can damage the heating coil and other parts of the dishwasher leading to damage to the unit and surrounding property. Use only household grade automatic dishwasher detergents.
How much Detergent to use
The amount of detergent to use depends on the water hardness. Water hardness is measured in grains per gallon. Using too little detergent can result in poor cleaning and hard water filming or spotting. Using too much detergent in soft water can cause a permanent film called etching. Your local water company, water softener company or county extension agent can tell you the water hardness in your area.
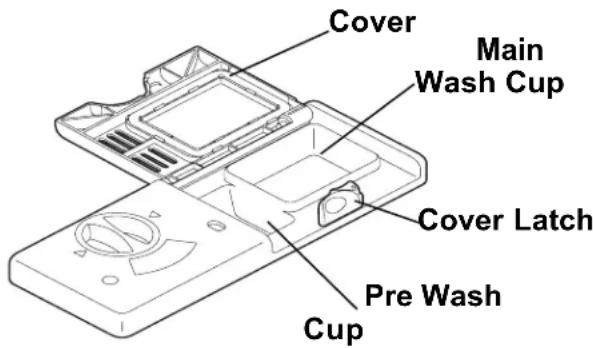
Note: If the cover is closed on the Main Wash Cup, open by pressing the cover latch.
| Detergent Usage Guide | ||||
| Cycle | Soft Water(0-3 grains) | Medium Hard Water(4-8 grains) | Hard Water(9-12 grains) | Very Hard Water*(over 12 grains) |
| Pots & PansNormal Wash | 2 teaspoons(each cup–1/4 full) | 5 teaspoons(each cup–fill to line above "Regular") | 8 teaspoons(each cup–completely full) | Each Cup–Completely Full(water softener recommended) |
| Light Wash | 2 teaspoons(Main Wash cup–1/4 full) | 5 teaspoons(Main Wash cup–fill to line above "Regular") | 8 teaspoons(Main Wash cup–completely full) | Main Wash Cup–Completely Full(water softener recommended) |
| Rinse/Hold | No Detergent | No Detergent No Detergent | No Detergent(water softener recommended) | |
*Note: For very hard water, detergent alone may not be enough. A water softener is recommended to improve water quality and dishwashing performance. Try adding more detergent at the beginning of the main wash portion of the cycle. As a rule, use 1 teaspoon for each grain above 12. Unlatch the door, open slowly and add detergent to the bottom of the tub. Close the door to latch and the dishwasher will continue through the cycle.
Dishwasher Dispenser & Detergents (continued)
Rinse Aid
Rinse aid greatly improves drying and reduces water spots and filming. Water “sheets” off dishes rather than forming water droplets that cling and leave spots.
Rinse aids come in solid or liquid form. If your dishwasher does not have a rinse aid dispenser, a solid rinse aid should be fastened to the front corner of the upper rack. When material dissolves and the container is empty, it is time to replace it.
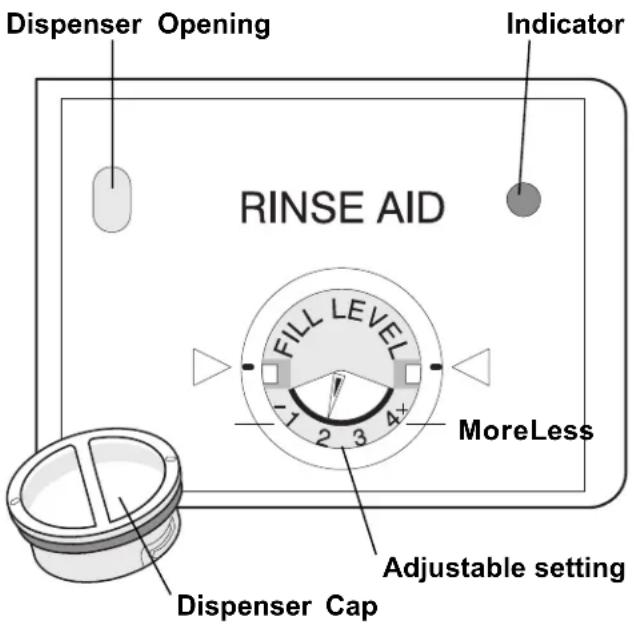
A dispenser for liquid rinse aid is located next to the detergent cup and automatically releases a measured amount of rinse aid during the last rinse. If spotting and poor drying are problems, increase the amount of rinse aid dispensed by rotating the dial to a higher number. The dial is located under the dispenser cap. The indicator will be dark when full and will show clear when it is time to refill.
To add liquid rinse aid, turn dispenser cap 1/4 turn counterclockwise and lift out. Pour in rinse aid until liquid touches the indicated fill level. Replace cap.
Do not overfill since this can cause oversudsing. Wipe up any spills with a damp cloth.
The dispenser holds enough for 35 to 140 washes, depending on the setting.
Factors Affecting Performance
Water Pressure
The hot water line to the dishwasher must provide water pressure between 20 and 120 psi.
Low water pressure may occur when laundry or showers are in operation. Wait until water use is reduced before starting dishwasher.
Water Temperature
Hot water is needed for best dishwashing and drying results. Water entering dishwasher should be at least 120^ F ( 49^ C) to give satisfactory results.
To check water temperature entering dishwasher:
- Turn on hot water faucet nearest dishwasher for several minutes to clear cool water from pipes.
- Hold a candy or meat thermometer in stream of water to check the temperature.
- If temperature is below 120^ (49°C), have a qualified person raise the hot water heater thermostat setting.
Important: Before starting a cycle, run hot water to clear cool water from pipe.
The HOT OR HEAT DRY option in combination with rinse aid will give you excellent drying results. The energy to use HOT OR HEAT DRY costs pennies per cycle. You may turn off the HOT OR HEAT DRY option, however you will have items in your dish load that will not be dry at the end of the cycle.

Care and Cleaning
⚠ WARNING

Burn Hazard
Allow heating element to cool before cleaning the interior.
Failure to do so can result in burns.
Outside—Occasionally wipe with a mild nonabrasive detergent and water. Rinse and dry.
Inside—The inside of the dishwasher, including the filter, is self-cleaning with normal use. If needed, clean around the tub gasket area with a damp cloth.
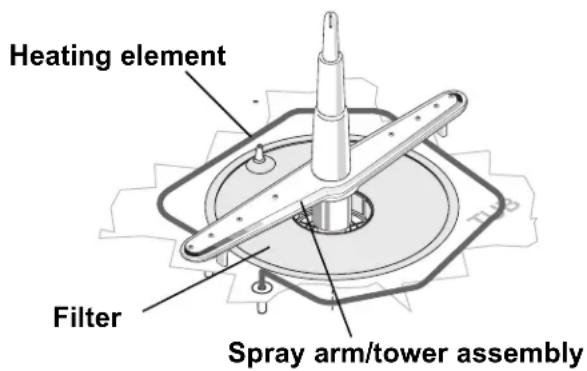
Note: Hard water may cause lime deposit buildup on the interior of the dishwasher. For cleaning instructions see “Removing Spots and Film” section.
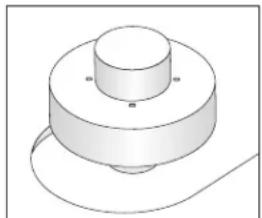
Overfill Protector—keeps dishwasher from overfilling and is located in the left front corner of the tub.
- Clean occasionally with household cleaner containing vinegar or bleach to dissolve any buildup.
• Overfill Protector should move up and down freely about one inch. If it does not move, lift and clean underneath.
natural_image
3D diagram of a mechanical component with concentric cylindrical features and a base, no text or symbols presentCare of Drain Air Gap
If a drain air gap was installed for your built-in dishwasher, check to make sure it is clean so the dishwasher will drain properly. A drain air gap is usually mounted on countertop and can be inspected by removing the cover. This is not part of your dishwasher and is not covered by warranty.
CAUTION
Property Damage Hazard
Freezing temperatures may cause water lines to rupture. Be sure all supply lines to and circulating lines within dishwasher are protected.
Failure to do so could result in property damage.
Winterizing
A dishwasher left in an unheated place should be protected from freezing. Have a qualified person do the following:
To Disconnect Service:
- Turn off electrical power to the dishwasher at the supply source by removing fuses or tripping circuit breaker.
- Shut off water supply.
- Place a pan under the inlet valve. Disconnect water line from inlet valve and drain into pan.
- Disconnect drain line from pump and drain water into pan.
Note: See Installations Instructions for more details.
To Restore Service:
- Reconnect the water, drain, and electrical power supply.
- Turn on water and electrical power supply.
- Fill detergent cup(s) and run dishwasher through a NORMAL cycle.
- Check connections to make sure they do not leak.
Note: See Installations Instructions for more details.

Solutions to Common Dishwashing Problems
Before calling for service, review this list. It may save you both time and expense. This list includes common experiences that are not the result of defective workmanship or material in your dishwasher.
Food Soils Left on Dishes
- Choose another cycle for longer washing time.
- Check rack loading section for proper loading—avoid nesting items.
- Home water pressure may be too low—should be 20 to 120 pounds per square inch (psi).
- Check incoming water temperature. It should be at least 120^ (49°C). (See Factors Affecting Performance.)
- Check water hardness. For extremely hard water, it may be necessary to install a water softener. (See Detergent Chart.)
- Use fresh detergent.
- Check to make sure tower in lower rack is not blocked.
- Make sure items are not blocking the spray arm, preventing it from rotating.
Dishes not Dry
- Select Hot Dry option.
- Make sure the liquid rinse aid dispenser is filled. Check container to see if it is time to replace solid rinse aid.
- Increase the amount of rinse aid, if available on your model. (See Rinse Aid).
- Check the incoming water temperature. Be sure it is at least 120^ (49°C).
- Check for proper loading—avoid nesting items.
- Plastic items may need to be towel dried.
• Cups with a concave bottom will collect water.
Dishware Chipped
- Load with care and do not overload. (See Preparing and Loading dishes.)
- Place delicate items in top rack.
- Place glasses securely against pins and not over pins.
- Load items so they are secure and don't jar loose when moving racks in and out. Move racks in and out slowly.
- Make sure tall glasses and stemware will clear top of tub when rack is pushed in.
- Fine antique china and crystal should be hand-washed.
Glassware/Flatware Spotted or Cloudy
- Check water hardness. For extremely hard water, it may be necessary to install a water softener. (See Detergent Chart.)
- Water temperature may be low. Avoid extremely low or high temperatures. (See Factors Affecting Performance.)
- Avoid overloading and improper loading. (See Preparing and Loading Dishes.)
- Use fresh detergent. Old detergent is ineffective.
- Check to see that proper amount of detergent is being used. Also, check phosphate level. (See Detergent Dispenser.)
- Home water pressure may be too low—it should be 20 to 120 pounds per square inch (psi).
Dishware Stained or Discolored
- Tea and coffee can stain cups. Remove the stains by hand washing in a solution of 1/2 cup (120 ml) bleach and one quart (1 L) of warm water. Rinse thoroughly.
- Iron deposits in water can cause a yellow or brown film. A special filter installed in the water supply line will correct this problem. (See Removing Spots and Film.)
- Aluminum utensils can leave gray/black marks when they rub against other items. Load properly.
- Certain high acid foods can cause discoloration of stainless steel and plastics if allowed to sit for a long period. Rinse by hand if not operating dishwasher at once.
- Mixing stainless steel and silver utensils in silverware basket can cause pitting of the stainless steel blades. Avoid mixing stainless steel and silver.
Etching
- Using too much detergent in soft or softened water causes this film that cannot be removed.
- Adjust the amount of detergent based on the water hardness. (Check Detergent Chart.)
- Lower the water temperature.
- Use the Cool Dry option.

Solutions to Common Dishwashing Problems
(continued)
Detergent Left in Cups
- Detergent may be old. Discard and use fresh detergent.
- Be sure water action can reach the dispenser.
- Check to see if cycle has been completed.
- Make sure items do not prevent the detergent dispenser from opening.
Dishwasher Leaks
- Use only fresh detergent designed for automatic dishwashers. Measure detergent carefully. Try a different brand.
- Spilled rinse aid can cause foam and lead to overflowing. Wipe up any spills with damp cloth.
- Check to see that dishwasher is level. (See Installation Instructions.)
Normal Sounds You Will Hear
- Normal sounds include water fill, water circulation and motor sounds.
Water in Bottom of Tub
- Water left in bottom of tub after cycle is complete is not normal. If water remains in the bottom of the tub, dishwasher may not be draining properly. (See Dishwasher Does Not Drain Properly.)
Vapor at Vent
• Water vapor escapes from the vent when the dishwasher is operating. This is normal.
Dishwasher Won't Run
- Check to see if circuit breaker is tripped or if a fuse is blown.
- Make sure water supply is turned on.
- Check to see if cycle is set correctly. (See Operating Instructions.)
- Make sure door is closed and latched.
Dishwasher Does Not Drain Properly
- If unit is hooked up to a food waste disposer, make sure the disposer is empty.
- Check to see if the knockout plug has been removed from inside the food waste disposer inlet.
- Check to see if drain hose is kinked.
- Make sure cycle is complete, not in a pause.
Dishwasher Won't Fill
• Is water supply turned on?
- Does overfill protector move up and down freely? (See Overfill Protector section.) Normal water fill covers filter area.
Dishwasher Has an Odor
- Soiled dishes left in dishwasher too long can create an odor. Use Rinse/Hold cycle or rinse by hand.
- There will be a “new” smell when first installed. This is normal.
- Check to see if unit is draining properly. (See Dishwasher Does Not Drain Properly.)
Stains on Tub Interior
- Washing large amounts of dishware with tomato based soil can cause a pink/orange appearance. This will not affect performance and will gradually fade over time. Pre-rinsing or using the Rinse/Hold cycle will reduce the chance of staining. Using Cool Dry option will lessen staining.
Removing Spots and Film
Hard water can cause lime deposit buildup on the interior of the dishwasher. Dishes and glasses may also get spots and film for a number of reasons. (See Glassware/Flatware Spotted or Cloudy section.) To remove buildup, spots and film, clean using the following instructions:
- Load clean dishes and glasses in normal manner. Do not load any metal utensils or silverware.
- Do not add detergent.
- Turn dial to NORMAL WASH. Close and latch door to start.
- Allow dishwasher to run for 40 minutes to reach the main wash portion of cycle.
- Unlatch and open door and pour 2 cups of white vinegar into the bottom of dishwasher.
- Close and latch door and allow the cycle to finish.
Note: If these conditions persist, a home water softener should be considered.
NOTES
Major Appliance Warranty Information
Your appliance is covered by a one year limited warranty. For one year from your original date of purchase, Electrolux will pay all costs for repairing or replacing any parts of this appliance that prove to be defective in materials or workmanship when such appliance is installed, used and maintained in accordance with the provided instructions.
Exclusions
This warranty does not cover the following:
- Products with original serial numbers that have been removed, altered or cannot be readily determined.
- Product that has been transferred from its original owner to another party or removed outside the USA or Canada.
- Rust on the interior or exterior of the unit.
- Products purchased "as-is" are not covered by this warranty.
- Food loss due to any refrigerator or freezer failures.
- Products used in a commercial setting.
- Service calls which do not involve malfunction or defects in materials or workmanship, or for appliances not in ordinary household use or used other than in accordance with the provided instructions.
- Service calls to correct the installation of your appliance or to instruct you how to use your appliance.
- Expenses for making the appliance accessible for servicing, such as removal of trim, cupboards, shelves, etc., which are not a part of the appliance when it is shipped from the factory.
- Service calls to repair or replace appliance light bulbs, air filters, water filters, other consumables, or knobs, handles, or other cosmetic parts.
- Surcharges including, but not limited to, any after hour, weekend, or holiday service calls, tolls, ferry trip charges, or mileage expense for service calls to remote areas, including the state of Alaska.
- Damages to the finish of appliance or home incurred during installation, including but not limited to floors, cabinets, walls, etc.
- Damages caused by: services performed by unauthorized service companies; use of parts other than genuine Electrolux parts or parts obtained from persons other than authorized service companies; or external causes such as abuse, misuse, inadequate power supply, accidents, fires, or acts of God.
DISCLAIMER OF IMPLIED WARRANTIES; LIMITATION OF REMEDIES
CUSTOMER'S SOLE AND EXCLUSIVE REMEDY UNDER THIS LIMITED WARRANTY SHALL BE PRODUCT REPAIR OR REPLACEMENT AS PROVIDED HEREIN. CLAIMS BASED ON IMPLIED WARRANTIES, INCLUDING WARRANTIES OF MERCHANTABILITY OR FITNESS FOR A PARTICULAR PURPOSE, ARE LIMITED TO ONE YEAR OR THE SHORTEST PERIOD ALLOWED BY LAW, BUT NOT LESS THAN ONE YEAR. ELECTROLUX SHALL NOT BE LIABLE FOR CONSEQUENTIAL OR INCIDENTAL DAMAGES SUCH AS PROPERTY DAMAGE AND INCIDENTAL EXPENSES RESULTING FROM ANY BREACH OF THIS WRITTEN LIMITED WARRANTY OR ANY IMPLIED WARRANTY. SOME STATES AND PROVINCES DO NOT ALLOW THE EXCLUSION OR LIMITATION OF INCIDENTAL OR CONSEQUENTIAL DAMAGES, OR LIMITATIONS ON THE DURATION OF IMPLIED WARRANTIES, SO THESE LIMITATIONS OR EXCLUSIONS MAY NOT APPLY TO YOU. THIS WRITTEN WARRANTY GIVES YOU SPECIFIC LEGAL RIGHTS. YOU MAY ALSO HAVE OTHER RIGHTS THAT VARY FROM STATE TO STATE.
If You Need Service
Keep your receipt, delivery slip, or some other appropriate payment record to establish the warranty period should service be required. If service is performed, it is in your best interest to obtain and keep all receipts. Service under this warranty must be obtained by contacting Electrolux at the addresses or phone numbers below.
This warranty only applies in the USA and Canada. In the USA, your appliance is warranted by Electrolux Major Appliances North America, a division of Electrolux Home Products, Inc. In Canada, your appliance is warranted by Electrolux Canada Corp. Electrolux authorizes no person to change or add to any obligations under this warranty. Obligations for service and parts under this warranty must be performed by Electrolux or an authorized service company. Product features or specifications as described or illustrated are subject to change without notice.
USA
1.800.944.9044
Electrolux Major Appliances
North America
P.O. Box 212378
Augusta, GA 30907

Electrolux
Canada
1.800.668.4606
Electrolux Canada Corp.
5855 Terry Fox Way
Mississauga, Ontario, Canada
L5V 3E4
- Record All Information For Future Reference
- Product Registration Card
- Safety
- Operating
- Preparing and
- Dishwasher Dispenser
- Factors Affecting
- Care and
- Solutions to Common
- Consumer Services
- Important Safety Instructions
- ⚠ WARNING
- SAVE THESE INSTRUCTIONS
- Operating Instructions
- Getting Started
- Wash Cycle Selections
- Pots & Pans
- Normal Wash
- Light Wash
- Rinse/Hold
- Plate Warmer
- Energy Options
- Hot or Heat Dry Option
- Cool or Air Dry Option
- Water Heating Delay
- Preparing and Loading Dishes
- Dish Preparation
- Loading the Top Rack
- Loading the Bottom Rack
- Loading the Silverware Basket
- Filling the Detergent Dispenser
- CAUTION
- How much Detergent to use
- Dishwasher Dispenser & Detergents (continued)
- Rinse Aid
- Factors Affecting Performance
- Water Pressure
- Water Temperature
- Care and Cleaning
- Burn Hazard
- Care of Drain Air Gap
- Property Damage Hazard
- Winterizing
- To Disconnect Service:
- To Restore Service:
- Solutions to Common Dishwashing Problems
- Food Soils Left on Dishes
- Dishes not Dry
- Dishware Chipped
- Glassware/Flatware Spotted or Cloudy
- Dishware Stained or Discolored
- Etching
- (continued)
- Detergent Left in Cups
- Dishwasher Leaks
- Normal Sounds You Will Hear
- Water in Bottom of Tub
- Vapor at Vent
- Dishwasher Won't Run
- Dishwasher Does Not Drain Properly
- Dishwasher Won't Fill
- Dishwasher Has an Odor
- Stains on Tub Interior
- Removing Spots and Film
- NOTES
- Major Appliance Warranty Information
- Exclusions
- This warranty does not cover the following:
- DISCLAIMER OF IMPLIED WARRANTIES; LIMITATION OF REMEDIES
- If You Need Service
- USA
- Electrolux
Brand : FRIGIDAIRE
Model : FDB126RBB
Category : Dishwasher