
RN524X - Server NETGEAR - Free user manual and instructions
Find the device manual for free RN524X NETGEAR in PDF.


| Product Type | Network Attached Storage (NAS) Server |
| Model | RN524X |
| Drive Bays | 2 x 3.5" or 2.5" SATA HDD/SSD |
| Processor | Marvell ARMADA 385 dual-core 1.6 GHz |
| Memory | 2 GB DDR3 |
| Dimensions (H x W x D) | 144 x 101 x 220 mm (5.67 x 3.98 x 8.66 in) |
| Weight | 1.4 kg (3.09 lb) without drives |
| Power Supply | External 70W power adapter |
| Power Consumption | Typical 20W (depending on drives) |
| Ethernet Ports | 2 x Gigabit Ethernet (RJ-45) |
| USB Ports | 2 x USB 3.0 (host), 1 x USB 2.0 (device) |
| RAID Levels Supported | RAID 0, 1, JBOD (via OS) |
| File System | BTRFS, EXT4, ZFS (via OS) |
| Operating System | NETGEAR ReadyNAS OS 6 (based on Linux) |
| Cooling | 1 x 80mm fan |
| Noise Level | 20 dBA (idle) |
| Operating Temperature | 0°C to 40°C (32°F to 104°F) |
| Storage Temperature | -40°C to 70°C (-40°F to 158°F) |
| Humidity | 20% to 80% (non-condensing) |
| Maintenance | Keep vents clean; avoid dust buildup; replace fan if needed |
| Safety | Use provided power adapter; do not block ventilation; keep away from liquids |
| Spare Parts & Repairability | Drive sleds, PSU, fan available; user-replaceable drives |
| Warranty | Limited 2-year hardware warranty |
Frequently Asked Questions - RN524X NETGEAR
User questions about RN524X NETGEAR
0 question about this device. Answer the ones you know or ask your own.
Ask a new question about this device
Download the instructions for your Server in PDF format for free! Find your manual RN524X - NETGEAR and take your electronic device back in hand. On this page are published all the documents necessary for the use of your device. RN524X by NETGEAR.
USER MANUAL RN524X NETGEAR
ReadyNAS 202, 204, 212, 214
ReadyNAS 312, 314, 316
ReadyNAS 422, 424, 426, 428
ReadyNAS 516, 524X, 526X, 528X
ReadyNAS 626X, 628X
ReadyNAS 716X
EDA 500
April 2017
202-11206-10
350 E. Plumeria Drive
San Jose, CA 95134
USA
ReadyNAS OS 6 Desktop Storage Systems
Support
Thank you for purchasing this NETGEAR product. You can visit www.netgear.com/support to register your product, get help, access the latest downloads and user manuals, and join our community. We recommend that you use only official NETGEAR support resources.
Conformity
For the current EU Declaration of Conformity, visit http://kb.netgear.com/app/answers/detail/a_id/11621.
Compliance
For regulatory compliance information, visit http://www.netgear.com/about/regulatory.
See the regulatory compliance document before connecting the power supply.
Trademarks
© NETGEAR, Inc., NETGEAR, and the NETGEAR Logo are trademarks of NETGEAR, Inc. Any non-NETGEAR trademarks are used for reference purposes only.
Contents
Chapter 1 Getting Started
Additional Documentation....13
Setup Locationsetup location....13
Supported Operating Systems....13
Supported Browsers....14
Diskless Storage Systems....14
Chapter 2 NETGEAR ReadyNAS 102
Front and Side Panels....16
Drive Bays....16
Rear Panel....17
Status Information....18
Power On and Shut Down....19
Power On....20
Preferred Shutdown....20
Forced Shutdown....20
Boot Menu....20
Chapter 3 NETGEAR ReadyNAS 104
Front and Side Panels....24
Drive Bays....24
Rear Panel....25
Status Information....26
Power On and Shut Down....27
Power On....28
Preferred Shutdown....28
Forced Shutdown....28
Boot Menu....28
Chapter 4 NETGEAR ReadyNAS 202
Front and Side Panels....31
Drive Bays....31
Rear Panel....32
Status Information....33
Power On and Shut Down....34
Power On....35
Preferred Shutdown....35
Forced Shutdown....35
Boot Menu....35
Chapter 5 NETGEAR ReadyNAS 204
Front and Side Panels....39
ReadyNAS OS 6 Desktop Storage Systems
Drive Bays....39
Rear Panel....40
Status Information....41
Power On and Shut Down....42
Power On....43
Preferred Shutdown....43
Forced Shutdown....43
Boot Menu....43
Chapter 6 NETGEAR ReadyNAS 212
Front and Side Panels....46
Drive Bays....46
Rear Panel....47
Status Information....48
Power On and Shut Down....49
Power On....50
Preferred Shutdown....50
Forced Shutdown....50
Boot Menu....50
Chapter 7 NETGEAR ReadyNAS 214
Front and Side Panels....54
Drive Bays....54
Rear Panel....55
Status Information....56
Power On and Shut Down....57
Power On....58
Preferred Shutdown....58
Forced Shutdown....58
Boot Menu....58
Chapter 8 NETGEAR ReadyNAS 312
Front and Side Panels....61
Drive Bays....61
Rear Panel....62
Status Information....63
Power On and Shut Down....64
Power On....64
Preferred Shutdown....65
Forced Shutdown....65
Boot Menu....65
Chapter 9 NETGEAR ReadyNAS 314
Front and Side Panels....69
Drive Bays....69
Rear Panel....70
Status Information....71
Power On and Shut Down....72
ReadyNAS OS 6 Desktop Storage Systems
Power On....73
Preferred Shutdown....73
Forced Shutdown....73
Boot Menu....74
Chapter 10 NETGEAR ReadyNAS 316
Front and Side Panels....77
Drive Bays....77
Rear Panel....78
Status Information....79
Power On and Shut Down....80
Power On....80
Preferred Shutdown....81
Forced Shutdown....81
Boot Menu....81
Chapter 11 NETGEAR ReadyNAS 422
Front and Side Panels....84
Drive Bays....85
Rear Panel....86
Status Information......87
Power On and Shut Down....87
Power On....88
Preferred Shutdown......88
Forced Shutdown......88
Boot Menu....89
Chapter 12 NETGEAR ReadyNAS 424
Front and Side Panels....92
Drive Bays....93
Rear Panel....94
Status Information....95
Power On and Shut Down....95
Power On....96
Preferred Shutdown....96
Forced Shutdown....96
Boot Menu....97
Chapter 13 NETGEAR ReadyNAS 426
Front and Side Panels....100
Drive Bays....101
Rear Panel....102
Status Information....103
Power On and Shut Down....103
Power On....104
Preferred Shutdown....104
Forced Shutdown....105
Boot Menu....105
ReadyNAS OS 6 Desktop Storage Systems
Chapter 14 NETGEAR ReadyNAS 428
Front and Side Panels....108
Drive Bays....109
Rear Panel....110
Status Information....111
Power On and Shut Down....111
Power On....112
Preferred Shutdown....112
Forced Shutdown....112
Boot Menu....113
Chapter 15 NETGEAR ReadyNAS 516
Front and Side Panels....116
Drive Bays....116
Rear Panel....117
Status Information....118
Power On and Shut Down....119
Power On....119
Preferred Shutdown....120
Forced Shutdown....120
Boot Menu....120
Chapter 16 NETGEAR ReadyNAS 524X
Front and Side Panels....123
Drive Bays....124
Rear Panel....125
Status Information....126
Power On and Shut Down....127
Power On....127
Preferred Shutdown....128
Forced Shutdown....128
Boot Menu....128
Chapter 17 NETGEAR ReadyNAS 526X and 626X
Front and Side Panels....131
Drive Bays....132
Rear Panel ReadyNAS 526X....133
Rear Panel ReadyNAS 626X....134
Status Information....135
Power On and Shut Down....136
Power On....136
Preferred Shutdown....137
Forced Shutdown....137
Boot Menu....137
Chapter 18 NETGEAR ReadyNAS 528X and 628X
Front and Side Panels....140
ReadyNAS OS 6 Desktop Storage Systems
Drive Bays....141
Rear Panel ReadyNAS 528X....142
Rear Panel ReadyNAS 628X....143
Status Information....144
Power On and Shut Down....145
Power On....145
Preferred Shutdown....146
Forced Shutdown....146
Boot Menu....146
Chapter 19 NETGEAR ReadyNAS 716X
Front and Side Panels....149
Drive Bays....149
Rear Panel....150
Status Information....151
Power On and Shut Down....153
Power On....153
Preferred Shutdown....154
Forced Shutdown....154
Boot Menu....154
Chapter 20 NETGEAR EDA 500
Front and Side Panels....157
Drive Bays....157
Rear Panel....158
Status Information....159
Power On and Shut Down....160
Power On....160
Preferred Shutdown....161
Forced Shutdown....161
Chapter 21 Disks
Disk Trays....163
Standard Disk Traydisk trays standard....163
EDA 500 Disk Tray....164
Supported Disks....164
Previously Formatted Disks....165
Reformat Previously Formatted Disks....165
Migrate a Volume....166
Add a Disk....166
Add a 3.5-Inch Disk....166
Appendix A Defaults and Technical Specifications
Factory Default Settings....184
ReadyNAS OS 6 Desktop Storage Systems
ReadyNAS 102 Technical Specifications....184
General: 184
Physical dimensions (h x w x d):....185
Physical weight:....185
Power consumption:....185
Electrical:....185
Environmental requirements:....185
Certifications: 185
ReadyNAS 104 Technical Specifications....186
General: 186
Physical dimensions (h x w x d):....186
Physical weight:....186
Power consumption:....186
Electrical:....186
Environmental requirements:....187
Certifications:....187
ReadyNAS 202 Technical Specifications....187
General: 187
Physical dimensions (h x w x d):....187
Physical weight:....187
Power consumption:....188
Electrical: 188
Environmental requirements:....188
Certifications: 188
ReadyNAS 212 Technical Specifications....188
General:....188
Physical dimensions (h x w x d):....189
Physical weight:....189
Power consumption:....189
Electrical: 189
Environmental requirements:....189
Certifications:....189
ReadyNAS 204 Technical Specifications....189
General: 189
Physical dimensions (h x w x d):....190
Physical weight:....190
Power consumption:....190
Electrical:....190
Environmental requirements:....190
Certifications:....190
ReadyNAS 214 Technical Specifications....191
General:....191
Physical dimensions (h x w x d):....191
Physical weight:....191
Power consumption:....191
Electrical:....191
Environmental requirements:....191
Certifications:....192
ReadyNAS 312 Technical Specifications....192
ReadyNAS OS 6 Desktop Storage Systems
General: 192
Physical dimensions (h x w x d):....192
Physical weight:....192
Power consumption:....192
Electrical:....193
Environmental requirements:....193
Certifications:....193
ReadyNAS 314 Technical Specifications....193
General: 193
Physical dimensions (h x w x d):....193
Physical weight:....194
Power consumption:....194
Electrical:....194
Environmental requirements:....194
Certifications: 194
ReadyNAS 316 Technical Specifications....194
General: 194
Physical dimensions (h x w x d):....195
Physical weight:....195
Power consumption:....195
Electrical:....195
Environmental requirements:....195
Certifications:....196
ReadyNAS 422 Technical Specifications....196
General: 196
Physical dimensions (h x w x d):....196
Physical weight:....196
Power consumption:....196
Electrical:....196
Environmental requirements:....197
Certifications:....197
ReadyNAS 424 Technical Specifications....197
General:....197
Physical dimensions (h x w x d):....197
Physical weight:....197
Power consumption:....198
Electrical:....198
Environmental requirements:....198
Certifications:....198
ReadyNAS 426 Technical Specifications....198
General:....198
Physical dimensions (h x w x d):....199
Physical weight:....199
Power consumption:....199
Electrical: 199
Environmental requirements:....199
Certifications:....199
ReadyNAS 428 Technical Specifications....200
General: 200
ReadyNAS OS 6 Desktop Storage Systems
Physical dimensions (h x w x d):....200
Physical weight:....200
Power consumption:....200
Electrical: 200
Environmental requirements:....201
Certifications:....201
ReadyNAS 516 Technical Specifications....201
General: 201
Physical dimensions (h x w x d):....201
Physical weight:....201
Power consumption:....202
Electrical:....202
Environmental requirements:....202
Certifications:....202
ReadyNAS 524X Technical Specifications....202
General: 202
Physical dimensions (h x w x d):......203
Physical weight:....203
Power consumption:....203
Electrical:....203
Environmental requirements:....203
Certifications: 203
ReadyNAS 526X Technical Specifications....204
General: 204
Physical dimensions (h x w x d):......204
Physical weight: 204
Power consumption:....204
Electrical:....204
Environmental requirements:....205
Certifications: 205
ReadyNAS 528X Technical Specifications....205
General: 205
Physical dimensions (h x w x d):......205
Physical weight: 205
Power consumption:....206
Electrical: 206
Environmental requirements:....206
Certifications:....206
ReadyNAS 626X Technical Specifications....206
General: 206
Physical dimensions (h x w x d):......207
Physical weight: 207
Power consumption:....207
Electrical: 207
Environmental requirements:....207
Certifications: 207
ReadyNAS 628X Technical Specifications....208
General: 208
Physical dimensions (h x w x d):......208
ReadyNAS OS 6 Desktop Storage Systems
Physical weight: 208
Power consumption:....208
Electrical: 208
Environmental requirements:....209
Certifications:....209
ReadyNAS 716X Technical Specifications....209
General: 209
Physical dimensions (h x w x d):....209
Physical weight:....209
Power consumption:......210
Electrical: 210
Environmental requirements:......210
Certifications:....210
EDA 500 Technical Specifications....210
General: 210
Physical dimensions (h x w x d):......210
Physical weight:....211
Power consumption: 211
Electrical: 211
Environmental requirements:....211
Certifications: 211
Safety Warnings....211
Electrical Safety Precautions....212
General Safety Precautions....212
Electrostatic Discharge Precautions....212
Congratulations on your purchase of a NETGEAR ReadyNAS® storage system. This manual describes the physical features of the ReadyNAS OS 6 desktop storage systems.
This chapter contains the following sections:
• Additional Documentation on page 13
- Setup Location on page 13
• Supported Operating Systems on page 13
• Supported Browsers on page 14
• Diskless Storage Systems on page 14
Additional Documentation
For detailed information about configuring, managing, and using your ReadyNAS storage system, see the ReadyNAS OS 6 Software Manual, which is available at netgear.com/support/product/ReadyNAS_OS_6.
NETGEAR maintains a community website that supports ReadyNAS products. Visit www.netgear.com/readynas for reviews, tutorials, a comparison chart, software updates, documentation, an active user forum, and much more.
Setup Location
Your ReadyNAS storage system is suitable for use in a home or small office environment where it can be freestanding. The small, compact size makes it suitable for sitting on a desk or on a closet shelf.
Choose a location for your storage system that meets these criteria:
- Cables can be connected easily.
• Water or moisture cannot enter the case.
• Airflow around the storage system and through the vents in the side of the case is not restricted.
• The air is as free of dust as possible.
• Temperature operating limits are not likely to be exceeded. - If you are using an uninterruptable power supply (UPS) for protection, the power cable can be securely and safely connected to the UPS.
Supported Operating Systems
The ReadyNAS storage system is supported on the following systems:
• Microsoft Windows 10 (32 bit and 64 bit)
- Microsoft Windows 8.1 (32 bit and 64 bit)
• Microsoft Windows 8 (32 bit and 64 bit)
• Microsoft Windows 7 (32 bit and 64 bit)
• Windows Server 2016 (64 bit)
• Windows Server 2012 R2 (64 bit)
• Microsoft Server 2012 (64 bit)
• Microsoft Server 2008 R2 (64 bit)
• Apple OS X 10.7 or later
- Linux, UNIX, Solaris
- Apple iOS
- Google Android
Supported Browsers
The ReadyNAS local admin page supports the following browsers:
- Microsoft Edge
• Microsoft Internet Explorer 9.0 and later
• Apple Safari, 5.0 and later
• Google Chrome 20 and later - Mozilla Firefox 14 and later
If you experience difficulty accessing the local admin page or if you notice unexpected behavior, try using another browser. For more information about the ReadyNAS local admin page, see the ReadyNAS OS 6 Software Manual, which is available at netgear.com/support/product/ReadyNAS_OS_6.
Diskless Storage Systems
If you purchased a ReadyNAS storage system without a preinstalled disk drive or drives, you must add at least one disk your system before you use the system. You can add a 3.5-inch hard disk drive, a 2.5-inch hard disk drive, or a 2.5-inch solid state drive to an empty drive bay. For information about how to install a disk, see Add a Disk on page 166.
Use only supported SATA hard disk drives (HDD) or solid state drives (SSD) in your ReadyNAS storage system. If you use disks that are not supported, NETGEAR technical support will not provide assistance. For a list of supported disks, see the NETGEAR Hardware Compatibility List at netgear.com/readynas-hcl.
If you are adding a previously formatted disk to your storage system, see the instructions in Previously Formatted Disks on page 165.
This chapter provides an overview of the physical features of the ReadyNAS 102 and includes the following sections:
• Front and Side Panels on page 16
- Drive Bays on page 16
- Rear Panel on page 17
• Status Information on page 18
• Power On and Shut Down on page 19
- Boot Menu on page 20
Front and Side Panels
The following figure shows the front and side panels of the ReadyNAS 102.
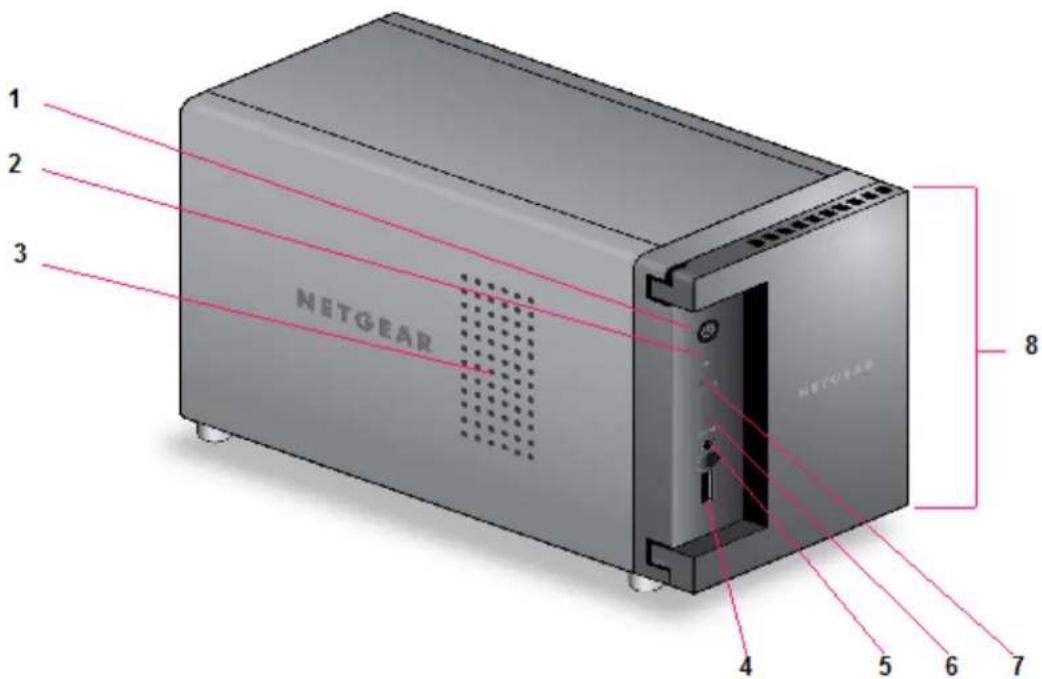
Figure 1. ReadyNAS 102 front and side panels
- Power button and LED
- Disk activity LED
- Exhaust vent
- USB 2.0 port
- Backup button
- USB and Backup status LED
- Disk 1 and Disk 2 LEDs
- Drive bay door
Drive Bays
The following figure shows the drive bays of the ReadyNAS 102.
ReadyNAS OS 6 Desktop Storage Systems
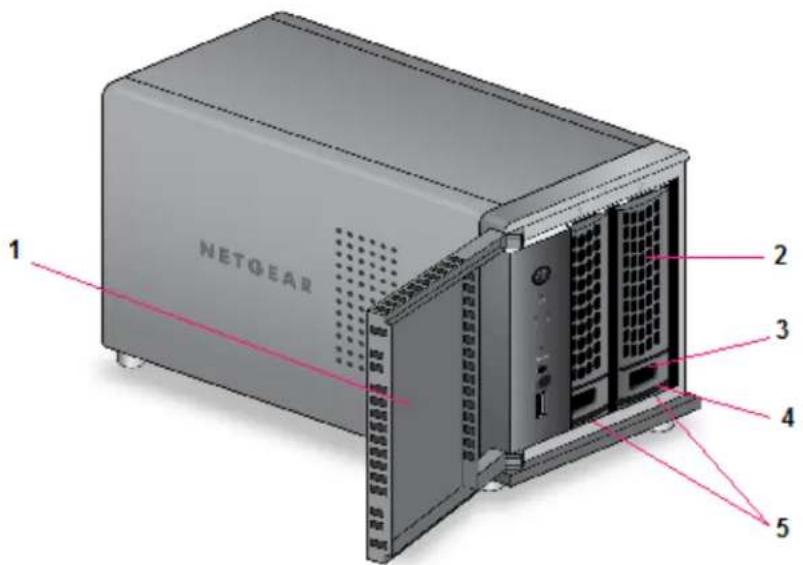
Figure 2. ReadyNAS 102 drive bays
- Drive bay door
- Disk tray handle
- Recessed disk tray handle lock
- Disk tray release latch
- Drive bays
Rear Panel
The following figure shows the rear panel of the ReadyNAS 102.
ReadyNAS OS 6 Desktop Storage Systems
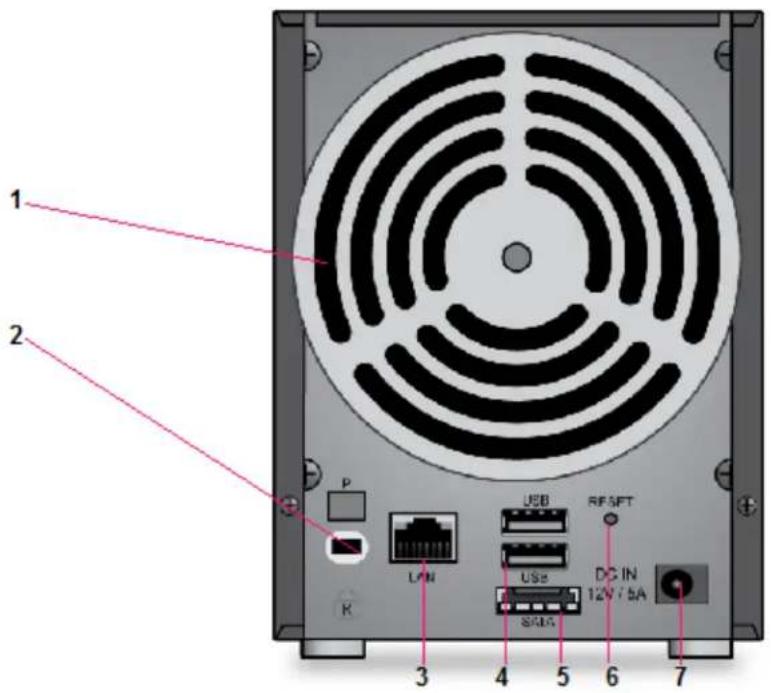
Figure 3. ReadyNAS 102 rear panel
- Exhaust fan
- Kensington lock
- GbE ports with LED status indicators
- USB 3.0 ports
- eSATA port
- Reset button
- Power adapter socket
Status Information
You can obtain information about the status of your storage system by reviewing the indicators listed in the following table.
Table 1. ReadyNAS 102 indicator descriptions
| DescriptionIndicator | |
| Power button and LED | Press this button to turn on the ReadyNAS. The LED indicates these states:On. Powered on.Blinking. Booting or shutting down.Off. Powered off. |
| Disk LEDs (1, 2) | An LED on the front panel of the storage system is associated with each drive bay. The disk LEDs have these states:On. Power is on and the disk is operating normally.Blinking. The disk was removed, failed, or is resynchronizing.Off. The drive bay is empty. |
| Disk activity LED | The disk activity LED has these states:On. At least one disk is present.Blinking. A disk is active.Off. All disks are idle. |
| Rear panel Ethernet port LEDs | Two LED status indicators are built into this port, one green and one amber. They indicate port speed and activity as follows:Green on, amber off. 1000 Mbps connection speed, no activity.Green blinking, amber off. 1000 Mbps connection speed, activity.Green off, amber on. 10 Mbps or 100 Mbps connection speed, no activity.Green off, amber blinking. 10 Mbps or 100 Mbps connection speed, activity.Green off, amber off. No connection. |
Power On and Shut Down
This section describes how to power on and shut down your system. If you must shut down the system, use one of the preferred shutdown methods whenever possible.
ReadyNAS OS 6 Desktop Storage Systems
Power On
When you connect the system to a power supply or the system recovers from a power outage, the system returns to its last state:
- If the system was powered on, the system automatically powers on again when the power supply is connected or power is restored.
- If the system was powered off, the system remains off when the power supply is connected or power is restored.
In this situation, press the Power button on the front panel of the system to power on the system.
Preferred Shutdown
You can gracefully shut down your system by using the Power button or the ReadyNAS local admin page.
For information about how to gracefully shut down your system using the ReadyNAS local admin page, see the ReadyNAS OS 6 Software Manual, which is available at netgear.com/support/product/ReadyNAS_OS_6.
To gracefully shut down your system using the Power button:
- Press the Power button.
The Power LED blinks, prompting you to confirm the shutdown. - Press the Power button again.
The system shuts down gracefully.
Forced Shutdown
Perform a forced shutdown only if the storage system is not responding.
To perform a forced shutdown:
- Unplug the system from the power supply.
Boot Menu
Use the boot menu to restart or troubleshoot your ReadyNAS storage system. Your storage system has the following boot modes:
• Normal. Initiates a normal boot process, just like booting using the Power button.
- Factory default. Initiates a short disk test that takes approximately 5 minutes. After the disk test, a 10-minute time-out period begins, during which all LEDs blink simultaneously.

WARNING:
The factory default reboot process resets the storage system to factory settings, erases all data, resets all defaults, and reformats the disk to X-RAID.
ReadyNAS OS 6 Desktop Storage Systems
- If you want to cancel the factory default process, power off the storage system before the 10-minute time-out ends. The system powers down safely without causing any data loss.
- If you want to reset the system to factory default settings, do not power off your system. After the 10-minute time-out period, the factory default process begins.
Tip To start the factory default process immediately, press the Backup button during the 10-minute time-out period.
- OS reinstall. Reinstalls the firmware from the internal flash to the disks. Use the OS reinstall boot mode when the system crashes and corrupts some configuration files. OS reinstall boot mode also resets some settings on your storage system, such as Internet protocol settings and the administrator password, to defaults.
- Tech support. Boots into a low-level diagnostic mode. Use the tech support boot mode only when a NETGEAR technical support representative instructs you to do so.
• Volume read only. Mounts a volume as read-only. Use this option when you are attempting to rescue data off a disk during a disaster recovery. - Memory test. Performs a memory test. The pass or fail result is reported using the storage system's LEDs. Contact a NETGEAR technical support representative to interpret memory test results.
- Test disk. Performs an offline full disk test. This process can take four hours or more, depending on the size of your disks. Any problems are reported in the system logs. For more information about viewing the system logs, see the ReadyNAS OS 6 Software Manual, which is available at netgear.com/support/product/ReadyNAS_OS_6.
To access the boot menu:
- Power off your storage system.
- Using a straightened paper clip, press and hold the Reset button.
-
Press the Power button.
The system powers on. -
Continue to press the Reset button until the Power button LED, USB and backup status LED, disk 1 LED, and disk 2 LED light.
-
Press the Backup button to scroll through boot mode options.
The storage system shows the boot mode options using the LEDs, as described in the following table:
| Status IndicatorBoot Mode | |||||
| Description | Power LED | Disk 1 LED | Disk 2 LED | USB and Backup LED | |
| All four LEDs light.Boot menu | |||||
| Power LED lights.Normal | |||||
| Disk 1 LED lights.Factory default | |||||
NETGEAR ReadyNAS 102
ReadyNAS OS 6 Desktop Storage Systems
(Continued)
| Status IndicatorBoot Mode | |||||
| Description | Power LED | Disk 1 LED | Disk 2 LED | USB and Backup LED | |
| Disk 2 LED lights.OS reinstall | |||||
| USB and backup status LED lights.Tech support | |||||
| Power LED and disk 1 LED light.Volume read only | |||||
| Power LED and disk 2 LED light.Memory test | |||||
| Test disk | Power LED and USB and backup status LED light. | ||||
Legend:
On:
Off: □
- Press and release the Reset button to confirm your boot menu selection.
The system boots in the selected boot mode.
This chapter provides an overview of the physical features of the ReadyNAS 104 and includes the following sections:
• Front and Side Panels on page 24
- Drive Bays on page 24
- Rear Panel on page 25
• Status Information on page 26
• Power On and Shut Down on page 27
- Boot Menu on page 28
Front and Side Panels
The following figure shows the front and side panels of the ReadyNAS 104.
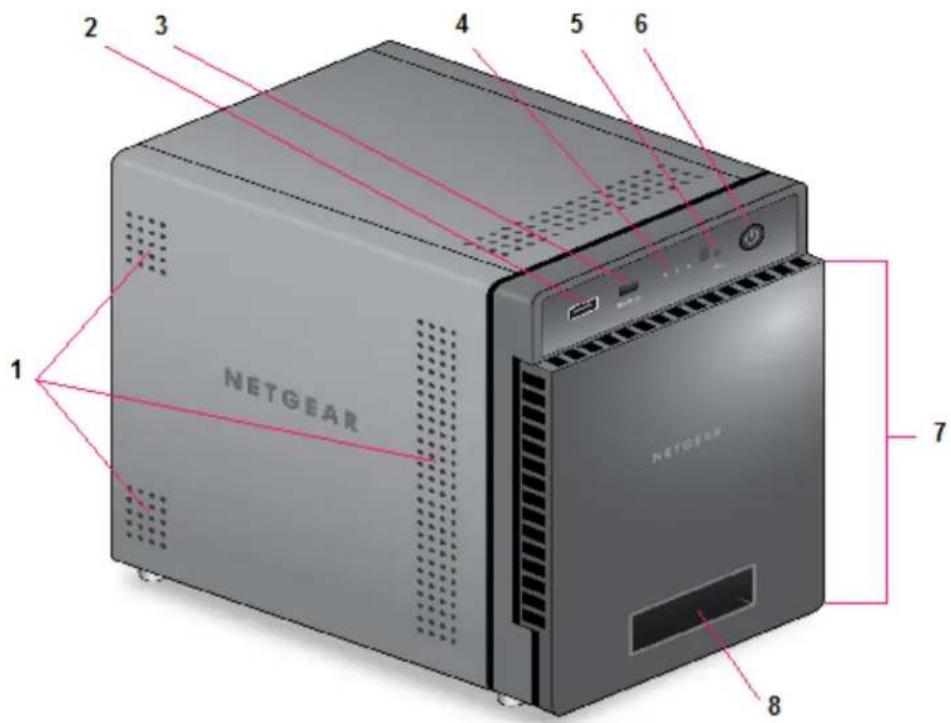
Figure 4. ReadyNAS 104 front and side panels
- Exhaust vents
- USB 2.0 port
- Backup button and LED
- Disk LEDs
- Disk activity LED
- Power button and LED
- Drive bay door
- Status display screen
Drive Bays
The following figure shows the drive bays of the ReadyNAS 104.
ReadyNAS OS 6 Desktop Storage Systems
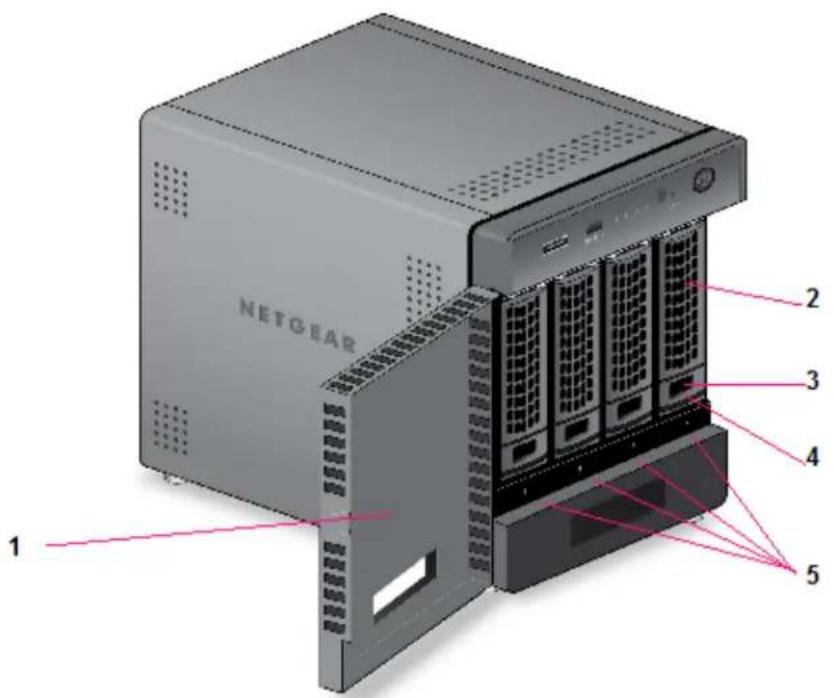
Figure 5. ReadyNAS 104 drive bays
- Drive bay door
- Disk tray handle
- Recessed disk tray handle lock
- Disk tray release latch
- Drive bays
Rear Panel
The following figure shows the rear panel of the ReadyNAS 104.
ReadyNAS OS 6 Desktop Storage Systems
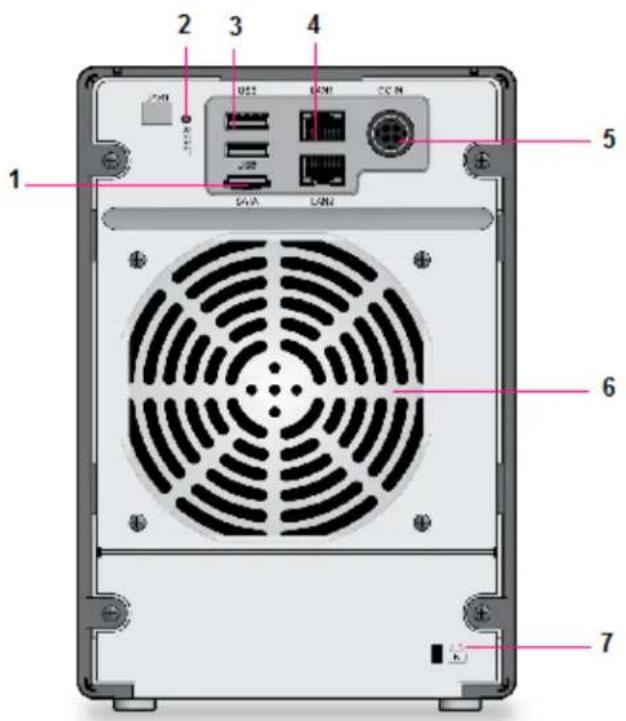
Figure 6. ReadyNAS 104 rear panel
- eSATA port
- Reset button
- USB 3.0 ports
- GbE ports with LED status indicators
Note The two GbE ports are equivalent. They can be used as two separate Ethernet connections, or can be configured as a single, bonded port with a 2 Gbps potential speed. For information about how to configure a bonded port, and the network configuration requirements needed to support 2 Gbps, see the ReadyNAS OS 6 Software Manual, which is available at netgear.com/support/product/ReadyNAS_OS_6.
- Power cable socket
- Exhaust fan
- Kensington lock
Status Information
You can obtain information about the status of your storage system by reviewing the indicators listed in the following table.
Table 2. ReadyNAS 104 indicator descriptions
| DescriptionIndicator | |
| Power button and LED | Press this button to turn on the ReadyNAS. The LED indicates these states:On. Powered on.Blinking. Booting or shutting down.Off. Powered off. |
| Disk LEDs (1, 2, 3, 4) | An LED on the top of the front panel is associated with each drive bay. LEDs are in numerical order from left to right. The disk LEDs indicate these states:On. Power is on and the disk is operating normally.Blinking. The disk was removed, failed, or is resynchronizing. See the display screen for details.Off. The drive bay is empty. |
| Disk activity LED | The disk activity LED indicates these states:On. At least one disk is present.Blinking. A disk is active.Off. All disks are idle. |
| Rear panel Ethernet port LEDs | Two LED status indicators are built into this port, one green and one amber. They indicate port speed and activity as follows:Green on, amber off. 1000 Mbps connection speed, no activity.Green blinking, amber off. 1000 Mbps connection speed, activity.Green off, amber on. 10 Mbps or 100 Mbps connection speed, no activity.Green off, amber blinking. 10 Mbps or 100 Mbps connection speed, activity.Green off, amber off. No connection. |
| Status display screen | Displays messages about the status of your storage system. Note that the status display screen goes to sleep to prevent burn-in. To wake it, press thePowerbutton once. If the storage system reports an abnormal operation or error, the status display screen stays on. |
Power On and Shut Down
This section describes how to power on and shut down your system. If you need to shut down the system, use one of the preferred shutdown methods whenever possible.
ReadyNAS OS 6 Desktop Storage Systems
Power On
When you connect the system to a power supply or the system recovers from a power outage, the system returns to its last state:
- If the system was powered on, the system automatically powers on again when the power supply is connected or power is restored.
- If the system was powered off, the system remains off when the power supply is connected or power is restored.
In this situation, press the Power button on the front panel of the system to power on the system.
Preferred Shutdown
You can gracefully shut down your system by using the Power button or the ReadyNAS local admin page.
For information about how to gracefully shut down your system using the ReadyNAS local admin page, see the ReadyNAS OS 6 Software Manual, which is available at netgear.com/support/product/ReadyNAS_OS_6.
To gracefully shut down your system using the Power button:
- If the status display screen is not lit, do the following:
a. Press the Power button.
The status display screen wakes.
b. Press the Power button a second time.
Instructions for graceful shutdown display on the status display screen.
c. Press the Power button a third time.
The system shuts down gracefully.
- If the status display screen is lit, do the following:
a. Press the Power button.
Instructions for graceful shutdown display on the status display screen.
b. Press the Power button again.
The system shuts down gracefully.
Forced Shutdown
Perform a forced shutdown only if the storage system is not responding.
To perform a forced shutdown:
- Unplug the system from the power supply.
Boot Menu
Use the boot menu to restart or troubleshoot your ReadyNAS storage system. Your storage system has the following boot modes:
ReadyNAS OS 6 Desktop Storage Systems
• Normal. Initiates a normal boot process, just like booting using the Power button.
- Factory default. Initiates a short disk test that takes approximately 5 minutes. After the disk test, a 10-minute time-out period begins, during which all LEDs blink simultaneously.

WARNING:
The factory default reboot process resets the storage system to factory settings, erases all data, resets all defaults, and reformats the disk to X-RAID.
- If you want to cancel the factory default process, power off the storage system before the 10-minute time-out ends. The system powers down safely without causing any data loss.
- If you want to reset the system to factory default settings, do not power off your system. After the 10-minute time-out period, the factory default process begins.
Tip To start the factory default process immediately, press the Backup button during the 10-minute time-out period.
- OS reinstall. Reinstalls the firmware from the internal flash to the disks. Use the OS reinstall boot mode when the system crashes and corrupts some configuration files. OS reinstall boot mode also resets some settings on your storage system, such as Internet protocol settings and the administrator password, to defaults.
- Tech support. Boots into a low-level diagnostic mode. Use the tech support boot mode only when a NETGEAR technical support representative instructs you to do so.
• Volume read only. Mounts a volume as read-only. Use this option when you are attempting to rescue data off a disk during a disaster recovery.
• Memory test. Performs a memory test. The pass or fail result is reported on the status display screen. - Test disk. Performs an offline full disk test. This process can take four hours or more, depending on the size of your disks. Any problems are reported in the system logs. For more information about viewing the system logs, see the ReadyNAS OS 6 Software Manual, which is available at netgear.com/support/product/ReadyNAS_OS_6.
To access the boot menu:
- Power off your storage system.
- Using a straightened paper clip, press and hold the Reset button.
-
Press the Power button.
The system powers on. -
Continue to press the Reset button until the status display screen shows a boot menu message.
-
Press the Backup button to scroll through boot mode options.
The status display screen shows the current boot mode option.
- When the status display screen shows the boot mode that you need, press and release the Reset button to confirm your boot menu selection.
The system boots in the selected boot mode.
NETGEAR ReadyNAS 104
This chapter provides an overview of the physical features of the ReadyNAS 202 and includes the following sections:
• Front and Side Panels on page 31
- Drive Bays on page 31
- Rear Panel on page 32
• Status Information on page 33
• Power On and Shut Down on page 34
- Boot Menu on page 35
Front and Side Panels
The following figure shows the front and side panels of the ReadyNAS 202.
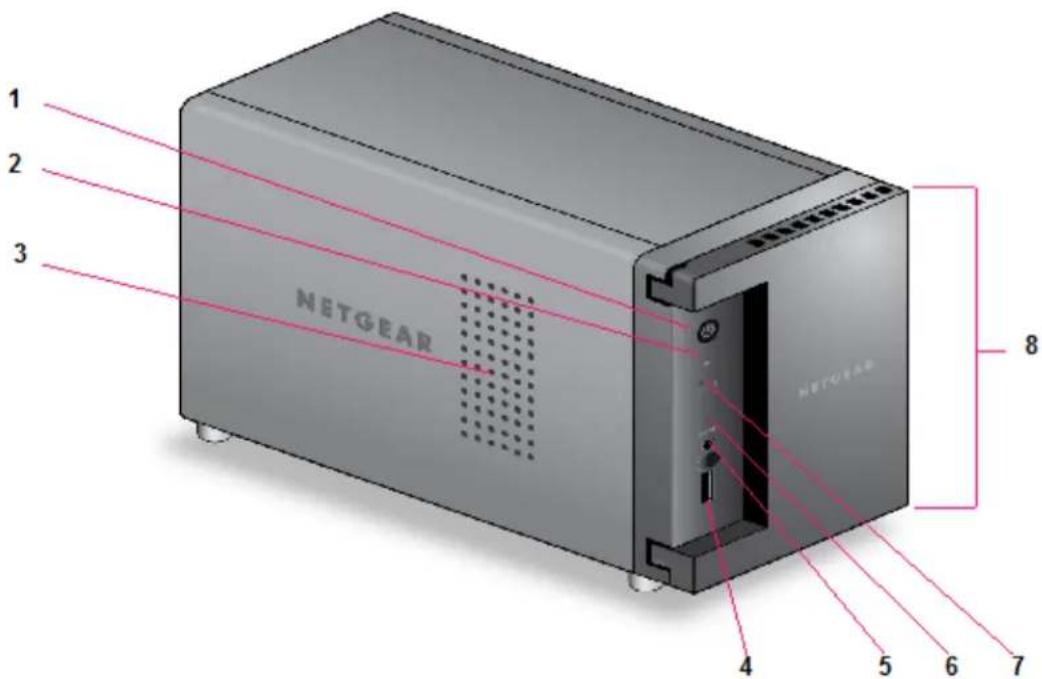
Figure 7. ReadyNAS 202 front and side panels
- Power button and LED
- Disk activity LED
- Exhaust vent
- USB 3.0 port
- Backup button
- USB and backup status LED
- Disk 1 and Disk 2 LEDs
- Drive bay door
Drive Bays
The following figure shows the drive bays of the ReadyNAS 202.
ReadyNAS OS 6 Desktop Storage Systems
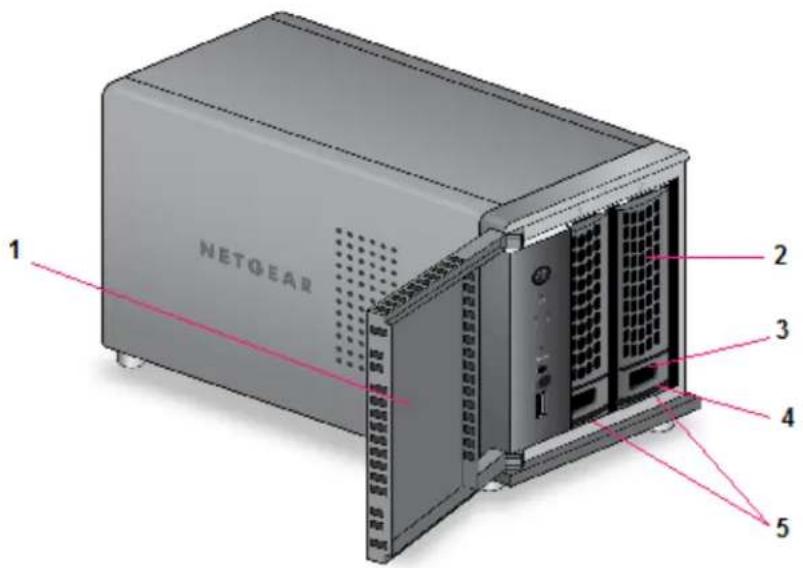
Figure 8. ReadyNAS 202 drive bays
- Drive bay door
- Disk tray handle
- Recessed disk tray handle lock
- Disk tray release latch
- Drive bays
Rear Panel
The following figure shows the rear panel of the ReadyNAS 202.
ReadyNAS OS 6 Desktop Storage Systems
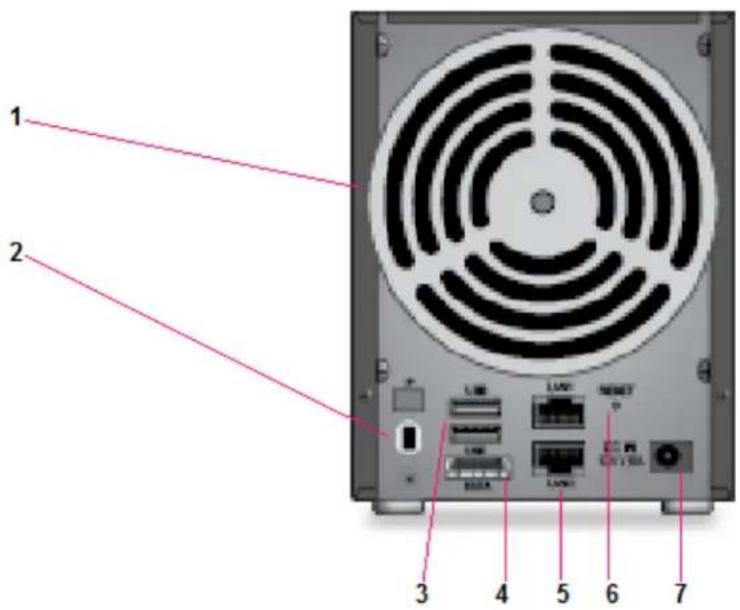
Figure 9. ReadyNAS 202 rear panel
- Exhaust fan
- Kensington lock
- USB 3.0 ports
- eSATA port
- GbE ports with LED status indicators
Note The two GbE ports are equivalent. They can be used as two separate Ethernet connections, or can be configured as a single, bonded port with a 2 Gbps potential speed. For information on how to configure a bonded port, and the network configuration requirements needed to support 2 Gbps, see the ReadyNAS OS 6 Software Manual, which is available at netgear.com/support/product/ReadyNAS_OS_6.
-
Reset button
-
Power adapter socket
Status Information
You can obtain information about the status of your storage system by reviewing the indicators listed in the following table.
Table 3. ReadyNAS 202 indicator descriptions
| DescriptionIndicator | |
| Power button and LED | Press this button to turn on the ReadyNAS. The LED has these states:On. Powered on.Blinking. Booting or shutting down.Off. Powered off. |
| Disk LEDs (1, 2) | Each drive bay has an LED associated with it on the front panel of the storage system.The disk LEDs have these states:On. Power is on and the disk is operating normally.Blinking. The disk was removed, failed, or is resynchronizing. See the display screen for details.Off.The drive bay is empty. |
| Disk activity LED | The disk activity LED has these states:Blinking. A disk is active.Off. Disk is idling. |
| Rear panel Ethernet port LEDs | Two LED status indicators are built into each port, one off or green and one showing three states: off, amber, or green.They indicate port speed and activity as follows:Green, green. 1000 Mbps connection speed, no activity.Green blinking, green. 1000 Mbps connection speed, activity.Green, amber. 100 Mbps connection speed, no activity.Green blinking, amber. 100 Mbps connection speed, activity.Green on, off. 10 Mbps connection speed, no activity.Green blinking, off. 10 Mbps connection speed, activity.Off, off. No connection. |
Power On and Shut Down
This section describes how to power on and shut down your system. If you must shut down the system, use one of the preferred shutdown methods whenever possible.
ReadyNAS OS 6 Desktop Storage Systems
Power On
When you connect the system to a power supply or the system recovers from a power outage, the system returns to its last state:
- If the system was powered on, the system automatically powers on again when the power supply is connected or power is restored.
- If the system was powered off, the system remains off when the power supply is connected or power is restored.
In this situation, press the Power button on the front panel of the system to power on the system.
Preferred Shutdown
You can gracefully shut down your system by using the Power button or the ReadyNAS local admin page. For information about how to gracefully shut down your system using the ReadyNAS local admin page, see the ReadyNAS OS 6 Software Manual, which is available at netgear.com/support/product/ReadyNAS_OS_6.
To gracefully shut down your system using the Power button:
- Press the Power button.
The Power LED blinks, prompting you to confirm the shutdown. - Press the Power button again.
The system shuts down gracefully.
Forced Shutdown
Perform a forced shutdown only if the storage system is not responding.
To perform a forced shutdown:
- Unplug the system from the power supply.
Boot Menu
Use the boot menu to restart or troubleshoot your ReadyNAS storage system. Your storage system has the following boot modes:
• Normal. Initiates a normal boot process, just like booting using the Power button.
- Factory default. Initiates a short disk test that takes approximately 5 minutes. After the disk test, a 10-minute time-out period begins, during which all LEDs blink simultaneously.

WARNING:
The factory default reboot process resets the storage system to factory settings, erases all data, resets all defaults, and reformats the disk to X-RAID.
ReadyNAS OS 6 Desktop Storage Systems
- If you want to cancel the factory default process, power off the storage system before the 10-minute time-out ends. The system powers down safely without causing any data loss.
- If you want to reset the system to factory default settings, do not power off your system. After the 10-minute time-out period, the factory default process begins.
Tip To start the factory default process immediately, press the Backup button during the 10-minute time-out period.
- OS reinstall. Reinstalls the firmware from the internal flash to the disks. Use the OS reinstall boot mode when the system crashes and corrupts some configuration files. OS reinstall boot mode also resets some settings on your storage system, such as Internet protocol settings and the administrator password, to defaults.
- Tech support. Boots into a low-level diagnostic mode. Use the tech support boot mode only when a NETGEAR technical support representative instructs you to do so.
• Volume read only. Mounts a volume as read-only. Use this option when you are attempting to rescue data off a disk during a disaster recovery. - Memory test. Performs a memory test. The memory test runs for eight hours. The current status and the pass or fail result is reported using the storage system LEDs, as described in the following table:
Figure 10. Memory Test Status
| Backup LEDDisk 2 LEDDisk 1 LEDPower LEDMemory Test State | ||||
| BlinkingOffOffOff1st hour | ||||
| OffBlinkingOffOff2nd hour | ||||
| OffOffBlinkingOff3rd hour | ||||
| BlinkingBlinkingBlinkingOff4th hour | ||||
| BlinkingOffOffOn5th hour | ||||
| OffBlinkingOffOn6th hour | ||||
| OffOffBlinkingOn7th hour | ||||
| BlinkingBlinkingBlinkingOn8th hour | ||||
| BIResidBlinkingBlinkingBlinking | ||||
| OnOnOnOnResult: pass |
- Test disk. Performs an offline full disk test. This process can take four hours or more, depending on the size of your disks. Any problems are reported in the system logs. For more information about viewing the system logs, see the ReadyNAS OS 6 Software Manual, which is available at netgear.com/support/product/ReadyNAS_OS_6.
ReadyNAS OS 6 Desktop Storage Systems
To access the boot menu:
- Power off your storage system.
- Using a straightened paper clip, press and hold the Reset button.
- Press the Power button.
The system powers on.
- Continue to press the Reset button until the Power LED, USB and backup status LED, disk 1 LED, and disk 2 LED light.
- Press the Backup button to scroll through boot mode options.
The storage system shows the boot mode options using the LEDs, as described in the following table:
| Status IndicatorBoot Mode | |||||
| Description | Power LED | Disk 1 LED | Disk 2 LED | USB and Backup LED | |
| All four LEDs light.Boot menu | |||||
| Power LED lights.Normal | |||||
| Disk 1 LED lights.Factory default | |||||
| Disk 2 LED lights.OS reinstall | |||||
| USB and backup status LED lights.Tech support | |||||
| Power LED and disk 1 LED light.Volume read only | |||||
| Power LED and disk 2 LED light.Memory test | |||||
| Test disk | Power LED and USB and backup status LED light. | ||||
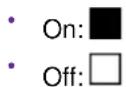
Legend:
- Press and release the Reset button to confirm your boot menu selection. The system boots in the selected boot mode.
This chapter provides an overview of the physical features of the ReadyNAS 204 and includes the following sections:
• Front and Side Panels on page 39
- Drive Bays on page 39
- Rear Panel on page 40
• Status Information on page 41
• Power On and Shut Down on page 42
- Boot Menu on page 43
Front and Side Panels
The following figure shows the front and side panels of the ReadyNAS 204.
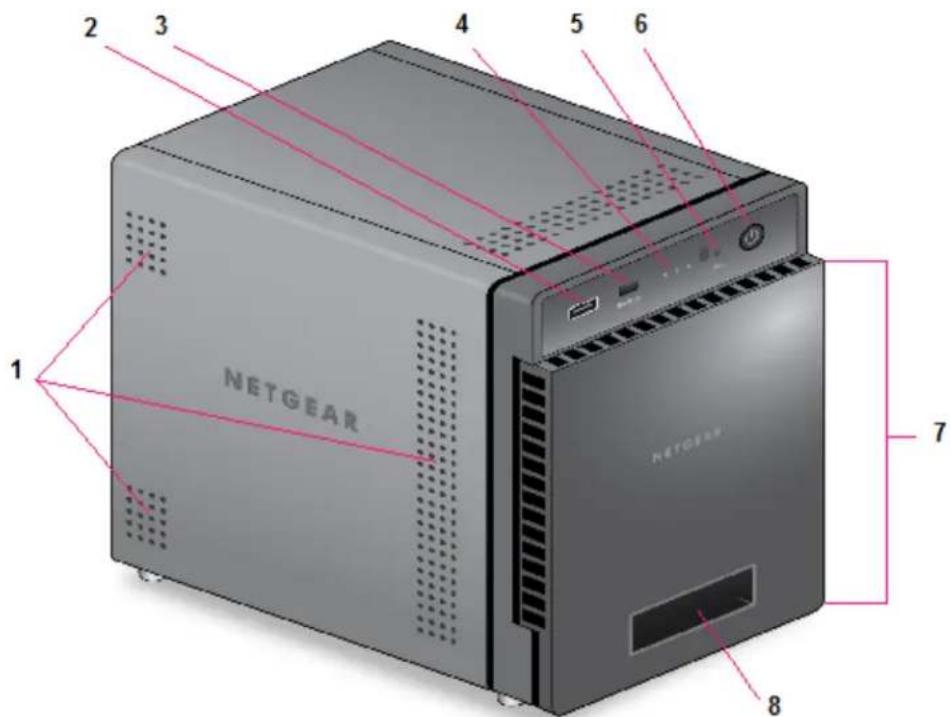
Figure 11. ReadyNAS 204 front and side panels
- Exhaust vents
- USB 2.0 port
- Backup button and LED
- Disk LEDs
- Disk activity LED
- Power button and LED
- Drive bay door
- Status display screen
Drive Bays
The following figure shows the drive bays of the ReadyNAS 204.
ReadyNAS OS 6 Desktop Storage Systems
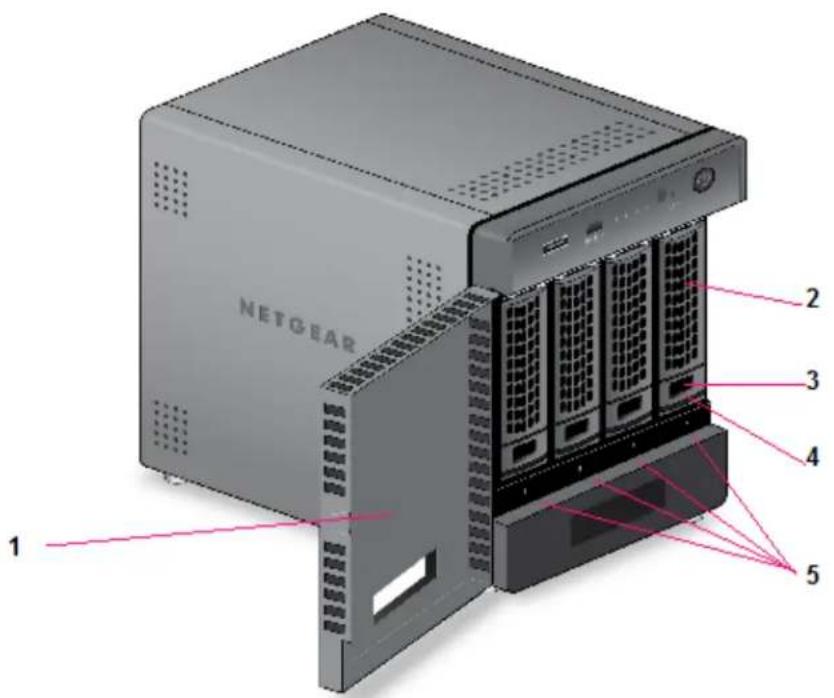
Figure 12. ReadyNAS 204 drive bays
- Drive bay door
- Disk tray handle
- Recessed disk tray handle lock
- Disk tray release latch
- Drive bays
Rear Panel
The following figure shows the rear panel of the ReadyNAS 204.
ReadyNAS OS 6 Desktop Storage Systems
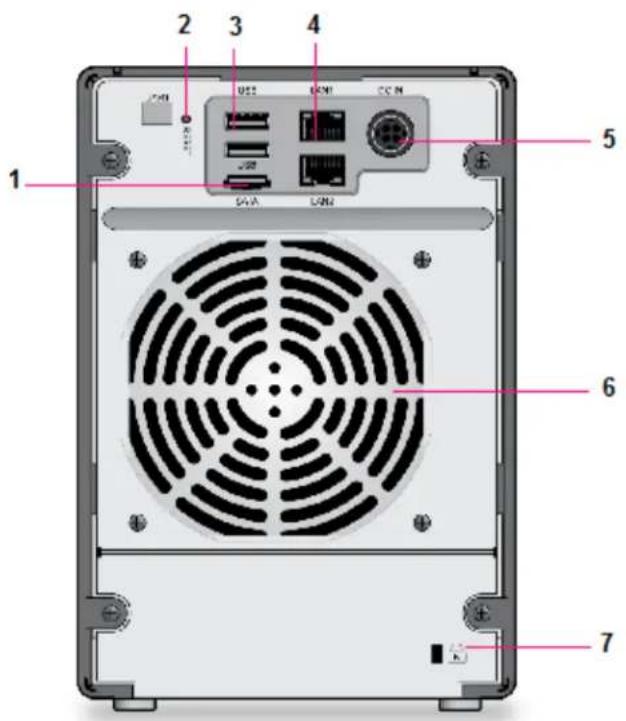
Figure 13. ReadyNAS 204 rear panel
- eSATA port
- Reset button
- USB 3.0 ports
- LAN ports with LED status indicators
Note The two LAN ports are equivalent. They can be used as two separate Ethernet connections, or can be configured as a single, bonded port with a 2 Gbps potential speed. For information about how to configure a bonded port, and the network configuration requirements needed to support 2 Gbps, see the ReadyNAS OS 6 Software Manual, which is available at netgear.com/support/product/ReadyNAS_OS_6.
- Power cable socket
- Exhaust fan
- Kensington lock
Status Information
You can obtain information about the status of your storage system by reviewing the indicators listed in the following table.
Table 4. ReadyNAS 204 indicator descriptions
| DescriptionIndicator | |
| Power button and LED | Press this button to turn on the ReadyNAS. The LED indicates these states:On. Powered on.Blinking. Booting or shutting down.Off. Powered off. |
| Disk LEDs (1, 2, 3, 4) | An LED on the top of the front panel is associated with each drive bay. LEDs are in numerical order from left to right. The disk LEDs indicate these states:On. Power is on and the disk is operating normally.Blinking. The disk was removed, failed, or is resynchronizing. See the display screen for details.Off. The drive bay is empty. |
| Disk activity LED | The disk activity LED indicates these states:Blinking. A disk is being accessed.Off. All disks are idle. |
| Rear panel Ethernet port LEDs | Two LED status indicators are built into each port, one off or green and one showing three states: off, amber, or green. They indicate port speed and activity as follows:Green, green. 1000 Mbps connection speed, no activity.Green blinking, green. 1000 Mbps connection speed, activity.Green, amber. 100 Mbps connection speed, no activity.Green blinking, amber. 100 Mbps connection speed, activity.Green on, off. 10 Mbps connection speed, no activity.Green blinking, off. 10 Mbps connection speed, activity.Off, off. No connection. |
| Status display screen | Displays messages about the status of your storage system. Note that the status display screen goes to sleep to prevent burn-in. To wake it, press the Power button once. If the storage system reports an abnormal operation or error, the status display screen stays on. |
Power On and Shut Down
This section describes how to power on and shut down your system. If you must shut down the system, use one of the preferred shutdown methods whenever possible.
ReadyNAS OS 6 Desktop Storage Systems
Power On
When you connect the system to a power supply or the system recovers from a power outage, the system returns to its last state:
- If the system was powered on, the system automatically powers on again when the power supply is connected or power is restored.
- If the system was powered off, the system remains off when the power supply is connected or power is restored.
In this situation, press the Power button on the front panel of the system to power on the system.
Preferred Shutdown
You can gracefully shut down your system by using the Power button or the ReadyNAS local admin page.
For information about how to gracefully shut down your system using the ReadyNAS local admin page, see the ReadyNAS OS 6 Software Manual, which is available at netgear.com/support/product/ReadyNAS_OS_6.
To gracefully shut down your system using the Power button:
- If the status display screen is not lit, do the following:
a. Press the Power button.
The status display screen wakes.
b. Press the Power button a second time.
Instructions for graceful shutdown display on the status display screen.
c. Press the Power button a third time.
The system shuts down gracefully.
- If the status display screen is lit, do the following:
a. Press the Power button.
Instructions for graceful shutdown display on the status display screen.
b. Press the Power button again.
The system shuts down gracefully.
Forced Shutdown
Perform a forced shutdown only if the storage system is not responding.
To perform a forced shutdown:
- Unplug the system from the power supply.
Boot Menu
Use the boot menu to restart or troubleshoot your ReadyNAS storage system. Your storage system has the following boot modes:
ReadyNAS OS 6 Desktop Storage Systems
• Normal. Initiates a normal boot process, just like booting using the Power button.
- Factory default. Initiates a short disk test that takes approximately 5 minutes. After the disk test, a 10-minute time-out period begins, during which all LEDs blink simultaneously.

WARNING:
The factory default reboot process resets the storage system to factory settings, erases all data, resets all defaults, and reformats the disk to X-RAID.
- If you want to cancel the factory default process, power off the storage system before the 10-minute time-out ends. The system powers down safely without causing any data loss.
- If you want to reset the system to factory default settings, do not power off your system. After the 10-minute time-out period, the factory default process begins.
Tip To start the factory default process immediately, press the Backup button during the 10-minute time-out period.
- OS reinstall. Reinstalls the firmware from the internal flash to the disks. Use the OS reinstall boot mode when the system crashes and corrupts some configuration files. OS reinstall boot mode also resets some settings on your storage system, such as Internet protocol settings and the administrator password, to defaults.
- Tech support. Boots into a low-level diagnostic mode. Use the tech support boot mode only when a NETGEAR technical support representative instructs you to do so.
• Volume read only. Mounts a volume as read-only. Use this option when you are attempting to rescue data off a disk during a disaster recovery.
• Memory test. Performs a memory test. The pass or fail result is reported on the status display screen. - Test disk. Performs an offline full disk test. This process can take four hours or more, depending on the size of your disks. Any problems are reported in the system logs. For more information about viewing the system logs, see the ReadyNAS OS 6 Software Manual, which is available at netgear.com/support/product/ReadyNAS_OS_6.
To access the boot menu:
- Power off your storage system.
- Using a straightened paper clip, press and hold the Reset button.
-
Press the Power button.
The system powers on. -
Continue to press the Reset button until the status display screen shows a boot menu message.
-
Press the Backup button to scroll through boot mode options.
The status display screen shows the current boot mode option.
- When the status display screen shows the boot mode that you need, press and release the Reset button to confirm your boot menu selection.
The system boots in the selected boot mode.
NETGEAR ReadyNAS 204
This chapter provides an overview of the physical features of the ReadyNAS 212 and includes the following sections:
• Front and Side Panels on page 46
- Drive Bays on page 46
- Rear Panel on page 47
• Status Information on page 48
• Power On and Shut Down on page 49
- Boot Menu on page 50
Front and Side Panels
The following figure shows the front and side panels of the ReadyNAS 212.
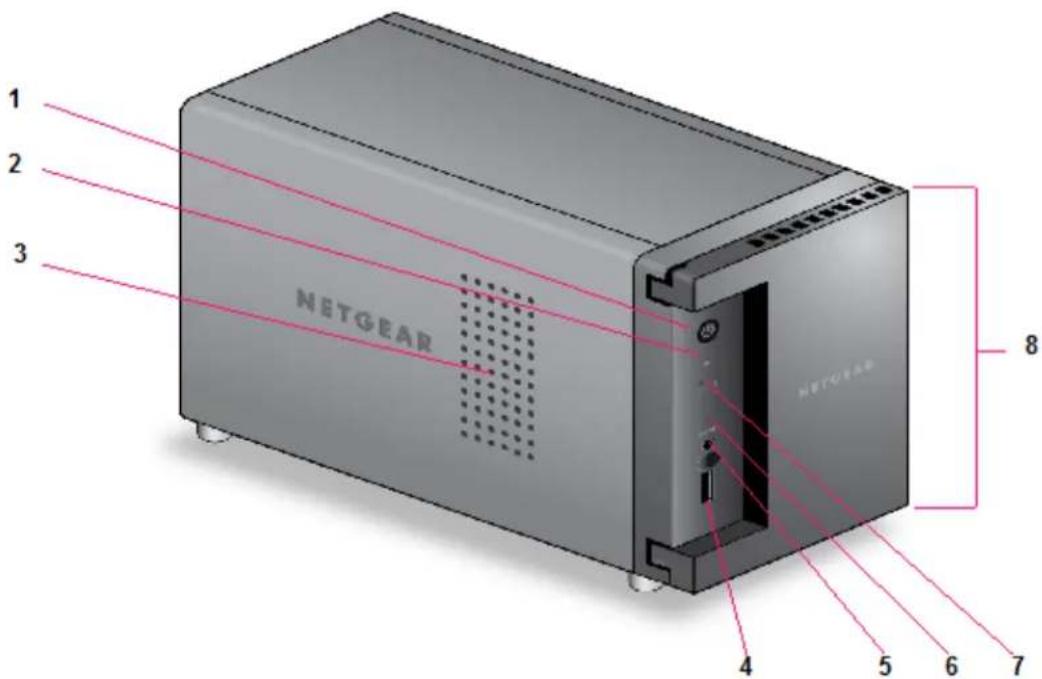
Figure 14. ReadyNAS 212 front and side panels
- Power button and LED
- Disk activity LED
- Exhaust vent
- USB 3.0 port
- Backup button
- USB and backup status LED
- Disk 1 and Disk 2 LEDs
- Drive bay door
Drive Bays
The following figure shows the drive bays of the ReadyNAS 212.
ReadyNAS OS 6 Desktop Storage Systems
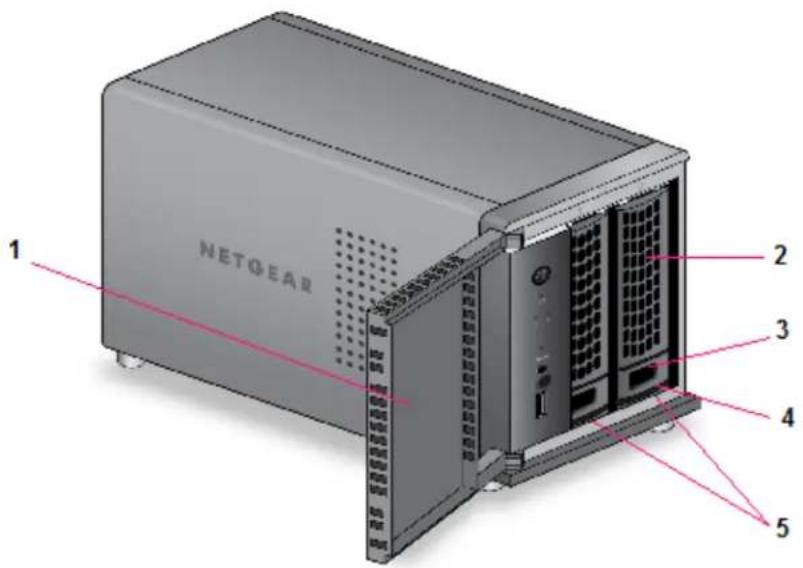
Figure 15. ReadyNAS 212 drive bays
- Drive bay door
- Disk tray handle
- Recessed disk tray handle lock
- Disk tray release latch
- Drive bays
Rear Panel
The following figure shows the rear panel of the ReadyNAS 212.
ReadyNAS OS 6 Desktop Storage Systems
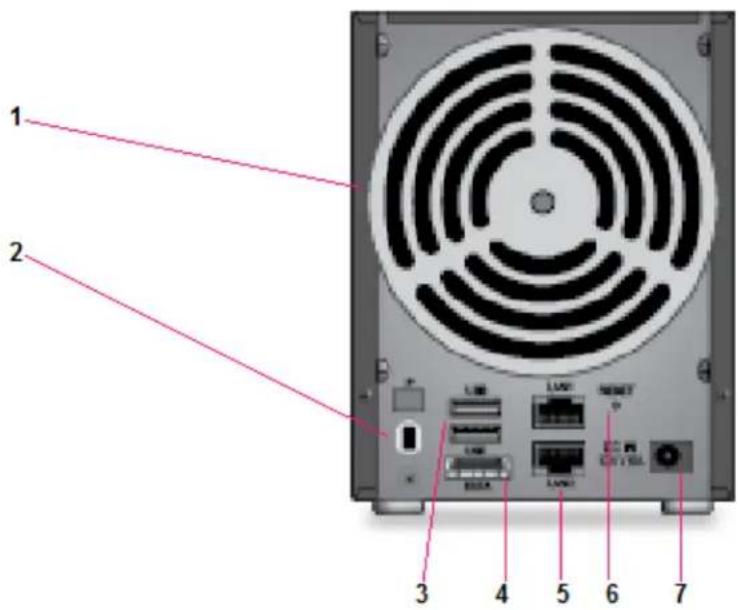
Figure 16. ReadyNAS 212 rear panel
- Exhaust fan
- Kensington lock
- USB 3.0 ports
- eSATA port
- GbE ports with LED status indicators
Note The two GbE ports are equivalent. They can be used as two separate Ethernet connections, or can be configured as a single, bonded port with a 2 Gbps potential speed. For information about how to configure a bonded port, and the network configuration requirements needed to support 2 Gbps, see the ReadyNAS OS 6 Software Manual, which is available at netgear.com/support/product/ReadyNAS_OS_6.
-
Reset button
-
Power adapter socket
Status Information
You can obtain information about the status of your storage system by reviewing the indicators listed in the following table.
Table 5. ReadyNAS 212 indicator descriptions
| DescriptionIndicator | |
| Power button and LED | Press this button to turn on the ReadyNAS. The LED indicates these states:On. Powered on.Blinking. Booting or shutting down.Off. Powered off. |
| Disk LEDs (1, 2) | An LED on the front panel of the storage system is associated with each drive bayThe disk LEDs indicate these states:On. Power is on and the disk is operating normally.Blinking. The disk was removed, failed, or is resynchronizing. See the display screen for details.Off. The drive bay is empty. |
| Disk activity LED | The disk activity LED indicates these states:Blinking. A disk is active.Off. disk is idling. |
| Rear panel Ethernet port LEDs | Two LED status indicators are built into each port, one off or green and one showing three states: off, amber, or green. They indicate port speed and activity as follows:Green, green. 1000 Mbps connection speed, no activity.Green blinking, green. 1000 Mbps connection speed, activity.Green, amber. 100 Mbps connection speed, no activity.Green blinking, amber. 100 Mbps connection speed, activity.Green on, off. 10 Mbps connection speed, no activity.Green blinking, off. 10 Mbps connection speed, activity.Off, off. No connection. |
Power On and Shut Down
This section describes how to power on and shut down your system. If you must shut down the system, use one of the preferred shutdown methods whenever possible.
ReadyNAS OS 6 Desktop Storage Systems
Power On
When you connect the system to a power supply or the system recovers from a power outage, the system returns to its last state:
- If the system was powered on, the system automatically powers on again when the power supply is connected or power is restored.
- If the system was powered off, the system remains off when the power supply is connected or power is restored.
In this situation, press the Power button on the front panel of the system to power on the system.
Preferred Shutdown
You can gracefully shut down your system by using the Power button or the ReadyNAS local admin page. For information about how to gracefully shut down your system using the ReadyNAS local admin page, see the ReadyNAS OS 6 Software Manual, which is available at netgear.com/support/product/ReadyNAS_OS_6.
To gracefully shut down your system using the Power button:
- Press the Power button.
The Power LED blinks, prompting you to confirm the shutdown. - Press the Power button again.
The system shuts down gracefully.
Forced Shutdown
Perform a forced shutdown only if the storage system is not responding.
To perform a forced shutdown:
- Unplug the system from the power supply.
Boot Menu
Use the boot menu to restart or troubleshoot your ReadyNAS storage system. Your storage system has the following boot modes:
• Normal. Initiates a normal boot process, just like booting using the Power button.
- Factory default. Initiates a short disk test that takes approximately 5 minutes. After the disk test, a 10-minute time-out period begins, during which all LEDs blink simultaneously.

WARNING:
The factory default reboot process resets the storage system to factory settings, erases all data, resets all defaults, and reformats the disk to X-RAID.
ReadyNAS OS 6 Desktop Storage Systems
- If you want to cancel the factory default process, power off the storage system before the 10-minute time-out ends. The system powers down safely without causing any data loss.
- If you want to reset the system to factory default settings, do not power off your system. After the 10-minute time-out period, the factory default process begins.
Tip To start the factory default process immediately, press the Backup button during the 10-minute time-out period.
- OS reinstall. Reinstalls the firmware from the internal flash to the disks. Use the OS reinstall boot mode when the system crashes and corrupts some configuration files. OS reinstall boot mode also resets some settings on your storage system, such as Internet protocol settings and the administrator password, to defaults.
- Tech support. Boots into a low-level diagnostic mode. Use the tech support boot mode only when a NETGEAR technical support representative instructs you to do so.
• Volume read only. Mounts a volume as read-only. Use this option when you are attempting to rescue data off a disk during a disaster recovery. - Memory test. Performs a memory test. The memory test runs for eight hours. The current status and the pass or fail result is reported using the storage system LEDs, as described in the following table:
Figure 17. Memory Test Status
| Backup LEDDisk 2 LEDDisk 1 LEDPower LEDMemory Test State | ||||
| BlinkingOffOffOffFirst hour | ||||
| OffBlinkingOffOffSecond hour | ||||
| OffOffBlinkingOffThird hour | ||||
| BlinkingBlinkingBlinkingOffForth hour | ||||
| BlinkingOffOffOnFifth hour | ||||
| OffBlinkingOffOnSixth hour | ||||
| OffOffBlinkingOnSeventh hour | ||||
| BlinkingBlinkingBlinkingOnEigth hour | ||||
| BlinkingBlinkingBlinkingBlinking | ||||
| OnOnOnOnResult: pass |
- Test disk. Performs an offline full disk test. This process can take four hours or more, depending on the size of your disks. Any problems are reported in the system logs. For more information about viewing the system logs, see the ReadyNAS OS 6 Software Manual, which is available at netgear.com/support/product/ReadyNAS_OS_6.
ReadyNAS OS 6 Desktop Storage Systems
To access the boot menu:
- Power off your storage system.
- Using a straightened paper clip, press and hold the Reset button.
- Press the Power button.
The system powers on.
- Continue to press the Reset button until the Power button LED, USB and backup status LED, disk 1 LED, and disk 2 LED light.
- Press the Backup button to scroll through boot mode options.
The storage system shows the boot mode options using the LEDs, as described in the following table:
| Status IndicatorBoot Mode | |||||
| Description | Power LED | Disk 1 LED | Disk 2 LED | USB and Backup LED | |
| All four LEDs light.Boot menu | |||||
| Power LED lights.Normal | |||||
| Disk 1 LED lights.Factory default | |||||
| Disk 2 LED lights.OS reinstall | |||||
| USB and backup status LED lights.Tech support | |||||
| Power LED and disk 1 LED light.Volume read only | |||||
| Power LED and disk 2 LED light.Memory test | |||||
| Test disk | Power LED and USB and backup status LED light. | ||||
Legend:
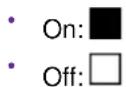
- Press and release the Reset button to confirm your boot menu selection. The system boots in the selected boot mode.
This chapter provides an overview of the physical features of the ReadyNAS 214 and includes the following sections:
• Front and Side Panels on page 54
- Drive Bays on page 54
- Rear Panel on page 55
• Status Information on page 56
• Power On and Shut Down on page 57
- Boot Menu on page 58
Front and Side Panels
The following figure shows the front and side panels of the ReadyNAS 214.
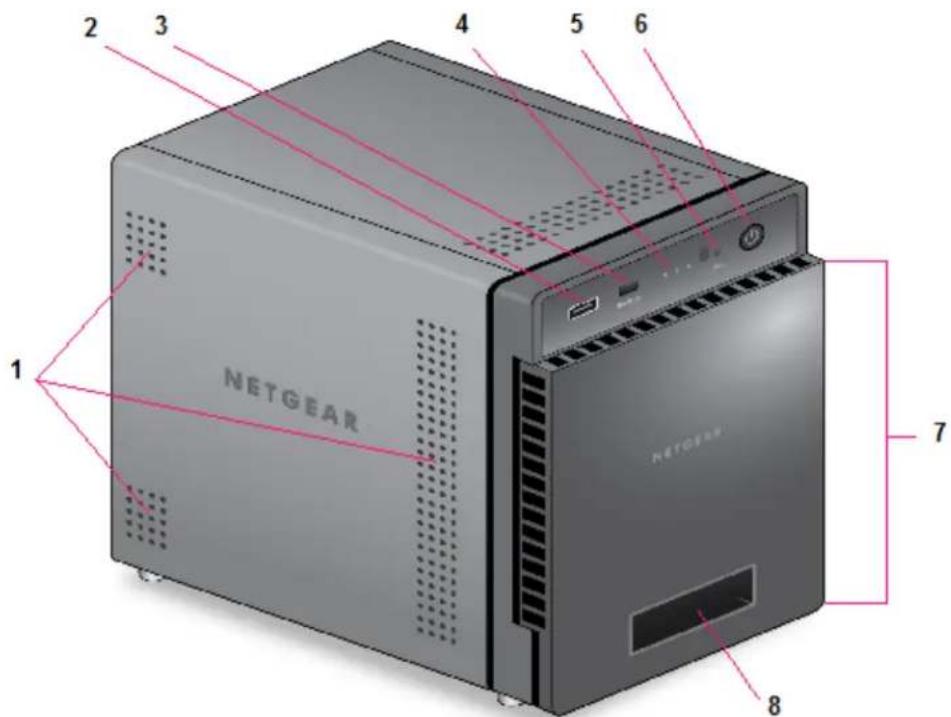
Figure 18. ReadyNAS 214 front and side panels
- Exhaust vents
- USB 2.0 port
- Backup button and LED
- Disk LEDs
- Disk activity LED
- Power button and LED
- Drive bay door
- Status display screen
Drive Bays
The following figure shows the drive bays of the ReadyNAS 214.
ReadyNAS OS 6 Desktop Storage Systems
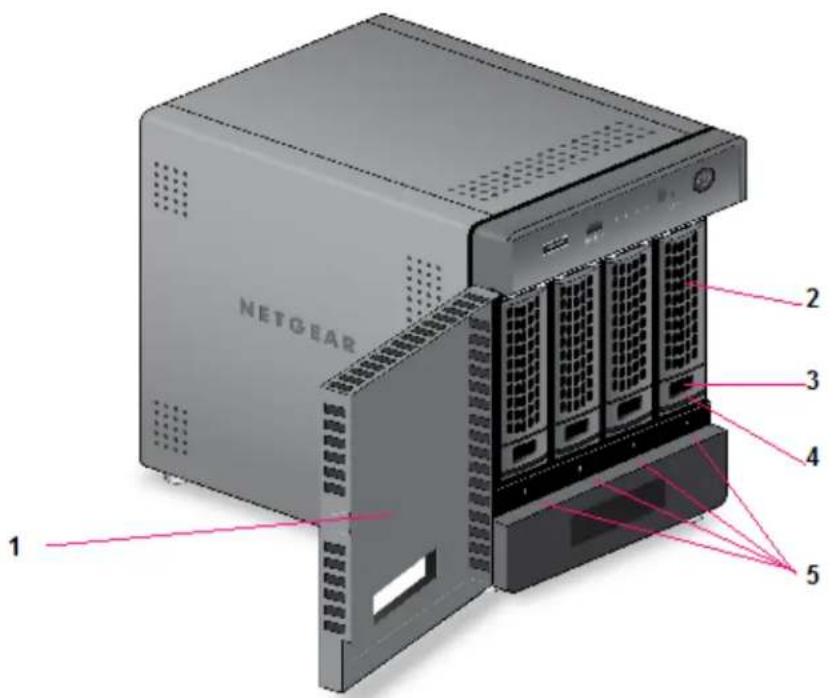
Figure 19. ReadyNAS 214 drive bays
- Drive bay door
- Disk tray handle
- Recessed disk tray handle lock
- Disk tray release latch
- Drive bays
Rear Panel
The following figure shows the rear panel of the ReadyNAS 214.
ReadyNAS OS 6 Desktop Storage Systems
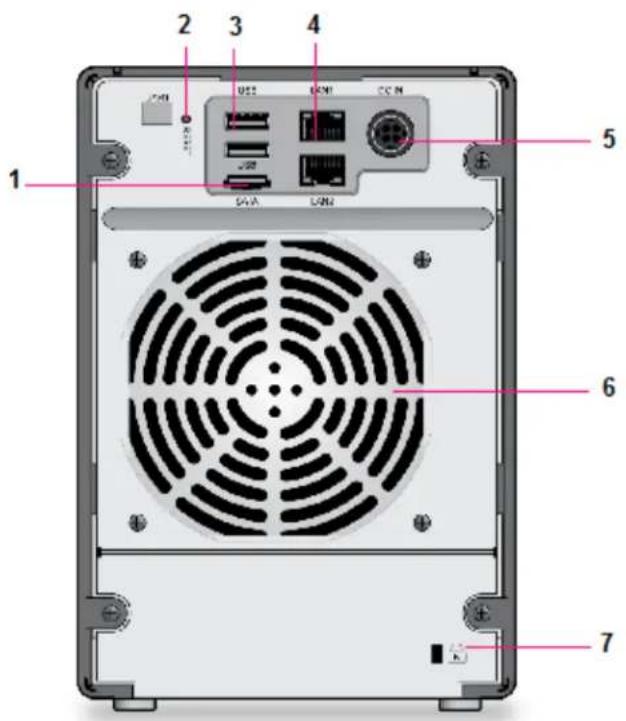
Figure 20. ReadyNAS 214 rear panel
- eSATA port
- Reset button
- USB 3.0 ports
- LAN ports with LED status indicators
Note The two LAN ports are equivalent. They can be used as two separate Ethernet connections, or can be configured as a single, bonded port with a 2 Gbps potential speed. For information about how to configure a bonded port, and the network configuration requirements needed to support 2 Gbps, see the ReadyNAS OS 6 Software Manual, which is available at netgear.com/support/product/ReadyNAS_OS_6.
- Power cable socket
- Exhaust fan
- Kensington lock
Status Information
You can obtain information about the status of your storage system by reviewing the indicators listed in the following table.
Table 6. ReadyNAS 214 indicator descriptions
| DescriptionIndicator | |
| Power button and LED | Press this button to turn on the ReadyNAS. The LED indicates these states:On. Powered on.Blinking. Booting or shutting down.Off. Powered off. |
| Disk LEDs (1, 2, 3, 4) | An LED on the top of the front panel is associated with each drive bay. LEDs are in numerical order from left to right. The disk LEDs indicate these states:On. Power is on and the disk is operating normally.Blinking. The disk was removed, failed, or is resynchronizing. See the display screen for details.Off. The drive bay is empty. |
| Disk activity LED | The disk activity LED indicate these states:Blinking. A disk is being accessed.Off. All disks are idle. |
| Rear panel Ethernet port LEDs | Two LED status indicators are built into each port, one off or green and one showing three states: off, amber, or green. They indicate port speed and activity as follows:Green, green. 1000 Mbps connection speed, no activity.Green blinking, green. 1000 Mbps connection speed, activity.Green, amber. 100 Mbps connection speed, no activity.Green blinking, amber. 100 Mbps connection speed, activity.Green on, off. 10 Mbps connection speed, no activity.Green blinking, off. 10 Mbps connection speed, activity.Off, off. No connection. |
| Status display screen | Displays messages about the status of your storage system. Note that the status display screen goes to sleep to prevent burn-in. To wake it, press the Power button once. If the storage system reports an abnormal operation or error, the status display screen stays on. |
Power On and Shut Down
This section describes how to power on and shut down your system. If you must shut down the system, use one of the preferred shutdown methods whenever possible.
ReadyNAS OS 6 Desktop Storage Systems
Power On
When you connect the system to a power supply or the system recovers from a power outage, the system returns to its last state:
- If the system was powered on, the system automatically powers on again when the power supply is connected or power is restored.
- If the system was powered off, the system remains off when the power supply is connected or power is restored.
In this situation, press the Power button on the front panel of the system to power on the system.
Preferred Shutdown
You can gracefully shut down your system by using the Power button or the ReadyNAS local admin page.
For information about how to gracefully shut down your system using the ReadyNAS local admin page, see the ReadyNAS OS 6 Software Manual, which is available at netgear.com/support/product/ReadyNAS_OS_6.
To gracefully shut down your system using the Power button:
- If the status display screen is not lit, do the following:
a. Press the Power button.
The status display screen wakes.
b. Press the Power button a second time.
Instructions for graceful shutdown display on the status display screen.
c. Press the Power button a third time.
The system shuts down gracefully.
- If the status display screen is lit, do the following:
a. Press the Power button.
Instructions for graceful shutdown display on the status display screen.
b. Press the Power button again.
The system shuts down gracefully.
Forced Shutdown
Perform a forced shutdown only if the storage system is not responding.
To perform a forced shutdown:
- Unplug the system from the power supply.
Boot Menu
Use the boot menu to restart or troubleshoot your ReadyNAS storage system. Your storage system has the following boot modes:
ReadyNAS OS 6 Desktop Storage Systems
• Normal. Initiates a normal boot process, just like booting using the Power button.
- Factory default. Initiates a short disk test that takes approximately 5 minutes. After the disk test, a 10-minute time-out period begins, during which all LEDs blink simultaneously.

WARNING:
The factory default reboot process resets the storage system to factory settings, erases all data, resets all defaults, and reformats the disk to X-RAID.
- If you want to cancel the factory default process, power off the storage system before the 10-minute time-out ends. The system powers down safely without causing any data loss.
- If you want to reset the system to factory default settings, do not power off your system. After the 10-minute time-out period, the factory default process begins.
Tip To start the factory default process immediately, press the Backup button during the 10-minute time-out period.
- OS reinstall. Reinstalls the firmware from the internal flash to the disks. Use the OS reinstall boot mode when the system crashes and corrupts some configuration files. OS reinstall boot mode also resets some settings on your storage system, such as Internet protocol settings and the administrator password, to defaults.
- Tech support. Boots into a low-level diagnostic mode. Use the tech support boot mode only when a NETGEAR technical support representative instructs you to do so.
• Volume read only. Mounts a volume as read-only. Use this option when you are attempting to rescue data off a disk during a disaster recovery.
• Memory test. Performs a memory test. The pass or fail result is reported on the status display screen. - Test disk. Performs an offline full disk test. This process can take four hours or more, depending on the size of your disks. Any problems are reported in the system logs. For more information about viewing the system logs, see the ReadyNAS OS 6 Software Manual, which is available at netgear.com/support/product/ReadyNAS_OS_6.
To access the boot menu:
- Power off your storage system.
- Using a straightened paper clip, press and hold the Reset button.
-
Press the Power button.
The system powers on. -
Continue to press the Reset button until the status display screen shows a boot menu message.
-
Press the Backup button to scroll through boot mode options.
The status display screen shows the current boot mode option.
- When the status display screen shows the boot mode that you need, press and release the Reset button to confirm your boot menu selection.
The system boots in the selected boot mode.
NETGEAR ReadyNAS 214
This chapter provides an overview of the physical features of the ReadyNAS 312 and includes the following sections:
• Front and Side Panels on page 61
- Drive Bays on page 61
- Rear Panel on page 62
• Status Information on page 63
• Power On and Shut Down on page 64
- Boot Menu on page 65
Front and Side Panels
The following figure shows the front and side panels of the ReadyNAS 312.
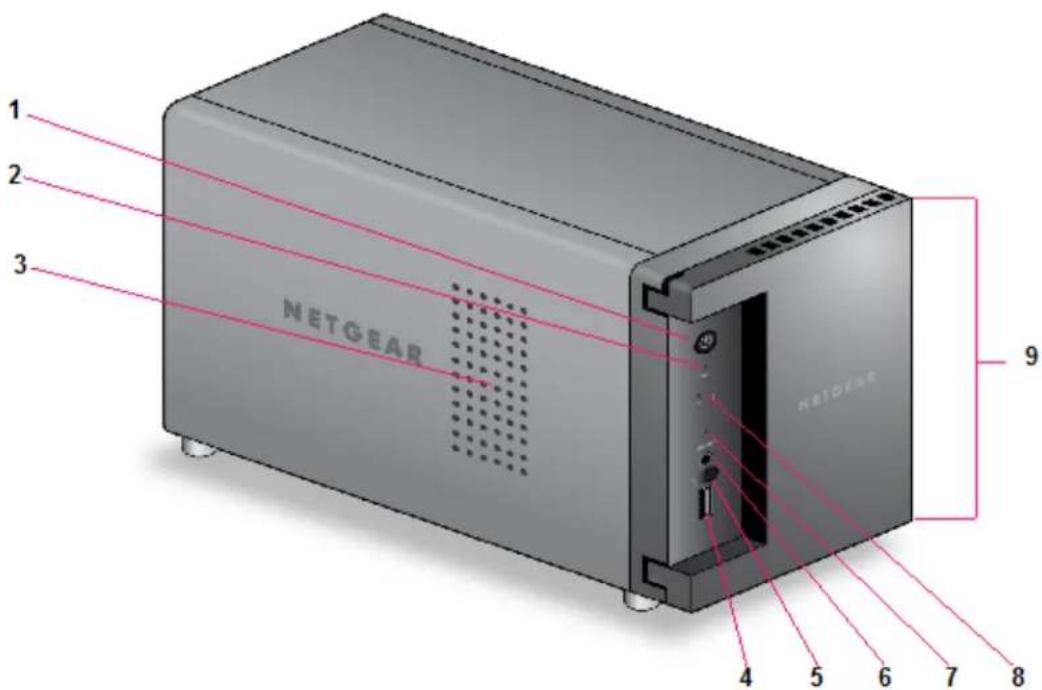
Figure 21. ReadyNAS 312 front and side panels
- Power button and LED
- Disk activity LED
- Exhaust vent
- USB 2.0 port
- Infrared remote receiver
- Backup button
- USB and Backup status LED
- Disk 1 and Disk 2 LEDs
- Drive bay door
Drive Bays
The following figure shows the drive bays of the ReadyNAS 312.
ReadyNAS OS 6 Desktop Storage Systems
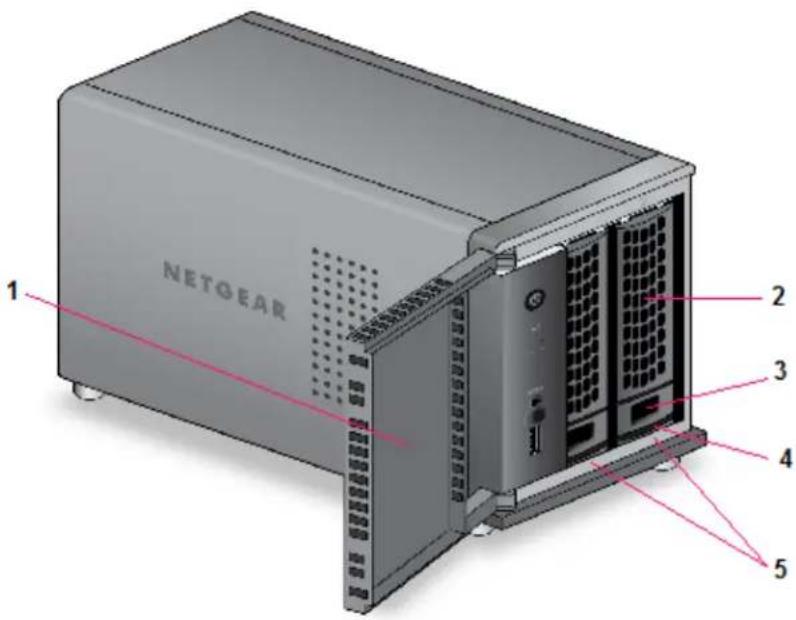
Figure 22. ReadyNAS 312 drive bays
- Drive bay door
- Disk tray handle
- Recessed disk tray handle lock
- Disk tray release latch
- Drive bays
Rear Panel
The following figure shows the rear panel of the ReadyNAS 312.
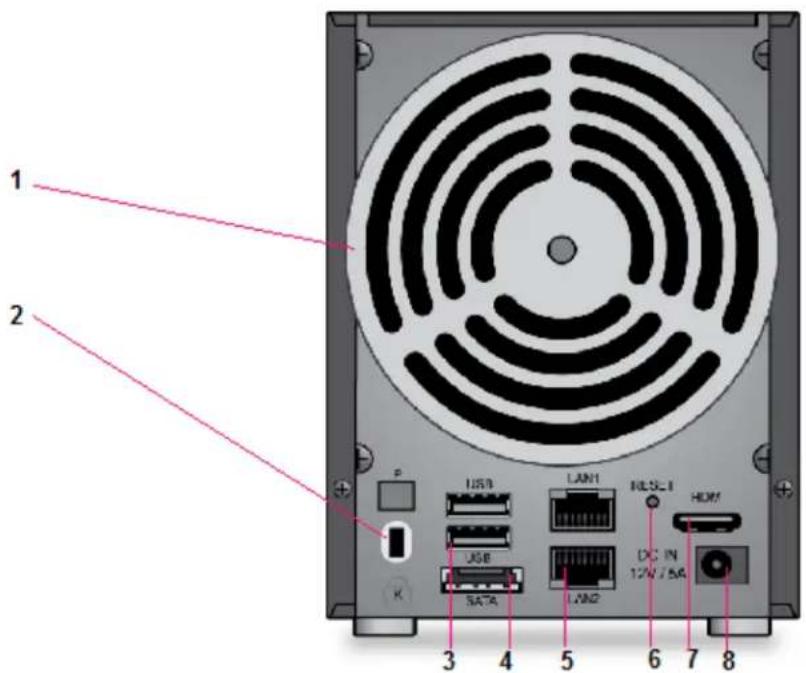
Figure 23. ReadyNAS 312 rear panel
- Exhaust fan
- Kensington lock
- USB 3.0 ports
- eSATA port
- LAN ports with LED status indicators
- Reset button
- HDMI port (currently not supported)
- Power adapter socket
Status Information
You can obtain information about the status of your storage system by reviewing the indicators listed in the following table.
Table 7. ReadyNAS 312 indicator descriptions
| DescriptionIndicator | |
| Power button and LED | Press this button to turn on the ReadyNAS. The LED has these states:On. Powered on.Blinking. Booting or shutting down.Off. Powered off. |
| Disk LEDs (1, 2) | An LED on the front panel of the storage system is associated with each drive bayThe disk LEDs have these states:On. Power is on and the disk is operating normally.Blinking.The disk was removed, failed, or is resynchronizing.Off.The drive bay is empty. |
| Disk activity LED | The disk activity LED has these states:On. At least one disk is present.Blinking. A disk is active.Off. All disks are idle. |
| Rear panel Ethernet port LEDs | Two LED status indicators are built into this port, one green and one amber. They indicate port speed and activity as follows:Green on, amber off. 1000 Mbps connection speed, no activity.Green blinking, amber off. 1000 Mbps connection speed, activity.Green off, amber on. 10 Mbps or 100 Mbps connection speed, no activity.Green off, amber blinking. 10 Mbps or 100 Mbps connection speed, activity.Green off, amber off. No connection. |
Power On and Shut Down
This section describes how to power on and shut down your system. If you need to shut down the system, use one of the preferred shutdown methods whenever possible.
Power On
When you connect the system to a power supply or the system recovers from a power outage, the following occurs:
ReadyNAS OS 6 Desktop Storage Systems
- The system automatically powers on if you enabled the Wake on LAN (WoL) feature or scheduled the system to automatically power on or off.
-
The system returns to its last state if the Wake on LAN (WoL) feature is disabled and you did not schedule the system to automatically power on or off:
-
If the system was powered on, the system automatically powers on again when the power supply is connected or power is restored.
- If the system was powered off, the system remains off when the power supply is connected or power is restored.
In this situation, press the Power button on the front panel of the system to power on the system.
Preferred Shutdown
You can gracefully shut down your system by using the Power button or the ReadyNAS local admin page.
For information about how to gracefully shut down your system using the ReadyNAS local admin page, see the ReadyNAS OS 6 Software Manual, which is available at netgear.com/support/product/ReadyNAS_OS_6.
To gracefully shut down your system using the Power button:
- Press the Power button.
The Power LED blinks, prompting you to confirm the shutdown.
- Press the Power button again.
The system shuts down gracefully.
Forced Shutdown
Perform a forced shutdown only if the storage system is not responding.
To perform a forced shutdown:
- Press and hold the Power button for five seconds.
The LEDs blink quickly and simultaneously to warn that power will be cut off forcibly.
The system shuts down.
Boot Menu
Use the boot menu to restart or troubleshoot your ReadyNAS storage system. Your storage system has the following boot modes:
• Normal. Initiates a normal boot process, just like booting using the Power button.
- Factory default. Initiates a short disk test that takes approximately 5 minutes. After the disk test, a 10-minute time-out period begins, during which all LEDs blink simultaneously.
ReadyNAS OS 6 Desktop Storage Systems

WARNING:
The factory default reboot process resets the storage system to factory settings, erases all data, resets all defaults, and reformats the disk to X-RAID.
- If you want to cancel the factory default process, power off the storage system before the 10-minute time-out ends. The system powers down safely without causing any data loss.
- If you want to reset the system to factory default settings, do not power off your system. After the 10-minute time-out period, the factory default process begins.
Tip To start the factory default process immediately, press the Backup button during the 10-minute time-out period.
- OS reinstall. Reinstalls the firmware from the internal flash to the disks. Use the OS reinstall boot mode when the system crashes and corrupts some configuration files. OS reinstall boot mode also resets some settings on your storage system, such as Internet protocol settings and the administrator password, to defaults.
- Tech support. Boots into a low-level diagnostic mode. Use the tech support boot mode only when a NETGEAR technical support representative instructs you to do so.
• Volume read only. Mounts a volume as read-only. Use this option when you are attempting to rescue data off a disk during a disaster recovery. - Memory test. Performs a memory test. The pass or fail result is reported using the storage system's LEDs. Contact a NETGEAR technical support representative to interpret memory test results.
- Test disk. Performs an offline full disk test. This process can take four hours or more, depending on the size of your disks. Any problems are reported in the system logs. For more information about viewing the system logs, see the ReadyNAS OS 6 Software Manual, which is available at netgear.com/support/product/ReadyNAS_OS_6.
To access the boot menu:
- Power off your storage system.
- Using a straightened paper clip, press and hold the Reset button.
- Press the Power button.
The system powers on.
- Continue to press the Reset button until the Power button LED, USB and backup status LED, disk 1 LED, and disk 2 LED light.
- Press the Backup button to scroll through boot mode options.
The storage system shows the boot mode options using the LEDs, as described in the following table:
ReadyNAS OS 6 Desktop Storage Systems
| Status IndicatorBoot Mode | |||||
| Description | Power LED | Disk 1 LED | Disk 2 LED | USB and Backup LED | |
| All four LEDs light.Boot menu | |||||
| Power LED lights.Normal | |||||
| Disk 1 LED lights.Factory default | |||||
| Disk 2 LED lights.OS reinstall | |||||
| USB and backup status LED lights.Tech support | |||||
| Power LED and disk 1 LED light.Volume read only | |||||
| Power LED and disk 2 LED light.Memory test | |||||
| Test disk | Power LED and USB and backup status LED light. | ||||
Legend:
On:
• Off: □
- Press and release the Reset button to confirm your boot menu selection.
The system boots in the selected boot mode.
This chapter provides an overview of the physical features of the ReadyNAS 314 and includes the following sections:
• Front and Side Panels on page 69
- Drive Bays on page 69
- Rear Panel on page 70
• Status Information on page 71
• Power On and Shut Down on page 72
- Boot Menu on page 74
Front and Side Panels
The following figure shows the front and side panels of the ReadyNAS 314.
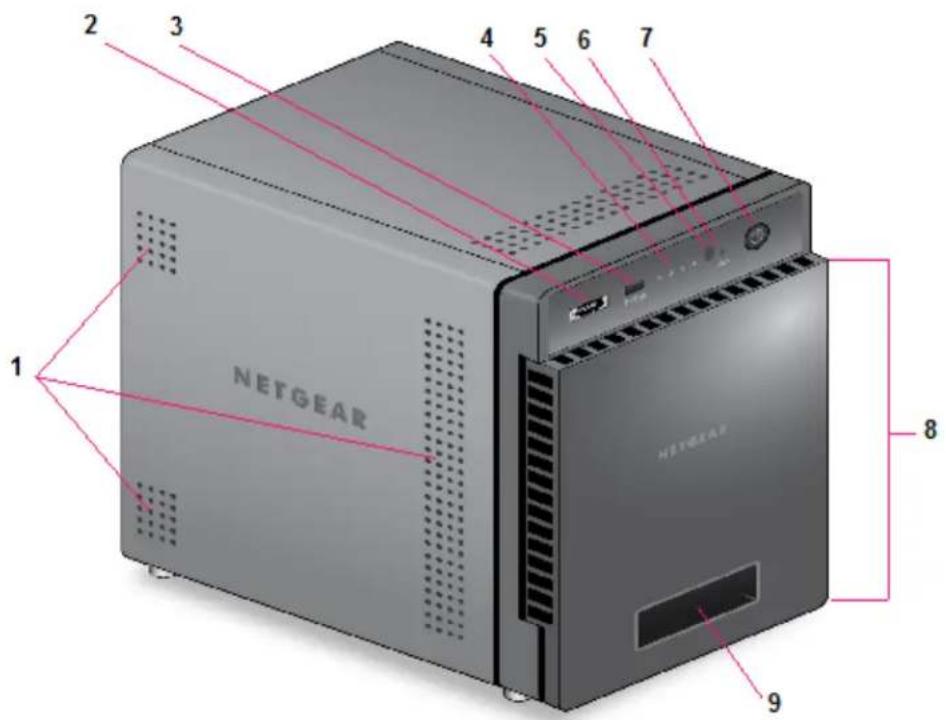
Figure 24. ReadyNAS 314 front and side panels
- Exhaust vents
- Backup button and LED
- Disk LEDs
- Infrared remote receiver
- Disk activity LED
- Power button and LED
- Drive bay door
-
Status display screen
-
Shared USB 2.0 and eSATA port
Drive Bays
The following figure shows the drive bays of the ReadyNAS 314.
ReadyNAS OS 6 Desktop Storage Systems
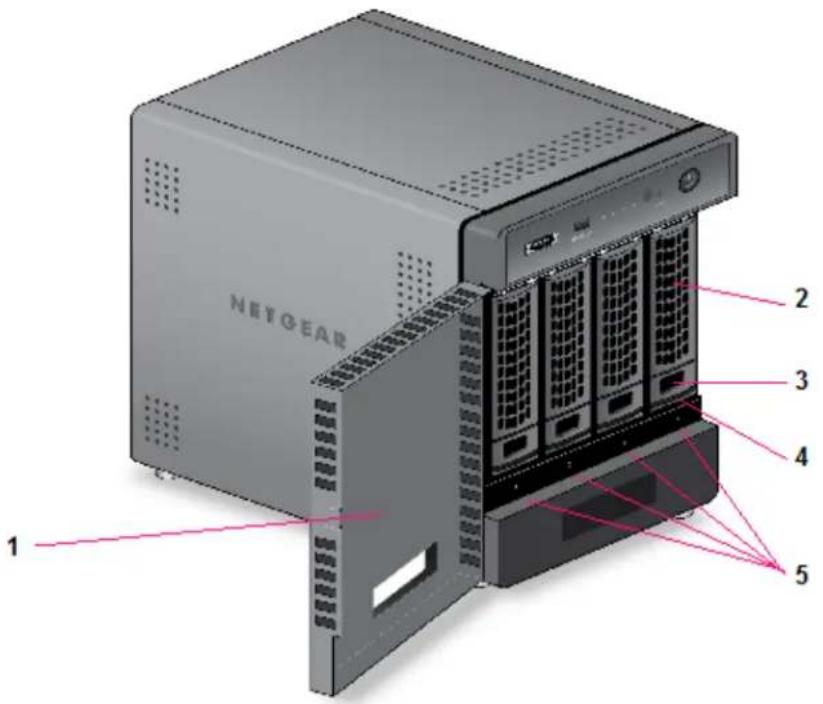
Figure 25. ReadyNAS 314 drive bays
- Drive bay door
- Disk tray handle
- Recessed disk tray handle lock
- Disk tray release latch
- Drive bays
Rear Panel
The following figure shows the rear panel of the ReadyNAS 314.
ReadyNAS OS 6 Desktop Storage Systems
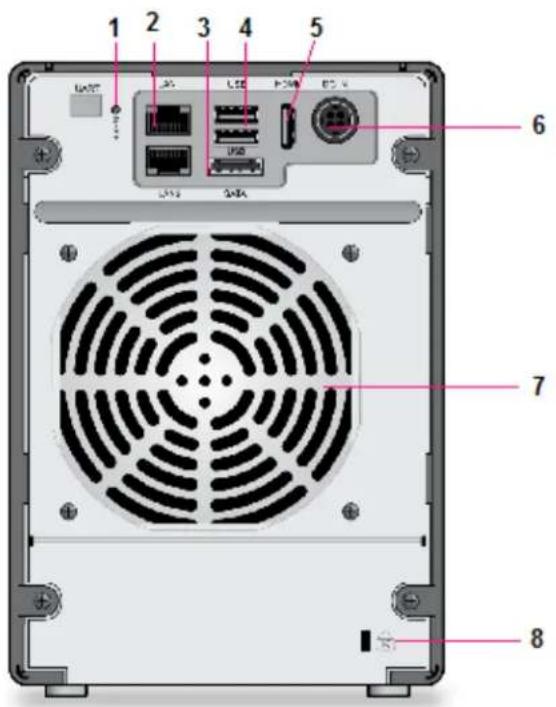
Figure 26. ReadyNAS 314 rear panel
- Reset button
- LAN ports with LED status indicators
- eSATA port
- USB 3.0 ports
- HDMI port (currently not supported)
- Power cable socket
- Exhaust fan
- Kensington lock
Status Information
You can obtain information about the status of your storage system by reviewing the indicators listed in the following table.
Table 8. ReadyNAS 314 indicator descriptions
| DescriptionIndicator | |
| Power button and LED | Press this button to turn on the ReadyNAS. The LED indicates these states:On. Powered on.Blinking. Booting or shutting down.Off. Powered off. |
| Disk LEDs (1, 2, 3, 4) | An LED on the top of the front panel is associated with each drive bay. LEDs are in numerical order from left to right. The disk LEDs indicate these states:On. Power is on and the disk is operating normally.Blinking. The disk was removed, failed, or is resynchronizing. See the display screen for details.Off. The drive bay is empty. |
| Disk activity LED | The disk activity LED has these states:On. At least one disk is present.Blinking. A disk is active.Off. All disks are idle. |
| Rear panel Ethernet port LEDs | Two LED status indicators are built into this port, one green and one amber. They indicate port speed and activity as follows:Green on, amber off. 1000 Mbps connection speed, no activity.Green blinking, amber off. 1000 Mbps connection speed, activity.Green off, amber on. 10 Mbps or 100 Mbps connection speed, no activity.Green off, amber blinking. 10 Mbps or 100 Mbps connection speed, activity.Green off, amber off. No connection. |
| Status display screen | Displays messages about the status of your storage system. Note that the status display screen goes to sleep to prevent burn-in. To wake it, press the Power button once. If the storage system reports an abnormal operation or error, the status display screen stays on. |
Power On and Shut Down
This section describes how to power on and shut down your system. If you must shut down the system, use one of the preferred shutdown methods whenever possible.
ReadyNAS OS 6 Desktop Storage Systems
Power On
When you connect the system to a power supply or the system recovers from a power outage, the following occurs:
- The system automatically powers on if you enabled the Wake on LAN (WoL) feature or scheduled the system to automatically power on or off.
-
The system returns to its last state if the Wake on LAN (WoL) feature is disabled and you did not schedule the system to automatically power on or off:
-
If the system was powered on, the system automatically powers on again when the power supply is connected or power is restored.
- If the system was powered off, the system remains off when the power supply is connected or power is restored.
In this situation, press the Power button on the front panel of the system to power on the system.
Preferred Shutdown
You can gracefully shut down your system by using the Power button or the ReadyNAS local admin page. For information about how to gracefully shut down your system using the ReadyNAS local admin page, see the ReadyNAS OS 6 Software Manual, which is available at netgear.com/support/product/ReadyNAS_OS_6.
To gracefully shut down your system using the Power button:
- If the status display screen is not lit, do the following:
a. Press the Power button.
The status display screen wakes.
b. Press the Power button a second time.
Instructions for graceful shutdown display on the status display screen.
c. Press the Power button a third time.
The system shuts down gracefully.
- If the status display screen is lit, do the following:
a. Press the Power button.
Instructions for graceful shutdown display on the status display screen.
b. Press the Power button again.
The system shuts down gracefully.
Forced Shutdown
Perform a forced shutdown only if the storage system is not responding.
To perform a forced shutdown:
- Press and hold the Power button on the front panel of the system for five seconds. The LEDs blink quickly and simultaneously to warn that power will be cut off forcibly.
NETGEAR ReadyNAS 314
ReadyNAS OS 6 Desktop Storage Systems
The system shuts down.
Boot Menu
Use the boot menu to restart or troubleshoot your ReadyNAS storage system. Your storage system has the following boot modes:
• Normal. Initiates a normal boot process, just like booting using the Power button.
- Factory default. Initiates a short disk test that takes approximately 5 minutes. After the disk test, a 10-minute time-out period begins, during which all LEDs blink simultaneously.

WARNING:
The factory default reboot process resets the storage system to factory settings, erases all data, resets all defaults, and reformats the disk to X-RAID.
- If you want to cancel the factory default process, power off the storage system before the 10-minute time-out ends. The system powers down safely without causing any data loss.
- If you want to reset the system to factory default settings, do not power off your system. After the 10-minute time-out period, the factory default process begins.
Tip To start the factory default process immediately, press the Backup button during the 10-minute time-out period.
- OS reinstall. Reinstalls the firmware from the internal flash to the disks. Use the OS reinstall boot mode when the system crashes and corrupts some configuration files. OS reinstall boot mode also resets some settings on your storage system, such as Internet protocol settings and the administrator password, to defaults.
- Tech support. Boots into a low-level diagnostic mode. Use the tech support boot mode only when a NETGEAR technical support representative instructs you to do so.
• Volume read only. Mounts a volume as read-only. Use this option when you are attempting to rescue data off a disk during a disaster recovery.
• Memory test. Performs a memory test. The pass or fail result is reported on the status display screen. - Test disk. Performs an offline full disk test. This process can take four hours or more, depending on the size of your disks. Any problems are reported in the system logs. For more information about viewing the system logs, see the ReadyNAS OS 6 Software Manual, which is available at netgear.com/support/product/ReadyNAS_OS_6.
To access the boot menu:
- Power off your storage system.
- Using a straightened paper clip, press and hold the Reset button.
- Press the Power button.
The systems powers on.
ReadyNAS OS 6 Desktop Storage Systems
- Continue to press the Reset button until the status display screen shows a boot menu message.
- Press the Backup button to scroll through boot mode options.
The status display screen shows the current boot mode option.
- When the status display screen shows the boot mode that you need, press and release the Reset button to confirm your boot menu selection.
The system boots in the selected boot mode.
This chapter provides an overview of the physical features of the ReadyNAS 316 and includes the following sections:
• Front and Side Panels on page 77
- Drive Bays on page 77
- Rear Panel on page 78
• Status Information on page 79
• Power On and Shut Down on page 80
- Boot Menu on page 81
Front and Side Panels
The following figure shows the front and side panels of the ReadyNAS 316.
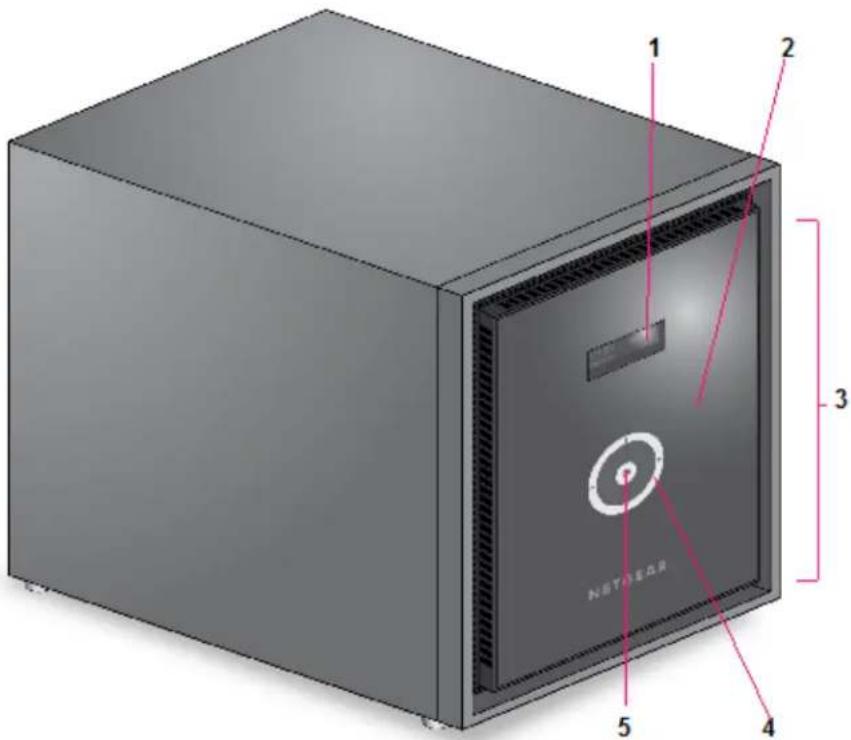
Figure 27. ReadyNAS 316 front and side panels
- Status and menu display screen
- Infrared remote receiver
- Drive bay door
- Touch pad and backlight
- OK button
Drive Bays
The following figure shows the drive bays of the ReadyNAS 316.
ReadyNAS OS 6 Desktop Storage Systems
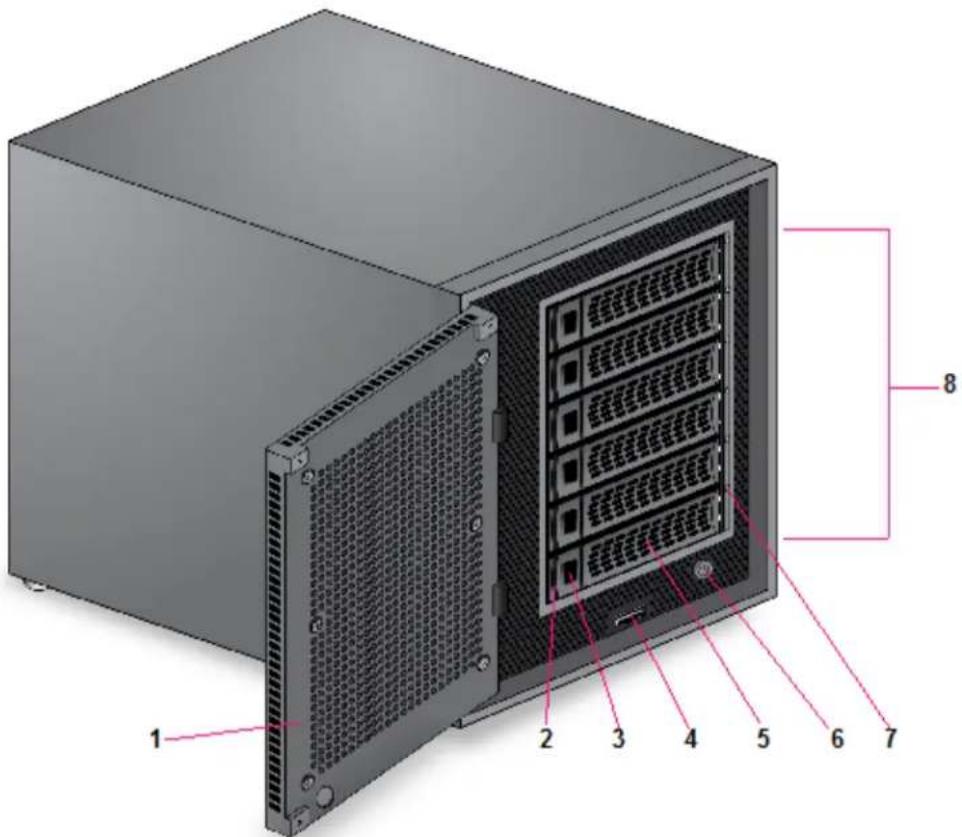
Figure 28. ReadyNAS 316 drive bays
- Drive bay door
- Disk tray release latch
- Recessed disk tray handle lock
- USB 2.0 port
- Disk tray handle
- Power button
- Disk LED
- Drive bays
Rear Panel
The following figure shows the rear panel of the ReadyNAS 316.
ReadyNAS OS 6 Desktop Storage Systems
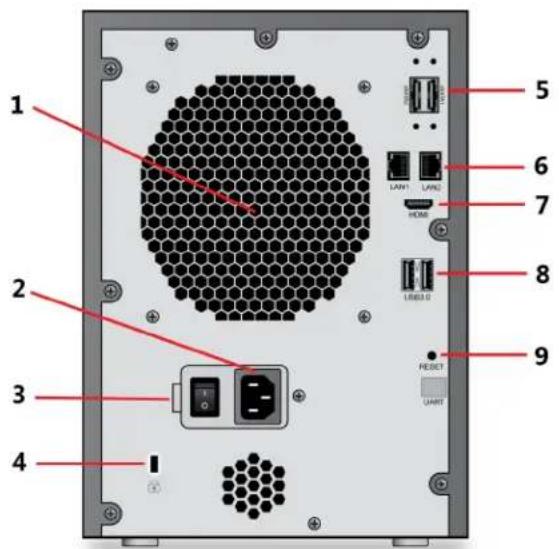
Figure 29. ReadyNAS 316 rear panel
- Exhaust fan
- Power cable socket
- Power switch
- Kensington lock
- eSATA ports
- LAN ports with LED status indicators
- HDMI port (currently not supported)
- USB 3.0 ports
- Reset button
Status Information
You can obtain information about the status of your storage system by reviewing the indicators listed in the following table.
Table 9. ReadyNAS 316 indicator descriptions
| DescriptionIndicator | |
| Disk LEDs | A disk LED next to each drive bay indicates the status of the disk inside. The disk LEDs indicate these states:Solid blue. Power is on and the disk is operating normally.Blinking blue.The disk is active.Solid red. The disk was removed, failed, or is resynchronizing. See the display screen for details.Off. No disk is present. |
| Rear panel Ethernet port LEDs | Two LED status indicators are built into this port, one green and one amber. They indicate port speed and activity as follows:Green on, amber off. 1000 Mbps connection speed, no activity.Green blinking, amber off. 1000 Mbps connection speed, activity.Green off, amber on. 10 Mbps or 100 Mbps connection speed, no activity.Green off, amber blinking. 10 Mbps or 100 Mbps connection speed, activity.Green off, amber off. No connection. |
| Status display screen | Displays messages about the status of your storage system. Note that the status display screen goes to sleep to prevent burn-in.To wake the status display screen, activate the proximity sensor, press the touch pad, press the OK button, or press the Power button once. If the storage system reports an abnormal operation or error, the status display screen stays on. |
Power On and Shut Down
This section describes how to power on and shut down your system. If you must shut down the system, use one of the preferred shutdown methods whenever possible.
Power On
When you connect the system to a power supply and the Power switch is in the On position or the system recovers from a power outage and the Power switch is in the On position, the following occurs:
- The system automatically powers on if you enabled the Wake on LAN (WoL) feature or scheduled the system to automatically power on or off.
- The system returns to its last state if the Wake on LAN (WoL) feature is disabled and you did not schedule the system to automatically power on or off:
ReadyNAS OS 6 Desktop Storage Systems
- If the system was powered on, the system automatically powers on again when the power supply is connected or power is restored.
- If the system was powered off, the system remains off when the power supply is connected or power is restored.
In this situation, press the Power button on the front panel of the system to power on the system.
Preferred Shutdown
You can gracefully shut down your system by using the Power button or the ReadyNAS local admin page.
For information about how to gracefully shut down your system using the ReadyNAS local admin page, see the ReadyNAS OS 6 Software Manual, which is available at netgear.com/support/product/ReadyNAS_OS_6.
To gracefully shut down your system using the Power button:
- If the status display screen is not lit, do the following:
a. Press the Power button on the front panel of the system. The status display screen wakes.
b. Press the Power button a second time.
Instructions for graceful shutdown display on the status display screen.
c. Press the Power button a third time. The system shuts down gracefully.
- If the status display screen is lit, do the following:
a. Press the Power button on the front panel of the system.
Instructions for graceful shutdown display on the status display screen.
b. Press the Power button again.
The system shuts down gracefully.
Forced Shutdown
Perform a forced shutdown only if the storage system is not responding.
To perform a forced shutdown:
- Press and hold the Power button on the front panel of the system for five seconds.
The LEDs blink quickly and simultaneously to warn that power will be cut off forcibly.
The system shuts down.
Boot Menu
Use the boot menu to restart or troubleshoot your ReadyNAS storage system. Your storage system has the following boot modes:
ReadyNAS OS 6 Desktop Storage Systems
• Normal. Initiates a normal boot process, just like booting using the Power button.
- Factory default. Initiates a short disk test that takes approximately 2 minutes. After the disk test, a 10-minute time-out period begins, during which all LEDs blink simultaneously.

WARNING:
The factory default reboot process resets the storage system to factory settings, erases all data, resets all defaults, and reformats the disk to X-RAID.
- If you want to cancel the factory default process, power off the storage system before the 10-minute time-out ends. The system powers down safely without causing any data loss.
- If you want to reset the system to factory default settings, do not power off your system. After the 10-minute time-out period, the factory default process begins.
Tip To start the factory default process immediately, press the OK button during the 10-minute time-out period.
- OS reinstall. Reinstalls the firmware from the internal flash to the disks. Use the OS reinstall boot mode when the system crashes and corrupts some configuration files. OS reinstall boot mode also resets some settings on your storage system, such as Internet protocol settings and the administrator password, to defaults.
- Tech support. Boots into a low-level diagnostic mode. Use the tech support boot mode only when a NETGEAR technical support representative instructs you to do so.
• Volume read only. Mounts a volume as read-only. Use this option when you are attempting to rescue data off a disk during a disaster recovery.
• Memory test. Performs a memory test. The pass or fail result is reported on the status display screen. - Test disk. Performs an offline full disk test. This process can take four hours or more, depending on the size of your disks. Any problems are reported in the system logs. For more information about viewing the system logs, see the ReadyNAS OS 6 Software Manual, which is available at netgear.com/support/product/ReadyNAS_OS_6.
To access the boot menu:
- Power off your storage system.
- Using a straightened paper clip, press and hold the Reset button.
-
Press the Power button on the front panel of the system.
The system powers on. -
Continue to press the Reset button until the status display screen shows a boot menu message.
-
Use the arrows on the touch pad to scroll through boot mode options.
The status display screen shows the current boot mode option.
- When the status display screen shows the boot mode that you need, press the OK button to confirm your boot menu selection.
The system boots in the selected boot mode.
NETGEAR ReadyNAS 316
This chapter provides an overview of the physical features of the ReadyNAS 422 and includes the following sections:
• Front and Side Panels on page 84
- Drive Bays on page 85
- Rear Panel on page 86
• Status Information on page 87
• Power On and Shut Down on page 87
- Boot Menu on page 89
Front and Side Panels
The following figure shows the front and side panels of the ReadyNAS 422.
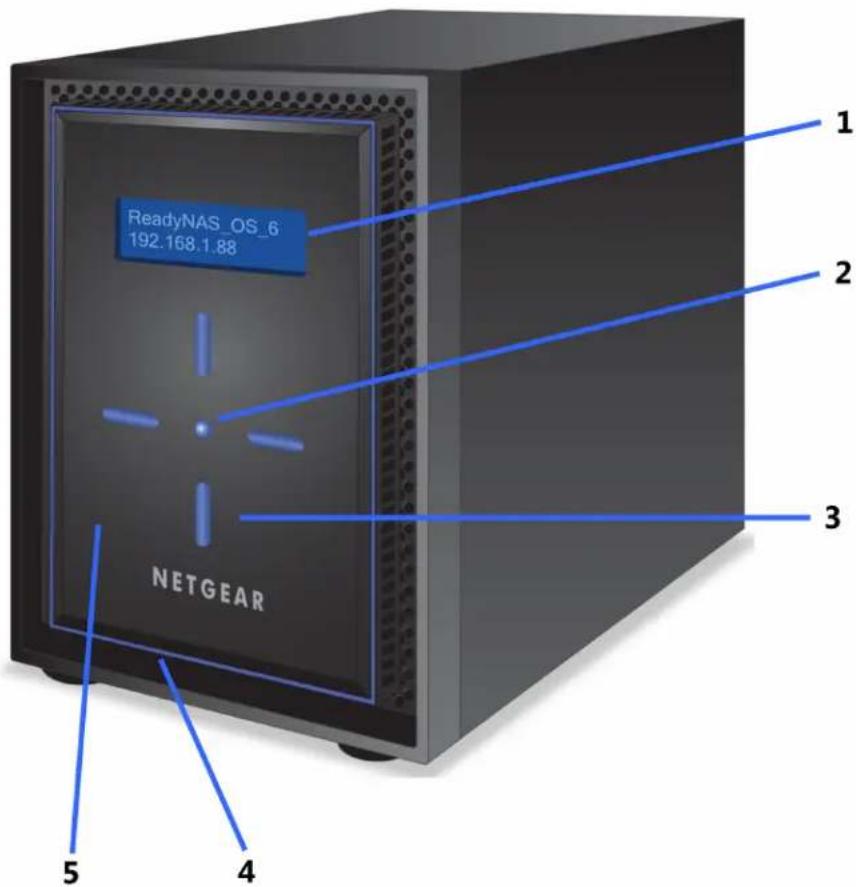
Figure 30. ReadyNAS 422 front and side panels
- Status and menu display screen
- OK button
- Four buttons (Up, Down, Left, Right) and backlights
- USB 3.0 port
- Drive bay door
Drive Bays
The following figure shows the drive bays of ReadyNAS 422.
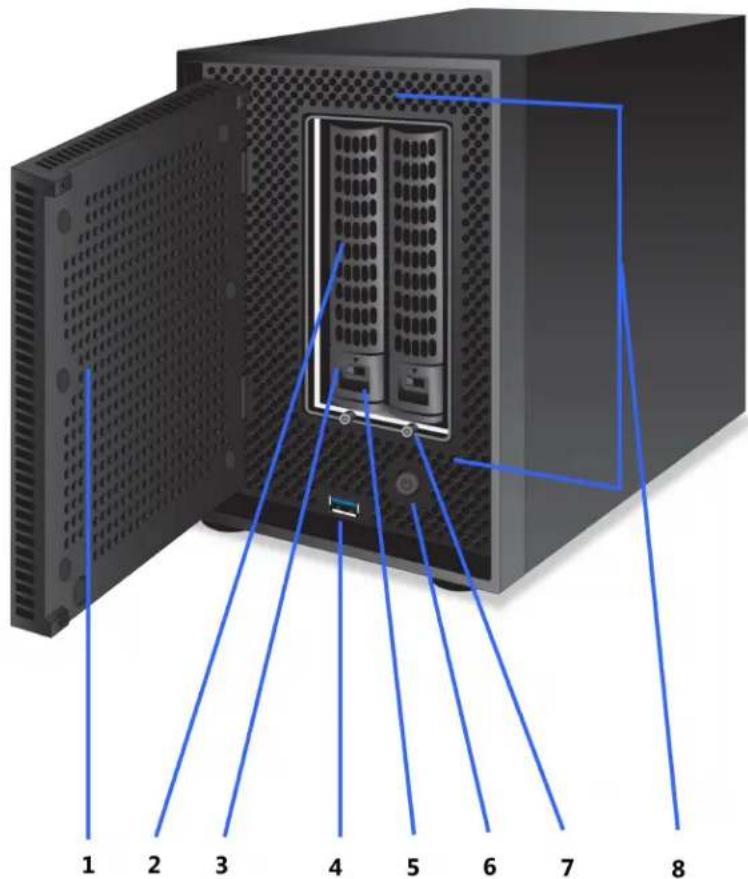
Figure 31. ReadyNAS 422 drive bays
- Drive bay door
- Disk tray handle
- Disk tray release latch
- USB 3.0 port
- Recessed disk tray handle lock
- Power button
- Disk LED
- Drive bays
Rear Panel
The following figure shows the rear panel of the ReadyNAS 422.
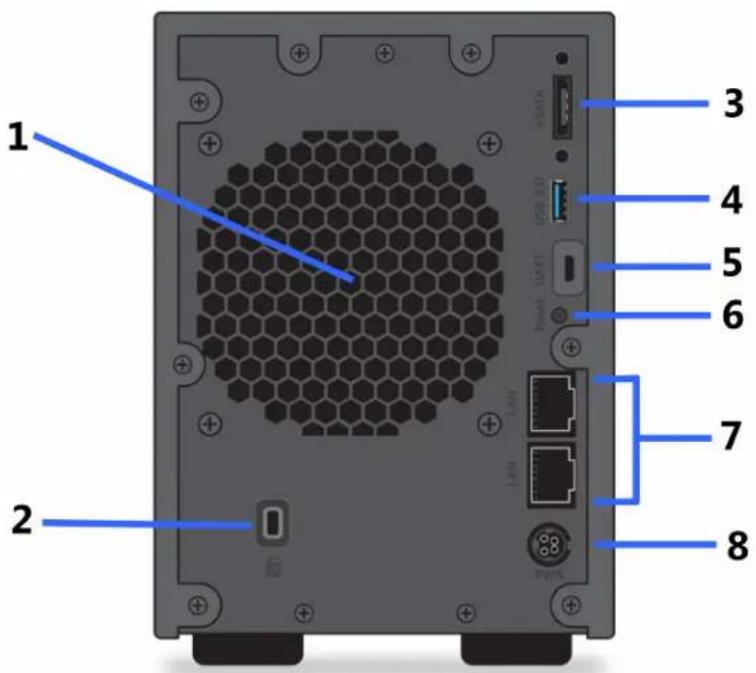
Figure 32. Rear panel ReadyNAS 422
- Exhaust fan
- Kensington lock
- eSATA port
- USB 3.0 port
- Micro USB console connector (marked as UART)
- Reset button
7.1 GbE LAN ports with LED status indicators - Power cable socket
Status Information
You can obtain information about the status of your storage system by reviewing the indicators listed in the following table.
Table 10. Indicator descriptions ReadyNAS 422
| DescriptionIndicator | |
| Front panel status display screen | Displays messages about the status of your storage system. Note that the status display screen goes to sleep to prevent burn-in.To wake the status display screen, press any button on the front panel. If the storage system reports an abnormal operation or error, the status display screen stays on. |
| Drive bay disk LEDs | A disk LED next to each drive bay indicates the status of the disk inside.The disk LEDs indicate these states:Solid blue. Power is on and the disk is operating normally.Blinking blue.The disk is active.Solid red. The disk was removed, failed, or is resynchronizing. See the display screen for details.Off. No disk is present. |
| Rear panel 1G Ethernet LAN port LEDs | Two LED status indicators are built into each 1G Ethernet port. One LED is a bicolor LED that can light solid amber or solid green and indicates the port speed.The other LED is green and indicates the link (solid green) and activity (blinking green).These LEDs indicate port speed and activity as follows:Bicolor LED green, green LED solid. 1 Gbps connection speed, no activity.Bicolor LED green, green LED blinking. 1 Gbps connection speed, activity.Bicolor LED amber, green LED solid. 100 Mbps connection speed, no activity.Bicolor LED amber, green LED blinking. 100 Mbps connection speed, activity.Bicolor LED off, green LED off. Either no connection or 10 Mbps connection without activity.Bicolor LED off, green LED blinking. 10 Mbps connection, activity. |
Power On and Shut Down
This section describes how to power on and shut down your system. If you must shut down the system, use one of the preferred shutdown methods whenever possible.
ReadyNAS OS 6 Desktop Storage Systems
Power On
When you connect the system to a power supply or the system recovers from a power outage, the system returns to its last state:
- If the system was powered on, the system automatically powers on again when the power supply is connected or power is restored.
- If the system was powered off, the system remains off when the power supply is connected or power is restored.
In this situation, press the Power button on the front panel of the system to power on the system.
Preferred Shutdown
You can gracefully shut down your system by using the Power button or the ReadyNAS local admin page.
For information about how to gracefully shut down your system using the ReadyNAS local admin page, see the ReadyNAS OS 6 Software Manual, which is available at netgear.com/support/product/ReadyNAS_OS_6.
To gracefully shut down your system using the Power button:
- If the status display screen is not lit, do the following:
a. Press the Power button on the front panel of the system. The status display screen wakes.
b. Press the Power button a second time.
Instructions for graceful shutdown display on the status display screen.
c. Press the Power button a third time. The system shuts down gracefully.
- If the status display screen is lit, do the following:
a. Press the Power button on the front panel of the system.
Instructions for graceful shutdown display on the status display screen.
b. Press the Power button again.
The system shuts down gracefully.
Forced Shutdown
Perform a forced shutdown only if the storage system is not responding.
To perform a forced shutdown:
Press and hold the Power button on the front panel of the system for five seconds. The LEDs blink quickly and simultaneously to warn that power will be cut off forcibly.
The system shuts down.
ReadyNAS OS 6 Desktop Storage Systems
Boot Menu
Use the boot menu to restart or troubleshoot your ReadyNAS storage system. Your storage system has the following boot modes:
• Normal. Initiates a normal boot process, just like booting using the Power button.
- Factory default. Initiates a short disk test that takes approximately 2 minutes. After the disk test, a 10-minute time-out period begins, during which all LEDs blink simultaneously.

WARNING:
The factory default reboot process resets the storage system to factory settings, erases all data, resets all defaults, and reformats the disk to X-RAID.
- If you want to cancel the factory default process, power off the storage system before the 10-minute time-out ends. The system powers down safely without causing any data loss.
- If you want to reset the system to factory default settings, do not power off your system. After the 10-minute time-out period, the factory default process begins.
Tip To start the factory default process immediately, press the OK button during the 10-minute time-out period.
- OS reinstall. Reinstalls the firmware from the internal flash to the disks. Use the OS reinstall boot mode when the system crashes and corrupts some configuration files. OS reinstall boot mode also resets some settings on your storage system, such as IP settings and the administrator password, to defaults.
- Tech support. Boots into a low-level diagnostic mode. Use the tech support boot mode only when instructed to do so by a NETGEAR technical support representative.
• Volume read only. Mounts a volume as read-only. Use this option when you are attempting to rescue data off a disk during a disaster recovery.
• Memory test. Performs a memory test. The pass or fail result is reported on the status display screen. - Test disk. Performs an offline full disk test. This process can take four hours or more, depending on the size of your disks. Any problems are reported in the system logs. For more information about viewing the system logs, see the ReadyNAS OS 6 Software Manual, which is available at netgear.com/support/product/ReadyNAS_OS_6.
To access the boot menu:
- Power off your storage system.
- Using a straightened paper clip, press and hold the Reset button.
- Press the Power button on the front panel of the system.
The system powers on. - Continue to press the Reset button until the status display screen shows a boot menu message.
- Use the Up and Down buttons on the front panel to scroll through boot mode options.
ReadyNAS OS 6 Desktop Storage Systems
The status display screen shows the current boot mode option.
- When the status display screen shows the boot mode that you need, press the OK button to confirm your boot menu selection.
The system boots in the selected boot mode.
This chapter provides an overview of the physical features of the ReadyNAS 424 and includes the following sections:
• Front and Side Panels on page 92
- Drive Bays on page 93
- Rear Panel on page 94
• Status Information on page 95
• Power On and Shut Down on page 95
- Boot Menu on page 97
Front and Side Panels
The following figure shows the front and side panels of the ReadyNAS 424.
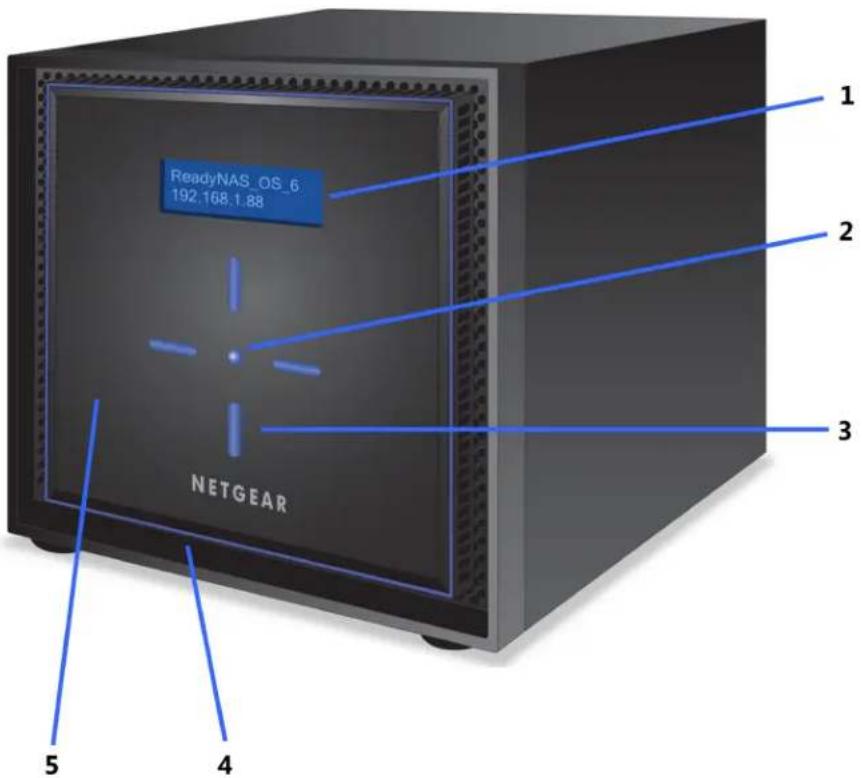
Figure 33. ReadyNAS 424 front and side panels
- Status and menu display screen
- OK button
- Four buttons (Up, Down, Left, Right) and backlights
- USB 3.0 port
- Drive bay door
Drive Bays
The following figure shows the drive bays of ReadyNAS 424.
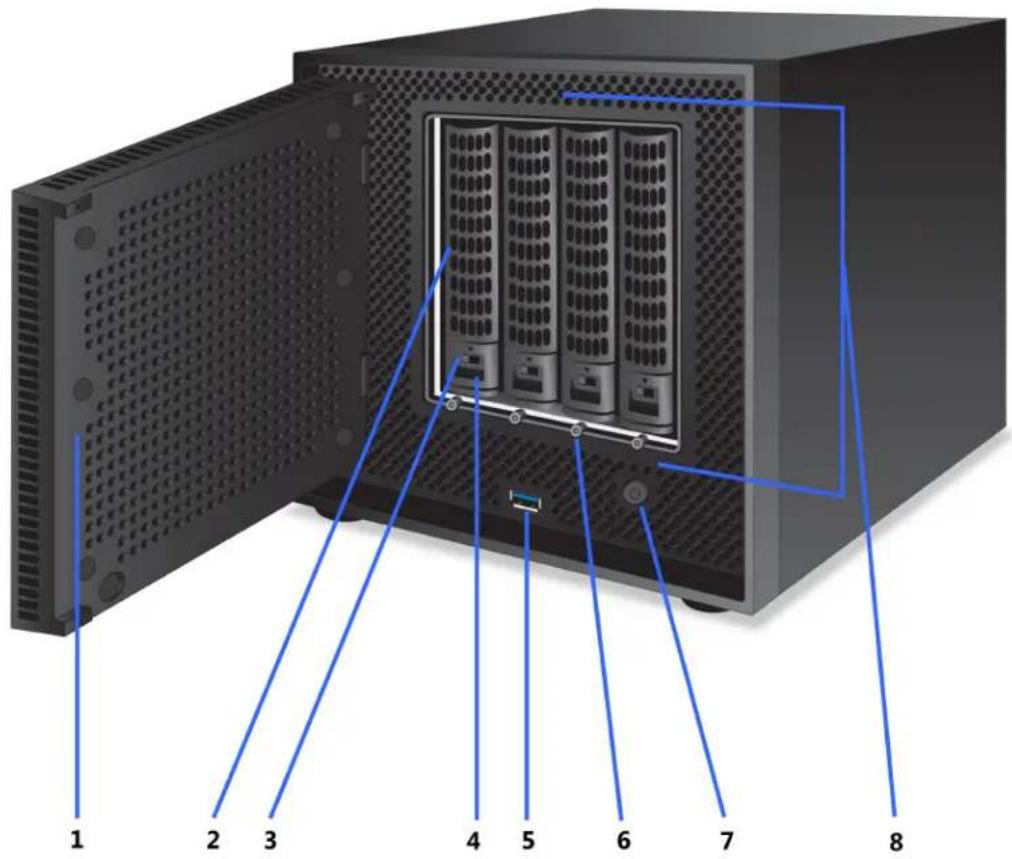
Figure 34. ReadyNAS 424 drive bays
- Drive bay door
- Disk tray handle
- Disk tray release latch
- Recessed disk tray handle lock
- USB 3.0 port
- Disk LED
- Power button
- Drive bays
Rear Panel
The following figure shows the rear panel of the ReadyNAS 424.
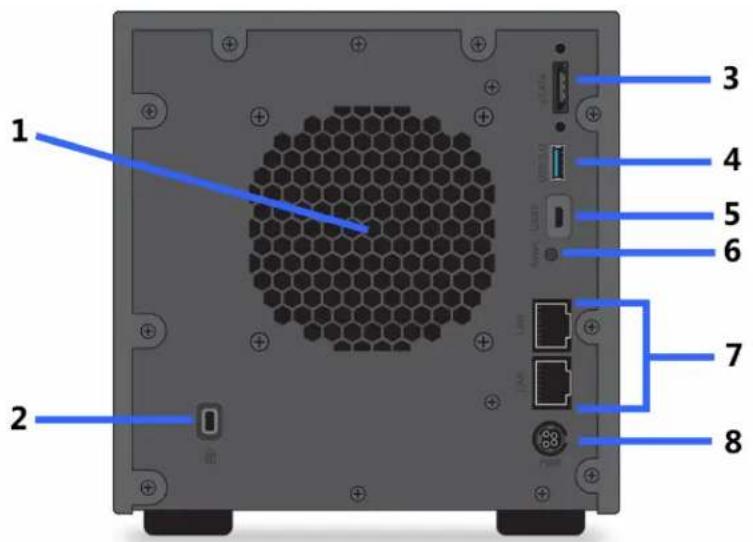
Figure 35. Rear panel ReadyNAS 424
- Exhaust fan
- Kensington lock
- eSATA port
- USB 3.0 port
- Micro USB console connector (marked as UART)
- Reset button
- 1 GbE LAN ports with LED status indicators
- Power cable socket
Status Information
You can obtain information about the status of your storage system by reviewing the indicators listed in the following table.
Table 11. Indicator descriptions ReadyNAS 424
| DescriptionIndicator | |
| Front panel status display screen | Displays messages about the status of your storage system. Note that the status display screen goes to sleep to prevent burn-in.To wake the status display screen, press any button on the front panel. If the storage system reports an abnormal operation or error, the status display screen stays on. |
| Drive bay disk LEDs | A disk LED next to each drive bay indicates the status of the disk inside.The disk LEDs indicate these states:Solid blue. Power is on and the disk is operating normally.Blinking blue.The disk is active.Solid red. The disk was removed, failed, or is resynchronizing. See the display screen for details.Off. No disk is present. |
| Rear panel 1G Ethernet LAN port LEDs | Two LED status indicators are built into each 1G Ethernet port. One LED is a bicolor LED that can light solid amber or solid green and indicates the port speed.The other LED is green and indicates the link (solid green) and activity (blinking green).These LEDs indicate port speed and activity as follows:Bicolor LED green, green LED solid. 1 Gbps connection speed, no activity.Bicolor LED green, green LED blinking. 1 Gbps connection speed, activity.Bicolor LED amber, green LED solid. 100 Mbps connection speed, no activity.Bicolor LED amber, green LED blinking. 100 Mbps connection speed, activity.Bicolor LED off, green LED off. Either no connection or 10 Mbps connection without activity.Bicolor LED off, green LED blinking. 10 Mbps connection, activity. |
Power On and Shut Down
This section describes how to power on and shut down your system. If you must shut down the system, use one of the preferred shutdown methods whenever possible.
ReadyNAS OS 6 Desktop Storage Systems
Power On
When you connect the system to a power supply or the system recovers from a power outage, the system returns to its last state:
- If the system was powered on, the system automatically powers on again when the power supply is connected or power is restored.
- If the system was powered off, the system remains off when the power supply is connected or power is restored.
In this situation, press the Power button on the front panel of the system to power on the system.
Preferred Shutdown
You can gracefully shut down your system by using the Power button or the ReadyNAS local admin page.
For information about how to gracefully shut down your system using the ReadyNAS local admin page, see the ReadyNAS OS 6 Software Manual, which is available at netgear.com/support/product/ReadyNAS_OS_6.
To gracefully shut down your system using the Power button:
- If the status display screen is not lit, do the following:
a. Press the Power button on the front panel of the system. The status display screen wakes.
b. Press the Power button a second time.
Instructions for graceful shutdown display on the status display screen.
c. Press the Power button a third time. The system shuts down gracefully.
- If the status display screen is lit, do the following:
a. Press the Power button on the front panel of the system.
Instructions for graceful shutdown display on the status display screen.
b. Press the Power button again.
The system shuts down gracefully.
Forced Shutdown
Perform a forced shutdown only if the storage system is not responding.
To perform a forced shutdown:
Press and hold the Power button on the front panel of the system for five seconds. The LEDs blink quickly and simultaneously to warn that power will be cut off forcibly.
The system shuts down.
ReadyNAS OS 6 Desktop Storage Systems
Boot Menu
Use the boot menu to restart or troubleshoot your ReadyNAS storage system. Your storage system has the following boot modes:
• Normal. Initiates a normal boot process, just like booting using the Power button.
- Factory default. Initiates a short disk test that takes approximately 2 minutes. After the disk test, a 10-minute time-out period begins, during which all LEDs blink simultaneously.

WARNING:
The factory default reboot process resets the storage system to factory settings, erases all data, resets all defaults, and reformats the disk to X-RAID.
- If you want to cancel the factory default process, power off the storage system before the 10-minute time-out ends. The system powers down safely without causing any data loss.
- If you want to reset the system to factory default settings, do not power off your system. After the 10-minute time-out period, the factory default process begins.
Tip To start the factory default process immediately, press the OK button during the 10-minute time-out period.
- OS reinstall. Reinstalls the firmware from the internal flash to the disks. Use the OS reinstall boot mode when the system crashes and corrupts some configuration files. OS reinstall boot mode also resets some settings on your storage system, such as IP settings and the administrator password, to defaults.
- Tech support. Boots into a low-level diagnostic mode. Use the tech support boot mode only when instructed to do so by a NETGEAR technical support representative.
• Volume read only. Mounts a volume as read-only. Use this option when you are attempting to rescue data off a disk during a disaster recovery.
• Memory test. Performs a memory test. The pass or fail result is reported on the status display screen. - Test disk. Performs an offline full disk test. This process can take four hours or more, depending on the size of your disks. Any problems are reported in the system logs. For more information about viewing the system logs, see the ReadyNAS OS 6 Software Manual, which is available at netgear.com/support/product/ReadyNAS_OS_6.
To access the boot menu:
- Power off your storage system.
- Using a straightened paper clip, press and hold the Reset button.
- Press the Power button on the front panel of the system.
The system powers on. - Continue to press the Reset button until the status display screen shows a boot menu message.
- Use the Up and Down buttons on the front panel to scroll through boot mode options.
ReadyNAS OS 6 Desktop Storage Systems
The status display screen shows the current boot mode option.
- When the status display screen shows the boot mode that you need, press the OK button to confirm your boot menu selection.
The system boots in the selected boot mode.
This chapter provides an overview of the physical features of the ReadyNAS 426 and includes the following sections:
• Front and Side Panels on page 100
- Drive Bays on page 101
- Rear Panel on page 102
• Status Information on page 103
• Power On and Shut Down on page 103
- Boot Menu on page 105
Front and Side Panels
The following figure shows the front and side panels of the ReadyNAS 426.
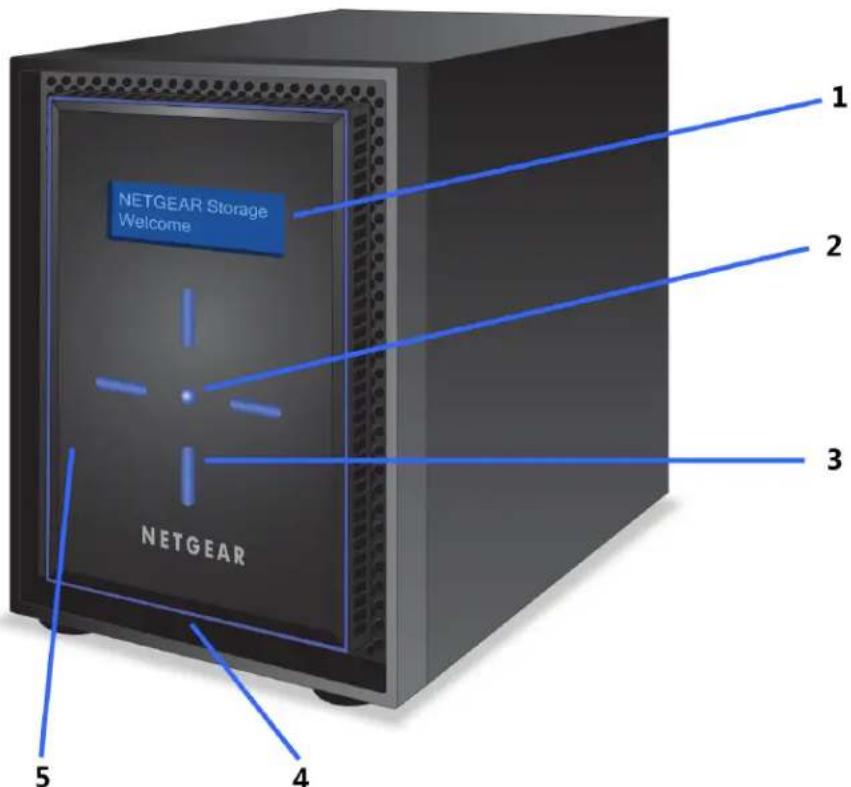
Figure 36. ReadyNAS 426 front and side panels
- Status and menu display screen
- OK button
- Four buttons (Up, Down, Left, Right) and backlights
- USB 3.0 port
- Drive bay door
Drive Bays
The following figure shows the drive bays of ReadyNAS 426.
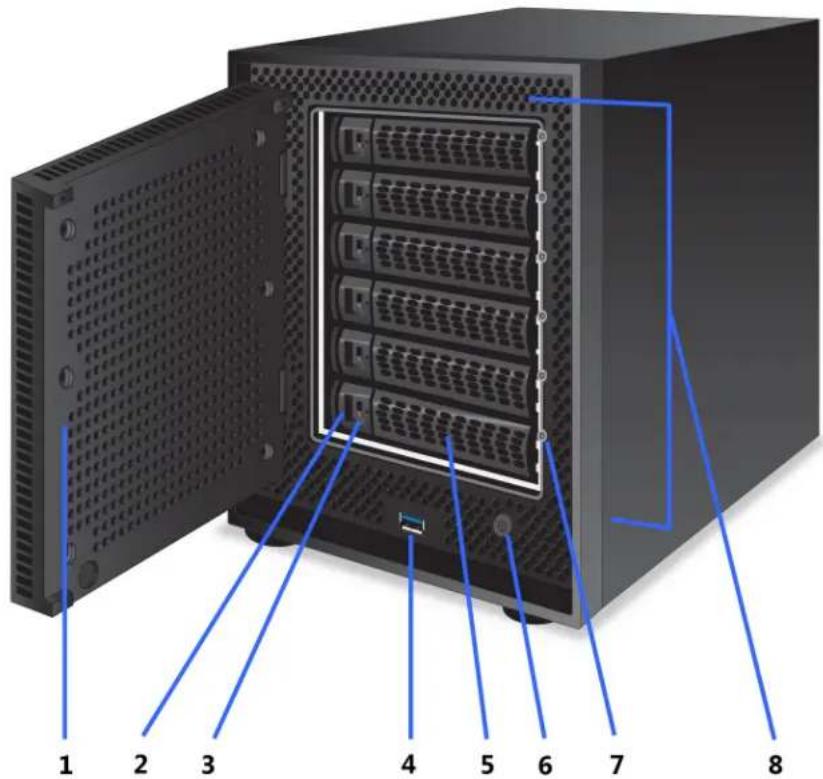
Figure 37. ReadyNAS 426 drive bays
- Drive bay door
- Disk tray release latch
- Recessed disk tray handle lock
- USB 3.0 port
- Disk tray handle
- Power button
- Disk LED
- Drive bays
Rear Panel
The following figure shows the rear panel of the ReadyNAS 426.
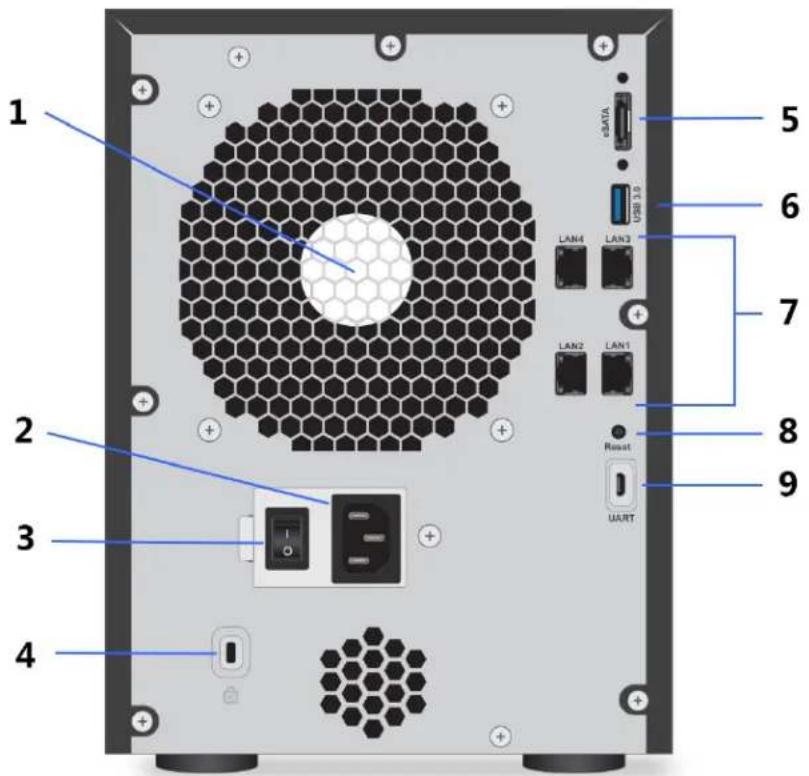
Figure 38. ReadyNAS 426 rear panel
- Exhaust fan
- Power cable socket
- Power switch
- Kensington lock
- eSATA port
- USB 3.0 port
- Four 1 GbE LAN ports with LED status indicators
- Reset button
- Micro USB console connector (marked as UART)
Status Information
You can obtain information about the status of your storage system by reviewing the indicators listed in the following table.
Table 12. Indicator descriptions ReadyNAS 426
| DescriptionIndicator | |
| Front panel status display screen | Displays messages about the status of your storage system. Note that the status display screen goes to sleep to prevent burn-in.To wake the status display screen, press any button on the front panel. If the storage system reports an abnormal operation or error, the status display screen stays on. |
| Drive bay disk LEDs | A disk LED next to each drive bay indicates the status of the disk inside.The disk LEDs indicate these states:Solid blue. Power is on and the disk is operating normally.Blinking blue.The disk is active.Solid red. The disk was removed, failed, or is resynchronizing. See the display screen for details.Off. No disk is present. |
| Rear panel 1G Ethernet LAN port LEDs | Two LED status indicators are built into each 1G Ethernet port. One LED is a bicolor LED that can light solid amber or solid green and indicates the port speed.The other LED is green and indicates the link (solid green) and activity (blinking green).These LEDs indicate port speed and activity as follows:Bicolor LED green, green LED solid. 1 Gbps connection speed, no activity.Bicolor LED green, green LED blinking. 1 Gbps connection speed, activity.Bicolor LED amber, green LED solid. 100 Mbps connection speed, no activity.Bicolor LED off, green LED off. Either no connection or 10 Mbps connection without activity.Bicolor LED off, green LED blinking. 10 Mbps connection, activity. |
Power On and Shut Down
This section describes how to power on and shut down your system. If you must shut down the system, use one of the preferred shutdown methods whenever possible.
ReadyNAS OS 6 Desktop Storage Systems
Power On
When you connect the system to a power supply and the Power switch is in the On position or the system recovers from a power outage and the Power switch is in the On position, the following occurs:
- The system automatically powers on if you enabled the Wake on LAN (WoL) feature or scheduled the system to automatically power on or off.
- The system returns to its last state if the Wake on LAN (WoL) feature is disabled and you did not schedule the system to automatically power on or off:
- If the system was powered on, the system automatically powers on again when the power supply is connected or power is restored.
- If the system was powered off, the system remains off when the power supply is connected or power is restored.
In this situation, press the Power button on the front panel of the system to power on the system.
Preferred Shutdown
You can gracefully shut down your system by using the Power button or the ReadyNAS local admin page.
For information about how to gracefully shut down your system using the ReadyNAS local admin page, see the ReadyNAS OS 6 Software Manual, which is available at netgear.com/support/product/ReadyNAS_OS_6.
To gracefully shut down your system using the Power button:
- If the status display screen is not lit, do the following:
a. Press the Power button on the front panel of the system. The status display screen wakes.
b. Press the Power button a second time.
Instructions for graceful shutdown display on the status display screen.
c. Press the Power button a third time. The system shuts down gracefully.
- If the status display screen is lit, do the following:
a. Press the Power button on the front panel of the system.
Instructions for graceful shutdown display on the status display screen.
b. Press the Power button again.
The system shuts down gracefully.
ReadyNAS OS 6 Desktop Storage Systems
Forced Shutdown
Perform a forced shutdown only if the storage system is not responding.
To perform a forced shutdown:
Press and hold the Power button on the front panel of the system for five seconds. The LEDs blink quickly and simultaneously to warn that power will be cut off forcibly.
The system shuts down.
Boot Menu
Use the boot menu to restart or troubleshoot your ReadyNAS storage system. Your storage system has the following boot modes:
• Normal. Initiates a normal boot process, just like booting using the Power button.
- Factory default. Initiates a short disk test that takes approximately 2 minutes. After the disk test, a 10-minute time-out period begins, during which all LEDs blink simultaneously.

WARNING:
The factory default reboot process resets the storage system to factory settings, erases all data, resets all defaults, and reformats the disk to X-RAID.
- If you want to cancel the factory default process, power off the storage system before the 10-minute time-out ends. The system powers down safely without causing any data loss.
- If you want to reset the system to factory default settings, do not power off your system. After the 10-minute time-out period, the factory default process begins.
Tip To start the factory default process immediately, press the OK button during the 10-minute time-out period.
- OS reinstall. Reinstalls the firmware from the internal flash to the disks. Use the OS reinstall boot mode when the system crashes and corrupts some configuration files. OS reinstall boot mode also resets some settings on your storage system, such as IP settings and the administrator password, to defaults.
- Tech support. Boots into a low-level diagnostic mode. Use the tech support boot mode only when instructed to do so by a NETGEAR technical support representative.
• Volume read only. Mounts a volume as read-only. Use this option when you are attempting to rescue data off a disk during a disaster recovery.
• Memory test. Performs a memory test. The pass or fail result is reported on the status display screen. - Test disk. Performs an offline full disk test. This process can take four hours or more, depending on the size of your disks. Any problems are reported in the system logs. For more information about viewing the system logs, see the ReadyNAS OS 6 Software Manual, which is available at netgear.com/support/product/ReadyNAS_OS_6.
ReadyNAS OS 6 Desktop Storage Systems
To access the boot menu:
- Power off your storage system.
- Using a straightened paper clip, press and hold the Reset button.
- Press the Power button on the front panel of the system.
The system powers on. - Continue to press the Reset button until the status display screen shows a boot menu message.
- Use the Up and Down buttons on the front panel to scroll through boot mode options.
The status display screen shows the current boot mode option. - When the status display screen shows the boot mode that you need, press the OK button to confirm your boot menu selection.
The system boots in the selected boot mode.
This chapter provides an overview of the physical features of the ReadyNAS 428 and includes the following sections:
• Front and Side Panels on page 108
- Drive Bays on page 109
- Rear Panel on page 110
• Status Information on page 111
• Power On and Shut Down on page 111
- Boot Menu on page 113
Front and Side Panels
The following figure shows the front and side panels of the ReadyNAS 428.
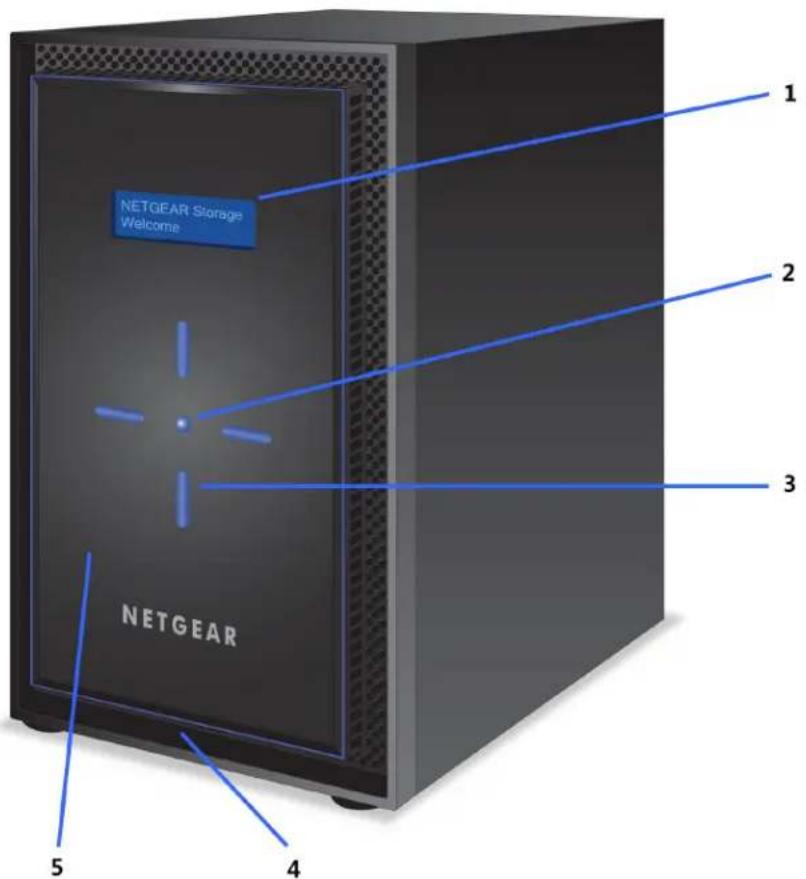
Figure 39. ReadyNAS 428 front and side panels
- Status and menu display screen
- OK button
- Four buttons (Up, Down, Left, Right) and backlights
- USB 3.0 port
- Drive bay door
Drive Bays
The following figure shows the drive bays of ReadyNAS 428.
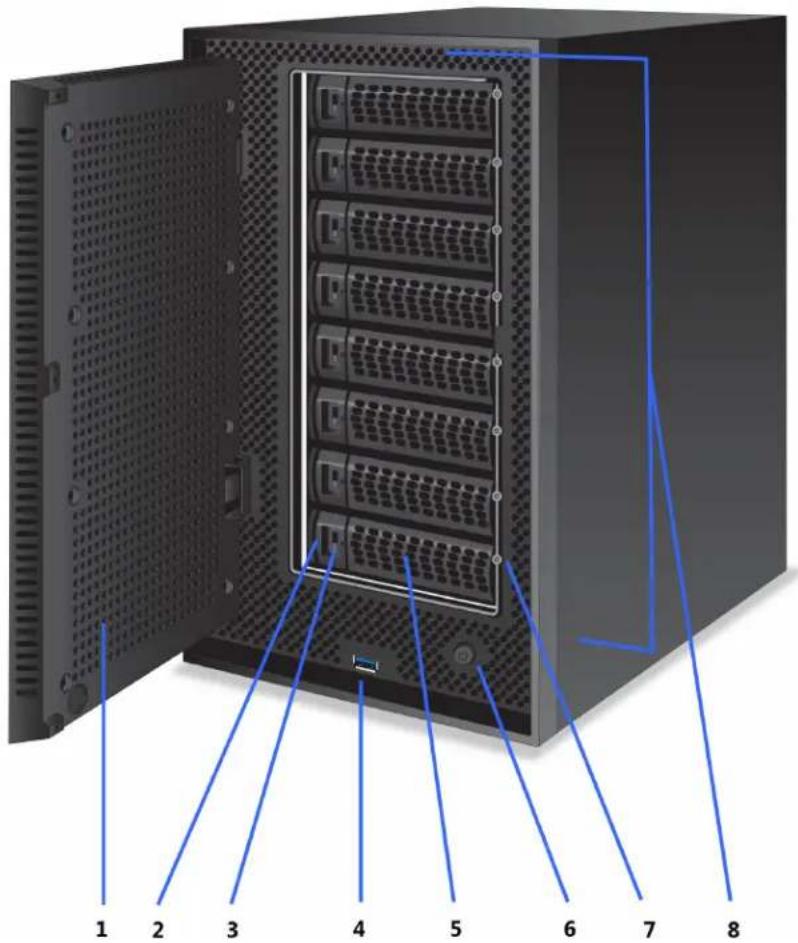
Figure 40. ReadyNAS 428 drive bays
- Drive bay door
- Disk tray release latch
- Recessed disk tray handle lock
- USB 3.0 port
- Disk tray handle
- Power button
- Disk LED
- Drive bays
Rear Panel
The following figure shows the rear panel of the ReadyNAS 428.
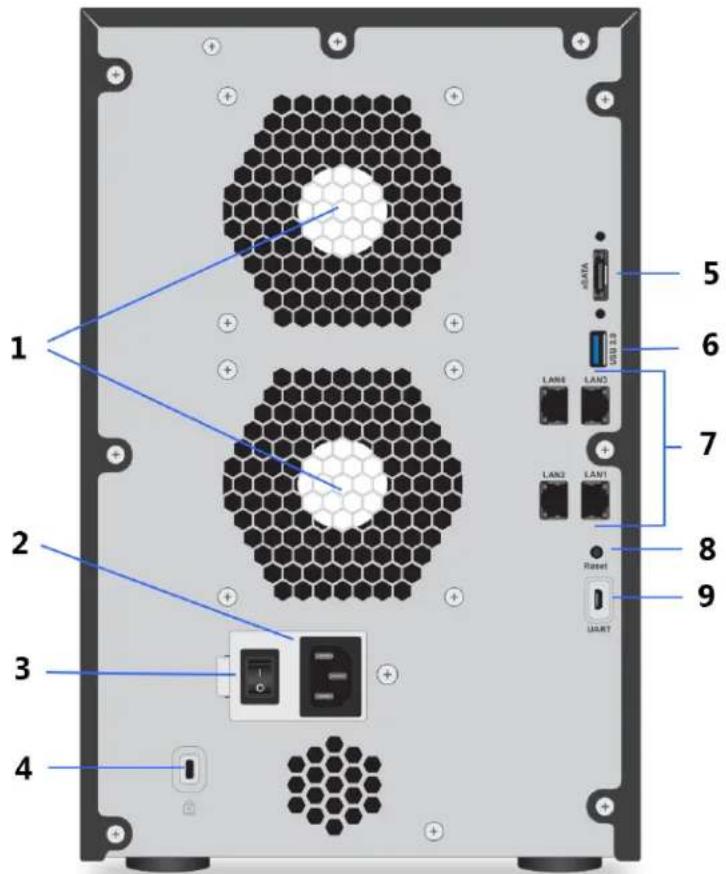
Figure 41. ReadyNAS 428 rear panel
- Two exhaust fans
- Power cable socket
- Power switch
- Kensington lock
- eSATA port
- USB 3.0 port
- Four 1 GbE LAN ports with LED status indicators
- Reset button
- Micro USB console connector (marked as UART)
Status Information
You can obtain information about the status of your storage system by reviewing the indicators listed in the following table.
Table 13. Indicator descriptions ReadyNAS 428
| DescriptionIndicator | |
| Front panel status display screen | Displays messages about the status of your storage system. Note that the status display screen goes to sleep to prevent burn-in.To wake the status display screen, press any button on the front panel. If the storage system reports an abnormal operation or error, the status display screen stays on. |
| Drive bay disk LEDs | A disk LED next to each drive bay indicates the status of the disk inside.The disk LEDs indicate these states:Solid blue. Power is on and the disk is operating normally.Blinking blue.The disk is active.Solid red. The disk was removed, failed, or is resynchronizing. See the display screen for details.Off. No disk is present. |
| Rear panel 1G Ethernet LAN port LEDs | Two LED status indicators are built into each 1G Ethernet port. One LED is a bicolor LED that can light solid amber or solid green and indicates the port speed.The other LED is green and indicates the link (solid green) and activity (blinking green).These LEDs indicate port speed and activity as follows:Bicolor LED green, green LED solid. 1 Gbps connection speed, no activity.Bicolor LED green, green LED blinking. 1 Gbps connection speed, activity.Bicolor LED amber, green LED solid. 100 Mbps connection speed, no activity.Bicolor LED off, green LED off. Either no connection or 10 Mbps connection without activity.Bicolor LED off, green LED blinking. 10 Mbps connection, activity. |
Power On and Shut Down
This section describes how to power on and shut down your system. If you must shut down the system, use one of the preferred shutdown methods whenever possible.
ReadyNAS OS 6 Desktop Storage Systems
Power On
When you connect the system to a power supply and the Power switch is in the On position or the system recovers from a power outage and the Power switch is in the On position, the system returns to its last state:
- If the system was powered on, the system automatically powers on again when the power supply is connected or power is restored.
- If the system was powered off, the system remains off when the power supply is connected or power is restored.
In this situation, press the Power button on the front panel of the system to power on the system.
Preferred Shutdown
You can gracefully shut down your system by using the Power button or the ReadyNAS local admin page.
For information about how to gracefully shut down your system using the ReadyNAS local admin page, see the ReadyNAS OS 6 Software Manual, which is available at netgear.com/support/product/ReadyNAS_OS_6.
To gracefully shut down your system using the Power button:
- If the status display screen is not lit, do the following:
a. Press the Power button on the front panel of the system. The status display screen wakes.
b. Press the Power button a second time.
Instructions for graceful shutdown display on the status display screen.
c. Press the Power button a third time. The system shuts down gracefully.
- If the status display screen is lit, do the following:
a. Press the Power button on the front panel of the system.
Instructions for graceful shutdown display on the status display screen.
b. Press the Power button again.
The system shuts down gracefully.
Forced Shutdown
Perform a forced shutdown only if the storage system is not responding.
To perform a forced shutdown:
Press and hold the Power button on the front panel of the system for five seconds. The LEDs blink quickly and simultaneously to warn that power will be cut off forcibly.
The system shuts down.
ReadyNAS OS 6 Desktop Storage Systems
Boot Menu
Use the boot menu to restart or troubleshoot your ReadyNAS storage system. Your storage system has the following boot modes:
• Normal. Initiates a normal boot process, just like booting using the Power button.
- Factory default. Initiates a short disk test that takes approximately 2 minutes. After the disk test, a 10-minute time-out period begins, during which all LEDs blink simultaneously.

WARNING:
The factory default reboot process resets the storage system to factory settings, erases all data, resets all defaults, and reformats the disk to X-RAID.
- If you want to cancel the factory default process, power off the storage system before the 10-minute time-out ends. The system powers down safely without causing any data loss.
- If you want to reset the system to factory default settings, do not power off your system. After the 10-minute time-out period, the factory default process begins.
Tip To start the factory default process immediately, press the OK button during the 10-minute time-out period.
- OS reinstall. Reinstalls the firmware from the internal flash to the disks. Use the OS reinstall boot mode when the system crashes and corrupts some configuration files. OS reinstall boot mode also resets some settings on your storage system, such as IP settings and the administrator password, to defaults.
- Tech support. Boots into a low-level diagnostic mode. Use the tech support boot mode only when instructed to do so by a NETGEAR technical support representative.
• Volume read only. Mounts a volume as read-only. Use this option when you are attempting to rescue data off a disk during a disaster recovery.
• Memory test. Performs a memory test. The pass or fail result is reported on the status display screen. - Test disk. Performs an offline full disk test. This process can take four hours or more, depending on the size of your disks. Any problems are reported in the system logs. For more information about viewing the system logs, see the ReadyNAS OS 6 Software Manual, which is available at netgear.com/support/product/ReadyNAS_OS_6.
To access the boot menu:
- Power off your storage system.
- Using a straightened paper clip, press and hold the Reset button.
- Press the Power button on the front panel of the system. The system powers on.
- Continue to press the Reset button until the status display screen shows a boot menu message.
- Use the Up and Down buttons on the front panel to scroll through boot mode options.
ReadyNAS OS 6 Desktop Storage Systems
The status display screen shows the current boot mode option.
- When the status display screen shows the boot mode that you need, press the OK button to confirm your boot menu selection.
The system boots in the selected boot mode.
This chapter provides an overview of the physical features of the ReadyNAS 516 and includes the following sections:
• Front and Side Panels on page 116
- Drive Bays on page 116
- Rear Panel on page 117
• Status Information on page 118
• Power On and Shut Down on page 119
- Boot Menu on page 120
Front and Side Panels
The following figure shows the front and side panels of the ReadyNAS 516.
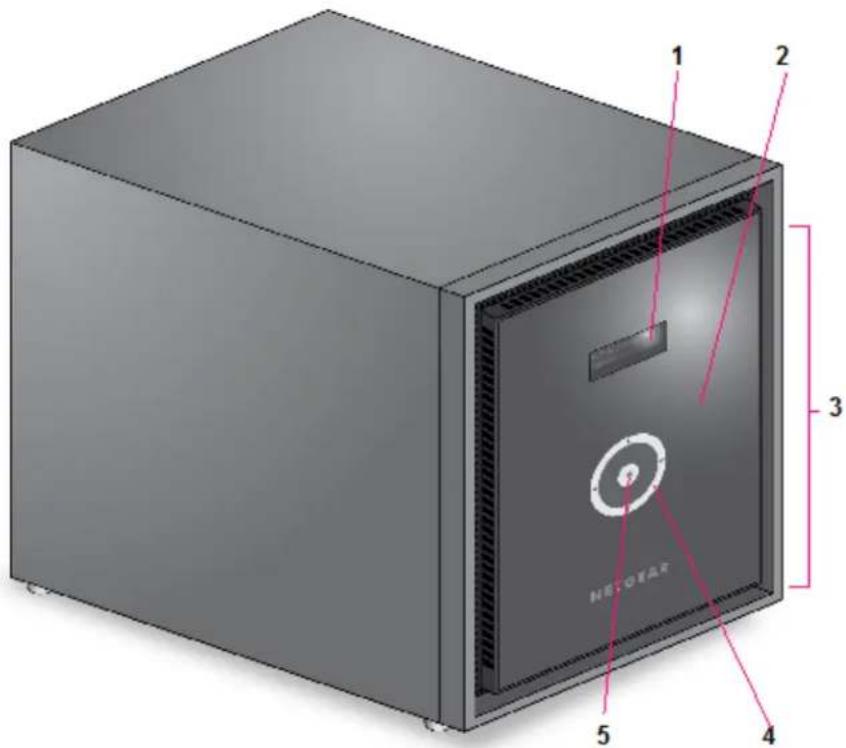
Figure 42. ReadyNAS 516 front and side panels
- Status and menu display screen
- Infrared remote receiver
- Drive bay door
- Touch pad and backlight
- OK button
Drive Bays
The following figure shows the drive bays of the ReadyNAS 516.
ReadyNAS OS 6 Desktop Storage Systems
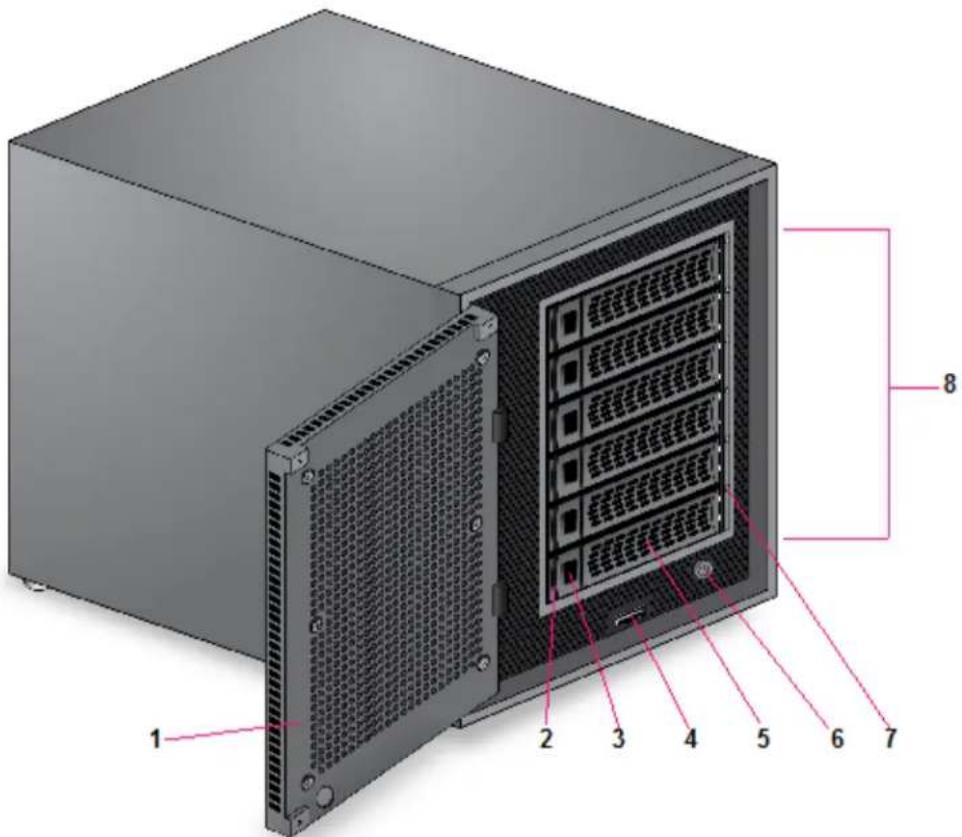
Figure 43. ReadyNAS 516 drive bays
- Drive bay door
- Disk tray release latch
- Recessed disk tray handle lock
- USB 2.0 port
- Disk tray handle
- Power button
- Disk LED
- Drive bays
Rear Panel
The following figure shows the rear panel of the ReadyNAS 516.
ReadyNAS OS 6 Desktop Storage Systems
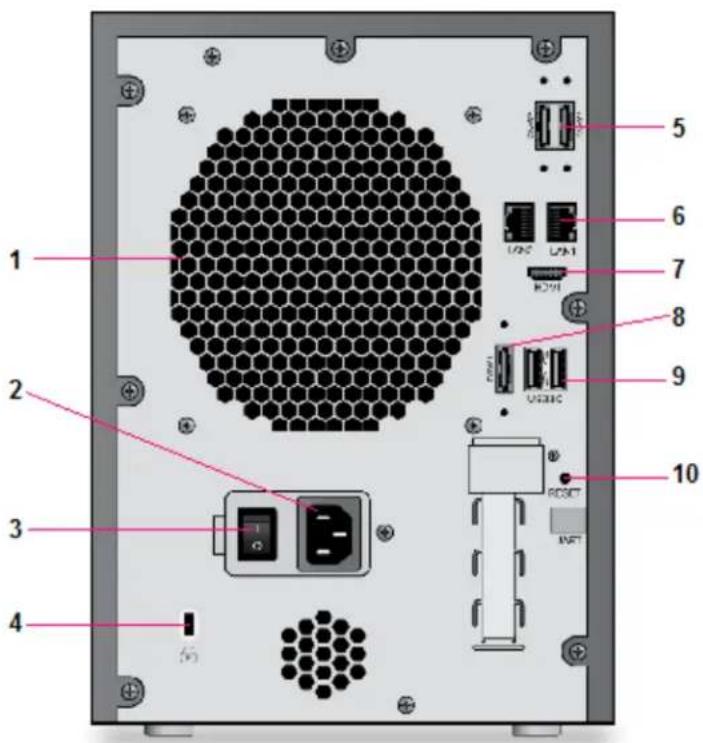
Figure 44. ReadyNAS 516 rear panel
- Exhaust fan
- Power cable socket
- Power switch
- Kensington lock
- eSATA ports
- LAN ports with LED status indicators
- HDMI port (currently not supported)
- eSATA port
- USB 3.0 ports
- Reset button
Status Information
You can obtain information about the status of your storage system by reviewing the indicators listed in the following table.
Table 14. ReadyNAS 516 indicator descriptions
| DescriptionIndicator | |
| Disk LEDs | A disk LED next to each drive bay indicates the status of the disk inside. The disk LEDs indicate these states:Solid blue. Power is on and the disk is operating normally.Blinking blue. The disk is active.Solid red. The disk was removed, failed, or is resynchronizing. See the display screen for details.Off. No disk is present. |
| Rear panel Ethernet port LEDs | Two LED status indicators are built into this port, one green and one amber. They indicate port speed and activity as follows:Green on, amber off. 1000 Mbps connection speed, no activity.Green blinking, amber off. 1000 Mbps connection speed, activity.Green off, amber on. 10 Mbps or 100 Mbps connection speed, no activity.Green off, amber blinking. 10 Mbps or 100 Mbps connection speed, activity.Green off, amber off. No connection. |
| Status display screen | Displays messages about the status of your storage system. Note that the status display screen goes to sleep to prevent burn-in. To wake the status display screen, activate the proximity sensor, press the touch pad, press the OK button, or press the Power button once. If the storage system reports an abnormal operation or error, the status display screen stays on. |
Power On and Shut Down
This section describes how to power on and shut down your system. If you must shut down the system, use one of the preferred shutdown methods whenever possible.
Power On
When you connect the system to a power supply and the Power switch is in the On position or the system recovers from a power outage and the Power switch is in the On position, the following occurs:
- The system automatically powers on if you enabled the Wake on LAN (WoL) feature or scheduled the system to automatically power on or off.
- The system returns to its last state if the Wake on LAN (WoL) feature is disabled and you did not schedule the system to automatically power on or off:
ReadyNAS OS 6 Desktop Storage Systems
- If the system was powered on, the system automatically powers on again when the power supply is connected or power is restored.
- If the system was powered off, the system remains off when the power supply is connected or power is restored.
In this situation, press the Power button on the front panel of the system to power on the system.
Preferred Shutdown
You can gracefully shut down your system by using the Power button or the ReadyNAS local admin page. For information about how to gracefully shut down your system using the ReadyNAS local admin page, see the ReadyNAS OS 6 Software Manual, which is available at netgear.com/support/product/ReadyNAS_OS_6.
To gracefully shut down your system using the Power button:
- If the status display screen is not lit, do the following:
a. Press the Power button on the front panel of the system. The status display screen wakes.
b. Press the Power button a second time.
Instructions for graceful shutdown display on the status display screen.
c. Press the Power button a third time. The system shuts down gracefully.
- If the status display screen is lit, do the following:
a. Press the Power button on the front panel of the system.
Instructions for graceful shutdown display on the status display screen.
b. Press the Power button again.
The system shuts down gracefully.
Forced Shutdown
Perform a forced shutdown only if the storage system is not responding.
To perform a forced shutdown:
- Press and hold the Power button on the front panel of the system for five seconds.
The LEDs blink quickly and simultaneously to warn that power will be cut off forcibly.
The system shuts down.
Boot Menu
Use the boot menu to restart or troubleshoot your ReadyNAS storage system. Your storage system has the following boot modes:
ReadyNAS OS 6 Desktop Storage Systems
• Normal. Initiates a normal boot process, just like booting using the Power button.
- Factory default. Initiates a short disk test that takes approximately 2 minutes. After the disk test, a 10-minute time-out period begins, during which all LEDs blink simultaneously.

WARNING:
The factory default reboot process resets the storage system to factory settings, erases all data, resets all defaults, and reformats the disk to X-RAID.
- If you want to cancel the factory default process, power off the storage system before the 10-minute time-out ends. The system powers down safely without causing any data loss.
- If you want to reset the system to factory default settings, do not power off your system. After the 10-minute time-out period, the factory default process begins.
Tip To start the factory default process immediately, press the OK button during the 10-minute time-out period.
- OS reinstall. Reinstalls the firmware from the internal flash to the disks. Use the OS reinstall boot mode when the system crashes and corrupts some configuration files. OS reinstall boot mode also resets some settings on your storage system, such as Internet protocol settings and the administrator password, to defaults.
- Tech support. Boots into a low-level diagnostic mode. Use the tech support boot mode only when a NETGEAR technical support representative instructs you to do so.
- Volume read only. Mounts a volume as read-only. Use this option when you are attempting to rescue data off a disk during a disaster recovery.
• Memory test. Performs a memory test. The pass or fail result is reported on the status display screen. - Test disk. Performs an offline full disk test. This process can take four hours or more, depending on the size of your disks. Any problems are reported in the system logs. For more information about viewing the system logs, see the ReadyNAS OS 6 Software Manual, which is available at netgear.com/support/product/ReadyNAS_OS_6.
To access the boot menu:
- Power off your storage system.
- Using a straightened paper clip, press and hold the Reset button.
-
Press the Power button on the front panel of the system.
The system powers on. -
Continue to press the Reset button until the status display screen shows a boot menu message.
-
Use the arrows on the touch pad to scroll through boot mode options.
The status display screen shows the current boot mode option.
- When the status display screen shows the boot mode that you need, press the OK button to confirm your boot menu selection.
The system boots in the selected boot mode.
This chapter provides an overview of the physical features of the ReadyNAS 524X and includes the following sections:
• Front and Side Panels on page 123
- Drive Bays on page 124
- Rear Panel on page 125
• Status Information on page 126
• Power On and Shut Down on page 127
- Boot Menu on page 128
Front and Side Panels
The following figure shows the front and side panels of the ReadyNAS 524X.
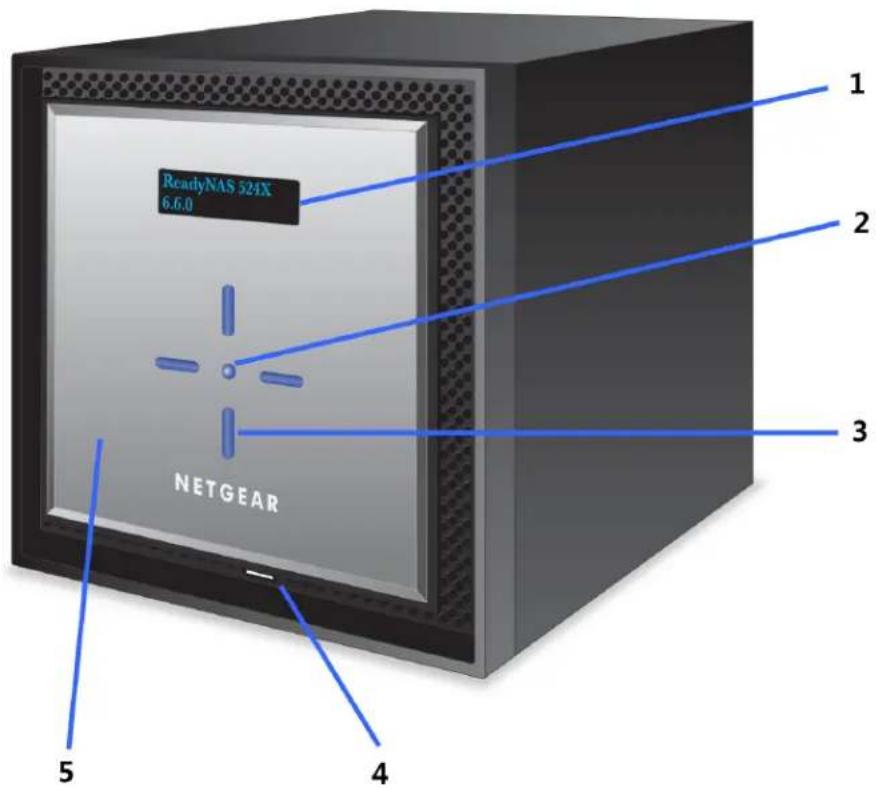
Figure 45. ReadyNAS 524X front and side panels
- Status and menu display screen
- OK button
- Four buttons (Up, Down, Left, Right) and backlights
- USB 3.0 port
- Drive bay door
Drive Bays
The following figure shows the drive bays of ReadyNAS 524X.
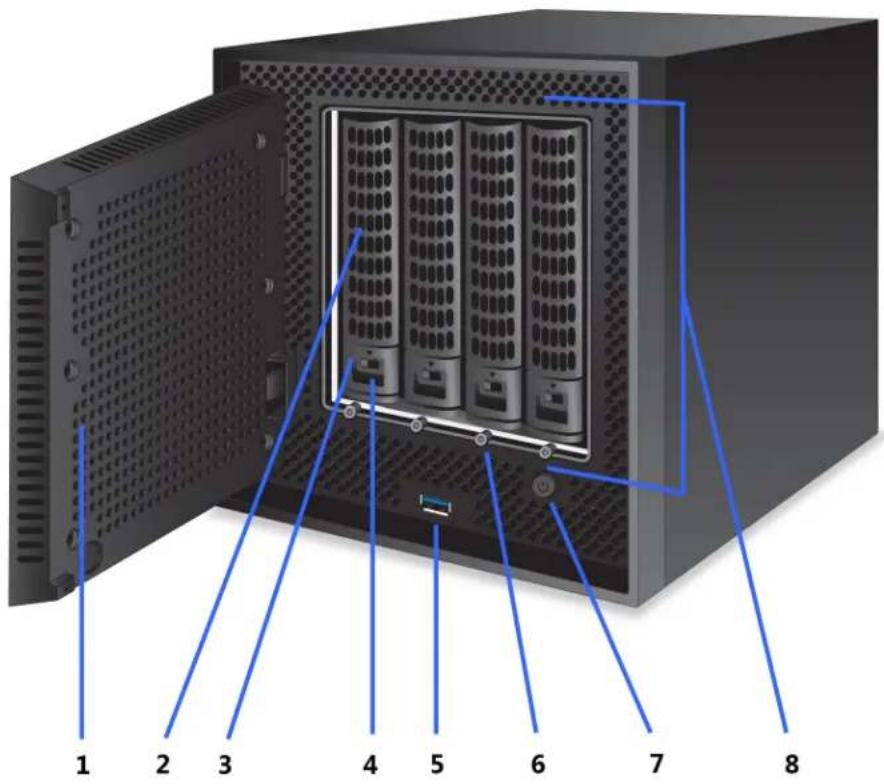
Figure 46. ReadyNAS 524X drive bays
- Drive bay door
- Disk tray handle
- Disk tray release latch
- Recessed disk tray handle lock
- USB 3.0 port
- Disk LED
- Power button
- Drive bays
Rear Panel
The following figure shows the rear panel of the ReadyNAS 524X.
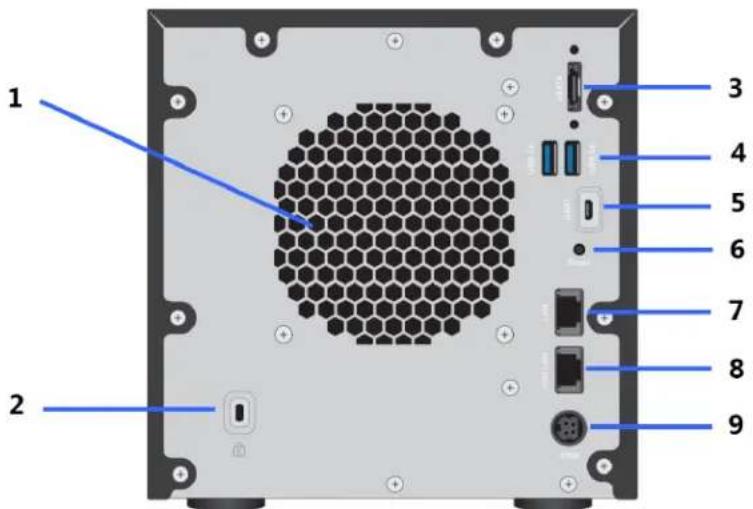
Figure 47. Rear panel ReadyNAS 524X
- Exhaust fan
- Kensington lock
- eSATA port
- USB 3.0 ports
- Micro USB console connector (marked as UART)
- Reset button
- 1 GbE LAN port with LED status indicators
- 10 GbE LAN port with LED status indicators
- Power cable socket
ReadyNAS OS 6 Desktop Storage Systems
Status Information
You can obtain information about the status of your storage system by reviewing the indicators listed in the following table.
Table 15. Indicator descriptions ReadyNAS 524X
| DescriptionIndicator | |
| Front panel status display screen | Displays messages about the status of your storage system. Note that the status display screen goes to sleep to prevent burn-in.To wake the status display screen, press any button on the front panel. If the storage system reports an abnormal operation or error, the status display screen stays on. |
| Drive bay disk LEDs | A disk LED next to each drive bay indicates the status of the disk inside.The disk LEDs indicate these states:Solid blue. Power is on and the disk is operating normally.Blinking blue.The disk is active.Solid red. The disk was removed, failed, or is resynchronizing. See the display screen for details.Off. No disk is present. |
| Rear panel 1G Ethernet LAN port LEDs | Two LED status indicators are built into each 1G Ethernet port. One LED is a bicolor LED that can light solid amber or solid green and indicates the port speed. The other LED is green and indicates the link (solid green) and activity (blinking green). These LEDs indicate port speed and activity as follows:· Bicolor LED green, green LED solid. 1 Gbps connection speed, no activity.· Bicolor LED green, green LED blinking. 1 Gbps connection speed, activity.· Bicolor LED amber, green LED solid. 100 Mbps connection speed, no activity.· Bicolor LED amber, green LED blinking. 100 Mbps connection speed, activity.· Bicolor LED off, green LED off. Either no connection or 10 Mbps connection without activity.· Bicolor LED off, green LED blinking. 10 Mbps connection, activity. |
| Rear panel 10G Ethernet LAN port LEDs | Two LED status indicators are built into each 10G Ethernet port. One LED is a bicolor LED that can light solid amber or solid green and indicates the port speed. The other LED is green and indicates the link (solid green) and activity (blinking green). These LEDs indicate port speed and activity as follows:· Bicolor LED green, green LED solid. 1 Gbps connection speed, no activity.· Bicolor LED green, green LED blinking. 1 Gbps connection speed, activity.· Bicolor LED amber. green LED solid. 10 Gbps connection speed, no activity.· Bicolor LED amber, green LED blinking. 10 Gbps connection speed, activity.· Bicolor LED off, green LED off. No connection. |
Power On and Shut Down
This section describes how to power on and shut down your system. If you must shut down the system, use one of the preferred shutdown methods whenever possible.
Power On
When you connect the system to a power supply or the system recovers from a power outage, the system returns to its last state:
- If the system was powered on, the system automatically powers on again when the power supply is connected or power is restored.
- If the system was powered off, the system remains off when the power supply is connected or power is restored.
In this situation, press the Power button on the front panel of the system to power on the system.
ReadyNAS OS 6 Desktop Storage Systems
Preferred Shutdown
You can gracefully shut down your system by using the Power button or the ReadyNAS local admin page.
For information about how to gracefully shut down your system using the ReadyNAS local admin page, see the ReadyNAS OS 6 Software Manual, which is available at netgear.com/support/product/ReadyNAS_OS_6.
To gracefully shut down your system using the Power button:
- If the status display screen is not lit, do the following:
a. Press the Power button on the front panel of the system. The status display screen wakes.
b. Press the Power button a second time.
Instructions for graceful shutdown display on the status display screen.
c. Press the Power button a third time. The system shuts down gracefully.
- If the status display screen is lit, do the following:
a. Press the Power button on the front panel of the system.
Instructions for graceful shutdown display on the status display screen.
b. Press the Power button again.
The system shuts down gracefully.
Forced Shutdown
Perform a forced shutdown only if the storage system is not responding.
To perform a forced shutdown:
Press and hold the Power button on the front panel of the system for five seconds. The LEDs blink quickly and simultaneously to warn that power will be cut off forcibly.
The system shuts down.
Boot Menu
Use the boot menu to restart or troubleshoot your ReadyNAS storage system. Your storage system has the following boot modes:
• Normal. Initiates a normal boot process, just like booting using the Power button.
- Factory default. Initiates a short disk test that takes approximately 2 minutes. After the disk test, a 10-minute time-out period begins, during which all LEDs blink simultaneously.

WARNING:
The factory default reboot process resets the storage system to factory settings, erases all data, resets all defaults, and reformats the disk to X-RAID.
ReadyNAS OS 6 Desktop Storage Systems
- If you want to cancel the factory default process, power off the storage system before the 10-minute time-out ends. The system powers down safely without causing any data loss.
- If you want to reset the system to factory default settings, do not power off your system. After the 10-minute time-out period, the factory default process begins.
Tip To start the factory default process immediately, press the OK button during the 10-minute time-out period.
- OS reinstall. Reinstalls the firmware from the internal flash to the disks. Use the OS reinstall boot mode when the system crashes and corrupts some configuration files. OS reinstall boot mode also resets some settings on your storage system, such as IP settings and the administrator password, to defaults.
- Tech support. Boots into a low-level diagnostic mode. Use the tech support boot mode only when instructed to do so by a NETGEAR technical support representative.
• Volume read only. Mounts a volume as read-only. Use this option when you are attempting to rescue data off a disk during a disaster recovery.
• Memory test. Performs a memory test. The pass or fail result is reported on the status display screen. - Test disk. Performs an offline full disk test. This process can take four hours or more, depending on the size of your disks. Any problems are reported in the system logs. For more information about viewing the system logs, see the ReadyNAS OS 6 Software Manual, which is available at netgear.com/support/product/ReadyNAS_OS_6.
To access the boot menu:
- Power off your storage system.
- Using a straightened paper clip, press and hold the Reset button.
- Press the Power button on the front panel of the system. The system powers on.
- Continue to press the Reset button until the status display screen shows a boot menu message.
- Use the Up and Down buttons on the front panel to scroll through boot mode options. The status display screen shows the current boot mode option.
- When the status display screen shows the boot mode that you need, press the OK button to confirm your boot menu selection. The system boots in the selected boot mode.
This chapter provides an overview of the physical features of the ReadyNAS 526X and 626X and includes the following sections:
• Front and Side Panels on page 131
- Drive Bays on page 132
- Rear Panel ReadyNAS 526X on page 133
• Rear Panel ReadyNAS 626X on page 134
• Status Information on page 135
• Power On and Shut Down on page 136
- Boot Menu on page 137
Front and Side Panels
The following figure shows the front and side panels of the ReadyNAS 526X and 626X.
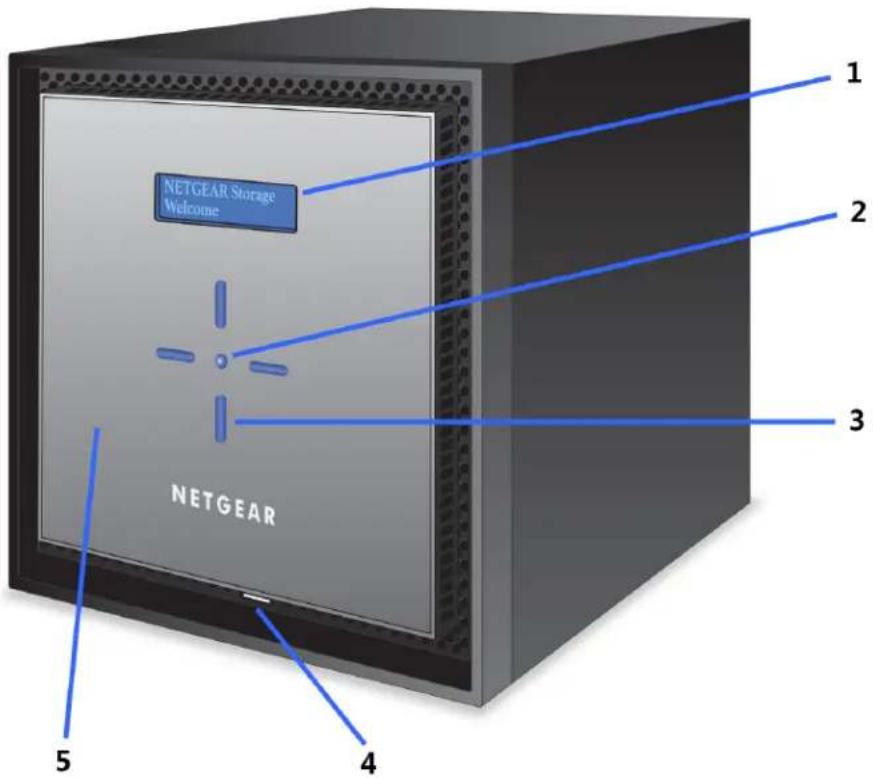
Figure 48. ReadyNAS 526X and 626X front and side panels
- Status and menu display screen
- OK button
- Four buttons (Up, Down, Left, Right) and backlights
- USB 3.0 port
- Drive bay door
Drive Bays
The following figure shows the drive bays of ReadyNAS 526X AND 626X.
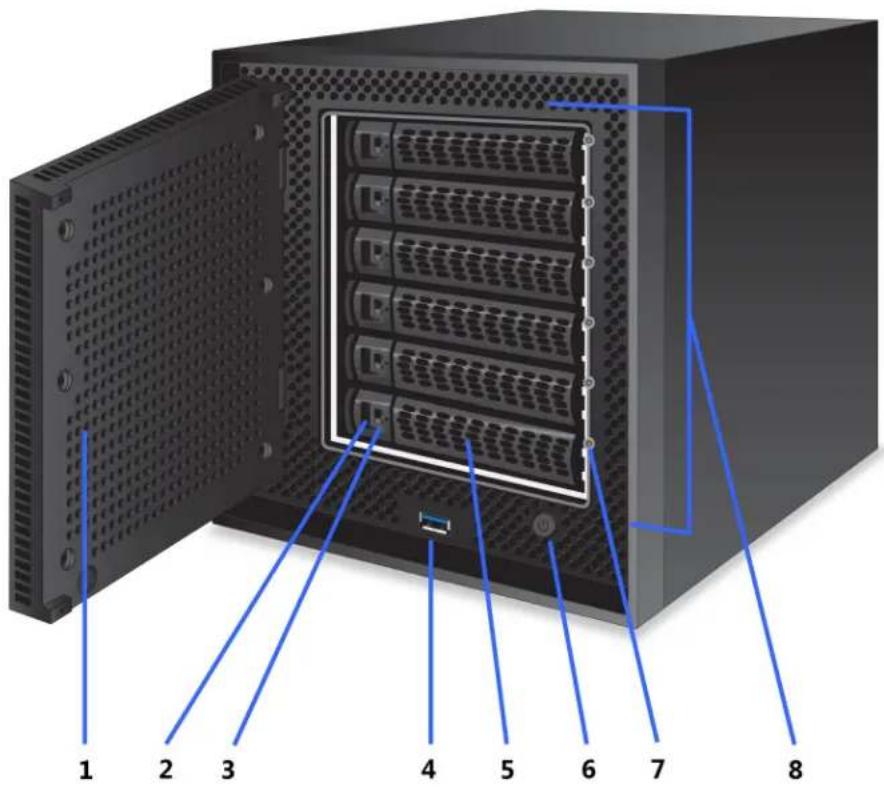
Figure 49. ReadyNAS 526X and 626X drive bays
- Drive bay door
- Disk tray release latch
- Recessed disk tray handle lock
- USB 3.0 port
- Disk tray handle
- Power button
- Disk LED
- Drive bays
Rear Panel ReadyNAS 526X
The following figure shows the rear panel of the ReadyNAS 526X.
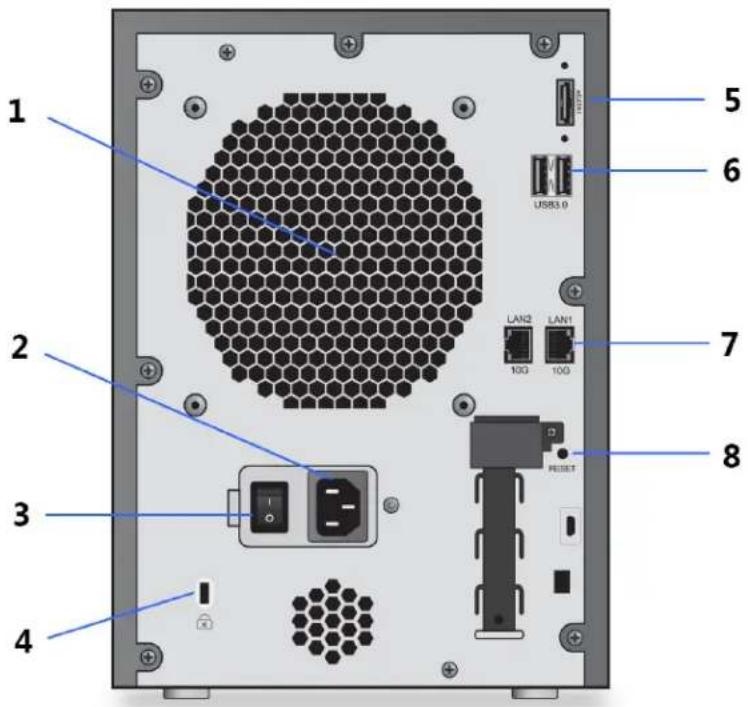
Figure 50. Rear panel ReadyNAS 526X
- Exhaust fan
- Power cable socket
- Power switch
- Kensington lock
- eSATA port
- USB 3.0 ports
- 10 GbE LAN ports with LED status indicators
- Reset button
Rear Panel ReadyNAS 626X
The following figure shows the rear panel of the ReadyNAS 626X.
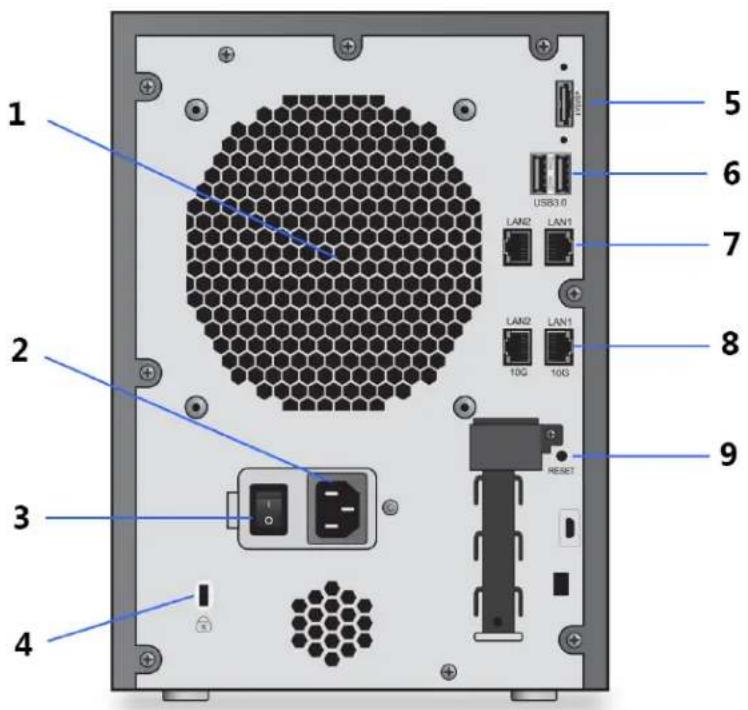
Figure 51. Rear panel ReadyNAS 626X
- Exhaust fan
- Power cable socket
- Power switch
- Kensington lock
- eSATA port
- USB 3.0 ports
7.1 GbE LAN ports with LED status indicators - 10 GbE LAN ports with LED status indicators
- Reset button
ReadyNAS OS 6 Desktop Storage Systems
Status Information
You can obtain information about the status of your storage system by reviewing the indicators listed in the following table.
Table 16. Indicator descriptions ReadyNAS 526X and 626X
| DescriptionIndicator | |
| Front panel status display screen | Displays messages about the status of your storage system. Note that the status display screen goes to sleep to prevent burn-in.To wake the status display screen, press any button on the front panel. If the storage system reports an abnormal operation or error, the status display screen stays on. |
| Drive bay disk LEDs | A disk LED next to each drive bay indicates the status of the disk inside.The disk LEDs indicate these states:Solid blue. Power is on and the disk is operating normally.Blinking blue.The disk is active.Solid red. The disk was removed, failed, or is resynchronizing. See the display screen for details.Off. No disk is present. |
| Model RN626X only:Rear panel 1G Ethernet LAN port LEDs | Two LED status indicators are built into each 1G Ethernet port. One LED is a bicolor LED that can light solid amber or solid green and indicates the port speed. The other LED is green and indicates the link (solid green) and activity (blinking green). These LEDs indicate port speed and activity as follows:Bicolor LED green, green LED solid. 1 Gbps connection speed, no activity.Bicolor LED green, green LED blinking. 1 Gbps connection speed, activity.Bicolor LED amber, green LED solid. 100 Mbps connection speed, no activity.Bicolor LED off, green LED off. Either no connection or 10 Mbps connection without activity.Bicolor LED off, green LED blinking. 10 Mbps connection, activity. |
| Rear panel 10G Ethernet LAN port LEDs | Two LED status indicators are built into each 10G Ethernet port. One LED is a bicolor LED that can light solid amber or solid green and indicates the port speed. The other LED is green and indicates the link (solid green) and activity (blinking green). These LEDs indicate port speed and activity as follows:Bicolor LED green, green LED solid. 1 Gbps connection speed, no activity.Bicolor LED green, green LED blinking. 1 Gbps connection speed, activity.Bicolor LED amber, green LED solid. 0 Gbps connection speed, no activity.Bicolor LED amber, green LED blinking. 10 Gbps connection speed, activity.Bicolor LED off, green LED off. No connection. |
Power On and Shut Down
This section describes how to power on and shut down your system. If you must shut down the system, use one of the preferred shutdown methods whenever possible.
Power On
When you connect the system to a power supply and the Power switch is in the On position or the system recovers from a power outage and the Power switch is in the On position, the following occurs:
- The system automatically powers on if you enabled the Wake on LAN (WoL) feature or scheduled the system to automatically power on or off.
- The system returns to its last state if the Wake on LAN (WoL) feature is disabled and you did not schedule the system to automatically power on or off:
ReadyNAS OS 6 Desktop Storage Systems
- If the system was powered on, the system automatically powers on again when the power supply is connected or power is restored.
- If the system was powered off, the system remains off when the power supply is connected or power is restored.
In this situation, press the Power button on the front panel of the system to power on the system.
Preferred Shutdown
You can gracefully shut down your system by using the Power button or the ReadyNAS local admin page.
For information about how to gracefully shut down your system using the ReadyNAS local admin page, see the ReadyNAS OS 6 Software Manual, which is available at netgear.com/support/product/ReadyNAS_OS_6.
To gracefully shut down your system using the Power button:
- If the status display screen is not lit, do the following:
a. Press the Power button on the front panel of the system. The status display screen wakes.
b. Press the Power button a second time.
Instructions for graceful shutdown display on the status display screen.
c. Press the Power button a third time. The system shuts down gracefully.
- If the status display screen is lit, do the following:
a. Press the Power button on the front panel of the system.
Instructions for graceful shutdown display on the status display screen.
b. Press the Power button again.
The system shuts down gracefully.
Forced Shutdown
Perform a forced shutdown only if the storage system is not responding.
To perform a forced shutdown:
Press and hold the Power button on the front panel of the system for five seconds. The LEDs blink quickly and simultaneously to warn that power will be cut off forcibly.
The system shuts down.
Boot Menu
Use the boot menu to restart or troubleshoot your ReadyNAS storage system. Your storage system has the following boot modes:
ReadyNAS OS 6 Desktop Storage Systems
• Normal. Initiates a normal boot process, just like booting using the Power button.
- Factory default. Initiates a short disk test that takes approximately 2 minutes. After the disk test, a 10-minute time-out period begins, during which all LEDs blink simultaneously.

WARNING:
The factory default reboot process resets the storage system to factory settings, erases all data, resets all defaults, and reformats the disk to X-RAID.
- If you want to cancel the factory default process, power off the storage system before the 10-minute time-out ends. The system powers down safely without causing any data loss.
- If you want to reset the system to factory default settings, do not power off your system. After the 10-minute time-out period, the factory default process begins.
Tip To start the factory default process immediately, press the OK button during the 10-minute time-out period.
- OS reinstall. Reinstalls the firmware from the internal flash to the disks. Use the OS reinstall boot mode when the system crashes and corrupts some configuration files. OS reinstall boot mode also resets some settings on your storage system, such as IP settings and the administrator password, to defaults.
- Tech support. Boots into a low-level diagnostic mode. Use the tech support boot mode only when instructed to do so by a NETGEAR technical support representative.
• Volume read only. Mounts a volume as read-only. Use this option when you are attempting to rescue data off a disk during a disaster recovery.
• Memory test. Performs a memory test. The pass or fail result is reported on the status display screen. - Test disk. Performs an offline full disk test. This process can take four hours or more, depending on the size of your disks. Any problems are reported in the system logs. For more information about viewing the system logs, see the ReadyNAS OS 6 Software Manual, which is available at netgear.com/support/product/ReadyNAS_OS_6.
To access the boot menu:
- Power off your storage system.
- Using a straightened paper clip, press and hold the Reset button.
- Press the Power button on the front panel of the system. The system powers on.
- Continue to press the Reset button until the status display screen shows a boot menu message.
- Use the Up and Down buttons on the front panel to scroll through boot mode options. The status display screen shows the current boot mode option.
- When the status display screen shows the boot mode that you need, press the OK button to confirm your boot menu selection. The system boots in the selected boot mode.
This chapter provides an overview of the physical features of the ReadyNAS 528X and 628X and includes the following sections:
• Front and Side Panels on page 140
- Drive Bays on page 141
- Rear Panel ReadyNAS 528X on page 142
• Rear Panel ReadyNAS 628X on page 143
• Status Information on page 144
• Power On and Shut Down on page 145
- Boot Menu on page 146
Front and Side Panels
The following figure shows the front and side panels of the ReadyNAS 528X and 628X.
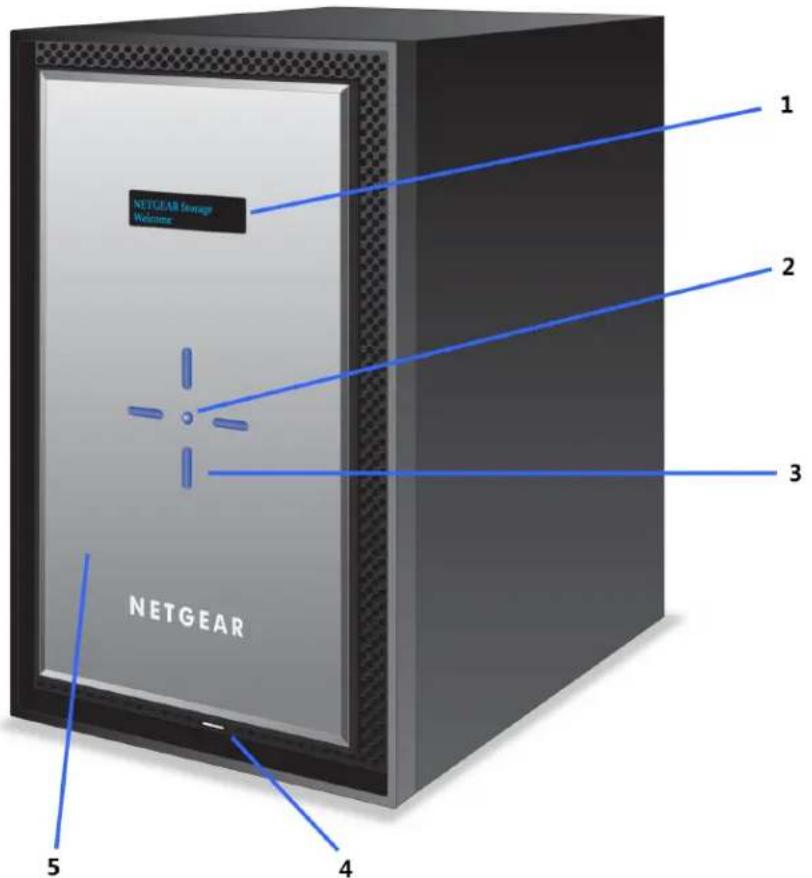
Figure 52. ReadyNAS 528X and 628X front and side panels
- Status and menu display screen
- OK button
- Four buttons (Up, Down, Left, Right) and backlights
- USB 3.0 port
- Drive bay door
Drive Bays
The following figure shows the drive bays of ReadyNAS 528X AND 628X.
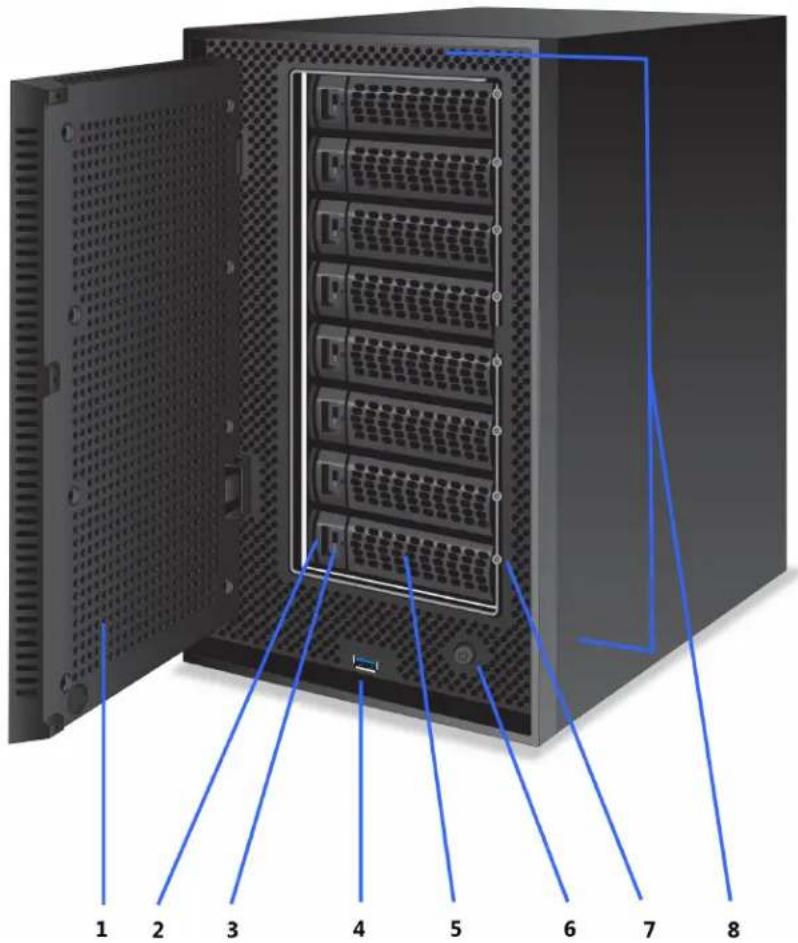
Figure 53. ReadyNAS 528X and 628X drive bays
- Drive bay door
- Disk tray release latch
- Recessed disk tray handle lock
- USB 3.0 port
- Disk tray handle
- Power button
- Disk LED
- Drive bays
Rear Panel ReadyNAS 528X
The following figure shows the rear panel of the ReadyNAS 528X.
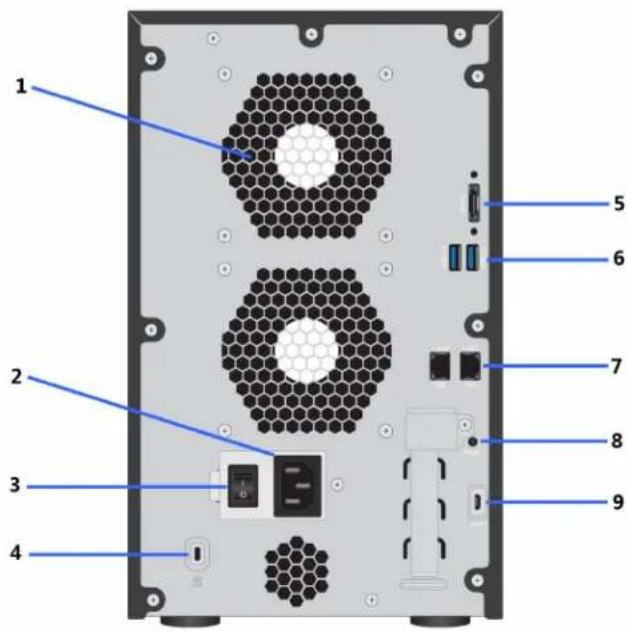
Figure 54. Rear panel ReadyNAS 528X
- Exhaust fan
- Power cable socket
- Power switch
- Kensington lock
- eSATA port
- USB 3.0 ports
- 10 GbE LAN ports with LED status indicators
- Reset button
- Micro USB console connector (marked as UART)
Rear Panel ReadyNAS 628X
The following figure shows the rear panel of the ReadyNAS 628X.
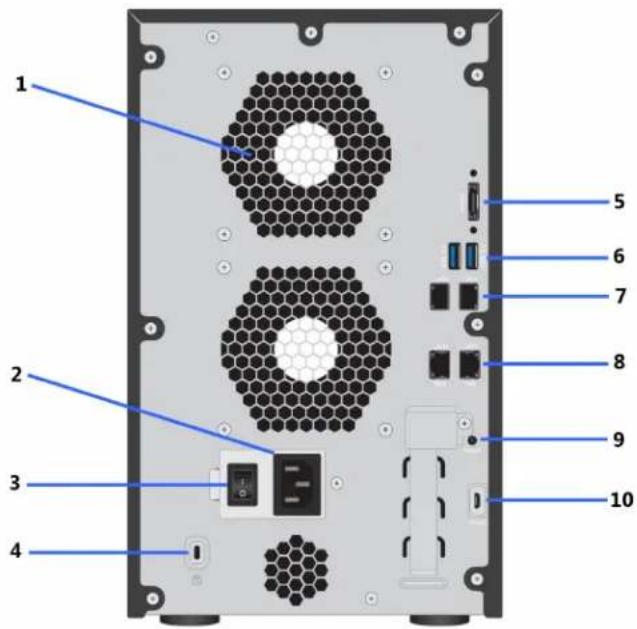
Figure 55. Rear panel ReadyNAS 628X
- Exhaust fan
- Power cable socket
- Power switch
- Kensington lock
- eSATA port
- USB 3.0 ports
7.1 GbE LAN ports with LED status indicators - 10 GbE LAN ports with LED status indicators
- Reset button
- Micro USB console connector (marked as UART)
ReadyNAS OS 6 Desktop Storage Systems
Status Information
You can obtain information about the status of your storage system by reviewing the indicators listed in the following table.
Table 17. Indicator descriptions ReadyNAS 528X and 628X
| DescriptionIndicator | |
| Front panel status display screen | Displays messages about the status of your storage system. Note that the status display screen goes to sleep to prevent burn-in.To wake the status display screen, press any button on the front panel. If the storage system reports an abnormal operation or error, the status display screen stays on. |
| Drive bay disk LEDs | A disk LED next to each drive bay indicates the status of the disk inside.The disk LEDs indicate these states:Solid blue. Power is on and the disk is operating normally.Blinking blue.The disk is active.Solid red. The disk was removed, failed, or is resynchronizing. See the display screen for details.Off. No disk is present. |
| Model RN628X only:Rear panel 1G Ethernet LAN port LEDs | Two LED status indicators are built into each 1G Ethernet port. One LED is a bicolor LED that can light solid amber or solid green and indicates the port speed. The other LED is green and indicates the link (solid green) and activity (blinking green). These LEDs indicate port speed and activity as follows:Bicolor LED green, green LED solid. 1 Gbps connection speed, no activity.Bicolor LED green, green LED blinking. 1 Gbps connection speed, activity.Bicolor LED amber, green LED solid. 100 Mbps connection speed, no activity.Bicolor LED off, green LED off. Either no connection or 10 Mbps connection without activity.Bicolor LED off, green LED blinking. 10 Mbps connection, activity. |
| Rear panel 10G Ethernet LAN port LEDs | Two LED status indicators are built into each 10G Ethernet port. One LED is a bicolor LED that can light solid amber or solid green and indicates the port speed. The other LED is green and indicates the link (solid green) and activity (blinking green). These LEDs indicate port speed and activity as follows:Bicolor LED green, green LED solid. 1 Gbps connection speed, no activity.Bicolor LED green, green LED blinking. 1 Gbps connection speed, activity.Bicolor LED amber, green LED solid. 0 Gbps connection speed, no activity.Bicolor LED amber, green LED blinking. 10 Gbps connection speed, activity.Bicolor LED off, green LED off. No connection. |
Power On and Shut Down
This section describes how to power on and shut down your system. If you must shut down the system, use one of the preferred shutdown methods whenever possible.
Power On
When you connect the system to a power supply and the Power switch is in the On position or the system recovers from a power outage and the Power switch is in the On position, the system returns to its last state:
- If the system was powered on, the system automatically powers on again when the power supply is connected or power is restored.
- If the system was powered off, the system remains off when the power supply is connected or power is restored.
In this situation, press the Power button on the front panel of the system to power on the system.
ReadyNAS OS 6 Desktop Storage Systems
Preferred Shutdown
You can gracefully shut down your system by using the Power button or the ReadyNAS local admin page.
For information about how to gracefully shut down your system using the ReadyNAS local admin page, see the ReadyNAS OS 6 Software Manual, which is available at netgear.com/support/product/ReadyNAS_OS_6.
To gracefully shut down your system using the Power button:
- If the status display screen is not lit, do the following:
a. Press the Power button on the front panel of the system. The status display screen wakes.
b. Press the Power button a second time.
Instructions for graceful shutdown display on the status display screen.
c. Press the Power button a third time. The system shuts down gracefully.
- If the status display screen is lit, do the following:
a. Press the Power button on the front panel of the system.
Instructions for graceful shutdown display on the status display screen.
b. Press the Power button again.
The system shuts down gracefully.
Forced Shutdown
Perform a forced shutdown only if the storage system is not responding.
To perform a forced shutdown:
Press and hold the Power button on the front panel of the system for five seconds. The LEDs blink quickly and simultaneously to warn that power will be cut off forcibly.
The system shuts down.
Boot Menu
Use the boot menu to restart or troubleshoot your ReadyNAS storage system. Your storage system has the following boot modes:
• Normal. Initiates a normal boot process, just like booting using the Power button.
- Factory default. Initiates a short disk test that takes approximately 2 minutes. After the disk test, a 10-minute time-out period begins, during which all LEDs blink simultaneously.

WARNING:
The factory default reboot process resets the storage system to factory settings, erases all data, resets all defaults, and reformats the disk to X-RAID.
ReadyNAS OS 6 Desktop Storage Systems
- If you want to cancel the factory default process, power off the storage system before the 10-minute time-out ends. The system powers down safely without causing any data loss.
- If you want to reset the system to factory default settings, do not power off your system. After the 10-minute time-out period, the factory default process begins.
Tip To start the factory default process immediately, press the OK button during the 10-minute time-out period.
- OS reinstall. Reinstalls the firmware from the internal flash to the disks. Use the OS reinstall boot mode when the system crashes and corrupts some configuration files. OS reinstall boot mode also resets some settings on your storage system, such as IP settings and the administrator password, to defaults.
- Tech support. Boots into a low-level diagnostic mode. Use the tech support boot mode only when instructed to do so by a NETGEAR technical support representative.
• Volume read only. Mounts a volume as read-only. Use this option when you are attempting to rescue data off a disk during a disaster recovery.
• Memory test. Performs a memory test. The pass or fail result is reported on the status display screen. - Test disk. Performs an offline full disk test. This process can take four hours or more, depending on the size of your disks. Any problems are reported in the system logs. For more information about viewing the system logs, see the ReadyNAS OS 6 Software Manual, which is available at netgear.com/support/product/ReadyNAS_OS_6.
To access the boot menu:
- Power off your storage system.
- Using a straightened paper clip, press and hold the Reset button.
- Press the Power button on the front panel of the system. The system powers on.
- Continue to press the Reset button until the status display screen shows a boot menu message.
- Use the Up and Down buttons on the front panel to scroll through boot mode options. The status display screen shows the current boot mode option.
- When the status display screen shows the boot mode that you need, press the OK button to confirm your boot menu selection. The system boots in the selected boot mode.
This chapter provides an overview of the physical features of the ReadyNAS 716X and includes the following sections:
• Front and Side Panels on page 149
- Drive Bays on page 149
- Rear Panel on page 150
• Status Information on page 151
• Power On and Shut Down on page 153
- Boot Menu on page 154
Front and Side Panels
The following figure shows the front and side panels of the ReadyNAS 716X.
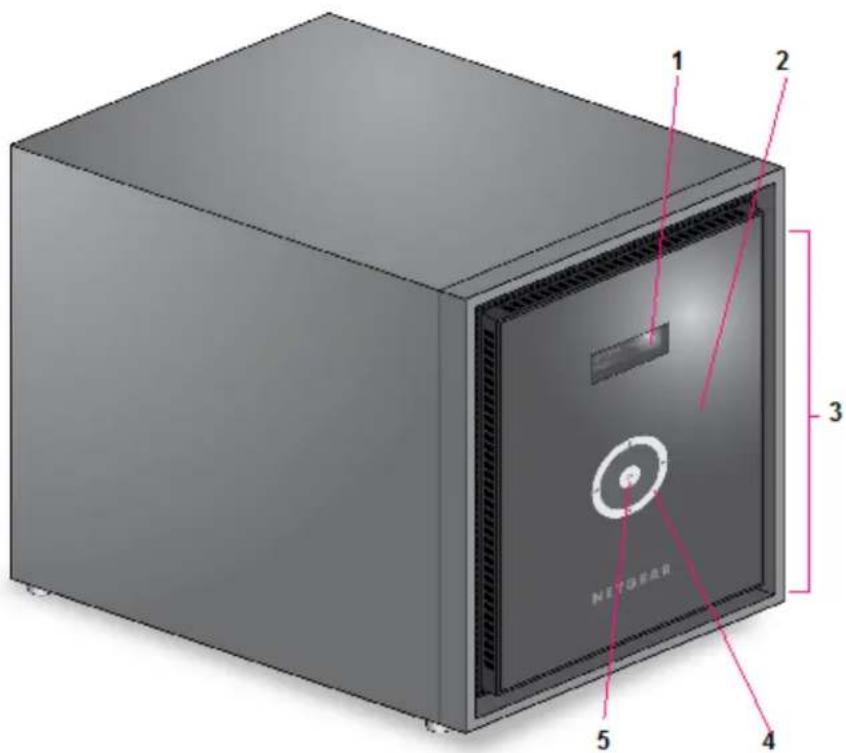
Figure 56. ReadyNAS 716X front and side panels
- Status and menu display screen
- Infrared remote receiver
- Drive bay door
- Touch pad and backlight
- OK button
Drive Bays
The following figure shows the drive bays of ReadyNAS 716X.
ReadyNAS OS 6 Desktop Storage Systems
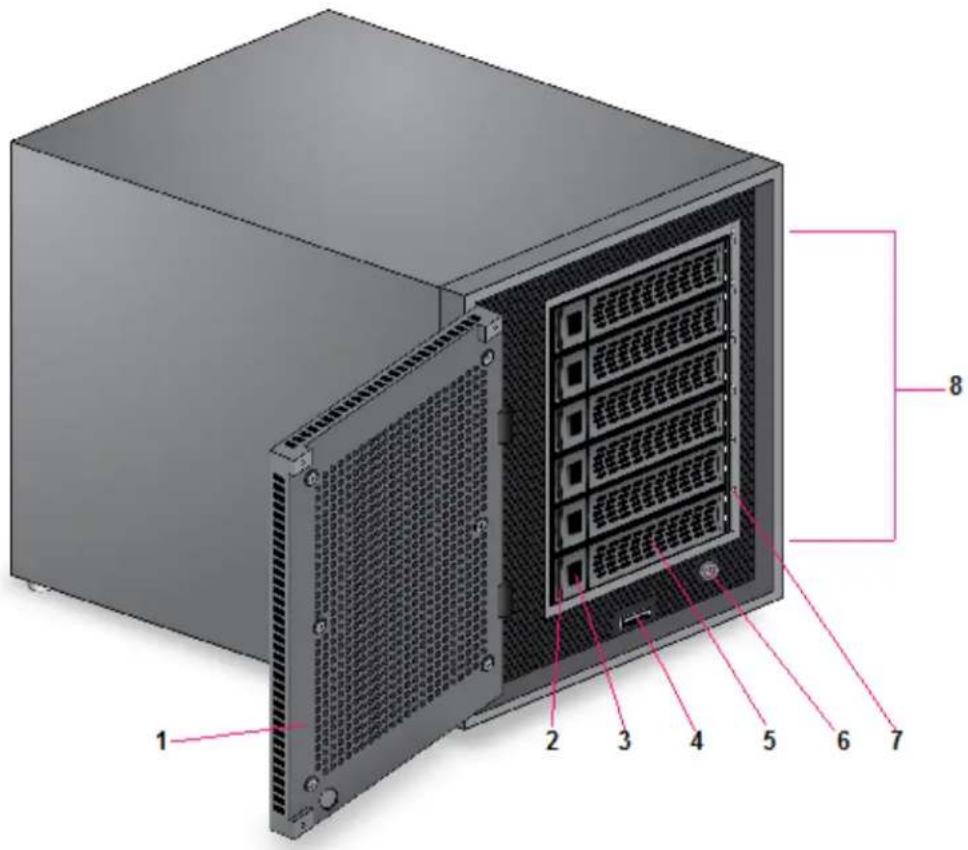
Figure 57. ReadyNAS 716X drive bays
- Drive bay door
- Disk tray release latch
- Recessed disk tray handle lock
- USB 2.0 port
- Disk tray handle
- Power button
- Disk LED
- Drive bays
Rear Panel
The following figure shows the rear panel of ReadyNAS 716X.
ReadyNAS OS 6 Desktop Storage Systems
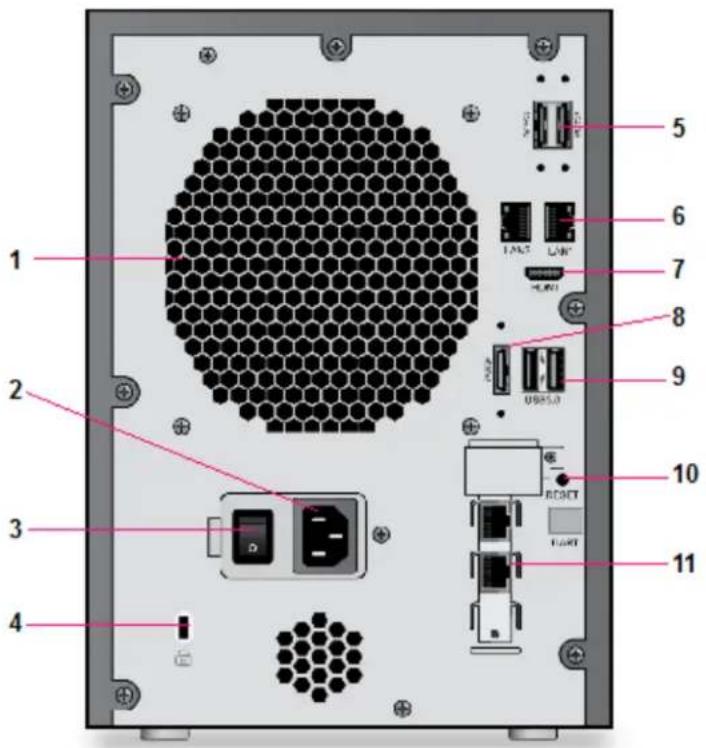
Figure 58. ReadyNAS 716X rear panel
- Exhaust fan
- Power cable socket
- Power switch
- Kensington lock
- eSATA ports
- 1 Gb LAN ports with LED status indicators
- HDMI port
- eSATA port
- USB 3.0 ports
- Reset button
- 10 Gb LAN ports with LED status indicators
Status Information
You can obtain information about the status of your storage system by reviewing the indicators listed in the following table.
ReadyNAS OS 6 Desktop Storage Systems
Table 18. ReadyNAS 716X indicator descriptions
| DescriptionIndicator | |
| Disk LEDs | A disk LED next to each drive bay indicates the status of the disk inside. The disk LEDs indicate these states:Solid blue. Power is on and the disk is operating normally.Blinking blue. The disk is active.Solid red. The disk was removed, failed, or is resynchronizing. See the display screen for details.Off. No disk is present. |
| Rear panel Ethernet port LEDs (1 Gb) | Two LED status indicators are built into this port, one green and one amber. They indicate port speed and activity as follows:Green on, amber off. 1000 Mbps connection speed, no activity.Green blinking, amber off. 1000 Mbps connection speed, activity.Green off, amber on. 10 Mbps or 100 Mbps connection speed, no activity.Green off, amber blinking. 10 Mbps or 100 Mbps connection speed, activity.Green off, amber off. No connection. |
ReadyNAS OS 6 Desktop Storage Systems
Table 18. ReadyNAS 716X indicator descriptions (Continued)
| DescriptionIndicator | |
| Rear panel Ethernet port LEDs (10 Gb) | Two LED status indicators are built into this port. They indicate port speed and activity as follows:LED 1Off. No link.Solid green. Linked.Blinking green. Activity.LED 2Solid green. 10 GbESolid yellow. 1 GbE.Off. 100 Mbps. |
| Status display screen | Displays messages about the status of your storage system. Note that the status display screen goes to sleep to prevent burn-in. To wake the status display screen, activate the proximity sensor, press the touch pad, press the OK button, or press the Power button once. If the storage system reports an abnormal operation or error, the status display screen stays on. |
Power On and Shut Down
This section describes how to power on and shut down your system. If you must shut down the system, use one of the preferred shutdown methods whenever possible.
Power On
When you connect the system to a power supply and the Power switch is in the On position or the system recovers from a power outage and the Power switch is in the On position, the following occurs:
- The system automatically powers on if you enabled the Wake on LAN (WoL) feature or scheduled the system to automatically power on or off.
- The system returns to its last state if the Wake on LAN (WoL) feature is disabled and you did not schedule the system to automatically power on or off:
ReadyNAS OS 6 Desktop Storage Systems
- If the system was powered on, the system automatically powers on again when the power supply is connected or power is restored.
- If the system was powered off, the system remains off when the power supply is connected or power is restored.
In this situation, press the Power button on the front panel of the system to power on the system.
Preferred Shutdown
You can gracefully shut down your system by using the Power button or the ReadyNAS local admin page. For information about how to gracefully shut down your system using the ReadyNAS local admin page, see the ReadyNAS OS 6 Software Manual, which is available at netgear.com/support/product/ReadyNAS_OS_6.
To gracefully shut down your system using the Power button:
- If the status display screen is not lit, do the following:
a. Press the Power button on the front panel of the system. The status display screen wakes.
b. Press the Power button a second time.
Instructions for graceful shutdown display on the status display screen.
c. Press the Power button a third time. The system shuts down gracefully.
- If the status display screen is lit, do the following:
a. Press the Power button on the front panel of the system.
Instructions for graceful shutdown display on the status display screen.
b. Press the Power button again.
The system shuts down gracefully.
Forced Shutdown
Perform a forced shutdown only if the storage system is not responding.
To perform a forced shutdown:
- Press and hold the Power button on the front panel of the system for five seconds. The LEDs blink quickly and simultaneously to warn that power will be cut off forcibly.
The system shuts down.
Boot Menu
Use the boot menu to restart or troubleshoot your ReadyNAS storage system. Your storage system has the following boot modes:
ReadyNAS OS 6 Desktop Storage Systems
• Normal. Initiates a normal boot process, just like booting using the Power button.
- Factory default. Initiates a short disk test that takes approximately 2 minutes. After the disk test, a 10-minute time-out period begins, during which all LEDs blink simultaneously.

WARNING:
The factory default reboot process resets the storage system to factory settings, erases all data, resets all defaults, and reformats the disk to X-RAID.
- If you want to cancel the factory default process, power off the storage system before the 10-minute time-out ends. The system powers down safely without causing any data loss.
- If you want to reset the system to factory default settings, do not power off your system. After the 10-minute time-out period, the factory default process begins.
Tip To start the factory default process immediately, press the OK button during the 10-minute time-out period.
- OS reinstall. Reinstalls the firmware from the internal flash to the disks. Use the OS reinstall boot mode when the system crashes and corrupts some configuration files. OS reinstall boot mode also resets some settings on your storage system, such as Internet protocol settings and the administrator password, to defaults.
- Tech support. Boots into a low-level diagnostic mode. Use the tech support boot mode only when instructed to do so by a NETGEAR technical support representative.
- Volume read only. Mounts a volume as read-only. Use this option when you are attempting to rescue data off a disk during a disaster recovery.
• Memory test. Performs a memory test. The pass or fail result is reported on the status display screen. - Test disk. Performs an offline full disk test. This process can take four hours or more, depending on the size of your disks. Any problems are reported in the system logs. For more information about viewing the system logs, see the ReadyNAS OS 6 Software Manual, which is available at netgear.com/support/product/ReadyNAS_OS_6.
To access the boot menu:
- Power off your storage system.
- Using a straightened paper clip, press and hold the Reset button.
-
Press the Power button on the front panel of the system.
The system powers on. -
Continue to press the Reset button until the status display screen shows a boot menu message.
-
Use the arrows on the touch pad to scroll through boot mode options.
The status display screen shows the current boot mode option.
- When the status display screen shows the boot mode that you need, press the OK button to confirm your boot menu selection.
The system boots in the selected boot mode.
This chapter provides an overview of the physical features of the EDA 500 and includes the following sections:
• Front and Side Panels on page 157
- Drive Bays on page 157
- Rear Panel on page 158
• Status Information on page 159
• Power On and Shut Down on page 160
Note The EDA 500 disk trays are slightly different from the standard trays. Use only EDA 500 disk trays with the EDA 500. For more information about the EDA 500 disk trays, see EDA 500 Disk Tray on page 164.
A ReadyNAS cannot boot using the disks in an EDA 500. All disks in a RAID volume must be either in a ReadyNAS or in an EDA 500. A RAID volume cannot combine disks in a ReadyNAS with disks in an EDA 500.
You can add an EDA 500 to a ReadyNAS while the ReadyNAS is running, but you cannot remove the EDA while the ReadyNAS is running.
You can add and remove disks while an EDA 500 is in operation (hot swap). If an added disk has data on it, the data shows as an inactive volume. You need to destroy inactive volumes, which destroys all data in the volume, and create new volumes, before the space is available for use by the ReadyNAS.
Front and Side Panels
The following figure shows the front and side panels of EDA 500.
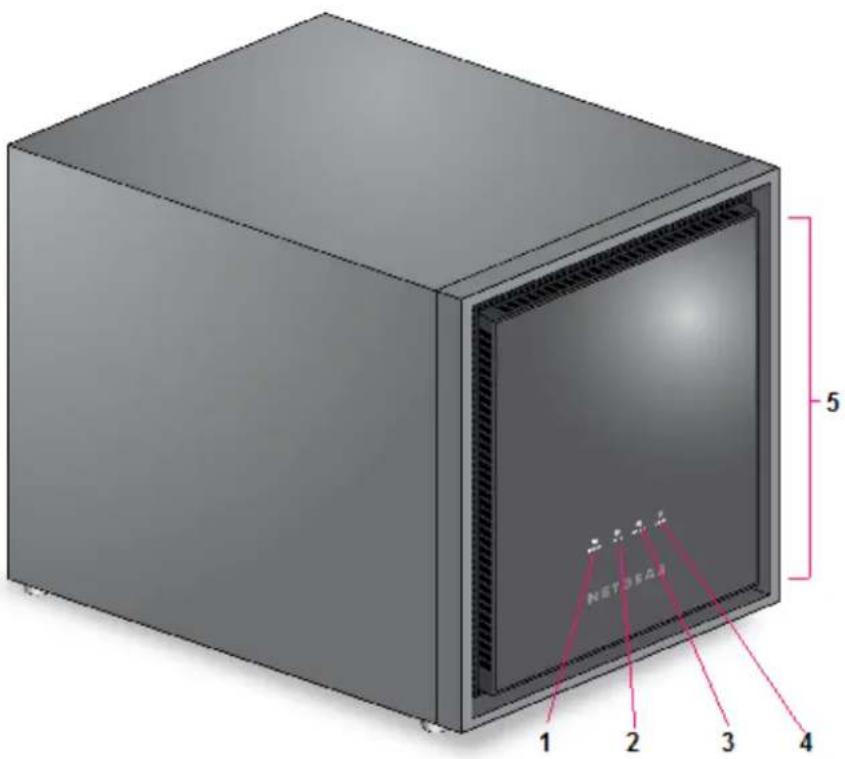
Figure 59. EDA 500 front and side panels
- Power LED
- eSATA LED
- Volume LED
- Alert LED
- Drive bay door
Drive Bays
The following figure shows the drive bays of EDA 500.
ReadyNAS OS 6 Desktop Storage Systems
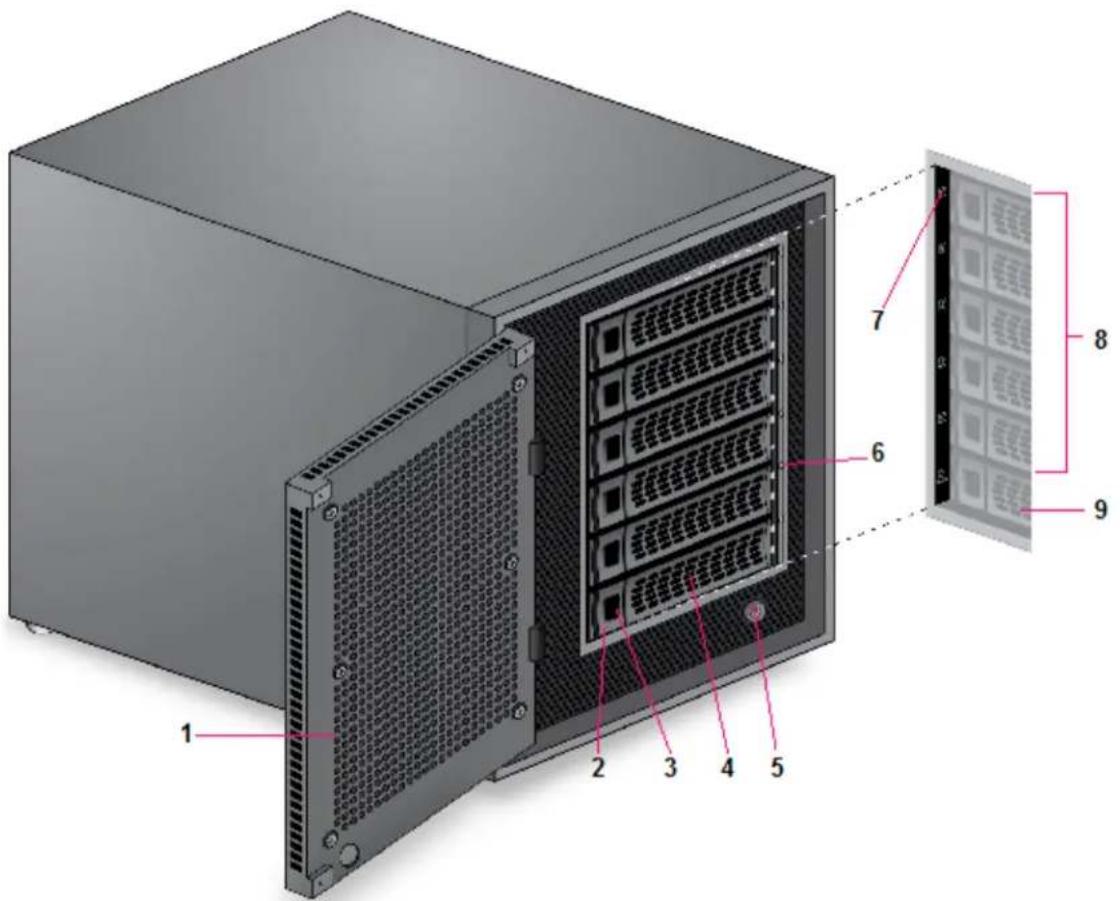
Figure 60. EDA 500 drive bays
- Drive bay door
- Disk tray release latch
- Recessed disk tray handle lock
- Disk tray handle
- Power button
- Disk LED
- Disk label
- Active drive bays
- Cold spare drive bay
Rear Panel
The following figure shows the rear panel of EDA 500.
ReadyNAS OS 6 Desktop Storage Systems
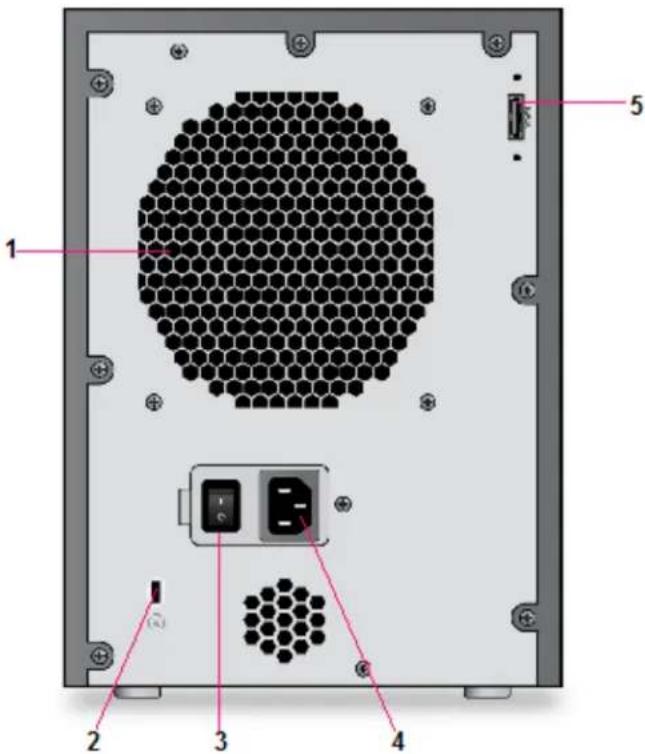
Figure 61. EDA 500 rear panel
- Exhaust fan
- Kensington lock
- Power switch
- Power cable socket
- eSATA port
Status Information
You can obtain information about the status of your storage system by reviewing the indicators listed in the following table.
Table 19. EDA 500 indicator descriptions
| DescriptionIndicator | |
| Power LED | The Power LED indicates these states:On. Powered on.Off. Powered off. |
| eSATA LED | The eSATA LED indicates these states:On.The SATA link is established between the EDA 500 and a host.Off.The SATA link is not established. |
| Volume LED | The Volume LED indicates these states:On.The data volume or volumes are mounted by a host.Off. The data volume or volumes are not mounted. You can safely disconnect the eSATA cable. |
| Alert LED | The Alert LED indicates these states:On. The system needs attention. Use the local admin page to determine the problem. For more information, see the ReadyNAS OS 6 Software Manual, which is available at netgear.com/support/product/ReadyNAS_OS_6.Off. The system is healthy. |
| Disk LEDs | A disk LED next to each active drive bay indicates the status of the disk inside.(The cold spare drive bay has no LED.) The disk LEDs indicate these states:Solid blue. Power is on and the disk is operating normally.Blinking blue. The disk is active.Solid red. The disk was removed, failed, or is resynchronizing. See the display screen for details.Off. No disk is present. |
Power On and Shut Down
This section describes how to power on and shut down your system. If you must shut down the system, use the preferred shutdown method whenever possible.
Power On
When the system is connected to a power supply and the Power switch is in the On position, the system automatically powers on.
ReadyNAS OS 6 Desktop Storage Systems
When connected to a host that is powered on, the EDA 500 automatically powers on. The EDA 500 detects a powered-on host through the eSATA link.
You can also power on the system by pressing the Power button on the front panel of the system.
Preferred Shutdown
If possible, always unmount the EDA 500 volumes from the host before shutting down the EDA 500.
Use the ReadyNAS local admin page to gracefully shut down the EDA 500. For information about how to gracefully shut down the EDA 500 using the ReadyNAS local admin page, see the ReadyNAS OS 6 Software Manual, which is available at netgear.com/support/product/ReadyNAS_OS_6.
Forced Shutdown
Perform a forced shutdown only if the storage system is not responding.
To perform a forced shutdown:
- Flip the Power switch on the back panel of the system to the Off position.
This chapter describes how to reformat, add, and replace disks in your ReadyNAS OS 6 storage system.
For information about configuring disks on your storage system, see the ReadyNAS OS 6 Software Manual, which is available at netgear.com/support/product/ReadyNAS_OS_6.
This chapter includes the following topics:
- Disk Trays on page 163
• Supported Disks on page 164
• Previously Formatted Disks on page 165 - Add a Disk on page 166
- Replace a Disk on page 175
ReadyNAS OS 6 Desktop Storage Systems
Disk Trays
All systems except the EDA 500 use standard disk trays. The EDA 500 comes with its own special disk trays. This section describes both the standard and EDA 500 disk trays.
Note For some disks, first remove the plastic mounting bracket from the disk tray before you mount the disk to the disk tray. After you mount the disk to the disk tray, use the screws to secure the disk to the disk tray.
Standard Disk Tray
The following figure shows the features of the standard disk tray. This disk tray is used in all systems except the EDA 500. For information about the EDA 500 disk tray, see EDA 500 Disk Tray on page 164.
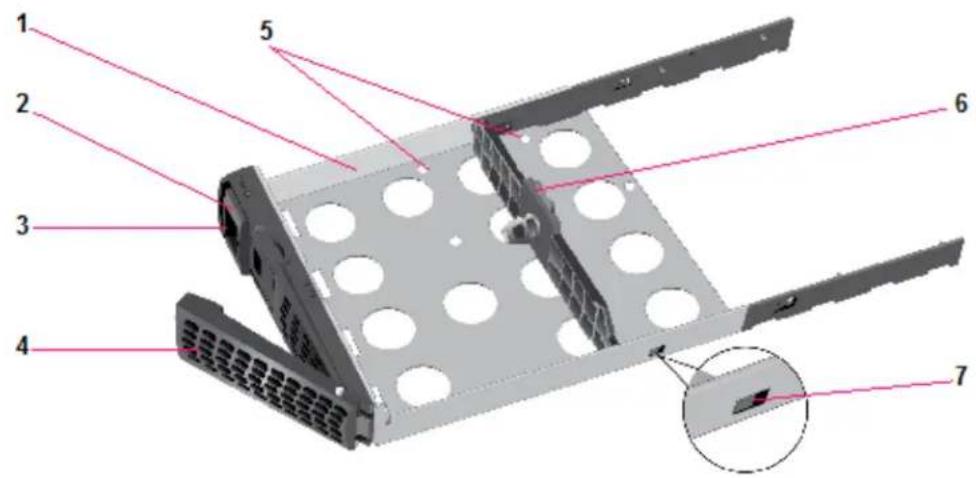
Figure 62. Standard disk tray
- Disk tray
- Disk tray release latch
- Recessed disk tray handle lock
- Disk tray handle
- Disk screw holes
- Mounting bracket
- Bracket lock
IMPORTANT:
To maintain adequate airflow, make sure that all disk trays remain in the drive bays, even if no disk is installed in the tray. Do not use standard disk trays with the EDA 500. Use only EDA 500 disk trays with the EDA 500.
ReadyNAS OS 6 Desktop Storage Systems
EDA 500 Disk Tray
The following figure shows the features of the EDA 500 disk tray. The EDA 500 disk tray and the standard disk tray are the same, except for the EMI shielding on the EDA 500 disk tray. For this reason, use only EDA 500 disk trays with the EDA 500.
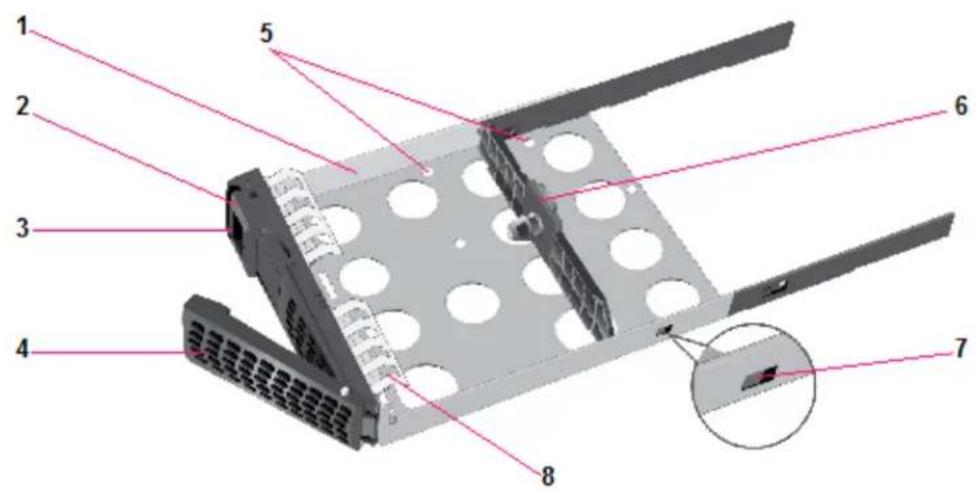
Figure 63. EDA 500 disk tray
- Disk tray
- Disk tray release latch
- Recessed disk tray handle lock
- Disk tray handle
- Disk screw holes
- Mounting bracket
- Bracket lock
- EMI shielding
IMPORTANT:
Use only EDA 500 disk trays with the EDA 500. Do not use standard disk trays with the EDA 500.
To maintain adequate airflow, make sure that all disk trays remain in the drive bays, even if no disk is installed in the tray.
Supported Disks
Use only supported SATA hard disk drives (HDD) or solid state drives (SSD) in your ReadyNAS storage system. If you use disks that are not supported, NETGEAR technical support will not provide assistance. For a list of supported disks, see the NETGEAR Hardware Compatibility List at netgear.com/readynas-hcl.
Previously Formatted Disks
This section describes how to use previously formatted disks with your ReadyNAS OS 6 storage system. Previously formatted disks must appear on the NETGEAR Hardware Compatibility List, which is available at netgear.com/readynas-hcl.
Reformat Previously Formatted Disks
If you want to use disks that were previously formatted for an operating system other than ReadyNAS OS 6 (for example, Windows or RAIDiator), you must reformat the disks.
If you want to use disks from another ReadyNAS OS 6 storage system, see Migrate a Volume on page 166.
Note If you try to use previously formatted disks in a system that does not contain any other disks, the system does not boot and ReadyCLOUD does not discover your device. If you use RAIDar to discover your device, RAIDar displays a "Corrupt Root" error message. If you try to use previously formatted disks in a system that already contains usable disks, the system does not reformat or use the previously formatted disks. Any data on the previously formatted disk remains intact.
The following instructions describe how to reformat previously formatted disks in a ReadyNAS OS 6 system. This procedure assumes that the system does not contain any other disks.
To reformat previously formatted disks with a diskless ReadyNAS OS 6 system:
- Gracefully shut down the storage system.
For information about how to gracefully shut down your system, see the Preferred Shutdown section of the chapter that describes your system.
- Install the disks.
For more information, see Add a Disk on page 166.
- Reset the system to its factory default settings.

WARNING:
This process erases all data and reformats all disks into a single X-RAID volume. If you want to preserve the data on the disks, you must back up the data to an external drive before using the disks in your ReadyNAS storage system.
For information about how to reset the system to its factory default settings, see the Boot Menu section of the chapter that describes your system.
The disk is reformatted and becomes available for use with your ReadyNAS OS 6 storage system.
ReadyNAS OS 6 Desktop Storage Systems
Migrate a Volume
You can migrate a volume from one ReadyNAS OS 6 storage system to another, as long as you migrate every disk in the volume. For example, if you want to migrate a volume that contains two disks, you must add both disks to the new system. If you add only part of a volume to the new system, the system recognizes the disk as a degraded volume.
If your ReadyNAS storage system is operating with one or more disks, you can add disks while the system is running. The new system recognizes the migrated volume and its data. For more information about adding a disk while the system is running, see Add a Disk on page 166.
If your ReadyNAS storage system does not have any disks installed, perform the following procedure.
To migrate a volume to a diskless ReadyNAS OS 6 system:
- Gracefully shut down the new (diskless) storage system.
For information about how to gracefully shut down your system, see the Preferred Shutdown section of the chapter that describes your system.
- Remove each disk in the volume from the old system.
- Install each disk in the volume into the new storage system.
For more information, see Add a Disk on page 166.
- Turn on the new system by pressing the Power button.
The new system recognizes the migrated volume and its data.
Add a Disk
You can add a 3.5-inch hard disk drive, a 2.5-inch hard disk drive, or a 2.5-inch solid state drive to an empty drive bay.
If you want to add a previously formatted disk to your storage system, see the instructions in Previously Formatted Disks on page 165.
Add a 3.5-Inch Disk
To add a 3.5-inch hard disk drive (HDD):
-
Determine whether you must shut down your system:
-
If you are adding disks to a diskless system, gracefully shut down the system.
For information about how to gracefully shut down your system, see the Preferred Shutdown section of the chapter that describes your system. -
If your system is operating with one or more disks, you can add disks while the system is running.
You do not need to shut down the system. -
If necessary, slide the recessed handle lock to the unlocked position.
ReadyNAS OS 6 Desktop Storage Systems
- Press the disk tray release latch.
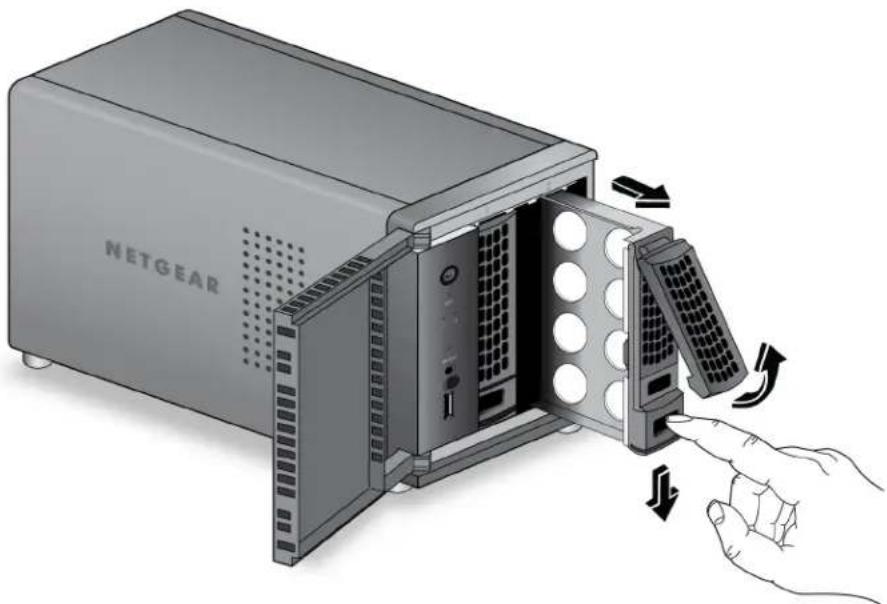
natural_image
Illustration of a NETGEAR server unit with internal components and a hand interacting with it (no text or symbols visible)The disk tray handle pops out.
- Pull out the disk tray.
- Separate the mounting bracket from the disk tray:
a. Press and hold the disk tray release latch.
b. While holding the release latch, use your other hand to pull out one end of the mounting bracket and then the other until the ends extend slightly past the disk tray.
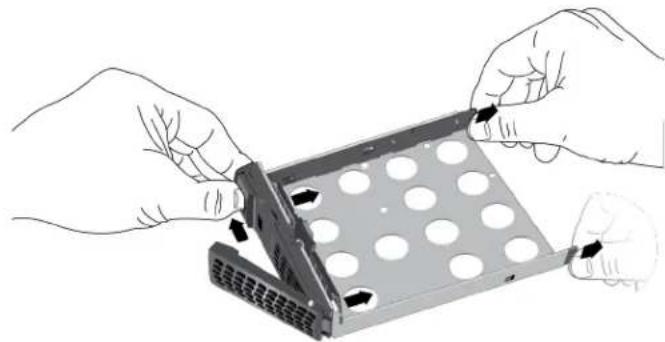
natural_image
Illustration of hands installing a component on a metal tray with circular holes (no text or symbols)ReadyNAS OS 6 Desktop Storage Systems
Make sure that the ends of the mounting bracket are even with each other.
c. Slide the bracket down the disk tray, keeping both sides of the bracket even with each other.
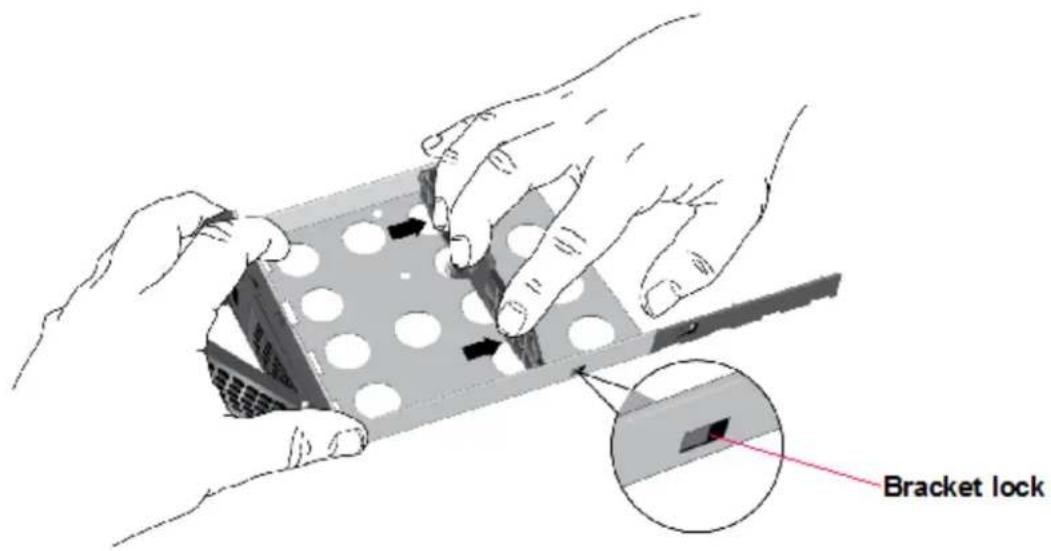
The mounting bracket stops when it hits the bracket lock.
The bracket lock prevents the mounting bracket from sliding all the way off the disk tray.
- Attach the new HDD to the mounting bracket.
ReadyNAS OS 6 Desktop Storage Systems
Make sure that the HDD mounting holes are aligned with the bracket's mounting posts and that the HDD connectors face the interior of the disk tray.
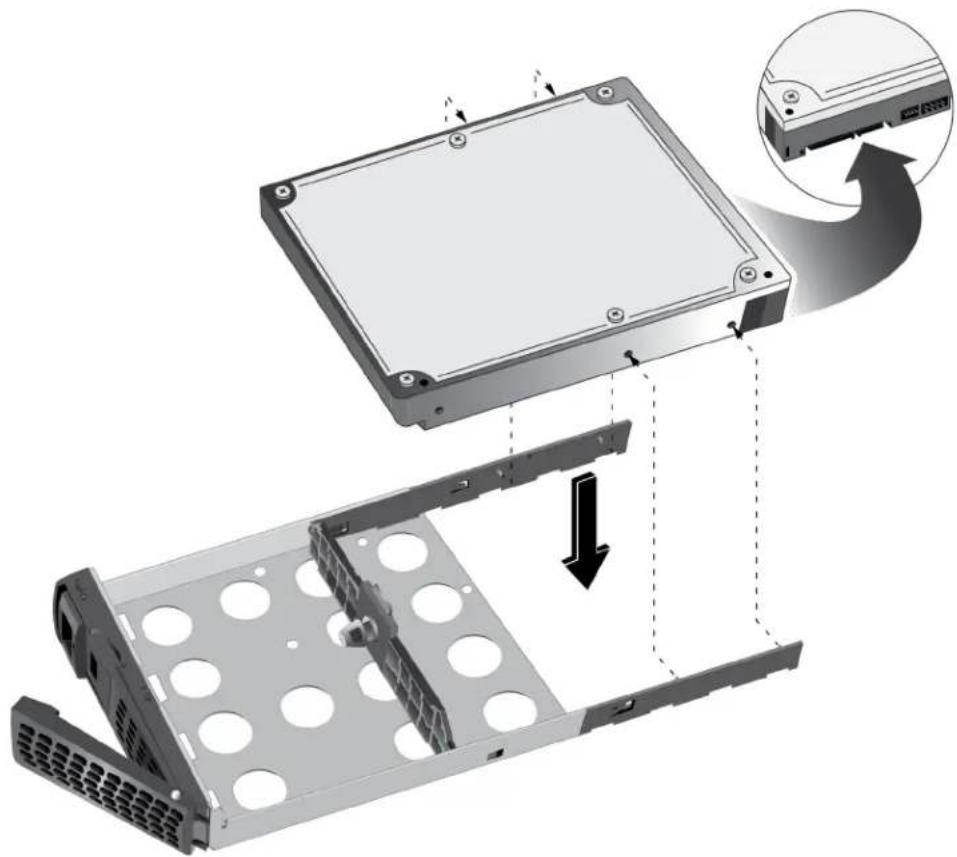
natural_image
Diagram showing a computer hard drive assembly with an inset close-up of the component (no text or symbols present)ReadyNAS OS 6 Desktop Storage Systems
- Push the mounting bracket and HDD back into the disk tray.
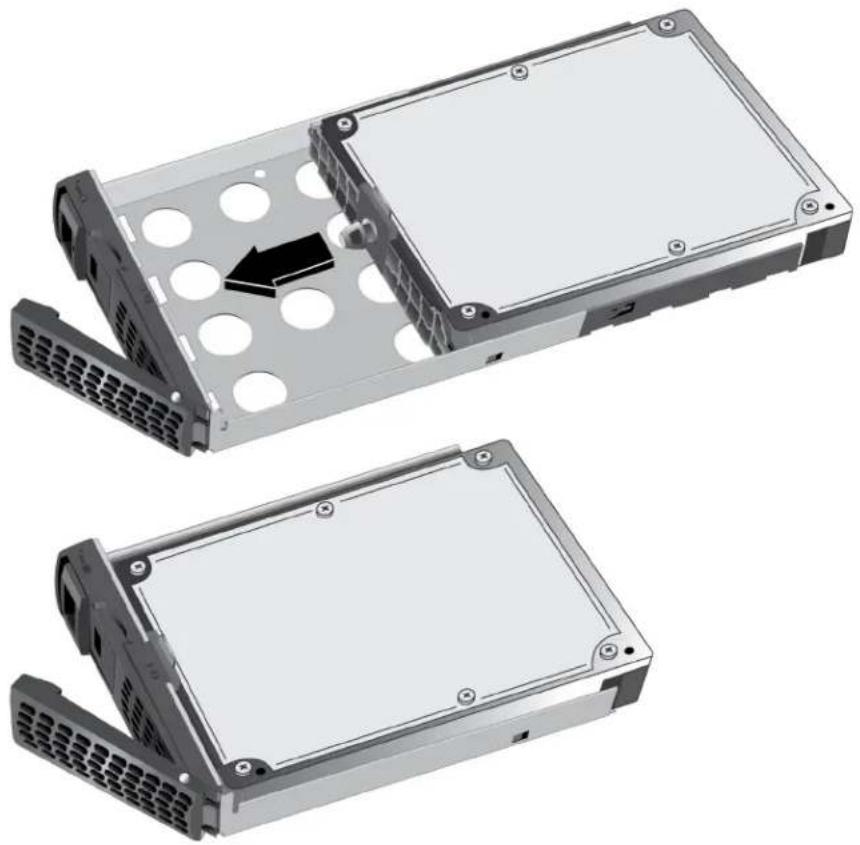
natural_image
Two views of a computer hard drive chassis showing internal components and mounting holes (no text or symbols visible)
WARNING:
To prevent damage to your system, make sure that the disk tray is correctly oriented before inserting it into the drive bay.
-
Insert the disk tray back into the drive bay of the storage system.
-
For 2-bay and 4-bay systems, insert the disk tray so that the disk tray release latch is near the bottom of the system.
-
For 6-bay systems, insert the disk tray so that the disk tray release latch is on the left side of the system.
-
Press down on the disk tray handle until it latches closed.
The disk tray is secured in the drive bay.
- If necessary, turn on your system by pressing the Power button.
If the disk that you added was not previously formatted, the system uses the disk in one of the following ways:
ReadyNAS OS 6 Desktop Storage Systems
- If you are adding the disk to a system that uses X-RAID, the system automatically determines whether the disk is used for protection or storage. The new disk is incorporated in the background while you continue to use your system.
- If you are adding the disk to a system that uses Flex-RAID, the disk becomes available for use. You use the local admin page to manually configure the new disk.
For more information about X-RAID, Flex-RAID, and using the local admin page, see the ReadyNAS OS 6 Software Manual, which is available at netgear.com/support/product/ReadyNAS_OS_6.
Add a 2.5-Inch Disk
To add a 2.5-inch hard disk drive (HDD) or 2.5-inch solid state drive (SSD):
-
Determine whether you must shut down your system:
-
If you are adding disks to a diskless system, gracefully shut down the system.
For information about how to gracefully shut down your system, see the Preferred Shutdown section of the chapter that describes your system. -
If your system is operating with one or more disks, you can add disks while the system is running. You do not need to shut down the system.
-
If necessary, slide the recessed handle lock to the unlocked position.
- Press the disk tray release latch.
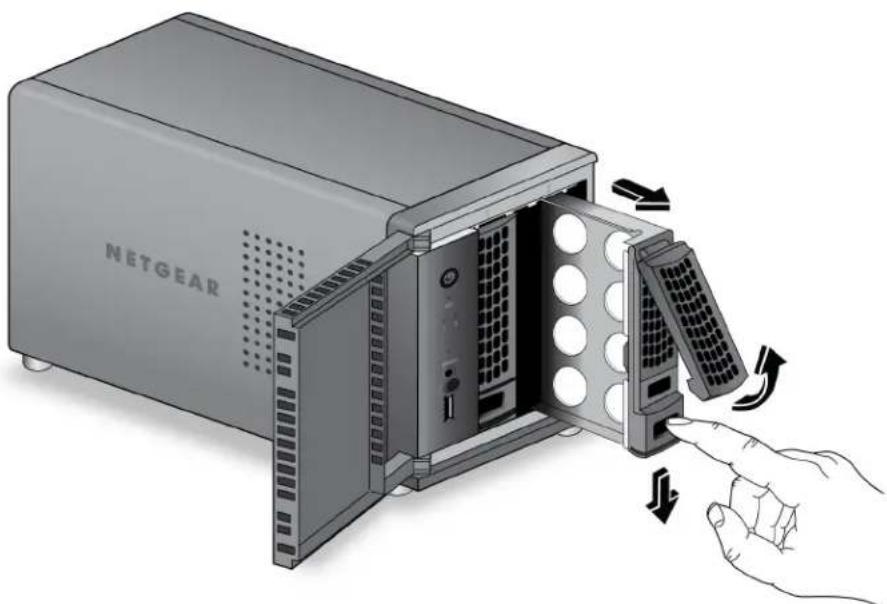
natural_image
Illustration of a NETGEAR server unit with internal components and a hand inserting a button (no text or symbols)The disk tray handle pops out.
- Pull out the disk tray.
- Remove the mounting bracket from the disk tray:
ReadyNAS OS 6 Desktop Storage Systems
a. Press and hold the disk tray release latch.
b. While holding the release latch, use your other hand to pull out one end of the mounting bracket and then the other until the ends extend slightly past the disk tray.
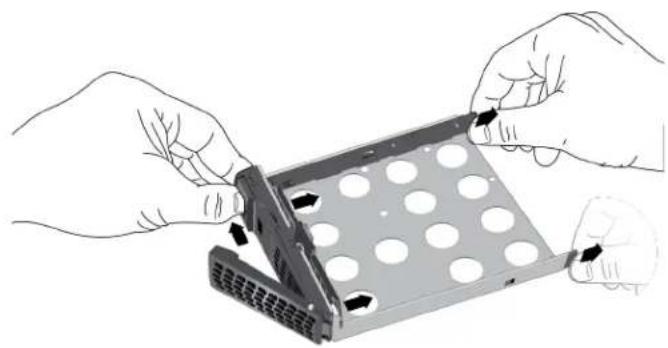
natural_image
Illustration of hands installing a hard drive into a perforated metal tray (no text or symbols visible)Make sure that the ends of the mounting bracket are even with each other.
c. Slide the bracket down the disk tray, keeping both sides of the bracket even with each other.
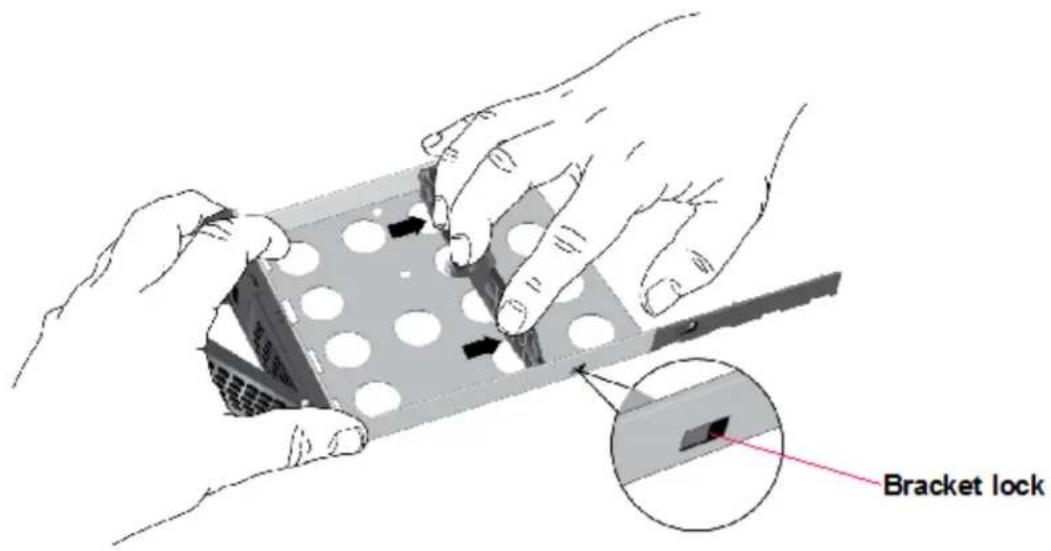
The mounting bracket stops when it hits the bracket lock.
The bracket lock prevents the mounting bracket from sliding all the way off the disk tray.
ReadyNAS OS 6 Desktop Storage Systems
d. Push the mounting bracket out of each bracket lock using a pointed object, such as a pen.
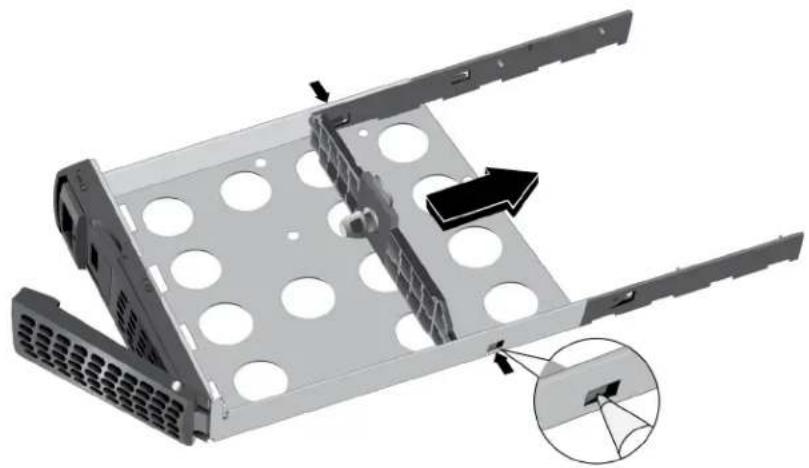
natural_image
3D diagram of a computer hard drive chassis with mounting holes and a close-up inset showing internal components (no text or symbols)The mounting bracket is released from the bracket locks.
e. Slide the mounting bracket out of the disk tray.
The mounting bracket is not used to secure 2.5-inch HDDs or SSDs.
- Place the new 2.5-inch HDD or SSD in the disk tray.
- Secure the HDD or SSD to the disk tray using the screws that came with your storage system. Make sure that the HDD or SSD connectors face the interior of the disk tray.
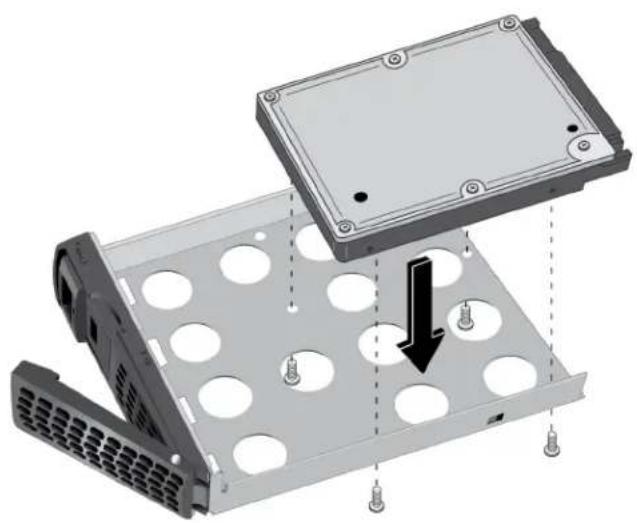
natural_image
3D diagram of a computer hardware component with mounting holes and a highlighted rectangular housing, showing no text or symbols.ReadyNAS OS 6 Desktop Storage Systems
Make sure that the HDD or SSD is installed on the correct side of the disk tray.
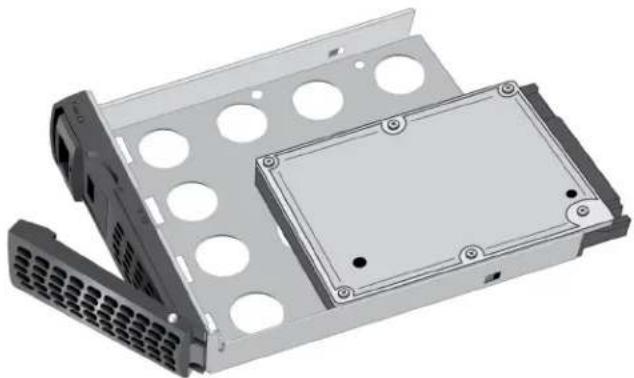
natural_image
3D rendering of a computer hard drive housing with mounting holes and ventilation slots (no text or symbols visible)
WARNING:
To prevent damage to your system, make sure that the disk tray is correctly oriented before inserting it into the drive bay.
-
Insert the disk tray back into the drive bay of the storage system.
-
For 2-bay and 4-bay systems, insert the disk tray so that the disk tray release latch is near the bottom of the system.
-
For 6-bay systems, insert the disk tray so that the disk tray release latch is on the left side of the system.
-
Press down on the disk tray handle until it latches closed.
The disk tray is secured in the drive bay.
- If necessary, turn on your system by pressing the Power button.
If the disk that you added was not previously formatted, the system uses the disk in one of the following ways:
- If you are adding the disk to a system that uses X-RAID, the system automatically determines whether the disk is used for protection or storage. The new disk is incorporated in the background while you continue to use your system.
- If you are adding the disk to a system that uses Flex-RAID, the disk becomes available for use. You use the local admin page to manually configure the new disk.
For more information about X-RAID, Flex-RAID, and using the local admin page, see the ReadyNAS OS 6 Software Manual, which is available at netgear.com/support/product/ReadyNAS_OS_6.
ReadyNAS OS 6 Desktop Storage Systems
Replace a Disk
If your volumes use a protected RAID configuration, your system can recover from the failure of a disk. When you replace the failed disk, the system rebuilds the volume using the new disk and no data from the volume is lost.
The Disk LEDs can help you identify a failed disk. For more information, see the Status Information section of the chapter that describes your system. You can also use the local admin page to set up email alerts that notify you when a disk fails. In addition, the local admin page provides information about the failed disk.
For information about RAID configurations, setting up email alerts, and using the local admin page, see the ReadyNAS OS 6 Software Manual, which is available at netgear.com/support/product/ReadyNAS_OS_6.
ReadyNAS supports hot-swap drive bays, so you do not need to power down your storage system when replacing a disk.
If you are replacing a disk with a previously formatted disk, see the instructions in Previously Formatted Disks on page 165.

WARNING:
Replace one disk at a time. Wait for the volume to resynchronize your data before replacing another disk. If you attempt to replace more than one disk at a time, the system will crash.
Replace a 3.5-Inch Disk
To replace a 3.5-inch hard disk drive (HDD):
- If necessary, slide the recessed handle lock to the unlocked position.
- Press the disk tray release latch.
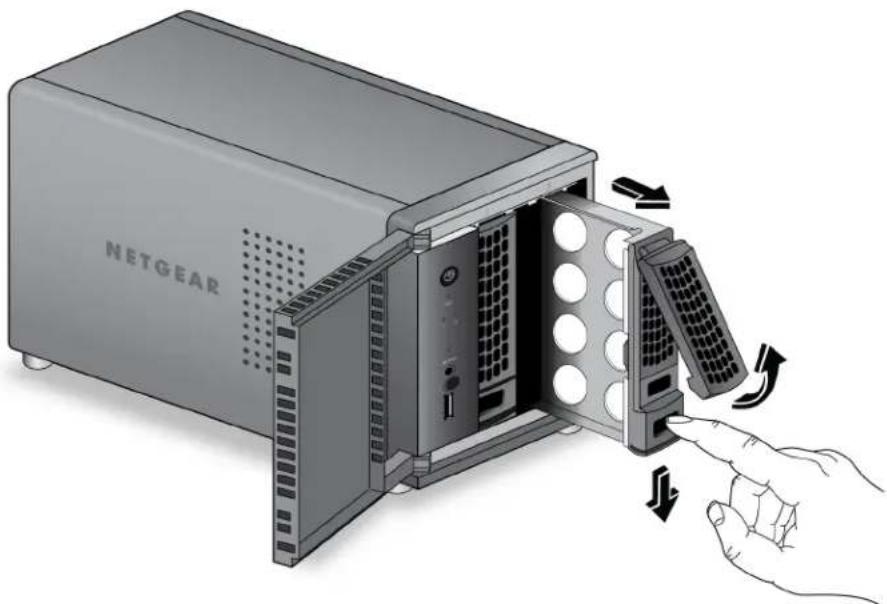
natural_image
Illustration of a NETGEAR server unit with internal components and a hand interacting with it (no text or symbols on the device itself)The disk tray handle pops out.
ReadyNAS OS 6 Desktop Storage Systems
-
Pull out the disk tray.
-
Press and hold the disk tray release latch.
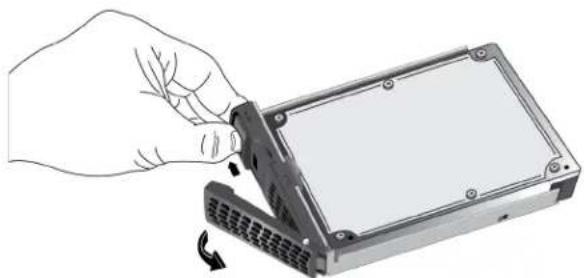
natural_image
Hand inserting a component into a hard drive chassis (no text or symbols visible)- While holding the disk tray release latch, pull out the mounting bracket and slide the bracket down the tray.
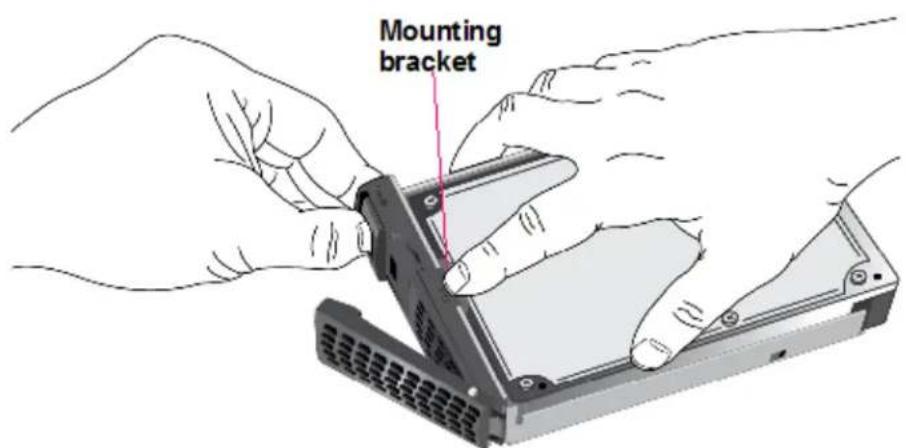
The mounting bracket stops when it hits the bracket lock.
ReadyNAS OS 6 Desktop Storage Systems
The bracket lock prevents the mounting bracket from sliding all the way off the disk tray.
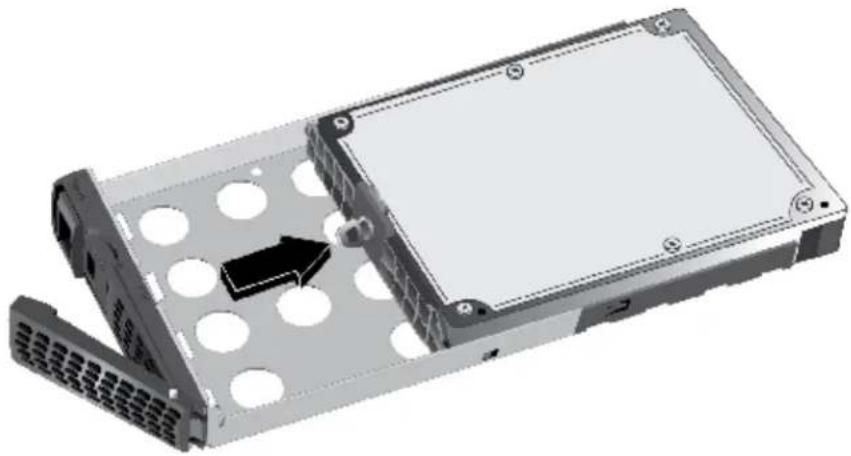
natural_image
3D rendering of an electronic device casing with mounting holes and a black arrow indicating a component (no text or symbols)- Remove the old HDD from the mounting bracket.
- Attach the new HDD to the mounting bracket.
ReadyNAS OS 6 Desktop Storage Systems
Make sure that the HDD mounting holes are aligned with the bracket's mounting posts and that the HDD connectors face the interior of the disk tray.
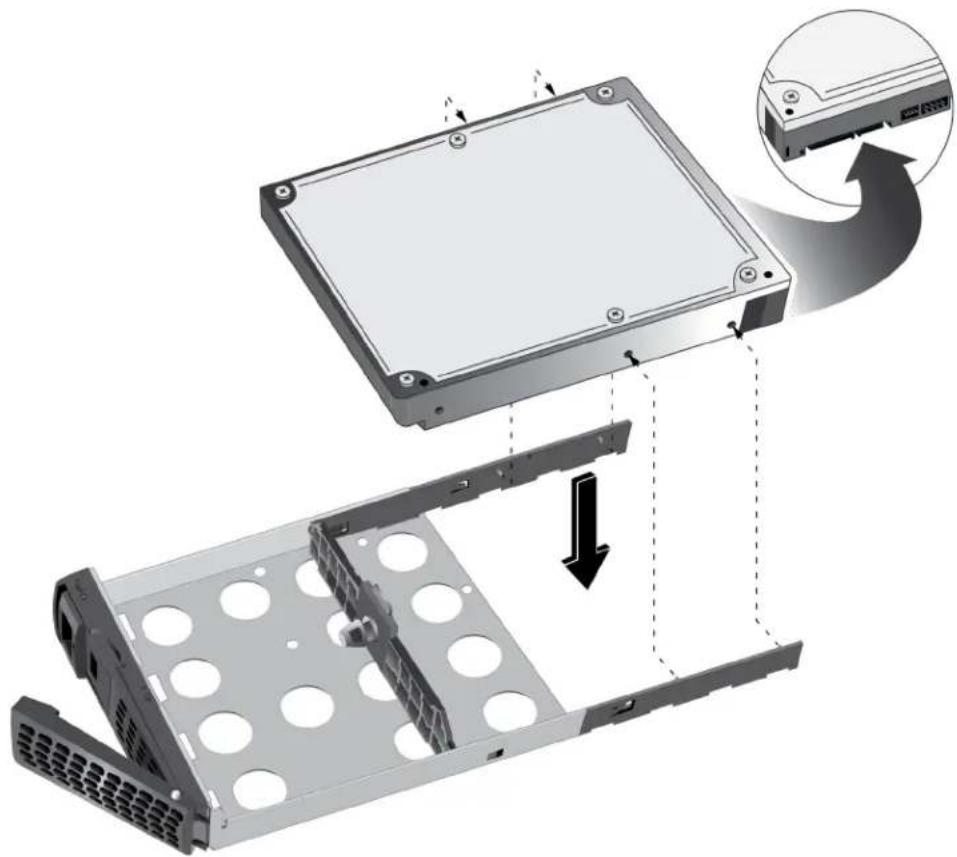
natural_image
Diagram showing a computer hard drive assembly with an inset view of the internal components (no text or symbols present)ReadyNAS OS 6 Desktop Storage Systems
- Push the mounting bracket and HDD back into the disk tray.
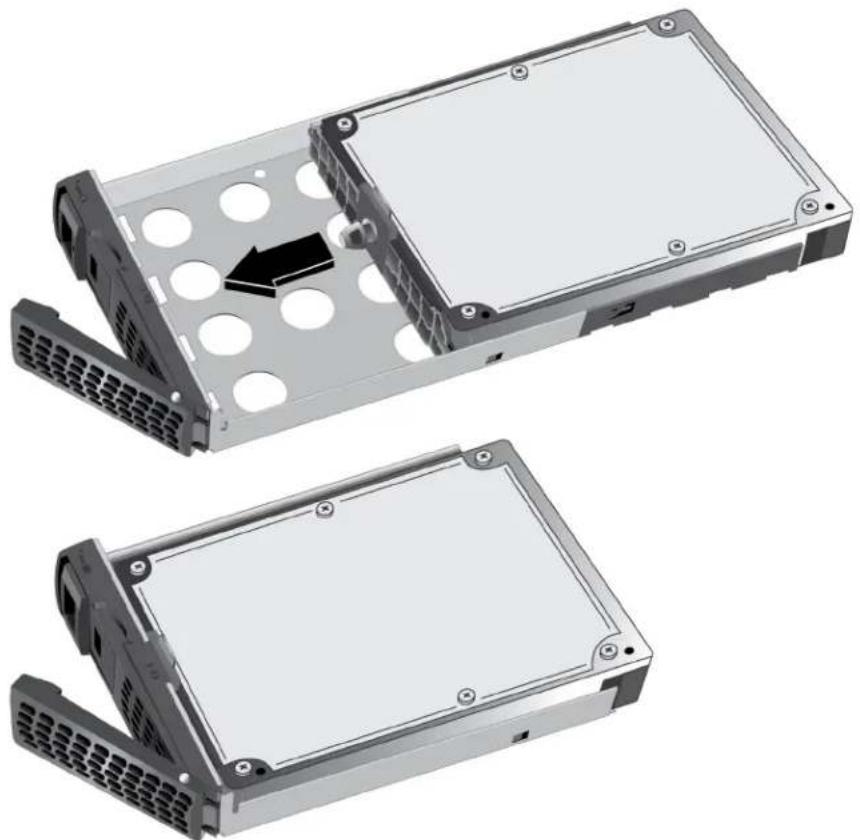
natural_image
Two views of a computer hard drive chassis showing internal components and mounting holes (no text or symbols visible)
WARNING:
To prevent damage to your system, make sure that the disk tray is correctly oriented before inserting it into the drive bay.
-
Insert the disk tray back into the drive bay of the storage system.
-
For 2-bay and 4-bay systems, insert the disk tray so that the disk tray release latch is near the bottom of the system.
-
For 6-bay systems, insert the disk tray so that the disk tray release latch is on the left side of the system.
-
Press down on the disk tray handle until it latches closed.
The disk tray is secured in the drive bay.
If the volume that contained the failed disk uses a protected RAID configuration, the system automatically resynchronizes the volume using the new disk. Resynchronization might take several hours, depending on the disk size. You can continue to use your storage system, although access is slower until the volume resynchronization finishes.
ReadyNAS OS 6 Desktop Storage Systems
For more information about RAID configurations, see the ReadyNAS OS 6 Software Manual, which is available at netgear.com/support/product/ReadyNAS_OS_6.
Replace a 2.5-Inch Disk
To replace a 2.5-inch hard disk drive (HDD) or 2.5-inch solid state drive (SSD):
- If necessary, slide the recessed handle lock to the unlocked position.
- Press the disk tray release latch.
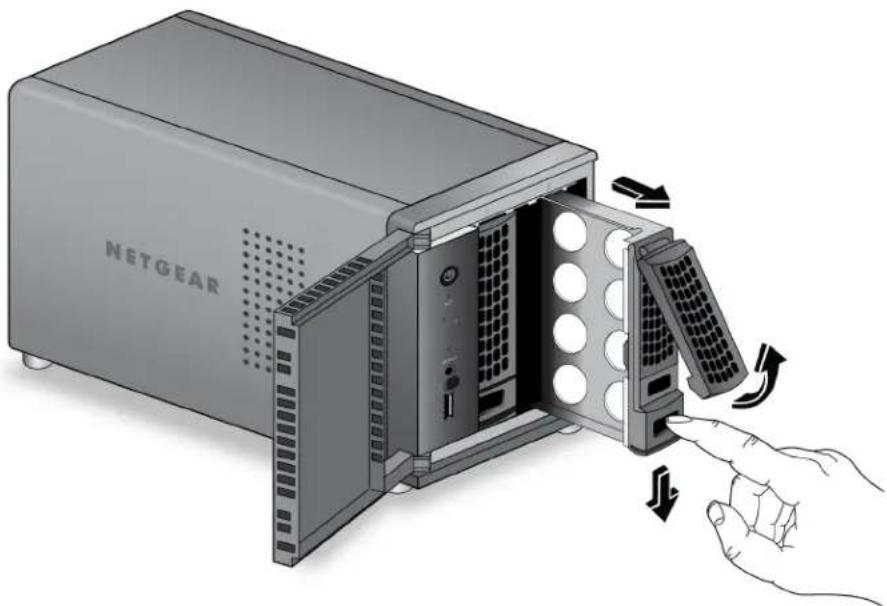
natural_image
Illustration of a NETGEAR server unit with a hand pointing to its front panel, showing internal components and directional arrows (no text or symbols on the device itself)The tray handle pops out.
- Pull out the disk tray.
- Replace the 2.5-inch HDD or SSD:
ReadyNAS OS 6 Desktop Storage Systems
a. Remove the screws and the old 2.5-inch HDD or SSD.
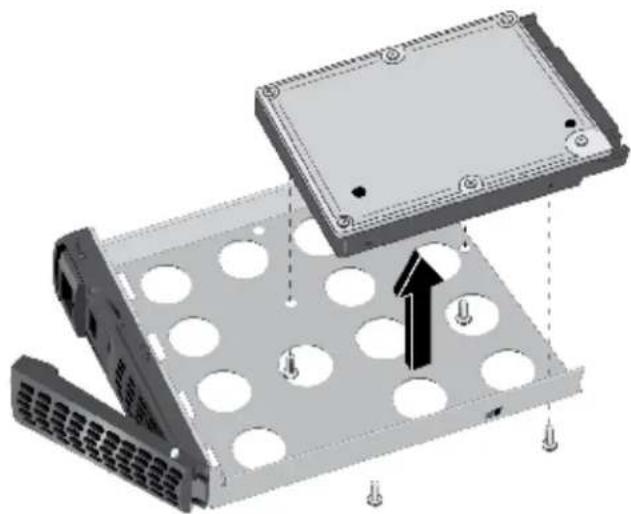
natural_image
3D diagram of a computer chassis with mounting holes and a highlighted component (no text or symbols)b. Place the new 2.5-inch HDD or SSD in the disk tray.
c. Secure the HDD or SSD to the disk tray using the screws.
Make sure that the disk connectors face the interior of the disk tray.
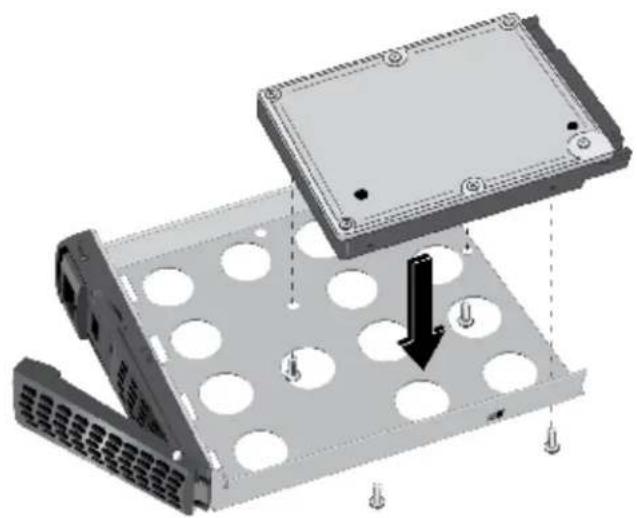
natural_image
3D diagram of a computer hardware component with mounting holes and a highlighted section showing a downward arrow (no text or symbols present)ReadyNAS OS 6 Desktop Storage Systems
Make sure that the HDD or SSD is installed on the correct side of the disk tray.
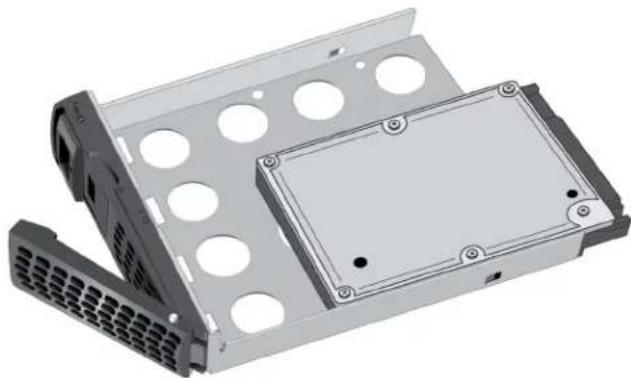
natural_image
3D rendering of a computer hard drive housing with mounting holes and ventilation slots (no text or symbols visible)
WARNING:
To prevent damage to your system, make sure that the disk tray is correctly oriented before inserting it into the drive bay.
-
Insert the disk tray back into the drive bay of the storage system.
-
For 2-bay and 4-bay systems, insert the disk tray so that the disk tray release latch is near the bottom of the system.
-
For 6-bay systems, insert the disk tray so that the disk tray release latch is on the left side of the system.
-
Press down on the disk tray handle until it latches closed.
The disk tray is secured in the drive bay.
If the volume that contained the failed disk uses a protected RAID configuration, the system automatically resynchronizes the volume using the new disk. Resynchronization might take several hours, depending on the disk size. You can continue to use your storage system, although access is slower until the volume resynchronization finishes.
For more information about RAID configurations, see the ReadyNAS OS 6 Software Manual, which is available at netgear.com/support/product/ReadyNAS_OS_6.
Defaults and Technical Specifications
A
This appendix includes the following sections:
• Factory Default Settings on page 184
- ReadyNAS 102 Technical Specifications on page 184
• ReadyNAS 104 Technical Specifications on page 186
• ReadyNAS 202 Technical Specifications on page 187
• ReadyNAS 212 Technical Specifications on page 188
• ReadyNAS 204 Technical Specifications on page 189
• ReadyNAS 214 Technical Specifications on page 191
• ReadyNAS 312 Technical Specifications on page 192
• ReadyNAS 314 Technical Specifications on page 193
• ReadyNAS 316 Technical Specifications on page 194
• ReadyNAS 422 Technical Specifications on page 196
• ReadyNAS 424 Technical Specifications on page 197
• ReadyNAS 516 Technical Specifications on page 201
• ReadyNAS 524X Technical Specifications on page 202
• ReadyNAS 526X Technical Specifications on page 204
• ReadyNAS 528X Technical Specifications on page 205
• ReadyNAS 626X Technical Specifications on page 206
• ReadyNAS 628X Technical Specifications on page 208
• ReadyNAS 716X Technical Specifications on page 209
• EDA 500 Technical Specifications on page 210
• Safety Warnings on page 211
Factory Default Settings
The following table lists factory default settings for ReadyNAS OS 6 desktop storage systems.
Table 20. ReadyNAS OS 6 factory default settings
| DefaultFeature | ||
| Login | ||
| Default IP address | The default IP address for the ReadyNAS is assigned by the local router (DHCP server).If a router does not assign an IP address, the ReadyNAS defaults to the IP address https://169.254.x.x, where the last two octets are randomly generated based on the system's MAC address. | |
| adminAdmin user name (case-sensitive) | ||
| passwordAdmin login password (case-sensitive) | ||
| Management | ||
| System configuration | ReadyNAS local admin page web-based configuration and status monitoring | |
| status monitoring web | ReadyCloud for Windows, Mac, and LinuxDiscovery, setup, and multi-storage system | |
| LAN Connections | ||
| See product labelMAC address | ||
| 1500MTU size | ||
| Auto Sense 10/100/1000BASE-T, RJ-45Ethernet port | ||
| DHCP acquiredLAN IP address | ||
ReadyNAS 102 Technical Specifications
The ReadyNAS 102 storage system meets the following technical specifications:
General:
• Marvell Armada 370 1.2 GHz CPU
- 512 MB memory
- Two-bay storage
- One eSATA port
• One USB 2.0 port (front)
- Two USB 3.0 ports (back)
- One GbE port
Physical dimensions (h x w x d):
142 x 101 x 220 mm (5.60 x 3.98 x 8.70 in.)
Physical weight:
2.12 kg (4.67 lb) without disks
Power consumption:
• BTU at full power supply utilization: 31.7W
• In operation: 31W
• Power off (Wake On LAN): 1.0W
• Power off: 210 mW
Electrical:
• External 60 W (12V, 5A) AC power supply
- Input: 100–240V AC, 50/60 Hz
Environmental requirements:
• Operating temperature: 0 to 40°C (32° to 104°F)
- Operating humidity: 20 to 80% relative humidity (noncondensing)
• Storage temperature: -20 to 70°C (-4 to 158°F)
• Storage humidity: 5 to 95% relative humidity (noncondensing)
- Software-controlled 92 mm chassis cooling fan
Certifications:
FCC Class B, CE Class B, RoHS, VCCI Class B
ReadyNAS 104 Technical Specifications
The ReadyNAS 104 storage system meets the following technical specifications:
General:
• Marvell Armada 370 1.2 GHz CPU
- 512 MB memory
- Four-bay storage
- One eSATA port
• One USB 2.0 port (front)
- Two USB 3.0 ports (back)
- Two GbE ports
- LCD display
Physical dimensions (h x w x d):
205 x 134 x 223 mm (8.97 x 5.28 x 8.78 in.)
Physical weight:
4.70 kg (10.36 lb) without disks
Power consumption:
• BTU at full power supply utilization: 47W
• In operation: 45.6W
• Power off (Wake On LAN): 1.4W
• Power off: 0.44 W
Electrical:
• External 90 W (12V, 7A) AC power supply
- Input: 100–240VAC, 50/60 Hz
Environmental requirements:
• Operating temperature: 0 to 40°C (32° to 104°F)
- Operating humidity: 20 to 80% relative humidity (noncondensing)
• Storage temperature: -20 to 70°C (-4 to 158°F)
• Storage humidity: 5 to 95% relative humidity (noncondensing)
- Software-controlled 92 mm chassis cooling fan
Certifications:
FCC Class B, CE Class B, RoHS, VCCI Class B
ReadyNAS 202 Technical Specifications
The ReadyNAS 202 storage system meets the following technical specifications:
General:
• Annapurna Labs AL212 1.4 GHz processor
- 2 GB memory
- Two-bay storage
- One eSATA port
• One USB 3.0 port (front)
- Two USB 3.0 ports (back)
- Two GbE ports
Physical dimensions (h x w x d):
142 x 101 x 220 mm (5.60 x 3.98 x 8.70 in.)
Physical weight:
2.12 kg (4.67 lb) without disks
Power consumption:
• BTU at full power supply utilization: 39.5W
• In operation: 38W
• Power off (Wake On LAN): 1.31W
Electrical:
• External 60 W (12V, 5A) AC power supply
- Input: 100–240 VAC, 50/60 Hz
Environmental requirements:
• Operating temperature: 0 to 40°C (32° to 104°F)
- Operating humidity: 20 to 80% relative humidity (noncondensing)
• Storage temperature: -20 to 70°C (-4 to 158°F)
• Storage humidity: 5 to 95% relative humidity (noncondensing)
- Software-controlled 92 mm chassis cooling fan
Certifications:
FCC Class B, CE Class B, RoHS, VCCI Class B, CCC
ReadyNAS 212 Technical Specifications
The ReadyNAS 212 storage system meets the following technical specifications:
General:
• Annapurna Labs AL214 1.4 GHz processor
- 2 GB memory
- Two-bay storage
- One eSATA port
• One USB 3.0 port (front)
- Two USB 3.0 ports (back)
- Two GbE ports
Physical dimensions (h x w x d):
142 x 101 x 220 mm (5.60 x 3.98 x 8.70 in.)
Physical weight:
2.12 kg (4.67 lb) without disks
Power consumption:
• BTU at full power supply utilization: 39.5W
• In operation: 38W
• Power off (Wake On LAN): 1.31W
Electrical:
• External 60W (12V, 5A) AC power supply
- Input: 100–240 VAC, 50/60 Hz
Environmental requirements:
• Operating temperature: 0 to 40°C (32° to 104°F)
- Operating humidity: 20 to 80% relative humidity (noncondensing)
• Storage temperature: -20 to 70°C (-4 to 158°F)
• Storage humidity: 5 to 95% relative humidity (noncondensing)
- Software-controlled 92 mm chassis cooling fan
Certifications:
FCC Class B, CE Class B, RoHS, VCCI Class B, CCC
ReadyNAS 204 Technical Specifications
The ReadyNAS 204 storage system meets the following technical specifications:
General:
• Annapurna Labs AL212 1.4 GHz processor
- 2 GB memory
ReadyNAS OS 6 Desktop Storage Systems
- Four-bay storage
- One eSATA port
• One USB 2.0 port (front) - Two USB 3.0 ports (back)
- Two GbE ports
- LCD display
Physical dimensions (h x w x d):
205 x 134 x 223 mm (8.97 x 5.28 x 8.78 in.)
Physical weight:
4.70 kg (10.36 lb) without disks
Power consumption:
• BTU at full power supply utilization: 48.7W
• In operation: 46.8W
• Power off (Wake On LAN): 1.31W
Electrical:
• External 90W (12V, 7A) AC power supply
- Input: 100–240 VAC, 50/60 Hz
Environmental requirements:
• Operating temperature: 0 to 40°C (32° to 104°F)
- Operating humidity: 20 to 80% relative humidity (noncondensing)
• Storage temperature: -20 to 70°C (-4 to 158°F)
• Storage humidity: 5 to 95% relative humidity (noncondensing)
- Software-controlled 92 mm chassis cooling fan
Certifications:
FCC Class B, CE Class B, RoHS, VCCI Class B, CCC
ReadyNAS 214 Technical Specifications
The ReadyNAS 214 storage system meets the following technical specifications:
General:
• Annapurna Labs AL214 1.4 GHz processor
- 2 GB memory
- Four-bay storage
- One eSATA port
• One USB 2.0 port (front)
- Two USB 3.0 ports (back)
- Two GbE ports
- LCD display
Physical dimensions (h x w x d):
205 x 134 x 223 mm (8.97 x 5.28 x 8.78 in.)
Physical weight:
4.70 kg (10.36 lb) without disks
Power consumption:
• BTU at full power supply utilization: 48.7W
• In operation: 46.8W
• Power off (Wake On LAN): 1.31W
Electrical:
• External 90W (12V, 7A) AC power supply
- Input: 100–240 VAC, 50/60 Hz
Environmental requirements:
• Operating temperature: 0 to 40°C (32° to 104°F)
- Operating humidity: 20 to 80% relative humidity (noncondensing)
ReadyNAS OS 6 Desktop Storage Systems
• Storage temperature: -20 to 70°C (-4 to 158°F)
• Storage humidity: 5 to 95% relative humidity (noncondensing)
- Software-controlled 92 mm chassis cooling fan
Certifications:
FCC Class B, CE Class B, RoHS, VCCI Class B, CCC
ReadyNAS 312 Technical Specifications
The ReadyNAS 312 storage system meets the following technical specifications:
General:
• Intel Atom 2.1 GHz Dual Core CPU
- 2 GB memory
- Two-bay storage
- One eSATA port
• One HDMI port (not currently supported)
• One USB 2.0 port (front)
- Two USB 3.0 ports (back)
- Two LAN ports
• Infrared remote receiver
Physical dimensions (h x w x d):
142 x 101 x 220 mm (5.60 x 3.98 x 8.70 in.)
Physical weight:
2.22 kg (4.89 lb) without disks
Power consumption:
• BTU at full power supply utilization: 50.58W
• In operation: 34.92W
• Power off (Wake On LAN): 627.07 mW
• Power off: 266.61 mW
Electrical:
• External 60 W (12V, 5A) AC power supply
- Input: 100–240 VAC, 50/60 Hz
Environmental requirements:
• Operating temperature: 0 to 40°C (32° to 104°F)
- Operating humidity: 20 to 80% relative humidity (noncondensing)
• Storage temperature: -20 to 70°C (-4 to 158°F)
• Storage humidity: 5 to 95% relative humidity (noncondensing)
- Software-controlled 92 mm chassis cooling fan
Certifications:
FCC Class B, CE Class B, RoHS, VCCI Class B
ReadyNAS 314 Technical Specifications
The ReadyNAS 314 storage system meets the following technical specifications:
General:
• Intel Atom 2.1 GHz Dual Core CPU
- 2 GB memory
- Four-bay storage
- Two eSATA ports (one shared USB 2.0 and eSATA port)
• One HDMI port (not currently supported)
• One USB 2.0 port (front)
- Two USB 3.0 ports (back)
- Two LAN ports
- LCD display
• Infrared remote receiver
Physical dimensions (h x w x d):
205 x 134 x 223 mm (8.97 x 5.28 x 8.78 in.)
Physical weight:
3.97 kg (8.75 lb) without disks
Power consumption:
• BTU at full power supply utilization: 69.45W
• In operation: 48.71 W
• Power off (Wake On LAN): 843.36 mW
• Power off: 472.77 mW
Electrical:
• External 90W (12V, 7A) AC power supply
- Input: 100–240 VAC, 50/60 Hz
Environmental requirements:
• Operating temperature: 0 to 40°C (32° to 104°F)
- Operating humidity: 20 to 80% relative humidity (noncondensing)
• Storage temperature: -20 to 70°C (-4 to 158°F)
• Storage humidity: 5 to 95% relative humidity (noncondensing)
- Software-controlled 92 mm chassis cooling fan
Certifications:
FCC Class B, CE Class B, RoHS, VCCI Class B
ReadyNAS 316 Technical Specifications
The ReadyNAS 316 storage system meets the following technical specifications:
General:
• Intel Atom 2.1 GHz Dual Core CPU
- 2 GB memory
- Six-bay storage
- Two eSATA ports
ReadyNAS OS 6 Desktop Storage Systems
• One HDMI port (not currently supported)
• One USB 2.0 port (front)
- Two USB 3.0 ports (back)
- Two LAN ports
- LCD display
• Infrared remote receiver
- Proximity sensor
Physical dimensions (h x w x d):
259 x 192 x 287.5 mm (10.20 x 7.56 x 11.32 in.)
Physical weight:
7.49 kg (16.50 lb) without disks
Power consumption:
• BTU at full power supply utilization: 110.66W
• In operation: 54.94W
• Power off (Wake On LAN): 804.64 mW
• Power off: 338.42 mW
Electrical:
- Internal 200W server-rated AC power supply
• Input: 100-240 VAC, 50/60 Hz
Environmental requirements:
• Operating temperature: 0 to 40°C (32° to 104°F)
- Operating humidity: 20 to 80% relative humidity (noncondensing)
• Storage temperature: -20 to 70°C (-4 to 158°F)
• Storage humidity: 5 to 95% relative humidity (noncondensing)
- Software-controlled 120 mm chassis cooling fan
ReadyNAS OS 6 Desktop Storage Systems
Certifications:
FCC Class B, CE Class B, RoHS, VCCI Class B
ReadyNAS 422 Technical Specifications
The ReadyNAS 422 storage system meets the following technical specifications:
General:
• Intel Atom C3338 Dual Core Processor
- 2 GB DDR4 memory
- Two-bay storage
- One eSATA port
- Two USB 3.0 ports (one on the front and one on the back)
- Two 1 GbE LAN ports
• One micro USB console connector (marked as UART)
- OLED display
Physical dimensions (h x w x d):
194 x 135.5 x 239 mm (7.64 x 5.3 x 9.4 in.)
Physical weight:
3.52 kg (7.76 lb) without disks
Power consumption:
• BTU at full power supply utilization: 40.15W
• In operation: 34.86W
• Power off (Wake On LAN): 4.5W
• Power off: 270 mW
Electrical:
• External 60W AC power supply
- Input: 100–240 VAC, 50/60 Hz
Environmental requirements:
• Operating temperature: 0 to 45°C (32° to 113°F)
- Operating humidity: 20 to 80% relative humidity (noncondensing)
• Storage temperature: -20 to 70°C (-4 to 158°F)
• Storage humidity: 5 to 95% relative humidity (noncondensing)
- Software-controlled 92 mm chassis cooling fan
Certifications:
FCC Class B, CE Class B, RoHS, VCCI Class B
ReadyNAS 424 Technical Specifications
The ReadyNAS 424 storage system meets the following technical specifications:
General:
• Intel Atom C3338 Dual Core Processor
- 2 GB DDR4 memory
- Four-bay storage
- One eSATA port
- Two USB 3.0 ports (one on the front and one on the back)
- Two 1 GbE LAN ports
• One micro USB console connector (marked as UART)
- OLED display
Physical dimensions (h x w x d):
194 x 185 x 239 mm (7.64 x 7.3 x 9.4 in.)
Physical weight:
3.95 kg (8.7 lb) without disks
ReadyNAS OS 6 Desktop Storage Systems
Power consumption:
• BTU at full power supply utilization: 57.4W
• In operation: 43.09W
• Power off (Wake On LAN): 4.4W
• Power off: 400 mW
Electrical:
• External 90W AC power supply
- Input: 100–240 VAC, 50/60 Hz
Environmental requirements:
• Operating temperature: 0 to 45°C (32° to 113°F)
- Operating humidity: 20 to 80% relative humidity (noncondensing)
• Storage temperature: -20 to 70°C (-4 to 158°F)
• Storage humidity: 5 to 95% relative humidity (noncondensing)
- Software-controlled 120 mm chassis cooling fan
Certifications:
FCC Class B, CE Class B, RoHS, VCCI Class B
ReadyNAS 426 Technical Specifications
The ReadyNAS 426 storage system meets the following technical specifications:
General:
• Intel Atom C3538 Quad Core Processor, 2.1 GHz
- 4 GB DDR4 memory
- Six-bay storage
- One eSATA port
• One USB 3.0 port (front)
• One USB 3.0 port (back)
• Four 1 GbE LAN ports
ReadyNAS OS 6 Desktop Storage Systems
• One micro USB console connector (marked as UART)
- OLED display
Physical dimensions (h x w x d):
259 x 192 x 277 mm (10.2 x 7.55 x 10.9 in.)
Physical weight:
7.43 kg (16.38 lb) without disks
Power consumption:
• BTU at full power supply utilization: 68.57W
• In operation: 63.11W
• Power off (Wake On LAN): 4.313W
• Power off: 189 mW
Electrical:
- Internal 200W server-rated AC power supply
- Input: 100–240 VAC, 50/60 Hz
Environmental requirements:
• Operating temperature: 0 to 45°C (32° to 113°F)
- Operating humidity: 20 to 80% relative humidity (noncondensing)
• Storage temperature: -20 to 70°C (-4 to 158°F)
• Storage humidity: 5 to 95% relative humidity (noncondensing)
- Software-controlled 120 mm chassis cooling fan
Certifications:
FCC Class B, CE Class B, RoHS, VCCI Class B, CCC, MIC, BIS
ReadyNAS 428 Technical Specifications
The ReadyNAS 428 storage system meets the following technical specifications:
General:
• Intel Atom C3538 Quad Core Processor, 2.1 GHz
- 4 GB DDR4 memory
- Eight-bay storage
- One eSATA port
• One USB 3.0 port (front)
• One USB 3.0 port (back)
• Four 1 GbE LAN ports
• One micro USB console connector (marked as UART)
- OLED display
Physical dimensions (h x w x d):
310 x 192 x 278 mm (12.2 x 7.55 x 10.94 in.)
Physical weight:
9.01 kg (19.86 lb) without disks
Power consumption:
• BTU at full power supply utilization: 91.47W
• In operation: 78.15W
• Power off (Wake On LAN): 3.995W
• Power off: 189 mW
Electrical:
- Internal 200W server-rated AC power supply
- Input: 100–240 VAC, 50/60 Hz
Environmental requirements:
• Operating temperature: 0 to 45°C (32° to 113°F)
- Operating humidity: 20 to 80% relative humidity (noncondensing)
• Storage temperature: -20 to 70°C (-4 to 158°F)
• Storage humidity: 5 to 95% relative humidity (noncondensing)
- Two software-controlled 92 mm chassis cooling fans
Certifications:
FCC Class B, CE Class B, RoHS, VCCI Class B, CCC, MIC, BIS
ReadyNAS 516 Technical Specifications
The ReadyNAS 516 storage system meets the following technical specifications:
General:
• Intel Core i3 3.3 GHz Dual Core CPU
- 4 GB ECC memory
- Six-bay storage
- Three eSATA ports
- One HDMI port
• One USB 2.0 port (front)
- Two USB 3.0 ports (back)
- Two LAN ports
- LCD display
• Infrared remote receiver
- Proximity sensor
Physical dimensions (h x w x d):
259 x 192 x 287.5 mm (10.20 x 7.56 x 11.32 in.)
Physical weight:
8.00 kg (17.60 lb) without disks
ReadyNAS OS 6 Desktop Storage Systems
Power consumption:
• BTU at full power supply utilization: 153.54W
• In operation: 87.69W
• Power off (Wake On LAN): 798.08 mW
• Power off: 416.77 mW
Electrical:
- Internal 200W server-rated AC power supply
- Input: 100–240 VAC, 50/60 Hz
Environmental requirements:
• Operating temperature: 0 to 40°C (32° to 104°F)
- Operating humidity: 20 to 80% relative humidity (noncondensing)
• Storage temperature: -20 to 70°C (-4 to 158°F)
• Storage humidity: 5 to 95% relative humidity (noncondensing)
- Software-controlled 120 mm chassis cooling fan
Certifications:
FCC Class B, CE Class B, RoHS, VCCI Class B
ReadyNAS 524X Technical Specifications
The ReadyNAS 524X storage system meets the following technical specifications:
General:
• Intel Pentium processor D-1508
• 4 GB ECC DDR4 memory
- Four-bay storage
- One eSATA port
• One USB 3.0 port (front)
- Two USB 3.0 ports (back)
• One 1 GbE LAN port
• One 10 GbE LAN port
• One micro USB console connector (marked as UART)
- OLED display
Physical dimensions (h x w x d):
194 x 185 x 239 mm (7.64 x 7.28 x 9.4 in.)
Physical weight:
4.53 kg (10.0 lb) without disks
Power consumption:
• BTU at full power supply utilization: 74.9W
• In operation: 41.9W
• Power off (Wake On LAN): 5.3W
• Power off: 204 mW
Electrical:
• External 120W AC power supply
- Input: 100–240 VAC, 50/60 Hz
Environmental requirements:
• Operating temperature: 0 to 40°C (32° to 104°F)
- Operating humidity: 20 to 80% relative humidity (noncondensing)
• Storage temperature: -20 to 70°C (-4 to 158°F)
• Storage humidity: 5 to 95% relative humidity (noncondensing)
- Software-controlled 92 mm or 120 mm chassis cooling fan
Certifications:
FCC Class B, CE Class B, RoHS, VCCI Class B, CCC, MIC, BIS
ReadyNAS 526X Technical Specifications
The ReadyNAS 526X storage system meets the following technical specifications:
General:
• Intel Pentium processor D-1508
• 4 GB ECC DDR4 memory
- Six-bay storage
- One eSATA port
• One USB 3.0 port (front)
- Two USB 3.0 ports (back)
- Two 10 GbE LAN ports
- OLED display
Physical dimensions (h x w x d):
260 x 190 x 280 mm (10.24 x 7.48 x 11.02 in.)
Physical weight:
7.9 kg (17.4 lb) without disks
Power consumption:
• BTU at full power supply utilization: 100W
• In operation: 70.5W
• Power off (Wake On LAN): 310 mW
• Power off: 264 mW
Electrical:
- Internal 200W server-rated AC power supply
- Input: 100–240 VAC, 50/60 Hz
Environmental requirements:
• Operating temperature: 0 to 40°C (32° to 104°F)
- Operating humidity: 20 to 80% relative humidity (noncondensing)
• Storage temperature: -20 to 70°C (-4 to 158°F)
• Storage humidity: 5 to 95% relative humidity (noncondensing)
- Software-controlled 120 mm chassis cooling fan
Certifications:
FCC Class B, CE Class B, RoHS, VCCI Class B, CCC, MIC, BIS
ReadyNAS 528X Technical Specifications
The ReadyNAS 528X storage system meets the following technical specifications:
General:
• Intel Pentium processor D-1508
• 4 GB ECC DDR4 memory
- Eight-bay storage
- One eSATA port
• One USB 3.0 port (front)
- Two USB 3.0 ports (back)
- Two 10 GbE LAN ports
• One micro USB console connector (marked as UART)
- OLED display
Physical dimensions (h x w x d):
319 x 192 x 289 mm (12.56 x 7.56 x 11.38 in.) with feet
Physical weight:
9.35 kg (20.61 lb) without disks
ReadyNAS OS 6 Desktop Storage Systems
Power consumption:
• BTU at full power supply utilization: 104.3W
• In operation: 82.2W
• Power off (Wake On LAN): 344 mW
• Power off: 341 mW
Electrical:
- Internal 250W server-rated AC power supply
- Input: 100–240 VAC, 50/60 Hz
Environmental requirements:
• Operating temperature: 0 to 40°C (32° to 104°F)
- Operating humidity: 20 to 80% relative humidity (noncondensing)
• Storage temperature: -20 to 70°C (-4 to 158°F)
• Storage humidity: 5 to 95% relative humidity (noncondensing)
- Software-controlled 120 mm chassis cooling fan
Certifications:
FCC Class B, CE Class B, RoHS, VCCI Class B, CCC, MIC, BIS
ReadyNAS 626X Technical Specifications
The ReadyNAS 626X storage system meets the following technical specifications:
General:
• Intel Xeon processor D-1521
• 8 GB ECC DDR4 memory
- Six-bay storage
- One eSATA port
• One USB 3.0 port (front)
- Two USB 3.0 ports (back)
- Two 1 GbE LAN ports
- Two 10 GbE LAN ports
- OLED display
Physical dimensions (h x w x d):
260 x 190 x 280 mm (10.24 x 7.48 x 11.02 in.)
Physical weight:
7.9 kg (17.4 lb) without disks
Power consumption:
• BTU at full power supply utilization: 100W
• In operation: 70.5W
• Power off (Wake On LAN): 310 mW
• Power off: 264 mW
Electrical:
- Internal 200W server-rated AC power supply
- Input: 100–240 VAC, 50/60 Hz
Environmental requirements:
• Operating temperature: 0 to 40°C (32° to 104°F)
- Operating humidity: 20 to 80% relative humidity (noncondensing)
• Storage temperature: -20 to 70°C (-4 to 158°F)
• Storage humidity: 5 to 95% relative humidity (noncondensing)
- Software-controlled 120 mm chassis cooling fan
Certifications:
FCC Class B, CE Class B, RoHS, VCCI Class B, CCC, MIC, BIS
ReadyNAS 628X Technical Specifications
The ReadyNAS 628X storage system meets the following technical specifications:
General:
• Intel Xeon processor D-1521
- 8 GB ECC DDR4 memory
- Eight-bay storage
- One eSATA port
• One USB 3.0 port (front)
- Two USB 3.0 ports (back)
- Two 1 GbE LAN ports
- Two 10 GbE LAN ports
• One micro USB console connector (marked as UART)
- OLED display
Physical dimensions (h x w x d):
319 x 192 x 289 mm (12.56 x 7.56 x 11.38 in.) with feet
Physical weight:
9.35 kg (20.61 lb) without disks
Power consumption:
• BTU at full power supply utilization: 104.3W
• In operation: 82.2W
• Power off (Wake On LAN): 344 mW
• Power off: 341 mW
Electrical:
- Internal 250W server-rated AC power supply
- Input: 100–240 VAC, 50/60 Hz
Environmental requirements:
• Operating temperature: 0 to 40°C (32° to 104°F)
- Operating humidity: 20 to 80% relative humidity (noncondensing)
• Storage temperature: -20 to 70°C (-4 to 158°F)
• Storage humidity: 5 to 95% relative humidity (noncondensing)
- Software-controlled 120 mm chassis cooling fan
Certifications:
FCC Class B, CE Class B, RoHS, VCCI Class B, CCC, MIC, BIS
ReadyNAS 716X Technical Specifications
The ReadyNAS 716X storage system meets the following technical specifications:
General:
• Intel Xeon processor E3-1265L v2 CPU
- 16 GB ECC memory
- Six-bay storage
- Three eSATA ports
- One HDMI port
• One USB 2.0 port (front)
- Two USB 3.0 ports (back)
- Two 1 GbE LAN ports
- Two 10 GbE LAN ports
- LCD display
• Infrared remote receiver
- Proximity sensor
Physical dimensions (h x w x d):
259 x 192 x 287.5 mm (10.20 x 7.56 x 11.32 in.)
Physical weight:
8.20 kg (18.04 lb) without disks
Power consumption:
• BTU at full power supply utilization: 172.79W
• In operation: 96.15W
• Power off (Wake On LAN): 799.89 mW
• Power off: 419.62 mW
Electrical:
- Internal 200W server-rated AC power supply
- Input: 100–240 VAC, 50/60 Hz
Environmental requirements:
• Operating temperature: 0 to 40°C (32° to 104°F)
- Operating humidity: 20 to 80% relative humidity (noncondensing)
• Storage temperature: -20 to 70°C (-4 to 158°F)
• Storage humidity: 5 to 95% relative humidity (noncondensing)
- Software-controlled 120 mm chassis cooling fan
Certifications:
FCC Class B, CE Class B, RoHS, VCCI Class B
EDA 500 Technical Specifications
The EDA 500 storage system meets the following technical specifications:
General:
- Five-bay storage
- One eSATA port
- Proximity sensor
Physical dimensions (h x w x d):
259 x 192 x 287.5 mm (10.20 x 7.56 x 11.32 in.)
ReadyNAS OS 6 Desktop Storage Systems
Physical weight:
7.3 kg (16.1 lb) without disks
Power consumption:
• BTU at full power supply utilization: 88.17W
• In operation: 37.3W
• Power off: 453.8 mW
Electrical:
- Internal 200W server-rated AC power supply
- Input: 100–240 VAC, 50/60 Hz
Environmental requirements:
• Operating temperature: 0 to 40°C (32° to 104°F)
- Operating humidity: 20 to 80% relative humidity (noncondensing)
• Storage temperature: -20 to 70°C (-4 to 158°F)
• Storage humidity: 5 to 95% relative humidity (noncondensing)
- Software controlled 120 mm chassis cooling fan
Certifications:
FCC Class B, CE Class B, RoHS, VCCI Class B
Safety Warnings
- The equipment contains no operator access areas and is certified for installation only by trained personnel, according to the installation instructions provided with each storage system.
• Install the socket-outlet near the equipment in an easily accessible location. - Observe the on-board battery precautions.
Note Risk of explosion if battery is replaced by an incorrect type. Dispose of used batteries according to their instructions.
- Connect the storage systems and their associated LAN connections only to equipment within the same building.
Electrical Safety Precautions
Follow basic electrical safety precautions to protect yourself from harm and the ReadyNAS from damage:
- Be aware of the locations of the power on/off switch on the chassis as well as the rooms emergency power-off switch, disconnection switch, or electrical outlet. If an electrical accident occurs, you can then quickly remove power from the system.
- Do not work alone when working with high-voltage components.
- Always disconnect power from the system when removing or installing main system components, such as the main board or memory modules. When disconnecting power, first power down the system with the operating system and then unplug the power cords of all the power supply storage systems in the system.
- When working around exposed electrical circuits, ensure that another person who is familiar with the power-off controls is nearby to switch off the power if necessary.
- Use only one hand when working with powered-on electrical equipment. This is to avoid making a complete circuit, which will cause electrical shock. Use extreme caution when using metal tools, which can easily damage any electrical components or circuit boards they come into contact with.
- Do not use mats designed to decrease static electrical discharge as protection from electrical shock. Instead, use rubber mats that have been specifically designed as electrical insulators.
- Use only power supply cords that include a grounding plug and plug them into grounded electrical outlets.
General Safety Precautions
Follow these rules to ensure general safety:
- Keep the area around the ReadyNAS clean and free of clutter.
• See the technical specifications in this manual for details about your specific ReadyNAS storage systems. - Replace the on-board battery only with the same battery or an equivalent type of battery recommended by the manufacturer. Dispose of used batteries according to the manufacturer's instructions.
Note Installing the battery upside down reverses its polarities and creates a danger of explosion.
- Only trained service technicians can replace the soldered-in self-resetting PTC (positive temperature coefficient) fuses on the main board, using only new fuses that are the same as or equivalent to the ones being replaced. Contact technical support for details and support.
Electrostatic Discharge Precautions
Electrostatic discharge (ESD) is generated by two objects with different electrical charges coming into contact with each other. An electrical discharge is created to neutralize this difference, which can damage electronic components and printed circuit boards. The following measures are generally sufficient to neutralize this difference before contact is made to protect your equipment from ESD:
ReadyNAS OS 6 Desktop Storage Systems
- Use a grounded wrist strap designed to prevent static discharge.
- Keep all components and printed circuit boards (PCBs) in their antistatic bags until ready for use.
- Touch a grounded metal object before removing the board from the antistatic bag.
- Do not let components or PCBs come into contact with your clothing, which might retain a charge even if you are wearing a wrist strap.
- Handle a board by its edges only; do not touch its components, peripheral chips, memory modules, or contacts.
- When handling chips or modules, avoid touching their pins.
- Put the main board and peripherals back into their antistatic bags when not in use.
- For grounding purposes, make sure your computer chassis provides excellent conductivity between the power supply, the case, the mounting fasteners, and the main board.
- ReadyNAS OS 6 Desktop Storage Systems
- Support
- Conformity
- Compliance
- Trademarks
- Contents
- Chapter 1 Getting Started
- Chapter 2 NETGEAR ReadyNAS 102
- Chapter 3 NETGEAR ReadyNAS 104
- Chapter 4 NETGEAR ReadyNAS 202
- Chapter 5 NETGEAR ReadyNAS 204
- Chapter 6 NETGEAR ReadyNAS 212
- Chapter 7 NETGEAR ReadyNAS 214
- Chapter 8 NETGEAR ReadyNAS 312
- Chapter 9 NETGEAR ReadyNAS 314
- Chapter 10 NETGEAR ReadyNAS 316
- Chapter 11 NETGEAR ReadyNAS 422
- Chapter 12 NETGEAR ReadyNAS 424
- Chapter 13 NETGEAR ReadyNAS 426
- Chapter 14 NETGEAR ReadyNAS 428
- Chapter 15 NETGEAR ReadyNAS 516
- Chapter 16 NETGEAR ReadyNAS 524X
- Chapter 17 NETGEAR ReadyNAS 526X and 626X
- Chapter 18 NETGEAR ReadyNAS 528X and 628X
- Chapter 19 NETGEAR ReadyNAS 716X
- Chapter 20 NETGEAR EDA 500
- Chapter 21 Disks
- Appendix A Defaults and Technical Specifications
- Additional Documentation
- Setup Location
- Supported Operating Systems
- Supported Browsers
- Diskless Storage Systems
- Front and Side Panels
- Drive Bays
- Rear Panel
- Status Information
- Power On and Shut Down
- Power On
- Preferred Shutdown
- To gracefully shut down your system using the Power button:
- Forced Shutdown
- To perform a forced shutdown:
- Boot Menu
- WARNING:
- To access the boot menu:
- NETGEAR ReadyNAS 102
- NETGEAR ReadyNAS 104
- NETGEAR ReadyNAS 204
- NETGEAR ReadyNAS 214
- NETGEAR ReadyNAS 314
- NETGEAR ReadyNAS 316
- Rear Panel ReadyNAS 526X
- Rear Panel ReadyNAS 626X
- Rear Panel ReadyNAS 528X
- Rear Panel ReadyNAS 628X
- Disk Trays
- Standard Disk Tray
- IMPORTANT:
- EDA 500 Disk Tray
- Supported Disks
- Previously Formatted Disks
- Reformat Previously Formatted Disks
- To reformat previously formatted disks with a diskless ReadyNAS OS 6 system:
- Migrate a Volume
- To migrate a volume to a diskless ReadyNAS OS 6 system:
- Add a Disk
- Add a 3.5-Inch Disk
- To add a 3.5-inch hard disk drive (HDD):
- Add a 2.5-Inch Disk
- To add a 2.5-inch hard disk drive (HDD) or 2.5-inch solid state drive (SSD):
- Replace a Disk
- Replace a 3.5-Inch Disk
- To replace a 3.5-inch hard disk drive (HDD):
- Replace a 2.5-Inch Disk
- To replace a 2.5-inch hard disk drive (HDD) or 2.5-inch solid state drive (SSD):
- Defaults and Technical Specifications
- A
- This appendix includes the following sections:
- Factory Default Settings
- ReadyNAS 102 Technical Specifications
- General:
- Physical dimensions (h x w x d):
- Physical weight:
- Power consumption:
- Electrical:
- Environmental requirements:
- Certifications:
- ReadyNAS 104 Technical Specifications
- ReadyNAS 202 Technical Specifications
- ReadyNAS 212 Technical Specifications
- ReadyNAS 204 Technical Specifications
- ReadyNAS 214 Technical Specifications
- ReadyNAS 312 Technical Specifications
- ReadyNAS 314 Technical Specifications
- ReadyNAS 316 Technical Specifications
- ReadyNAS 422 Technical Specifications
- ReadyNAS 424 Technical Specifications
- ReadyNAS 426 Technical Specifications
- ReadyNAS 428 Technical Specifications
- ReadyNAS 516 Technical Specifications
- ReadyNAS 524X Technical Specifications
- ReadyNAS 526X Technical Specifications
- ReadyNAS 528X Technical Specifications
- ReadyNAS 626X Technical Specifications
- ReadyNAS 628X Technical Specifications
- ReadyNAS 716X Technical Specifications
- EDA 500 Technical Specifications
- Safety Warnings
- Electrical Safety Precautions
- General Safety Precautions
- Electrostatic Discharge Precautions
Brand : NETGEAR
Model : RN524X
Category : Server