
FMK542 - Car audio accessory American International - Free user manual and instructions
Find the device manual for free FMK542 American International in PDF.


| Product Type | Portable Fan |
| Brand | American International |
| Model | FMK542 |
| Dimensions (H x W x D) | 30 x 25 x 25 cm |
| Weight | 2.5 kg |
| Power Supply | 120V ~ 60Hz |
| Power Consumption | 50 W |
| Number of Speed Settings | 3 |
| Oscillation | Yes |
| Remote Control | Yes |
| Timer Function | Up to 8 hours |
| Blade Material | ABS Plastic |
| Grill Material | Metal |
| Noise Level | ≤ 55 dB |
| Safety Features | Overheat protection, tip-over switch |
| Cleaning | Wipe with damp cloth; do not immerse |
| Spare Parts | Replacement blades and remote available |
| Certifications | ETL, RoHS |
Frequently Asked Questions - FMK542 American International
User questions about FMK542 American International
0 question about this device. Answer the ones you know or ask your own.
Ask a new question about this device
Download the instructions for your Car audio accessory in PDF format for free! Find your manual FMK542 - American International and take your electronic device back in hand. On this page are published all the documents necessary for the use of your device. FMK542 by American International.
USER MANUAL FMK542 American International
VEHICLEAPPLICATIONS
Ford
2009-16ECONOLINEVAN
2007-10EDGE
**2008-12ESCAPE
2007-14 EXPEDITION
2006-10EXPLORER
2007-10 EXPLORERSPORTTRAC
2004-08F-150
*2009-12F-150
*2013-14F-150 (withclassicdash)
2005-07500
2005-07FOCUS
2004-07FREESTAR
2005-07FREESTYLE
2006-09FUSION
2005-09MUSTANG
2008-09TAURUS/TAURUSX
2005-12SUPERDUTY
2013-16SUPERDUTY
(withclassicdash)
2012-13 TRANSIT CONNECT
Lincoln
2005-08MARKLTP/U
2007-10MKX(NAVonly)
2007-14NAVIGATOR(NAVonly)
Mazda
**2008-11TRIBUTE
Mercury
**2008-11MARINER
2006-09MILAN
2005-07MONTEGO
2004-07MONTEREY
2006-10MOUNTAINEER
2008-09SABLE
*Excludesacclimatedradio/climatecontrolpanelequippedvehicles.
**ThiskitiscompatibleforvehiclesequippedwiththefactoryNavigationradioonly.
DOUBLEDINMOUNTINSTALLATIONINSTRUCTIONS
NOTE:RemovesupporttabshowninFig.A.
- Attachleftandrightmountingbracketstothekitasshowninthefigurebelow.
- Insert ISO mountableradiobetween ISO mountbracketsandlooselyattachto sidesofradiousingscrewsprovidedwithradiowhenpossible orscrewssuppliedwithkit.
3.Slideradioforwardorbackwardfordesiredlookandtightenscrews. - Supporttherearoftheradiocomponentwithbackstrap.
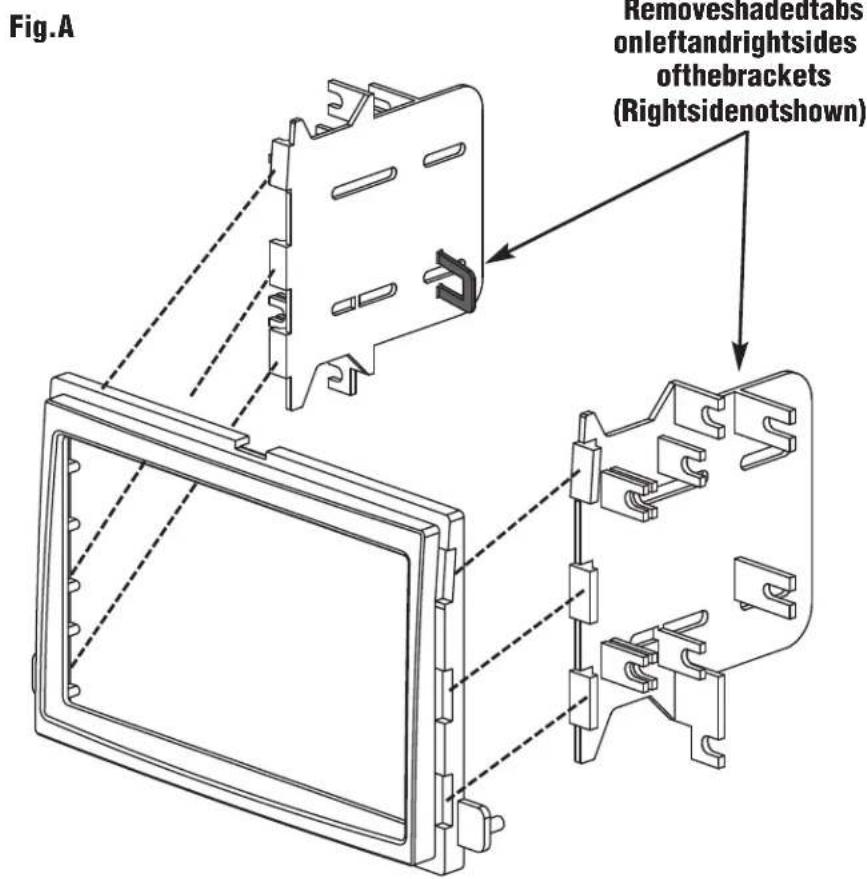
BRACKETPREPARATION
For all vehicles listed below, removetheshaded mounting tabson both left and right brackets.
Fig.A
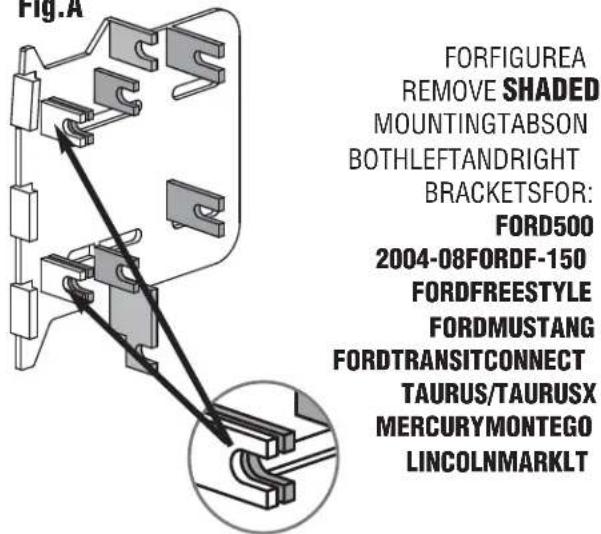
Fig.B
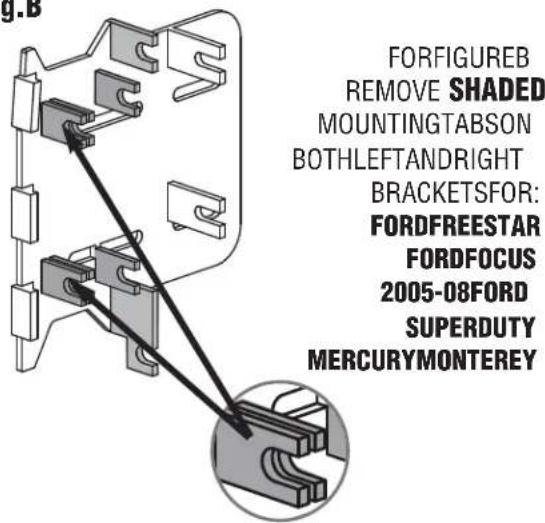
Fig.C
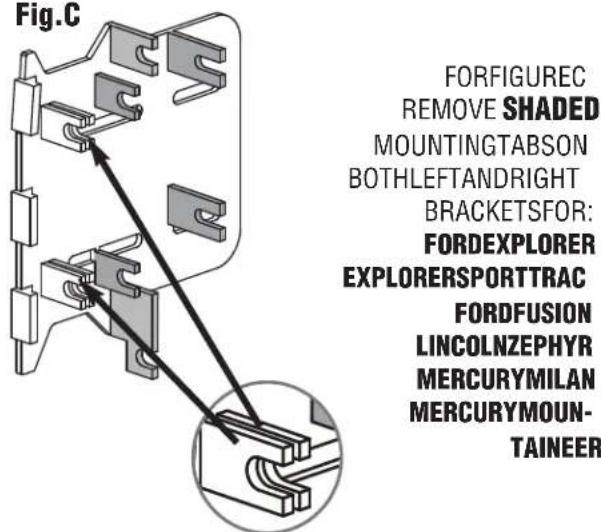
Fig.D
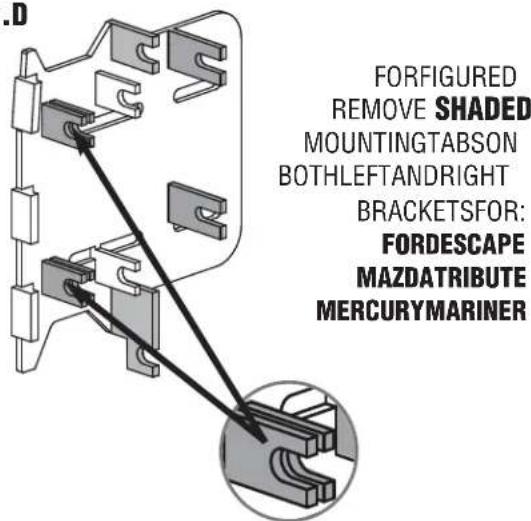
Fig.E
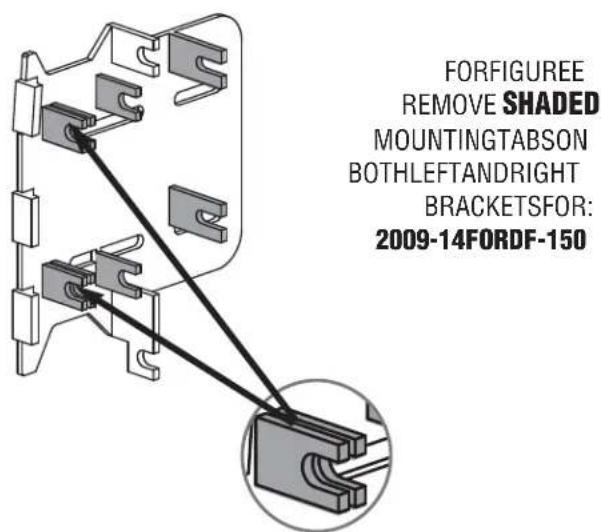
Fig.F
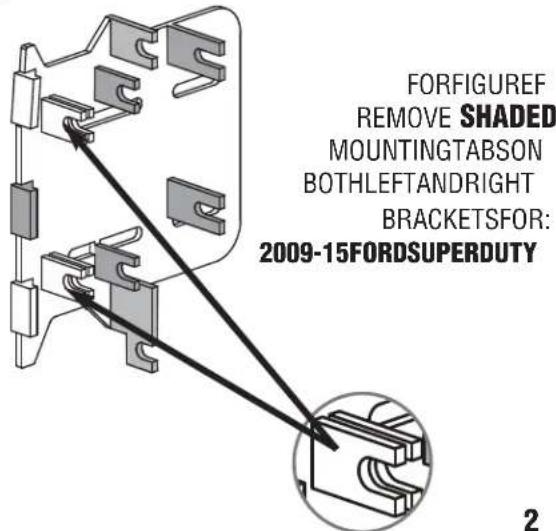
2005-07FORDFREESTYLE
DASHDISASSEMBLYINSTRUCTIONS
NOTE: SeeIllustrationAonpage2forbracketpreparation
- OpenthestoragecompartmentlocatedabovetheRadio/Venttrimbezel.
- Starting from the top edge and working your way down the sidestoward the bottom, carefully pry the Radio/Climate control trim bezelforward, disconnect all harnesses from therear of the trim bezeland remove bezel.
- Removethe(4)9/32screwssecuringtheradiotothesub-dash. Carefullypull radioforward, disconnectallharnessesandantennaleadandremoveradio.
2005-09FORDMUSTANG
DASHDISASSEMBLYINSTRUCTIONS
NOTE:SeeillustrationAonpage2forbracketpreparation
- Carefullyremovethetrimfromaroundthegearshift.
2.Removethe(2)Phillipsscrewslocatedunderthecenterconsolelid. - Liftupontheemergencybrakeandcarefullyremovethecenterconsole.
- Carefullyunclipandremovethetrimpanelsattheleftandrightsideoftheradio.
- Removethe(4)9/32screwssecuringtheradiotrimbezeltothesub-dash, carefully pulltrimbezelforward, disconnectallattachedharnessesandremovetrimbezel.
- Removethe(4)9/32screwssecuringtheradiotothesub-dash, carefullypullradio forwardanddisconnectallharnessesandantennaleadandremoveradio.
2005-08FORDSuperDuty
DASHDISASSEMBLYINSTRUCTIONS
NOTE:SeeillustrationBonpage2forbracketpreparation
- Engagetheparkingbrake.
- For Automatic Transmission Vehicles only, insert key into the ignition and turn to the ON position and depress the brake pedal, (DONOT START THE VEHICLE!) then placetheshift lever into the lowest position.
- Lowerthesteeringcolumnallthewaydown.
- Starting at the top edge of the dash trim bezel, carefully unclip and pull forward the dash trim bezel to access all the wire harness connectors attached to the features on therear of the trim bezel.
- Carefully disconnect all the connectors on the backside of the dash trim bezeland remove bezel.
6.Removethe(4)9/32screwssecuringtheradiotothesub-dash. - Carefully pull radio forward, disconnect the wire harnesses and antennalead from therearoftheradio and remover radio.
2005-07FORDFOCUS
DASHDISASSEMBLYINSTRUCTIONS
NOTE: SeeIllustrationBonpage2forbracketpreparation
- CarefullypryforwardandunclipRadio/Climatecontroltrimbezelanddisconnect the12VoltReceptacleplugfromtherearofthebezel.
- Laythetrimbezelassemblyoutoftheway(Disconnectingtheclimatecontrolcables orharnessesisnotnecessary).
3.Removethe(4)9/32screwssecuringtheradiotothesub-dash. - CarefullypullFactoryradioforward, disconnectthewireharnessandantennalead fromtherearoftheradioandremoveradio.
2004-07FORDFREESTAR
2004-07MERCURYMONTEREY
DASHDISASSEMBLYINSTRUCTIONS
NOTE: SeeIllustrationBonpage2forbracketpreparation
- Carefully unclip and removether radio/climate control trimbezelfromaround the factory radio.
- Disconnect the harnesses from therearoftheradio/climatecontrolbezeland remove bezel.
3.Removethe(4)9/32screwssecuringthefactoryradiotothesub-dash. - Carefully pull radio forward, disconnect the wire harness and antennalead from the factory radio and remover radio.
2006-10 FORDEXPLORER
2006-10 MERCURYMOUNTAINEER(NAVONLY)
2007-10 EXPLORERSPORTTRAC
DASHDISASSEMBLYINSTRUCTIONS
NOTE: SeeillustrationConpage2forbracketpreparation
- Openthecenterconsoleandremovethe(2)9/32screwsfromthecenterconsole shiftertrim.
- Carefully liftup on the center console shifter trim and disconnect the 12 volt receptacle harness and removetrim.
- Carefullypryoutwardontheradiotrimbezeltoreleasethepanelclips, thenliftthe lowersidesupwardandslightlyoutwardtocleartheshiftlever.
4.Disconnectallharnessesfromtheradiotrimbezelandremovebezel.
5.Removethe(4)9/32screwssecuringtheradiotothesub-dash.
6.Pullradioforward,disconnectallharnessesandantennaleadandremoveradio.
2006-09FORDFUSION
2006-08LINCOLNZEPHYR
2006-09MERCURYMILAN
DASHDISASSEMBLYINSTRUCTIONS
NOTE: SeeillustrationConpage2forbracketpreparation
- Starting from the bottom, carefully pry the factory radiotrim bezelfrom around the radioforward, disconnect all harnesses attached to therearofthetrim bezeland remove bezel.
2.Removethe(4)9/32screwssecuringtheradiotothesub-dash. - Carefully pull radio forward, disconnect all harnesses and antennalead and remover radio.
2008-11 FORDESCAPE
2008-11 MAZDATRIBUTE/MERCURYMARINER
DASHDISASSEMBLYINSTRUCTIONS
NOTE: SeeillustrationDonpage2forbracketpreparation
- CarefullyprytheVentassemblyabovetheradioforward.
- Removethe(2)9/32screwssecuringthetopoftheradio/Climatecontrolassemblyto thesub-dash.
- CarefullyprytheLOWER12Volt/USB/Auxiliaryplugpanelforward, disconnectall attachedharnessesandremovepanel.
- Removethe(2)9/32screwssecuringtheloweredgeoftheRadio/Climatecontrol assembly.
-
Settheparkingbrake.
-
Removetheshiftlockcoverandpresstheshiftlockbuttondownusingasmall screwdriverorpenanddepressthebrakepedalandmovetheshiftlever allthewaytotherear.
- CarefullypulltheentireRadio/Climatecontrolassemblyforward(youwillneeda secondpersonforthenextstep).Becarefulnottoscratchthesidesofthedash, ortheshiftlever.
- Removethe(1)5/16 bolt securing the Groundstrap to other rights side of the assembly. Pliers may be necessary due to the short length of the strap.
- Pulltheentireassemblyforwardandremoveallattachedharnessesandantenna leadsandremoveassembly.
- Removethe(4)9/32screwsfromthesub-dashtobeabletomounttheinstallkit intothedashlocation.
2009-12FORDF-150/2013-14FORDF-150(withClassicDash)
DASHDISASSEMBLYINSTRUCTIONS
NOTE: SeeIllustrationEonpage2forbracketpreparation
- Open the ashtray/pocket below the climate controls.
- From behind the auxiliary panel allocated to other right of the cigarette lighter, carefully unclip and presst the auxiliary panel forward to release, disconnect the attached harnesses (if applicable) and remove panel. (save forre-assembly)
- Removethe(1)9/32screwsecuringtheloweredgeoftheradio/climatecontroltrimbezel.
- Removetherubbermatlocatedabovethetopedgeoftheradiotrimbezelorfascia.
- Removethe(2)9/32screwslocatedunderthismat.
- Using a panel removal tool, carefully pry the left and right vent trim panel slightly outward to allow the edges of the Fascia of the Radio/Climate control bezeltobe removed, (it is not necessary to remove the vent trims entirely).
- Carefully unclip and removethe factory radio/climate control bezel, or fascia.
8.Removethe(4)9/32screwssecuringtheradio(orradiosub-chassis)tothesub-dash. - Carefully pulltheradioforward, disconnect all attached harnesses and antennalead and remover radio (orradiosub-chassis).
(CenterConsoleshiftVehicles)
- SettheParkingBrake.
- Openthecenterconsolearmrestlidandremovethe(3)lowerTorxscrewssecuringthelid/hingeassemblytothepocketcavityofthecenterconsole.
-
Carefully unclip and removethethin panel below the cigarette lighter.
-
From behind the auxiliary panel allocated to other right of the cigarette lighter, carefully unclip and press the auxiliary panel forward to release, disconnect the attached harnesses (if applicable) and remove panel. (save for re-assembly)
5.Removethe(1)9/32screwsecuringtheloweredgeoftheradio/climatecontroltrimbezel.
6.Removetherubbermatlocatedabovethetopedgeoftheradiofascia.
- Removethe(2)9/32screwslocatedunderthismat.
8.InsertkeyintotheignitionandturntotheONposition,(DONOTSTARTthevehicle).
9.Depressthebrakepedalandmovetheshiftleverback.
-
Liftupandremovetheshifttrim/drinkholderassembly.
-
Starting from the rear top edge of the center console, carefully lift up and unclip the entire top trimsectionthatmeetstheloweredgesoftheCenterStackVent/radiosidetrimpanels.
-
Using a panel removal tool, carefully prysthe left and right vent trim panel slightly outward to allow the edges of the Fascia of the Radio/Climate control bezeltobe removed, (it is not necessary to remove the vent trims entirely).
-
Carefully unclip and removethe factory radio/climate control bezel, or fascia.
-
Removethe(4)9/32screwssecuringtheradio(orradiosub-chassis)tothesub-dash.
-
Carefully pull the radio forward, disconnect all attached harnesses and antennalead and remover radio (orradiosub-chassis).
2005-07FORD500
2005-07MERCURYMONTEGO
2008-09TAURUS/TAURUSX
DASHDISASSEMBLYINSTRUCTIONS
NOTE:SeeillustrationAonpage2forbracketpreparation
- Carefully Pryradiodashtrimbezeloutward, disconnectallharnessesfrombackof trimbezelandremovebezel.
2.Removethe(4)9/32screwssecuringthefactoryradiotothesub-dash.
3.Pullradioforward, disconnectallharnessesandantennaleadandremoveradio.
2004-08FORDF-150(EXCLUDESHERITAGEMODELS)
2006-07LINCOLNMARKLT
2012-2013TransitConnect
DASHDISASSEMBLYINSTRUCTIONS
NOTE:SeeillustrationAonpage2forbracketpreparation
- Carefully Pryradiodashtrimbezeloutward, disconnectallharnessesfrombackof trimbezelandremovebezel.
2.Removethe(4)9/32screwssecuringthefactoryradiotothesub-dash.
3.Pullradioforward,disconnectallharnessesandantennaleadandremoveradio.
2009-15FORDSUPERDUTYPICKUP
DASHDISASSEMBLYINSTRUCTIONS
NOTE: SeeillustrationFonpage2forbracketpreparation
- UsingaFlatbladescrewdriver, insert thescrewdriverblade into the slots located on the bottomedges of each the 12 Volt receptacle and Sync panels located below and to the sides of the factory climate controls, gently pulleach panelforward to release and rest out of the way.
2.Removetheindividual9/32screwlocatedbehindeachpanelremovedinstep1above. - Carefully pull the entire Radio/Climate Control panel with Vents forward to release and rest out of the way.
- Removethe(4)9/32screwssecuringtheradiotothesub-dash.
- Carefully pulltheradioforward, disconnect the attached wire harnesses and antenna adapter and remover radio.

www.aampglobal.comwww.aius.net
2500EastFrancisStreetOntario,CA91761,U.S.A.
Sales:(800)477-2267
Intl:(727)572-9255
Support:888-228-5560

- VEHICLEAPPLICATIONS
- FORD
- LINCOLN
- MAZDA
- MERCURY
- DOUBLEDINMOUNTINSTALLATIONINSTRUCTIONS
- BRACKETPREPARATION
- 2005-07FORDFREESTYLE
- DASHDISASSEMBLYINSTRUCTIONS
- NOTE: SEEILLUSTRATIONAONPAGE2FORBRACKETPREPARATION
- 2005-09FORDMUSTANG
- NOTE:SEEILLUSTRATIONAONPAGE2FORBRACKETPREPARATION
- 2005-08FORDSUPERDUTY
- NOTE:SEEILLUSTRATIONBONPAGE2FORBRACKETPREPARATION
- 2005-07FORDFOCUS
- NOTE: SEEILLUSTRATIONBONPAGE2FORBRACKETPREPARATION
- 2004-07FORDFREESTAR
- 2004-07MERCURYMONTEREY
- 2006-10 FORDEXPLORER
- 2006-10 MERCURYMOUNTAINEER(NAVONLY)
- 2007-10 EXPLORERSPORTTRAC
- NOTE: SEEILLUSTRATIONCONPAGE2FORBRACKETPREPARATION
- 2006-09FORDFUSION
- 2006-08LINCOLNZEPHYR
- 2006-09MERCURYMILAN
- 2008-11 FORDESCAPE
- 2008-11 MAZDATRIBUTE/MERCURYMARINER
- NOTE: SEEILLUSTRATIONDONPAGE2FORBRACKETPREPARATION
- 2009-12FORDF-150/2013-14FORDF-150(WITHCLASSICDASH)
- NOTE: SEEILLUSTRATIONEONPAGE2FORBRACKETPREPARATION
- (CENTERCONSOLESHIFTVEHICLES)
- 2004-08FORDF-150(EXCLUDESHERITAGEMODELS)
- 2006-07LINCOLNMARKLT
- 2012-2013TRANSITCONNECT
- 2009-15FORDSUPERDUTYPICKUP
- NOTE: SEEILLUSTRATIONFONPAGE2FORBRACKETPREPARATION
Brand : American International
Model : FMK542
Category : Car audio accessory