
GMK422 - Car audio accessory American International - Free user manual and instructions
Find the device manual for free GMK422 American International in PDF.


| Product Type | Installation Kit (Dash Kit) for Aftermarket Radios |
| Brand | American International |
| Model | GMK422 |
| Compatible Vehicles | 1995-2009 GM cars, trucks, SUVs (Buick, Cadillac, Chevrolet, GMC, Hummer, Isuzu, Oldsmobile, Pontiac, Suzuki, Toyota, Geo, Honda) |
| Radio Size Support | Single DIN and Double DIN (with bracket adjustments) |
| Mounting Type | ISO Mounting Brackets and Trim Ring |
| Includes | Trim ring, side brackets, ISO trim ring, hardware (screws, nuts, bolts) |
| Material | Plastic (brackets and trim ring) |
| Weight | Approx. 0.5 lbs (0.23 kg) |
| Installation Difficulty | Moderate (requires basic tools and vehicle-specific steps) |
| Special Features | Removable mounting tabs for custom fit; separate instructions for 1990-1996 Cadillac Fleetwood/Brougham and 1998-2002 Honda/Isuzu |
| Cleaning | Wipe with a soft, dry cloth |
| Safety Precautions | Disconnect negative battery terminal before installation; avoid pinching wires |
Frequently Asked Questions - GMK422 American International
User questions about GMK422 American International
0 question about this device. Answer the ones you know or ask your own.
Ask a new question about this device
Download the instructions for your Car audio accessory in PDF format for free! Find your manual GMK422 - American International and take your electronic device back in hand. On this page are published all the documents necessary for the use of your device. GMK422 by American International.
USER MANUAL GMK422 American International
VEHICLEAPPLICATIONS
*FitsoversizedDelcoRadiodashopeningonly
| Buick | 2003-06SILVERADO | 2006-07i350 |
| 1997-05CENTURY | 2007SILVERADO | 2007-09i290 |
| 1995-05LESABRE | Classic | 2007-09i370 |
| 1995-05PARKAVE | 2003-06SUBURBAN | Oldsmobile |
| 2004-07RAINIER | 2003-06TAHOE | 1996-98ACHIEVA |
| 1995-04REGAL | 1998-04TRACKER | 1999-04ALERO |
| 2002-07RENDEZVOUS | 2002-09TRAILBLAZER | 1995-03AURORA |
| 1996-99RIVIERA | 2000-05VENTURE | 1998-04BRAVADA |
| 1995-96ROADMASTER | Geo | 1995-99CUTLASS/SUPREME |
| 1996-98SKYLARK | 1995-97METRO | 1994-99DELTA88/ROYALE/88 |
| Cadillac | GMC | 1998-02INTRIGUE |
| 1990-96FLEETWOOD | 2004-12CANYON | 1996-99LSS |
| 1990-92BROUGHAM | 2002-09ENVOY | 1994-96NINETY-EIGHT |
| 1992-95ELDORADO | 2002-03*JIMMY | 1997-98REGENCY |
| 2003-06ESCALADE/ESV | 2001-07SAVANAVAN | 2000-04SILOUETTE |
| 1992-95SEVILLE | 2003-06SIERRA | Pontiac |
| Chevrolet | 2007SIERRAClassic | 2001-05AZTEK |
| 2003-06AVALANCHE | 2002*SONOMA | 2000-05BONNEVILLE |
| 2002*BLAZER | 2003-04SONOMA | 2001-05GRANDAM |
| 2003-05BLAZER | 2003-06YUKON | 2000-05SUNFIRE |
| 2000-05CAVALIER | 2003-06YUKONXL | 2000-04MONTANA |
| 2004-12COLORADO | Honda | 2003-08VIBE |
| 2001-07EXPRESSVAN | 1998-02PASSPORT | Suzuki |
| 2000-05IMPALA | Hummer | 2002AERIO |
| 2001-03MALIBU | 2003-06H1 | 1992-98SIDEKICK |
| 2004MALIBUCLASSIC | 2003-07H2/SUT | 1998-02ESTEEM |
| 1998-01METRO | Isuzu | 1999-02GRANDVITARA |
| 2000-05MONTECARLO | 1998-00AMIGO | 1995-01SWIFT |
| 2003-06SSR | 2003-08ASCENDER | 1999-03VITARA |
| 2002*S-10P/U | 1998-04RODEO | 2001-02XL-7 |
| 2003-04S-10P/U | 2006-07i280 | Toyota |
| 2003-04MATRIX |
BRACKETPREPARATION
ForAllVehiclesNotIncluding
1990-96Fleetwood/Brougham
Removethe(2)topandthe(2)bottommountingtabslocatedontheTrimring oftheGM-K422kit.
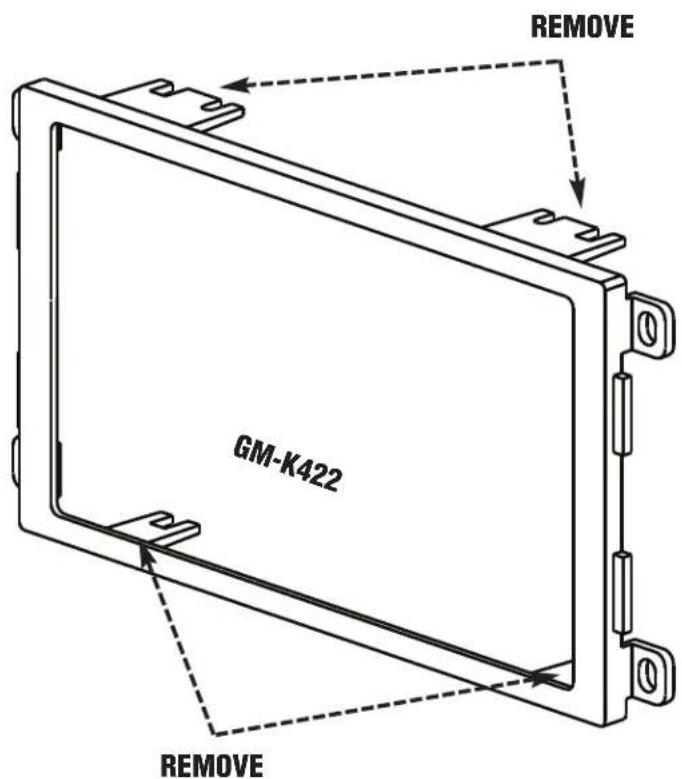
For1990-1996CadillacFleetwood/Broughaminstructions Seepage6
**RemoveallmountingtabsontheSideBracketsnotshownabove. RemoveallmountingTabsonISOTrimRing
| Buick | Cadillac | SSR | Isuzu | Oldsmobile(Cont.) |
| CENTURY | ESCALADE | TAHOE | ASCENDER | LSS |
| LASABRE | Chevrolet | VENTURE | i-280/i-290 | NINETY-EIGHT |
| PARKAVE | BLAZER | GMC | i-350/i-370 | SILOUETTE |
| REGAL | CAVALIER | CANYON | Oldsmobile | Pontiac |
| REGENCY | COLORADO | ENVOY | ACHIEVA | AZTEK |
| RENDEZVOUS | EXPRESSVAN | JIMMY | ALERO | BONNEVILLE |
| RIVIERA | IMPALA | SIERRA | AURORA | GRANDAM |
| ROADMASTER | MALIBU | YUKON | BRAVADA | MONTANA |
| SKYLARK | MONTECARLO | YUKONXL | CUTLASS/SUPREME | SUNFIRE |
| S-10P/U | Hummer | DELTA | ||
| SILVERADO | H2 | 88/ROYALE | ||
| SUBURBAN | INTRIGUE |
FIG.B

**RemoveallmountingtabsontheSideBrackets
Chevy/GEO
METRO
TRACKER
Suzuki
AERIO
ESTEEM
SIDEKICK
SWIFT
GRAND
VITARA
VITARA
XL-7

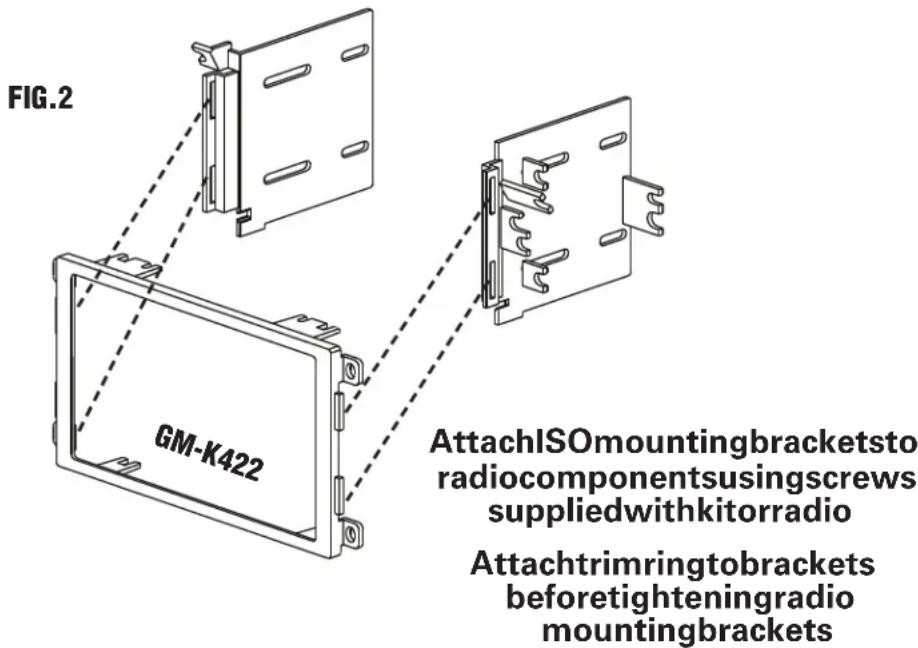
Attachmountingbracketstoradio componentsusingscrewssupplied withkitorradio
Attachtrimringtobracketsbefore tighteningradiomountingbrackets
ForAllVehiclesNotListedBelow
1998-02HondaPassport
1998-00lsuzuAmigo
1998-02IsuzuRodeo
Attachmountingbracketstoradiocomponents usingscrewssuppliedwithkitorradio
KITASSEMBLY
Attachtrimringtobracketsbefore tighteningradiomountingbrackets
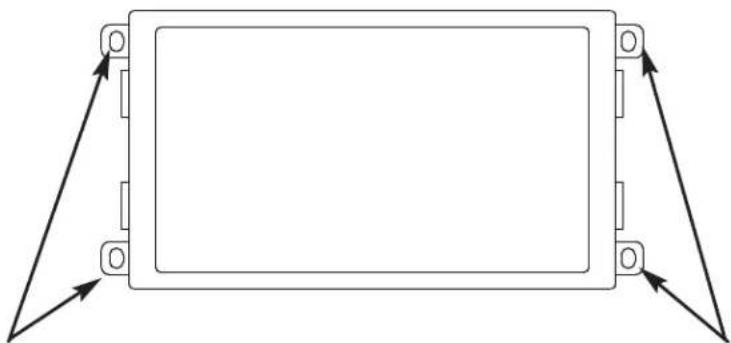
**RemoveallmountingtabsontheISOTrimring
1992-95CadillacApplications
KITASSEMBLY

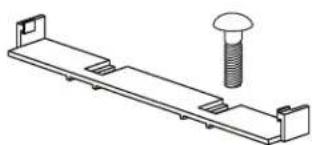
Using2nuts&boltsprovidedwithkit,insert1boltintoeach slotofCadillacbracketfacingdownwardasillustratedbelow
AllDoubleDINApplications

Seebracketpreparation foryourvehicle
Attachmountingbracketstoradio componentsusingscrewssupplied withkitorradio
Attachtrimringtobracketsbefore tighteningradiomountingbrackets
2003-08PontiacVibe/2003-04ToyotaMatrix
DASHDISASSEMBLYINSTRUCTIONS
- Starting from the bottom of the Radiotrim bezel, carefully pray outward on the dash trim bezeltounclipthelower edge and sides.
- Anglethedashtrimbezeloutwardfromthebottomandpullthetopofthe paneldowntounfastenthetwouppertabs.
- Pullthetrimbezelforwardanddisconnectallharnessesattachedtothe panelandremovepanel.
- Removetheharnessclampattachedattherearoftheleftfactoryradiobracket.
5.Removethe(4)10mmboltssecuringthefactoryradiotothesub-dash. - Pullradioforward, disconnectthewireharnessandantennaleadandremoveradio.
FIG.D

**RemoveallmountingtabsontheSideBracketsnotshownabove. RemoveallmountingTabsonISOTrimRing
Toyota
MÁTRIX
Pontiac
VIBE
ForkitassemblyinstructionsseeFigureEonpage5
1998-02Honda/IsuzuApplications
DASHDISASSEMBLYINSTRUCTIONS
1.Openashtrayandremoveashtraycup.
2. Remove(1)phillipsscrewfromrearofashtraycavity.
3. Carefully unclip trimbezelforaroundradio/lighterassembly.
4. Disconnectwireharnessfromlighterandremovetrimassembly.
5. Removethe(4)phillipsscrewssecuringradiotosubdash.
6. Pullradioforward, disconnectthewireharnessandantennaleadandremoveradio.
FIG.C

**RemoveallmountingtabsontheSideBracketsnotshownabove. RemoveallmountingTabsonISOTrimRing
Honda
PASSPORT
Izusu
AMIGO
RODEO

Attachtrimringtobracketsbefore tighteningradiomountingbrackets
1990-1996 CADILLACFLEETWOOD/FLEETWOODBROUGHAM
DASHDISASSEMBLYINSTRUCTIONS
- Carefully unclipthedashtrimbezelfromabovetheclimatecontrols.
- Removethe(2)screwssecuringthetopoftheRadio/climatecontroltrimbezel, carefullyunclipandremovebezel.
- Removethe(4)screwssecuringtheradiotothesub-dash.
- Carefullyslideradiooutofthedash, disconnectallwireharnessesandantennalead (ifapplicable) and removeradio.
- Removethetopandbottommountingbracketsfromthefactoryradio;youwillneedto attachthesebracketstotheinstallationkitfollowingtheinstructionsinthekit.
FACTORYBRACKETATTACHMENTINSTRUCTIONS
- Attachtopfactorymountingbracket(usingcarriageboltsandnutssuppliedwithkit)totopedgeofkit.
- Attachbottomfactorymountingbracket(usingcarriageboltsandnutssuppliedwith kit)tobottomedgeofkit.

ViewoftheTopEdge

ViewoftheBottomEdge
ISOMOUNTINSTRUCTIONS
REMOVEALLMOUNTINGTABSONTHESIDEBRACKETS. REMOVE(4)SIDEMOUNTINGTABSONISOTRIMRING.
ForinformationaboutotherAmericanInternationalautomotive accessoriesvisitourwebsiteat:
http://www.americaninternational.net

American International
AutomotiveProductsDivision
1040AvenidaAcaso•Camarillo,CA93012,U.S.A.
USASales(800)336-6500
CanadaSales(888)922-3006•USAFax(805)388-7950
CUSTOMERHELPLINE
USA800-323-4329•Canada800-245-8777
iGMK422

- BRACKETPREPARATION
- FORALLVEHICLESNOTINCLUDING
- FORALLVEHICLESNOTLISTEDBELOW
- KITASSEMBLY
- ALLDOUBLEDINAPPLICATIONS
- SEEBRACKETPREPARATION FORYOURVEHICLE
- 2003-08PONTIACVIBE/2003-04TOYOTAMATRIX
- DASHDISASSEMBLYINSTRUCTIONS
- 1998-02HONDA/ISUZUAPPLICATIONS
- 1990-1996 CADILLACFLEETWOOD/FLEETWOODBROUGHAM
- FACTORYBRACKETATTACHMENTINSTRUCTIONS
- ISOMOUNTINSTRUCTIONS
- AMERICAN INTERNATIONAL
Brand : American International
Model : GMK422
Category : Car audio accessory