
CMXGMAM201202 - Lawn mower Craftsman - Free user manual and instructions
Find the device manual for free CMXGMAM201202 Craftsman in PDF.


| Product Type | 28-inch Rear Wheel Drive Gas Lawn Mower |
| Brand | Craftsman |
| Model Number | CMXGMAM201202 |
| Cutting Width | 28 inches |
| Engine Type | 4-cycle gas engine (Briggs & Stratton or MTD) |
| Fuel Type | Regular unleaded gasoline |
| Weight (approx.) | 90 lb (41 kg) |
| Dimensions (LxWxH) | 58 x 28 x 40 in (147 x 71 x 102 cm) |
| Drive Type | Rear wheel drive with premium drive control (variable speed) |
| Cutting Height Adjustment | Single lever or rear wheel/caster wheel adjustment (6 positions) |
| Cutting Height Range | 1.5 to 4 inches (approx.) |
| Discharge Options | Mulching, side discharge, or rear bagging (grass catcher included) |
| Grass Catcher Capacity | 3 bushels (approx.) |
| Starting System | Recoil start; electric start optional (with push key and battery) |
| Blade Control | Two-step with lockout lever and blade control bar (safety mechanism) |
| Deck Material | Steel cutting deck with Smart Jet deck wash system |
| Wheel Size (Front/Rear) | 8 in front / 10 in rear (est.) |
| Handle Type | Foldable, adjustable height with comfort grip |
| Safety Features | Blade control, lockout lever, discharge cover, trail shield, slope gauge, and safety labels |
| Maintenance | Oil changes, air filter cleaning, spark plug replacement, blade sharpening, belt inspection, and deck cleaning |
| Spare Parts | Use only O.E.M. parts; blades (high lift and mulching), belts, battery, spark plug, air filter, oil |
| Warranty | See separate warranty supplement; average useful life 7 years / 140 hours |
| Manual Languages | English and Spanish included |
Frequently Asked Questions - CMXGMAM201202 Craftsman
User questions about CMXGMAM201202 Craftsman
0 question about this device. Answer the ones you know or ask your own.
Ask a new question about this device
Download the instructions for your Lawn mower in PDF format for free! Find your manual CMXGMAM201202 - Craftsman and take your electronic device back in hand. On this page are published all the documents necessary for the use of your device. CMXGMAM201202 by Craftsman.
USER MANUAL CMXGMAM201202 Craftsman
28" Rear Wheel Drive Model Series W3 and W6
Table of Contents
Safe Operation Practices.... 2
Assembly & Set-Up 6
Controls & Operation.... 9
Service....12
Troubleshooting....15
Spanish....17
Parts/Warranty......See Separate Supplement
WARNING
READ AND FOLLOW ALL SAFETY RULES AND INSTRUCTIONS IN THIS MANUALBEFORE ATTEMPTING TO OPERATE THIS MACHINE.
FAILURE TO COMPLY WITH THESE INSTRUCTIONS MAY RESULT IN PERSONAL INJURY.
NOTE: This Operator's Manual covers several models. Features may vary by model. Not all features in this manual are applicable to all models and the model depicted may differ from yours.
Important Safe Operation Practices

WARNING! This symbol points out important safety instructions which, if not followed, could endanger the personal safety and/or property of yourself and others. Read and
follow all instructions in this manual before attempting to operate this machine. Failure to comply with these instructions may result in personal injury. When you see this symbol.
HEED ITS WARNING!
CALIFORNIA PROPOSITION 65

WARNING! Engine Exhaust, some of its constituents, and certain vehicle components contain or emit chemicals
known to State of California to cause cancer and birth defects or other reproductive harm. Battery posts, terminals, and related accessories contain lead and lead compounds, chemicals known to the State of California to cause cancer and reproductive harm. Wash hands after handling.

DANGER: This machine was built to be operated according to the safe operation practices in this manual. As with any type of power equipment, carelessness or error on
the part of the operator can result in serious injury. This machine is capable of amputating fingers, hands, toes and feet and throwing foreign objects. Failure to observe the following safety instructions could result in serious injury or death.
General Operation
- Read this operator's manual carefully in its entirety before attempting to assemble this machine. Read, understand, and follow all instructions on the machine and in the manual(s) before operation. Keep this manual in a safe place for future and regular reference.
- Be completely familiar with the controls and the proper use of this machine before operating it.
- This machine is a precision piece of power equipment, not a plaything. Therefore, exercise extreme caution at all times. This machine has been designed to perform one job: to mow grass. Do not use it for any other purpose.
- Never allow children under 14 years of age to operate this machine. Children 14 and over should read and understand the instructions and safe operation practices in this manual and on the machine and should be trained and supervised by an adult.
-
Only responsible individuals who are familiar with these rules of safe operation should be allowed to use this machine.
-
Thoroughly inspect the area where the equipment is to be used. Remove all stones, sticks, wire, bones, toys and other foreign objects, which could be tripped over or picked up and thrown by the blade. Thrown objects can cause serious personal injury.
- Plan your mowing pattern to avoid discharge of material toward roads, sidewalks, bystanders and the like. Also, avoid discharging material against a wall or obstruction, which may cause discharged material to ricochet back toward the operator.
- To help avoid blade contact or a thrown object injury, stay in operator zone behind handles and keep children, bystanders, helpers and pets at least 75 feet from mower while it is in operation. Stop machine if anyone enters area.
- Always wear safety glasses or safety goggles during operation and while performing an adjustment or repair to protect your eyes. Thrown objects which ricochet can cause serious injury to the eyes.
- Wear sturdy, rough-soled work shoes and close-fitting slacks and shirts. Shirts and pants that cover the arms and legs and steel-toed shoes are recommended. Never operate this machine in bare feet, sandals, slippery or light-weight (e.g. canvas) shoes.
- Do not put hands or feet near rotating parts or under the cutting deck. Contact with blade can amputate fingers, hands, toes and feet.
- A missing or damaged discharge cover can cause blade contact or thrown object injuries.
- Many injuries occur as a result of the mower being pulled over the foot during a fall caused by slipping or tripping. Do not hold on to the mower if you are falling; release the handle immediately.
- Never pull the mower back toward you while you are walking. If you must back the mower away from a wall or obstruction first look down and behind to avoid tripping and then follow these steps:
a. Step back from mower to fully extend your arms.
b. Be sure you are well balanced with sure footing.
c. Pull the mower back slowly, no more than half way toward you.
d. Repeat these steps as needed. - Do not operate the mower while under the influence of alcohol or drugs.
-
Do not engage the self-propelled mechanism on machines so equipped while starting engine.
-
The blade control is a safety device. Never attempt to bypass its operation. Doing so makes the safety device inoperative and may result in personal injury through contact with the rotating blade. The blade control must operate easily in both directions and automatically return to the disengaged position when released.
-
Never operate the mower in wet grass. Always be sure of your footing. A slip and fall can cause serious personal injury. If you feel you are losing your footing, release the blade control handle immediately and the blade will stop rotating within three seconds.
-
Mow only in daylight or good artificial light. Walk, never run.
-
Stop the blade when crossing gravel drives, walks or roads.
-
If the equipment should start to vibrate abnormally, stop the engine and check immediately for the cause. Vibration is generally a warning of trouble.
-
Shut the engine off and wait until the blade comes to a complete stop before removing the grass catcher or unclogging the chute. The cutting blade continues to rotate for a few seconds after the blade control is released. Never place any part of the body in the blade area until you are sure the blade has stopped rotating.
-
Never operate mower without proper trail shield, discharge cover, grass catcher, blade control or other safety protective devices in place and working. Never operate mower with damaged safety devices. Failure to do so can result in personal injury.
-
Muffler and engine become hot and can cause a burn. Do not touch.
-
Never attempt to make a wheel or cutting height adjustment while the engine is running.
-
Only use parts and accessories made for this machine by the manufacturer. Failure to do so can result in personal injury.
-
When starting engine, pull cord slowly until resistance is felt, then pull rapidly. Rapid retraction of starter cord (kickback) will pull hand and arm toward engine faster than you can let go. Broken bones, fractures, bruises or sprains could result.
-
If situations occur which are not covered in this manual, use care and good judgement. Contact Customer Support for assistance or the name of the nearest service dealer.
Slope Operation
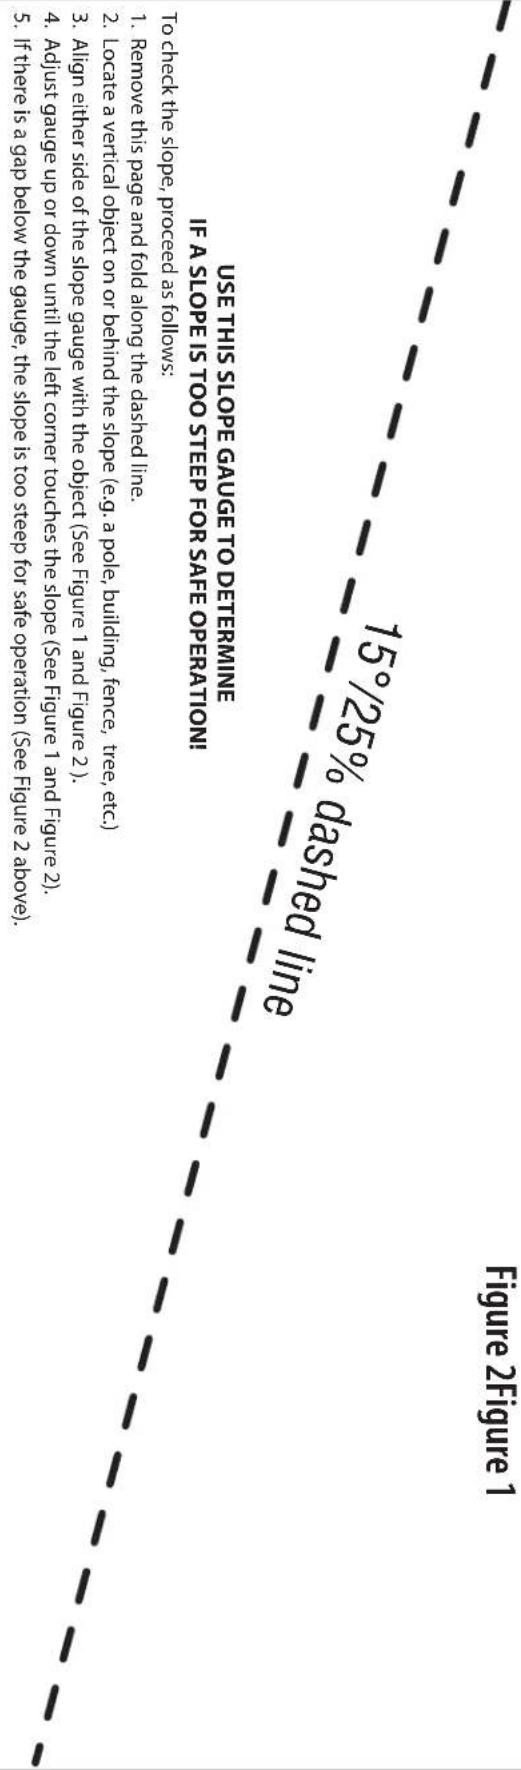
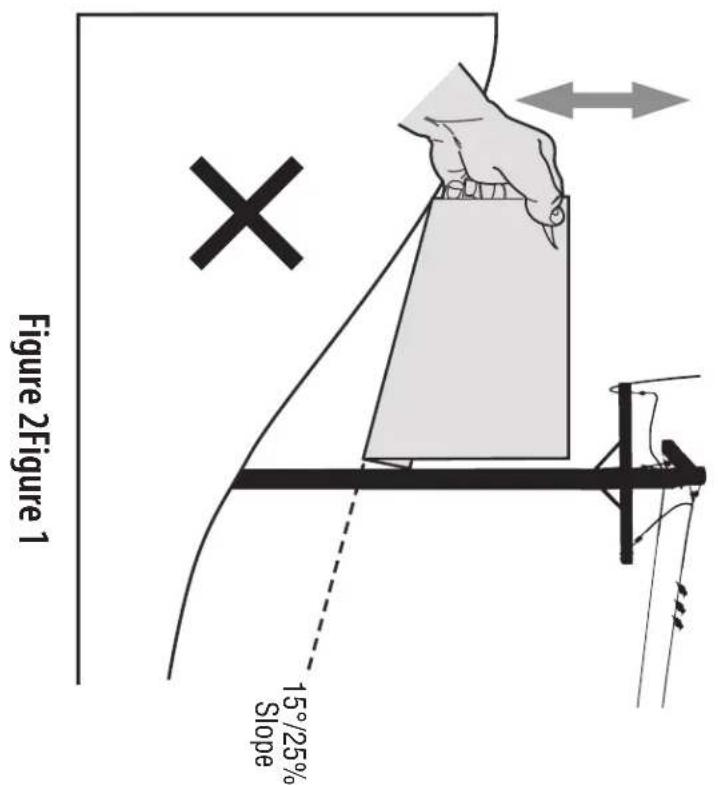
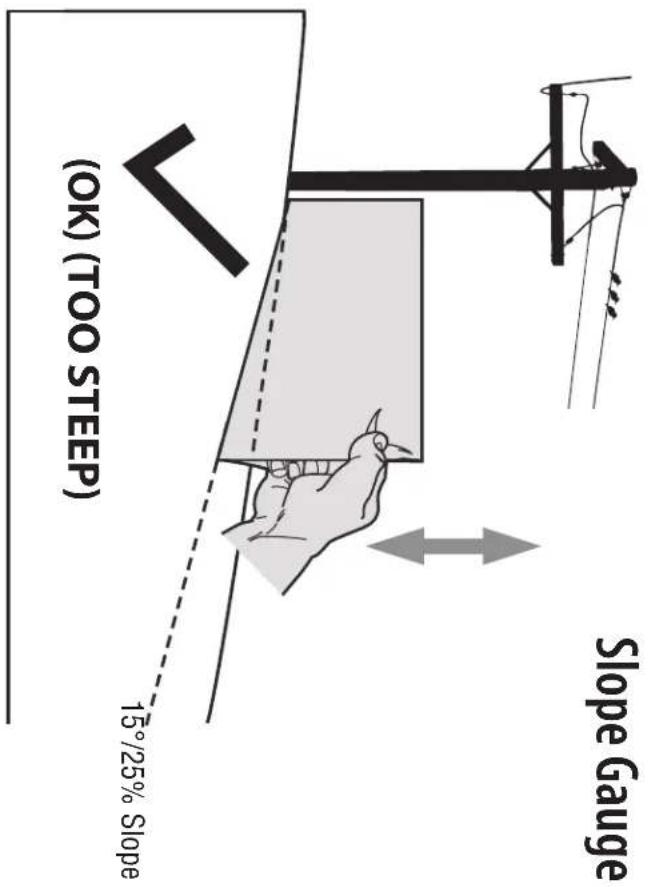
Slopes are a major factor related to slip and fall accidents, which can result in severe injury. Operation on slopes requires extra caution. The machine is heavy and can speed up when going downhill. Be prepared to maintain control of the machine. If you feel uneasy on a slope, do not mow it. For your safety, use the slope gauge included as part of this manual to measure slopes before operating this machine on a sloped or hilly area. If the slope is greater than 15 degrees, do not mow it.
Do:
- Mow across the face of slopes; never up and down to avoid loss of control.
- Exercise extreme caution when changing direction on slopes; turn uphill not down.
- Watch for holes, ruts, rocks, hidden objects, or bumps which can cause you to slip or trip. Tall grass can hide obstacles.
- Always be sure of your footing. A slip and fall can cause serious personal injury. If you feel you are losing your balance, release the blade control handle immediately and the blade will stop rotating within three (3) seconds.
Do Not:
- Do not mow near drop-offs, ditches or embankments, you could lose your footing or balance.
- Do not mow slopes greater than 15 degrees as shown on the slope gauge.
- Do not mow on wet grass. Unstable footing could cause slipping.
Children
Tragic accidents can occur if the operator is not alert to the presence of children. Children are often attracted to the mower and the mowing activity. They do not understand the dangers. Never assume that children will remain where you last saw them.
-
Keep children out of the mowing area and under watchful care of a responsible adult other than the operator.
-
Be alert and turn mower off if a child enters the area.
-
Before and while moving backwards, look behind and down for small children.
-
Use extreme care when approaching blind corners, doorways, shrubs, trees, or other objects that may obscure your vision of a child who may run into the mower.
-
Keep children away from hot or running engines. They can suffer burns from a hot muffler.
-
Never allow children under 14 years of age to operate this machine. Children 14 and over should read and understand the instructions and safe operation practices in this manual and on the machine and be trained and supervised by an adult.
-
After stopping engine, remove Electric Start Push Key (if equipped) and keep it in a safe place out of the reach of children.
Service
Safe Handling Of Gasoline:
- To avoid personal injury or property damage use extreme care in handling gasoline. Gasoline is extremely flammable and the vapors are explosive. Serious personal injury can occur when gasoline is spilled on yourself or your clothes, which can ignite. Wash your skin and change clothes immediately.
- Use only an approved gasoline container.
- Never fill containers inside a vehicle or on a truck or trailer bed with a plastic liner. Always place containers on the ground away from your vehicle before filling.
- Remove gas-powered equipment from the truck or trailer and refuel it on the ground. If this is not possible, then refuel such equipment on a trailer with a portable container, rather than from a gasoline dispenser nozzle.
- Keep the nozzle in contact with the rim of the fuel tank or container opening at all times until fueling is complete. Do not use a nozzle lock-open device.
- Extinguish all cigarettes, cigars, pipes and other sources of ignition.
- Never fuel machine indoors because flammable vapors will accumulate in the area.
- Never remove gas cap or add fuel while engine is hot or running. Allow engine to cool at least two minutes before refueling.
- Never over fill fuel tank. Fill tank to no more than 1 inch below bottom of filler neck to provide for fuel expansion.
- Replace gasoline cap and tighten securely.
- If gasoline is spilled, wipe it off the engine and equipment. Move machine to another area. Wait 5 minutes before starting engine.
- Never store the machine or fuel container near an open flame, spark or pilot light as on a water heater, space heater, furnace, clothes dryer or other gas appliances.
- To reduce fire hazard, keep machine free of grass, leaves, or other debris build-up. Clean up oil or fuel spillage and remove any fuel soaked debris.
- Allow machine to cool at least 5 minutes before storing.
General Service:
- Never run an engine indoors or in a poorly ventilated area. Engine exhaust contains carbon monoxide, an odorless and deadly gas.
-
Before cleaning, repairing, or inspecting, make certain the blade and all moving parts have stopped. Disconnect the spark plug wire and ground against the engine and remove Electric Start Push Key (if equipped) to prevent unintended starting.
-
Check the blade and engine mounting bolts at frequent intervals for proper tightness. Also, visually inspect blade for damage (e.g., bent, cracked, worn). Replace blade with the original equipment manufacture's (O.E.M.) blade only, listed in this manual. "Use of parts which do not meet the original equipment specifications may lead to improper performance and compromise safety!"
- Mower blades are sharp and can cut. Wrap the blade or wear gloves, and use extra caution when servicing them.
- Keep all nuts, bolts, and screws tight to be sure the equipment is in safe working condition.
- Never tamper with safety devices. Check their proper operation regularly.
- After striking a foreign object, stop the engine, disconnect the spark plug wire and ground against the engine. Thoroughly inspect the mower for any damage. Repair the damage before starting and operating the mower.
- Never attempt to make a wheel or cutting height adjustment while the engine is running.
- Grass catcher components, discharge cover, and trail shield are subject to wear and damage which could expose moving parts or allow objects to be thrown. For safety protection, frequently check components and replace immediately with original equipment manufacturer's (O.E.M.) parts only, listed in this manual. "Use of parts which do not meet the original equipment specifications may lead to improper performance and compromise safety!"
- Do not change the engine's governor setting or over-speed the engine. The governor controls the maximum safe operating speed of the engine.
- Check fuel line, tank, cap, and fittings frequently for cracks or leaks. Replace if necessary.
- Do not crank engine with spark plug removed.
- Maintain or replace safety and instruction labels, as necessary.
- Observe proper disposal laws and regulations. Improper disposal of fluids and materials can harm the environment.
- According to the Consumer Products Safety Commission (CPSC) and the U.S. Environmental Protection Agency (EPA), this product has an Average Useful Life of seven (7) years, or 140 hours of operation. At the end of the Average Useful Life have the machine inspected annually by an authorized service dealer to ensure that all mechanical and safety systems are working properly and not worn excessively. Failure to do so can result in accidents, injuries or death.
Do not modify engine
To avoid serious injury or death, do not modify engine in any way. Tampering with the governor setting can lead to a runaway engine and cause it to operate at unsafe speeds. Never tamper with factory setting of engine governor.
Notice Regarding Emissions
Engines which are certified to comply with California and federal EPA emission regulations for SORE (Small Off Road Equipment) are certified to operate on regular unleaded gasoline, and may include the following emission control systems: Engine Modification (EM), Oxidizing Catalyst (OC), Secondary Air Injection (SAI) and Three Way Catalyst (TWC) if so equipped.
Spark Arrestor

WARNING: This machine is equipped with an internal combustion engine and should not be used on or near any unimproved forest-covered,
brush covered or grass-covered land unless the engine's exhaust system is equipped with a spark arrestor meeting applicable local or state laws (if any).
If a spark arrestor is used, it should be maintained in effective working order by the operator. In the State of California the above is required by law (Section 4442 of the California Public Resources Code). Other states may have similar laws. Federal laws apply on federal lands.
A spark arrestor for the muffler is available through your nearest engine authorized service dealer or contact the service department, P.O. Box 361131 Cleveland, Ohio 44136-0019.
Safety Symbols
This page depicts and describes safety symbols that may appear on this product. Read, understand, and follow all instructions on the machine before attempting to assemble and operate.
| SymbolDescription | ||
 | READ THE OPERATOR'S MANUAL(S)Read, understand, and follow all instructions in the manual(s) before attempting to assemble and operate. | |
 | DANGER — ROTATING BLADESTo reduce the risk of injury, keep hands and feet away. Do not operate unless discharge cover or grass catcher is in its proper place. If damaged, replace immediately. | |
 | DANGER — BYSTANDERSDo not mow when children or others are around. | |
 | DANGER — HAND/ FOOT CUTKeep hands and feet away from rotating parts. | |
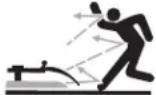 | DANGER — THROWN DEBRISRemove objects that can be thrown by the blade in any direction. Wear safety glasses. | |
 | DANGER — SLOPESUse extra caution on slopes. The machine is heavy and can speed up when going downhill. Be prepared to maintain control of the machine. To avoid loss of control, operate across slopes, not up and down. When turning, turn uphill, not down. Do not operate on slopes greater than 15°. | |
 | WARNING—GASOLINE IS FLAMMABLEAllow the engine to cool at least two minutes before refueling. | |
 | WARNING— CARBON MONOXIDENever run an engine indoors or in a poorly ventilated area. Engine exhaust contains carbon monoxide, an odorless and deadly gas. | |
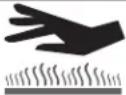 | WARNING— HOT SURFACEEngine parts, especially the muffler, become extremely hot during operation. Allow engine and muffler to cool before touching. | |

WARNING! Your Responsibility—Restrict the use of this power machine to persons who read, understand and follow the warnings and instructions in this manual and on the machine.
SAVE THESE INSTRUCTIONS!

WARNINGS: Stoves are a major factor related to slip and fall accidents which can result in severe injury or death. The machine is heavy and can speed up when going downhill. Be prepared to maintain control of the machine. To avoid loss of control, operate across slopes, not up and down. When turning, turn uphill, not down. Do not operate machine on slopes in excess of 15 degrees.
Assembly & Set-Up
Thank You
Thank you for purchasing this product. It was carefully engineered to provide excellent performance when properly operated and maintained.
Please read this entire manual prior to operating the equipment. It instructs you how to safely and easily set up, operate and maintain your machine. Please be sure that you, and any other persons who will operate the machine, carefully follow the recommended safety practices at all times. Failure to do so could result in personal injury or property damage.
All information in this manual is relative to the most recent product information available at the time of printing. Review this manual frequently to familiarize yourself with the machine, its features and operation. Please be aware that this Operator's Manual may cover a range of product specifications for various models. Characteristics and features discussed and/or illustrated in this manual may not be applicable to all models. We reserve the right to change product specifications, designs and equipment
without notice and without incurring obligation.
If applicable, the power testing information used to establish the power rating of the engine equipped on this machine can be found at www.opei.org or the engine manufacturer's web site.
If you have any problems or questions concerning the machine, phone your local authorized service dealer or contact us directly. We want to ensure your complete satisfaction at all times.
Throughout this manual, all references to right and left side of the machine are observed from the operating position.
The engine manufacturer is responsible for all engine-related issues with regards to performance, power-rating, specifications, warranty and service. Please refer to the engine manufacturer's Owner's/Operator's Manual, packed separately with your machine, for more information.
Contents of Carton
- Lawn Mower (1)
Grass Catcher (1)
• Grass Catcher Chute (1)
- Side Discharge Chute (1) • Battery Charger† (1) • Electric Start Push Key† (1)
- Wing Knob (1)
• High Lift Bagger Blades† (2)
• Lawn Mower Operator's Manual (1)
• Fast Start Guide† (1)
• Replacement Parts/Warranty Supplement (1)
• Engine Operator's Manual (1)
- Oil (1) + If Equipped
NOTE: This Operator's Manual covers several models. Features may vary by model. Not all features in this manual are applicable to all models and the model depicted may differ from yours.
Mower Set-Up
NOTE: This unit is shipped without gasoline or oil in the engine. Fill up with gasoline and oil as instructed in the Engine Operator's Manual BEFORE operating your mower.
Unfolding the Handle
Remove any packing material which may be between the handle and mower.
-
Tighten star knobs securing lower and upper handles together.
-
Push down on the handle adjustment lever with your foot. See Figure 2-1.
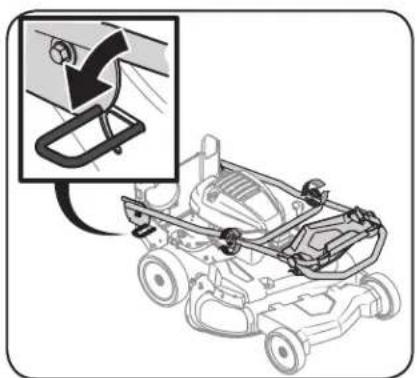
natural_image
Diagram of a car chassis with a close-up inset showing a mechanical linkage mechanism (no text or symbols present)Figure 2-1
- Pivot the handle into operating position. Be careful not to crimp cables. See Figure 2-2.
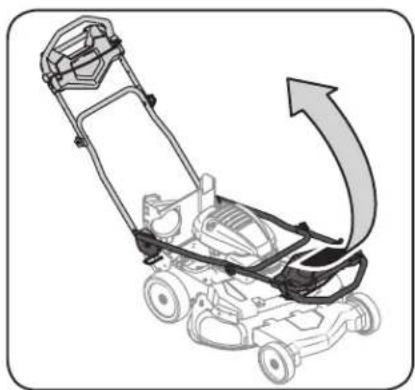
natural_image
Diagram of a lawn mower with directional arrow indicating motion (no text or symbols)Figure 2-2
- The handle height can be adjusted to one of two positions. Push down on the handle adjustment lever with your foot and place the handle into the most comfortable operating position. See Figure 2-3.
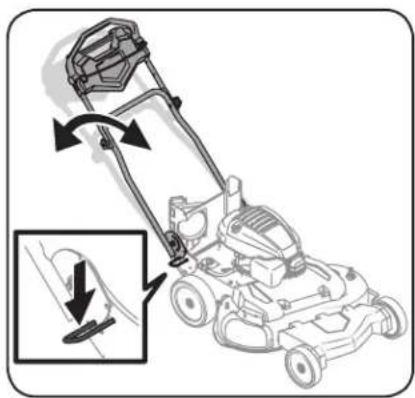
natural_image
Diagram of a lawn mower with a close-up inset showing the blade and handle (no text or symbols)Figure 2-3
Attaching the Grass Catcher (If Equipped)
NOTE: Mower ships with mulching blade installed. Before attaching the grass chatcher ensure ensure the high lift blades are installed for proper grass catcher operation.
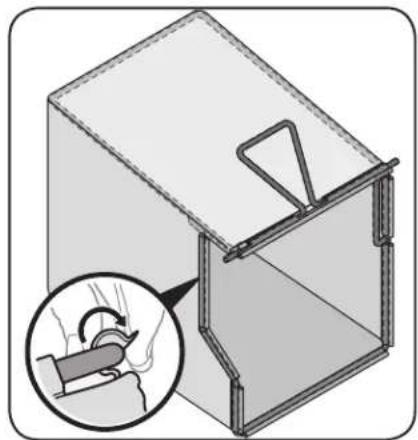
- Follow steps below to assemble the grass catcher. Make certain bag is turned right side out before assembling (warning label will be on the outside).
a. Place bag over frame so that its black plastic side is at the bottom.
b. Slip plastic channel of grass bag over hooks on the frame. See Figure 2-4.
natural_image
Diagram of a mechanical device with an inset showing a tool interacting with a component (no text or symbols present)Figure 2-4
- Follow steps below to attach grass catcher:
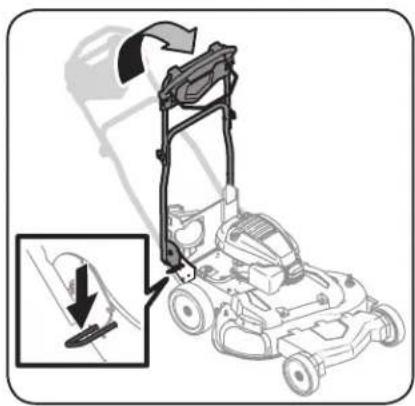
a. Push down on the handle adjustment lever and pivot handle into storage position. See Figure 2-5.
natural_image
Diagram of a lawn mower with a close-up inset showing the blade being inserted (no text or symbols present)Figure 2-5
b. Open the rear discharge door using the door handle. See Figure 2-6.
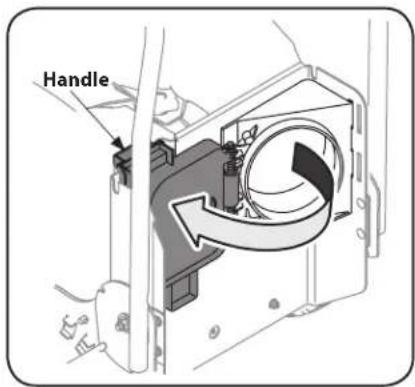
Figure 2-6
c. Place the grass catcher into the slots on the rear discharge support bracket. See Figure 2-7 inset.
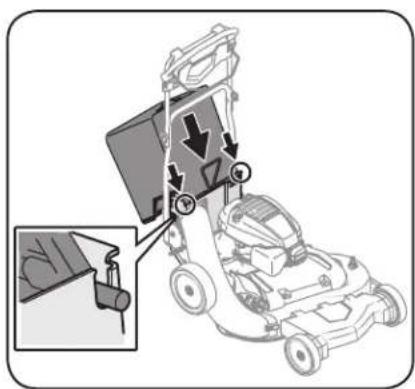
Figure 2-7
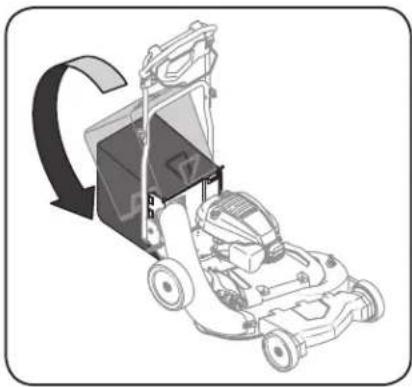
d. Pivot the grass catcher down so that it rests over the rear opening of the mower. See Figure 2-8. Let go of discharge door so that it rests against the grass catcher.
natural_image
Diagram of a lawn mower with a moving cart and directional arrow indicating motion (no text or symbols)Figure 2-8
To remove grass catcher, hold open rear discharge door on the mower. Lift grass catcher up and off of the slots in the support bracket. Release rear discharge door to allow it to close rear opening of mower.
Attaching Grass Catcher Chute
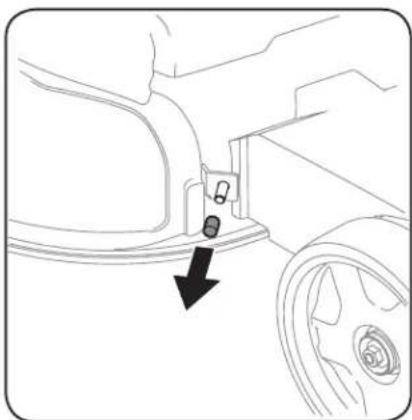
- Remove the vinyl cap on the deck stud in front of the discharge opening. See Figure 2-9.
natural_image
Line drawing of a car seatbelt mechanism with a black arrow indicating the direction (no text or symbols present)Figure 2-9
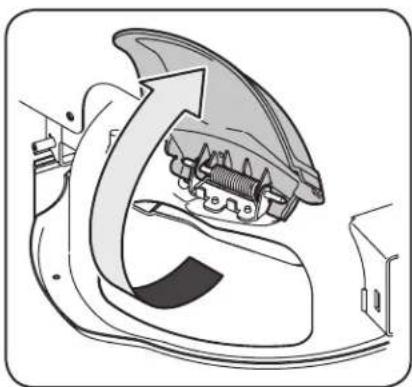
- On the side of the mowing deck, lift the mulch plug. See Figure 2-10.
natural_image
Diagram of a mechanical device with internal components and directional arrows indicating motion (no text or symbols)Figure 2-10
- Insert the top of the chute into the opening of the grass catcher support bracket. See Figure 2-11a.
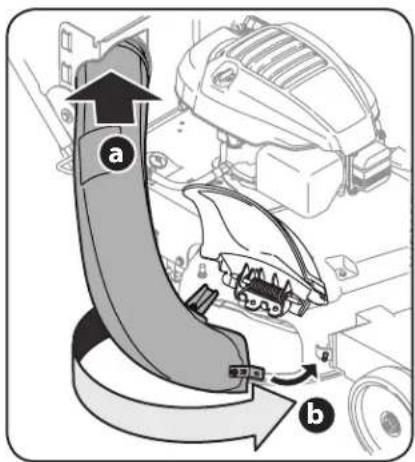
Figure 2-11
-
Pivot the chute towards the mowing deck and over the opening in the side of the mowing deck. See Figure 2-11b.
-
Secure the chute to the mowing deck using the wing knob included in the manual bag. Thread the wing knob onto the deck stud. Hand tighten to secure the discharge chute. See Figure 2-12.
NOTE: On units with caster wheels, you may need to pivot the front wheel to the side to attach the wing knob.
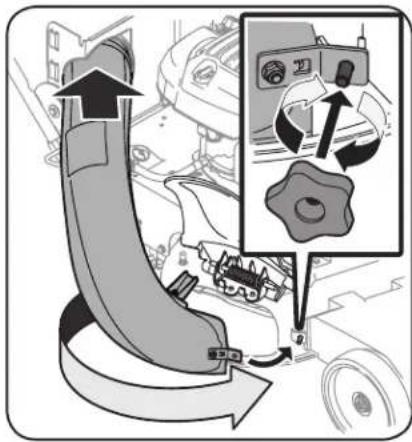
Figure 2-12
Attaching Side Discharge Chute
Your mower is shipped as a mulcher. To convert to side discharge, make sure grass catcher is off the unit and mower rear discharge door is closed.
- On the side of the mower deck, lift the mulch plug. See Figure 2-13.
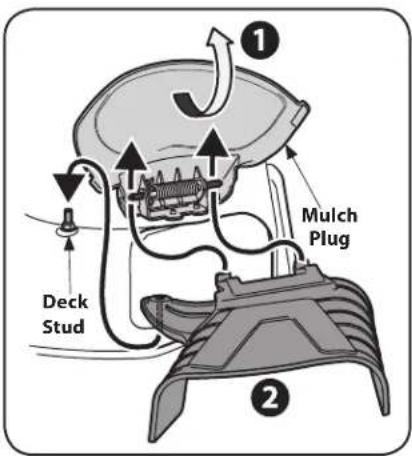
Figure 2-13
- Slide two hooks of side discharge chute under hinge pin on mulch plug assembly and position hole in the chute over and on to the deck stud located behind the discharge opening. See Figure 2-13. Lower mulch plug.
- Secure the chute to the mowing deck using the wing knob included in the manual bag. Hand tighten the wing knob onto the deck stud. See Figure 2-14.
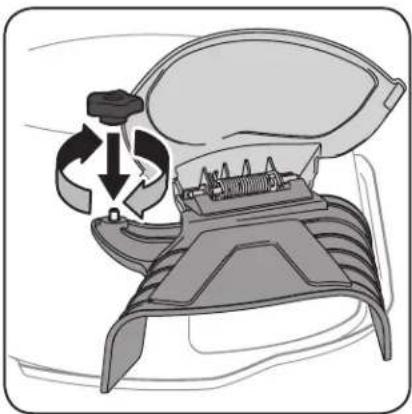
natural_image
Illustration of a device with a switch and circular arrow indicating rotation (no text or symbols)Figure 2-14
NOTE: Do not remove side mulch plug at any time.
Adjustments
Cutting Height (Standard Wheel)
There is a cutting height adjustment lever located above the rear left wheel. See Figure 2-15.
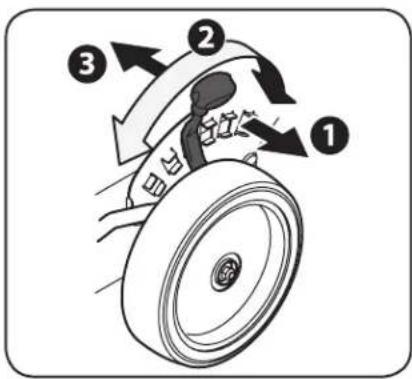
Figure 2-15
- Pull lever out and away from mower.
- Move lever forward or back for desired cutting height.
- Release lever towards mower deck.
NOTE: On the standard wheel units, this lever adjusts the rear and front wheel height simultaneously. On caster wheel models, it adjusts the rear wheel height only.
Cutting Height (Caster Wheel)
If equipped, the caster wheels cutting height are determined by selecting one of six positions on each caster assembly. Refer to Figure 2-16.
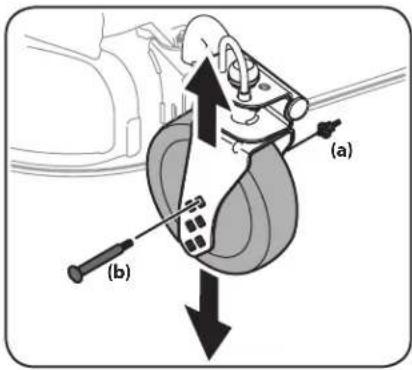
Figure 2-16
- Remove wing nut (a) from axle bolt (b). Slide axle bolt from the assembly and select a cutting height.
- Reinsert axle bolt in the square hole desired through wheel assembly and secure with wing nut removed in Step 1.
IMPORTANT: All wheels must be placed in the same relative position. For rough or uneven lawns, move the height adjustment lever to a higher position. This will stop scalping of grass.
The casters can be locked in a straight ahead position or positioned to swivel freely. See Figure 2-17.
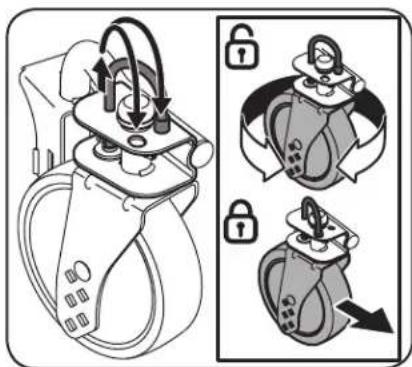
Figure 2-17
- Lift lock pins.
- Place in larger holes to lock wheels. Place pins in smaller holes to allow casters to rotate freely for turning.
Set-Up
Electric Starter (If Equipped)
NOTE: Remove cable tie (a) from around battery box. Cable tie is used for shipping only. See Figure 2-18.
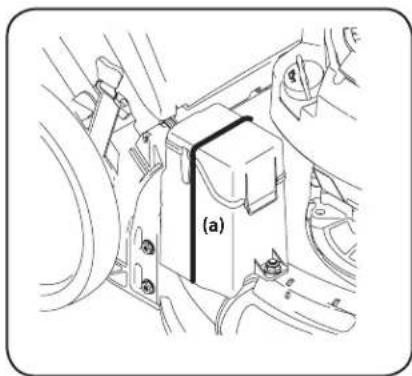
Figure 2-18
Gas and Oil Fill-Up
Refer to the Engine Operator's Manual for additional engine information.
- Add provided oil before starting unit for the first time.
- Service the engine with gasoline as instructed in the Engine Operator's Manual.

WARNING: Use extreme care when handling gasoline. Gasoline is extremely flammable and the vapors are explosive. Never fuel the machine indoors or while the engine is hot or running. Extinguish cigarettes, cigars, pipes and other sources of ignition.
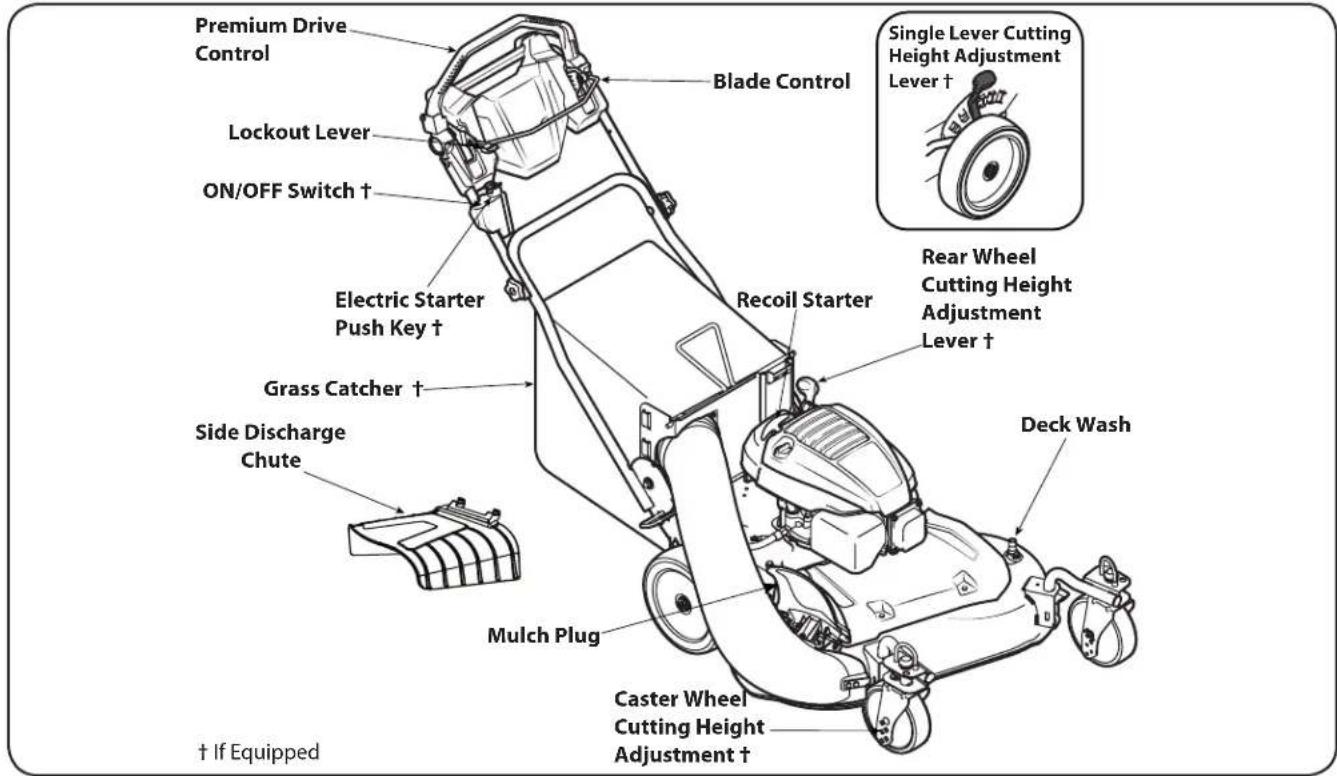
Figure 3-1
Lawn Mower controls and features are illustrated in Figure 3-1 and described on the following pages.

WARNING! Read and follow all safety rules and instructions in this manual, including the entire Operation section, before attempting to operate this machine. Failure to comply with all safety rules and instructions may result in personal injury.
IMPORTANT: Your mower features a two step process to engage the blade:
Lockout Lever
The lockout lever is attached to the blade control on the upper handle of the mower. Press down on it prior to engaging the blade control.
Blade Control
The blade control is attached to the upper handle of the mower. After pressing down on the lockout lever, depress and squeeze it against the upper handle to engage the blade. Release it to stop the blade.

WARNING: The blade control is a safety device. Never attempt to bypass its operations.
Premium Drive Control
The premium drive control is located on the upper handle and is used to engage the drive. Pushing the control forward will engage the drive. The farther the control is pushed forward, the faster the mower will propel. Once
pressure is released from the control it will return to the neutral position and the drive will be disengaged.
Cutting Height Adjustment Lever
There are two cutting height adjustment configurations.
Single Lever (If Equipped)
The cutting height adjustment lever is located above the rear left wheel. To adjust the cutting height, refer to Cutting Height Adjustment on page 8.
Rear Wheel/ Caster Wheels (If Equipped)
The rear wheel cutting height adjustment lever is located above the rear left wheel. The caster wheels adjust by moving the wheel bolts to the desired position. To adjust the cutting height, refer to Cutting Height Adjustment on page 8.
Grass Catcher (If Equipped)
The grass catcher, located at the rear of the mower, is used to bag the grass clippings for disposal. Once the bag is full, remove it up through the handles using the grass catcher handle and empty it.
Mulch Plug
The mulch plug is used for mulching purposes. Instead of collecting the grass clippings in a grass catcher or using the side discharge chute, some mower models have the option of recirculating the clippings back to the lawn. This is called mulching.
Side Discharge Chute
Your mower is shipped as a mulcher. To discharge the grass clippings to the side, follow the instructions on page 7 in the Assembly & Set-Up section to attach the side discharge chute.

WARNING: Keep hands and feet away from the chute area on cutting deck. Refer to warning label on the unit.
Deck Wash
Your mower's deck is equipped with a fast attach deck wash nozzle on its surface as part of its deck wash system. Use the deck wash to rinse grass clippings from the deck's underside.
Electric Starter Push Key (If Equipped)
The electric starter push key is located on the right side of the upper handle. It is both a removable key and push button and is only provided on electric start models.
NOTE: Removing the Electric Starter Push Key will not turn the engine off. It will only disable the "start" function of the unit.
ON/OFF Switch
The ON/OFF Switch is located on the electric starter housing and when pressed and held, will turn the engine OFF.
Recoil Starter
The recoil starter is located on the engine. Pull the recoil starter rope to start the unit.
Starting Engine

WARNING: Be sure no one other than the operator is standing near the lawn mower while starting engine or operating mower. Never run engine indoors or in enclosed, poorly ventilated areas. Engine exhaust contains carbon monoxide, an odorless and deadly gas. Keep hands, feet, hair and loose clothing away from any moving parts on engine and lawn mower.
Refer to engine manual for help with the engine.
Electric Start
- Insert plastic electric start push key into starter housing located on the right side of upper handle until it snaps in place. See Figure 3-2.
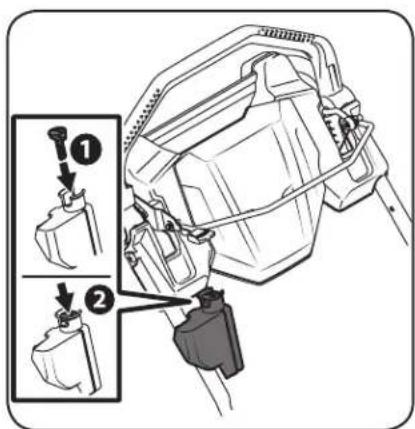
Figure 3-2
- Push the electric starter push key to start the engine.
NOTE: Electric starter is equipped with an internal circuit breaker. If unit fails to start when starter button is depressed, wait one minute for breaker to reset, then attempt to start again.
Recoil Start
- Pull the recoil starter lightly until resistance is felt, then pull rapidly to overcome compression, prevent kickback, and start the engine. Repeat if necessary.
IMPORTANT: Do not allow the recoil starter to snap back against the rope guide. Return it gently to prevent damage to the starter.
Stopping Engine
- Push and hold the ON/OFF switch until the mower engine stops. See Figure 3-3.
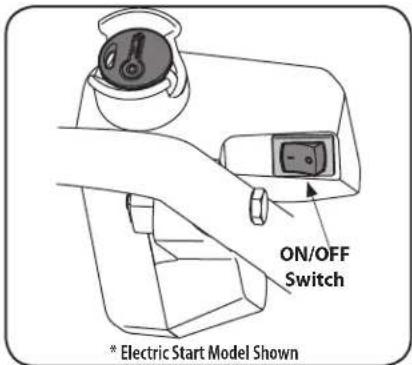
Figure 3-3
- Remove electric start push key if mower is to be left unattended, stored, or serviced (Electric Start units only). To remove key, grasp the top of the key and pull it straight up and out. Keep key in a safe place out of the reach of children.

WARNING: Wait for the blade to stop completely before performing any work on the mower or to remove the grass catcher.
Using Your Lawn Mower
Be sure lawn is clear of stones, sticks, wire, or other objects which could damage lawn mower or engine. Such objects could be accidentally thrown by the mower in any direction and cause serious injury to the operator, others, or the equipment.
- Once the engine is running, press down on the lockout lever. See Figure 3-4.
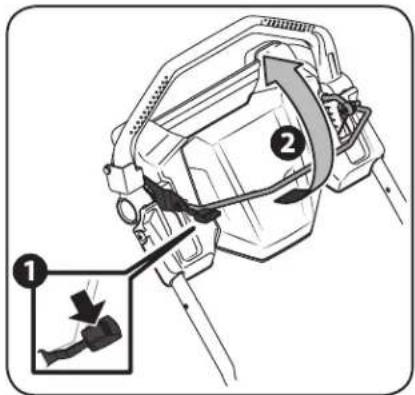
Figure 3-4
- Pull the blade control back against the drive control. See Figure 3-4.
- While continuing to hold the blade and drive controls together, push the drive control forward to propel mower. See Figure 3-5. The farther the control is pushed forward, the faster the mower will propel.
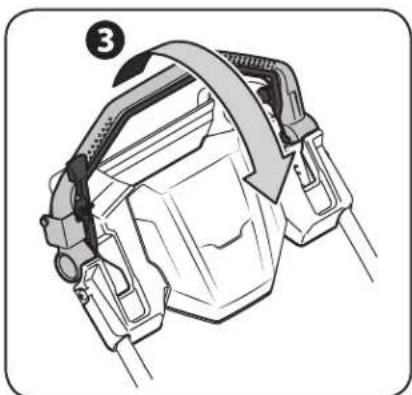
natural_image
Technical illustration of a mechanical device with a belt and clasp (no text or symbols)Figure 3-5
- Once pressure is released from the control it will return to the neutral position and the drive will be disengaged.
NOTE: For ease of use, while gripping the controls, simply lock your wrist and elbows and walk - the unit will automatically adjust to your speed.

WARNING: The operation of any lawn mower can result in foreign objects being thrown into the eyes, which can damage your eyes severely. Always wear safety glasses while operating the mower, or while performing any adjustments or repairs on it.
The following information will be helpful when operating your mower.

WARNING! Plan your mowing pattern to avoid discharge of materials toward roads, sidewalks, bystanders and the like. Also, avoid discharging material against a wall or obstruction which may cause discharged material to ricochet back toward the operator.
- Do not mow at fast ground speeds, especially if mulching or a grass collector is installed.
- Do not cut the grass too short. Short grass is prone to weed growth and yellows quickly in dry weather.
- For best results, it is recommended that the first two laps be cut with the discharge thrown towards the center. After the first two laps, reverse the direction to throw the discharge to the outside for the balance of cutting. This will give a better appearance to the lawn.
- Do NOT attempt to mow heavy brush and weeds or extremely tall grass. Your mower is designed to mow lawns, NOT clear brush.
- Keep the blades sharp and replace the blades when worn.

WARNING! After striking a foreign object, stop the engine, disconnect the spark plug wire and ground against the engine. Thoroughly inspect the mower for any damage. Repair the damage before starting and operating the mower.
Using as Mulcher
For mulching grass, remove the side discharge chute or the grass catcher and allow the rear discharge door to close the rear opening of mower. Refer to the Assembly & Set-Up section. For effective mulching, do not cut wet grass. If the grass has been allowed to grow in excess of four inches, mulching is not recommended. Use the grass catcher to bag clippings instead. If converting the mower from a grass catcher to mulcher, ensure the mulcher blades are installed before using the mower.
Using Grass Catcher
Use the grass catcher to collect clippings while you are operating the mower.
IMPORTANT: To effectively bag the grass, you will need to install the high lift blades that were packed separately in the box. See Blade Care on page 13 of the Service section and follow the procedure for removing and reinstalling the blades.
- Attach grass catcher following instructions in the Assembly & Setup section on page 6. Grass clippings will automatically collect in bag as you run mower. Operate mower until grass bag is full.
- Stop engine completely by releasing the blade control. Make sure that the unit has come to a complete stop.
- Lift discharge door and pull grass bag up and away from the mower to remove the bag. Dispose of the grass clippings and reinstall the bag when complete.

WARNING: If you strike a foreign object, stop the engine. Remove wire from the spark plug, thoroughly inspect mower for any damage, and repair damage before restarting and operating. Extensive vibration of mower during operation is an indication of damage. The unit should be promptly inspected and repaired.
Operating on Slopes
Refer to the Slope Gauge on page 6 to help determine slopes where you may operate the mower safely.

WARNING! Do not mow on inclines with a slope in excess of 15 degrees (a rise of approximately 2-1/2 feet every 10 feet). The mower could overturn and cause serious injury.
- Mow across the face of slopes; never up and down.
• Exercise extreme caution when changing direction on slopes. - Watch for holes, ruts, rocks, hidden objects, or bumps which can cause you to slip or trip. Tall grass can hide obstacles.
• Always be sure of your footing. A slip and fall can cause serious personal injury. If you feel you are losing your balance, release the blade control handle immediately and the blade will stop rotating within three seconds. - Do not mow near drop-offs, ditches or embankments, you could lose your footing or balance.
- Do not mow slopes greater than 15 degrees as shown on the slope gauge.
- Do not mow on wet grass. Unstable footing could cause slipping.
Maintenance

WARNING! Before performing any maintenance or repairs, disengage blades, stop engine and remove key (if equipped) to prevent unintended starting.
General Recommendations
• Always observe safety rules when performing any maintenance.
• The warranty on this lawn mower does not cover items that have been subjected to operator abuse or negligence. To receive full value from warranty, operator must maintain the lawn mower as instructed here.
- Changing of engine-governed speed will void engine warranty.
- All adjustments should be checked at least once each season.
• Periodically check all fasteners and make sure these are tight.

WARNING: Always stop engine, allow engine to cool, disconnect spark plug, and ground against engine before performing any type of maintenance on your machine.
Lubrication

WARNING! Before lubricating, repairing, or inspecting, always disengage blades, stop engine and remove key (if equipped) to prevent unintended starting.
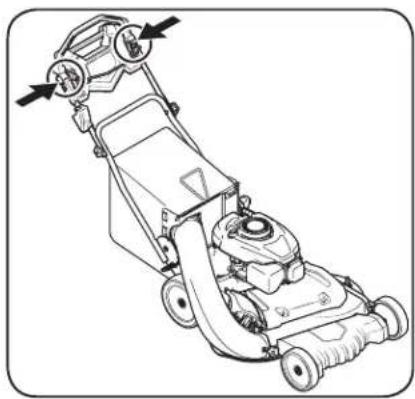
- Lubricate pivot points on the blade and drive controls at least once a season with light oil. These controls must operate freely in both directions. See Figure 4-1.
natural_image
Line drawing of a lawn mower with control valves and wheels (no text or symbols)Figure 4-1
- The transmission is pre-lubricated and sealed at the factory and does not require lubrication.
- Follow the accompanying Engine Operator's Manual for lubrication schedule and instruction for engine lubrication.
Front Caster Wheels (If Equipped)
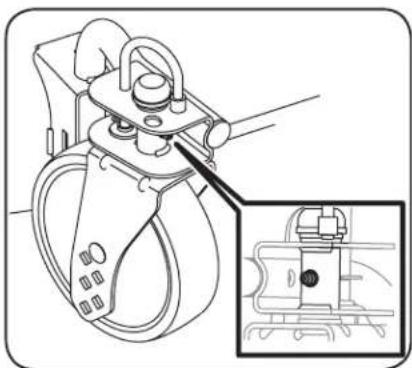
Each of the front wheel axles and casters is equipped with a grease fitting. See Figure 4-3. Lubricate with a No. 2 multi-purpose grease applied with a grease gun after every 25 hours of mower operation or once a season.
natural_image
Technical line drawing of a mechanical clamp or bracket assembly with an inset detail view (no text or symbols)Figure 4-2
Engine
A list of key engine maintenance jobs required for good performance by the mower is given below. Follow the Engine Operator's Manual for a detailed list of maintenance intervals and instructions.
- Maintain oil level as instructed in the Engine Operator's Manual.
• Service air cleaner once a season under normal conditions. Clean every few hours under extremely dusty conditions. Poor engine performance and flooding usually indicates that the air cleaner should be serviced. To service the air cleaner, refer to the engine manual. - Clean spark plug and reset the gap once a season. Spark plug replacement is recommended at the start of each mowing season. Check Engine Operator's Manual for correct plug type and gap specifications.
- Clean engine regularly with a cloth or brush. Keep the top of the engine clean to permit proper air circulation. Remove all grass, dirt, and combustible debris from muffler area.
• Engines stored between 30 and 90 days need to be treated with a gasoline stabilizer to prevent deterioration and gum from forming in fuel system or on essential carburetor parts.
Changing the Engine Oil

WARNING! If the engine has been recently run, the engine, muffler and surrounding metal surfaces will be hot and can cause burns to the skin. Exercise caution to avoid burns.
Refer to the Engine Operator's Manual for specific oil change intervals.
- Pull up the oil drain hose to release it from the deck. See Figure 4-3 for MTD engine and Figure 4-4 for Briggs & Stratton engine.
NOTE: The engine is equipped with either a plastic twist-off or metal square head cap. Refer to Figure 4-3 insets.
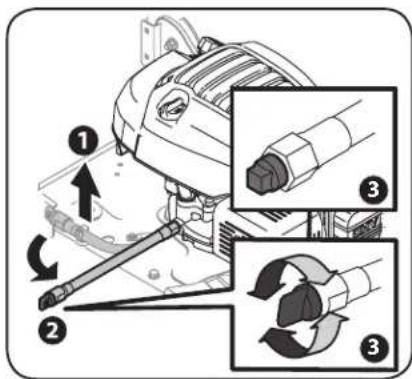
Figure 4-3
NOTE: For units equipped with the Briggs & Stratton engine and bagger, remove the bagger from the mower, which will expose a hole in the back plate of the mower when the bagger door closes to pass the oil drain hose through. See Figure 4-4.
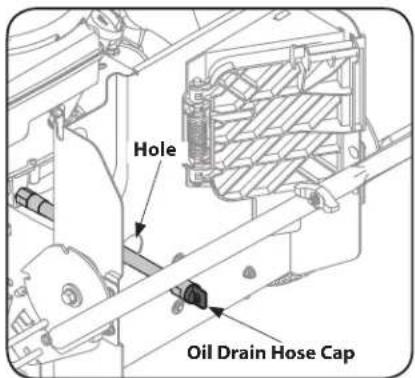
Figure 4-4
- Position the end of the hose over an appropriate oil collection container with at least a 20 ounce capacity, to collect the used oil.
NOTE: On units with the Briggs & Stratton engine and rear draining oil hose, tip the mower back to help drain the oil from the engine.
-
Unscrew the cap on the end of the oil drain hose to begin draining oil. See Figure 4-3 inset.
-
After the oil has finished draining, screw the cap back onto the end of the oil drain hose. See Figure 4-5.
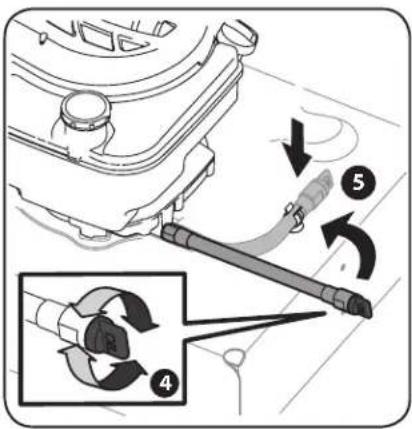
Figure 4-5
- Position the hose back over the deck and press the hose back into place on the deck.
- Refill the engine with new oil. Refer to the Engine Operator's Manual for information regarding the volume and weight of engine oil.
Cleaning the Mower
Smart Jet
Your mower's deck is equipped with a water port on its surface as part of its deck wash system.
Use the Smart Jet to rinse grass clippings from the deck's underside and prevent the buildup of corrosive chemicals. Complete the following steps AFTER EACH MOWING:

WARNING! Before using the deck wash system, always disengage the blade control, stop engine and remove key to prevent unintended starting.
- Position the mower on a level, clear location on your lawn, near enough for your garden hose to reach.

CAUTION: Make certain the mower's discharge chute is directed AWAY from your house, garage, parked cars, etc.
- Remove the fast attach deck wash nozzle from the mower deck and thread it onto the end of your garden hose.
- Attach garden hose with the deck wash nozzle to the water port on your deck's surface. See Figure 4-6.
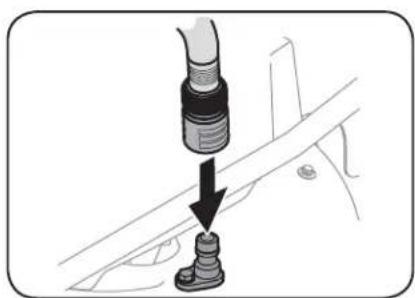
natural_image
Mechanical assembly diagram showing a valve inserted into a component, with a downward arrow indicating force or direction (no text or symbols present)Figure 4-6
- Turn the water ON and start the engine as described in the Controls & Operation section.
- While in the operator's position behind the mower, depress the lockout lever and pull the blade control back against the drive control to engage the blades.
- Remain in the operator's position with the cutting deck engaged for a minimum of two minutes, allowing the underside of the cutting deck to thoroughly rinse.
- Release the blade control to disengage the cutting deck and stop the blades.
- Push and hold the ON/OFF switch until the mower engine stops.
- Turn the water OFF and detach the deck wash nozzle from the water port on your deck's surface.
After cleaning your deck with the Smart Jet system, start the mower's engine, return to the operator's position and engage the blades. Keep the cutting deck running for a minimum of two minutes, allowing the underside of the cutting deck to thoroughly dry.
Mower Deck
For every 25 hours of operation and before off-season storage, it is recommended to remove the deck cover and remove any grass clipping or other debris.
NOTE: Drive belt assembly not shown in figure 1-7 for clarity.
- Remove the four shoulder screws securing the deck shroud to the mower deck.
Note: When removing the deck shroud two tabs (a) on the shroud are inserted into the mower frame. Tabs must be inserted into the frame when reinstalling the deck shroud.
- Remove the deck shroud from the mower deck.
Note: DO NOT use water to remove grass clippings or debris.
- Using a brush or compressed air, remove any grass clippings or debris present.
- Position the deck shroud onto the mower deck.
- Using the four shoulder screws, secure the deck shroud to the mower deck.
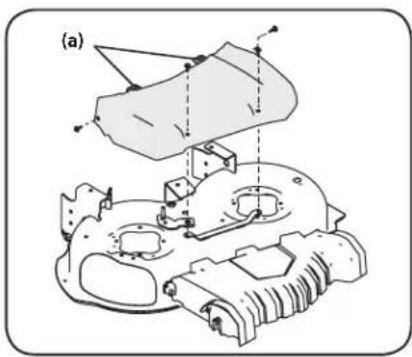
natural_image
Technical diagram of a mechanical assembly with no visible text or symbolsFigure 4-7
Blade Care

WARNING! Shut the engine OFF and remove ignition key (if so equipped) before removing the cutting blade(s) for sharpening or replacement. Protect your hands by using heavy gloves when grasping the blades.

WARNING! Periodically inspect the blade and/or spindle for cracks or damage, especially after you've struck a foreign object. Do not operate the machine until damaged components are replaced.
To remove the blades, proceed as follows:
- Allow the engine to run until it is out of fuel. Do not attempt to pour fuel from the engine. Disconnect spark plug wire. Refer to Engine Operator's Manual.
- Turn mower on its side making sure that the air filter and the carburetor are facing up.
- Place a block of wood between the center deck housing baffle and the cutting blade to prevent the blade from turning when loosening the blade's hex flange nut. See Figure 4-7.
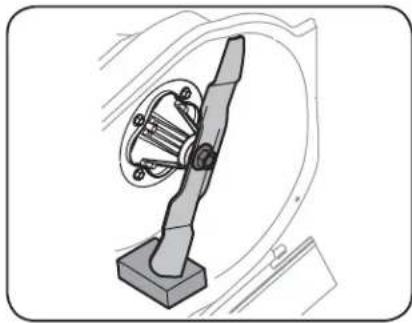
natural_image
Mechanical component diagram showing a lever mechanism with rotating parts and a base (no text or symbols)Figure 4-8
- Remove the hex flange nuts (a) that secures the blades to the spindle assembly. See Figure 4-8.
Note: The hex flange nuts are secured using a standard thread pattern. Turn counter-clockwise to loosen.
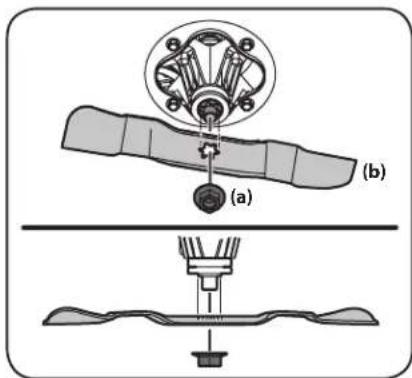
Figure 4-9
-
Remove the blades (b) from the mowing deck.
-
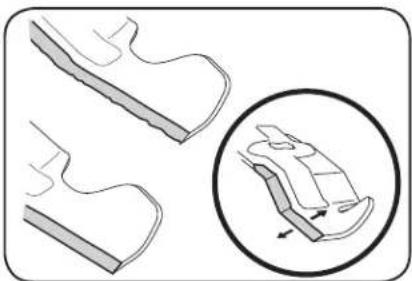
Replace or sharpen the blades. To properly sharpen the cutting blades, remove equal amounts of metal from both ends of the blades along the cutting edges, parallel to the trailing edge, at a 25° to 30° angle. Always grind each cutting blade edge equally to maintain proper blade balance. See Figure 4-9.
natural_image
Diagram showing two views of a shoe blade with an inset close-up highlighting the blade structure (no text or symbols)Figure 4-10
- Test the blades for balance by balancing the blade on a round shaft screwdriver to check. If out of balance, when sharpening, remove metal from the heavy side until it balances evenly. During sharpening the blade, follow the original angle of grind. Grind each cutting edge equally to keep the blade balanced.

WARNING: An unbalanced blade will cause excessive vibration when rotating at high speeds. It may cause damage to mower and could break causing personal injury.
- Slide the blades (b) onto the spindle shafts with the side marked "Grass Side" (or with part number) facing the ground when the mower is in the operating position.
- Replace the hex flange nuts (a) and tighten to torque: 70 ft-lb (min.), 90 ft-lb (max.).
To ensure safe operation of your mower, periodically check the blade bolt for correct torque.
Belt Care
Several components must be removed and special tools used in order to change the mower's belts. See your authorized service dealer to have belts replaced.
Replacing Battery (If Equipped)

WARNING: Batteries contain sulfuric acid which may cause burns. Do not short circuit or damage batteries in any way. Do not put batteries in fire as these may burst or release toxic materials.
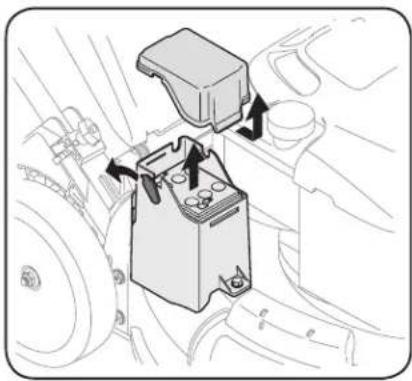
- Unhinge cover seal and remove battery cover.
- Remove positive and negative leads from battery, and pull up on battery to remove. See Figure 4-10.
natural_image
Diagram of a vehicle engine compartment with arrows indicating assembly or movement (no text or symbols present)Figure 4-11
- Replace with new battery. Connect the positive lead (red) to the positive side of the battery pack, then connect the negative lead (black) to the negative side. See Figure 4-11.
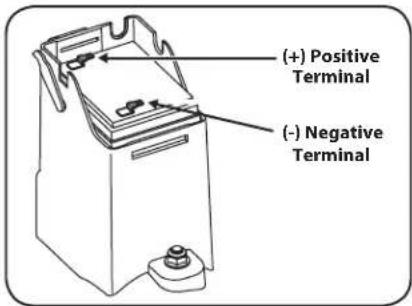
Figure 4-12
- Reattach battery cover and cover seal.
Charging Battery (If Equipped)

WARNING: The battery contains corrosive fluid and toxic material; handle with care and keep away from children. Do not puncture, disassemble, damage or incinerate the battery. Explosive gases could be vented during charging or discharging. Use in a well ventilated area, away from sources of ignition.
IMPORTANT: The special designed plug on the charger will only fit into plug on battery box.
- Unhinge the cover seal and plug the battery charger into the port on the side of the battery housing. See Figure 4-12.
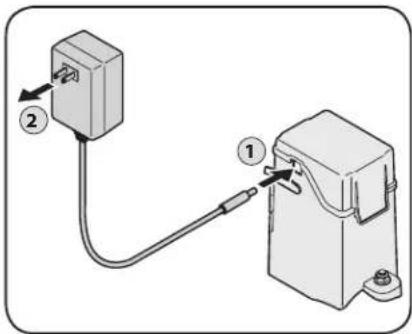
Figure 4-13
- Insert the battery charger plug into a standard 120V household outlet. Charge battery for 8 to 10 hours before initial use. Do not charge longer than 12 hours. The battery should only need to be charged upon initial setup, at the end of the season, after any other extended periods of non-use, and as needed.
NOTE: If you frequently stop and restart the mower during each cut throughout the season (for instance when bagging), more frequent charging may be necessary.
- After charging, disconnect charger plug from outlet first, then disconnect charger lead from battery and reattach cover seal.
IMPORTANT: Do not remove the battery pack from the electric starter housing for any reason other than replacement.
IMPORTANT: Always plug charger lead into battery pack lead first, and then insert battery charger plug into 120V standard household outlet. Follow this order of action every time you charge the battery.
Off-Season Storage
Mower
The following steps should be taken to prepare your lawn mower for storage.
- Clean and lubricate mower thoroughly as described in Lubrication section on page 12.
- Apply a coat of chassis grease to mower's cutting blades to prevent rusting.
- Refer to Engine Operator's Manual for correct engine storage instructions.
- Do not use a pressure washer to clean your unit.
- Store mower in a dry, clean area. Do not store next to corrosive materials, such as fertilizer.
When storing any type of power equipment in a poorly ventilated or metal storage shed, care should be taken to rust-proof the equipment. Using a light oil or silicone, coat the equipment, especially cables and all moving parts of your lawn mower before storage.
Battery (If Equipped)
• The battery must be stored with a full charge. Extended storage of a discharged battery will reduce life and capacity of the battery. For optimal battery life, charge the battery once per month while in storage.
- Remove electric starter push key (if equipped) and keep in a safe place out of the reach of children.
| ProblemCause | Remedy | |
| Engine fails to start 1. Spark plug boot disconnected.2. Fuel tank empty or stale fuel.3. Engine not primed (if equipped with primer).4. Faulty spark plug.5. Blocked fuel line.6. Engine flooded. | 1. Connect wire to spark boot.2. Fill tank with clean, fresh gasoline.3. Prime engine as instructed in the Engine Operator's Manual.4. Clean, adjust gap, or replace.5. Clean fuel line.6. Wait a few minutes to restart; do not prime. | |
| Engine fails to start with electric starter (Electric Start Units Only) | 1. Electric starter push key not fully inserted.2. Battery not charged.3. Circuit breaker tripped. | 1. Insert electric starter push key into starter housing until it snaps into place.2. Charge battery.3. Debris may be blocking blade operation. Stop engine, remove electric starter push key, and disconnect spark plug boot. Verify grass or other debris are not obstructing the blade. Carefully clean out debris if necessary. Reattach spark plug boot and reinsert electric starter push key. Wait one minute after tripping for circuit breaker to automatically self-reset then reattempt start. |
| Engine runs erratic 1. Spark plug boot loose.2. Blocked fuel line or stale fuel.3. Vent in gas cap plugged.4. Water or dirt in fuel system.5. Dirty air cleaner. | 1. Connect and tighten spark plug boot.2. Clean fuel line; fill tank with clean, fresh gasoline.3. Clear vent.4. Drain fuel tank. Refill with fresh fuel.5. Refer to Engine Operator's Manual. | |
| Engine overheats 1. Engine oil level low.2. Air flow restricted. | 1. Fill crankcase with proper oil.2. Clean area around and on top of engine. | |
| Occasional skips (hesitates) at high speed | 1. Spark plug gap too close. | 1. Adjust spark plug gap. Refer to Engine Operator's Manual. |
| Idles poorly 1. Spark plug fouled, faulty, or gap too wide.2. Dirty air cleaner. | 1. Reset gap or replace spark plug.2. Refer to Engine Operator's Manual. | |
| Excessive vibration/noise | 1. Cutting blade loose or unbalanced.2. Bent/damaged blade. | 1. Tighten blade. Balance blade.2. See an authorized service dealer. |
| Mower will not mulch grass (if equipped) | 1. Wet grass.2. Excessively high grass.3. Dull blade.4. High lift bagger blades installed. | 1. Do not mow when grass is wet; wait until dry to cut.2. Mow once at a high cutting height, then mow again at desired height or make a narrower cutting path.3. Sharpen or replace blade.4. Install mulcher blades. |
| Mower will not catch grass (if equipped) | 1. Dull blade.2. Mulcher blades installed. | 1. Sharpen or replace blade.2. Install high lift bagger blades. |
| Uneven cut | 1. Wheels not positioned correctly.2. Dull blade. | 1. Place front and rear wheels in same height position. (Rear Wheel/Caster Wheel height adjusters only)2. Sharpen or replace blade. |
| Mower will not self propel 1. | Belt not installed properly.2. Debris clogging drive operation.3. Damaged or worn belt. | 1. Check belt for proper pulley installation and movement.2. Stop engine, disconnect spark plug boot, and clean out debris.3. Inspect and replace belt. |
| High pullback effort 1. Pulling | mower backwards before transmission disengages. | 1. Allow the unit to roll forward slightly without the drive lever(s) engaged before pulling backwards. |
MANUAL DEL OPERADOR
Grande Cortadora
natural_image
Diagram of a car's steering wheel assembly with a magnified inset showing the lever mechanism (no text or labels)Figura 2-14
natural_image
Diagram of a lawn mower with directional arrow indicating motion (no text or symbols)Figura 2-15
natural_image
Diagram of a lawn mower with a close-up inset showing the blade and handle (no text or symbols)Figura 2-16
natural_image
Diagram of a mechanical device with a magnified inset showing a tool interacting with it (no text or symbols present)Figura 2-17
natural_image
Diagram of a lawn mower with a close-up inset showing the blade and handle (no text or symbols)Figura 2-18
natural_image
Diagram of a lawn mower with a device and load, showing mechanical components and directional arrows (no text or labels)Figura 2-20
natural_image
Diagram of a lawn mower with a moving cart and directional arrow indicating motion (no text or symbols)Figura 2-21
natural_image
Line drawing of a car seatbelt mechanism with a black arrow indicating the direction (no text or symbols present)Figura 2-22
natural_image
Diagram of a mechanical device with a curved arrow indicating motion or force, showing internal components (no text or symbols)Figura 2-23
Figura 2-25
natural_image
Diagram of a device with a switch and circular arrow indicating rotation or change (no text or symbols)Figura 2-28
Figura 2-30
Figura 3-2
Figura 3-4
natural_image
Illustration of a mechanical device with a belt and clasp, no text or symbols presentFigura 3-5
natural_image
Line drawing of a lawn mower with directional arrows indicating motion (no text or symbols)Figura 4-1
natural_image
Technical line drawing of a mechanical lifting device with an inset showing a close-up view of the component (no text or symbols present)Figura 4-2
Motor
Figura 4-3
Figura 4-5
natural_image
Mechanical assembly diagram showing a pipe fitting inserted into a car component (no text or symbols)Figura 4-6
natural_image
Technical line drawing of a mechanical assembly with no visible text or symbolsFigura 4-7
natural_image
Technical line drawing of a mechanical component with a base and circular assembly (no text or symbols)Figura 4-8
natural_image
Diagram showing two shoe cutouts with a magnified inset highlighting a specific part (no text or symbols present)Figura 4-10
natural_image
Technical illustration of a mechanical assembly with directional arrows indicating components (no text or symbols)Figura 4-11
Figura 4-13
- Table of Contents
- WARNING
- Important Safe Operation Practices
- HEED ITS WARNING!
- CALIFORNIA PROPOSITION 65
- General Operation
- Slope Operation
- Do:
- Do Not:
- Children
- Service
- Safe Handling Of Gasoline:
- General Service:
- Do not modify engine
- Notice Regarding Emissions
- Spark Arrestor
- Safety Symbols
- Assembly & Set-Up
- Thank You
- Contents of Carton
- Mower Set-Up
- Unfolding the Handle
- Attaching the Grass Catcher (If Equipped)
- Attaching Grass Catcher Chute
- Attaching Side Discharge Chute
- Adjustments
- Cutting Height (Standard Wheel)
- Cutting Height (Caster Wheel)
- Set-Up
- Electric Starter (If Equipped)
- Gas and Oil Fill-Up
- Lockout Lever
- Blade Control
- Premium Drive Control
- Cutting Height Adjustment Lever
- Single Lever (If Equipped)
- Rear Wheel/ Caster Wheels (If Equipped)
- Grass Catcher (If Equipped)
- Mulch Plug
- Side Discharge Chute
- Deck Wash
- Electric Starter Push Key (If Equipped)
- ON/OFF Switch
- Recoil Starter
- Starting Engine
- Electric Start
- Recoil Start
- Stopping Engine
- Using Your Lawn Mower
- Using as Mulcher
- Using Grass Catcher
- Operating on Slopes
- Maintenance
- General Recommendations
- Lubrication
- Front Caster Wheels (If Equipped)
- Engine
- Changing the Engine Oil
- Cleaning the Mower
- Smart Jet
- Mower Deck
- Blade Care
- Belt Care
- Replacing Battery (If Equipped)
- Charging Battery (If Equipped)
- Off-Season Storage
- Mower
- Battery (If Equipped)
- MANUAL DEL OPERADOR
- Motor
Brand : Craftsman
Model : CMXGMAM201202
Category : Lawn mower