
COM7000SS - Oven SUNBEAM - Free user manual and instructions
Find the device manual for free COM7000SS SUNBEAM in PDF.


| Product Type | 12-in-1 Digital Multifunctional Air Fryer Oven |
| Model | COM7000SS |
| Brand | Sunbeam |
| Preset Functions | Air Fry, Fries, Wings, Veggies, Convection, Pizza, Bake, Toast, Grill, Dehydrate, Defrost, Keep Warm |
| Temperature Range (Manual Mode) | 40°C - 230°C (depending on function) |
| Timer Range (Manual Mode) | 1 minute to 90 minutes (12 hours for dehydrate) |
| Power Supply | 230-240V AC |
| Rack Positions | 3 |
| Accessories Included | Air fryer basket, wire rack, non-stick baking tray (28x26 cm), crumb tray |
| Maximum Capacity | 12-inch pizza, 2 kg whole chicken |
| Control Panel | Preset knob, temperature/timer adjustment buttons, power, start/pause, oven light |
| Safety Features | Auto shut-off after 2 minutes idle, cool-touch handle, overheat protection |
| Cleaning | Accessories dishwasher safe; wipe interior with damp cloth; do not immerse main unit |
| Warranty | 12-month replacement or repair guarantee |
| Construction | Stainless steel (body) |
| Heating Elements | 2 upper/lower heating elements plus dedicated air fry heater and fan |
| Intended Use | Household and similar applications (kitchen areas, farm houses, hotels, etc.) |
| Certifications | Approved by appropriate electrical regulatory authorities |
Frequently Asked Questions - COM7000SS SUNBEAM
User questions about COM7000SS SUNBEAM
0 question about this device. Answer the ones you know or ask your own.
Ask a new question about this device
Download the instructions for your Oven in PDF format for free! Find your manual COM7000SS - SUNBEAM and take your electronic device back in hand. On this page are published all the documents necessary for the use of your device. COM7000SS by SUNBEAM.
USER MANUAL COM7000SS SUNBEAM
Sunbeam's Safety Precautions
Features of your Sunbeam 12-in-1 Digital Multifunctional Air Fryer Oven 3 Control Panel
Parts & Accessories
Usage Instructions
Care & Cleaning
Temperature Guide
Cooking Guide 9-16
Recipes
Important instructions – retain for future use.
Sunbeam's Safety Precautions
SAFETY PRECAUTIONS FOR YOUR SUNBEAM AIR FRYER OVEN
- Use your air fryer oven at least 200mm away from walls and curtains.
- Avoid using on metal surfaces e.g. sink.
- Do not use in confined spaces.
- Do not immerse the unit in water or any other liquid.
• Always operate on a flat surface. -
Avoid contact with oven surfaces, including oven door, during and after use, as they will be hot.
-
Use well away from walls and curtains.
- Do not place items on top of the oven while in use.
- Do not block or cover the air vents on the top, back or side of the oven.
- Do not use in confined spaces or cavities.
- Do not immerse the unit in water.
- Do not place items on top of oven.
- The temperature of accessible surfaces may be high when the appliance is operating.
Sunbeam is very safety conscious when designing and manufacturing consumer products, but it is essential that the product user also exercise care when using an electrical appliance. Listed below are precautions which are essential for the safe use of an electrical appliance:
- Read carefully and save all the instructions provided with an appliance.
- Always turn the power off at the power outlet before you insert or remove a plug. Remove by grasping the plug - do not pull on the cord.
- Turn the power off and remove the plug when the appliance is not in use and before cleaning.
- Do not use your appliance with an extension cord unless this cord has been checked and tested by a qualified technician or service person.
- Always use your appliance from a power outlet of the voltage (A.C. only) marked on the appliance.
- Children should be supervised to ensure that they do not play with the appliance.
- Use well away from walls and curtains.
- Never leave an appliance unattended while in use.
- Do not use an appliance for any purpose other than its intended use.
- Do not place an appliance on or near a hot gas flame, electric element or on a heated oven.
- Do not place on top of any other appliance.
- Do not let the power cord of an appliance hang over the edge of a table or bench top or touch any hot surface.

Hot Surface Do Not Touch
This symbol indicates that the temperature of accessible surfaces may be high when the appliance is operating and for some time after use.
- Do not block or cover the air vents on the back and sides of the sandwich maker
- The temperature of accessible surfaces may be high when the appliance is operating.
- Do not operate any electrical appliance with a damaged cord or after the appliance has been damaged in any manner. If damage is suspected, return the appliance to the nearest Sunbeam Appointed Service Centre for examination, repair or adjustment.
- For additional protection, Sunbeam recommend the use of a residual current device (RCD) with a tripping current not exceeding 30mA in the electrical circuit supplying power to your appliances.
- Do not immerse the appliance in water or any other liquid unless recommended.
- Appliances are not intended to be operated by means of an external timer or separate remote control system.
- This appliance is intended to be used in household and similar applications such as: staff kitchen areas in shops, offices and other working environments; farm houses; by clients in hotels, motels and other residential type environments; bed and breakfast type environments.
- Refer to "Care and Cleaning" section for details concerning precautions during use maintenance.
- Cleaning and user maintenance shall not be made by children unless they are older than 8 and supervised.
- Keep the appliance and its cord out of reach of children less than 8 years old.
- This appliance is not intended for use by persons (including children) with reduced physical, sensory or mental capabilities, or lack of experience and knowledge, unless they have been given supervision or instruction concerning use of the appliance by a person responsible for their safety.
Features of your Sunbeam 12-in-1 Digital Multifunctional Air Fryer Oven

1. Air vents
Air vents allow smoke to come out during cooking process. Please do not block or cover this area.
2. Air fryer basket
Use for all your air frying or dehydrating needs.
3. Wire rack
Use for pizza, bake, grill or toast functions
4. Baking pan
Used to accommodate a wide variety of foods or use to sit your cake tin when baking.
5. Control panel
Choose from 12 cooking functions by turning the knob to desired setting.
6. Three rack positions
7. Crumb tray
Use to catch oil and crumbs throughout the cooking cycle.
8. Glass Door
Allows you to see food cooking.
9. Door handle
Pull down the door to open the air fryer oven.
Control Panel

123456789
- Preset knob: Choose from 12 cooking functions by turning the knob to desired setting.
- Function settings: Choose from 3 Air Fryer presets (Fries, Wings, Veggies) or 9 cooking functions (Air Fry, Convection, Pizza, Bake, Toast, Grill, Dehydrate, Defrost, Keep Warm)
- Temperature digital display: Temperature displayed is in Celsius
- Timer digital display: Time displayed is in Minutes: Seconds. When dehydrating, this will automatically change to HOURS:MINUTES
- Temperature setting: Manually adjust temperature
- Timer setting: Manually adjust time
- Power
- Start/Pause
- Oven light
Parts & Accessories
Heating Elements
Your Air Fryer Oven is powered by 2 heating elements, an extra air fryer heater and a powerful fan to experience the ultimate air fryer performance. Make sure you check on the cooking progress of your food from time to time to avoid burning and overcooking.
Accessories
To accommodate a wide variety of foods, the oven has 3 rack positions. The position of the rack will depend on the size of the food and desired browning.
Before removing the accessories, allow the unit to cool.
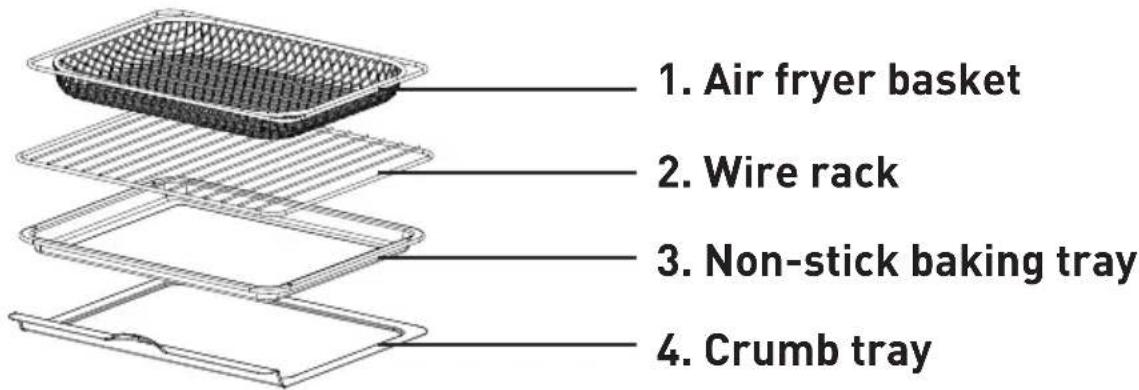
1. Air Fryer Basket
- Ideal for cooking a variety of foods such as fries, wings, veggies, chicken, fish or steak
- Use for air frying or dehydrating
- Place the basket on the top slot for more crisp results
- When using the basket with food that has a high sugar content, you may find that lining each rack with a sheet of baking paper can be helpful
2. Wire Rack
• Use for pizza, bake, grill or toast functions
• The wire rack can fit a 12" pizza
3. Non-stick Baking Tray
• The baking tray is 28cm wide x 26cm deep
- Place your cake tin on top of the baking tray. This can fit up to 24cm cake tins
- The baking tray is coated with a durable non-stick coating for easy cleaning. When cooking with cheese or sticky sauces, this may stick on the baking tray. Use a heat-resistant spatula or wooden spoon to remove residues. Never use a sharp or metal object, as this will damage the non-stick surface.
4. Crumb tray
- Use to catch oil and crumbs throughout the cooking cycle
- Place drip tray at the bottom of the unit before beginning the cooking cycle
- Be sure to wash the crumb tray after every use
For best results:
- For best air frying results, position the air fryer basket on top rack, just below the internal light bulb.
- For best grilling, toasting and pizza results, position the baking pan in the middle rack position.
- For best baking results, position the baking pan in the bottom rack position.
Usage Instructions
Before for use
Before using your Air Fryer for the first time, unpack the appliance and remove all packaging, promotional materials and stickers from the product. Remove any plastic or cardboard and all printed documents.
Clean the accessories with a small amount of dishwashing liquid and a non-abrasive cleaning pad. Dry thoroughly with a soft cloth.
Note: When using your Air Fryer Oven for the first time you may notice a slight smell and/or fine smoke haze being emitted from the unit. This is normal. It is due to the initial heating of internal components.
Note: Your Air Fryer Oven does not require pre-heating.
Using your Air Fryer Oven
- Place your Air Fryer Oven on a flat, level, heat-resistant surface, where the plug will reach an outlet.
WARNING: When the Air Fryer Oven is in use or cooling down, please be sure there is a 6-inch clearance between the Air Fryer Oven and any other surface including cords. Be sure the cord is not resting against the back of the air fryer oven. - Plug the power cord into a 230-240 volt AC power outlet.
- You will hear a beep sound and the POWER light will start blinking. This means the air fryer oven was successfully plugged in.
- To open the unit, grab the center of the handle underhanded with fingertips and gently pull down the oven door.
WARNING: Do not force open the oven door beyond its limit or let the door drop open as this will distort the door and hinder the oven's ability to maintain a proper seal.

natural_image
Line drawing of a hand inserting a slot into a drawer with horizontal stripes (no text or symbols)
natural_image
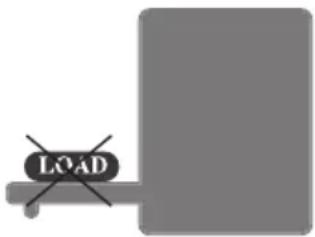
Line drawing of a hand using a tool to cut or install a rectangular object, with no visible text or symbols.CAUTION: Do not place any load on the oven door, in an open condition.
- Place your food on the accessories and slide the accessories on your desired rack.
- Press POWER to turn on the air fryer oven.
- Turn the PRESET knob to set to the desired function. Turn clockwise to choose presets from top to bottom. Turn counter-clockwise to return to previous preset. You can choose from 3 air frying presets or 9 cooking modes.
- When you are ready to start cooking, press START/PAUSE button.
Note: To quickly pause the cooking cycle to check on your food, press PAUSE and gently pull the handle out. Using oven mitts, carefully slide the tray out. Alternatively, you can press LIGHT button to see the food from inside without opening the oven. The oven light will automatically turn off after 60 seconds.
Note: Without pressing PAUSE, the oven will continue cooking even if you open the door.
Manual Modes
- To manually set the time, press the Timer Setting and use the PLUS and MINUS signs. You will see the time reading in the Time Indicator next to the Function Settings.
- To manually set the temperature, press the Temperature Setting and use the PLUS and MINUS signs. You will see the temperature reading in the Temperature Indicator next to the Function Settings.
Auto-Switch Off
The air fryer oven will automatically switch off after 2 minutes when it is not running. To wake up the appliance, press the POWER button.
Caution: Do not touch the outside or top of the unit when in use, as these surfaces may be hot. Ensure you use the handle to open and close the air fryer oven. Avoid touching hot surfaces. The oven may generate steam while food is cooking and when the door is opened. Take care when removing food from the oven.
Care & Cleaning
Use heat-resistant plastic or wooden or silicone utensils when cooking or lifting food from the Air Fryer Oven and its accessories. Avoid using sharp or metal objects as these will scratch the non-stick surface of the baking tray. Do not cut food on top of the cooking surface. Do not leave plastic utensils in contact with the cooking surface while in use.
Sunbeam will not be liable for damage to the non-stick coating where metal utensils have been used.
To clean after use
Always unplug your Air Fryer Oven and allow for it to cool completely before cleaning it. NEVER immerse the MAIN body, power cord or plug in water or any other liquid. To prevent damage to the appliance do not use alkaline cleaning agents when cleaning, use a soft cloth and a mild detergent.
Always clean after each use to prevent a build up of cooking residue on the grill.
Baking Tray Non-Stick Coating
When cleaning with non-stick coating, do not use metal or other abrasive scourer. When the tray has cooled down, you may wipe using a damp paper towel to remove residue on the baking tray.
Accessories
Before first use, wash with warm soapy water using a mild household detergent and dry thoroughly. When the accessories have cooled down, you may wipe using a paper towel to remove residue then wash with warm soapy water using a mild household detergent. Rinse thoroughly and dry the accessories with a soft cloth before storing to avoid rusting.
Empty the Crumb Tray frequently to avoid accumulation of crumbs and oil. Air Fryer Basket, Wire Rack, Baking Tray and Crumb Tray are dishwasher safe.
To clean the interior
Simply wipe over with a dampened cloth using only mild, soapy water and polish dry with a dry soft cloth. Do not use steel wool, scouring pads or abrasive cleaners as these will scratch the surface and damage the unit. DO NOT IMMERSE IN WATER.
Storage
After the unit has cooled down, carefully wipe any oil spatter from the inside. Wipe over the outer body with a clean, slightly damp cloth and dry.
You can store your air fryer oven on your benchtop or in a safe place. If the outer body of the unit accumulates dust, wipe over with a clean, slightly damp cloth. Dry thoroughly to avoid rusting on the stainless steel parts.
Caution: Always close the door before storing.
This appliance has no user serviceable parts. Any servicing beyond that described in the Cleaning Section should be performed by an Authorised Service Representative only. See Warranty Section.
Temperature Setting Guide
This table provides the default time and temperature for each Air Fry Preset and Cooking Modes, and the Temperature and Time Range of each Preset as a guide when selecting for Manual Mode.
| Defaults Range (For Manual Mode) | ||||
| Preset | Temperature(Degrees in C) | Time(in Mins) | Temperature(Degrees in C) | Time(in Mins) |
| Air fry 180 | 25 120 - 230 1 - 60 | |||
| Fries 230 | 10 120 - 230 1 - 60 | |||
| Wings 180 | 10 175 - 230 1 - 60 | |||
| Veggies 20 | 0 20 120 - 230 1 - 60 | |||
| Convection 1 | 60 30 120 - 230 1 - 90 | |||
| Pizza 200 | 20 175 - 230 1 - 90 | |||
| Bake 175 | 25 120 - 230 1 - 90 | |||
| Toast - 6 | MINS, 30 SEC - | 2:30 MINS -10:30 MINS | ||
| Grill 230 | 15 120 - 230 1 - 90 | |||
| Dehydrate | 40 | 8 hours | 40 - 95 | 5min -12hours |
| Defrost 65 | 10 | 65 - 150 | 1 - 90 | |
| Keep Warm | 80 | 20 | 80 | 1 - 90 |
Cooking Guide
Air Fry
Air frying is an alternative to deep frying for crispy results, with the use of less oil. Not all foods will benefit from being tossed in oil prior to being air fried. Frozen foods and foods with a high fat content such as chicken wings or bacon do not require oil. To achieve crispy and browned results on foods such as hand-cut fries or vegetables, evenly coat food with about one tablespoon of oil. Large quantities of food can benefit from being tossed halfway through the cooking cycle to ensure even cooking and browning.
Your Air Fryer Oven has 3 Air Fry Presets: FRIES, WINGS, VEGGIES where the 2 heating elements, extra air fryer heater and a powerful fan are turned on in these settings. You can also air fry other foods by adjusting the time and temperature on the AIR FRY preset as required.
Guide to oils and fats when air frying
Using your Air Fryer Oven to air fry food will help you to reduce the amount of oil needed in some recipes.
The table below lists some of the more widely available, popular oils. All of them can be used in your Air Fryer Oven. However, for best results, we recommend Vegetable or grapeseed oil.
| Oil Type Use | |
| Vegetable oil Shallow, deep and stir frying. | |
| Grapeseed oil (often called vegetable oil) | Shallow, deep and stir frying. |
| Corn oil Shallow, deep and stir frying. | |
| Sunflower oil Shallow, deep and stir frying. | |
| Olive oil Shallow and stir frying. Marinades, dressings, drizzling. | |
| Sesame oil Shallow, deep and stir frying. | Mari-nades, drizzling. |
| Peanut oil (often called ground nut oil) | Shallow and stir frying. Dressings. Adds a nutty flavour. |
| Grape Seed oil Shallow, deep and stir frying. | |
| You can also use low calorie cooking spray in your Air Fryer Oven. | Always ensure that the ingredients are evenly coated with oil |
Cooking Guide
Convection
Ideal for roasting dinners, cooking big meats or evenly browning your food. The upper and lower heating elements are turned on and hot air is circulated gently and evenly to achieve a moist but crispy outcome.
Pizza
Cook fresh or frozen pizza in your air fryer oven.
Bake
Suitable for baking homemade biscuits, cakes, cookies and muffins.
Toast
Use this setting for sandwiches or open melts. Both the upper and lower heating elements are switched on to achieve a toasted sandwich on both sides. For best results, place the wire rack in the middle position. Toasting times will vary depending on the type of bread used. Sweet and fruit breads generally take less time than white or wholemeal bread.
Grill
Use this setting for grilling sausages and other types of meats. The upper heating element is switched on to achieve a controlled temperature for a range of rare to well done cooking of meats.
Dehydrate
Dehydrating fruits, herbs and flowers removes moisture from food so you can enjoy these for a longer period of time and when stored in air-tight storage jars depending on the type of food and climate.
Defrost
Use this setting to defrost frozen meats. The default time is 65 degrees but can be adjusted depending on the size and thickness of food.
Keep Warm
Keep your food warm after grilling, baking, or toasting prior to serving.
Cooking Guide
Guide to cooking popular foods in your Air Fryer Oven
The following table provides basic cooking guidelines for popular foods that can be used for each Air fry Preset, 9 Cooking modes, and Manual Mode. Please note that due to the variations in thickness and size of the foods being cooked some experimentation may be required for the best cooking results. Always ensure that the food is thoroughly cooked to food-safe temperature throughout before consuming.
When cooking fresh fries, keep oil quantities as low as possible for the healthiest results. However, if you feel the fries are a little pale and require further browning, increase the quantity of oil slightly.
Note: For crispier results it is recommended to shake the fryer basket 2-4 times throughout the cooking cycle.
For larger quantities, (1kg) increase cooking times and toss food more frequently
FRIES/POTATO PRODUCTS
Tip: For best results, use 750g frozen shoestring fries, shake once. If using 1 kilo, shake 2 or 3 times or as required.
Preset: Use AIR FRY or FRIES preset and adjust time and temp as required.
Accessory: Air fryer basket
| Ingredient | Min – Max Amount | Time (min) | Temp | Shake, turn or Stir halfway through | Additional Information |
| Shoestring fries | 200g – 1kg 20 | -25 200c Yes | |||
| Steak cut fries | 200g – 1kg 25 | -30 200c Yes | |||
| Sweet potato fries | 200g – 1kg 20 | -25 200c Yes | |||
| Potato Gems | 200g – 1kg 10-15 | 200c Yes | |||
| Hash Browns | 4-6 pieces 8-10 | 200c Yes | |||
| Hand cut chips - fresh | 200g – 1kg 25 | -30 200c Yes | Soak 30 minutes In water, rinse, pat dry, then toss in 1Tbs oil prior to cooking | ||
| Roast potatoes-fresh | 200g – 1kg 20 | -25 200c Yes | Soak 30 minutes In water, rinse, pat dry, then toss in 1Tbs oil prior to cooking |
Cooking Guide
BACON
Tip: You can use any type of bacon to air fry. Bacon has a high fat content and do not need be tossed in oil prior to being air fried. Check from time to time depending on how you like your bacon cooked. Be careful when lifting the air fryer basket and baking crumb tray as the fat from the bacon may remain there after cooking.
Preset: Use AIR FRY preset and adjust time and temp as required.
Accessory: Air fryer basket, Baking tray or Crumb Tray. Place the air fryer basket on the top rack and the baking tray in the middle rack. Crumb tray should always be on the bottom rack.
| Ingredient | Min – Max Amount | Time (min) Temp | Shake, turn or Stir halfway through |
| Rashers 4 – | 6 each 10 185c Yes |
| Ingredient | Min – Max Amount | Time (min) | Temp | Shake, turn or Stir halfway through | Additional Information |
| King prawns | 12 pcs 6-8 180c | Yes | |||
| Fish fillets - white | 200g each 8 | 12 180c Yes | Coat with oil prior to cooking | ||
| Salmon fillet | 350g | 18 | 190c | Yes | Coat with oil prior to cooking |
| Calamari | 350g | 15 | 200c | Spray with vegetable oil |
Cooking Guide
VEGETABLES
Tip: Best for thicker veggies such as carrots, broccoli, cauliflower, and asparagus rather than leafy vegetable like spinach, kale and collard green.
Preset: Use AIR FRY or VEGGIES preset and adjust time and temp as required.
Accessory: Air fryer basket
| Ingredient | Min – Max Amount | Time (min) | Temp | Shake, turn or Stir halfway through | Additional Information |
| Potatoes, sweet potato, Carrots, beetroot, swede | 150g – 1kg | 20-30 190c Yes | Coat with oil prior to cooking | ||
| Eggplant, capsicum, onion Cauliflower, broccoli, Pumpkin | 150g – 1kg | 10-15 190c Yes | Coat with oil prior to cooking | ||
| Mushrooms, broccoli, Asparagus, zucchini | 150g – 1kg | 5-15 190c Yes | Coat with oil prior to cooking |
POULTRY
Tip: Your air fryer can fit a 2kg whole chicken. You can also use chicken wings, drumsticks or breast fillets for a crispy skin finish with moist meat
Preset: Use CONVECTION for whole chicken or WINGS for wings, drumsticks, or breast fillets. Adjust time and temp as required.
Accessory: Baking Tray for whole chicken or Air fryer basket for small cuts of meat
| Pre-set Programs | Min – Max Amount | Time (min) | Temp | Shake, turn or Stir halfway through | Additional Information |
| Whole chicken 1.3kg – 2.0kg 45-60 | 180c | Coat with oil prior to cooking | |||
| Wings 600g 10 | 180c Yes | Coat with oil prior to cooking | |||
| Drumsticks | 4 – 6 each | 25-30 200c | Yes | Coat with oil prior to cooking | |
| Breast fillets | 120g each | 25 190c | Yes | Coat with oil prior to cooking | |
| Chicken nuggets | 400g 15 | 180c Yes | Coat with oil prior to cooking |
Cooking Guide
MEAT
Tip: Cooks meat such as steak to medium-light pink middle and 750g pork belly. When using pork belly, score the pork belly across on diagonal, 2cm apart. No need to shake or turn over. Less oil is required as the pork will ooze this out from its own meat. Be careful when lifting the wire rack and baking crumb tray as the fat from the meat may remain there after cooking.
Preset: Use CONVECTION for whole pork belly or GRILL for steaks or smaller cuts of meat and adjust time and temp as required.
Accessory: Wire rack and baking tray. Place the wire rack on the top rack and the baking tray in the middle rack.
| Ingredient | Min – Max Amount | Time (min) | Temp | Shake, turn or Stir halfway through | Additional Information |
| Steak 2 x 200g | 10-15 200c | Yes | |||
| Beef patties 4 x | 100g 5-8 200c | Yes | |||
| Sausages 4 - 6 each | 8-10 200c Yes | ||||
| Pork tenderloins 4 x | 120g 15 200c Yes | Toss in 1Tbs oil prior to cooking | |||
| Pork belly | 750g | 25 200c | Toss in 1Tbs oil prior to cooking | ||
| Rack of lamb | 500g - 800g | 20-30 120c | |||
| Lamb loin chops | 6 each | 10-15 | 130c | Yes |
PIZZA
Tip: Oven can fit up to 12" pizza. Line the baking tray with non-stick baking paper. Preset: Use PIZZA preset and adjust time and temp as required.
Accessory: Baking tray. Place the baking tray on the middle rack of the oven.
| Ingredient | Min – Max Amount | Time (min) | Temp | Shake, turn or Stir halfway through | Additional Information |
| Fresh pizza | 1 x 10" pizza | 10-15 200c | Note: Time & Temp is based on store-bought pizza base and fresh meat and vegetables for toppings | ||
| Frozen pizza | 1 x 8" pizza | 15 200d |
Cooking Guide
DEHYDRATE
Tip: Dehydrating fruits, herbs and flowers removes moisture from food so you can enjoy these for a longer period of time and when stored in air-tight storage jars depending on the type of food and climate
Preset: Use DEHYDRATE preset and adjust time and temp as required.
Accessory: Air fryer basket or Wire Rack
| Ingredient Min | - Max Amount Time (min) Temp | Shake, turn or Stir halfway through | |
| Herbs, flowers Multi layer 2-4 hours 35c Yes | |||
| Yoghurt Pots 8-12 hours 40c Yes | |||
| Soft vegetables Single layer 6-8 hours 45c Yes | |||
| Hard vegetables Multi layer 8-10 hours 50c Yes | |||
| Citrus peel | Multi layer 4-6 hours 55c Yes | ||
| Fruit- high in sugar | Single layer | 12 - 14 hours | 60c Yes |
| Fruit - other | Variable | 8-10 hours | 60c Yes |
| Fish | Single layer | Up to 8 hours | 65c Yes |
| Meat jerky Single layer | Up to 10 hours | 70c Yes | |
Cooking Guide
FROZEN SNACKS
Tip: Frozen foods do not require oil.
Preset: Use AIR FRY preset and adjust time and temp as required.
Accessory: Air fryer basket
| Ingredient | Min – Max Amount | Time (min) | Temp | Shake, turn or Stir halfway through | Additional Information |
| Frozen mozzarella sticks | 500g 10-1 | 15 200c Yes | Line with baking paper | ||
| Frozen onion rings | 285g 10 200c | Yes | |||
| Frozen spring rolls | 350g 10-1 | 15 200c Yes |
VEGETARIAN
Preset: Use AIR FRY preset and adjust time and temp as required.
Accessory: Air fryer basket
| Ingredient Min | – Max Amount Time (min) Temp | Shake, turn or Stir halfway through | |
| Tofu 450g 10 | -15 190c Yes | ||
| Tempeh 450g | 10-15 160c Yes | ||
| Halloumi 450g | 8-10 | 180c Yes |
Recipes
All recipes have been specifically created and tested by the Sunbeam Test Kitchen for the 12-in-1 Digital Multifunctional Air Fryer Oven. We hope you enjoy using your Sunbeam Air Fryer Oven.
The temperature and time in each recipe are a guide only and may require adjustment to suit various thickness and size of food being cooked and individual tastes. Always ensure that the food is thoroughly cooked before consuming.
Chicken Schnitzel
Prep Time: 5 mins
Cook Time: 21 mins
Serves: 4
Accessory: Air Fry Basket
2 chicken breasts (500g), sliced half horizontally
1 / 4 cup plain flour
3 eggs, lightly whisked
1 cup panko crumbs
14 cup fresh parsley, roughly chopped
Zest of 1 lemon
Sea Salt and freshly cracked pepper
-
Place chicken on a chopping board, cover with baking paper and hit with a rolling pin until flat. Season both sides with salt and pepper.
-
Place flour in one bowl, eggs in another bowl. Mix panko breadcrumbs in a third bowl with lemon zest and parsley. Coat each piece of chicken in flour, egg, then the crumb mixture.
-
Place chicken on the air fryer basket, and place on the middle rack.
-
Select AIR FRY Function, temperature at 180c. Adjust time to 22 minutes. Press START.
-
Serve with lemon wedges and coleslaw.
Brownie
Prep Time: 5 mins
Cook Time: 25 mins
Serves: 9
125g butter, chopped
125g milk chocolate, chopped
1 / 4 cup cocoa
1 cup caster sugar
3 eggs, lightly whisked
^3/_4 cup plain flour, sifted
100g milk choc bits
Raspberries and mint, to serve
-
Line a 20cm square cake tin with baking paper and spray oil.
-
Add butter and chocolate to a glass mixing bowl, place in microwave and heat for 20 seconds. Stir with a metal spoon. Heat again in 20 second intervals, stirring every time until mixture is smooth. Add cocoa and stir through until dissolved. Mix through sugar, then the eggs, add the flour and mix through the choc bits.
-
Pour mixture into a prepared cake tin.
-
Place the cake tin in the middle and select BAKE function. Adjust temperature to 170c, adjust time to 25 minutes. Press START.
-
Test brownies with a skewer. If it comes out mostly dry, remove brownies from oven and allow to cool in pan. If the top burns a little, cover the pan with alfoil and continue cooking until the brownies are cooked through.
-
Remove the brownie out of tin and cut into 9 or more pieces. Serve hot or cold.
-
Sprinkle with additional cocoa (optional). Serve with fresh raspberries and mint.
Recipes
Roast Chicken
Prep Time: 2 mins
Cook Time: 65 mins
Serves: 4
Accessory: Baking tray
1.9kg whole chicken
1 tbs olive oil
Sea salt and freshly cracked pepper
3 carrots, cut into thirds
3 potatoes, cleaned and cut into half
- Line the baking tray with baking paper, place chicken on top, surround carrot and potatoes around chicken, drizzle with oil and season with salt and pepper.
- Place chicken in middle shelf. Select CONVECTION function, temperature at 160c, adjust time to 65 mins. Press START.
- Serve with a side of chips and salad.
Pork Belly
Prep time: 5 mins
Cook Time: 30 mins
Serves: 4-6
1.6 - 1.8kg pork belly, scored at room temperature
1 tsp olive oil
Sea salt
- Pour boiling water over the scored pork belly skin.
- Pat dry. Place on the baking tray lined with baking paper. Rub on the oil and sea salt.
- Position the baking tray on the middle rack. Select CONVECTION function. Adjust temperature to 230c, time at 30 minutes. Press START.
- Remove from oven and place on a chopping board and cover with alfoil. Rest for 10 minutes before carving.
Recipes
Grilled Porterhouse Steaks
Prep Time: 1 min
Cook Time: 13 mins (Medium rare)
Serves: 4
4 x 250g porterhouse steaks
1 tbs olive oil
Sea salt and freshly cracked pepper
Serve with your favourite mustard and salad
- Pre-set Grill, for 15 minutes. Await 2 minutes to allow grill to heat up.
- Oil steaks and season, place steaks on the fryer basket and position on the top rack.
- Select GRILL function and turn over after 6 minutes for medium rare result.
- Rest on a chopping board covered with alfoil for 4 minutes.
- Serve with your favourite mustard and salad.
Mushroom & Spinach Pizza
Prep Time: 2 mins Cook Time: 10 mins
Serves: 4
Accessory: Wire rack
1 x 26cm pizza base
1 / 2 cup passata
1 cup button mushrooms, thinly sliced
1 / 2 cup baby spinach
^3/_4 cup pizza cheese
1 tsp dried chilli flakes (optional)
- Spread passata evenly over pizza base, top with mushroom, spinach, cheese and chili.
- Place pizza on the wire rack and position on the top rack.
- Select PIZZA function, temperature 200c, adjust time to 10 minutes. Press START.
12 Month Replacement Guarantee
This Sunbeam product is covered by a 12 month replacement or repair warranty, which is in addition to your rights under the Australian Consumer Law (if your product was purchased in Australia) or New Zealand Consumer Guarantees Act (if your product was purchased in New Zealand).
Should you experience any difficulties with your product during the warranty period, please contact our customer service line for advice on 1300 881 861 in Australia, or 0800 786 232 in New Zealand.
Australia
www.sunbeam.com.au 1300 881 861
New Zealand
www.sunbeam.co.nz 0800 786 232
Upon receipt of your claim, Sunbeam will seek to resolve your difficulties or, if the product is defective, advise you on how to obtain a replacement or refund.
To assist us in managing warranty claims, we recommend you register your product as soon as practicable after purchase, on our Sunbeam website and uploading a copy of your original receipt. View the Support section of the Sunbeam website.
In order to make a claim under our warranty, you must have the original proof of purchase documentation for the product and present it when requested (if not already uploaded to our website).
Should your product develop any defect within 12 months of purchase because of faulty materials or workmanship, we will replace or repair it, at our discretion, free of charge. A product presented for repair may be replaced by a refurbished product of the same type rather than being repaired. Refurbished parts may be used to repair the product.
Our replacement or repair warranty only applies where a defect arises as a result of faulty material or workmanship during the warranty period. Your warranty does not cover misuse or negligent handling (including damage caused by failing to use the product in accordance with this instruction booklet), accidental damage, or normal wear and tear.
Your warranty does not:
• cover freight or any other costs incurred in making a claim, consumable items, accessories that by their nature and limited lifespan require periodic renewal (such as filters and seals) or any consequential loss or damage; or
• cover damage caused by:
- power surges, power dips, voltage supply problems, or use of the product on incorrect voltage;
- servicing or modification of the product other than by Sunbeam or an authorised Sunbeam service centre;
- use of the product with other accessories, attachments, product supplies, parts or devices that do not conform to Sunbeam specifications; or
- exposure of the product to abnormally corrosive conditions; or
- extend beyond 3 months if the product is used in commercial, industrial, educational or rental applications.
The benefits given to you by our warranty are in addition to other rights and remedies under law in relation to the product.
In Australia our goods come with guarantees that cannot be excluded under the Australian Consumer Law. You are entitled to a replacement or refund for a major failure and for compensation for any other foreseeable loss or damage. You are also entitled to have the goods repaired or replaced if the goods fail to be of acceptable quality and the failure does not amount to a major failure.
Our goods also come with guarantees that cannot be excluded under the New Zealand Consumer Guarantees Act.
If your warranty claim is not accepted, we will inform you and if requested to do so by you, repair the product provided you pay the usual charges for such repair. You will also be responsible for all freight and other costs.
Should your product require repair or service after the warranty period, contact your nearest Sunbeam service centre. For a complete list of Sunbeam's service centres, visit our website or call our customer service line for advice on 1300 881 861 in Australia, or 0800 786 232 in New Zealand.
Need help with your appliance?
Contact our customer service team or visit our website for information and tips on getting the most from your appliance.
Australia | visit www.sunbeam.com.au phone 1300 881 861
New Zealand | visit www.sunbeam.co.nz phone 0800 786 232
Newell Australia Pty Ltd I ABN 68 075 071 233
Sunbeam is a registered trade mark.
Made in China to Sunbeam's specification.
Due to minor changes in design or otherwise,
the product you buy may differ slightly from the one shown here.
Approved by the appropriate electrical regulatory authorities.
© Copyright Sunbeam 2021.
10/2021
GCDS-SUN-SL
P.N: NWL0001346670 Rev A


- Important instructions – retain for future use.
- Sunbeam's Safety Precautions
- SAFETY PRECAUTIONS FOR YOUR SUNBEAM AIR FRYER OVEN
- Sunbeam is very safety conscious when designing and manufacturing consumer products, but it is essential that the product user also exercise care when using an electrical appliance. Listed below are precautions which are essential for the safe use of an electrical appliance:
- Hot Surface Do Not Touch
- Features of your Sunbeam 12-in-1 Digital Multifunctional Air Fryer Oven
- Air vents
- Air fryer basket
- Wire rack
- Baking pan
- Control panel
- Three rack positions
- Crumb tray
- Glass Door
- Door handle
- Control Panel
- 123456789
- Parts & Accessories
- Heating Elements
- Accessories
- Air Fryer Basket
- Wire Rack
- Non-stick Baking Tray
- Crumb tray
- For best results:
- Usage Instructions
- Before for use
- Using your Air Fryer Oven
- Manual Modes
- Auto-Switch Off
- Care & Cleaning
- To clean after use
- Baking Tray Non-Stick Coating
- To clean the interior
- Storage
- Temperature Setting Guide
- Cooking Guide
- Air Fry
- Guide to oils and fats when air frying
- Convection
- Pizza
- Bake
- Toast
- Grill
- Dehydrate
- Defrost
- Keep Warm
- Guide to cooking popular foods in your Air Fryer Oven
- FRIES/POTATO PRODUCTS
- BACON
- VEGETABLES
- POULTRY
- MEAT
- FROZEN SNACKS
- VEGETARIAN
- Recipes
- Chicken Schnitzel
- Brownie
- Roast Chicken
- Pork Belly
- Grilled Porterhouse Steaks
- Mushroom & Spinach Pizza
- Month Replacement Guarantee
- Australia
- New Zealand
- Your warranty does not:
- • cover damage caused by:
- Need help with your appliance?
Brand : SUNBEAM
Model : COM7000SS
Category : Oven