
Nugget Mk2 - Heating EUREKA - Free user manual and instructions
Find the device manual for free Nugget Mk2 EUREKA in PDF.


| Product Type | Freestanding Wood Heater |
| Brand | Eureka |
| Model | Nugget Mk2 |
| Fuel Type | Dry wood (recommended) |
| Weight | >120 kg |
| Minimum Flue Height | 4500 mm (from base to underside of cowl) |
| Hearth Protection | Min 910 mm deep x 770 mm wide x 9 mm thick, extending 350 mm in front |
| Certification | AS/NZS 2918:2001 Appendix B |
| Warranty | 10 years firebox, 12 months paint and other components |
| Combustion Air Control | Adjustable slide |
| Door Operation | Closed and locked except for lighting (open 25 mm) or reloading |
| Glass | Ceramic glass; clean with damp cloth or ash |
| Baffle Plate | Included; ensures efficient operation |
| Firebrick Lining | Included; vertical placement required |
| Optional Fan | Can be fitted; recommended for even heat distribution |
| Cooking Surface | Top of heater suitable for kettle or cooking vessels |
| Overnight Burn Capability | Yes, with proper air control setting |
| Cleaning Frequency | Regular ash removal; flue cleaned annually |
| Paint Cure | First fires at medium setting; use touch-up paint |
| Installation | Requires qualified installer; permit may be needed |
Frequently Asked Questions - Nugget Mk2 EUREKA
User questions about Nugget Mk2 EUREKA
0 question about this device. Answer the ones you know or ask your own.
Ask a new question about this device
Download the instructions for your Heating in PDF format for free! Find your manual Nugget Mk2 - EUREKA and take your electronic device back in hand. On this page are published all the documents necessary for the use of your device. Nugget Mk2 by EUREKA.
USER MANUAL Nugget Mk2 EUREKA
Nugget Mk2 Freestanding

Troubleshooting (Continued)
- Smoke entering the room from the firebox when the door is open may be caused by
- Insufficient length of flue (Flue to be 4500mm minimum from underneath base of heater to underside of cowl)
- Increase height of flue.
- Flue downdraught
- Consult dealer or increase height of flue.
- Creosote build up in flue
- Remove cowl and clean flue as per cleaning instructions. Check moisture content of wood.
• Excessive ash build up
Some woods will give large amounts of ash despite how you run the heater. Others will give you very little. Use the wood which is most convenient for you as long as it is dry. After a period of time you will get to know when to empty your unit. Always leave 12mm of ash in the bottom of your heater. Bark will give you excessive ash. Try not to burn it.
If you are burning wood that gives you charcoal, you may find that after running the heater say for 8 hours at maximum burn rate, the charcoal builds up excessively. Overnight burn will reduce this charcoal back to a fine ash. If you are not ready to shutdown for overnight burn when you next fuel the stove, load the stove with only one piece of wood and lay it across the firebox on top of the charcoal. Open the air control wide open and you will find the charcoal will burn down with the one piece of wood. Repeat the process until the ash level is significantly reduced.
WARRANTY
- Subject to causes 2 & 3 of this warranty: A.F. Gason Pty Ltd ACR 104 667 356 (Gason) warrants the following components of its heaters against defects in workmanship and/or materials for the following periods from the date of purchase:
at the firebox for ten years,
(a) the point finish for a period of twelve months if the purchaser has followed the instructions provided by Gasco in this Operation and Installation Instructions manual; and (b) all other components for twelve months except the gives, fire brick lining or ballie plaise if, in the opinion of Gasco, these items have been damaged by impact.
- This extended warranty does not apply:
(a) If the heater is purchased from a person who has not been authorised by Gason to sell its products:
(2) In the opinion of Gason, the holder or any component has been subjected to abuse, misuse, elimination, modification or has not been installed, operated or maintained in accordance with the instructions provided by Gason or
12 to owners other than the original purchaser.
-
If you believe that the bester you purchased remains a manufacturing defect and you want to make a claim under this warranty, please contact an authorized Green service centre to arrange for an assessment.
-
If, after assessing the heater, Gason determines that the heater contains a manufacturing fault, Gason may at its discretion:
let replace the horset:
Jal repair or replace specific components of the heater or
Ic provide a full refund.
-
Pents replaced under this warranty are warranted for the balance of their original warranty period.
-
If, at the discretion of Gason the heater or any part needs to be replaced, serviced or repaired at an authorised Gason service centre, then the person claiming under this
warranty must pay all costs associated with:
let returning the heater; and
Ist the defense or collection of are new or retained heaters.
Our goods come with guarantees that cannot be excluded under the Australian Consumer Law: You are entitled to a replacement or refund for a major failure and for
compensation for any other reasonably irreversible loss or damage. You are also sent to have the goods impaired or replaced if the goods fail to be of acceptable quality and the failure does not amount to a major failure.
Any benefits you receive under these warranties are in addition to other rights and remedies that you may have as a consumer under a law in relation to the header to which these warranties arise.
The year's average net change is
These dominoles are given by.
A.F. Carson Pty Ltd
Blake Street
4:30:15 397
Please contact us if you have any queries on
10.00 42532651
or email to via the "Contact lls" section of our website. www.geset.com.au.
Eureka Heating reserves the right to modify or alter specifications, materials, etc. in the interest of product improvement.

Wood Heating
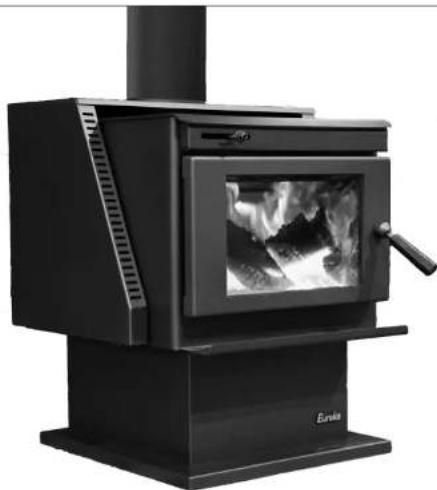
natural_image
Exterior view of a black industrial stove with visible flames and a chimney (no text or symbols)Nugget Mk2 Freestanding
Operation & Installation Instructions
REV.B
Please keep these instructions for future reference.
GPN 231628
Nugget Mk2 Freestanding
1
WARNING
Read and follow these instructions carefully before installing and using this appliance.
SAVE THESE INSTRUCTIONS
WARNING
Safety Warnings
- A flue fire with resulting damage may occur if this appliance is not installed, operated and maintained as per this booklet.
- Never place combustible material such as wood, paper or furniture near the appliance.
- This appliance is designed to burn dry wood. Do not burn rubbish, driftwood, flammable liquids or any substance containing salts or corrosives.
- This appliance must not be installed and operated in an area where kerosene, petrol, paint thinner or other flammable liquid is used or stored.
- The flue system must be inspected and cleaned annually or sooner if required. Failure to do so could result in an excessive build up of creosote which may result in a flue fire which may damage the flue or cause damage to your home.
- The surface of the appliance becomes hot during operation. Do not touch the surface of this appliance. Keep children away from the appliance during operation. Do not allow anyone to operate this appliance who is not familiar with the instructions in this booklet.
WARNING
Paint Curing and Care
Your heater is coated with the best available heat resistant paint. Even though the paint has been baked after application, it may require further temperature curing. It may, if you overfire the heater on its first fire, discolour. For your first two or three firings, never exceed medium air setting. Do not wipe the heater while the paint is curing. After the paint has cured the only maintenance required to maintain the heaters finish is to wipe it with a soft cloth. Do not use any commercial cleaners or solvents on the paint finish.
We are proud of the presentation of our products. If at any time you need to freshen up the paint finish, your local dealer has touch up paint available for purchase. You may even change the colour of your heater if you wish.
If you have any enquires, please contact the dealer from whom you purchased your heater:
PLEASE COMPLETE:
Dealer Name
Dealer Address
Phone
Please attach your original purchase dockets to this booklet for future reference.
Nugget Mk2 Freestanding
7
WARNING
The Door
Leaving Door Open
As stated previously in relation to leaving door open 25mm to encourage the fire to pick up at a faster rate. Your heater has been tested to ensure that no structural damage can take place if the door is inadvertently left open. However your paint finish can be damaged if the door is left open for a long period with a full firebox of fuel. Closely supervise your heater while the door is left open.
Closing the Door
Always ensure that before you close your door there is no wood protruding beyond the front of the firebox opening. Do not use the door glass as a 'battering ram' to push the wood back into the firebox. Damage to the glass by such impact is not covered by your warranty.
Troubleshooting
• Air Control Jamming
Remove air control cover plate by removing the two screws which hold it onto the face of the heater. There are two bolts holding the air slide in place. Undo them and remove the air slide. Wipe any ash or dust that may have accumulated on the back of the air slide or on the face of the heater. If any burns have developed on the back of the air slide or on the face of the heater, rub them off with fine wet and dry sand paper till you have a smooth surface and edges. Replace the air slide and make sure the washers and spacers are on the bolts when you screw the bolts back into the face of the heater. Do not apply any type of lubricant to the air slide whatsoever as this will attract dust and make the slide stick.
• No Overnight Burn
Remove the air slide as per air control jamming and check that the air slide is hard against the face of the heater. If it is loose, tighten up the bolts holding the air slide to the face of the heater. Do not overtighten.
Check that the door rope has an even indentation from the sealing strip, which is on the face of the firebox. If it is uneven and it appears as though air could leak through the seal, adjust the thickness of the door rope to suit. Stretch the rope to make it thinner where the indentation is the heaviest and bunch up the excess where the indentation is smaller.
Check the four bolts that hold the glass retainer in position. If loose tighten. Do not overtighten.
The door may become loose through the door seal shrinking. To tighten the door, open the door and look at the inside of the door catch. Undo the nut which is holding the latch plate. Remove the latch plate. Remove one thick washer and the star washer. Refit the latch plate. The latch plate is concave to provide a lead in edge so that there is smooth connection between the door latch and the catch. Make sure that the face of the latch that is curved outward is facing towards the door.
Replace the nut. When closing the door you should now feel firm resistance when the latch comes into contact with the catch.
- Noisy Fan (when optional Fan fitted)
Turn the power off and remove the three pin plug from the power point.
At the lower rear of the heater, removed the four screws which attach the fan assembly to the heater and remove fan. Clean any dust with a dry paint brush and vacuum the fan blades. Clean around the motor. After completion place two or three drops of sewing machine oil on the shafts at the bearings. Replace the fan in reverse to the removal.
• Fan not working (when optional Fan fitted)
Check the power connection with another appliance. If the power point is okay assume the fan or the switch is defective. Isolate the power as above. Check that the terminals on the loom and switch are firmly connected. If the fan then fails to function, remove the fan as per above instruction and convey the same to authorized Jindara/Eureka dealer from whom you purchased you unit for service. Replace in the reverse order.
WARNING
Overfiring
NEVER OPERATE THE HEATER WITH THE DOOR LOOSE AND NOT AIR TIGHT. OVERFIRING COULD RESULT IN DETRIMENTAL WEAR AND TEAR ON THE FIREBOX.
Nugget Mk2 Freestanding

Operating your Eureka (Continued)
Using your Eureka as a cooking appliance
COOKING
The front section on the top of the heater is the external surface of the firebox. When you require a fast increase in temperature or continuous high heat, place your cooking vessel or kettle there. If you want to simmer, place the cooking vessel or the kettle on the shelf at the rear of the heater.
CLEANING
If spillage occurs wipe the heater with a soft cloth. If something sticks to the heater, leave it and it will eventually burn off.
It is recommended to use a stove mat to protect the top of the heater. An ideal stove mat is a 150mm x 150mm quarry tile. Buy a quarry tile that suits your application. You will find that the bottom of the tile will have an uneven surface. Grind them off so that you have a flat surface and then place the tile onto the firebox top. You can now place your kettle onto the tile.
If you mark or damage the paint finish, you can easily renew the heater's appearance by using touch up paint available from your authorized Eureka Dealer.
Overnight burn
Approximately 30 minutes before turning the heater down to overnight burn it is recommended to load the heater with fuel for the overnight burn. Leave the air control in the medium to high position. Let the heater run for about thirty minutes. This will reduce the moisture content in the fuel before shut down. (This will help reduce the creosote formation in the firebox and flue.) Set the air control to the setting you have found best for your requirements which is normally about 8mm to the right of full shut down. The aim when overnight burning is to have only a few hot embers left in the bottom of the firebox in the morning, not huge lumps of wood.
Cleaning your flue
Carefully remove baffle plate and put it to one side. Close the heater door. Obtain a 150mm flue brush from your local Eureka Dealer and proceed up onto your roof. Remove the cowl. Slowly push the flue brush down the chimney until it stops. Pull the brush back out and repeat the process. Each time you do this you will notice that the brush will go further down the chimney till it reaches the bottom. The soot and creosote will fall down the chimney and into the firebox. Clean residue from firebox. Replace the baffle plate. Make sure you do the job well. The cleaner the flue the less chance there will be of the creosote sticking again. After you have replaced the cowl, inspect the roof flashing for any damage that may have been incurred whilst you were cleaning the flue. Reseal the seal on the roof with roof and gutter silicone if required.
The Fan (when optional Fan fitted)
It is recommended to run the fan while the heater is operating above Low burn on Low speed. For extended periods when the heater is running above Medium fire, fan speed High or Boost is recommended for short bursts where a quick temperature rise is desired in conjunction with a high fire setting. The fan should be cleaned on a regular basis. (refer Troubleshooting for fan removal and cleaning.)
Nugget Mk2 Freestanding

Installation
Installation
THE INSTALLATION OF THIS APPLIANCE MUST BE CARRIED OUT AS PER THIS MANUAL AND THE FLUE MANUFACTURER'S SPECIFICATIONS. WE RECOMMEND THAT YOU USE A QUALIFIED INSTALLER TO CARRY OUT THE INSTALLATION.
If you have any other enquiries, please contact the dealer from whom you purchased your heater.
THIS APPLIANCE WEIGHS IN EXCESS OF 120 KILOGRAMS. EXTREME CARE SHOULD BE TAKEN WHEN HANDLING THE APPLIANCE.
Clearances to combustibles & flue requirements
It is recommended that you either use the flue kit that was tested in the test report number shown below, or an approved Australian Standard flue kit, (that incorporates a decorative surround which is unperforated for 180 degrees of its circumference) in conjunction with an additional 180 degree x 900mm stainless steel flue shield between decromesh casing and active flue (supplied with wood heater).
The Eureka Nugget Mk2 Freestanding has been tested to the AS/NZS 2918:2001 Appendix B Test Report Number HCMG-15-062.
The Eureka Nugget Mk2 Freestanding heater conforms to the Australian Standard in the following placement of the appliance in relation to combustible surfaces.
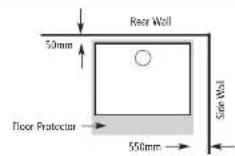
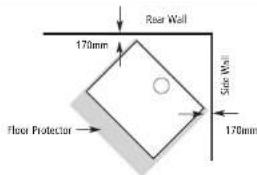
Corner installation – flue protection not required
Hearth Requirements
The Eureka Nugget Mk2 conforms to AS/NZS 2918:2001 Appendix B when placed in the above position on a minimum hearth or floor protector of 910mm deep x 770mm wide x 9mm thickness. The floor protector should extend 350mm in front of the appliance base.
Nugget Mk2 Freestanding
4
Installation (Continued)
Fitting the Baffle Plate
After you have completed the installation you firstly have to fit the baffle plate into the heater with the curved lip facing upright and to the front.
Put the baffle plate back into the heater by putting the right side of the plate through the door opening and then the left. Holding the plate in two hands under the plate, lift the right hand side up hard against the top and right hand side of the firebox. Then lift the left hand side past the retaining lugs on the left hand side of the firebox. When the plate is level, slowly lower it onto the baffle plate retainers. With the baffle plate sitting evenly on the holders, push the baffle plate to the rear of the firebox so that the rear of the baffle plate is against the back wall and sitting on the rear support.
Baffle Plate
WITH THE CURVED LIP FACING UPRIGHT AND TO THE FRONT, ENSURE THE BAFFLE IS SITTING CORRECTLY. FAILURE TO DO SO WILL CAUSE THE APPLIANCE TO BE LESS EFFICIENT AND OVERHEAT THE FLUE SYSTEM. IF THE BAFFLE PLATE IS NOT SUPPORTED AT THE REAR OF THE FIREBOX AND PLACED FIRMLY AGAINST THE BACK WALL THE BAFFLE MAY BOW DOWNWARDS CAUSING INEFFICIENT OPERATION.
Placement of firebricks in firebox
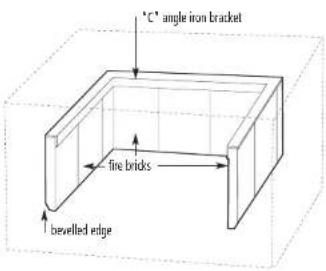
Take the firebricks out of the heater. They are to be placed so that they stand on end against the rear and two side walls of the firebox. You will notice that the bricks have a bevel on one end.
Inside the firebox there is a "C" shaped angle iron firebrick retaining bracket. This is designed to sit over the bricks and hold them in place. This should be placed in the firebox so that you see a flat face of the angle iron on both sides of the firebox and at the rear of the firebox.
Holding the "C" frame up to the top of the firebox, insert a whole firebrick, standing it vertically with the bevel edge pointing down and facing inwards toward the left hand side of the firebox. Lower the left hand side of the "C" frame onto the firebrick. Repeat with a whole firebrick on the right hand side. Place 3 whole firebricks using the same method against the back wall of the firebox.
Now place one extra whole and one half firebrick on either side of the firebox to complete the installation of the firebricks. (i.e. two and a half each side and remainder on the back wall.)
Push each brick and "C" frame firmly against the wall of the firebox and you are ready to light your fire.
Installation Permit
Depending on what your local authority requires, a permit may be required for the installation of your heater. It is your responsibility to arrange the same.
Nugget Mk2 Freestanding
5
Operating your Eureka
Read these instructions
DO NOT ATTEMPT TO OPERATE THIS APPLIANCE WITHOUT READING AND UNDERSTANDING THESE OPERATING INSTRUCTIONS THOROUGHLY. FAILURE TO OPERATE THIS APPLIANCE PROPERLY MAY CAUSE UNDUE DAMAGE TO THE APPLIANCE OR RESULT IN A FLUE FIRE.
Your first fire
On installation of your Eureka Heater it is necessary to place a 12mm (approx) layer of sand, soil or ash in the bottom of the firebox. This is required for the first fire. Thereafter, when cleaning out the firebox, always leave the equivalent amount of ash in the bottom.
Starting your fire
Place a firelighter or paper in the bottom of the firebox and place a large amount of small kindling on top. Ignite the paper or the firelighter. Set the air control to high and leave the main door open approximately 25mm. When the kindling is burning, place about four pieces of small wood on top of the burning kindling. Once the wood is alight, close the main door. After approximately 20 minutes, turn the air control down to medium.
On the initial fire up you may detect smoke coming from the paint finish and from any oils that may be on the steel on the outside of the firebox. This is normal. It is suggested to well ventilate your home on the initial fire up. Please refer to our section 'Paint Curing and Care'.
The glass door
Always operate your heater with the door closed and locked. The only time you can leave the door open is on initial lighting, or when reloading the heater.
Care of your glass
If you are burning good dry wood, you will have very little discolouration of your glass in normal burning cycle. If you aim for an eight to ten hour overnight burn, you should not get much discolouration. You can control this by adjusting the air control, moving from the left and slowly creeping the control to the right. After a number of days you will find the right position to suit your requirements and the fuel that you are using.
Cleaning the glass
Generally the only time you will possibly need to clean your glass is after a long overnight burn. If you find that you have a wet sticky black film on your glass (creosote), it is better to burn the heater as normal for one load of wood. When the wood has burnt down to a hot bed of embers, open the door and leave it wide open until the glass cools sufficiently to be wiped with a damp cloth. This should clean all the white smoky film off the glass. Creosote on the glass is normally a sign that you have tried to get too long an overnight burn or you have burnt excessively wet or green wood. If the film on the glass won't come off with a wet cloth, you can use wet ash from the ash bed as a cleaner or commercial products such as Crystal Clear, Johnson Foam Clean or Windex.
Normal Operations
When you get up in the morning, open up the air control of the heater to high position to start the embers glowing. Place three or four pieces of wood on top of the embers and leave the door open 25mm. Once the fuel starts to flame close the door. As the heater starts to heat up, begin reducing the air control towards a lower setting.
For best results it is best to burn 350mm long wood and load your wood straight into the firebox front to rear. This will give optimum efficiency and recoverable heat, and minimise creosote formation and smoke emissions.
- Troubleshooting (Continued)
- WARRANTY
- Nugget Mk2 Freestanding
- WARNING
- PLEASE COMPLETE:
- Leaving Door Open
- Closing the Door
- Troubleshooting
- • Air Control Jamming
- • No Overnight Burn
- Operating your Eureka (Continued)
- Using your Eureka as a cooking appliance
- Overnight burn
- Cleaning your flue
- Installation
- Clearances to combustibles & flue requirements
- Hearth Requirements
- Installation (Continued)
- Fitting the Baffle Plate
- Placement of firebricks in firebox
- Installation Permit
- Operating your Eureka
- Your first fire
- Starting your fire
- The glass door
- Care of your glass
- Cleaning the glass
- Normal Operations
Brand : EUREKA
Model : Nugget Mk2
Category : Heating