ETLW100B - Washing machine Esatto - Free user manual and instructions
Find the device manual for free ETLW100B Esatto in PDF.


| Product Type | Top-Loading Washing Machine |
| Brand | Esatto |
| Model | ETLW100B |
| Washing Capacity (Dry Clothes) | 10.0 kg |
| Dimensions (W x D x H) | 601 x 630 x 1000 mm |
| Net Weight | 45 kg |
| Rated Input Power | 600 W |
| Rated Voltage | 230-240 V~ |
| Rated Frequency | 50 Hz |
| Water Pressure Range | 0.03 - 0.8 MPa |
| Water Connection | Single inlet valve (cold water only) |
| Wash Programs | Mix, Normal, Jeans, Soft, Strong, Heavy, Quick 15', Quick Clean |
| Special Features | Fuzzy Weighting, Delay Start, Child Lock, Quick Clean (saves 20-40% cycle time) |
| Safety Features | Child lock, lid lock, auto shut-off, overheat protection |
| Accessories Included | Inlet hose, drain hose, user manual, screws, spring clamper |
| Warranty (Australia) | 24 months for domestic use |
| Cleaning Maintenance | Clean lint filter every 10 cycles; clean inlet filter; clean drain pump filter periodically |
| Installation Requirements | Rigid, dry, level surface; avoid direct sunlight; room temperature above 0°C |
| Energy Test Standard | AS/NZS 2040.2 and AS/NZS 6400 using Standard program |
| User Manual Included | Yes (24 pages in English; free PDF available online) |
Frequently Asked Questions - ETLW100B Esatto
User questions about ETLW100B Esatto
0 question about this device. Answer the ones you know or ask your own.
Ask a new question about this device
Download the instructions for your Washing machine in PDF format for free! Find your manual ETLW100B - Esatto and take your electronic device back in hand. On this page are published all the documents necessary for the use of your device. ETLW100B by Esatto.
USER MANUAL ETLW100B Esatto
Esatto User Manual Exactly what you need
Version:
V5.3 0322
Online:
esatto.house
Welcome
Residentia Group
Head Office
165 Barkly Avenue
Burnley, Victoria
Australia 3121
ACN
600 546 656
Online
residentia.group
www.esatto.house
f @esatto.house
Postage
PO Box 5177
Burnley, Victoria
Australia 3121
Telephone
1300 11 4357
Congratulations on purchasing your washing machine. The Esatto brand is proudly distributed within Australia by Residentia Group Pty Ltd.
Please refer to the warranty card at the rear of this manual for information regarding your product's parts and labour warranty, or visit us online at: www.residentia.group
At Residentia Group, we are customer obsessed and our Support Team are there to ensure you get the most out of your appliance. Should you want to learn more about your washing machine such as the various washing modes or importantly taking care of the appliance, our Support Team are here to help.
You can use our online Support Centre at anytime by visiting:
http://support.residentiagroup.com.au
Or you can contact us via phone by dialing: 1300 11 HELP (4357).
It is important that you read through the following use and care manual thoroughly to familiarise yourself with the installation and operation requirements of your appliance to ensure optimum performance.
Again, thank you for choosing an Esatto appliance and we look forward to being of service to you.
Kind Regards,
The Residentia Team
User Manual:
Esatto
Contents:
Page:
Safety Instructions 4
Your Washing Machine 6
Installation 7
Operating Instructions 10
Cleaning & Maintenance 16
Troubleshooting 18
Technical Specifications 20
Purchase Details 21
Your receipt 21
Warranty Information 22
Safety Instructions
For your safety, the information in this manual must be followed to minimize the risk of fire or explosion, electric shock, or to prevent property damage, personal injury or loss of life.
- This appliance is not intended for use by persons(including children) with reduced physical, sensory or mental capabilities or lack of experience and knowledge unless they have been given supervision or instruction concerning use of the appliance by a person responsible for their safety.
- Children should be supervised to ensure that they do not play with the appliance.
- If the supply cord is damaged, it must be replaced by the manufacturer, its service agent or similarly qualified persons in order to avoid a hazard.
- The new hose-sets supplied with the appliance are to be used and that old hose-sets should not be reused.
- The openings must not be obstructed by a carpet.
Explanation of the following signal words:
WARNING!
This signal word indicates a potentially dangerous situation which may result in death or serious injuries unless it's avoided.
CAUTION!
This signal word indicates a potentially dangerous situation which may result in slight or minor injuries or damage to property and the environment.
NOTE!
This signal word indicates a potentially dangerous situation which may result in slight or minor injuries.
| Model | Washing Capacity | Standard Water Pressure |
| ETLW55B 5.5kg | 0.03MPa~0.8MPa | |
| ETLW70B 7.0kg | 0.03MPa~0.8MPa | |
| ETLW80B 8.0kg | 0.03MPa~0.8MPa | |
| ETLW100B 10.0kg | 0.03MPa~0.8MPa |
WARNING!
POTENTIAL ELECTRIC SHOCK
• This appliance is for indoor use only.
- Do not position washing machine in a humid place.
- Do not insert your hands into running spin-dry tub.
- If the spin-dry tub does not stop within 15 seconds after opening the cover, please stop using the machine and have it repaired.
- Before performing any maintenance on the device, unplug the appliance from the mains.
- Always unplug the machine and turn off the water supply after use. The max. inlet water pressure, in pascals. The min. inlet water pressure, in pascals.
- To ensure your safety, power plug must be inserted into an earthed three-pole socket. Check carefully and make sure that your socket is properly and reliably earthed.
- Make sure that the water and electrical devices must be connected by a qualified technician in accordance with the manufacturer's instructions and local safety regulations.
RISK TO CHILDREN
- The appliance can be used by children aged from 8 years and above and persons with reduced physical, sensory or mental capabilities or lack of experience and knowledge if they have been given supervision or instruction concerning use of the appliance in a safe way and understand the hazards involved. Children shall not play with the appliance. Cleaning and user maintenance shall not be made by children without supervision.
- Animals and children may climb into the machine. Check the machine before every operation.
- Young children should be supervised that they do not play with the appliance.
- Machine may be very hot during the operation. Keep kids and pets far away from the machine during the operation very wet rooms as well as in the rooms with explosive or caustic gas.
- Remove all packaging before using the appliance. Otherwise, serious damage may result.
- The washing machine with single inlet valve only can be connected to the cold water supply. The product with double inlet valves should be correctly connected to the hot water and cold water supply.
- Plug must be accessible after installation.
RISK OF EXPLOSION
- Do not wash or dry articles that have been cleaned in, washed in, soaked in, or dabbed with combustible or explosive substances (such as wax, oil, paint, gasoline, degreasers, dry-cleaning solvents, kerosene, etc.) This may result in fire or explosion.
- Before hand thoroughly rinse items of washing by hand.
CAUTION!
INSTALLING THE PRODUCT
- This washing machine is for indoor use only.
- It isn't intended to be built-in using.
- The openings must not be obstructed by a carpet.
- Washing machine shall not be installed in bath room or very wet rooms as well as in the rooms with explosive or caustic gases.
- Remove all packaging and transport bolts before using the appliance. Otherwise, serious damage may result.
- The washing machine with single inlet valve only can be connected to the cold water supply. The product with double inlet valves should be correctly connected to the hot water and cold water supply.
- Plug must be accessible after installation.
RISK OF DAMAGING THE APPLIANCE
- Your product is only for home use and is only designed for the textiles suitable for machine washing.
- Do not climb up and sit on top cover of the machine.
-
Do not lean against machine door.
• Cautions during Handling Machine: -
Transport bolts shall be reinstalled to the machine by a specialised
-
The accumulated water shall be drained out of the machine.
-
Handle the machine carefully. Never hold each protruded part on the machine while lifting. Machine door can not be used as the handle during the conveyance.
-
This appliance is heavy. Transport with care.
- Please do not close the door with excessive force.
- Do not wash carpets.
OPERATING THE APPLIANCE
- Before washing the clothes at first time, the product should be operated in one round of the whole procedures without the clothes inside.
- Do not wash flammable and explosive or toxic solvents.
- Do not use gasoline and alcohol etc. as detergents.
- Please only select the detergents suitable for machine washing, especially for drum.
- Make sure that all pockets are emptied. Sharp and rigid items such as coin, brooch, nail, screw or stone etc. may cause serious damages to this machine.
- Please check whether the water inside the drum has been drained before opening its door. Please do not open the door if there is any water visible.
- Be careful of burning when the product drains hot washing water.
- Never refill the water by hand during washing.
- After the program is completed, Please wait for two minutes to open the door.
Your Washing Machine
PRODUCT DESCRIPTION
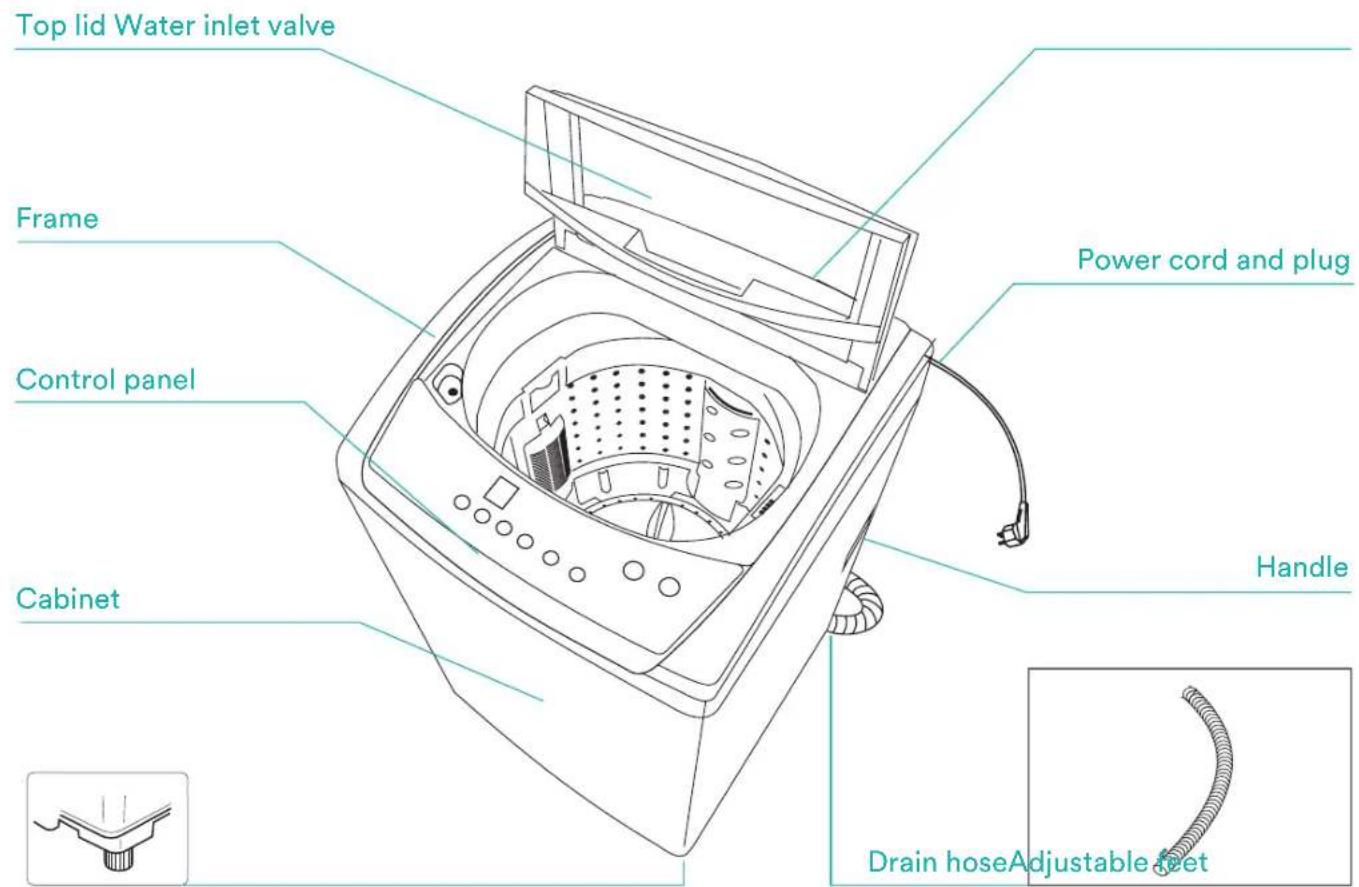
NOTE!
The product line chart is for reference only, please refer to real product as standard.
ACCESSORIES
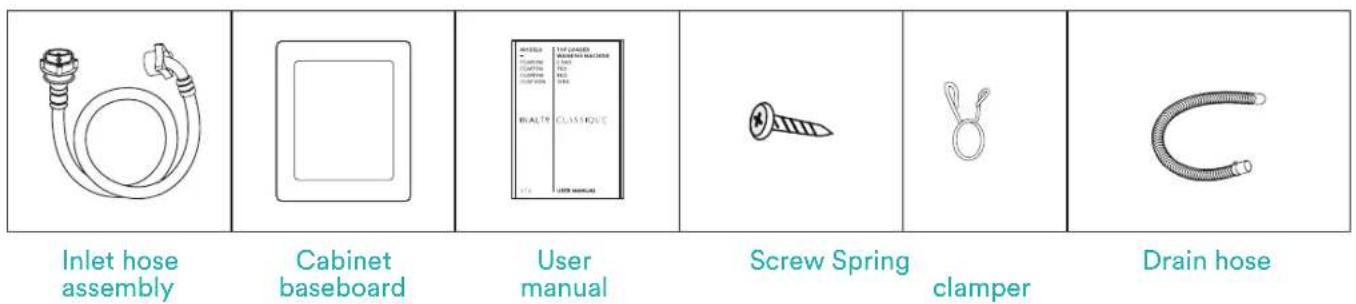
NOTE!
If the drain hose is already installed on the machine, then there is no spring clamper and drain hose in the accessories.
Installation
INSTALLATION INSTRUCTIONS
It's recommended to use the washing machine on its own dedicated power outlet for both convenience and safety. The power outlet must be grounded.
IMPORTANT!
If the power cord is damaged, it must be replaced by Residentia Group or one of its authorised service representatives. Please contact 1300 11 HELP (4357) and ensure the appliance is completely disconnected from the power supply.
WARNING!
- Stability is important to prevent the product from moving!
- Make sure that the product should not stand on the power cord.
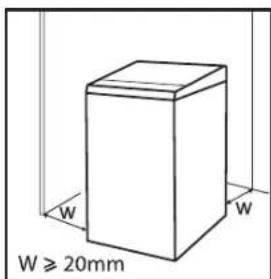
Before installing the machine, the location must be:
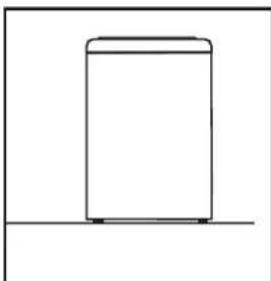
- Rigid, dry, and a level surface
- Avoiding direct sunlight
- Sufficient ventilation
- Room temperature is above 0 °C
- Kept far away from the heat resources such as coal or gas.
UNPACKING THE WASHING MACHINE
WARNING!
- Packaging material (e.g. Films, Styrofoam) can be dangerous for children.
-
There is a risk of suffocation! Keep all packaging well away from children.
-
Remove the cardboard box and styrofoam packing.
- Lift the washing machine and remove the base packing.
- Remove the tape securing the power supply cord and drain hose.
- Remove the inlet hose from the drum.
INSTALLATION OF THE DRAIN HOSE
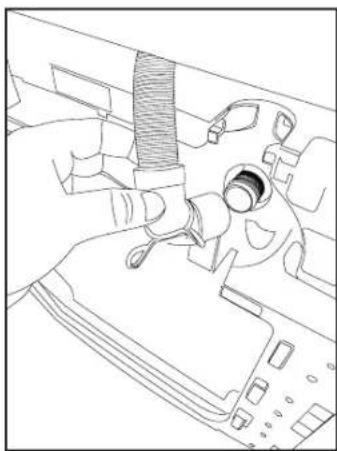
natural_image
Technical line drawing of a mechanical assembly with no visible text or symbolsDrain hose inserted into the drain
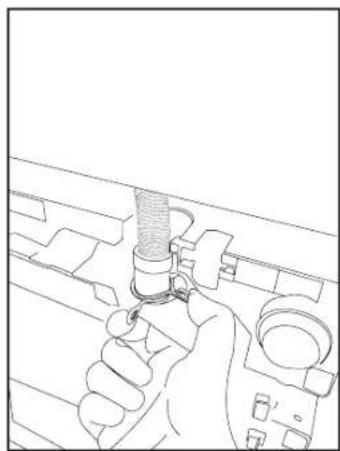
natural_image
Line drawing of a hand holding a tool with a probe inserted, surrounded by mechanical components (no text or symbols)Clamping spring
natural_image
Simple line drawing of a rectangular container with a lid, placed on a horizontal surface (no text or symbols)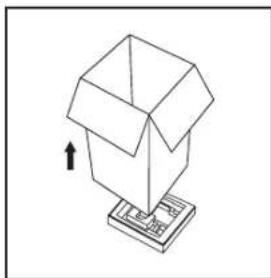
natural_image
Simple line drawing of a box with an upward arrow, no text or symbols presentInstallation (Continued)
WARNING!
To prevent leakage or water damage, follow the instructions in this chapter carefully:
- Do not kink, crush, modify, sever or protract the inlet hose or drain hose.
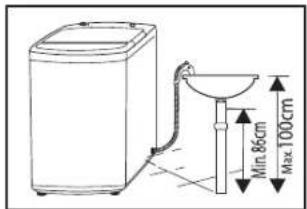
- Position drain hose properly, otherwise damage might result of water leakage.
- If drain hose is too long, do not force it into washing machine as it will cause abnormal noises.
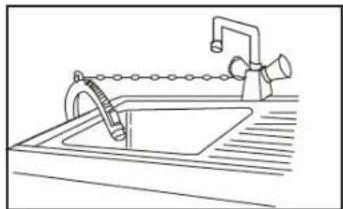
Use an upper drain system to place the end of drain hose:
natural_image
Line drawing of a stainless steel sink with faucet and chain (no text or symbols)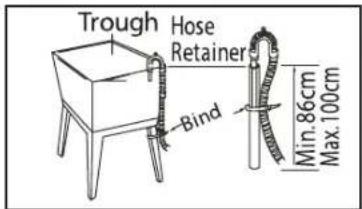
LEVELLING THE WASHING MACHINE
WARNING!
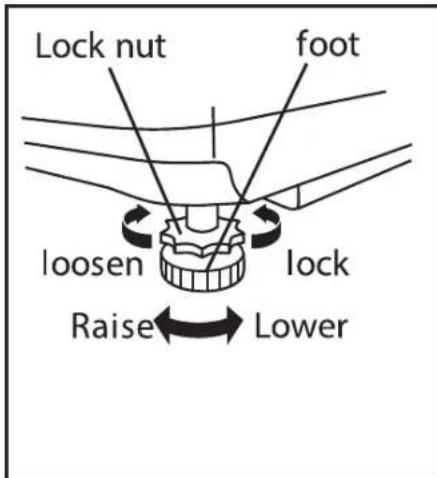
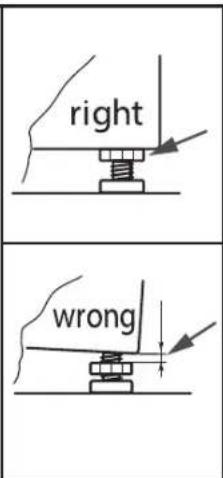
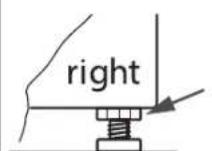
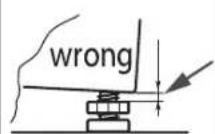
The lock nuts on all four feet must be screwed tightly against the housing.
- Check if the legs are closely attached to the cabinet. If not, please turn them to their original positions tighten the nuts.
- Check alignment of the product with a spirit level and if required, correct.
- Loosen the lock nut and turn the feet until it closely contacts with to the floor.
- After being locked properly, press four corners again to make sure that they has been adjusted properly.
SELECTION OF TAP
Please select appropriate tap.
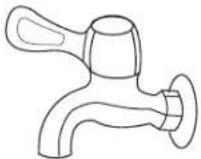
Ordinary faucet
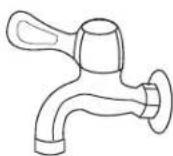
Screw tap Special washing
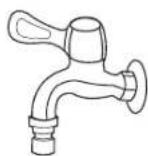
machine tap
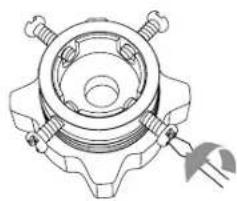
CONNECTION OF INLET HOSE, TAP AND WASHING MACHINE
- Connection between ordinary tap and inlet hose.
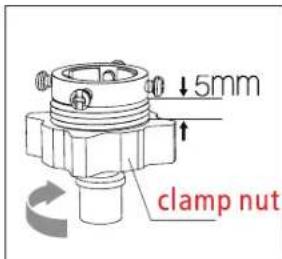
a) Loosen clamp nut to show 5mm thread
natural_image
Technical line drawing of a mechanical component with mounting flanges and a central hub (no text or symbols)b) Loosen four bolts
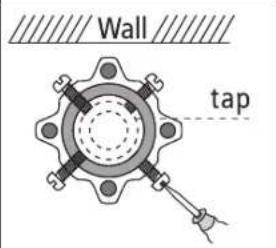
c) Set connecting base on tap and tighten bolts evenly
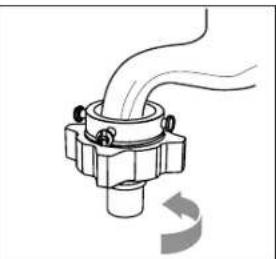
natural_image
Diagram of a pipe fitting with a valve and circular arrow indicating rotation (no text or symbols)d) Tighten clamp nut
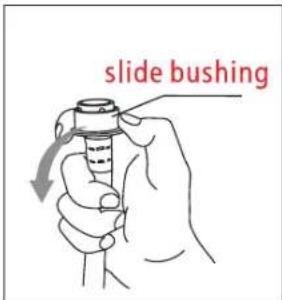
e) Press slide bushing, insert inlet hose into connecting base
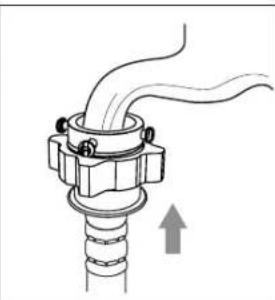
natural_image
Diagram of a mechanical assembly with pipes and a valve, showing an upward arrow (no text or symbols)f) Connection finished
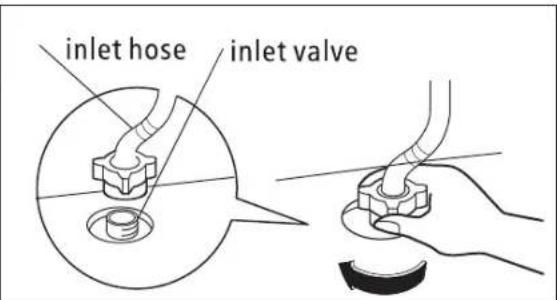
g) After connection and installation, check if there is water leakage
- Connection between screw tap and inlet hose.
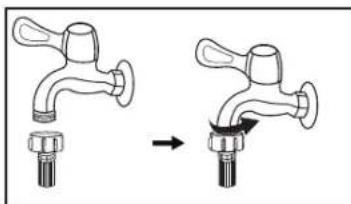
natural_image
Diagram showing two pipe fittings with a valve, one being inserted and the other being removed (no text or symbols)tap with threads and inlet hose
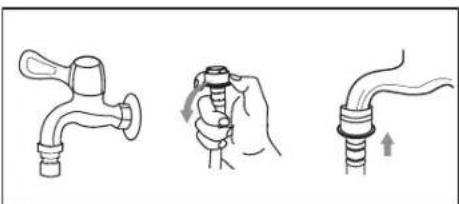
natural_image
Three-step diagram showing a faucet being adjusted for each other, with no text or symbols present.special tap for washing machine
Operating Instructions
PREPARATION BEFORE WASHING
CAUTION!
- Before washing, please make sure it's installed properly.
- Before washing it at first time, the washing machine shall be operated in one round of the whole procedures without clothes in as follows.
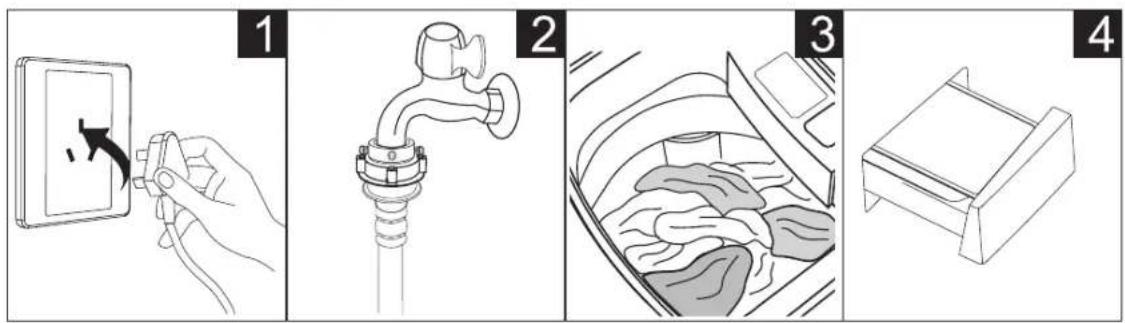
Plug in
Open tap
Load and Close door
Add detergent
WASHING
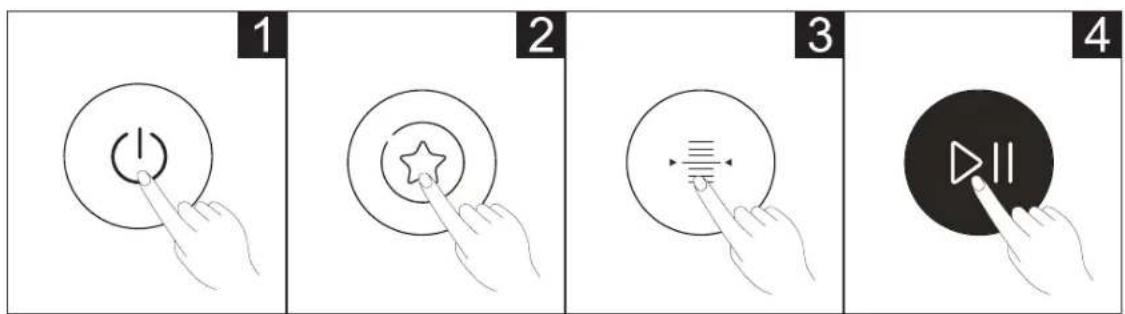
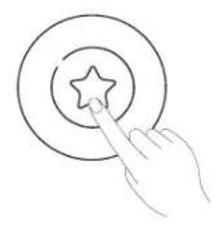
Power On
natural_image
Hand pointing at a star inside concentric circles (no text or symbols)Select Program
natural_image
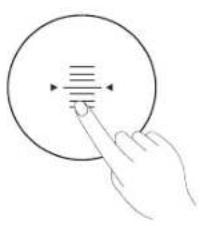
Hand pointing at a circular button with horizontal lines and arrows, no text or symbols presentSelect Water Level
natural_image
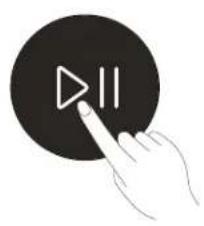
Hand pointing at a black circular button with a white play triangle symbol (no text or numbers)Start up
NOTE!
- If default is selected, step 2, 3 can be skipped.
AFTER WASHING
Buzzer will beep after washing finished and the power supply will be cut off automatically. Then unload the laundry.
WASHING MATTERS NEEDING ATTENTION
- The working condition of the washer should be(0-40)°C. If used under 0°C, the inlet valve and draining system may be damaged. If the machine is placed under condition of 0°C or less, then it should be transferred to normal ambient temperature to ensure the water supply hose and drain hose are not frozen before use.
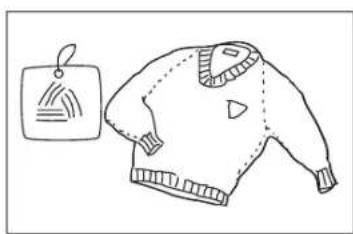
- Please check the labels and the explanation of using detergent before wash. Use non-foaming or less-foaming detergent suitable for machine washing properly.
natural_image
Simple line drawing of a sweater with a tag and decorative pattern (no text or symbols)Check the label
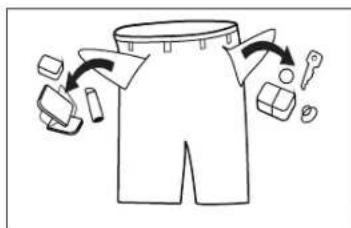
Take out the items out of the pockets
natural_image
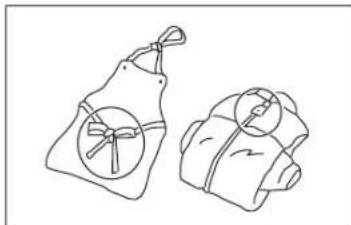
Line drawing of two backpacks with circular designs and straps (no text or symbols)Knot the long strips,zip or button
natural_image
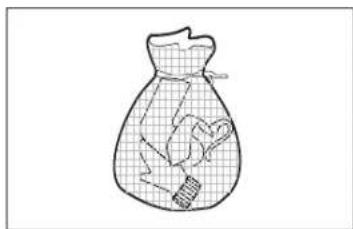
Line drawing of a bag with a small object inside, no text or symbols presentPut small clothes into the pillow slip
natural_image
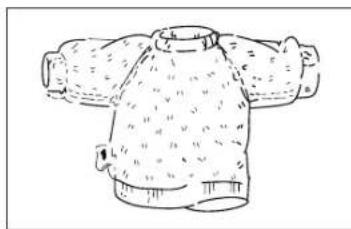
Line drawing of a knitted sweater with three arms (no text or symbols)Turn easy-pilling and long-pile fabric inside out
natural_image
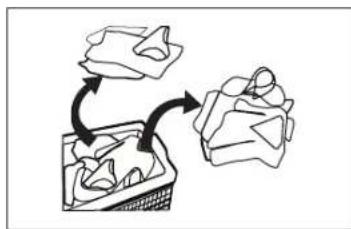
Simple line drawing of a box with an arrow indicating rotation or folding process (no text or symbols)Separate clothes with different textures
WARNING!
- When washing a single clothes, it may easily cause great eccentricity and give alarm due to great unbalance. Therefore it is suggested to add one or two more clothes to be washed together so that draining can be done smoothly.
- Don't washing the clothes touching with kerosene, gasoline, alcohol and other flammable materials.
THE USAGE OF DETERGENT AND WASHING POWDER
- Add liquid detergent to the left compartment of the detergent drawer.
- Add power detergent to the right side compartment of the detergent drawer.
- As for the agglomerated or ropy detergent or additive, before they are poured into the detergent box, it is suggested to use some water for dilution to prevent the inlet of detergent box from being blocked and overflowing while filling water.
- Please choose suitable type of detergent for the various washing temperature to get the best washing performance with less water and energy consumption.
Operating Instructions (Continued)
WATER LEVEL:
Select water level according to clothing categories, degree of soiling and washing habits of customers.
Press this button to set your Water Level, where 1 is low and 8 is high.
A solid indicator light indicates the water levels to the left (1, 3, 5, 7) and a flashing indicator light indicates the water levels to the right (2, 4, 6, 8).
DISPLAY:
The display shows the settings, estimated time remaining, options, and status messages for your washer. The display will remain on through the cycle.
When LED flashing, it means the time that delay to start the machine. When LED lighting, it means the program time that remaining.
CAUTION!
- If there is any break in the power supply while the machine is operating, a special memory stores the selected program and when the power is restarted.
Esatto
SOLID ⇌ FLASH
DELAY (H) REMAIN (M)

7 | 8
SOAK
5 | 6
WASH
图
(1)
3 | 4
RINSE
图 1
1
1 | 2
SPIN
WATER LEVEL
DELAY
WASH TYPE
DELAY:
After selecting a Program, press the Delay button to choose a delayed start time. Press Start/Pause to commense the delay operation.
To switch the delayed start off, simply press the button until the delay light is off. If the program has already started, press the Power button to reset the program.
WASH FUNCTION:
Press this button to select your wash function. I.e. Soak, Wash, Rinse or Spin, or a combination of these.
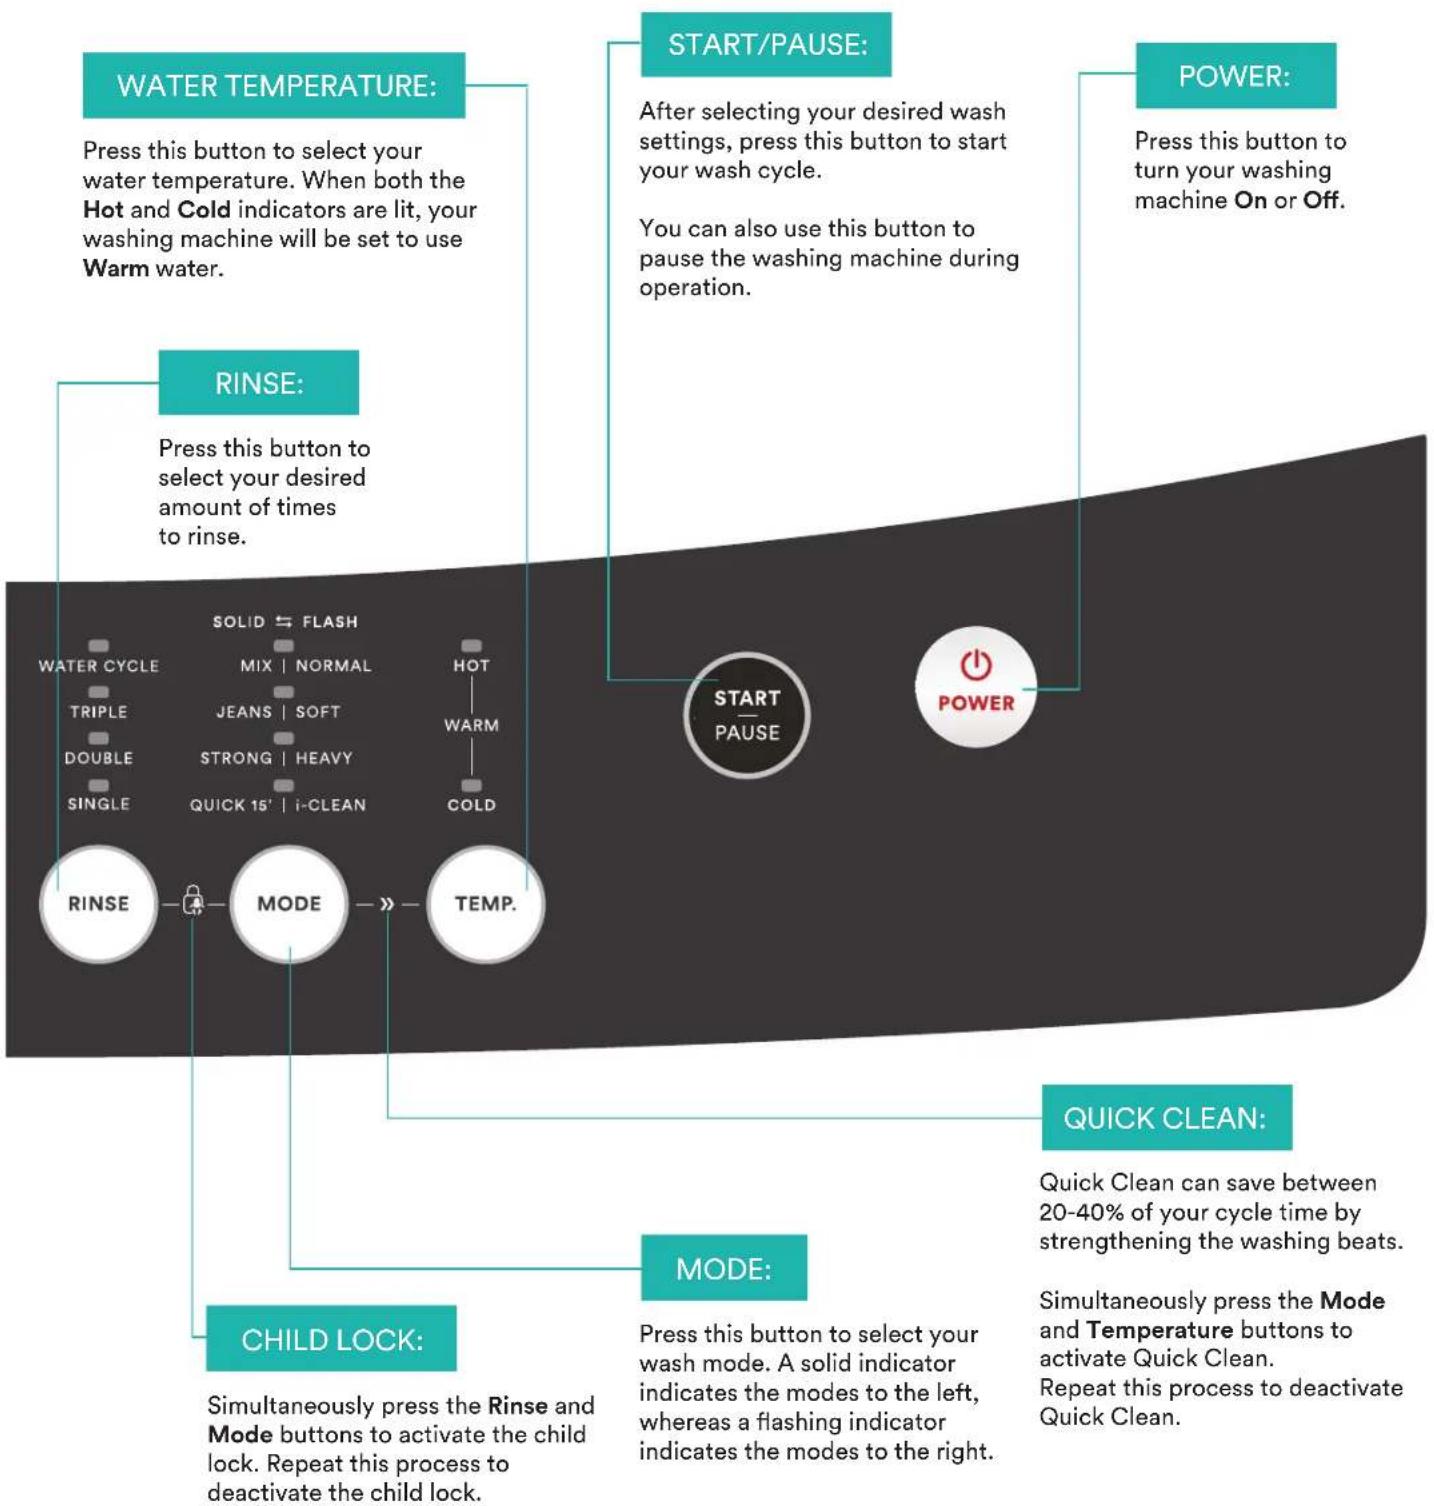
flowchart
graph TD
    A["WATER TEMPERATURE"] --> B["RINSE"]
    B --> C["SOLID ← FLASH"]
    C --> D["WATER CYCLE"]
    C --> E["MIX | NORMAL"]
    C --> F["TRIPLE"]
    C --> G["JEANS | SOFT"]
    C --> H["DOUBLE"]
    C --> I["STRONG | HEAVY"]
    C --> J["SINGLE"]
    C --> K["QUICK 15' | i-CLEAN"]
    C --> L["COLD"]
    M["START/PAUSE"] --> N["After selecting your desired wash settings, press this button to start your wash cycle."]
    N --> O["You can also use this button to pause the washing machine during operation."]
    P["POWER"] --> Q["Press this button to turn your washing machine On or Off."]
    R["START PAUSE"] --> S["POWER"]
    T["QUICK CLEAN"] --> U["Quick Clean can save between 20-40% of your cycle time by strengthening the washing beats."]
    V["MODE"] --> W["Press this button to select your wash mode. A solid indicator indicates the modes to the left, whereas a flashing indicator indicates the modes to the right."]
    X["CHILD LOCK"] --> Y["Simultaneously press the Rinse and Mode buttons to activate the child lock. Repeat this process to deactivate the child lock."]
NOTE!
- The Child Lock function will lock all buttons except Power.
Operating Instructions (Continued)
PERSONALISED WASH MODE SETTING
Users can select washing program according to actual demand, set rinsing times, water volume and delay amount.

flowchart
graph LR
    A["POWER"] --> B["MODE"]
    B --> C["WATER LEVEL"]
    C --> D["WASH TYPE"]
    D --> E["RINSE"]
    E --> F["TEMP."]
    F --> G["DELAY"]
    G --> H["START PAUSE"]
OPERATIONS OF WASHING PROCESS
Users can set single process or combinations of washing, rinsing and spinning freely according to demand. Detailed operations as follows for different models:
flowchart
graph LR
    A["Power On"] --> B["WASH TYPE"]
    B --> C["Press Rinse separately, set desired setting"]
    C --> D["START PAUSE"]
    style A fill:#fff,stroke:#000
    style B fill:#fff,stroke:#000
    style C fill:#fff,stroke:#000
    style D fill:#fff,stroke:#000
NOTE!
- There are other process combinations just like the above.
WASHING MODES
• MIX
Suitable to wash cotton, linen, flax. jute clothes
• NORMAL (STANDARD)
Standard fabric washing program, suitable to wash ramie cotton fabric. Wash for once, rinsing for twice, the spin time is a little long.
• JEANS
Suitable to wash heavy stained/wearable clothes.
- SOFT
The tempo is soft, slow washing and spinning speed, to make the lightest wear and deformation.
• STRONG
The wash time is longer, the stream is stronger, so the washing effect is better.
- HEAVY
Suitable to wash heavy stained/wearable clothes.
- QUICK 15'
Suitable to wash light stained clothes and summer clothes.
- QUICK CLEAN
Start up Quick Clean: Power on, select "Normal", "Soft", "Mix", "Strong", "Jeans" program, then press the Quick Clean button combinations.
Cancellation of Quick Clean function:
The function can be cancelled by pressing Quick Clean combination buttons
(Mode and Temperature) or Power off.
- FUZZY WEIGHTING
The washing machine will select the water level automatically according to the load weight.
- When there's water in the tub, this function is not available;
- Before press [Start/Pause] button, if consumer selected the water level, there will be no fuzzy weighting function;
- After press [Start/Pause] button, the washing machine will run the fuzzy weighting function. Consumer can also select the water level to set the water level as needed.
Cleaning & Maintenance
CLEANING AND CARE
WARNING!
- Before you begin maintenance, please unplug the machine and close the tap.
CLEANING THE CABINET
Proper maintenance on the washing machine can extend its working life. The surface can be cleaned with diluted non-abrasive neutral detergents when necessary. If there is any water overflow, use the wet cloth to wipe it off immediately. No sharp items are allowed.
NOTE!
- Formic acid and its diluted solvents or equivalent are forbidden, such as alcohol, solvents or chemical products, etc.
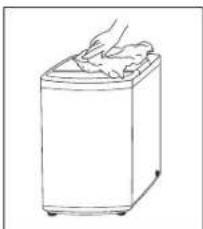
natural_image
Line drawing of a hand washing a washing machine (no text or symbols)CLEANING THE INLET FILTER
NOTE!
- Inlet filter must be cleaned if there is less water.
Washing the filter in washing machine:
- Screw off the inlet pipe from the rear of the machine.
- Pull out the filter with long pliers and reinstall it back after being washed.
- Use a brush to clean the filter.
- Reconnect the inlet pipe.
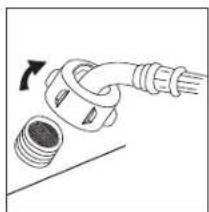
natural_image
Diagram of a plug with a bulb inserted, showing electrical connection (no text or symbols)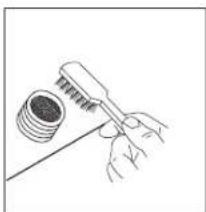
natural_image
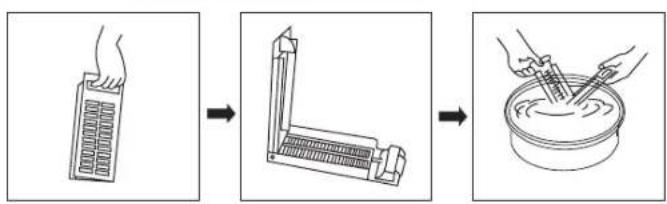
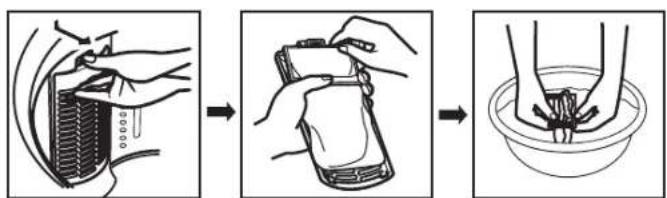
Illustration of a hand using a tool to apply material to a cylindrical component (no text or symbols present)Lint filter clean:
- There is a built-in lint filter in your washer. It can help to collect lint during washing cycle.
- It is suggested to clean the lint filter every 10 cycles.
- Take it out and clean the filter with water. Then place it back into the washer.
Magic filter
flowchart
graph LR
    A["Hand-drawn box with handles"] --> B["Add a tool"]
    B --> C["Add a bowl with chopsticks"]
Normal filter
CLEANING THE DRAIN PUMP FILTER (NOT APPLICABLE FOR MODEL ETLW55B)
WARNING!
- Be careful of the hot water!
- Allow detergent solution to cool down.
- Unplug the machine to avoid electrical shock before washing.
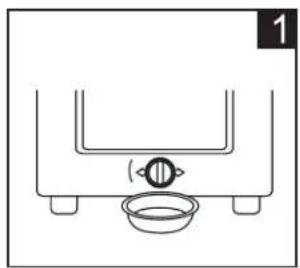
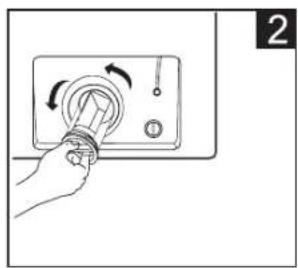
- Drain pump filter can filter the yarns and small foreign matters from the washing.
- Clean the filter periodically to ensure the normal operation of washing machine.
natural_image
Simple line drawing of a U-shaped tube with a central circular knob and a bowl at the bottom (no text or symbols)Drain the water out of the pump, using a container to collect
natural_image
Hand holding a rotary switch with arrows indicating clockwise rotation (no text or symbols)Open the filter by turning to the counter clockwise
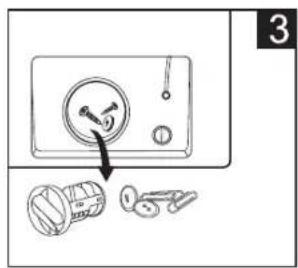
Remove foreign objects
natural_image
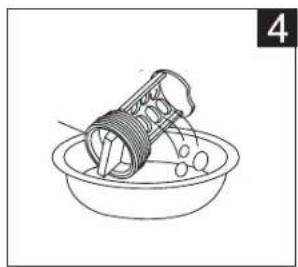
Line drawing of a bucket pouring liquid into a bowl (no text or symbols)Clean the filter
natural_image
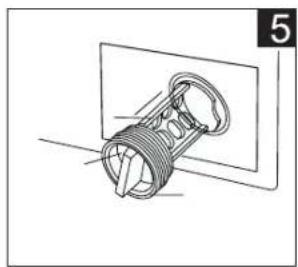
Technical line drawing of a mechanical component with threaded end and mounting plate (no text or symbols)Restore it and adjust the convex place to align at the pump hole
natural_image
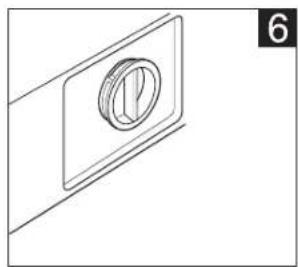
Simple line drawing of a circular object mounted on a rectangular plate, with no text or symbols present.Tighten the pump cover clockwise
CAUTION!
- Make sure that valve cap and emergency drain hose are reinstalled properly, cap plates should be inserted aligning to hole plates otherwise water may leak;
- Some machines don't have emergency drain hose, so step 2 and step 3 can be skipped. Rotate lower cover cap directly to make water run into basin.
- When the appliance is in use and depending on the program selected there can be hot water in the pump. Never remove the pump cover during a wash cycle, always wait until the appliance has finished the cycle, and is empty. When replacing the cover, ensure it is securely re-tightened.
Troubleshooting
OPERATION IN CASE OF EMERGENCY
In the event of an emergency you should:
- Switch off all controls.
- Switch the washing machine off at the power point or at the fuse box.
- Call the Residentia Support Team on 1300 11 HELP (4357).
Some minor faults can be fixed by referring to the instructions given in the Troubleshooting section below. There is also a self-help section online at https://support.residentiagroup.com.au/
| DESCRIPTION INSPECTION ITEMS | |
| No washing | If the power is off or the fuse is burned out.If the power supply voltage is too low.If the water amount reaches to the required water level.(The washer will not work if the water amount does not reach the required water level)If it is set to "Delay" washing mode. (It will only start to work until the reservation time reached) |
| No water flows in | If the power is off or the fuse is burned out.If the water supply is cut off or the water pressure too low.If the inlet hose is properly connected and the water tap is opened.If the filtering screen of inlet valve is blocked by dirt.If the coil of inlet valve is damaged. (The slight electromagnetic sound is normal phenomenon when the inlet valve is switched on)If the "Start / Pause" button is pressed after the power switch is pressed. |
| Abnormal draining | If the water drain hose is placed very high.If the end of water drain hose is sealed in pond.If the internal rubber ring of drain valve is blocked by dirt. |
| Abnormal spin | If the door lid is closed.If all clothing piled largely at one side of barrel or the clothing is excessively placed.If the washer is not placed in stable condition or it is placed in inclination state. (The ground is not flat).If the motor belt is loosened. |
When the washing machine experiences a fault, please contact the Residentia Group support team on:
Telephone: 1300 11 HELP (4357).
WARNING! Never dismantle the washing machine.
ERROR MESSAGES AND SOLUTIONS
| INDICATION REASON SOLUTION | |
| "E1" displays Alarm for abnormal water intake. | Check the water tap is opened or not |
| "E2" displays Alarm for water drain has not finished. | Check the water level sensor and drain pump |
| "E3" displays Alarm for lid not closed before wash and spin. | Close the lid, Press "Start" button |
| "E4" displays Alarm for washing stay at one side. | Manually balance clothes in the barrel by hand. |
| Other If problems still occur, please contact | the support team with the number at the top of this page. |
Technical Specifications
Below outlines the technical specifications for your Esatto Washing Machine.
| ETLW55B ETLW70B ETLW80B ETLW100B | ||||
| Size | 515w × 525d × 910h (mm) | 550w × 565d × 935h (mm) | 580w × 596d × 968h (mm) | 601w × 630d × 1000h (mm) |
| Net Weight | 31kg 38kg 39kg 45kg | |||
| Rated Input Power | 400W 450W 480W 600W | |||
| Rated Capacity of Wash and Spin | 5.5kg (dry clothes) | 7.0kg (dry clothes) | 8.0kg (dry clothes) | 10.0kg (dry clothes) |
| Rated Voltage | 230-240V~ 230-240V~ | 230-240V~ | 230-240V~ | |
| Rated Frequency | 50Hz | 50Hz | 50Hz | 50Hz |
| Maximum water pressure permitted in the water inlet | 0.03MPa | 0.03MPa | 0.03MPa | 0.03MPa |
| Minimum water pressure permitted in the water inlet | 0.8MPa | 0.8MPa | 0.8MPa | 0.8MPa |
NOTE:
This product is subject to continuous improvement, specification are subject to change without prior notice. This product was tested in accordance with AS/NZS 2040.2 and AS/NZS6400 using program: Standard, which is the program recommended for a normally soiled cotton load at rated capacity.
Purchase Details
For future reference, please record the following information which can be found on the rating plate and the date of purchase which can be found on your sales invoice.
STORE DETAILS
STORE NAME
ADDRESS
TELEPHONE | PURCHASE DATE
PRODUCT DETAILS
MODEL NO.
SERIAL NO.*
Attach your receipt to this page
Warranty Information
AUSTRALIA WARRANTY TERMS & CONDITIONS LAUNDRY APPLIANCES
This document sets out the terms and conditions of the product warranties for Residentia Group Appliances. It is an important document. Please keep it with your proof of purchase documents in a safe place for future reference should you require service for your Appliance.
1. IN THIS WARRANTY
(a) ‘acceptable quality’ as referred to in clause 10 of this warranty has the same meaning referred to in the ACL;
(b) 'ACL' means Trade Practices Amendment (Australian Consumer Law) Act (No.2) 2010;
(c) 'Appliance' means any Residentia Group product purchased by you accompanied by this document;
(d) 'ASR' means Residentia Group authorised service representative;
(e) 'Residentia Group' means Residentia Group Pty Ltd of 165 Barkly Ave, Burnley VIC 3121, ACN 600 546 656 in respect of Appliances purchased in Australia;
(f) ‘major failure’ as referred to in clause 10 of this warranty has the same meaning referred to in the ACL and includes a situation when an Appliance cannot be repaired or it is uneconomic for Residentia Group, at its discretion, to repair an Appliance during the Warranty Period;
(g) 'Warranty Period' means:
(i) where the Appliance is used for personal, domestic or household use (i.e. normal single family use) as set out in the instruction manual, the Appliance is warranted against manufacturing defects for 24 months, following the date of original purchase of the Appliance;
(h) ‘you’ means the purchaser of the Appliance not having purchased the Appliance for re-sale, and ‘your’ has a corresponding meaning.
-
This warranty only applies to Appliances purchased and used in Australia and is in addition to (and does not exclude, restrict, or modify in any way) any non-excludable statutory warranties in Australia.
-
During the Warranty Period Residentia Group or its ASR will, at no extra charge if your Appliance is readily accessible for service, without special equipment and subject to these terms and conditions, repair or replace any parts which it considers to be defective. Residentia Group or its ASR may use remanufactured parts to repair your Appliance. You agree that any replaced Appliances or parts become the property of Residentia Group. This warranty does not apply to light globes, batteries, filters or similar perishable parts.
-
Parts and Appliances not supplied by Residentia Group are not covered by this warranty.
-
You will bear the cost of transportation, travel and delivery of the Appliance to and from Residentia Group or its ASR. If you reside outside of the service area, you will bear the cost of:
(a) travel of an authorised representative;
(b) transportation and delivery of the Appliance to and from Residentia Group or its ASR, in all instances, unless the Appliance is transported by Residentia Group or its ASR, the Appliance is transported at the owner's cost and risk while in transit to and from Residentia Group or its ASR.
6. Proof of purchase is required before you can make a claim under this warranty.
7. You may not make a claim under this warranty unless the defect claimed is due to faulty or defective parts or workmanship. Residentia Group is not liable in the following situations (which are not exhaustive):
(a) the Appliance is damaged by:
(i) accident
(ii) misuse or abuse, including failure to properly maintain or service
(iii) normal wear and tear
(iv) power surges, electrical storm damage or incorrect power supply
(v) incomplete or improper installation
(vi) incorrect, improper or inappropriate operation
(vii) insect or vermin infestation
(viii) failure to comply with any additional instructions supplied with the Appliance;
(b) the Appliance is modified without authority from Residentia Group in writing;
(c) the Appliance's serial number or warranty seal has been removed or defaced;
(d) the Appliance was serviced or repaired by anyone other than Residentia Group, an authorised repairer or ASR.
8. This warranty, the contract to which it relates and the relationship between you and Residentia Group are governed by the law applicable where the Appliance was purchased.
9. To the extent permitted by law, Residentia Group excludes all warranties and liabilities (other than as contained in this document) including liability for any loss or damage whether direct or indirect arising from your purchase, use or non use of the Appliance.
- For Appliances and services provided by Residentia Group in Australia, the Appliances come with a guarantee by Residentia Group that cannot be excluded under the Australian Consumer Law. You are entitled to a replacement or refund for a major failure and for compensation for any other reasonably foreseeable loss or damage. You are also entitled to have the Appliance repaired or replaced if the Appliance fails to be of acceptable quality and the failure does not amount to a major failure. The benefits to you given by this warranty are in addition to your other rights and remedies under a law in relation to the Appliances or services to which the warranty relates.
- At all times during the Warranty Period, Residentia Group shall, at its discretion, determine whether repair, replacement or refund will apply if an Appliance has a valid warranty claim applicable to it.
- Missing parts are not covered by warranty. Residentia Group reserves the right to assess each request for missing parts in a case by case basis. Any parts that are not reported missing in the first week after purchase will not provide free of charge.
- To enquire about claiming under this warranty, please follow these steps:
(a) carefully check the operating instructions, user manual and the terms of this warranty;
(b) have the model and serial number of the Appliance available;
(c) have the proof of purchase (e.g. an invoice) available;
(d) telephone the numbers shown below.
14. You accept that if you make a warranty claim, Residentia Group and its ASR may exchange information in relation to you to enable Residentia Group to meet its obligations under this warranty.
IMPORTANT
Before calling for service, please ensure that the steps in point 13 have been followed.
→ Service: Please call 1300 11 HELP (4357)
→ Spare parts: Please call 1300 11 SPARE (7727)
Esatto Appliances Exactly what you need
- Esatto User Manual Exactly what you need
- Welcome
- Residentia Group
- Head Office
- ACN
- Online
- Postage
- Telephone
- Esatto
- Safety Instructions
- WARNING!
- CAUTION!
- NOTE!
- POTENTIAL ELECTRIC SHOCK
- RISK TO CHILDREN
- RISK OF EXPLOSION
- INSTALLING THE PRODUCT
- RISK OF DAMAGING THE APPLIANCE
- OPERATING THE APPLIANCE
- Your Washing Machine
- Installation
- INSTALLATION INSTRUCTIONS
- IMPORTANT!
- UNPACKING THE WASHING MACHINE
- INSTALLATION OF THE DRAIN HOSE
- Installation (Continued)
- LEVELLING THE WASHING MACHINE
- SELECTION OF TAP
- CONNECTION OF INLET HOSE, TAP AND WASHING MACHINE
- Operating Instructions
- AFTER WASHING
- WASHING MATTERS NEEDING ATTENTION
- THE USAGE OF DETERGENT AND WASHING POWDER
- Operating Instructions (Continued)
- WATER LEVEL:
- DISPLAY:
- DELAY:
- WASH FUNCTION:
- PERSONALISED WASH MODE SETTING
- OPERATIONS OF WASHING PROCESS
- WASHING MODES
- • MIX
- • NORMAL (STANDARD)
- • JEANS
- - SOFT
- • STRONG
- - HEAVY
- - QUICK 15'
- - QUICK CLEAN
- - FUZZY WEIGHTING
- Cleaning & Maintenance
- CLEANING AND CARE
- CLEANING THE CABINET
- CLEANING THE INLET FILTER
- CLEANING THE DRAIN PUMP FILTER (NOT APPLICABLE FOR MODEL ETLW55B)
- Troubleshooting
- OPERATION IN CASE OF EMERGENCY
- Technical Specifications
- NOTE:
- Purchase Details
- STORE DETAILS
- PRODUCT DETAILS
- Attach your receipt to this page
- Warranty Information
- AUSTRALIA WARRANTY TERMS & CONDITIONS LAUNDRY APPLIANCES
- IN THIS WARRANTY
- IMPORTANT
- Esatto Appliances Exactly what you need
Brand : Esatto
Model : ETLW100B
Category : Washing machine