
SC-70AU9DRHPC - Tumble dryer Seiki - Free user manual and instructions
Find the device manual for free SC-70AU9DRHPC Seiki in PDF.


| Brand | Seiki |
| Model | SC-70AU9DRHPC |
| Product Type | Tumble Dryer (Condensing) |
| Drying Capacity | 7 kg |
| Dimensions (W x D x H) | 595 x 622 x 845 mm |
| Net Weight | 51 kg |
| Gross Weight | 54 kg |
| Power Supply | 220-240 V ~ 50 Hz |
| Rated Power | 650 W |
| Motor Power | 120 W |
| Rated Current | 4.5 A |
| Refrigerant Type | R134a |
| Refrigerant Quantity | 280 g |
| Waterproof Grade | IPX4 |
| Programmes | Cotton (Extra/Standard/Iron), Delicate, Synthetics (Extra/Standard/Iron), Wool, Special (Jean/Mix/Sports/Shirts), Time (Warm/Cool/Refresh), My Cycle |
| Additional Functions | Delay (up to 24h), Time (10 min steps), Intensity, Lamp, Signal, Anti-Crease, Child Lock, My Cycle |
| Safety Features | Residual current device recommended, child lock, anti-crease |
| Maintenance | Clean filter after each use; empty water container after each use; clean heat exchanger every 2 months |
| Customer Helpline | 1300 296 699 |
Frequently Asked Questions - SC-70AU9DRHPC Seiki
User questions about SC-70AU9DRHPC Seiki
0 question about this device. Answer the ones you know or ask your own.
Ask a new question about this device
Download the instructions for your Tumble dryer in PDF format for free! Find your manual SC-70AU9DRHPC - Seiki and take your electronic device back in hand. On this page are published all the documents necessary for the use of your device. SC-70AU9DRHPC by Seiki.
USER MANUAL SC-70AU9DRHPC Seiki
natural_image
Front view of a white SEKI washing machine with a circular vent, digital display, and control panel (no visible text or symbols on the device itself)INSTRUCTION MANUAL
MODEL: SC-70AU9DRHPC
CONTENTS
| General | Safety | Instructions | 4 | |
| Product | Overview | 8 | ||
| Getting | Started | 10 | ||
| Instructions | 11 | |||
| Operation | 12 | |||
| Maintenance | 15 | |||
| Troubleshooting | 17 | |||
| Specifications | 18 | |||
| Customer | Helpline | 20 |
GENERAL SAFETY INSTRUCTIONS
IMPORTANT INFORMATION
Read this manual thoroughly before you start using the Clothes Dryers.
The safety precautions instructions reduces the risk of fire, electric shock and injury when correctly complied to.
Please follow all instructions and take notice of all warnings.
Pay close attention to messages that follow this safety alert symbol or the words DANGER, WARNING or CAUTION. These words will be used to alert you of potential hazards that and injure you and others. Following these instruction will tell you how to reduce the chance of injury and the possible dangers if instructions aren't followed.
ELECTRICAL SAFETY
- Voltage: Plug the appliance to a 220-240V, 50Hz, properly earthed power outlet, it must be in good working order.
- Power connection: Do not use an adaptor or an extension cord.
Plug the power plug directly into a separate power point that cannot be accidentally turned off, and that is easily accessible so you can switch it off if needed.
- Power cord: Do not kink or damage the power supply cord. Make sure it is behind the appliance so no one can step on or place anything on the power supply cord or against it. A damaged power plug may overheat and cause a fire.
- Damaged cord: Do not use a cord that shows cracks or damage. Any damage to the cord may cause a short circuit, fire and/or electric shock. Contact our support centre on 1300 296 699 for advice
- Disconnection: Never pull the power cord to unplug appliance. Grip the plug and pull straight out from the power point. After turning the device off, wait at least 2 minutes before turning the appliance back on again.
- Electrical work: If the installation of this appliance requires any electrical work, make sure it is carried out by an electrician.
WARNING
Make sure your home is fitted with a residual current device (Safety Switch).
GENERAL SAFETY INSTRUCTIONS (Cont.)
To reduce risk of fire, electric shock or injury, always follow these basic precautions and accident prevention measures when using this appliance, including the below:
INSTALLATION
- The product is heavy, be careful when moving it. To avoid back or other injury, have 2 people lift or mechanical aid when installing.
- When unboxing, thoroughly inspect the appliance carefully for any damage. If there is any damage, do not install the appliance. Contact our support centre on 1300 296 699 for advice.
- While installing the appliance make sure that the power cord is not bent or flattened.
• Install appliance on a flat level and stable ground. - Do not install appliance in a tight fitted cabinet.
- Do not install appliance near other heat sources such as radiators, heaters or direct sunlight.
- If not wall mounted, be sure that the appliance is not placed on any soft materials such as plastics or foams.
WARNING
Make sure that transport packaging is removed from the rear of the dryer. Do not overload the dryer with too many clothes.
GENERAL SAFETY INSTRUCTIONS (Cont.)
USAGE CONDITIONS AND RESTRICTIONS
- Supervision over children is to ensure that they do not play with the appliance. Never allow them to use, play with or crawl inside the appliance. Cleaning and maintenance must not be done by children.
- This appliance is not to be used by persons (including children) with reduced physical, sensory or mental capabilities, or lack of experience and knowledge, unless they are being supervised or been given instructions on how to use of the appliance in a safe way and understand the hazards with using this appliance incorrectly.
- Do not block any ventilation openings. Ensure that vents are not covered by anything.
- Do not use this product for anything other than its intended purpose, and only use it as described in this manual. Do not attempt to alter or modify this appliance.
- Only load items that are suitable for the clothes dryer.
- Do not place any open source flames on the dryer such as candles, etc..
- The door/window will be hot after a long cycle, be sure not to touch the window and to keep children away from the appliance.
- Never stop the clothes dryer before the cycle finishes, the last stage of the cycle is a drying mode without heat to ensure items are left at a temperature that will not damage them.
- The only part that can be changed is the filter, other than this nothing else in the dryer contains user serviceable parts. Do not open, disassemble or try to repair the appliance yourself. Only have this appliance serviced by a qualified technician.
- Incorrect use can result in property damage, injury or death. We assume no liability for misuse of the appliance or noncompliance with these instructions.
WARNING
Never try to repair, modify or replace any part of the appliance, unless this manual says you can do so. All other servicing is to be done by a qualified technician, or contact our support centre on 1300 296 699 for advice.
CAUTION
ITEMS BELOW ARE NOT SUITABLE FOR DRYING. IT CAN CAUSE FIRE IN THE APPLIANCE OR EXTENSIVE DAMAGE. DO NOT PLACE FOLLOWING IN THE APPLIANCE
- Items containing rubber or foam like rubber or any other similar textured materials.
- Items that are spotted or soaked with cooking oil or any other flammable items. These other items include kerosene, stain removers, dry-cleaning solvents, alcohol, petrol, turpentine, waxes, hair care products, wax removers.
- Washing the items vigoursly beforehand in hot water with extra detergent will reduce, but not completely eliminate the hazard.
- Undergarments that contain metal reinforcements (such as underwire bras). Plastic articles such shower caps and waterproof bibs.
- Rubber-backed articles, clothes with foam rubber pads, pillows, galoshes and rubber coated tennis shoes.
- Fabric softeners or similar products unless recommended by product manufacturer for use in a clothes dryer.
- WARNING: Never stop a dryer before the end of the drying cycle unless all items are quickly removed and spread out so that the heat is dissipated.
CAUTION
- Do not use the tumble dryer if industrial chemicals have been used for cleaning.
- Do not dry unwashed items in the dryer.
- Do not allow lint to accumulate around the tumble dryer. Clean the Lint Trap and Filter after every use.
- Enough ventilation has to be provided to avoid the backflow of gases into the room from appliances burning other fuels including open fires.
- Remove all objects from pockets such as lighters and matches.
If it is unavoidable that fabrics that contain vegetable or cooking oil or have been contaminated by hair care products be placed in a tumble dryer they should first be washed in hot water with extra detergent - this will reduce, but not eliminate the hazard.

WARNING: Risk of fire
This symbol alerts you to take care as oil-affected items can ignite, especially when exposed to heat, such as in a clothes dryer. The items become warm, causing an oxidation reaction in the oil. Oxidation causes heat. If the heat cannot escape, the items can become hot enough to catch fire. Piling, stacking or storing oil-affected items can prevent heat from escaping and so it will create a fire hazard.
PRODUCT OVERVIEW

PRODUCT OVERVIEW (Cont.)
CONTROL PANEL

1 On/Off
Product is switched on or off.
2 Start/Pause
Press the button to start or pause the drying cycle.
3 Specialty function
These buttons are used for setting additional functions.
4 Display
This display shows the settings, estimated remaining time and status messages of your dryer.
5 Programmes
Different Dryer cycle can be selected according to the user's needs to make the clothes have more effective drying result.
GETTING STARTED
Before installing your appliance, read all safety instructions in this manual, especially the sections on electrical safety and installation.
INSTALLATION
- This clothes dryer can be installed on the floor (as supplied).
- This appliance can not be installed behind a lockable door, sliding or a door with a hinge on the opposite of the clothes dryer. In all ways that full opening of clothes dryer door is strictly not allowed.
- Make sure that all electrical connections are made by qualified technicians and all instructions in this manual are observed.
- Place the dryer in a dry, well ventilated area, away heat and direct sunlight.
- Exhaust air must not be discharged into the flue which is used for exhausting fumes from appliances burning gas or other fuels.
- Make sure to allow 10cm of spacing behind the dryer to the wall.

LEVELLING THE APPLIANCE
- Make sure to position the dryer is on a level and stable ground. If the floor is uneven you can adjust the feet by twisting it as if to screw in the feet to the product, either clockwise or counter-clockwise to adjust the feet up or down until appliance is completely level.
NOTE: The Dryer will not work correctly unless it is positioned perfectly level.
- Do not install the dryer in a place that can easily be reached by rain
- Do not place the back of the dryer near curtains.
- Do not place the dryer near gas or flammable areas.
INSTRUCTIONS
CAUTION!
Make sure you read all safety precaution in this manual that cause a hazard if placed in the clothes dryer.
LOADING THE DRYER
- Before loading the dryer, check that none of the clothes you are inserting into the dryer have any symbols anywhere on them. These symbols indicate that there are not suitable for clothes drying.
 Dry Dry |  Normal Normal |  Not tumble dry normal Not tumble dry normal |  Do not dry Do not dry |
 Line dry / hang to dry Line dry / hang to dry |  Drip dry Drip dry |  Dry flat Dry flat |  In the shade In the shade |
 Dry clean Dry clean |  Do not dry clean Do not dry clean |  Dry clean normal cycle with any solvent Dry clean normal cycle with any solvent |  Dry clean normal cycle petroleum solvent only Dry clean normal cycle petroleum solvent only |
- Make sure none of the items you are putting into the dryer have no combustible materials or foreign objects (such as coins, hair pins or lighters). Be sure to empty pockets of everything before putting into the dryer.
- Clean the filter before each use and make sure its properly back in palce.
- To avoid items getting tangled in the dryer which can reduce drying performance, please insert items into the dryer one at a time.
- Turn items with cippers inside out and fasten buckles, as this will help to reduce impact noise with items hitting the drum while spinning.
- Make sure to check items for stains before inserting into the dryer, as drying can permanently set stains.
- As you dry large blankets or sheets from time to time open the dryer door take out the blanket or sheet and give it a shake then place back into the dryer. This will help larger items with drying process.
WARNING: Do not overload the dryer, maximum amount of items that can be dried in one load is 7kg.
- Make sure only items that have been washed and are still we are placed in the dryer, no items that are dry are to be placed in.
- Be sure when closing the dryer door that not items are jammed in the door.
- Do not add items to the dryer while it is operating.
OPERATION
| FliterPlease clean the filter when the" " is lighting, after the dryer stops. | |
| TankPlease empty the container when the" " is lighting, after the dryer stops. | |
| Delay start | |
| Time | |
| Child lock | |
| Remaining Time indicator/Error message | |
| Cycle phase status | |
| Clean filters (warning) | |
| Empty water container (warning) | |
| Dryness level (four grades) | |
| Drum lamp indicator | |
| Signal indicator | |
| Anti-crease mode | |
| My cycle |
OTHER FUNCTIONS
Delay
This function is used for delaying start time of drying clothes of up to 24 hours. Selecting a time that you choose, after all your load is added and drying program selecting, press “Delay” to select in how many hours you want your dryer to start. Pressing On/Off will commence the countdown.
OPERATION (Cont.)
Time
When a program is selected, the "Time" button can be used to add an additional 10 minutes into the washing cycle.
Intensity
Use this “Intensity” function for adjusting the dryness level of the laundry.
This function can only be activated before starting the drying cycle.
Intensity function does not work with “Cotton Iron”, “Delicate”, “Synthetic Iron”, “Wool”, “Time”.
Lamp
Pressing this will turn on the inside lamp for 3 minutes, or 1 minute when the door is opened.
Signal
Press the “Signal” button if you want your dryer to notify you when certain programme or function can not be selected or when your drying program is completed it will notify you.
Anti-Crease
Anti-Crease function timeframe is about 30 minutes. This function prevents the laundry from creases. This laundry can be removed except during the following programmes: "Cool", "Wool", "Warm" and "Refresh", all other programmes have this function.
My Cycle
You can save your favourite cycle that is used frequently as a shortcut.
1 Select your program and other drying functions.
2 Press and hold "Intensity" button for 3 seconds until you hear a beep and the programme is saved.
3 Turn the program selector knob to "My Cycle" and your saved cycle will start one you start the cycle.
Child Lock
This Dryer can operate with a special child safety lock which can protect children from carelessly pressing keys.
1 When dryer is in a drying cycle, press and hold "Anti-Crease" + "Signal buttons" at the same time for 3 seconds, when set the display will show "Child Lock" Icon. Once set, only the On/Off key can be pressed.
2 Press and hold "Anti-Crease" + "Signal buttons" at the same time for 3 seconds to de-activate Child lock.
OPERATION (Cont.)
DRYING PROGRAMMES TABLE
| Programme | Weight (max) | Application/Properties | Delay | Time | |
| 7.0kg | |||||
| Cotton | For cottons and coloureds made of cotton or linen. | ||||
| Extra | 7.0kg | To dry cotton pieces of clothing. Drying level: extra dry. | Y | N | |
| Standard | To dry cotton pieces of clothing. Drying level: cupboard dry. | ||||
| Iron | To dry cotton pieces of clothing. Drying level: applicable to iron. | Y | N | ||
| Delicate | Delicate | 1.0kg | To dry delicate laundry that is suitable for drying or laundry which is advised to be hand-washed at a lower temperature. | Y | N |
| Synthetics | For non-iron washing made of synthetic and blended fabrics, cotton. | ||||
| Extra | 3.5kg | To dry thick or multi-layered synthetic fabrics. Drying level: extra dry. | |||
| Standard | To dry thin synthetic fabrics which are not ironed, such as easy care shirts, table linen, baby clothes, socks. | Y | N | ||
| Iron | To dry thin synthetic fabrics which are also to be ironed, such as knitwear, shirts. | ||||
| Wool | Wool | 1.0kg | For a fluffy and fresh wool clothing(Can not be used for drying wool clothing), When the cycle is done, take out the clothes at once, let them dry in the air. | Y | N |
| Special | Jean | 5.0kg | To dry jeans or leisure clothes that are spun at high speeds in the washing machine. | Y | N |
| Mix | 3.5kg | If you can not determine what the clothing's material is, please choose Mix. | |||
| Sports | 3.0kg | To dry sportswear, thin fabrics, polyester,which are not ironed. | |||
| Shirts | 1.0kg | For easy care clothes such shirts and blouses with anti-crease mechanism for minimum ironing effort. Place clothes loosely in the dryer. Once dried, hang it on a clothes hange | |||
| My Cycle | My Cycle | — | Define and save your favorite programme. | Y | — |
| Time | Warm | — | To warm clothes from minimum 10 min. to maximum 120 min.(in 10 min. steps). | Y | Y |
| Cool | — | To cool clothes without blowing hot air from minimum 10 min. to maximum 30 min.(in 10 min. steps). | |||
| Refresh | 1.0kg | To refresh the clothes that have been kept at closed environments for a long time from minimum 20 min. to maximum 150 min.(in 10 min. steps). | |||
Drying times is affected by many different factors, such as the type of materials used in the clothing, bulkiness of the items and how full the dryer is, etc...
Standard Cotton Programme level is used for the energy efficiency program.
MAINTENANCE
CLEANING AND CARE
EMPTY THE WATER CONTAINER
- Hold and pull out the water container with 2 hands.
- Tilt the water container, pour out the condensate water into basin.
- Install the water container.

natural_image
Technical line drawings showing hand operating a mechanical component and liquid being poured into a water tank (no text or symbols)WARINING:
Empty the water container after each use, the programme will be paused and the “☐” icon will light if the water container is full during the drying process.
After the container is emptied, the dryer can be restarted by pressing the "start/pause" button.
- Do not consume the condensate water.
- Do not use the dryer without the water container.
CLEAN THE FILTER DOOR
- Open the door and take our the filter.
- Clean the door filter; wipe off the scrap threads accumulated on the filter.
- Re-install the filter back in the door.

- Open the cover and unscrew both locking levers towards each other.
- Clean the filter base and re-install it.
- Screw both the locking levers and close the cover until it locks into position.

MAINTENANCE (Cont.)
WARNING:
- The fluff accumulated on the filter will block the air circulation, which will cause the extension of drying time and energy consumption.
- Make sure to disconnect the power from the wall socket before cleaning.
- Do not operate this dryer without the filter.
- Clean the filter after each use to prevent lint accumulation inside the dryer.
CLEAN THE HEAT EXCHANGER
- As necessary, every 2 months remove the fluff from the heat exchanger using a sponge or soft brush.
- When doing this, please use gloves
Note: the fluff can be removed more easily if it is first dampened.
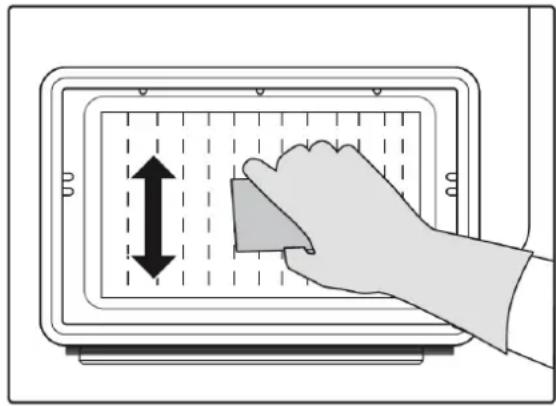
natural_image
Illustration of a hand using a tool to press down an electronic device with a vertical double-headed arrow (no text or symbols)TROUBLESHOOTING
ERROR CODES
| Dispiay | Reason | Solutions |
| "E32" | Humidity sensor error | Please contact your local service center if the problem persists |
| "E33" | Temperature sensor error |
TROUBLESHOOTINTING GUIDE
Use the below list to identify if your clothes dryer is having any issues and to identify and solve any problems. If you cannot solve the problem, contact our call centre on 1300 296 699.
| PROBLEM SOLUTION | |
| Display does not turn on | Check if the power supply is plugged inCheck the selected programmePress the On/Off button |
| “” is flashing | Empty water ContainerIf the light is still on, call customer service. |
| “” is flashing | Clean heat exchangerClean lint filter |
| Dryer does not start | Check the door is closed properlyCheck if the programme has been setCheck if the start button has been pressed. |
| Degree of dryness was not reached or drying time is too long | Clean lint filter and heat exchangerEmpty Water ContainerCheck drain hoseWhere the dryer has been installed is too restricted and may not have enough ventilation.Clean the moisture sensorsKeep the air inlet cleanUse higher drying intensity level programme or time programme. |
SPECIFICATIONS
| Power Supply 220-240V ~ 50Hz | |
| Rated Power 650W | |
| Refrigerant R134a | |
| Quantity of Refrigerant 280g | |
| Grade of Waterproof IPX4 | |
| Dryer Type Condensing | |
| Motor Power 120W | |
| Rated Current 4.5A | |
| Drying Capacity 7kg | |
| Weights | Net: 51kg |
| Gross: 54kg | |
| Dimensions 595 (w) x 622 (d) x 845 (h) mm | |
NOTE: The rated capacity is maximum capacity, make sure that the dry clothes which are loaded in to the appliance do not exceed the rated capacity each time.
SEIKI™
CUSTOMER HELPLINE:
1300 296 699
DISTRIBUTED BY:
Ayonz Pty Ltd


- INSTRUCTION MANUAL
- CONTENTS
- GENERAL SAFETY INSTRUCTIONS
- IMPORTANT INFORMATION
- ELECTRICAL SAFETY
- WARNING
- GENERAL SAFETY INSTRUCTIONS (Cont.)
- INSTALLATION
- USAGE CONDITIONS AND RESTRICTIONS
- CAUTION
- ITEMS BELOW ARE NOT SUITABLE FOR DRYING. IT CAN CAUSE FIRE IN THE APPLIANCE OR EXTENSIVE DAMAGE. DO NOT PLACE FOLLOWING IN THE APPLIANCE
- PRODUCT OVERVIEW
- PRODUCT OVERVIEW (Cont.)
- On/Off
- Start/Pause
- Specialty function
- Display
- Programmes
- GETTING STARTED
- LEVELLING THE APPLIANCE
- INSTRUCTIONS
- CAUTION!
- LOADING THE DRYER
- OPERATION
- OTHER FUNCTIONS
- Delay
- OPERATION (Cont.)
- Time
- Intensity
- Lamp
- Signal
- Anti-Crease
- My Cycle
- Child Lock
- MAINTENANCE
- CLEANING AND CARE
- EMPTY THE WATER CONTAINER
- WARINING:
- CLEAN THE FILTER DOOR
- MAINTENANCE (Cont.)
- WARNING:
- CLEAN THE HEAT EXCHANGER
- TROUBLESHOOTING
- TROUBLESHOOTINTING GUIDE
- SEIKI™
Brand : Seiki
Model : SC-70AU9DRHPC
Category : Tumble dryer