
SC-45AU6DR - Tumble dryer Seiki - Free user manual and instructions
Find the device manual for free SC-45AU6DR Seiki in PDF.


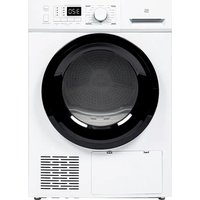
| Product Type | Tumble Dryer |
| Brand | Seiki |
| Model | SC-45AU6DR |
| Installation Type | Freestanding |
| Dimensions (Height x Width x Depth) | 85 cm x 60 cm x 60 cm |
| Weight | 30 kg |
| Power Supply | 220-240 V, 50 Hz |
| Power Consumption | 2000 W |
| Drying Capacity | 8 kg |
| Drying Programs | Cotton, Synthetics, Delicates, Time Dry, Quick Dry |
| Drying System | Condenser (Vented) |
| Sensor Drying | Yes |
| Anti-Crease Function | Yes |
| Lint Filter | Removable, washable |
| Condenser Cleaning | Accessible, requires periodic cleaning |
| Water Tank | External drainage optional |
| Control Type | Electronic display with dial and buttons |
| Delay Start | Yes (up to 24 hours) |
| Child Lock | Yes |
| Safety Features | Overheat protection, door lock |
| Spare Parts Availability | Replaceable drum belt, heating element, door seal |
| Repairability Index | Moderate; user-serviceable filters |
| Manual Included | Yes (20 pages, PDF available) |
Frequently Asked Questions - SC-45AU6DR Seiki
User questions about SC-45AU6DR Seiki
0 question about this device. Answer the ones you know or ask your own.
Ask a new question about this device
Download the instructions for your Tumble dryer in PDF format for free! Find your manual SC-45AU6DR - Seiki and take your electronic device back in hand. On this page are published all the documents necessary for the use of your device. SC-45AU6DR by Seiki.
USER MANUAL SC-45AU6DR Seiki
natural_image
Line drawing of a washing machine with circular vent and side slots (no text or symbols)INSTRUCTION MANUAL
MODEL: SC-45AU6DR
CONTENTS
| General | Safety | 4 | ||
| Product | Overview | 8 | ||
| Getting | Started | 10 | ||
| Instructions | 13 | |||
| Operation | 14 | |||
| Other | Useful | Information | ||
| FAQS | 16 | |||
| Specifications | 17 | |||
| Customer | Helpline | 20 |
GENERAL SAFETY INSTRUCTIONS
IMPORTANT INFORMATION
Read this manual thoroughly before you start using the Clothes Dryers.
The safety precautions instructions reduces the risk of fire, electric shock and injury when correctly complied to.
Please follow all instructions and take notice of all warnings.
Pay close attention to messages that follow this safety alert symbol or the words DANGER, WARNING or CAUTION. These words will be used to alert you of potential hazards that and injure you and others. Following these instruction will tell you how to reduce the chance of injury and the possible dangers if instructions aren't followed.
ELECTRICAL SAFETY
- Voltage: Plug the appliance to a 220-240V, 50Hz, properly earthed power outlet, it must be in good working order.
- Power connection: Do not use an adaptor or an extension cord.
Plug the power plug directly into a separate power point that cannot be accidentally turned off, and that is easily accessible so you can switch it off if needed. - Power cord: Do not kink or damage the power supply cord. Make sure it is behind the appliance so no one can step on or place anything on the power supply cord or against it. A damaged power plug may overheat and cause a fire.
- Damaged cord: Do not use a cord that shows cracks or damage. Any damage to the cord may cause a short circuit, fire and/or electric shock. Contact our support centre on 1300 296 699 for advice
- Disconnection: Never pull the power cord to unplug appliance. Grip the plug and pull straight out from the power point. After turning the device off, wait at least 2 minutes before turning the appliance back on again.
- Electrical work: If the installation of this appliance requires any electrical work, make sure it is carried out by an electrician.
WARNING
Make sure your home is fitted with a residual current device (Safety Switch).
GENERAL SAFETY INSTRUCTIONS (Cont.)
To reduce risk of fire, electric shock or injury, always follow these basic precautions and accident prevention measures when using this appliance, including the below:
INSTALLATION
- The product is heavy, be careful when moving it. To avoid back or other injury, have 2 people lift or mechanical aid when installing.
- When unboxing, thoroughly inspect the appliance carefully for any damage. If there is any damage, do not install the appliance. Contact our support centre on 1300 296 699 for advice.
- While installing the appliance make sure that the power cord is not bent or flattened.
• Install appliance on a flat level and stable ground. - Do not install appliance in a tight fitted cabinet.
- Do not install appliance near other heat sources such as radiators, heaters or direct sunlight.
- If not wall mounted, be sure that the appliance is not placed on any soft materials such as plastics or foams.
WARNING
Make sure that transport packaging is removed from the rear of the dryer. Do not overload the dryer with too many clothes.
GENERAL SAFETY INSTRUCTIONS (Cont.)
USAGE CONDITIONS AND RESTRICTIONS
- Supervision over children is to ensure that they do not play with the appliance. Never allow them to use, play with or crawl inside the appliance. Cleaning and maintenance must not be done by children.
- This appliance is not to be used by persons (including children) with reduced physical, sensory or mental capabilities, or lack of experience and knowledge, unless they are being supervised or been given instructions on how to use of the appliance in a safe way and understand the hazards with using this appliance incorrectly.
- Do not block any ventilation openings. Ensure that vents are not covered by anything.
- Do not use this product for anything other than its intended purpose, and only use it as described in this manual. Do not attempt to alter or modify this appliance.
- Only load items that are suitable for the clothes dryer.
- Do not place any open source flames on the dryer such as candles, etc..
- The door/window will be hot after a long cycle, be sure not to touch the window and to keep children away from the appliance.
- Never stop the clothes dryer before the cycle finishes, the last stage of the cycle is a drying mode without heat to ensure items are left at a temperature that will not damage them.
- The only part that can be changed is the filter, other than this nothing else in the dryer contains user serviceable parts. Do not open, disassemble or try to repair the appliance yourself. Only have this appliance serviced by a qualified technician.
- Incorrect use can result in property damage, injury or death. We assume no liability for misuse of the appliance or noncompliance with these instructions.
WARNING
Never try to repair, modify or replace any part of the appliance, unless this manual says you can do so. All other servicing is to be done by a qualified technician, or contact our support centre on 1300 296 699 for advice.
GENERAL SAFETY INSTRUCTIONS (Cont.)
CAUTION
ITEMS BELOW ARE NOT SUITABLE FOR DRYING. IT CAN CAUSE FIRE IN THE APPLIANCE OR EXTENSIVE DAMAGE. DO NOT PLACE FOLLOWING IN THE APPLIANCE
- Items containing rubber or foam like rubber or any other similar textured materials.
- Items that are spotted or soaked with cooking oil or any other flammable items. These other items include kerosene, stain removers, dry-cleaning solvents, alcohol, petrol, turpentine, waxes, hair care products, wax removers.
- Washing the items vigoursly beforehand in hot water with extra detergent will reduce, but not completely eliminate the hazard.
- Undergarments that contain metal reinforcements (such as underwire bras). Plastic articles such shower caps and waterproof bibs.
- Rubber-backed articles, clothes with foam rubber pads, pillows, galoshes and rubber coated tennis shoes.
- Fabric softeners or similar products unless recommended by product manufacturer for use in a clothes dryer.
- WARNING: Never stop a dryer before the end of the drying cycle unless all items are quickly removed and spread out so that the heat is dissipated.
CAUTION
- Do not use the tumble dryer if industrial chemicals have been used for cleaning.
- Do not dry unwashed items in the dryer.
- Do not allow lint to accumulate around the tumble dryer. Clean the Lint Trap and Filter after every use.
- Enough ventilation has to be provided to avoid the backflow of gases into the room from appliances burning other fuels including open fires.
- Remove all objects from pockets such as lighters and matches.
If it is unavoidable that fabrics that contain vegetable or cooking oil or have been contaminated by hair care products be placed in a tumble dryer they should first be washed in hot water with extra detergent - this will reduce, but not eliminate the hazard.
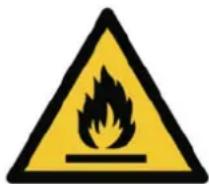
WARNING: Risk of fire
This symbol alerts you to take care as oil-affected items can ignite, especially when exposed to heat, such as in a clothes dryer. The items become warm, causing an oxidation reaction in the oil. Oxidation causes heat. If the heat cannot escape, the items can become hot enough to catch fire. Piling, stacking or storing oil-affected items can prevent heat from escaping and so it will create a fire hazard.
PRODUCT OVERVIEW


PRODUCT OVERVIEW (Cont.)
CONTROL PANEL
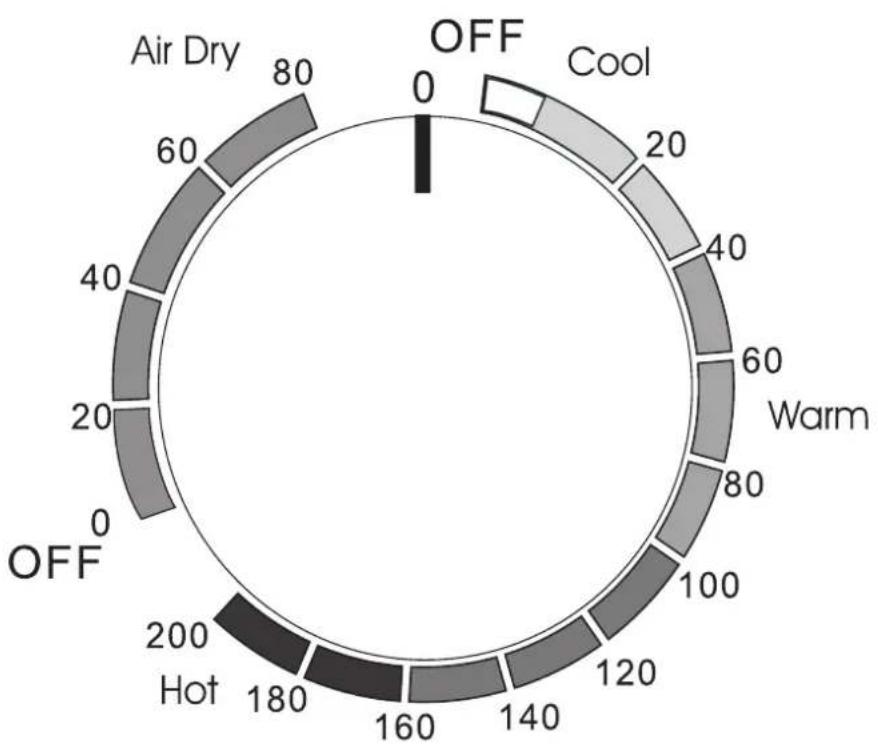
radar
| Condition | Value | |---|---| | Air Dry | 80 | | Cool | 20 | | Warm | 40 | | Hot | 180 | | Off | 0 | | 160 | 160 | | 140 | 140 | | 120 | 120 | | 100 | 100 | | 80 | 80 | | 60 | 60 | | OFF | 0 |
half heat full heat
Heat Selector Knob
AIR DRY: This function runs with cool air, primarily to air items that require freshening i.e.: clothes that have been stored for a long time.
OFF: When the "Drying Timer" is on the "Off" position no power is supplied to the unit. As soon as the dial is turned clockwise to the desired program the dryer will start.
COOL: This function is generally used to cool the items that have just been dried. This helps to prevent creasing. Instead of the motor pushing heat into the drum of the dryer it will generate cool air.
WARM: Anti-Wrinkle function: This is used for items that are difficult to iron i.e.: cotton shirts and linen. Using the heat selector knob choose "Half Heat". Set the drying timer to knob between 30-60 minutes depending the amount of items in the dryer. Once the timer stops the items will still contain moisture, making the ironing process easier.
HOT: For drying large quantities or bulky items (dryer drum is more than 1/2 full). Select the "Full Heat" option and set the timer for more than 150 minutes.
GETTING STARTED
Before installing your appliance, read all safety instructions in this manual, especially the sections on electrical safety and installation.
INSTALLATION
- This clothes dryer can be installed on the floor (as supplied), or wall mounted.
- This appliance can not be installed behind a lockable door, sliding or a door with a hinge on the opposite of the clothes dryer. In all ways that full opening of clothes dryer door is strictly not allowed.
- Make sure that all electrical connections are made by qualified technicians and all instructions in this manual are observed.
- Place the dryer in a dry, well ventilated area, away heat and direct sunlight.
- Exhaust air must not be discharged into the flue which is used for exhausting fumes from appliances burning gas or other fuels.
- Make sure to allow 10cm of spacing behind the dryer to the wall.

NOTE: The Dryer will not work correctly unless it is positioned perfectly level.
- Do not place the back of the dryer near curtains.
- Do not place the dryer near gas or flammable areas.
- Do not install the dryer in a place that can easily be reached by rain
GETTING STARTED (Cont.)
WALL MOUNTING INSTRUCTIONS
- Ensure that the wall can adequately support the weight of the dryer.
- Ensure all fasteners used for wall mounted are of the correct type and can support the weight of the dryer and load.
- If wall mounting above a washing machine make sure there is enough room for the lid to open.
- Allows 5-10cm ontop of the dryer for ease of installation if you are installing the appliance near the ceiling.
- If wall mounting dryer onto a plasterboard wall, make sure the brackets are securely fitted to a timer stud, if the space between the studs is too wide, fit a timber slat between the studs. (if using a timber slat, ensure you fit a secondary slat at the bottom to align bottom spaces of the wall).
- If mounting to a masonry wall, use the correct anchoring bolts of a least a minimum size of 8 × 40 ~mm .
The below instruction will guide you on the measurements needed to drill the holes, the positioning of the hooks and support parts.
| Tools required | ||
| Tools & parts required for Plaster/ wooden wall | Drill & 3mm Bit | 1 |
| Philips Head Screw Driver | 1 | |
| Wood Screws, 12G x 8 50mm Timber Screws | ||
| Helper to lift dryer onto wall | 1 | |
- Determine dryer position on the wall and mark required bracket position. The distance to mark between each bracket hole is 554 mm. (refer to figure 1)
- Fix the wall hanging brackets (2 supplied) to the wall securely (into the stud/timber slat). Fit a timber slat between the studs to mount the brackets onto the stud if position is too wide.

Fig. 1


**Wall mounting continues on next page.
GETTING STARTED (Cont.)
- Install exhaust pipe: Adjust the direction of the exhaust outlet either vertically or horizontally. Use the small screws to secure the exhaust duct. As per fig.2.
Fig. 2

natural_image
Close-up of a white mechanical component with a metallic knob and lever, mounted on a plain surface (no text or symbols visible)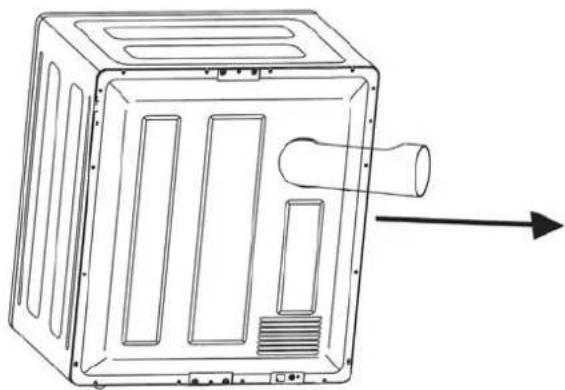
natural_image
Technical line drawing of a rectangular device with internal compartments and a cylindrical component, showing an arrow indicating direction (no text or symbols)
natural_image
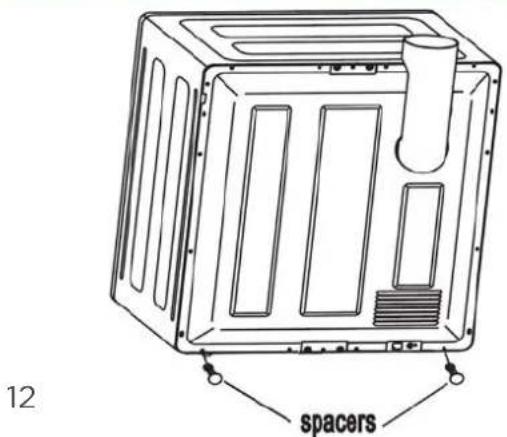
Line drawing of a rectangular device with internal compartments and a cylindrical component, showing an upward arrow (no text or symbols)- Fix the 2 bottom spacers. 5. With assistance, mount dryer on the wall
Fig. 3

natural_image
Close-up of a kitchen sink with a white plastic clip and metallic fixtures (no visible text or symbols)by aligning the hooks of the brackets with the slots on the top rear of the dryer.

natural_image
Close-up of a metal door with attached metal bracket and circular buttons (no visible text or symbols)INSTRUCTIONS
CAUTION!
Make sure you read all safety precaution in this manual that cause a hazard if placed in the clothes dryer.
LOADING THE DRYER
- Before loading the dryer, check that none of the clothes you are inserting into the dryer have any symbols anywhere on them. These symbols indicate that there are not suitable for clothes drying.

Dry flat

Dry in the shade

Do not tumble dry

Hang to dry

Drip dry
- Make sure none of the items you are putting into the dryer have no combustible materials or foreign objects (such as coins, hair pins or lighters). Be sure to empty pockets of everything before putting into the dryer.
- Clean the filter before each use and make sure its properly back in palce.
- To avoid items getting tangled in the dryer which can reduce drying performance, please insert items into the dryer one at a time.
- Turn items with cippers inside out and fasten buckles, as this will help to reduce impact noise with items hitting the drum while spinning.
- Make sure to check items for stains before inserting into the dryer, as drying can permanently set stains.
- As you dry large blankets or sheets from time to time open the dryer door take out the blanket or sheet and give it a shake then place back into the dryer. This will help larger items with drying process.
WARNING: Do not overload the dryer, maximum amount of items that can be dried in one load is 4.5kg.
- Make sure only items that have been washed and are still we are placed in the dryer, no items that are dry are to be placed in.
- Be sure when closing the dryer door that not items are jammed in the door.
- Do not add items to the dryer while it is operating.
OPERATION
DRYING CLOTHES
| Drying Capacity | Dry time | |
| Full heat | Half heat | |
| Approx.1kg | Approx.30min | Approx.55min |
| Approx.2kg | Approx.60min | Approx.110min |
| Approx.3kg | Approx.120min | |
| Approx.4kg | Approx.200min | |
Drying times is affected by many different factors, such as the type of materials used in the clothing, bulkiness of the items and how full the dryer is, etc...
OTHER USEFUL INFORMATION
REMOVING THE FILTERS
Remove by pulling outwards, inserted into the four holes around the exhaust vent shroud. The filter is in 3 parts: Exhaust vent Shroud, lint filter and exhaust filter.

flowchart
graph LR
    A["Exhaust vent shroud"] --> B["Exhaust Filter"]
    B --> C["Lint filter"]
    C --> D["Figure 1"]
CLEANING THE FILTERS
Seperate the 3 filters, Clean the lint on the lint filter and exhaust filter with a soft brush of vacuum cleaner, be careful to not damage the filters.

RE-INSTALLING THE FILTERS
After cleaning, assemble in the exact order as below to go back into the dryer, align the recesses in the centre with centre of the drum. Make sure it is firmly inserted as shown in the figure below)

flowchart
graph LR
    A["Circular Component"] --> B["Segmented Wheel"]
    B --> C["Rotated Wheel"]
    C --> D["Figure 3"]
NOTE:
The filter fixed in the bottom of the drum should also be cleaned with a soft brush.
FAQS
TROUBLESHOOTINTING GUIDE
Use the below list to identify if your clothes dryer is having any issues and to identify and solve any problems. If you cannot solve the problem, contact our call centre on 1300 296 699.
| PROBLEM POSSIBLE CAUSE SOLUTION | ||
| No response from buttons | Power plug inserted correctly? | Ensure that the power plug is firmly connecting into the power socket. |
| The drum is not turning | Is the door closed correctly?Is the power plug firmly connected?Does the power socket have power? | Close the door.Insert the plug correctly.Check with another appliance to see if power is running to socket. |
| The load did not dry correctly | Too much washing in the dryer?Were the items added mid drying cycle?Has the washing been twisted while drying? | Check and clean the filtersReduce the amount of washing in the dryer.Untwist the items and dry them for a little longer. |
| The Dryer isnt starting | No power?Is the power plug in correctly?Is the door closed?Have you selected a program?Is the power switched on at the wall? | Check and try again when the power is back.Insert the power plug firmly.Closed the door correctly.Set a drying program.Switch on power at the wall. |
SPECIFICATIONS
| Dimensions 595 x 438 x 671 mm | |
| Weight 20kg | |
| Rated Input Power 220-240V ~ 50Hz / 1200W | |
| Rated Volume of Dryer 4.5kg (dry clothes) | |
NOTE: The rated capacity is maximum capacity, make sure that the dry clothes which are loaded in to the appliance do not exceed the rated capacity each time.

CUSTOMER HELPLINE:
1300 296 699
DISTRIBUTED BY:
Ayonz Pty Ltd


- INSTRUCTION MANUAL
- CONTENTS
- GENERAL SAFETY INSTRUCTIONS
- IMPORTANT INFORMATION
- ELECTRICAL SAFETY
- WARNING
- GENERAL SAFETY INSTRUCTIONS (Cont.)
- INSTALLATION
- USAGE CONDITIONS AND RESTRICTIONS
- CAUTION
- ITEMS BELOW ARE NOT SUITABLE FOR DRYING. IT CAN CAUSE FIRE IN THE APPLIANCE OR EXTENSIVE DAMAGE. DO NOT PLACE FOLLOWING IN THE APPLIANCE
- PRODUCT OVERVIEW
- PRODUCT OVERVIEW (Cont.)
- GETTING STARTED
- GETTING STARTED (Cont.)
- WALL MOUNTING INSTRUCTIONS
- INSTRUCTIONS
- CAUTION!
- LOADING THE DRYER
- OPERATION
- DRYING CLOTHES
- OTHER USEFUL INFORMATION
- REMOVING THE FILTERS
- CLEANING THE FILTERS
- RE-INSTALLING THE FILTERS
- NOTE:
- FAQS
- TROUBLESHOOTINTING GUIDE
- SPECIFICATIONS
Brand : Seiki
Model : SC-45AU6DR
Category : Tumble dryer