
DSF1645B - Household Fan Defy - Free user manual and instructions
Find the device manual for free DSF1645B Defy in PDF.


| Product Type | Stand fan (domestic use) |
| Model | DSF1645B |
| Brand | Defy |
| Power Supply | 220-240V~, 50 Hz |
| Wind Modes | Normal, Natural, Sleep, Smart |
| Wind Speed Levels | 4 speeds (Normal mode: 6 speeds) |
| Timer | Up to 8 hours (1, 2, 4, 8 hours) |
| Oscillation | Yes (left-right) |
| Remote Control | Yes (with batteries: 2x 1.5V AAA, not included) |
| Safety Feature | Touch Stop Sensor (fan stops when guard is touched) |
| Height Adjustment | Yes (via internal pole and height adjustment ring) |
| Tilt Adjustment | Yes (manual tilt up/down) |
| Fan Diameter | Approx. 16 inches (40 cm) - standard size |
| Weight | Approx. 4 kg (estimation for standing fan) |
| Dimensions (approx.) | Height: 120-140 cm, Base diameter: 35 cm |
| Cleaning | Wipe exterior with damp cloth; do not immerse |
| Warranty | 2 years (conditions apply) |
Frequently Asked Questions - DSF1645B Defy
User questions about DSF1645B Defy
0 question about this device. Answer the ones you know or ask your own.
Ask a new question about this device
Download the instructions for your Household Fan in PDF format for free! Find your manual DSF1645B - Defy and take your electronic device back in hand. On this page are published all the documents necessary for the use of your device. DSF1645B by Defy.
USER MANUAL DSF1645B Defy
natural_image
Line drawing of a standard 16-inch standing fan with a vertical post and control panel (no text or symbols)Read this manual before operation of the appliance!
Dear Customer,
Congratulations on the purchase of your new Defy appliance!
Please read this manual carefully before using your appliance for the first time and then store it within easy reach for future reference. We trust you will enjoy years of trouble free use.
The user manual:
- This manual will provide you with information on how to safely operate and care for your appliance in order that you gain the maximum benefit from it.
- Pay particular attention to any safety instructions.
Controls and parts


The manufacturer strives for continuous improvement. For this reason, technical specifications, text and illustrations in this manual are subject to change without notice.
Figures in this manual are schematic and may not match your appliance exactly.
1 Safety and set-up
Please read this instruction manual thoroughly prior to using this appliance! Follow all safety instructions in order to avoid damages due to improper use! Keep the instruction manual for future reference. Should this appliance be given to a third party, then this instruction manual must also be handed over.
- This appliance is intended for private domestic use only. It should not be used for commercial use.
- Do not touch any moving parts of the appliance. Do not attach or remove the parts until the appliance comes to a complete stop.
• Always keep hair, clothing and any other utensils away from the appliance during operation in order to prevent injury and damages. - Check if the mains voltage on the rating label corresponds to your local mains supply. The only way to disconnect the appliance from the mains is to pull out the plug.
- Do not wrap the power cord around the appliance.
- If the supply cord is damaged, it must be replaced by manufacturer or its service agent or a similarly qualified person in order to avoid a hazard.
• To protect against the risk of electrical shock, do not immerse the unit, cord or plug in water or other liquid. -
When the appliance is not in use and before cleaning, unplug the appliance from the outlet.
-
Do not immerse the appliance, power cord or power plug in water or in other liquids.
- Do not squeeze or bend the power cord and do not rub it on sharp edges in order to prevent any damage.
- Keep the cord away from hot surfaces and open flames.
- When the fan was assembled, the rotor blade guard shall not be taken off anymore
• Prior cleaning unplug the fan. - The rotor guard shall not be dissembled/opened to clean the rotor blades.
- Wipe the fan enclosure and rotor blade guard with a slightly damp cloth.
- Never insert fingers, pencils, or any other object through the grille when fan is running.
- Do not use an extension cord with the appliance.
- Never use the appliance if the power cord or the appliance is damaged.
- Our Household Appliances meet applicable safety standards, thus if the appliance or power cord is damaged, it must be repaired or replaced by the dealer, a service centre or a similarly qualified and authorized service person to avoid any dangers. Faulty or unqualified repair work may cause danger and risks to the user.
- Do not dismantle the appliance under any circumstances. No warranty claims are accepted for damage caused by improper handling.
- Disconnect fan when moving from one location to another
Safety and set-up
- This appliance is not intended for use by persons (including children) with reduced physical, sensory or mental capabilities or lack of experience and knowledge, unless they have been given supervision or instruction concerning the use of the appliance by a person responsible for their safety.
- Children should be supervised to ensure that they do not play with the appliance.
- Before using the appliance for the first time, carefully clean parts which come into contact with food. See details in the “Cleaning and Care” section.
- Never place the appliance, attachments, power cord or plug on hot surfaces such as gas or electric burners or hot oven surfaces.
- Avoid contact with moving parts.
- Do not use the appliance for anything other than its intended use.
- Never use the appliance with damp or wet hands.
• Make sure that there is no danger that the power cord could be accidentally pulled or that someone could trip over it when the appliance is in use. - Position the appliance in such a way that the plug is always accessible.
- Do not use outdoors.
- Be sure fan is on a stable surface when operating to avoid overturning.
- DO NOT use fan in window, rain may create electrical hazard.
• Household use only. - Save these instructions.

The manufacturer strives for continuous improvement. For this reason, the text and illustrations in this manual are subject to change without notice.
If the appliance is damaged in any way do not use it. Report the damage to your dealer who will take the necessary corrective action.
Please register your product at
www.defy.co.za
DEFY APPLIANCES (PTY) LTD
P.O.BOX 12004
JACOBS
DURBAN
4026
SOUTH AFRICA
Assembly of chassis & column unit
- Unscrew the 7-shape Bolt from the Extension Pole. (Fig.1)
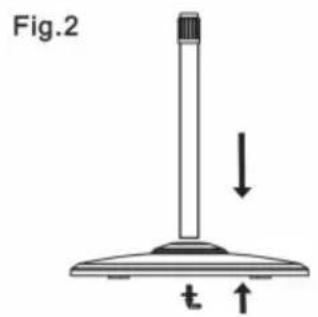
- Insert the extension pole into the chassis and tighten the 7-shape Bolt (Fig.2)
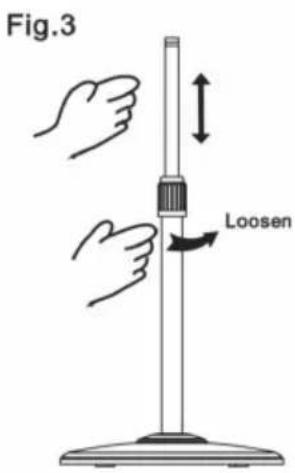
- From the extension pole loosen the height adjustment ring and adjust the internal pole to the desired height. (Note: If you can't find the internal pole, it must inside the extension pole. You can pull it out from the extension pole.) (Fig.3)
- To attach the head unit to the internal pole, loosen the thumb screw on the bottom of the head unit. Place the head unit on the internal pole and tighten the thumb screw in alignment with the groove on the internal pole. (Fig.4)
CAUTION: Height adjustment ring must be fully fastened before the assembly of the motor section to the internal pole.


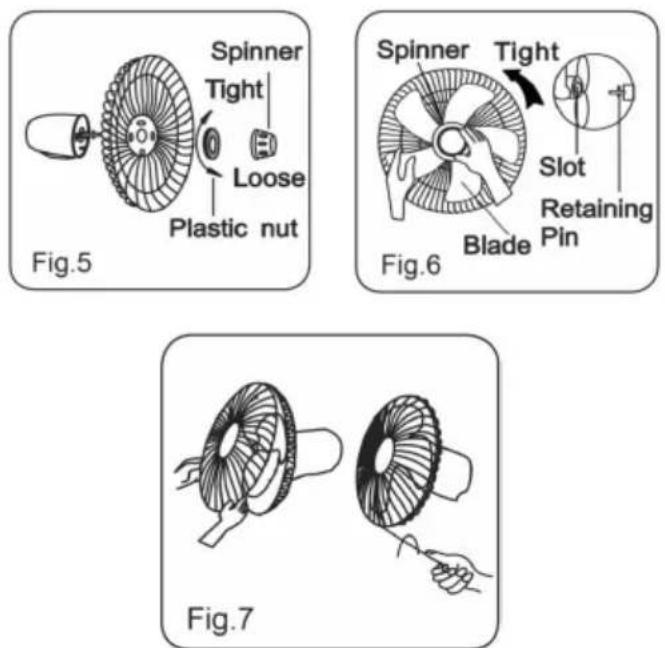
- Unscrew the spinner clockwise (or take the spinner out from the bag) and the plastic nut counter clockwise to remove both. Fix the rear grill to the motor then tighten the plastic nut. (Fig. 5)
- Insert the blade onto the shaft, and make sure the rotor shaft pin is fitted into the groove of the blade. Turn the spinner counter clockwise to tighten the blade. (Fig. 6)
- Fasten the front grill and the rear grill by means of the grill clip and then tighten the fan grill locking screw and nut. (Fig. 7)
Control panel
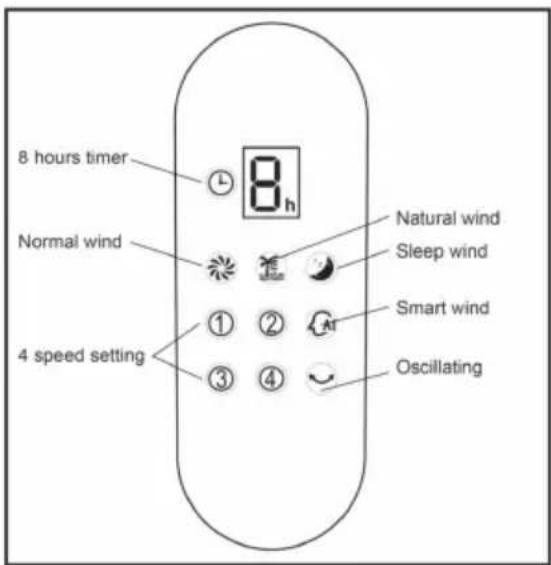
On the control panel, there are five buttons to operate the fan. (See Fig.8)

Power Button
Once plugged in, pressing this button will switch the fan on, and pressing it again will turn the fan off.
Wind Speed Button
When the fan starts, pressing this button will change the wind speed in the according to the following sequence "1-2-3-4".
Wind mode button
This button is provided to select air supply mode, and if pressed repeatedly, wind type will change cyclically in the sequence of "Normal wind - Natural wind - Sleep wind - Smart wind". A corresponding indicator on the screen will display the current fan mode. The four wind modes have the following features:
Normal wind: The fan will deliver wind constantly according to the wind speed level set by the wind speed button. There are six speeds.
Natural wind: The fan will simulate natural wind according to the pre-set program, and the delivered wind speed will change based on the program, giving users a fresh and natural wind type effect. There are three speeds.
Sleep wind: The fan will simulate natural wind according to the pre-set program with three wind speeds. The delivered wind is light and soft.
Smart wind: Based on current fan speed and room temperature, when this mode is selected the fan speed automatically increases or decreases if the room temperature increases or decreases 0.5^ C, until maximum or minimum fan speed is achieved.
DISPLAY
When room temperature falls below 20^ C, the fan will stop running and the "Smart" icon in the display area will keep flashing, once room temperature reaches or surpasses 20^ C, the fan will automatically resume running.
Note: These are features designed for your comfort and are not a malfunction.
OSC button
Press this button to oscillate the fan left and right and corresponding indication is showed on the control panel. To stop the fan from oscillating in the position desired, press this button again.
Timer button
Press this button repeatedly to set the fan to automatically shut off after a selected number of hours in the sequence of "1-2-4-8." Do not press this button if you want the fan to run continuously.
After the timer is set, the timer display will indicate in how many hours the fan will shut off, in the sequence of "8-4-2-1." For example, if you set timer for eight hours, after one hour, the display will still indicate "8h," however, after four hours, the display will change to "4h," etc.

Caution: The fan has a Safety Touch Stop Sensor function. This feature is designed to protect children. If the guard is touched then the fan will stop. This is a safety feature of the unit, and is not a malfunction.
Buttons such as Power (☐), Wind Speed (☒), Wind MODE (☐), OSC (☐), and TIMER (☐) on the remote control have the same functions as corresponding buttons on the unit.

natural_image
Line drawing of a remote control device with six function buttons (flower, power, smile, clock, refresh) on the screen (no text or symbols)Fig. 9
Remote Control Operation
(1) Point the remote control at the control panel and press the desired button.
(2) Make sure that the emitter at the front of the remote control is aligned with the receiving window
(3) Avoid having direct sunlight shine on to the control panel. This may affect the functionality of the remote control.
Batteries
(Batteries not included)
(1) Slide off the battery compartment cover located at the back of the remote control.
(2) Insert the batteries, and make sure the batteries are placed as shown in Fig.10.
(3) Slide back the battery cover.
NOTE: Use only size "1.5V AAA" manganese or alkaline batteries (Not included).
Do not use rechargeable batteries.
| Do not dispose of batteries in a fire, batteries may explode or leak. | |
| Do not mix old with new batteries. | |
| Do not mix alkaline, standard (carbon-zinc) or rechargeable (nickel-cadmium) batteries. | |
| Pay attention to poles (+ and -) of the batteries. |
Tilt adjustment
To adjust the air flow upward or downward, push the grilles lightly to the desired direction.
Height adjustment
Loosen the height adjustment ring and adjust the internal pole to the desired height. Tighten the ring when the desired height is achieved (See Fig. 3)


natural_image
Line drawing of two hands holding a handheld device with an arrow indicating direction (no text or symbols)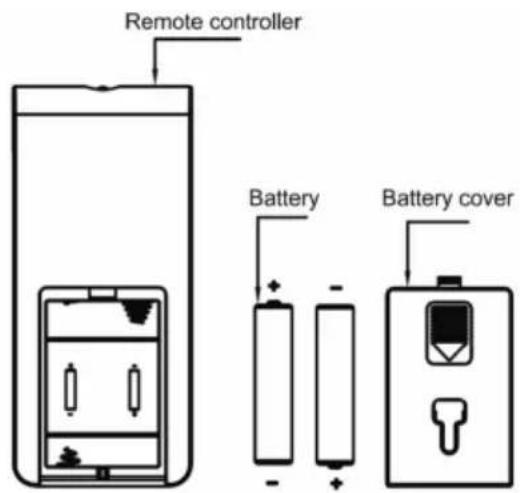
Fig.10 Battery Compartment
4
Maintenance
The fan requires little maintenance. Do not try to fix it by yourself. Refer it to qualified service personnel if service is needed.
- Before cleaning and assembling, the fan must be unplugged.
- To ensure adequate air circulation to the motor, keep vents at the rear of the motor free of dust. Do not disassemble the fan to remove dust.
- Please wipe the exterior parts with a soft cloth moistened with a mild detergent. Thoroughly remove any soap with a dry cloth.
- Do not use any abrasive detergent or solvents to avoid scratching the surface. Do not use any of the following as a cleaner: gasoline, thinners.
- Do not allow water or any other liquid into the motor housing or interior parts.
Environmental note
This appliance has been made from high quality materials and parts which can be reused and are suitable for recycling. Do not dispose of the appliance with normal household waste at the end of its service life. Consult your local authorities for disposal information and facilities available.
Help protect the environment by recycling used appliances.
Technical data
Power supply: 220-240V\~, 50 Hz
Technical and design modifications reserved.
5
Branches
If you have followed the instructions and still have a problem, contact the customer care line on 086 100 3339. They will be able to advise you on any aspect of the appliance.
South African Branches:
BLOEMFONTEIN
Unit Number 5
Monument Business Park
50 Monument Road
Oranjesig, Bloemfontein
Bloemfontein.Service@defy.co.za
CAPE TOWN
5A Marconi Rd. Montague Gardens, 7441
CapeTown.Service@defy.co.za
DURBAN
135 Teakwood Road, Jacobs,
Durban, 4052
Durban.Service@defy.co.za
EAST LONDON
Robbie de Lange Road, Wilsonia,
East London, 5201
EastLondon.Service@defy.co.za
GAUTENG, MIDRAND
127 15th Road, Cnr Pharmaceutical &15th Rd,
Midrand, Gauteng
Gauteng.Service@defy.co.za
POLOKWANE
87 Nelson Mandela Drive, Superbia 0699
Polokwane.Service@defy.co.za
PORT ELIZABETH
112 Patterson Road, North End, Port Elizabeth 6001
PortElizabeth.Service@defy.co.za
Sub-Saharan Africa branches:
ZAMBIA: SOUTHGATE INVESTMENTS LTD
Plot 1606, Sheki Sheki Road
P.O. Box 33681
Lusaka, 10101, Zambia
Tel: +260 0211 242332/3
Fax: +260 0211 242933
sgiservicecentre@microlink.zm
NAMIBIA: ATLANTIC DISTRIBUTORS (PTY) LTD
10 Tienie Louw Street, Northern Industrial Area
P.O. Box 21158, Windhoek, Namibia
Tel: (061) 216162
Fax: (061) 216134
atlantic@mweb.com.na
ZIMBABWE: TRADECOMAFRICA
Trade Com Africa, 183 Loreley Crescent
Msasa, Harare, Zimbabwe
Tel: +263 4 486165/6
Cell: +263 772 469010
Cell: +263 772 469011
BOTSWANA: RAY MORGAN AGENCIES
RMA Service Centre, Plot 48, East Gate
Gaborone International Commerce Park
Kgale View, Gaborone
Botswana
Tel: +267 390 3996 / 390 3912
Fax: +267 318 7376
Cell: +267 7134 6539
service@rma.co.bw; raja@rma.co.bw
SWAZILAND: LYNDS DISTRIBUTORS
P.O Box 716, Mbabane, Swaziland, H100
Tel: (00268) 2515 4310/8
Fax: (00268) 2518 4318
MOZAMBIQUE: COOL WORLD. LDA
This certificate is issued by DEFY APPLIANCES (PTY) LIMITED manufacturers of Defy and Ocean products, hereinafter the Company, to the original purchaser only, of the appliance described on the certificate and shall constitute the only warranty given in respect of this appliance.
The Company warrants to the original purchaser that for a period of TWO YEARS from date of purchase the appliance is free from defect under normal domestic use, both in workmanship and material, subject to the following conditions.
- Carry-in service. Small appliances are repaired in our service centres and are not collected from the customers home. Faulty units must be delivered to the purchasing dealer or to the nearest Company Service Centre for warranty repairs.
- Vitreous enamelware, fuses and lamps are specifically excluded from these warranties. It is an express condition of these warranties that the purchaser takes due care and attention in the use and maintenance of the appliance. Abuse, misuse in conflict with operating instructions, connection to incorrect voltages and subjection to commercial use shall release the Company from its obligations.
- This warranty shall become void and cease to operate if the appliance is dismantled by, or any repairs to the appliance are effected by any persons not duly authorised by the Company, or if substitute parts not approved by the Company are used in the appliance, or if the serial number of the appliance is removed.
- The Company shall not be responsible for damages resulting from fire, flood, civil disturbances or any Act of God. The Company shall not, in terms of these warranties be responsible nor held liable for any consequential loss or damage of any kind caused by or due to the failure or malfunction of the appliance. The Company shall not be responsible for damages caused by insect and/or animal infestation.
- The Company shall not be responsible for transportation or other costs other than those incurred within the provisions of Point 1 of this Certificate.
- For warranties in the Republic of South Africa and Sub-Saharan Africa, please contact your nearest Defy office. Please refer to the previous page for respective South African branches and Sub-Saharan Africa branches.
- Where service is requested under warranty and no fault or defect can be found by the Company, all costs incurred will be for the purchaser's account.
- This Certificate as well as your invoice will serve as proof of purchase. For the purpose of warranty, it will be essential to produce this Certificate and invoice. Failure to do so, will render the purchaser liable for service costs.
KEEP THIS CERTIFICATE AND SALES INVOICE AS PROOF OF PURCHASE FOR WARRANTY PURPOSES.


- Read this manual before operation of the appliance!
- The user manual:
- Controls and parts
- Safety and set-up
- Safety and set-up
- Assembly of chassis & column unit
- Control panel
- Power Button
- Wind Speed Button
- Wind mode button
- OSC button
- Timer button
- Remote Control Operation
- Batteries
- Tilt adjustment
- Height adjustment
- 4
- Maintenance
- Environmental note
- Technical data
- 5
- Branches
- South African Branches:
- BLOEMFONTEIN
- CAPE TOWN
- DURBAN
- EAST LONDON
- GAUTENG, MIDRAND
- POLOKWANE
- PORT ELIZABETH
- Sub-Saharan Africa branches:
- ZAMBIA: SOUTHGATE INVESTMENTS LTD
- NAMIBIA: ATLANTIC DISTRIBUTORS (PTY) LTD
- ZIMBABWE: TRADECOMAFRICA
- BOTSWANA: RAY MORGAN AGENCIES
- SWAZILAND: LYNDS DISTRIBUTORS
- MOZAMBIQUE: COOL WORLD. LDA
- KEEP THIS CERTIFICATE AND SALES INVOICE AS PROOF OF PURCHASE FOR WARRANTY PURPOSES.
Brand : Defy
Model : DSF1645B
Category : Household Fan