
Explore 7 E7EK1-60BP - Kettle ELECTROLUX - Free user manual and instructions
Find the device manual for free Explore 7 E7EK1-60BP ELECTROLUX in PDF.


| Product Type | Electric Kettle |
| Brand | Electrolux |
| Model | Explore 7 E7EK1-60BP |
| Capacity | 1.7 L (max), 0.6 L (min) |
| Power Supply | 220-240 V ~ 50/60 Hz |
| Power Consumption | Not specified |
| Dimensions (W x D x H) | Not specified |
| Weight | Not specified |
| Material | Stainless steel (jug), plastic (base, handle) |
| Temperature Settings | 40°C to 100°C in 5°C increments (40, 45, 55, 60, 65, 70, 75, 80, 85, 90, 95, 100) |
| Functions | Quick boil, variable temperature control, keep warm (up to 40 min) |
| Controls | Start/Stop button, Increase/Decrease temperature buttons, Keep warm button |
| Indicator Lights | LED temperature indicators, Start/Stop button light, Keep warm button light |
| Safety Features | Auto-off, boil-dry protection, thermal cut-out, cool-touch handle, steam-safe lid |
| Filtration | Removable mesh filter |
| Cleaning | Wipe exterior with damp cloth; descale every 3 months with decalcifier |
| Warranty | Not specified |
| Accessories Included | Base unit with mains cable, jug, lid |
| Colors Available | Not specified |
| User Manual Languages | EN, KO, ZH, ID, and others |
Frequently Asked Questions - Explore 7 E7EK1-60BP ELECTROLUX
User questions about Explore 7 E7EK1-60BP ELECTROLUX
0 question about this device. Answer the ones you know or ask your own.
Ask a new question about this device
Download the instructions for your Kettle in PDF format for free! Find your manual Explore 7 E7EK1-60BP - ELECTROLUX and take your electronic device back in hand. On this page are published all the documents necessary for the use of your device. Explore 7 E7EK1-60BP by ELECTROLUX.
USER MANUAL Explore 7 E7EK1-60BP ELECTROLUX
natural_image
Line drawing of a modern electric kettle with control buttons and a brand mark (no text or symbols on the device itself)EN INSTRUCTION BOOK
CNS 说明书
CNT 說明手冊
KR사용 설명서
ID Buku Panduan

Keep Warm

Temperature set

Quick boil
natural_image
Illustration of a water tap being poured into a shared tank (no text or symbols)INSTRUCTION MANUAL
Graphics and drawings in this manual are solely for illustration purposes and are subject to variations from actual product.
Read all instructions carefully before using the appliance for the first time.
Keep this manual for future reference.
COMPONENTS
A. Jug
B. Spout
C. Lid
D. Opening lid button
E. Handle
F. Water level indicator
G. Decrease heat setting button (<)
H. Increase heat setting button (>)
I. Keep warm button
J. Start/Stop button
K. Base and mains cable
SAFETY ADVICE
- This appliance is not intended for use by persons (including children) with reduced physical, sensory or mental capabilities, or lack of experience and knowledge, unless they have been given supervision or instruction concerning the use of the appliance by a person responsible for their safety.
- Keep the appliance and its power cord out of reach of children. Children should be supervised to ensure that they do not play with the appliance.
- Cleaning and user maintenance shall not be performed by children without supervision.
- The appliance can only be connected to a power supply which voltage and frequency comply with the specifications on the rating plate.
- The appliance must only be connected to an earthed mains socket.
- Never leave the appliance unattended while connected to the supply mains.
-
Never use or pick up the appliance if
-
the power cord is damaged, or
- the housing is damaged.
- If the appliance or its power cord is damaged, it must be replaced by Electrolux or its service agent in order to avoid hazard.
- Do not immerse the appliance, its power cord or plug in water or any liquid.
- Do not use or place the appliance on sink, on hot surface, near heat source, or near the edge of table or counter.
• Always place the appliance on a flat, level and dry surface. - Caution: Ensure that the appliance is switched off before removing the kettle from the base.
- Do not move the appliance when it is in operation.
- Never operate the appliance without the lid.
- Warning: Do not open the lid while the water is boiling, or immediately after the water is boiled. Failure to do so may lead to injury due to sudden ejection of steam.
- Position the lid so that steam is directed away from the handle.
- Caution: Do not exceed the maximum filling volume as indicated on the appliance, as there is risk of boiling water splashing out, which may cause scalding or burn.
- Do not operate the appliance without any water in it.
- The kettle is only used for boiling water. Never use the kettle to boil any other liquids.
- The appliance and its accessories become hot during operation. Use only designated handles and knobs. Allow to cool down before cleaning and maintenance.
- Caution: The surfaces around the heater are subjected to residual heat after use.
- The appliance must be switched off and mains plug removed from wall socket each time after use, and before cleaning and maintenance.
-
Warning: The power cord or any object must be kept away from the ON/OFF switch. Do not obstruct the ON/OFF switch. Failure to do so could result in malfunction of auto-off function and risk of fire hazard.
-
Do not let the power cord come into contact with hot surfaces or hang over the edge of a table or counter.
- The kettle can only be used with the base unit provided.
- This appliance is not intended to be operated by means of an external timer or separate remote control system.
• This appliance is for indoor use only. - This appliance is intended for domestic use only. Electrolux will not accept any liability for possible damage caused by improper or incorrect use.
- This appliance is suitable to operate on both 50 and 60Hz.
- CAUTION: In order to avoid a hazard due to inadvertent resetting of the thermal cut-out, this appliance must not be supplied through an external switching device, such as a timer, or connected to a circuit that is regularly switched on and off by the utility.
GETTING STARTED
Before using your appliance for the first time, remove all packing material such as plastics, stickers or tags that may be attached to the components.
Before first use:
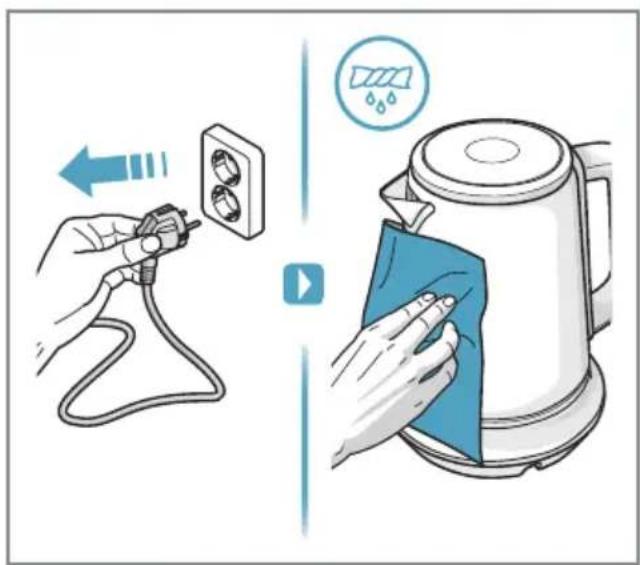
Boil water in the kettle and pour it out. Repeat for 2 or 3 times. This will remove any remaining dust or residues. (See the following steps on how to use the kettle). Wipe the outside of the kettle with a damp cloth.
USING THE PRODUCT
- Place the base unit on a firm and flat surface. Plug the mains plug into a wall socket.
- Press the open lid button to open the lid. Fill the kettle with fresh tap water to the desired level (E7CK1-Min. 0.6 L - Max. 1.25 L, E7EK1-Min. 0.6 L - Max. 1.7 L).
- Close the lid and make sure that it snaps in correctly. Place the kettle on the base. The kettle is now in stand-by mode.
Quick boil water:
- From stand-by mode, press the Start/Stop button. The heating will start. The Start/Stop button will be illuminated and the 100 degree LED will blink slowly.
- As the water temperature rises, the temperature LEDs will be illuminated. The 100 degree LED will continue to blink slowly.
- When the temperature (100°C) is reached, all of the temperature LEDs will be illuminated. The Start/Stop button light will turn off, and you will hear three short beeps.
- After the heating is turned off, the temperature of the water will begin to decrease. The temperature LEDs will indicate the current temperature.
- When the water is cold ( <40^ C), all of the lights will turn off. This indicates that the kettle is stand-by mode.
Set temperature and heat:
- From stand-by mode, press either the increase or decrease heat setting buttons (< or >). If pressing the decrease button, the 100^ C will light up first. If pressing the increase button, the 40^ C LED will light up first.
- Continue pressing the increase or decrease buttons until the desired temperature setting is reached.
- Press the Start/Stop button. The chosen temperature LED will start blinking slowly, and the Start-Stop button will be illuminated. Heating starts.
- As the water temperature rises, the temperature LEDs will be illuminated. The selected degree LED will continue to blink slowly.
- When the temperature is reached, all of the temperature LEDs below the selected setting will be illuminated. The Start/Stop button light will turn off, and you will hear three short beeps.
- After the heating is turned off, the temperature of the water will begin to decrease. The temperature LEDs will indicate the current temperature.
- When the water is cold ( <40^ C), all of the lights will turn off. This indicates that the kettle is stand-by mode.
Note: If you do not press Start/Stop within 10 seconds after making your temperature setting selection, the kettle will revert to stand-by mode.
Note: The target temperature may be changed at any time during any heating function. While heating, simply press the increase or decrease buttons accordingly.
Keep warm function:
- This kettle can maintain your target temperature for up to 40 minutes.
- Press start and select your target temperature, then press the Keep warm button. The button will remain illuminated while the function is activated.
- To turn off the function, press the keep warm button at any time while it is illuminated. It will also turn off automatically after 40 minutes.
Note: If you press the Start/Stop button while the keep warm mode is active, the KEEP WARM button turns off and the kettle starts heating at 100 degrees.
To cancel heating:
- You may cancel the heating function at any time by pressing the Start/Stop button (Boiling water mode only). Under heating and keep warm modes, by pressing the Start/Stop button, the kettle will go into keep warm mode at current temperature.
CAUTION: Keep enough water on the minimum water level (0.6L).
Note: If the Preset temperature is set to 100 °C , the keep warm function will be unavailable.
CLEANING AND CARE
- Before cleaning, always unplug the appliance. Wipe the outside of the kettle with a damp cloth. Occasionally rinse out the kettle with clean water. Warning! Never immerse the housing, plug, or cord in water or any other fluid.
- To clean the mesh filter, grab the mesh filter and lift it out. Rinse under clean, running water, and insert it back into the kettle in the correct orientation. To clean the base plate, you may use a stainless steel cleaning product to clean the metal of the base plate.
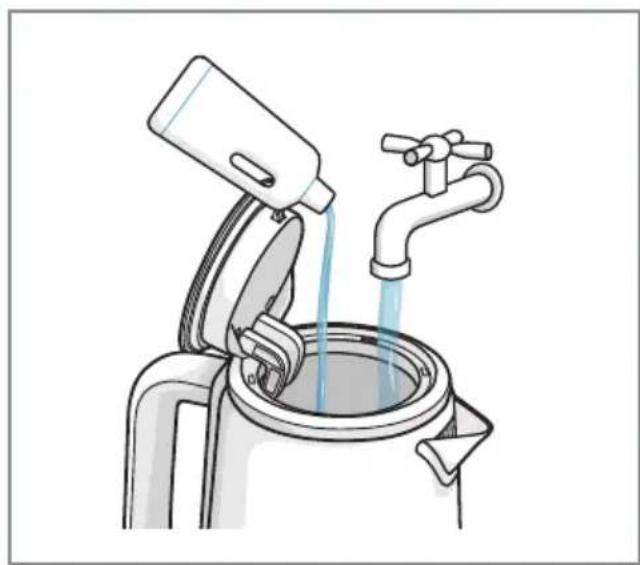
- Decalcifying is recommended every three months for best performance. Fill the kettle with water and decalcifier according to decalcifier product instructions. Do not boil the solution as it may foam over. Afterwards, rinse kettle thoroughly with fresh water.
Enjoy your new Electrolux product!
DISPOSAL
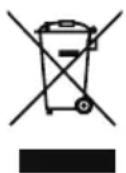
This symbol on the product or on its packaging indicates that the product may not be treated as householdwaste. To recycle your product, please take it to an official collection point or to an Electrolux service center that can remove and recycle the battery and electric parts in a safe and professional way. Follow your country's rules for the separate collection of electrical products and rechargeable batteries.
CUSTOMER CARE AND SERVICE
When contacting Service, ensure that you have the following data available: Model, PNC, Serial Number. The information can be found on the rating plate.
Due to the Electrolux policy of continual product development; specifications, colours, and details of our products and those mentioned in this manual are subject to change without notice.
RECIPES
| 40° 60° 80° 85° 90° 95° | 100° | |||||
| Baby Milk | Warm Water | Yellow Tea (3min) | Jasmine Tea (3min) | Pu-erh (3min) | Coffee Pour Over | Boiling Water |
| Lemon Water | ||||||
| Honey Water | Matcha Tea | Sow Mee (4min) | Instant Coffee | Herbal Tea 5min | ||
TROUBLESHOOTING
| PROBLEM POSSIBLE CAUSE SOLUTION | ||
| The appliance switches off before boiling. | Too much lime scale at the base of the kettle. | Run the decalcifying procedure. |
| The appliance cannot be switched on. | After operating with little or no water, the appliance has not cooled down sufficiently. | Allow to cool a short time and try again. |
说明书
Electrolux Korea limited
9F, Pine Avenue B,
100 Euljiro, Jung-gu, Seoul, Korea 04551
Korea
Tel: +82 2 6020-2200
Fax: +82 2 6020-2271-3
Customer Care Services : +82 1566-1238
Email : homecare.krh@electrolux.com
Website: www.electrolux.co.kr
INDONESIA
Electrolux Philippines, Inc.
10th Floor. W5th Avenue Building
5th Avenue Corner 32nd Street
Bonifacio Global City,
Taguig Philippines 1634
Trunkline: +63 2 737 4756
Domestic Toll Free: 1 800 10 845 care 2273
Customer Care Services: +63 2 845 care 2273
Email: wecare@electrolux.com
Website: www.electrolux.com.ph
THAILAND
Electrolux Thailand Co Ltd
Electrolux Building
14th Floor 1910 New Petchburi Road
Bangkapi, Huay Kwang
Bangkok 10310
Thailand
Tel: +66 2 725 9100
Fax: +66 2 725 9299
Customer Care Services: +66 2 725 9000
Email: customercarethai@electrolux.com
Website: www.electrolux.co.th
VIETNAM
Electrolux Vietnam Ltd
Floor 9th, A&B Tower
76 Le Lai Street
Ben Thanh Ward - District 1
Ho Chi Minh City
Vietnam
Tel: +84 8 3910 5465
Fax: +84 8 3910 5470
Customer Care Services: 1800-58-8899
Email: vncare@electrolux.com
Website: www.electrolux.vn
MALAYSIA
Electrolux Home Appliances Sdn Bhd
Lot C6, No. 28, Jalan 15/22,
Taman Perindustrian Tiong Nam,
40200 Shah Alam, Selangor
Malaysia
Customer Care Services Tel: +60 3 5525 0800
Customer Care Services Fax: +60 3 5524 2521
Email: malaysia.customercare@electrolux.com
Website: www.electrolux.com.my
SINGAPORE
Electrolux SEA Pte Ltd
1 Fusionopolis Place, Galaxis
07-10 (West Lobby)
Singapore 138522
Customer Care Services: +65 6727 3699
Fax: +65 6727 3611
Email: customer-care.sin@electrolux.com
Website: www.electrolux.com.sg
AUSTRALIA
Electrolux Home Products Pty Ltd
ABN 51 004 762 341
163 O'Riordan Street, Mascot, NSW 2020, Australia
Customer Service Phone: 1300 365 305
Website: www.electrolux.com
NEW ZEALAND
Electrolux (NZ) Limited
3-5 Niall Burgess Road, Mt. Wellington, Auckland,
New Zealand
Phone: (09) 9573 2220
Customer Service Phone: 0508 730 730
Website: www.electrolux.com
HONG KONG
大昌貿易行有限公司
電器維修中心
香港九龍灣啟祥道20號
大昌行集團大廈5樓
natural_image
Abstract geometric design with three white petal-like shapes on a black background (no text or symbols)Share more of our thinking at www.electrolux.com
- INSTRUCTION MANUAL
- COMPONENTS
- SAFETY ADVICE
- GETTING STARTED
- Before first use:
- USING THE PRODUCT
- Quick boil water:
- Set temperature and heat:
- Keep warm function:
- To cancel heating:
- CLEANING AND CARE
- DISPOSAL
- CUSTOMER CARE AND SERVICE
- 说明书
- INDONESIA
- THAILAND
- VIETNAM
- MALAYSIA
- SINGAPORE
- 07-10 (West Lobby)
- AUSTRALIA
- NEW ZEALAND
- HONG KONG
Brand : ELECTROLUX
Model : Explore 7 E7EK1-60BP
Category : Kettle