
Jive - Stroller Redsbaby - Free user manual and instructions
Find the device manual for free Jive Redsbaby in PDF.


| Product Type | Stroller (Pram) |
| Brand | Redsbaby |
| Model | Jive ^5 |
| Chassis Weight | 7.5 kg (16.5 lbs) |
| Maximum Child Weight (Upper Seat) | 20 kg (44.1 lbs) |
| Maximum Child Weight (Lower Seat, Double Mode) | 17 kg (37.5 lbs) |
| Maximum Child Weight (Bassinet) | 9 kg (19.8 lbs) |
| Basket Capacity | 12 kg (26.4 lbs) |
| Harness Type | 5-point safety harness |
| Seat Recline | Adjustable (multiple positions) |
| Seat Orientation | Reversible (forward and rearward facing) |
| Handlebar Height | Adjustable (multiple positions) |
| Front Wheels | Lockable swivel |
| Brake | Foot brake on right rear wheel |
| Canopy | Adjustable with ventilation panel |
| Bumper Bar | Removable |
| Footrest | 3 adjustable positions |
| Tether Strap | Included |
| Compatible Capsule Brands | Britax, Maxi-Cosi, Joie, Nuna (adaptors sold separately) |
| Safety Standards | AS 2088:2022, Bassinet: ASTM F2194-16ε1 |
| Warranty | 24 months (extendable to 36 with registration) |
| Cleaning Method | Sponge clean with mild detergent, air dry |
| Material | Leatherette, fabric, plastic, metal |
| Country of Design | Australia |
Frequently Asked Questions - Jive Redsbaby
User questions about Jive Redsbaby
0 question about this device. Answer the ones you know or ask your own.
Ask a new question about this device
Download the instructions for your Stroller in PDF format for free! Find your manual Jive - Redsbaby and take your electronic device back in hand. On this page are published all the documents necessary for the use of your device. Jive by Redsbaby.
USER MANUAL Jive Redsbaby
Nothing folds easier. With a lightweight 7.5kg chassis, our market-leading JIVE ^5 conveniently transforms from one of the lightest and most compact single prams into a slimline double pram. Perfect for one; and double, no trouble.
SINGLE TO
DOUBLE PRAM
TIMELESS
STYLE
JIVE ^5 Pram
Product Guide
redsbaby
For your journey®
We are committed to innovating, crafting and bringing to life the best in baby products and experiences. Our products are designed in Australia for our unique lifestyle. They are as functional as they are beautiful, serving our core purpose to enrich your family journey.
CELEBRATING
HOMEGROWN
HEAD-TURNING
STYLE
CONTENTS
General instructions /7/
Product care /8/
Cleaning instructions /9/
Safety standards /10/
Warnings and safety precautions /11/
Features and components /20/
Assembly instructions /22/
Frame /22/
Basket /22/
Brake component /22/
Rear wheels /23/
Front wheels /23/
Canopy and bumper bar /24/
Bassinet /24/
To remove /25/
Using your JIVE ^5 /26/
Unfolding /27/
Folding /28/
Lifting and carrying safely /28/
Engaging and releasing the brake /29/
Locking the front wheels /30/
Adjusting the handlebar /31/
Using the 5-point safety harness /32/
Reclining the seat /34/
Reversing the seat /35/
Adjusting the footrest /36/
Using the tether strap /36/
Bassinet for overnight sleeping /37/
Warranty information /40/
For future ^® /42/
Company information /43/
Scan to Watch
How-to and assembly videos available at redsbaby.com.au

Embrace Your Journey
GENERAL
INSTRUCTIONS
Keep this document for future reference. It contains important information.
Please read thoroughly before commencing assembly and use of your JIVE ^5 . Incorrect assembly and usage can be dangerous and result in serious injury or even death.
There may be slight variations in the design of your product to the images shown in this product guide.
Your JIVE ^5 chassis is compatible with the JIVE ^5 seat and bassinet. Do not use your JIVE ^5 frame with any other model of pram, seat or bassinet.
Your JIVE ^5 Bassinet is approved for overnight sleeping when used with the Redsbaby Bassinet Stand.
Your JIVE ^5 is compatible with Britax capsules using the JIVE ^5 bassinet adaptors.
Your JIVE ^5 is also compatible with Maxi-Cosi, Joie and Nuna car capsules using our Maxi-Cosi Capsule Adaptors (sold separately).
Product care
GENERAL MAINTENANCE
- Regularly inspect the locking devices, brakes, harness assembly, catches, seat adjusters, joints and fixings to ensure they are secure and in full working order.
- Do not store your JIVE ^5 in your car for prolonged periods, especially in hot weather, as heat may warp certain plastic parts and reduce your product's life.
- The brakes and wheels are subject to wear and should be replaced when necessary.
Brakes are available by contacting our Customer Care team at info@redsbaby.com.au
- Should any parts of the JIVE ^5 become stiff or difficult to operate, ensure that dirt is not the cause.
- Sparingly apply a silicone spray lubricant to penetrate the components. Excessive application may encourage the accumulation of dirt. Regular light lubrication of moving parts will extend the life of your JIVE ^5 and make operating, opening and folding easier.
- Do not leave your JIVE ^5 in sunlight for prolonged periods, as fabrics may fade.
- Store your JIVE ^5 in a dry, well-ventilated and safe place.
- Do not use your JIVE ^5 if screws are loose or missing or if any component is damaged.
Cleaning instructions
GENERAL INSTRUCTIONS
- Do not use products that contain alcohol, as they may cause erosion, stains, discolouring and damage to the leatherette parts on your JIVE ^5 . This includes applying hand sanitiser to your hands or directly on the product.
- Do not place any fabric or other component of your JIVE ^5 in the dryer. Allow all parts to dry thoroughly before storing.
PLASTIC AND METAL PARTS
- Sponge clean with warm water and a mild detergent then air dry.
- Do not use any abrasive or corrosive cleaning products on your JIVE ^5 .
FABRICS
- Sponge lightly with warm water and a mild detergent, and air dry.
- Follow the care label to prolong the life of the fabric.
Safety standards
Redsbaby JIVE ^5 is designed to comply with AS 2088:2022 and CPN No.8 of 2007.
Redsbaby JIVE ^5 Bassinet is also designed to comply with ASTM F2194-16ε1/16 CFR 1218 and ASTM F2194-22ε1 when used with the Redsbaby Bassinet Stand.
Warnings and safety precautions
Please read the following warnings and safety precautions thoroughly before using your JIVE ^4 .
Incorrect assembly and use can result in serious injury or death.
Always follow the safety instructions to ensure that your JIVE ^5 is correctly folded, assembled, and the locks are engaged for safe usage.
After unpacking, immediately discard packaging materials, as these can become a choking hazard.
Always use the safety features that come with your JIVE ^5 , such as the tether strap, brakes and harness.

GENERAL WARNINGS
- To avoid injury or death: Always apply the brakes whenever the Redsbaby JIVE ^5 is stationary.
- Do not leave children unattended.
- Secure the child in the harness at all times.
- Do not carry extra children or bags on the Redsbaby JIVE ^5 .
- Make sure children are clear of any moving parts if you adjust the Redsbaby JIVE, you adjust the Redsbaby, but we be injured. be injured.
- Ensure the frame fold locks are engaged correctly before placing a child in the Redsbaby JIVE ^5 .
- Follow the manufacturer's instructions.
- Put on all the brakes whenever you park the Redsbaby JIVE ^5 .
- Use the harness at all times.
-
When not in use disconnect shoulder straps from the waist strap and/or buckle.
-
The harness can form loops which may cause a strangulation hazard. Never leave a harness connected when not fitted to a child in the Redsbaby JIVE ^5 .
- Use the tether strap to stop the Redsbaby JIVE ^5 rolling away.
- Do not use the seat or bassinet with any other models of pram/stroller.
- Do not use bassinet once the child can sit up unaided.
- Only use the bassinet in the flat position. Do not recline.
- Do not use any accessories that are not designed for or compatible with the Redsbaby JIVE ^5 .
• Take care when using on stairs or escalators. - We recommend you do not use the Redsbaby JIVE ^5 on stairs, as this may damage the frame and lead to breakage.
- Do not use or leave the Redsbaby JIVE ^5 near open fire or exposed flames.
-
Brakes must always be applied when the Redsbaby JIVE ^5 is not moving.
-
The Redsbaby JIVE ^5 is compatible with the Redsbaby Buggyboard. The maximum weight of a child on the board is 20kg (44.1lbs). Ensure you securely connect the Redsbaby Buggyboard to the tubing that runs between the rear wheels of your Redsbaby JIVE ^5 .
- The rearward-facing position of the seat is only intended for a child up to 2 years, or until the child's feet extend over the edge of the leg rest. The front-facing position should be used from then on.
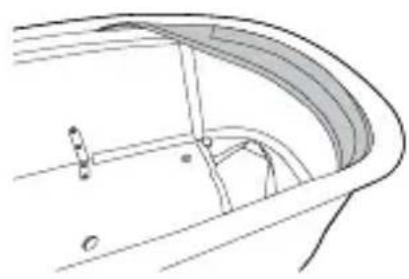
- This bassinet can be used for overnight sleeping only when the flap at the foot end of the bassinet is lifted and when used with the Redsbaby Bassinet Stand.
- DO NOT use the bassinet for overnight sleeping in your Redsbaby pram frame. Failure to follow these instructions may result in serious injury or death.
- The Redsbaby JIVE ^5 Bassinet is only approved for use with the Redsbaby JIVE, JIVE ^2 , JIVE ^3 , JIVE ^5 Pram/stroller.
• Maximum weight for a child in the bassinet is 9kg (19.8lbs).

GENERAL
SAFETY
PRECAUTIONS
- When the vehicle is being folded and unfolded, there is potential for fingers or parts of the body to be injured and due care should be exercised.
• Overloading, incorrect folding or the use of non-approved accessories may cause injury or damage your Redsbaby JIVE ^5 . - Ensure you follow the regular maintenance and care instructions included in this manual. Pay special attention to maintenance and care of the brakes.
- The Redsbaby JIVE ^5 can be used for two (2) children only when using the Redsbaby JIVE ^5 Second Seat Conversion Kit. Without the Second Seat Conversion Kit, the Redsbaby JIVE ^5 can only be used for (1) child.
- Do not hang bags on the Redsbaby JIVE ^5 handles, as this can cause it to become unstable.
-
Do not lift or carry the Redsbaby JIVE ^5 when a child is in it.
-
Do not lift or carry the Redsbaby JIVE ^5 when fully assembled. Only lift and carry when folded.
- The Redsbaby JIVE ^5 is designed for use on flat or gentle sloping surfaces and may be unstable on higher sloping and uneven surfaces. The vehicle may tip over when used incorrectly on steep inclines/declines.
- Take care when changing terrains and when going over uneven surface levels (inclines/declines/curbs/obstacles) with your pram. Ensure you apply pressure to the handle to lift the front wheels over uneven surface levels or when meeting an incline or decline as required (also called ‘popping’ the front wheels). Failure to take care when changing terrains or surface levels, and when going over uneven surface levels, may cause your pram to become unstable.
- When using your Redsbaby JIVE ^5 on stairs or escalators, take care.
- WARNING: DO NOT USE FOR UNSUPERVISED SLEEPING.SLEEPING.
- The vehicle is not to be used as an unsupervised sleeping environment.

MAXIMUM WEIGHT LIMITS
• Maximum weight for a child in the bassinet is 9kg (19.8 lbs).
• Maximum weight for a child in the upper seat is 20kg (44.1 lbs).
• Maximum weight for a child in the lower seat is 17kg (37.5 lbs).
• Maximum weight for items in the basket is 12kg (26.4 lbs).
Additional Bassinet Safety Precautions

WARNING FALL HAZARD
Failure to follow to these warnings and instructions could result in death or serious injury.
To help prevent falls,
- Do not use this product when the infant begins to push up on hands and knees or has reached 9kg (19.8lbs), whichever comes first.
- Strings can cause strangulation! Do not place items with a string around a child's neck, such as hood strings or pacifier cords. Do no suspend strings over a product or attach strings to toys.
- Do not use if any part of the bassinet/ cradle is broken, torn or missing.

WARNING SUFFOCATION HAZARD
Babies have suffocated:
- On pillows, comforters and extra padding.
- In gaps between a wrong size mattress, or extra padding and product sides.
- NEVER add soft bedding or padding.
- Use ONLY the mattress provided by manufacturer.
• Always place baby on back to sleep to reduce the risk of SIDS and suffocation. - If a sheet is used with the pad, use only the one provided by the product manufacturer or one specifically designed to fit the dimension of the product mattress.
Features and components
1 HANDLEBAR
2HANDLEBARLATCHES
3 SEAT RECLINE LEVER
4 FRAME FOLD LATCHES
5 SEAT UNIT
6 BASKET
7 BRAKE
8 REAR WHEELS
9 CANOPY
10 BUMPER BAR
11 FOLD LOCK
12 FRAME
13 FOOTREST
14 FRONT WHEELS
15 CANOPY
16 VENTILATION PANEL
17 ADAPTORS
18 LEATHERETTE/FABRIC PANEL
19 APRON

Assembly instructions

Frame
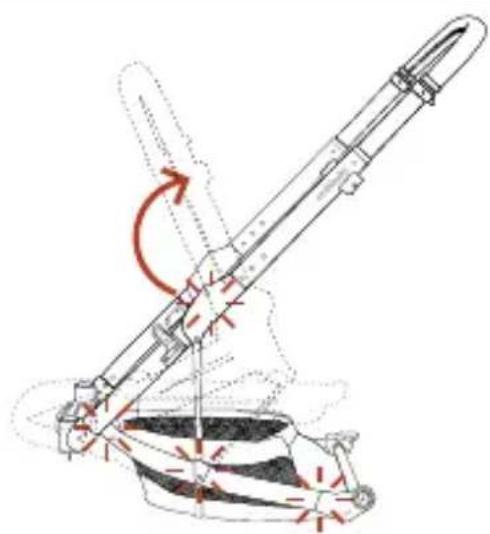
- Place the frame on the ground and position yourself behind the brake.
- Release the frame lock located on the left-hand side of the frame.
- Holding the handlebar, gently lift the frame until the frame locks into place. When the frame has been fully opened, you will hear and feel a firm click.
natural_image
Technical diagram of a mechanical device with red arrows indicating motion or force direction (no text or symbols)Basket
- Unfold the frame.
- Secure the basket's press studs to the frame.
Brake component
The brake is red in colour and is permanently assembled on your pram frame. The brake is located at the bottom right-hand side of the frame.
IMPORTANT
Check the wheels are clicked in correctly by tugging them outwards.
The wheels will fall off the pram if they are not attached correctly.

natural_image
Technical line drawing of a four-wheeled cart with labeled dimensions L and R (no text or symbols beyond labels)Rear wheels
-
Press the centre button on each wheel and insert it in the frame's rear wheel housing. Once inserted, release the centre button.
-
To remove the rear wheels press the button in the middle of the wheel and pull outwards.

natural_image
Line drawing of a two-wheeled cart with wheels and a long handle, no text or symbols presentFront wheels
Insert wheels into the chassis front wheel housing. A firm click indicates the wheels are secured.
natural_image
Line drawing of a baby stroller with an inset showing the handle and seat (no text or symbols)Canopy and bumper bar
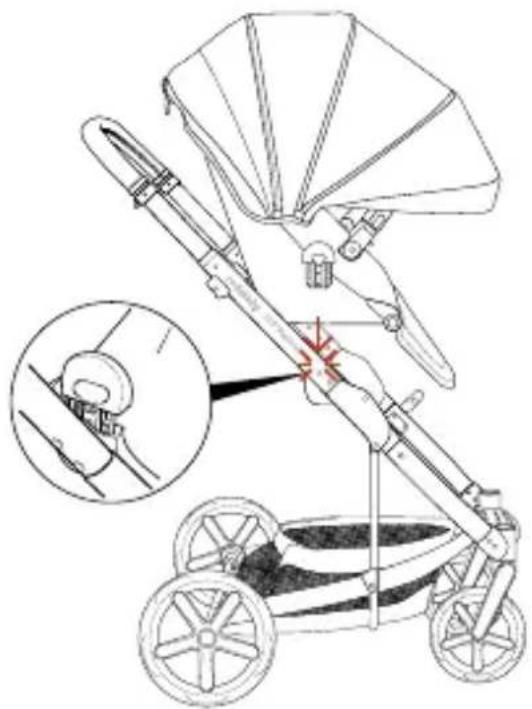
The pram comes with the seat fabrics assembled.
- Position the back of the canopy over the seat hand recline lever. Click the canopy rods into the sides of the seat frame.
- Align the bumper bar pins with the openings on the seat frame and secure them.
- Gently push the seat frame's connectors downwards into the chassis seat connectors until you feel and hear a firm click.

Bassinet
- Pull the three support rods located in the bottom of the bassinet into place.
- Push one of your hands into the base of the bassinet while pulling the support rods into position.
- Once assembled correctly, your bassinet will sit rigid and upright.
Note: To ensure the sides of the bassinet are rigid and upright, pull the support rods up against the black stoppers on the bottom of the bassinet.

natural_image
Technical line drawing of a mechanical component with red arrows indicating directional flow or movement (no text or symbols)-
Secure the velcro and press stud on the lining to the bassinet body. Press firmly to secure in place.
-
Fit the bassinet mattress into the bottom of the bassinet snugly.
-
Secure the bassinet apron.

natural_image
Line drawing of a baby stroller with a baby in the background (no text or symbols)-
Secure the bassinet adaptors in the pram frame.
-
Click the bassinet into the adaptors. Check the bassinet is secured by lifting it upwards when in the pram frame.

natural_image
Illustration of a baby stroller with a magnified inset showing the lid and seat (no text or symbols)To remove
Lift and release the locks on either side of the bassinet.
Using your JIVE ^5
Unfolding and folding

natural_image
Line drawing of a baby car with a close-up inset showing a mechanical component (no text or symbols)
natural_image
Diagram of a two-wheeled cart with a handle and wheels, showing motion direction (no text or symbols)To unfold
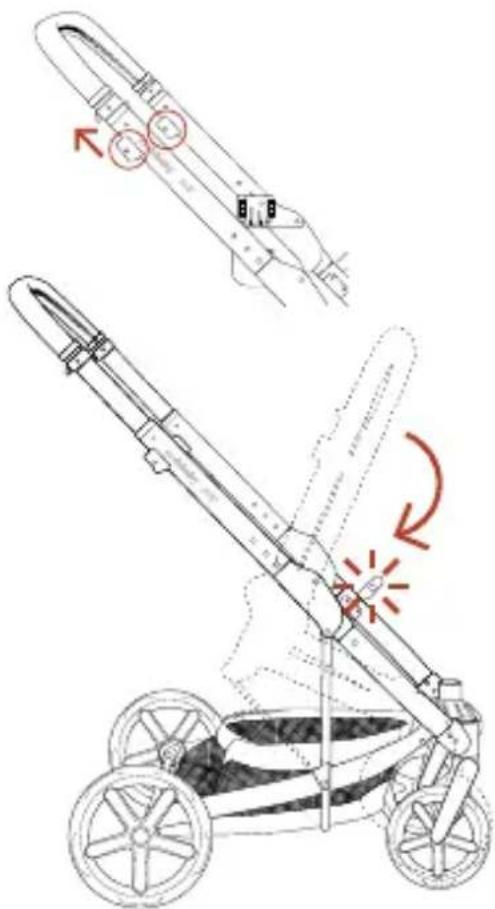
-
Release the frame lock on the left-hand side of the frame.
-
Gently lift the handlebar until the frame locks into place. A firm click indicates the frame is unfolded.
To fold
- Using bassinet: Remove the bassinet from the frame.
- Using seat: Return seat to forward-facing and fully upright position.
- Return handlebar to the lowest position.
- Simultaneously slide the frame fold latches on each side of the frame upwards.
- While still holding the frame, fold latches upwards, fold the frame forwards and toward the ground, until the frame lock engages.
Lifting and carrying safely
• Always lift and carry the frame using two hands.
- Ensure the fold lock is engaged.
Engaging and releasing the brake
The brake is red and located next to the right rear wheel of the JIVE ^4 .

natural_image
Diagram showing a car wheel with a padlock and a switch, no text or symbols presentTo engage
Press downwards on the brake. A firm click indicates the brake is engaged.

To release
Press your foot forwards on the top surface of the brake or flick upwards from underneath the brake until it disengages.
Locking the front wheels

natural_image
Diagram of a bicycle with wheels and a red arrow indicating motion or force (no text or symbols)To lock
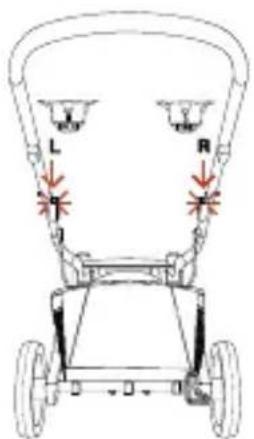
Press the buttons on the top of the front wheel housing downwards to lock.
To unlock
Press the buttons again to release.
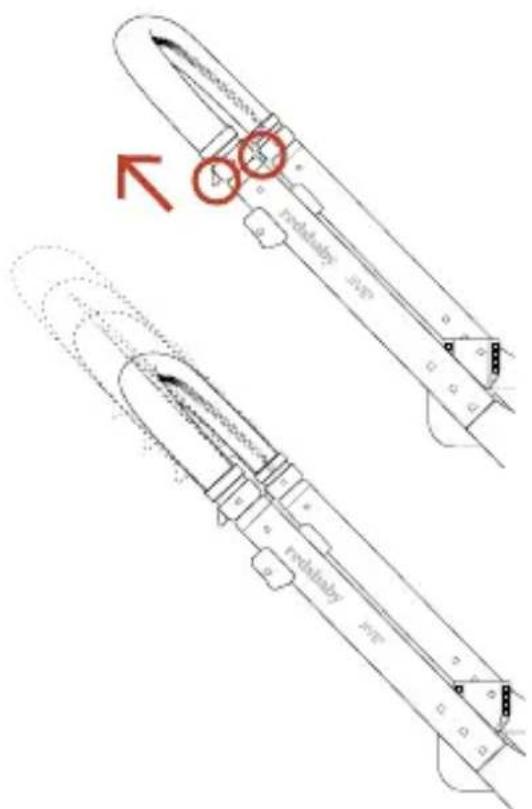
Adjusting the handlebar
-
Pull both handlebar latches located under either side of the handlebar upwards.
-
Adjust to the desired height.
Using the 5-point safety harness
natural_image
Pure technical diagram of two mechanical components connected to a central circular component with red arrows indicating force or movement (no text or symbols)To lock
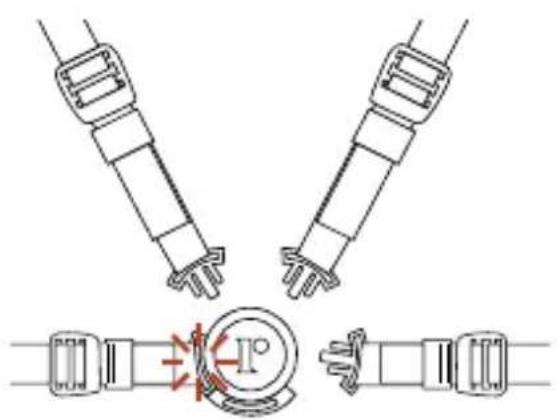
Insert the clips located on the shoulder and waist straps into the centre buckle. Click backwards to secure.

natural_image
Diagram of a V-shaped mechanical or electrical component with four connectors and a central valve, featuring a red lock symbol (no text or labels)To unlock
Press the button in the middle of the buckle to release all straps at once.
Note: Padding has been provided for the shoulder straps and crotch strap.

Adjusting the straps
- Adjust the shoulder strap height by sliding the strap upwards and downwards to the desired height.
- Adjust the shoulder straps (A1) and (A2), waist straps (B1) and (B2) and crotch strap (D) to the desired fit.
Note: Position the shoulder straps just above your child's shoulder.
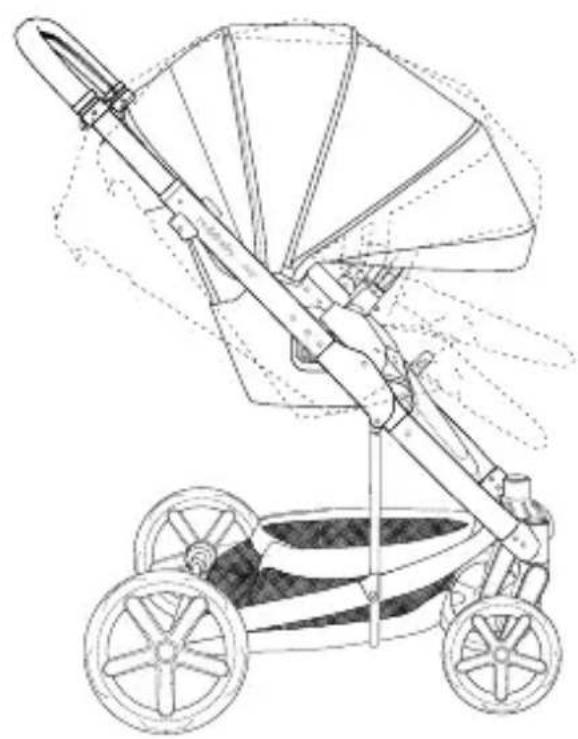
Reclining the seat
natural_image
Line drawing of a stroller with wheels and fan blade (no text or symbols)
natural_image
Line drawing of a hat with a circular arrow pointing to a small object on the side (no text or symbols)To recline
Lift the seat hand recline lever upwards and move the seat into the desired position.
Reversing the seat

natural_image
Diagram of a propeller with two wheels and a close-up inset showing the blade being inserted (no text or symbols present)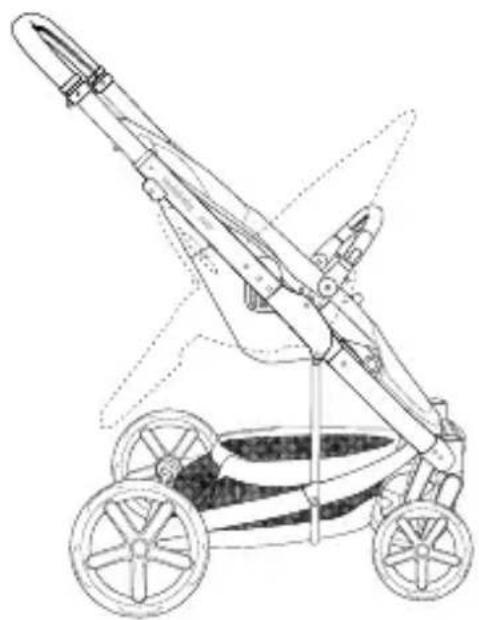
natural_image
Line drawing of a two-wheeled baby stroller with wheels and handle (no text or symbols)To reverse
-
Remove the seat unit by pushing the connectors located on both sides of the seat unit and lifting the seat upwards.
-
Position the seat forward or rearward facing.
Adjusting the footrest

natural_image
Technical line drawing of a mechanical device with no visible text or symbolsThe footrest has three positions.
- Press the buttons on both sides of the footrest to adjust the footrest downwards.
- Lift the footrest to adjust upwards.
Note: The footrest will move freely in the upwards direction. It will not lock into place. This allows the seat to fold into the frame without resistance.
Using the tether strap
Attach the tether strap to your wrist at all times when using the JIVE ^4 .
Bassinet for overnight sleeping

The JIVE ^5 Bassinet can only be used for overnight sleeping in the Redsbaby Bassinet stand.
- Pull the three support rods located in the bottom of the bassinet into place.
- Push one of your hands into the base of the bassinet while pulling the support rods into position.
- Once assembled correctly, your bassinet will sit rigid and upright.
Note: To ensure the sides of the bassinet are rigid and upright, pull the support rods up against the black stoppers on the bottom of the bassinet.
natural_image
Technical line drawing of a boat hull with visible structural components (no text or symbols)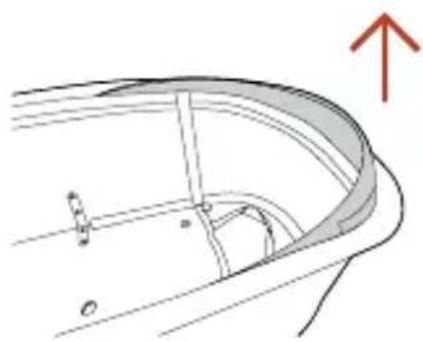
natural_image
Technical line drawing of a curved mechanical component with an upward arrow indicator (no text or symbols present)- Lift the flap located at the foot end of the bassinet.

natural_image
Technical line drawing of a mechanical component with red directional arrows indicating movement or force (no text or symbols)- Secure the velcro and press stud on the lining to the bassinet body. Press firmly to secure in place.
- Open the ventilation panel at the head end of the bassinet for more airflow.
The bassinet is now ready to be placed in the Bassinet Stand.
NOTE
More detailed instructions about using the Redsbaby Bassinet Stand can be found in the Bassinet Stand Product Guide.
Understand your warranty
36 MONTH WARRANTY
Your product comes with a standard 24 month warranty to cover faults in materials and quality when used under normal conditions and according to user manuals and technical specifications. Register your product online at redsbaby.com.au within 60 days of delivery to receive an additional 12 month warranty. Our goods come with guarantees that cannot be excluded under the Australian Consumer Law.
You are entitled to a replacement or refund for a major failure and compensation for any other reasonably foreseeable loss or damage. You are also entitled to have the goods repaired or replaced if the goods fail to be of acceptable quality and the failure does not amount to a major failure.
The 24 month warranty period starts from the date your product(s) are dispatched from our warehouse, including products purchased on pre-order. The benefits provided by our 36 Month Warranty are in addition to other rights and remedies available under law.
CLAIM VALIDITY
Immediately cease use of the product once you become aware of a fault or defect. Contact Redsbaby to report the issue. You must make a claim within the claims period for it to be valid.
WARRANTY EXPENSES
Redsbaby will provide repairs and replacements free of charge for claims made within the claims period. Redsbaby will provide free shipping for replacement products or parts and repairs shipped within Australia. The customer will be responsible for shipping charges for replacement products or parts and repairs shipped outside Australia.
HOW TO MAKE A CLAIM
Visit redsbaby.com.au/warranty and complete a warranty claim form or contact Customer Care for assistance with making your warranty claim. Further warranty information is available at redsbaby.com.au.
For future®
We strive to use resources and make decisions that safeguard our planet for future generations. Our products are made to last for years to come and wherever possible, use sustainable materials and packaging to minimise our impact on our beautiful planet.
'REDSBABY', 'JIVE', 'FOR YOUR JOURNEY' and 'FOR FUTURE' are registered trademarks of Redsbaby Pty Ltd
ACN 625 563 519
729 Elizabeth Street Zetland 2017 NSW Australia
02 7201 5891
redsbaby®
REDSBABY.COM.AU
@REDSBABYAUS

- For your journey®
- CONTENTS
- Scan to Watch
- Embrace Your Journey
- Product care
- Cleaning instructions
- GENERAL INSTRUCTIONS
- PLASTIC AND METAL PARTS
- FABRICS
- Safety standards
- Warnings and safety precautions
- GENERAL WARNINGS
- GENERAL
- SAFETY
- PRECAUTIONS
- MAXIMUM WEIGHT LIMITS
- Additional Bassinet Safety Precautions
- WARNING FALL HAZARD
- WARNING SUFFOCATION HAZARD
- Babies have suffocated:
- Features and components
- Assembly instructions
- Frame
- Basket
- Brake component
- IMPORTANT
- Rear wheels
- Front wheels
- Canopy and bumper bar
- Bassinet
- To remove
- Using your JIVE 5
- Unfolding and folding
- To unfold
- To fold
- Lifting and carrying safely
- Engaging and releasing the brake
- To engage
- To release
- Locking the front wheels
- Adjusting the handlebar
- Using the 5-point safety harness
- To lock
- To unlock
- Adjusting the straps
- Reclining the seat
- To recline
- Reversing the seat
- To reverse
- Adjusting the footrest
- Using the tether strap
- Bassinet for overnight sleeping
- NOTE
- Understand your warranty
- CLAIM VALIDITY
- WARRANTY EXPENSES
- HOW TO MAKE A CLAIM
- For future®
- redsbaby®
Brand : Redsbaby
Model : Jive
Category : Stroller