
METRO 2 - Stroller Redsbaby - Free user manual and instructions
Find the device manual for free METRO 2 Redsbaby in PDF.


| Product Type | Stroller |
| Brand | Redsbaby |
| Model | METRO 2 |
| Dimensions (unfolded) | Approx. 110 x 60 x 100 cm |
| Dimensions (folded) | Approx. 45 x 60 x 75 cm |
| Weight | Approx. 10 kg |
| Weight Capacity | Up to 15 kg |
| Age Range | From 6 months to 3 years |
| Seat Recline | Multi-position recline (nearly flat) |
| Canopy | Extendable, with UV protection (UPF 50+) |
| Safety Harness | 5-point adjustable harness |
| Wheels | 4-wheel design, front swivel with lock, rear fixed |
| Suspension | All-wheel suspension |
| Brake | Foot-operated rear brake |
| Handle Bar | Adjustable, leatherette grip |
| Storage Basket | Large, accessible from rear |
| Folding | One-hand compact fold, free-standing |
| Materials | Aluminum frame, polyester fabric |
| Cleaning | Wipeable fabric, removable seat pad (machine washable) |
| Accessories Included | Rain cover, seat liner, cup holder |
| Warranty | 2 years |
Frequently Asked Questions - METRO 2 Redsbaby
User questions about METRO 2 Redsbaby
0 question about this device. Answer the ones you know or ask your own.
Ask a new question about this device
Download the instructions for your Stroller in PDF format for free! Find your manual METRO 2 - Redsbaby and take your electronic device back in hand. On this page are published all the documents necessary for the use of your device. METRO 2 by Redsbaby.
USER MANUAL METRO 2 Redsbaby
Getting ready for the journey.
Welcoming a new baby is an adventure. Excitement builds as the days pass through pregnancy – whether you're welcoming your first, or you're a practiced parent. Your growing family excites us, too. From much-anticipated 'firsts' to every day family adventures, beautiful moments await.
We're with you, for the journey.
METRO² PRAM - INSTRUCTION MANUAL
Contents
General instructions 3
Warranty information 4
Warnings and safety precautions 8
Features and components 13
Assembly instructions 14
Frame 14
Brake component 15
Rear wheels 16
Front swivel wheels 17
Seat and bumper 18
Basket 18
Using your Redsbaby METRO ^2 19
Unfolding 19
Folding 21
Engaging and releasing the brake 23
Locking the front wheels 24
Adjusting the handle 25
Using the 5-point safety harness 26
Reversing and reclining the seat 29
Using the tether strap 31
Lifting and carrying your Redsbaby METRO ^2 safely 31
Adjusting the footrest 32
Product Care 33
METRO ^2
Pram
Beautiful moments await.
General Instructions
This document contains important information and must be kept for future reference.
Please read thoroughly before commencing assembly, and use of your Redsbaby METRO ^2 . Incorrect assembly, and use can be dangerous and result in serious injury or even death.
There may be slight variations in the design of your product to that shown in the images of this instruction manual.
Your Redsbaby METRO ^2 chassis is only compatible with the Redsbaby JIVE ^2 / METRO ^2 seat unit or Redsbaby JIVE ^2 / METRO ^2 bassinet. Do not use your Redsbaby METRO ^2 chassis with any other model of pram seat or bassinet.
Your Redsbaby METRO ^2 chassis can be used with Maxi-Cosi, Britax, Joie and Nuna car capsules (sold separately) using our Redsbaby JIVE / METRO Maxi-Cosi adaptors sold separately or, for a Britax capsule, the adaptors that are used to connect your bassinet to the frame.

TIP! You can also view our Assembly and Daily Use instructional videos on the Redsbaby YouTube channel.
Warranty information
24 Month Warranty
The Redsbaby METRO ^2 and its accessories come with a 24 Month Warranty to cover against faults in materials and workmanship when your products are used under normal conditions, according to our user manuals and technical specifications.
Our goods come with guarantees that cannot be excluded under the Australian Consumer Law. You are entitled to a replacement, or refund, for a major failure and compensation for any other reasonably foreseeable loss or damage. You are also entitled to have the goods repaired, or replaced, if the goods fail to be of acceptable quality and the failure does not amount to a major failure.
The 24 Month Warranty period starts from the date your product(s) are dispatched from our warehouse. This includes products that are purchased via pre-order (for example items that are out of stock or newly launching products). For a claim to be valid, it must be made within the claims period.
Your 24 Month Warranty covers manufacturing defects relating to your pram/accessories as listed below:
- Chassis, frame, wheels and adaptors;
- 5-point harness buckle, padding, strapping and assembly; and
- All soft good seams, bindings and zippers.
To the extent permitted by law, the following are not covered by warranty: - Failure or defects resulting from improper care or use;
- Normal wear and tear including scratches to the pram frame;
- Scuffs and tears to leatherette handles/bumpers;
- Products purchased second hand or from an unauthorised distributor;
- Fading or discolouration of fabrics and materials due to cleaning and/or excessive sun exposure;
- Faulty or incorrect assembly of the products by the customer;
• Installation of a part or accessory not compatible with the product and/or not manufactured by Redsbaby; - Any modification or alteration not conducted or authorised by Redsbaby;
- Corrosion or rust on the wheels and chassis due to extreme environmental conditions, including high humidity, salt spray, ice or snow or due to insufficient maintenance;
• Accidental or intentional damage, abuse or neglect;
- Damage to handle bar grips or fabrics as a result of normal handling and daily use;
- Airline/transport damage: check your Redsbaby product carefully after it has been handled by the airline (or other transporters) and if required, submit your claim directly to your travel insurer/airline;
- Consumer dissatisfaction with the product in terms of disliking the fit, weight, functionality, colour or style (outside of the 30 Day Trial period);
- If the batch number sticker has been damaged or removed; and
- When the product has not been used for normal use and in accordance with the manufacturer's instructions.
For more information on our 24 Month Warranty, please read our Terms and Conditions at www.redsbaby.com.au. Please ensure you follow the assembly instructions, which can be found in this instruction manual.
How to make a warranty claim
To submit a warranty claim please visit the Support Centre page on our website, www.redsbaby.com.au and complete the Warranty Claim form. The more detailed you are with your description of the defect, the quicker we will be able to process your warranty claim. Once your form has been submitted, a member of our Customer Care team will contact you within seven (7) business days. Depending on the nature of the claim, we will either send out a replacement part to resolve the issue or request a repair at one of our Australia-wide repair centres.
Alternatively you can call our Customer Care team on 1300 344 964.
Warnings and safety precautions
Please read the following warnings and safety precautions thoroughly before using your Redsbaby METRO ^2 . Incorrect assembly and use can result in serious injury or death. Always follow safety instructions for assembly, folding and use. Always ensure that your Redsbaby METRO ^2 is correctly assembled and locks are engaged before use.
After unpacking, immediately discard any plastic wrapping and packaging materials, as these can lead to a choking hazard.
Always use the safety features that come with your Redsbaby METRO ^2 , such as the tether strap, brakes and harness.
GENERAL WARNINGS:
- To avoid injury or death: Always apply the brakes whenever the Redsbaby METRO ^2 is stationary.
- Do not leave children unattended.
- Secure the child in the harness at all times.
- Do not carry extra children or bags on the Redsbaby METRO ^2 .
- Make sure children are clear of any moving parts if you adjust the Redsbaby METRO ^2 , otherwise they may be injured.
- Follow the manufacturer's instructions.
- Put on all the brakes whenever you park the Redsbaby METRO ^2 .
- Use the harness at all times.
- When not in use disconnect shoulder straps from the waist strap and/or buckle.
- The harness can form loops which may cause a strangulation hazard. Never leave a harness connected when not fitted to a child in the Redsbaby METRO ^2 .
- Use the tether strap to stop the Redsbaby METRO rolling away.
- Do not use the seat or bassinet with any other models of pram/stroller.
- Do not use bassinet once the child can sit up unaided.
- Only use the bassinet in the flat position. Do not recline.
-
Do not use any accessories that are not designed for or compatible with the Redsbaby METRO ^2 .
• Take care when using on stairs or escalators. -
Do not use or leave the Redsbaby METRO near open fire or exposed flames.
- Brakes must always be applied when the Redsbaby METRO ^2 is not moving.
- The Redsbaby METRO ^2 is compatible with the Redsbaby JIVE / METRO Buggyboard. The maximum weight of a child on the board is 20kg (44.1lbs). Ensure you securely connect the JIVE / METRO Buggyboard to the tubing that runs between the rear wheels of your Redsbaby METRO ^2 .
- The rearward-facing position of the seat is only intended for a child up to 2 years, or until the child's feet extend over the edge of the leg rest. The front-facing position should be used from then on.

GENERAL SAFETY PRECAUTIONS:
- When the vehicle is being folded and unfolded, there is potential for fingers or parts of the body to be injured and due care should be exercised.
• Overloading, incorrect folding or the use of non-approved accessories may cause injury or damage your Redsbaby METRO ^2 . - Ensure you follow the regular maintenance and care instructions included in this manual. Pay special attention to maintenance and care of the brakes.
- The Redsbaby METRO ^2 must only be used for one (1) child.
- Do not hang bags on the Redsbaby METRO ^2 handles, as this can cause it to become unstable.
- Do not lift or carry the Redsbaby METRO ^2 when a child is in it.
- Do not lift or carry the Redsbaby METRO ^2 when fully assembled. Only lift and carry when folded.
- The Redsbaby METRO ^2 is designed for use on flat or gentle sloping surfaces and may be unstable on higher sloping and uneven surfaces. The vehicle may tip over when used incorrectly on steep inclines/declines.
• Take care when changing terrains and when going over uneven surface levels (inclines/declines/curbs/obstacles)
with your pram. Ensure you apply pressure to the handle to lift the front wheels over uneven surface levels or when meeting an incline or decline as required (also called 'popping' the front wheels). Failure to take care when changing terrains or surface levels, and when going over uneven surface levels, may cause your pram to become unstable.
- Do not leave the rain cover on without the ventilation window on the front of the rain cover open.
- When using your Redsbaby METRO ^2 on stairs or escalators, take care.

MA XIMUM WEIGHT LIMITS:
• Maximum weight for a child in the bassinet is 9kg (19.8 lbs).
• Maximum weight for a child in the seat is 20kg (44.1 lbs).
• Maximum weight for items in the basket is 10kg (22 lbs).
• Maximum weight for items in the back pocket is 1kg (2.2lbs).
Features and components
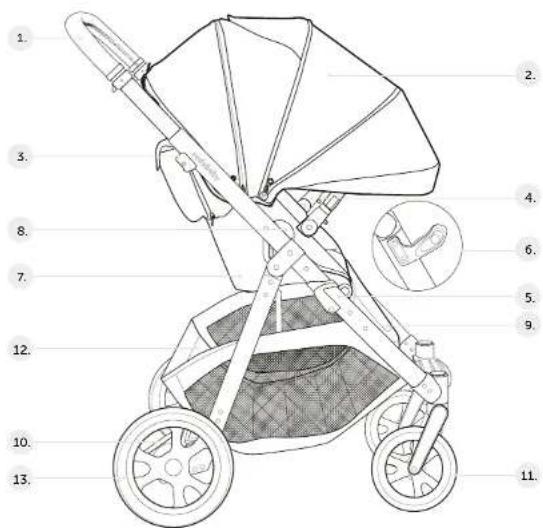
- Adjustable handle
- Extension canopy
- Frame fold latches
- Bumper bar
-
Frame
-
Fold lock
- Seat unit
- Circular frame
- Adjustable foot rest
-
Brake
-
Frontswivel
wheels - Basket
- Rear wheels
Assembly instructions
Frame
To release the frame from the folded position:
- Place frame on the ground and position yourself behind handle bar.
- Release the automatic frame lock located on the left hand side of the frame.
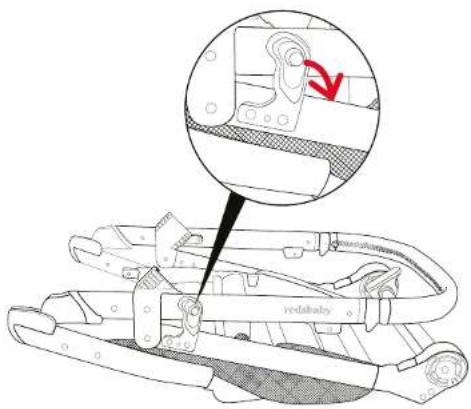
- Holding the frame on both sides, gently lift the frame upwards, continuing until the frame locks into place. When the frame has been fully opened, you will hear and feel a firm 'click'.

natural_image
Technical line drawing of a mechanical device with no visible text or symbolsBrake component
The brake will come permanently assembled on your pram frame and is located at the bottom of the frame in the right hand side and is red in colour.
Rear wheels
Fit the rear wheels by pressing the button in the middle of the wheel and clicking them into the rear wheel housing located at the back of the pram frame. You will hear and feel a firm 'click' when the wheels are locked in place.

IMPO R TANT:
Ensure you check that the wheels are clicked in correctly by tugging them outwards. Failure to attach the wheels correctly will result in them falling off the pram while in use. To remove, simply press the button in the middle of the wheel to release.
Front swivel wheels
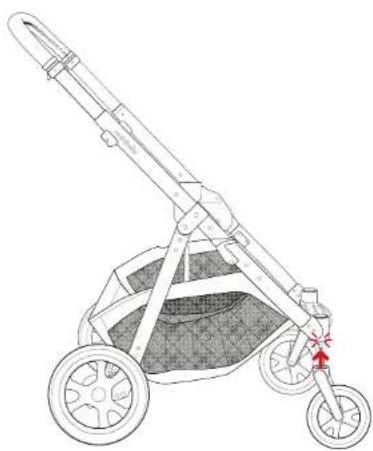
Fit the front wheels by inserting them into the front wheel housing located at the front of the frame. You will hear and feel a firm 'click' when the wheels are locked in place.
natural_image
Line drawing of a two-wheeled baby stroller with wheels and a handle, no text or symbols presentAssembling the seat and bumper
- The seat fabrics will come assembled on your Redsbaby METRO ^2 circle frame.
- Attach the bumper by aligning the ends of the bumper with the two openings on the circular frame. Gently push down into place until you hear and feel a firm 'click' on both sides.
- If desired, attach the canopy.
- To place the seat on the frame, push down gently until you feel and hear a firm 'click'.

natural_image
Illustration of a baby stroller with a hand operating the seat, showing a close-up of the seat and a red arrow indicating force or pressure (no text or symbols present)Basket
The basket will come assembled on your Redsbaby METRO ^2 . To remove, release all press studs and clips.
Using your Redsbaby METRO ^2
To release the frame from the folded position:
- Release the frame fold lock on the left hand side of the frame.
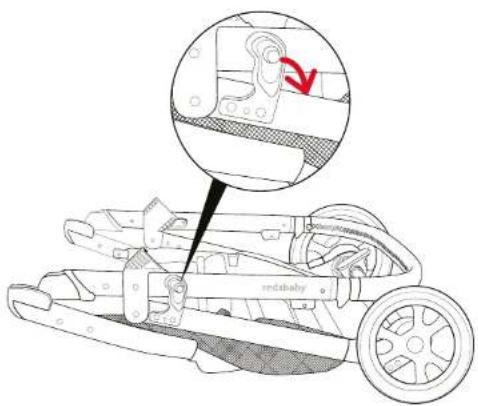
- Holding the frame on either side, gently lift the top half of the frame and place on the ground.
- Continue to lift the handle until the frame fold locks engage.

natural_image
Line drawing of a two-wheeled cart with a mounted gun, showing no text or symbolsTo fold the frame
- Remove the bassinet or seat unit if attached to the frame.
- Simultaneously pull back on the frame fold locks on the left and right hand side of the frame.
- Gently fold the frame downwards (once the frame fold locks have been pulled back) until the frame fold latch automatically engages.

Tip: You can also fold the Redsbaby METRO ^2 with the seat connected in the fully upright and forward-facing position.
Safe lifting and carrying of the Redsbaby METRO ^2 frame when folded:
- Always lift and carry the frame using two hands.
- Ensure the frame fold lock is engaged.
IMPORTANT:
- Do not lift or carry the Redsbaby METRO ^2 when a child is in it.
- Do not lift or carry the Redsbaby METRO ^2 when fully assembled.
- Only lift and carry when folded.
Engaging and releasing the brake
The brake is located next to the right rear wheel of the Redsbaby METRO ^2 . The brake is identified by its red colour.
- To engage the brake, press downwards and backwards on the brake until you feel and hear a 'click'.
- To release the brake, press your foot forwards on the brake in the opposite direction until the brake lock disengages. You can also flick the brake upwards to disengage if it is comfortable for you to do so.

natural_image
Illustration of a hand holding a car seatbelt with red arrows indicating force or movement (no text or symbols)IMPO R TANT:
- Ensure the pram is completely stationary before applying the brake.
- Ensure you have disengaged the brake completely before pushing your pram. If you hear a clicking sound, double check the brake lock isn't clicking on the rear wheel. It can be helpful to push your toe downwards on the brake in the released position firmly to ensure the brake lock is not touching the rear wheel.
Locking the front swivel wheels
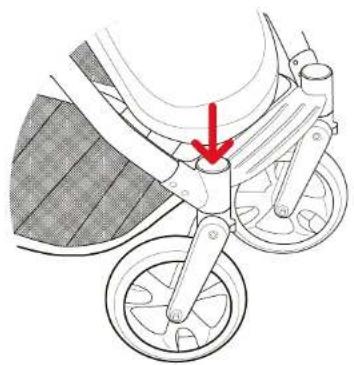
- Press downwards on the buttons located on top for the front wheel housing until you hear and feel a 'click'.
- Push the Redsbaby METRO forwards until you hear a second click in both front wheels.
- To unlock, simply press the buttons again. When released successfully, you will hear and feel a 'click'.
natural_image
Diagram of a bicycle's wheel assembly with a red arrow indicating the pivot point (no text or symbols present)Adjusting the handle
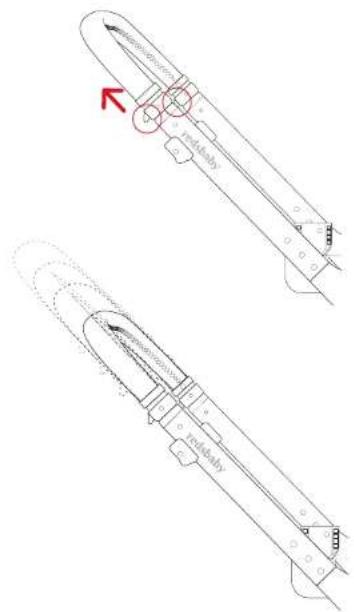
Simultaneously pull the tabs located under either side of the handle and move the handle to the desired height.
natural_image
Technical line drawings of two mechanical components with no visible text or symbolsUsing the 5-Point Safety Harness
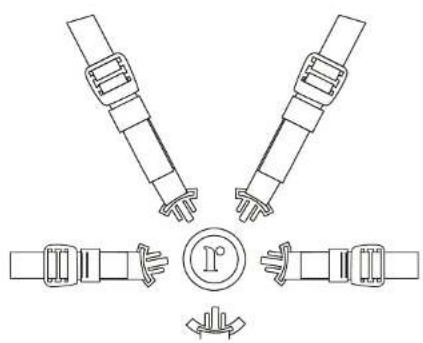
- Clip shoulder and waist straps into center buckle securely.
IMPORTANT:
For the safety of your child the 5-point safety harness must be properly fitted and adjusted.
natural_image
Diagram of two vertical connectors with a central circular symbol and directional arrows, no text or labels present.Note: The shoulder heights can be adjusted according to your child's height by feeding the shoulder straps through the seat back. The shoulder straps should sit just above the shoulders of your child.
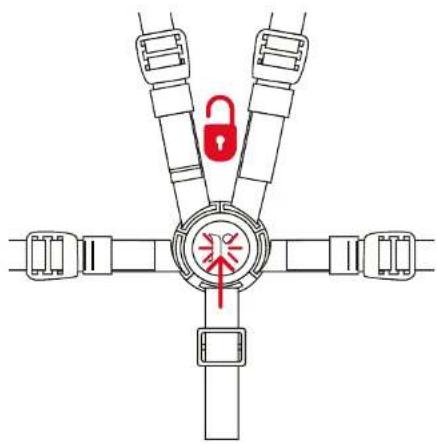
- Adjust the shoulder strap (A1) and (A2), waist straps (B1) and (B2) and crotch strap (D) to the desired fit.

- To unlock the 5-point safety harness, simply press the button in the middle of the centre buckle (C) to release all straps at once.
Note: Padding has been provided for the shoulder straps (A1) and (A2) and crotch strap (D) for the comfort of your child.
natural_image
Diagram of a mechanical or electrical component with four vertical connectors and a central circular component, featuring a red lock icon (no text or symbols)Reversing and reclining the seat
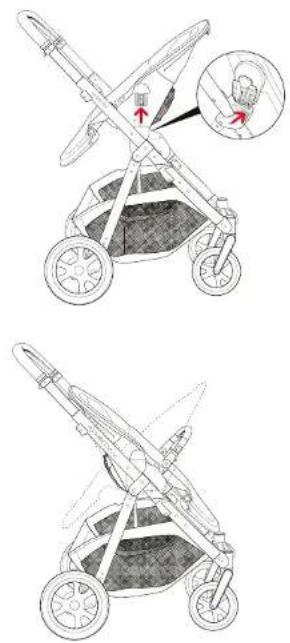
- To recline, lift the lever located at the top of the seat back and move the seat into the desired position.
IMPORTANT:
Do not reverse the seat when a child is in the seat.
IMPORTANT:
The lever MUST be fully released (pulled upwards) before trying to lower or raise the seat. If the lever is not fully released, the seat will not move.

natural_image
Illustration of a baby stroller with a handbag and side view, showing body positioning and seat arrangement (no text or symbols)- To reverse, remove the seat unit by pushing the tabs located on either side of the seat unit inwards and lift upwards. The seat unit can be fitted either rear or forward facing.
Using the tether strap
Attach the tether strap to your wrist at all times when using the Redsbaby METRO ^2 .
Lifting and carrying the Redsbaby METRO ^2 safely
IMPORTANT:
- Do not lift or carry the Redsbaby METRO ^2 when a child is in it.
- Do not lift or carry the Redsbaby METRO ^2 when fully assembled.
• Only lift and carry when folded.
Adjusting the footrest
The footrest can be adjusted into three positions. Simply press the buttons on either side of the footrest to adjust the footrest downwards into the desired position. To adjust into the upper positions, simply lift the footrest upwards and it will click into position and hold with downward pressure.
IMPORTANT:
The footrest will move freely in the upwards direction and doesn't lock into place. This is normal and allows the footrest to fold into the frame without resistance when folding the METRO ^2 with the seat attached.

natural_image
Technical line drawing of a mechanical device with no visible text or symbolsProduct care
IMPORTANT:
Ensure you follow the regular maintenance and care instructions. Pay special attention to maintenance and care of the brakes.
General Maintenance
- Regularly inspect the locking devices, brakes, harness assembly, catches, seat adjusters, joints and fixings to ensure they are secure and in full working order.
- Do not store your Redsbaby METRO ^2 in your car for prolonged periods of time, especially when it is hot as this may lead to warping some of the plastics parts and reduce the life of your product.
-
The brakes and wheels are subject to wear and should be replaced as and when necessary. Brakes are available through contacting our Customer Care team at info@redsbaby.com.au
-
Should any parts of the Redsbaby METRO ^2 become stiff or difficult to operate, ensure that dirt is not the cause. Use a light application of a silicone spray lubricant, ensuring the lubricant penetrates between the components. Use sparingly, as excessive application may encourage the accumulation of dirt. Regular light lubrication of moving parts will extend the life of your Redsbaby METRO ^2 and make operating, opening and folding much easier.
- Do not leave the Redsbaby METRO ^2 in sunlight for prolonged periods of time, as the colour of some fabrics may fade.
- Store the Redsbaby METRO ^2 in a dry, well-ventilated and safe place.
- Do not use your Redsbaby METRO ^2 if any screws are loose or missing or if any component is damaged.
Cleaning
Plastic and metal parts
- Sponge clean with warm water and a mild detergent and then air dry.
- Do not use any abrasive or corrosive cleaning products on your Redsbaby METRO ^2 .
- Do not use products that contain alcohol, as they may cause stains, discolouring and damage to the leatherette parts on your Redsbaby METRO ^2 . This includes applying hand sanitiser to your hands or directly on the product.
Fabrics
- May be cleaned by sponging lightly with warm water and a mild detergent (ensure your child is not allergic to the detergent you use). Then air dry.
- For more instructions, follow the care labels on each fabric item.
IMPORTANT:
Do not place any fabric or other component of your Redsbaby METRO ^2 in the dryer. Allow all parts to dry thoroughly before storing.
METRO² PRAM - INSTRUCTION MANUAL
Exciting times ahead.
We can't wait to hear your stories.
Share them with us:



for the journey
'REDSBABY' is a registered
trademark of Redsbaby Pty Ltd
ABN 68 625 563 519
©Redsbaby Pty Ltd 2019.



- Getting ready for the journey.
- Contents
- METRO 2
- Beautiful moments await.
- General Instructions
- Warranty information
- Month Warranty
- How to make a warranty claim
- Warnings and safety precautions
- GENERAL WARNINGS:
- GENERAL SAFETY PRECAUTIONS:
- MA XIMUM WEIGHT LIMITS:
- Features and components
- Assembly instructions
- Frame
- Brake component
- Rear wheels
- IMPO R TANT:
- Front swivel wheels
- Assembling the seat and bumper
- Basket
- Using your Redsbaby METRO 2
- To release the frame from the folded position:
- To fold the frame
- Safe lifting and carrying of the Redsbaby METRO 2 frame when folded:
- IMPORTANT:
- Engaging and releasing the brake
- Locking the front swivel wheels
- Adjusting the handle
- Using the 5-Point Safety Harness
- Reversing and reclining the seat
- Using the tether strap
- Lifting and carrying the Redsbaby METRO 2 safely
- Adjusting the footrest
- Product care
- General Maintenance
- Cleaning
- Plastic and metal parts
- Fabrics
- Exciting times ahead.
Brand : Redsbaby
Model : METRO 2
Category : Stroller