
AW1422TW1W - Washing machine HISENSE - Free user manual and instructions
Find the device manual for free AW1422TW1W HISENSE in PDF.
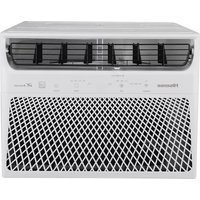


| Product Type | Window Air Conditioner |
| Brand | Hisense |
| Model | AW1422TW1W (covers multiple BTU models) |
| Power Supply | 115 V, 60 Hz, 10-15 A (depending on model) |
| Cooling Capacity | 5,000 - 14,000 BTU/h (varies by model) |
| Energy Efficiency | E-star models available |
| Operating Modes | Cool, Dry, Fan Only, Eco |
| Fan Speeds | Low, Medium, High |
| Remote Control | Yes, with LCD display and timer |
| Timer | 0-24 hour delay on/off |
| Sleep Mode | 8-hour automatic operation with temperature adjustment |
| Air Direction Control | Vertical swing (manual louver adjustment) |
| Exhaust Vent | Available on 12K/14K models |
| Filter | Washable, with indicator light (clean every 2 weeks) |
| WiFi | Optional (on connected models) |
| Refrigerant | Flammable (refer to nameplate for type) |
| Installation Type | Double-hung window, requires two people |
| Minimum Window Width | 22 inches (559 mm) for 5K-6K models; 24.5-24.9 inches for larger models |
| Safety Features | Grounding plug, power supply cord with test/reset, flammable refrigerant precautions |
| Annual Maintenance | Recommended (contact authorized dealer) |
Frequently Asked Questions - AW1422TW1W HISENSE
User questions about AW1422TW1W HISENSE
0 question about this device. Answer the ones you know or ask your own.
Ask a new question about this device
Download the instructions for your Washing machine in PDF format for free! Find your manual AW1422TW1W - HISENSE and take your electronic device back in hand. On this page are published all the documents necessary for the use of your device. AW1422TW1W by HISENSE.
USER MANUAL AW1422TW1W HISENSE
USE AND INSTALLATION INSTRUCTIONS
For questions about features, operation/performance, parts or service, call: 1-877-465-3566
AIR CONDITIONER SAFETY 2
INSTALLATION REQUIREMENTS 3
Electrical Requirements 3
Tools and Parts 4
Unpack the Air Conditioner 4
Location Requirements 5
INSTALLATION INSTRUCTIONS 6
Prepare Air Conditioner for Installation 6
Window Air Conditioner Installation 6
Complete Installation 8
AIR CONDITIONER USE 8
Starting Your Air Conditioner 9
Using the Remote Control 10
Changing Air Direction 11
Exhaust Air Vent 11
Normal Sounds 12
AIR CONDITIONER CARE 12
Cleaning the Air Filter 12
Cleaning the Front Panel 12
Repairing Paint Damage 12
Annual Maintenance 12
REMOVING AC FROM WINDOW 12
TROUBLESHOOTING 13
AIR CONDITIONER SAFETY
Your safety and the safety of others are very important.
We have provided many important safety messages in this manual and on your appliance. Always read and obey all safety messages.

This is the safety alert symbol.
This symbol alerts you to potential hazards that can kill or hurt you and others.
All safety messages will follow the safety alert symbol and either the word "DANGER" or "WARNING".
These words mean:
DANGER
You can be killed or seriously injured if you don't immediately follow instructions.
WARNING
You can be killed or seriously injured if you don't follow instructions.
All safety messages will tell you what the potential hazard is, tell you how to reduce the chance of injury, and tell you what can
IMPORTANT SAFETY INSTRUCTIONS
WARNING: To reduce the risk of fire, electrical shock or injury when using your air conditioner, follow these basic precautions:
■ Plug into a grounded 3 prong outlet.
■ Do not use an extension cord.
■ Do not remove ground prong.
■ Unplug air conditioner before servicing.
■ Do not use an adapter.
■ Use two or more people to move and install air conditioner.
SAVE THESE INSTRUCTIONS
DISPOSING OF THE UNIT
■ Before throwing the device, it is necessary to pull back the battery cells and get rid of them safely for recycling reasons. ■ When you need to dispose of the unit, consult our dealer. If pipes are removed incorrectly, refrigerant may blow out and come into contact with your skin, causing injury. Releasing refrigerant into the atmosphere also damages the environment. - Please recycle or dispose of the packaging material for the product in an environmentally responsible manner. ■ Never store or ship the air conditioner upside down or sideways to avoid damage to the compressor. This appliance is not intended for use by persons (including children) with reduced physical, sensory or mental capabilities, or lack of experience and knowledge, unless they have been given supervision or instruction concerning use of the appliance by a person responsible for their safety. Children should be supervised to ensure that they do not play with the appliance. ■ The wiring diagram is shown on the nameplate on the air conditioner.

WARNING
Risk of Fire or Explosion. This unit contains flammable refrigerant. Additional safety precautions must be followed.
■ Do not use means to accelerate the defrosting process or to clean, other than those recommended by the manufacturer. ■ The appliance shall be stored in a room without continuously operating ignition sources (for example: open flames, an operating gas appliance or an operating electric heater). ■ Do not pierce or burn refrigerant tubing. Be aware that refrigerants may not contain an odor. - Keep ventilation openings clear of obstruction. ■ The maximum refrigerant charge amount is shown on the nameplate on the air conditioner.
■ When handling, installing, and operating the appliance, care should be taken to avoid damage to the refrigerant tubing. ■ Do not drill holes in the unit. ■ Maintenance, cleaning, and service should only be performed by technicians properly trained and qualified in the use of flammable refrigerants. ■ Dispose of air conditioner in accordance with Federal and Local Regulations. Flammable refrigerants require special disposal procedures. Contact your local authorities for the environmentally safe disposal of your air conditioner. ■ The appliance shall be stored so as to prevent mechanical damage from occurring.
INSTALLATION REQUIREMENTS
Electrical Requirements

WARNING

Electrical Shock Hazard
Plug into a grounded 3 prong outlet.
Do not remove ground prong.
Do not use an adapter.
Do not use an extension cord.
Failure to follow these instructions can result in death, fire, or electrical shock.
Recommended Grounding Method
This air conditioner must be grounded. This air conditioner is equipped with a power supply cord with a three-prong grounding plug. The cord must be plugged into a mating, grounded three-prong outlet, grounded in accordance with all local codes and ordinances. If a mating outlet is not available, it is the customer's responsibility to have a properly grounded three-prong outlet installed by a qualified electrical installer.
It is the customer's responsibility:
To contact a qualified electrical installer. To assure that the electrical installation is adequate and conforms to the National Electrical Code, ANSI/NFPA 70-last edition, and all local codes and ordinances.
Copies of the standards listed may be obtained from: National Fire Protection Association 1 Batterymarch Park Quincy, MA 02169-7471 www.nfpa.org
Wiring requirement
| Power supply | Model | Time-delay fuse (or circuit breaker) |
| 115V 103.5V min. 126.5 V max. | 5K BTU DOE 6K BTU DOE | 10A |
| 6K BTU E-star 8K BTU cooling only 10K BTU cooling only | 13A | |
| 12K BTU cooling only 14K BTU cooling only 8K BTU cooling&heating | 15A |
Power Supply Cord
A. Test button B. Reset button
NOTE:
Your air conditioner's device may differ from the one shown. This room air conditioner is equipped with a power supply cord required by UL. This power supply cord contains state-of-the-art electronics that sense leakage current. If the cord is crushed, the electronics detect leakage current and power will be disconnected in a fraction of a second.
To test your power supply cord:
- Plug power supply cord into a grounded 3 prong outlet.
- Press RESET (on some devices, a green light will turn on).
- Press TEST (listen for click; Reset button will trip, and on some devices, a green light will turn off).
- Press and release RESET (listen for click; Reset button will latch, and on some devices, a green light will turn on). The power supply cord is ready for operation.
NOTE:
■ The Reset button must be pushed in for proper operation. ■ The power supply cord must be replaced if it fails to trip when the test button is pressed or fails to reset. - Do not use the power supply cord as an off/on switch. The power supply cord is designed as a protective device. - A damaged power supply cord must be replaced with a new power supply cord obtained from the product manufacturer and must not be repaired. ■ The power supply cord contains no user serviceable parts. Opening the tamper-resistant case voids all warranty and performance claims.
Tools and Parts
Gather the required tools and parts before starting installation. Read and follow the instructions provided with any tools listed here.
Tools needed
Parts supplied
Check that all parts are included in parts package.

A Adhesive seal (2). B Foam seal. C. lock frame (for Wooden windows)(2) K. Air conditioner D. lock frame (for Vinyl-Clad windows)(2) E. 3/8" screws(4) F. 3/4" screws(7) L. Remote control G Side curtains (2) H. Top rail 1. sash lock J. EVA foam(2) M.Sealing sponge
NOTE: The H.Top rail, E. 3/8" screws(4) is not provided for 12K\14K BTU cooling only models.
The J. EVA foam(2) is provided only for E-star models, with E-star LOGO on the control panel.
The M.Sealing sponge is provided only for 5K\6K BTU DOE models.
Unpack the Air Conditioner
WARNING
Excessive Weight Hazard
Use two or more people to move and install air conditioner.
Failure to do so can result in back or other injury.
Remove packaging materials
■ Remove and dispose of/recycle packaging materials. Remove tape and glue residue from surfaces before turning on the air conditioner. Rub a small amount of liquid dish soap over the adhesive with your fingers. Wipe with warm water and dry. ■ Do not use sharp instruments, rubbing alcohol, flammable fluids, or abrasive cleaners to remove tape or glue. These products can damage the surface of your air conditioner. ■ Handle the air conditioner gently. ■ Remove top rail from the packaging material.

Location Requirements
Before You Begin
Read these instructions completely and carefully.
■ IMPORTANT: Save these instructions for local inspector's use. ■ IMPORTANT: Observe all governing codes and ordinances. ■ Note to Installer: Be sure to leave these instructions with the consumer. ■ Note to Consumer: Keep these instructions for future reference. ■ Skill level: Installation of this appliance requires basic mechanical skills. ■ Completion time: Approximately 1 hour. ■ We recommend that two people install this product. ■ Proper installation is the responsibility of the installer. ■ Product failure due to improper installation is not covered under the Warranty. - You MUST use all supplied parts and use proper installation procedures as described in these instructions when installing this air conditioner.
IMPORTANT: Observe all governing codes and ordinances.
Check the location where air conditioner will be installed. Proper installation is your responsibility. Make sure you have everything necessary for correct installation.
The location should provide:
■ Do not use an extension cord. The appliance shall be installed in accordance with national wiring regulations. ■ Free movement of air in room to be cooled. ■ A large enough opening for the air conditioner.
NOTE: Cabinet louvers must not be obstructed. Air must be able to pass through the cabinet louvers freely.

A Cabinet louvers.
Window Installation
Window opening measurements:
These instructions are for a standard double-hung window. You will need to modify them for other types of windows.
The air conditioner can be installed without the side curtain panels if needed to fit in a narrow window. See the window opening dimensions. All supporting parts must be secured to firm wood, masonry or metal.
The electrical outlet must be within reach of the power cord.
Follow the dimensions in the table and illustration for your model.
| Models | A | B |
| 5K BTU DOE6K BTU DOE | 12 2/5" (315mm) min | 22" (559mm) - 37 4/5" (960mm) |
| 6K BTU E-star8K BTU10K BTU | 13 3/5" (345mm) min | 24 1/2" (622mm) - 39" (991mm) |
| 12K BTU14K BTU | 15 1/5" (386mm) min | 24 9/10" (632mm) - 39" (991mm) |

If AC is Blocked by Storm Window
Add wood as shown, or remove storm window before air conditioner is installed.
If storm window frame must remain, be sure the drain holes or slots are not caulked or painted shut. Accumulated rain water or condensation must be allowed to drain out.

INSTALLATION INSTRUCTIONS
Prepare Air Conditioner for Installation
Attach Top Rail
- Locate the bag of screws provided.
- Place the top rail on the top of the air conditioner cabinet, lining up the 4 holes in the top rail with the 4 holes on the top of the air conditioner cabinet.
- Using four 3/8" (10mm) screws, attach the top rail to the air conditioner cabinet.

A. 3/8" screws B. Top rail NOTE: The top rail had been attached by manufacturer. (Models: 12K\14K BTU cooling only)
Install Side Curtains
NOTE: Attach curtains to the air conditioner before placing the air conditioner in window.
- Slide the Side curtain directly into the cabinet. Slide the Side curtain down.

- Insert top and then bottom of right-hand curtain housing in top and bottom curtain rails on air conditioner.
Back View
A. Curtain housing C. Curtain bottom rail on air conditioner
- Slide the curtain housing into the channels as far as it could go.
- Repeat steps above for the left-hand curtain.
Attach Adhesive Seal
- Cut the adhesive seal to the width of the lower window sash.
- Remove the backing from the seal and attach the seal to the bottom of the lower window sash.

A. Lower window sash B. Adhesive seal
A. Lower window sash B. Adhesive seal
Window Air Conditioner Installation
WARNING
Excessive Weight Hazard
Use two or more people to move and install air conditioner.
Failure to do so can result in back or other injury.
NOTES:
■ Handle air conditioner gently. ■ Be sure your air conditioner does not fall out of the opening during installation or removal. ■ Do not block the louvers in the front panel. ■ Do not block the louvers on the outside of the air conditioner.
Window Air Conditioner Installation
- Center air conditioner in window. Lower the window sash behind the top rail to hold cabinet in place. Keep a firm grip on the air conditioner, place the unit into the window opening carefully so the bottom of the air conditioner frame is against the window sill and make sure the unit is staying center of the window. Close the window behind the top rail of the unit carefully.

NOTE: Your model may differ from the one shown.
- Place the frame lock between the frame extensions and the window sill with 3/4" (19mm) screw as shown.

- To secure lower sash in place, attach right angle sash lock with 3/4" (19mm) screw as shown.

Attach Side Curtains to Window
- Pull the left-hand curtain out until it fits into the window channel.
- Use a 1/8" (3mm) drill bit to drill a starter hole through the hole in the top rail.
- Insert one of the 3/4" (19mm) screws through the left-hand curtain and into the window sash.

A. Window sash B. Hole in side curtain C 3/4" screw
NOTE: The following step 4 and step 5 are only applicable for E-star models, with E-star LOGO on the control panel.
- Put one EVA Foam on the Curtain housing. In order to minimize air leaks and ensure optimal insulation, it is necessary to install the EVA Foam on the Curtain housing.
After the unit is installed to the window, measure the inner width of the side curtain as shown.

Measure the inner width of the side curtain.
Remark a line on the EVA Foam according to less 1/8" (3mm) than the measured width in, then cut the EVA Foam along the line.

Remove the backing from the EVA Foam. Attach one EVA Foam on the Curtain housing, the side with adhesive should facing the Curtain housing.

A. Curtain housing B. EVA Foam
- Repeat for the right-hand curtain.
Complete Installation.
- Insert foam seal behind the top of the lower window sash and against the glass of the upper window.

A. Top of lower window sash B. Foam seal
- Use a 1/8" (3mm) drill bit to drill a starter hole through the hole in the top rail.
- Attach top channel to window sash with one 3/4" (19mm) screw to secure window in place.

The M.Sealing sponge is provided only for 5K/6K BTU DOE model.
- Check the gap around the unit and seal it with the adhesive seal attached.

- Plug into a grounded 3 prong outlet.
- Press RESET on the power supply cord. See "Electrical Requirements".
AIR CONDITIONER USE
Operating your air conditioner properly helps you to obtain the best possible results.
This section explains proper air conditioner operation.
IMPORTANT:
- If you turn off the air conditioner, wait at least 3 minutes before turning it back on. This prevents the air conditioner from blowing a fuse or tripping a circuit breaker.
Air conditioner in the Cool mode operation the better limits: Outdoor side 64.4~109.4°F (18~43 °C), ≤80%RH; indoor side 62.6~89.6°F (17~32°C), ≤80%RH.
NOTE: In the event of a power failure, your air conditioner will operate at the previous settings when the power is restored.
Starting Your Air Conditioner

ON/OFF
- Press the power button to turn on the air conditioner.

ON/OFF
NOTE: When the air conditioner is turned on for the first time after it is plugged in, the display will show the current set temperature and will run in the ECO control.
After cleaning and replacing the filter, press the POWER button for resetting and the FILTER light will go off.
- Select mode. See "Mode".
- Select fan speed. See "Fan".
- Set temperature. See "Temperature".
Mode
- Press MODE repeatedly until you see the indicator light glow for the desired setting.
- Choose Fan, Dry, Cool or Eco.
■ Fan - To select Fan Only mode. ■ Dry - Dries the room. The air conditioner automatically selects the temperature. Fan runs at Low speed only. ■ Cool - Cools the room. ■ Eco - Cools the room and save energy.
NOTE: Dry mode should not be used to cool the room.
NOTE: Select ECO mode to initiate this function.
For E-star models, the fan will continue to run after the compressor shuts off for 2 minutes (4 minutes for the first time), then the fan will shut off for 10 minutes. The fan then cycles run for 2 minutes and 10 minutes off intervals until the room temperature is above the set temperature, at which time the compressor turns back on and Cooling resumes.

Temperature
- Press the plus UP (∧) button to raise the temperature. Each time you press or hold the plus UP (∧) button, the temperature will go up 1°F (1°C) until it reaches 86°F (30°C).

- Press the minus DOWN (V) button to lower the temperature. Each time you press or hold the DOWN (V) button, the temperature will go down 1°F (1°C) until it reaches 61°F (16°C).
To change the temperature display from °F to °C:
Press both the MODE and DOWN (V) buttons at the same time for 5 seconds to switch the display from °F to °C.
Fan
NOTE: The Fan button will operate only when the Fan, Cool or Eco mode has been selected.
- Press FAN until you see the indicator light glow for the desired setting.
- Choose High, Med, Low.
■ High - for maximum cooling ■ Med - for normal cooling ■ Low - for quieter cooling
NOTE: In ECO mode, the Fan will run at low speed when compressor turn off.

FAN
Timer Sleep Filter
- The LED light on control panel for Timer, Sleep, Filter.

- The function introduction see "using the remote control".
WIFI
WIFI control is available for connected models with this logo on the control panel.

(Optional)
CONNECT
- Press the CONNECT button for 5 seconds; the LED starts to flash.
- After the WIFI module connects to the router, the LED stays on. Or the LED stays off.
NOTE: WIFI control is available only for WIFI control models.
Using the Remote Control
NOTE: Remote control may differ in appearance.
Button and Function
| 1 | ON/OFF | 6 | UP | ||
| 2 | MODE | 7 | DOWN | ||
| 3 | FAN | 8 | |||
| 4 | QUIET MODE(Optional) | 9 | FILTER | ||
| 5 | DIMMER or Sleep | ||||
| 1 | Timer On/Off |
NOTE:
Press and hold the MODE button on the remote for 5 seconds to switch the temperature display from degrees Fahrenheit (°F) to degrees Celsius (°C). Quiet mode is only valid in cooling mode. It takes about 2 to 3 minutes to fully enter quiet mode. Sometimes it cannot enter quiet mode due to some protection.
Indication symbols
Indication symbols on LCD:
| Cooling indicator | Auto fan speed | ||
| Dry indicator | High fan speed | ||
| Fan only indicator | Medium fan speed | ||
| Heating indicator | Low fan speed | ||
| Quiet indicator | Sleep indicator | ||
| Signal transmit. | |||

To turn off Super control, press any button on the remote control or control panel except Timer On, Timer Off, Clock, Dimmer, and Swing.


DIMMER
Press the DIMMER button to turn off the control panel display.
DIMMER
NOTE:
■ When in DIMMER mode, new control inputs will return the display to normal.
Sleep mode
SLEEP mode can only be set in Cooling or Drying mode. When in sleep mode, the unit will utilize lower, quieter fan speeds and automatic temperature adjustments, offering 8 hours of optimal sleeping conditions before shutting off.

NOTE:
■ The appliance will stop operation automatically after operating for 8 hours. ■ Fan speed is automatically set to low speed. ■ In cooling mode, if the current room temperature is below 79°F (26°C), the temperature will automatically increase 1°F (1°C) during the first hour after Sleep mode is activated, and continue running at that temperature. If the room temperature is 79°F (26°C) or above, the set temperature will not change.
- Press MODE to select COOL or DRY. NOTE: Sleep control cannot be selected in Fan mode.
- Press the UP or DOWN button to set the temperature.
- Press and hold the DIMMER button on the remote for 5 seconds to switch the DIMMER mode to Sleep mode.
- After 5 seconds, the light on the control panel display will dim. NOTE: The temperature and airflow direction may be adjusted during Sleep control. The fan speed is automatically set to low speed. After 5 seconds, the lights on the control panel display will dim again.
- To turn off Sleep control, press MODE, FAN, SLEEP, or wait 8 hours for Sleep control to turn off automatically. NOTE: The air conditioner will return to the previous setting after Sleep mode is turned off.
TIMER
Use the timer function to turn the air conditioner ON/OFF automatically.

Setting the Air Conditioner to Turn ON:
- Plug in the air conditioner and use the remote to power it ON. Use
- the remote to set the desired mode, temperature, fan speed, etc.
- Use the remote to power OFF the air conditioner.
- Press TIMER on the remote and use UP, DOWN buttons to set the desired delay time until the air conditioner turns ON. The delay time can be set from 0 to 24 hours in one-hour increments.
- Press TIMER again to enter the delay time. The TIMER LED on the air conditioner illuminates, and the delay time appears on the remote.
Setting the Air Conditioner to Turn OFF:
- Plug in the air conditioner and use the remote to power it ON.
- Use the remote to set the desired mode, temperature, fan speed, etc.
- Press TIMER on the remote and use UP, DOWN buttons to set the desired delay time until the air conditioner turns OFF. The delay time can be set from 0 to 24 hours in one-hour increments.
- Press TIMER again to enter the delay time. The TIMER LED on the air conditioner illuminates, and the delay time appears on the remote.
To cancel TIMER:
Press the TIMER button again. When a "beep" is heard and the indicator disappears, the TIMER mode has been canceled.
NOTE:
■ The TIMER function can only be set using the remote.
SWING
Press SWING once to change the vertical airflow direction. Press again to hold the louver in a desired position.

NOTE:
■ Airflow is automatically adjusted to a preset direction after turning on the unit. ■ The direction of airflow can be adjusted by pressing the Swing button. ■ Do not turn the airflow louvers manually, to prevent damage, turn off the unit first and cut off the power supply. Then restore power again after adjustment.
Filter
- When the Filter indicator light is lit, remove, clean and replace the air filter. See "Cleaning the Air Filter".
- Press Power button on the machine, or FILTER button on remote to reset the filter, after cleaning and replacing the air filter.

NOTE:
When the light is on, it will remain on for 180 hours or until you press Clean Filter button.
Changing Air Direction
Use the Vertical Level Vane to direct the air right or left. Use the whole cartridge to direct air up, down or straight ahead.

A. Vertical Level Vane B. Cartridge
Exhaust Air Vent
Pull out the exhaust air vent control to open the exhaust air vent and draw stale or smoky air from the room. Push in the exhaust air vent control to close the exhaust air vent for maximum continuous cooling.
NOTE: The exhaust air vent control is available only for 12K/14K models.

A. Exhaust air vent control
NOTE: The exhaust air vent control will function only when the fan is running.
Normal Sounds
When your air conditioner is operating normally, you may hear sounds such as:
Droplets of water hitting the condenser, causing a pinging or clicking sound. The water droplets help cool the condenser. Air movement from the fan.
Clicks from the thermostat cycle. Vibrations or noise due to poor wall or window construction. A high-pitched hum or pulsating noise caused by the modern high-efficiency compressor cycling on and off.
AIR CONDITIONER CARE
Your new air conditioner is designed to give you many years of dependable service. This section tells you how to clean and care for your air conditioner properly. Call your local authorized dealer for an annual checkup. Remember the cost of this service call is your responsibility.
Cleaning the Air Filter
The air filter is removable for easy cleaning. A clean filter helps remove dust, lint, and other particles from the air and is important for best cooling and operating efficiency. Check the filter every 2 weeks to see whether it needs cleaning.
NOTE: Do not operate the air conditioner without the filter in place.
- Turn off the air conditioner.
- Open the front panel. Grasp the filter by the handle and pull it out.

- Use a vacuum cleaner to clean the air filter. If the air filter is very dirty, wash it in warm water with a mild detergent. Do not wash the air filter in the dishwasher or use any chemical cleaners. Air dry the filter completely before replacing to ensure maximum efficiency.
- Replace the air filter back and close the front panel.
Cleaning the Front Panel
- Turn off the air conditioner.
- Clean the front panel with a soft, damp cloth.
- Air dry the front panel completely.
Repairing Paint Damage
Check once or twice a year for paint damage. This is very important, especially in areas near oceans or where rust is a problem. If needed, touch up with a good grade enamel paint.
Annual Maintenance
Your air conditioner needs annual maintenance to help ensure steady, top performance throughout the year. Call your local authorized dealer to schedule an annual checkup. The expense of an annual inspection is your responsibility.
REMOVING AC FROM WINDOW
- Turn AC off, and disconnect power cord.
- Remove sash seal from between windows, and unscrew safety lock.
- Remove screws installed through frame and frame lock.
- Remove the EVA foam (E-star models only).
- Close the curtain housing.
- Keeping a firm grip on the air conditioner, raise the sash and carefully remove it.
- Be careful not to spill any standing water while lifting the unit from the window. Store parts with the AC.
TROUBLESHOOTING
Before calling for service, try the suggestions below to see whether you can solve your problem without outside help.
Air conditioner does not operate


Electrical Shock Hazard
Plug into a grounded 3 prong outlet.
Do not remove ground prong.
Do not use an adapter.
Do not use an extension cord.
Failure to follow these instructions can result in death, fire, or electrical shock.
- The power supply cord is unplugged. Plug into grounded 3 prong outlet. See "Electrical Requirements".
- The power supply cord has tripped (Reset button has popped out). Press and release RESET (listen for click; Reset button will latch and on some devices, a green light will turn on) to resume operation.
- A household fuse has blown, or circuit breaker has tripped. Replace the fuse or reset the circuit breaker. If the problem continues, call an electrician. See "Electrical Requirements". ■ The Power button has not been pressed. Press the Power button. ■ The local power has failed. Wait for power to be restored.
Air conditioner blows fuses or trips circuit breakers
■ Too many appliances are being used on the same circuit. Unplug or relocate appliances that share the same circuit. - Time-delay fuse or circuit breaker of the wrong capacity is being used. Replace with a time-delay fuse or circuit breaker of the correct capacity. See "Electrical Requirements". ■ An extension cord is being used. Do not use an extension cord with this or any other appliance. - You are trying to restart the air conditioner too soon after turning off the air conditioner. Wait at least 3 minutes after turning off the air conditioner before trying to restart the air conditioner.
Air conditioner power supply cord trips (Reset button pops out)
■ Disturbances in your electrical current can trip (Reset button will pop out) the power supply cord. Press and release RESET (listen for click; Reset button will latch and on some devices, a green light will turn on) to resume operation. - Electrical overloading, overheating, cord pinching or aging can trip (Reset button will pop out) the power supply cord. After correcting the problem, press and release RESET (listen for click; Reset button will latch and on some devices, a green light will turn on) to resume operation.
NOTE: A damaged power supply cord must be replaced with a new power supply cord obtained from the product manufacturer and must not be repaired.
Air conditioner seems to run too much
- The current air conditioner replaced an older model. The use of more efficient components may cause the air conditioner to run longer than an older model, but the total energy consumption will be less. Newer air conditioners do not emit the "blast" of cold air you may be accustomed to from older air conditioners, but this is not an indication of lesser cooling capacity or efficiency. Refer to the efficiency rating (EER) and capacity rating (in Btu/h) marked on the air conditioner.
- The air conditioner is in a heavily occupied room, or heat-producing appliances are in use in the room. Use exhaust vent fans while cooking or bathing and try not to use heat-producing appliances during the hottest part of the day. A higher capacity air conditioner may be required, depending on the size of the room being cooled.
Air conditioner cycles on and off too much or does not cool
- The air conditioner is not properly sized for your room. Check the cooling capabilities of your room air conditioner. Room air conditioners are not designed to cool multiple rooms. ■ The filter is dirty or obstructed by debris. Clean the filter. ■ The inside evaporator and outside condenser coils are dirty or obstructed by debris. See Annual Maintenance.
- There is excessive heat or moisture (open container cooking, showers, etc.) in the room. Use a fan to exhaust heat or moisture from the room. Try not to use heat-producing appliances during the hottest part of the day. ■ The louvers are blocked. Install the air conditioner in a location where the louvers are free from curtains, blinds, furniture, etc.
- The temperature of the room you are trying to cool is extremely hot. Allow extra time for the air conditioner to cool off a very hot room. ■ Windows or doors to the outside are open. Close all windows and doors.
- The Temp control is not at a cool enough setting. Adjust the Temp control to a cooler setting by pressing the minus button to reduce the temperature. Set the Fan Speed control to the highest setting.
Water drips from the rear of the unit
- You see water dripping from the rear of the unit. Water may be collected in the base pan in highly humid conditions or on rainy days. This water overflows and drips from the rear of the unit.
Water drips from cabinet into your house
- The air conditioner is not properly leveled. The air conditioner should slope slightly downward toward the outside. Level the air conditioner to provide a downward slope toward the outside to ensure proper drainage. See the Installation Instructions.
NOTE: Do not drill a hole in the bottom of the metal base and condensate pan.
(for wooden windows) (2)
Exterior side 64.4~109.4°F (18~43°C), ≤80%RH;
Interior side 62.6~89.6°F (17~32°C), ≤80%RH.
SUPER
- AIR CONDITIONER SAFETY
- INSTALLATION REQUIREMENTS
- INSTALLATION INSTRUCTIONS
- AIR CONDITIONER USE
- AIR CONDITIONER CARE
- REMOVING AC FROM WINDOW
- TROUBLESHOOTING
- YOUR SAFETY AND THE SAFETY OF OTHERS ARE VERY IMPORTANT
- DANGER
- WARNING
- IMPORTANT SAFETY INSTRUCTIONS
- SAVE THESE INSTRUCTIONS
- DISPOSING OF THE UNIT
- RISK OF FIRE OR EXPLOSION. THIS UNIT CONTAINS FLAMMABLE REFRIGERANT. ADDITIONAL SAFETY PRECAUTIONS MUST BE FOLLOWED
- ELECTRICAL REQUIREMENTS
- ELECTRICAL SHOCK HAZARD
- RECOMMENDED GROUNDING METHOD
- IT IS THE CUSTOMER'S RESPONSIBILITY
- NOTE
- TO TEST YOUR POWER SUPPLY CORD
- TOOLS AND PARTS
- PARTS SUPPLIED
- UNPACK THE AIR CONDITIONER
- REMOVE PACKAGING MATERIALS
- LOCATION REQUIREMENTS
- BEFORE YOU BEGIN
- WINDOW INSTALLATION
- PREPARE AIR CONDITIONER FOR INSTALLATION
- ATTACH TOP RAIL
- INSTALL SIDE CURTAINS
- ATTACH ADHESIVE SEAL
- WINDOW AIR CONDITIONER INSTALLATION
- NOTES
- ATTACH SIDE CURTAINS TO WINDOW
- COMPLETE INSTALLATION
- IMPORTANT
- STARTING YOUR AIR CONDITIONER
- ON/OFF
- MODE
- TEMPERATURE
- TO CHANGE THE TEMPERATURE DISPLAY FROM °F TO °C
- FAN
- TIMER SLEEP FILTER
- WIFI
- CONNECT
- USING THE REMOTE CONTROL
- INDICATION SYMBOLS
- DIMMER
- SLEEP MODE
- TIMER
- SWING
- FILTER
- CHANGING AIR DIRECTION
- EXHAUST AIR VENT
- NORMAL SOUNDS
- CLEANING THE AIR FILTER
- CLEANING THE FRONT PANEL
- REPAIRING PAINT DAMAGE
- ANNUAL MAINTENANCE
- AIR CONDITIONER POWER SUPPLY CORD TRIPS (RESET BUTTON POPS OUT)
- AIR CONDITIONER SEEMS TO RUN TOO MUCH
- AIR CONDITIONER CYCLES ON AND OFF TOO MUCH OR DOES NOT COOL
- WATER DRIPS FROM THE REAR OF THE UNIT
- WATER DRIPS FROM CABINET INTO YOUR HOUSE
- SUPER
Brand : HISENSE
Model : AW1422TW1W
Category : Washing machine