
SPK-SB120 - Soundbar Laser - Free user manual and instructions
Find the device manual for free SPK-SB120 Laser in PDF.


| Product Type | Soundbar |
| Brand | Laser |
| Model | SPK-SB120 |
| Dimensions | 75 x 5.8 x 6 cm (29.5 x 2.3 x 2.4 inches) |
| Power Output | 2 x 10 Watts |
| Speaker Size | 2 inches |
| Number of Speakers | 2 |
| Cabinet Material | ABS Plastic (crack resistant) |
| Power Supply | DC 12V via included mains adapter |
| Audio Inputs | Optical, 3.5mm Line In, USB, Bluetooth, FM Radio |
| Bluetooth Version | Not specified (standard, pairing code 0000) |
| Remote Control | Included (battery: coin cell, replaceable) |
| On-Device Controls | Power, Source, Volume +/-, Next/Prev |
| Display | Source indicator (LINE, FM, USB, BLUE, OPT) |
| Subwoofer Output | Yes (S.W OUT, subwoofer not included) |
| Care and Cleaning | Wipe with damp soft cloth; avoid liquids, extreme temperatures, humidity, dust |
| Safety | No user-serviceable parts; place on stable surface; avoid interference with other electronics |
| Package Contents | Soundbar, Optical cable, 3.5mm audio cable, Power adapter, Quick manual |
| Warranty | 12 months against defects (Australia) |
Frequently Asked Questions - SPK-SB120 Laser
User questions about SPK-SB120 Laser
0 question about this device. Answer the ones you know or ask your own.
Ask a new question about this device
Download the instructions for your Soundbar in PDF format for free! Find your manual SPK-SB120 - Laser and take your electronic device back in hand. On this page are published all the documents necessary for the use of your device. SPK-SB120 by Laser.
USER MANUAL SPK-SB120 Laser
IMPORTANT SAFETY INSTRUCTIONS AND PRECAUTIONS
- Read all instructions carefully before use.
- Retain manuals for future reference.
- Use this product only in the manner described.
- Only use a water-dampened soft-cloth to clean the surface of this product.
- The following will damage this product: any liquid such as water or moisture, extreme heat; cold; humidity, dusty or sandy environments.
- Only place this device on stable surfaces and ensure that any attached cables are secure and will not cause the device to fall.
- There are no user serviceable parts in this product.
- Un-authorized attempts to dismantle or repair this product will void product warranty
- Using this device near other electronic devices may cause interference.
PACKAGE INCLUDES
1 X Sound Bar, 1 X Optical Cable, 1 x 3.5mm Audio Jack Cable, 1 x Mains Power Adapter, 1 x Quick User Manual.
CONNECTIONS

| 1 | Output to subwoofer (not supplied) |
| 2 | Optical input (Audio) |
| 3 | DC In 12v (Power for speaker bar) |
THE REMOTE CONTROL

| 1 | ON / OFF Turn | Sound Bar On or Off |
| 2 | MUTE Mute or | Unmute audio |
| 3 | BASS- Surround | sound (sound effects equaliser) |
| 4 | BASS+ Music sound | (sound effects equaliser) |
| 5 | TREBLE- Movie | sound (sound effects equaliser) |
| 6 | TREBLE+ News | (sound effects equaliser) |
| 7 | VOL + Increase | Volume (of sound bar) |
| 8 | CH - Previous music file / Radio station | |
| 9 | PLAY/PAUSE | Pause or Play Audio while playing |
| 10 | CH + Next music file / Radio station | |
| 11 | VOL - Decrease | Volume (of sound bar) |
| 12 | FM Select Audio Input via FM Radio | |
| 13 | BLUETOOTH | Select Audio Input via BLUETOOTH |
| 14 | LINE IN | Select Audio Input via LINE IN |
| 15 | USB | Select Audio Input via USB |
| 16 | OPTICAL | Select Audio Input via OPTICAL INPUT |
ON DEVICE CONTROLS / HARDWARE INPUTS
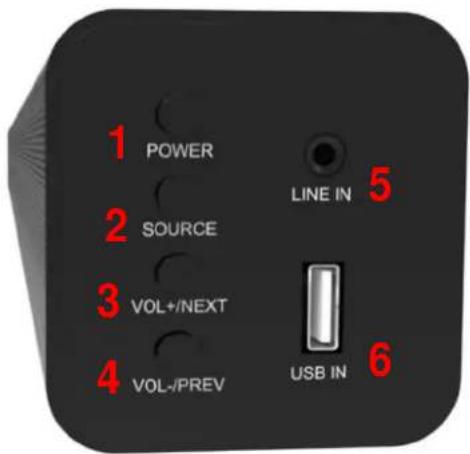
| 1 POWER Turn Sound Bar On or Off | ||
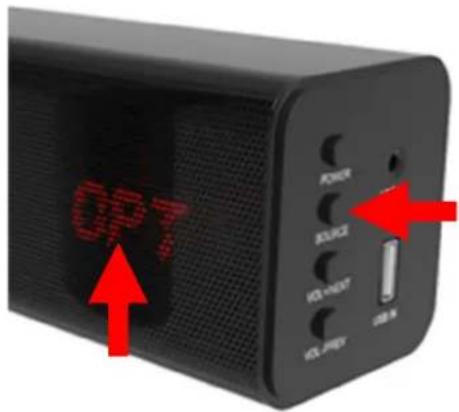
| 2 SOURCE Toggle between audio input sources | ||
| 3 VOL+/NEXT | Increase volume of sound bar OR select next song (or radio station) | |
| 4 VOL-/PREV | Decrease volume of sound bar OR select previous song (or radio station) | |
| 5 LINE IN | Connect any audio device via a 3.5mm headphone audio socket | |
| 6 USB IN | Connect your thumb drive via the USB socket | |
ON DEVICE DISPLAY
| 1 | LINE Select LINE IN Audio Input |
| 2 | FM Select FM RADIO Audio input |
| 3 | USB Select USB Audio input |
| 4 | BLUE Select BLUETOOTH Audio input |
| 5 | OPT Select Optical Audio input |
REPLACING THE BATTERIES
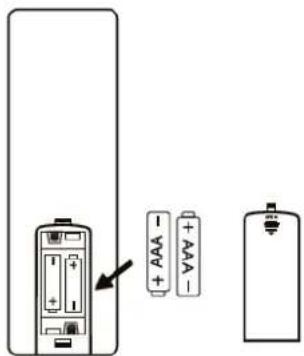
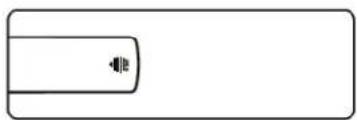
- Open the battery compartment by sliding the cover back.
- Insert the new battery as pictured making you have observed the correct polarity
- Close the battery compartment.
Note: the remote control has a usable angle of 30 degrees from the speaker IR receiver.
natural_image
Simple line drawing of a rectangular shape with a small circular symbol inside, no text or labels present.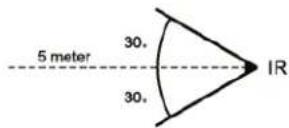
CONNECTING YOUR SPEAKER TO YOUR TV GOOD

natural_image
Product display showing a monitor, a black audio strip, and a close-up of a speaker with headphones (no text or symbols visible)You can connect your sound bar to your TV if you have a headphone / Aux 3.5mm jack. BEST

natural_image
Product display showing a monitor, a black cable with connector, and an optical output device (no text or symbols visible)If your TV has an Optical port, you can connect the sound bar to your TV this way for digital sound. This method is similar in operation to the 3.5mm jack option.
ALL CONNECTION TYPES

flowchart
graph LR
    A["3.5mm Headphone Jack Connect"] --> B["TV"]
    B --> C["Soundbar"]
    D["Optical Connect"] --> E["TV"]
    E --> F["Soundbar"]
    G["ICA to 3.5mm Connect"] --> H["TV"]
    H --> I["Soundbar"]
    J["Bluetooth Connect"] --> K["TV"]
    K --> L["OR Smartphone"]
    M["Soundbar"] --> N["Soundbar"]
CONNECTING VIA
| Connection type | Connection Method | Via on-board buttons Via | Remote Control |
| LINE IN | Via 3.5mm Audio Cable | Connect your audio device to the sound-bar using the 3.5mm cable and press the SOURCE button until the word LINE is shown on front display. | Connect your audio device to the sound-bar using the 3.5mm cable and press the LINE button until the word LINE is displayed. |
| USB (Storage) | Music playback Via USB Storage | Connect your storage device (such as a thumb drive) to the sound-bar and press the SOURCE button until the word USB is shown on the front display. | Connect your storage device (such as a thumb drive) to the sound-bar and press the USB button. The word USB will be shown on the front display. |
| BLUE | Via Bluetooth (Wireless) | Press the SOURCE button until the word BLUE is shown on the front display. Turn on your portable Bluetooth device and follow the pairing instructions above. | Press the BLUE button until the word BLUE is shown on the front display. Turn on your portable Bluetooth device and follow the pairing instructions above. |
| OPT | Via Optical fibre Cable | Connect your Media device (such as BluRay or DVD player) to the sound-bar using an Optical Fibre Cable and press the SOURCE button until the word OPT is shown on the front display. | Connect your Media device (such as BluRay or DVD player) to the sound-bar using an Optical Fibre Cable and press the OPT button. The word will be shown on the front display. |
| FM (Radio) | Listen to FM Radio | Press the SOURCE button until the word FN (meaning FM) is shown on the front display. | Press the FM button. The word FN (meaning FM) will be shown on the front display. |
USING BLUETOOTH
1) Press the INPUT button to toggle to the BT function. "BLUE" will begin to flash on screen, which means the Bluetooth "pairing mode" has been activated.
2) Turn the Bluetooth function on, on your device (smart phone or tablet etc).
3) Scan for new devices, and look for SPK-SB120 to pop up on screen.
4) Once found and selected, you may be prompted for a password to complete the pairing process. The password is 0000 (4 zeros).
5) Once connected and paired, "BLUE" will stop flashing to indicate pairing has been completed.
6) You are now ready to listen to music wireless via your sound bar. Open your music files, select a song and press play.
SPECIFICATIONS
| Output Power 2 x 10 Watt | |
| Speaker size 2 inch | |
| Number of speakers 2 | |
| Vibrating Diaphragm 1 | |
| Cabinet material ABS Plastic (Crack resistant) | |
| Sound bar dimensions 75 x 5.8 x 6cm |
Warranty Against Defects
Laser Corporation Pty Ltd ("Laser") warrants your new product to be free from defects in materials and workmanship for 12 months, from the date of purchase, provided that the product is used in accordance with accompanying recommendations or instructions where provided. The benefit of this warranty is in addition to your rights under the Australian Consumer Law and to other rights and remedies of the consumer under a law in relation to the goods or services to which the warranty relates. Through a network of retailers and resellers, Laser will provide you with your choice of a repair, exchange (where possible) or refund (within Dead on Arrival period) for this product if it becomes defective within the warranty period.
This warranty will no longer apply where the defect is a result of alteration, accident, misuse, abuse, normal wear and tear, neglect or improper storage. Please retain your receipt as proof of purchase How to make a product warranty claim:
Step 1: Find your receipt which proves the date of purchase. Where the date of purchase cannot be verified, your place of purchase or Laser will make an assessment based on the date of manufacture, the condition of the Laser Product and the type of defect.
Step 2a): Contact your place of purchase. They will assess the nature of the fault and repair, replace or fund the product as per their store refund or warranty policy.
Step 2b): If your place of purchase cannot be contacted, then you can contact Laser. Customer Service with details of your defective Laser Product: Phone: (02) 9870 3388; or Email: support@laserco.com.au or online www.laserco.com.au/warranty (click on "Consumers (End Users)"). Our business address is at 1/6-8 Byfield Street, North Ryde, NSW 2113
Step 3: Laser will issue you with a Return Authorisation (RA) number within 48 hours. When requested, send us the defective Product and a copy of your receipt. Laser will cover the cost of the return delivery.
Step 4: Wait for us to contact you. Once we have received your defective Laser Product for inspection, we will inform you of our assessment of your claim within 7 days. When we contact you, we will firstly let you know whether you have a valid claim under this Warranty, and if so, we will inform you whether your defective Laser Product will be replaced or repaired, together with the number of days you can expect to wait to receive your replaced or repaired Laser Product.
Step 5: For further details on warranty cover and returns, please check Terms and Conditions for Warranty Returns section on http://www.laserco.com.au/warranty
Our goods come with guarantees that cannot be excluded under the Australian Consumer Law. You are entitled to a replacement or refund for a major failure and compensation for any other reasonably foreseeable loss or damage. You are also entitled to have the goods repaired or replaced if the goods fail to be of acceptable quality and the failure does not amount to a major failure.

NAVIG[8]R
PRECISION gaming accessories
CONNECT
naum8 GPS ESSENTIALS
iRange!
Brand : Laser
Model : SPK-SB120
Category : Soundbar