
ETB2502J-A - Fridge ELECTROLUX - Free user manual and instructions
Find the device manual for free ETB2502J-A ELECTROLUX in PDF.


| Product Type | Freestanding Refrigerator |
| Brand | Electrolux |
| Model | ETB2502J-A |
| Energy Rating | A+ |
| Annual Energy Consumption | 120 kWh/year |
| Total Net Capacity | 250 L |
| Refrigerator Capacity | 180 L |
| Freezer Capacity | 70 L |
| Dimensions (H x W x D) | 145 x 55 x 60 cm |
| Weight | 45 kg |
| Power Supply | 220-240 V, 50 Hz |
| Climate Class | N, ST |
| Noise Level | 40 dB(A) |
| Cooling System | Static Cooling |
| Defrosting | Manual Defrost for Freezer |
| Adjustable Thermostat | Yes, internal dial |
| Reversible Door | Yes |
| Interior Light | LED |
| Shelves | Tempered Glass (3 adjustable) |
| Door Bins | 3 in door, 1 for bottles |
| Freezer Drawers | 2 |
| Cleaning Instructions | Clean with mild soap and damp cloth; avoid abrasive cleaners |
| Safety | Child lock on control panel (if applicable); anti-tip bracket recommended |
| Spare Parts Availability | Available through Electrolux service centers; model specific |
| Repairability Index | 7.5/10 (estimated) |
Frequently Asked Questions - ETB2502J-A ELECTROLUX
User questions about ETB2502J-A ELECTROLUX
0 question about this device. Answer the ones you know or ask your own.
Ask a new question about this device
Download the instructions for your Fridge in PDF format for free! Find your manual ETB2502J-A - ELECTROLUX and take your electronic device back in hand. On this page are published all the documents necessary for the use of your device. ETB2502J-A by ELECTROLUX.
USER MANUAL ETB2502J-A ELECTROLUX
| ETB2302J-A | ETB2302J-H | EBB2802K-A | EBB2802K-H |
| ETB2502J-A | ETB2502J-H | EBB3402K-A | EBB3402K-H |
| ETB2802J-A | ETB2802J-H | EBB3442K-A | EBB3442K-H |
| ETB3400K-A | ETB3400K-H | EBB3462K-A | EBB3462K-H |
| ETB3440K-A | ETB3440K-H | EBB3702K-A | EBB3702K-H |
| ETB3460K-A | ETB3460K-H | EBB3742K-A | EBB3742K-H |
| ETB3700K-A | ETB3700K-H | EBB3762K-A | EBB3762K-H |
| ETB3740K-A | ETB3740K-H | ||
| ETB3760K-A | ETB3760K-H |
EN Refrigeration
IN Lemari es
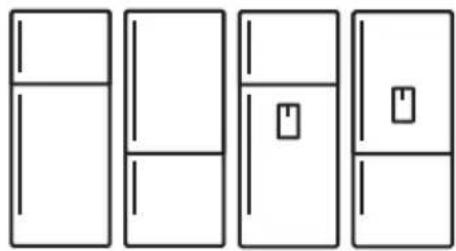
natural_image
Five simple line drawings of refrigerators in vertical and horizontal sections, no text or symbols presentUser Manual
Petunjuk Pengguna
Enjoy peace of mind. Register your appliance today.
Stay updated on better living services, safety notices and shop for accessories.
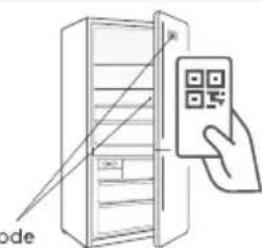
- Open the camera app on your smartphone and point at the QR code to scan
Product Registration QR code is located on the front of the door or internal side wall of your fridge.
-
Tap the notification or link to open the registration form
-
Complete your details and enjoy peace of mind
CONTENTS
- SAFETY INFORMATION .... 3
- DESCRIPTION OF THE APPLIANCE 5
- CONTROL PANEL 19
- INSTALLING YOUR NEW APPLIANCE 24
- USING YOUR REFRIGERATOR 25
- AUTOMATIC ICE MAKER 29....
- CLEANING YOUR REFRIGERATOR 30
- FOOD STORAGE GUIDE ...... 31
- TROUBLESHOOTING 32
- NOISES 35
WE'RE THINKING OF YOU
Thank you for choosing Electrolux. We have designed this product to make your life simpler and deliver impeccable performance for many years. Please spend a few minutes reading this document to get the best from your new Electrolux appliance.
Visit our website to:

Get usage advice or service information www.electrolux.com

Register your product for better service: www.electrolux.com/support/register-warranty
CUSTOMER CARE AND SERVICE
Always use original spare parts.
When contacting our Authorised Service Centre, ensure that you have the following data available: Model, PNC, Serial Number.
The information can be found on the rating plate.
⚠ Warning / Caution-Safety information.
i General information and tips.
Environmental information.
Subject to change without notice.
1. SAFETY INFORMATION
Note: You must read these warnings carefully before installing or using the refrigerator. If you need assistance, contact your customer care centre. The manufacturer will not accept liability, should these instructions or any other safety instructions incorporated in this book be ignored.

WARNING
- It is essential the electric outlet is properly earthed to ground. Consult a qualified electrician if you are unsure.
- Do not use electrical appliances inside the food storage compartments of the appliance, unless they are of the type recommended by the manufacturer.
- Unplug the refrigerator before cleaning or moving it to avoid electric shock.
- Never unplug the refrigerator by pulling the electrical cord as this may damage it. Grip the plug firmly and pull straight out.
- If the power cord is damaged, it must be replaced by the manufacturer, its service agent or similarly qualified persons in order to avoid a hazard
- Don't use a steam cleaner. If live components come into contact with condensing steam, they may short-circuit or cause an electric shock.
- Do not store explosive substances such as aerosol cans with a flammable propellant this appliance. If pressurised aerosol containers bear the word ‘flammable’ and/or a small flame symbol, do not store them inside any refrigerator or freezer. If you do so you may cause an explosion.
- Do not damage the refrigerant circuit.
- This appliance contains insulation formed with flammable blowing gases. Avoid safety hazards by carefully disposing of this appliance.
- If you wish to discard this refrigerator, please contact your local authorities and ask for the correct method of disposal.
- When you dispose of your old refrigerators and freezers, remove any doors. Children can suffocate if they get trapped inside.
- When positioning the appliance, ensure the supply cord is not trapped or damaged.
- Do not locate multiple portable socket-outlets or portable power supplies at the rear of the appliance.

WARNING
R600a refrigerant warning
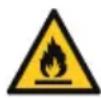
This appliance contains flammable R600a refrigerant. Avoid safety hazards by carefully installing, handling, servicing and disposing of this appliance.
- Ensure that the tubing of the refrigerant circuit is not damaged during transportation and installation.
- Leaking refrigerant may cause eye injuries or ignite.
- The room for installing appliance must be at least 1m^3 per 8g of refrigerant. The amount of refrigerant in the appliance can be found on the rating plate inside the appliance.
- If you are unsure of the refrigerant check the rating plate inside the refrigerator compartment.
- It is hazardous for anyone other than an Authorised Service Person to service this appliance. In Queensland Australia the Authorisation Service Person MUST hold a Gas Work Authorisation for hydrocarbon refrigerants to carry out servicing or repairs which involve the removal of covers.
- Keep ventilation openings in the appliance enclosure or in the built-in structure, clear of obstruction.
- Do not use mechanical devices or other means to accelerate the defrosting process, other than those recommended by the manufacturer.

WARNING
Stable Footing
When your refrigerator is in place, you need to stabilise it. Lift the front of the refrigerator to take the weight off each stability foot and make small quarter turns to each foot until it is in firm contact with the floor. If you intend to move the refrigerator, remember to wind up each foot so that you can move it freely. Repeat the process of the foot adjustment once you have settled on the new location of the refrigerator.
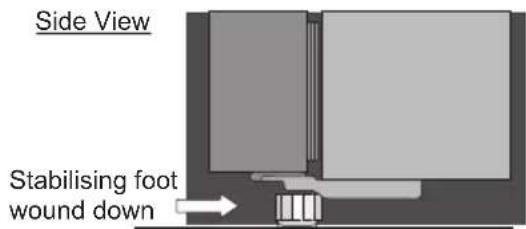
GENERAL WARNINGS
Read the following carefully to avoid damage or injury. It is important to use your refrigerator safely. Check these safety points before using your refrigerator.
• The appliance must be plugged into its own dedicated electrical outlet.
- The plug must be accessible when the refrigerator is in position.
- It is essential the powerpoint is properly earthed to ground. Consult a qualified electrician if you are unsure.
- Don't use extension cords or adapter plugs with this refrigerator.
- If the supply cord is damaged, it must be replaced by the manufacturer, its service agent or similarly qualified persons in order to avoid a hazard.
- Unplug the appliance before cleaning and before changing the light bulb (when fitted) to avoid electric shock.
- Never unplug the refrigerator by pulling the electrical cord as this may damage it. Grip the plug firmly and pull straight out.
- Choose a location for your refrigerator that isn't too cold. The ambient room temperature should be above 10°C.
- Stand your refrigerator in a dry place avoid areas of high moisture or humidity.
- Don't put the refrigerator in frosty or unprotected areas like a garage or on the verandah.
- Don't plug your refrigerator into a timer fitted to the powerpoint.
- Do not put the refrigerator in direct sunlight, near stoves, fires or heaters.
- Do not put the refrigerator on an uneven surface.
- Do not store flammable materials on or under the appliance, e.g. aerosols.
- Do not store explosive substances such as aerosol cans with a flammable propellant in this appliance.
- Never store fizzy drinks in the freezer compartment.
- Never try to repair the refrigerator yourself, only use a qualified or authorised service person for repairs.
- Never use electric heaters or dryers to defrost the freezer because you can receive an electric shock
- When transporting and installing the refrigerator, care should be taken to ensure that no parts of the refrigerating circuit are damaged.
- Keep ventilation openings in the appliance enclosure or in the built-in structure clear of obstruction.
- When installed correctly, your refrigerator should:
– Have adequate space at the back and sides for air circulation.
- Be vertically aligned to the surrounding cupboards.
- Have doors that will self-close from a partially open position.
• The appliance is not to be used by persons (including children) with reduced physical, sensory or mental capabilities, or lack of experience and knowledge, unless they have been given supervision or instruction.
• Children being supervised not to play with the appliance.
NOTE: You must read these warnings carefully before installing or using the refrigerator. If you need assistance, contact your Customer Care Department. The manufacturer will not accept liability, should these instructions or any other safety instructions incorporated in this book be ignored.

Environmental information.
This appliance is intended to be used in household and similar applications such as,
• The kitchen areas in shops, offices and other working environments:
• Farm house and by clients in hotels, motels and other residential type enviroments;
• Bed and breakfast type environments:
• Catering and similar non-retail applications:
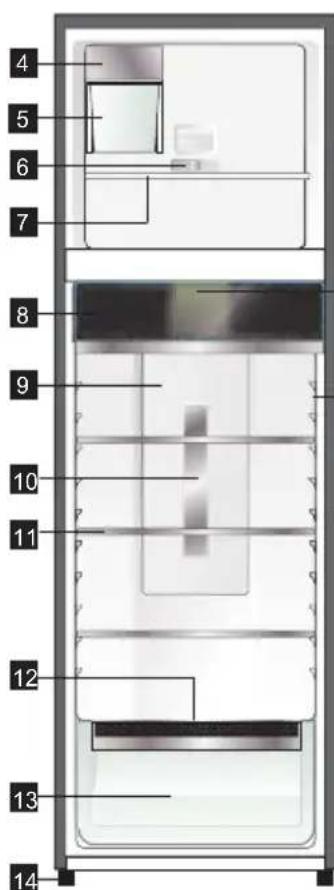
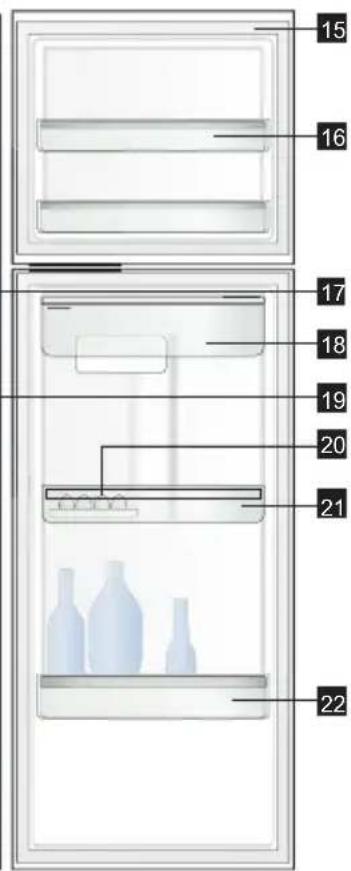
2. DESCRIPTION OF THE APPLIANCE
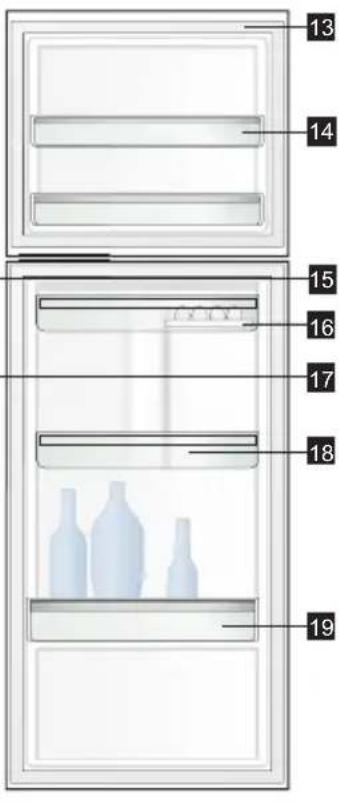
TOP MOUNT REFRIGERATOR FEATURES
- ETB2302J-A
- ETB2502J-A
- ETB2802J-A
- ETB2302J-H
- ETB2502J-H
- ETB2802J-H
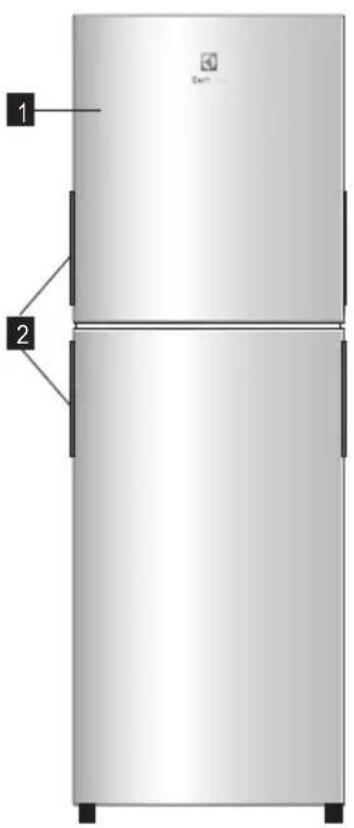
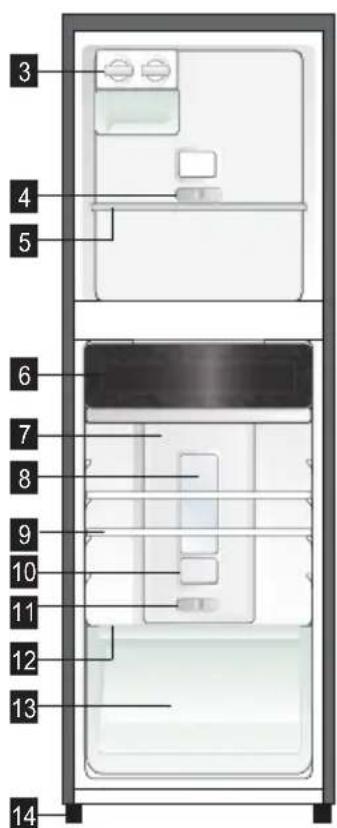
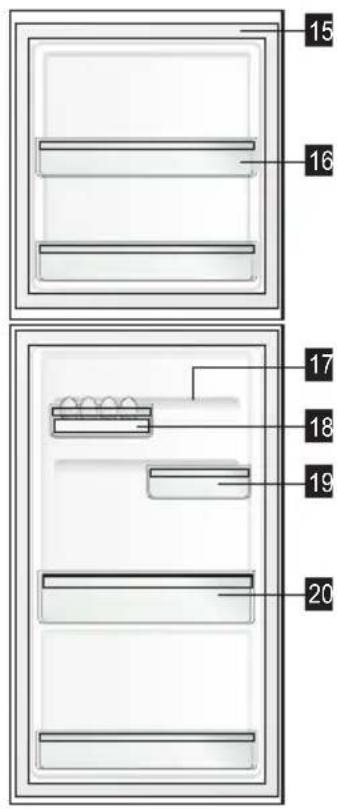
ETB2802 illustrated
The details of the refrigerator feature:
1 Doors Slide Control Refrigerator T
11 emperature
2 Door Handles Humidity Slide
12
3 Ice Twist & Serve Crisper
13
4 emperature
14 FeetSlide Control Freezer T
5
15 GasketsFreezer Shelf
6
16 Door BinsTasteSeal Room
7 Multi Flow
17 FlexStor Rails
8 Refrigerator Light
18 Egg Tray
9 Shelves
19 FlexStor Bins
10 Deoderizer Cover Refrigerator
20 Bottle Bins
Features may vary depending on model. Not all models will have features listed.
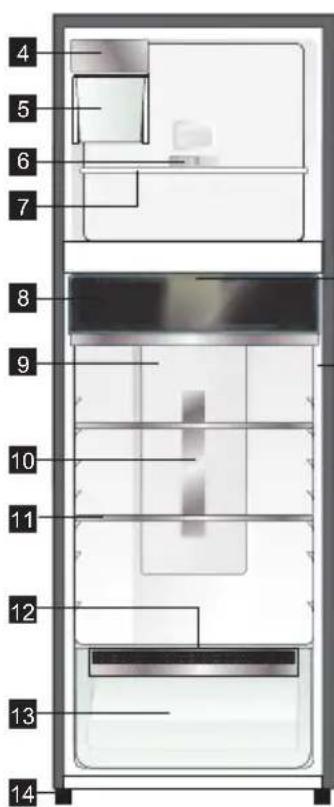
TOP MOUNT REFRIGERATOR FEATURES
- ETB3400K-A
- ETB3400K-H
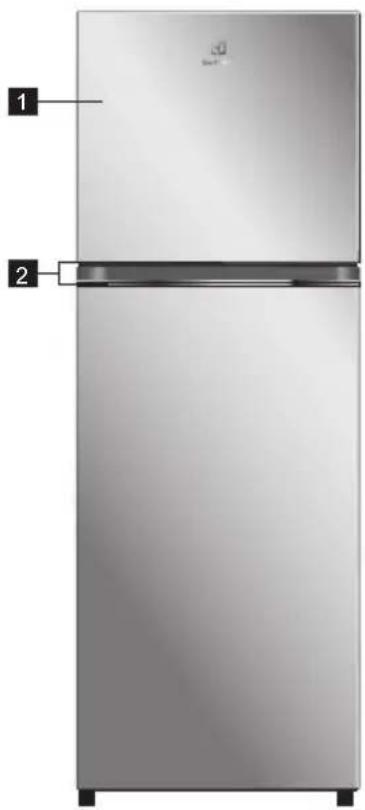
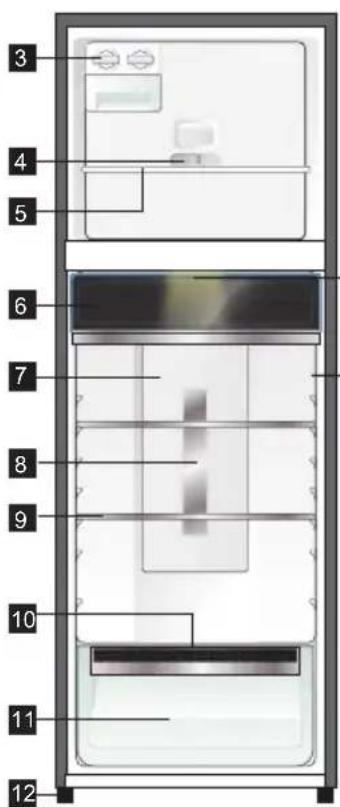
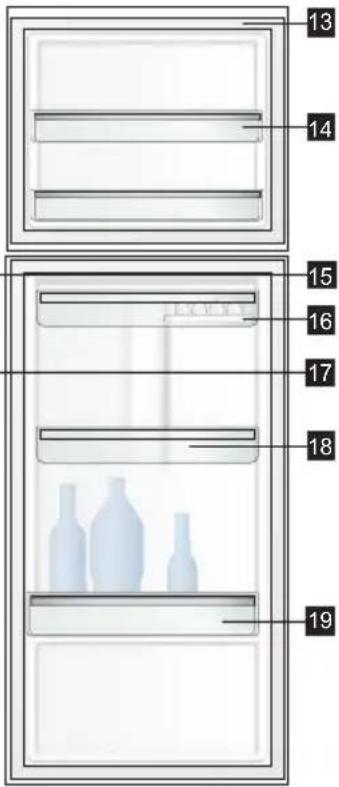
ETB3400 illustrated
The details of the refrigerator feature:
1 Door
2 Door Handles
3 Ice Twist & Serve
4 Slide Control Freezer Temperature
5 Freezer Shelf
6 TasteSeal Room
7 Multi Flow
8 Metal Cover Deoderizer
9 Shelves
10 Auto Humidity Control
11 Crisper
12 Feet
13 Gaskets
14 Door Bins Shallow
15 Refrigerator Light
16 Egg Tray
17 Refrigerator Temperature Control Panel
18 Door Bins Upper
19 Bottle Bin
Features may vary depending on model. Not all models will have features listed.
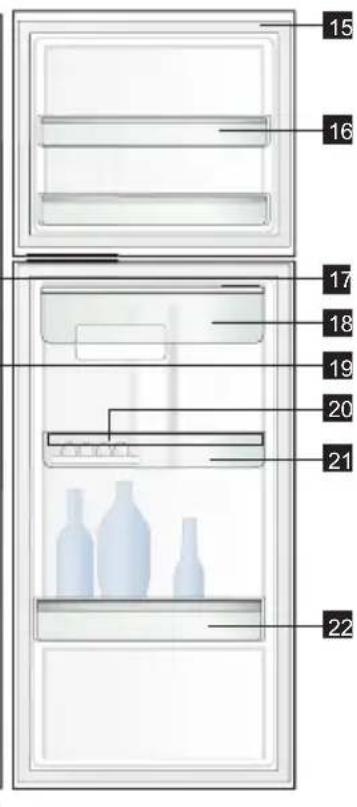
TOP MOUNT REFRIGERATOR FEATURES
- ETB3440K-A
- ETB3440K-H
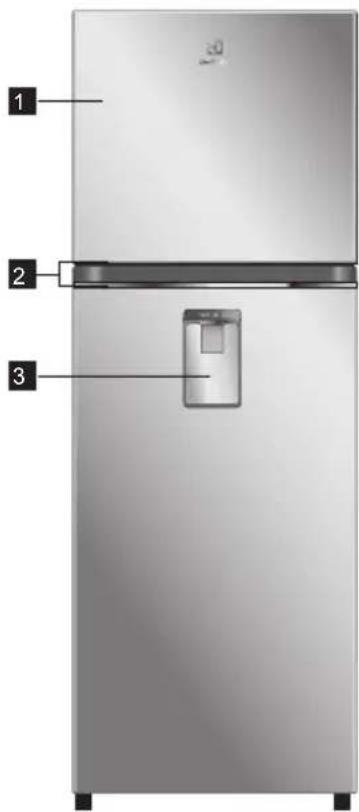
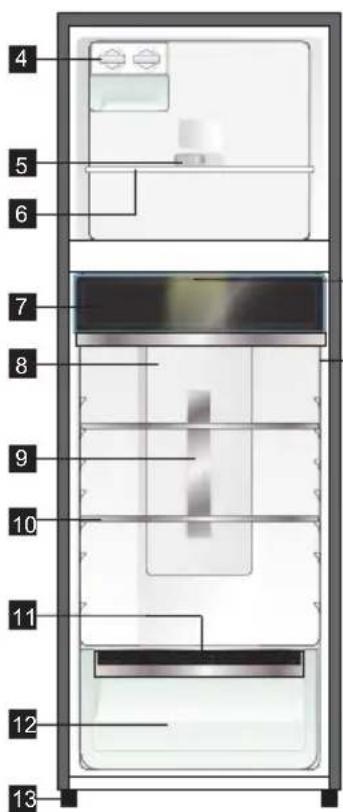
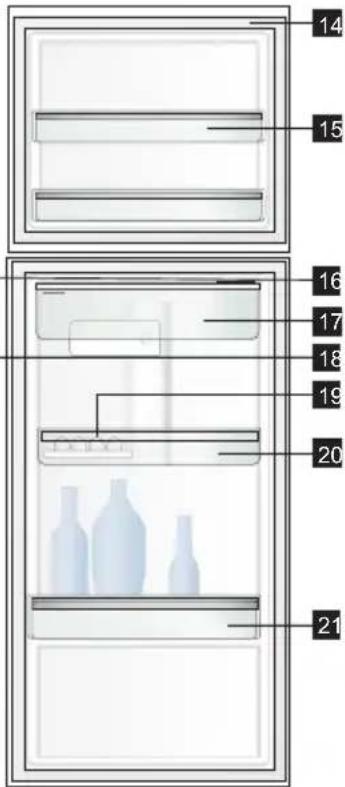
ETB3440 illustrated
The details of the refrigerator feature:
1 Door
2 Door Handles
3 Water Dispenser
4 Ice Twist & Serve
5 Slide Control Freezer Temperature
6 Freezer Shelf
7 TasteSeal Room
8 Multi Flow
9 Metal Cover Deoderizer
10 Shelves
11 Auto Humidity Control
12 Crisper
13 Feet
14 Gaskets
15 Door Bins Shallow
16 Refrigerator Light
17 Water Tank
18 Refrigerator Temperature Control
19 Panel Egg Tray
20 Door Bin Upper
21 Bottle Bin
Features may vary depending on model. Not all models will have features listed.
TOP MOUNT REFRIGERATOR FEATURES
- ETB3460K-A
- ETB3460K-H
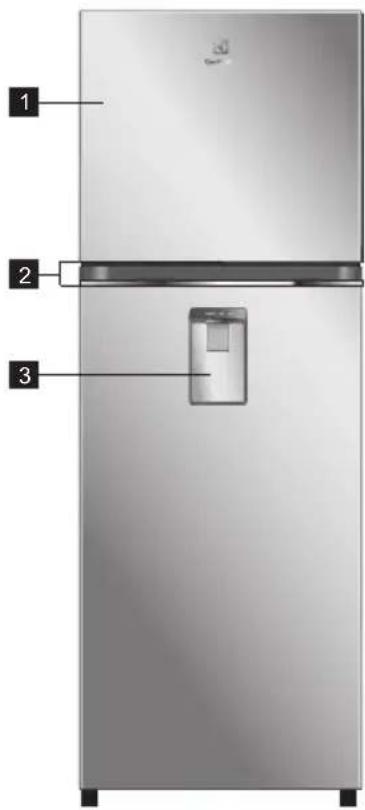
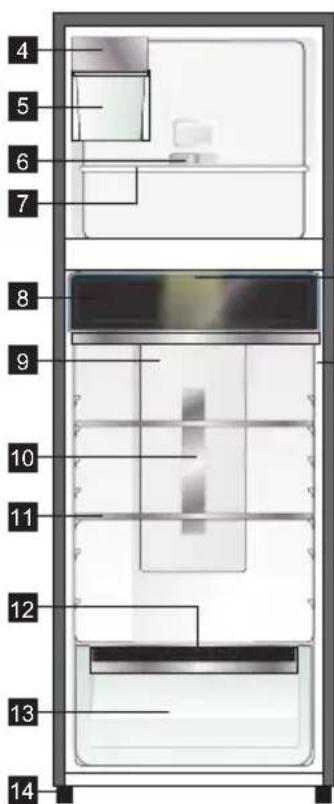
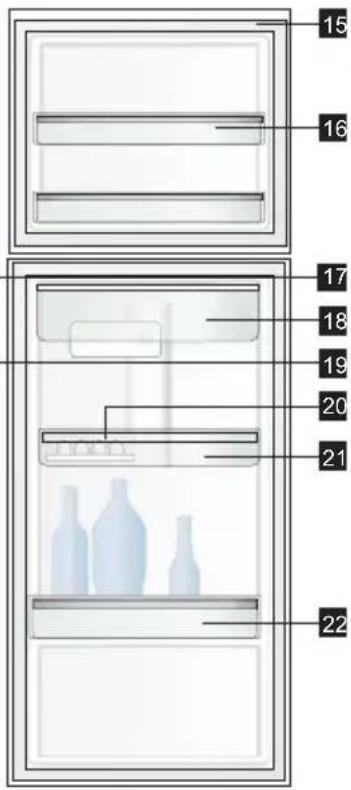
ETB3460 illustrated
The details of the refrigerator feature:
1 Door Auto Humidity Control
2 Door Handles Crisper
3 Water Dispenser Feet
4
5
6 Slide Control Freezer Temperature
7 Freezer Shelf
8 TasteSeal Room
9 Multi Flow
10 Metal Cover Deoderizer
11 Shelves
12
13
14
15 GasketsAuto Ice Maker
16 Door Bins ShallowIce Bin
17 Refrigerator Light
18 Water Tank
19 Refrigerator Temperature Control Panel
20 Egg Tray
21 Door Bin Upper
22 Bottle Bin
Features may vary depending on model. Not all models will have features listed.
TOP MOUNT REFRIGERATOR FEATURES
- ETB3700K-A
- ETB3700K-H
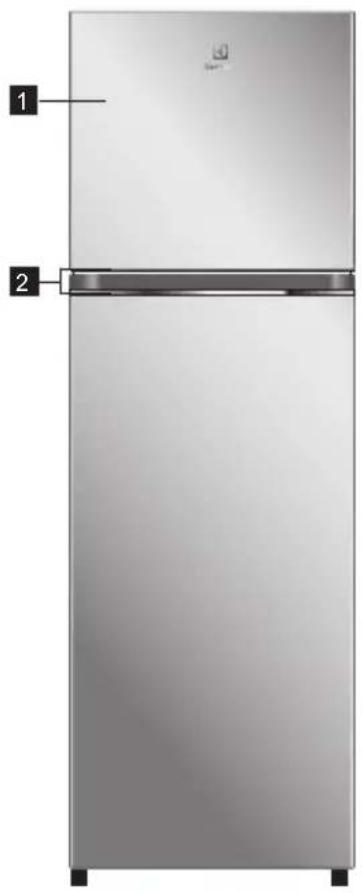
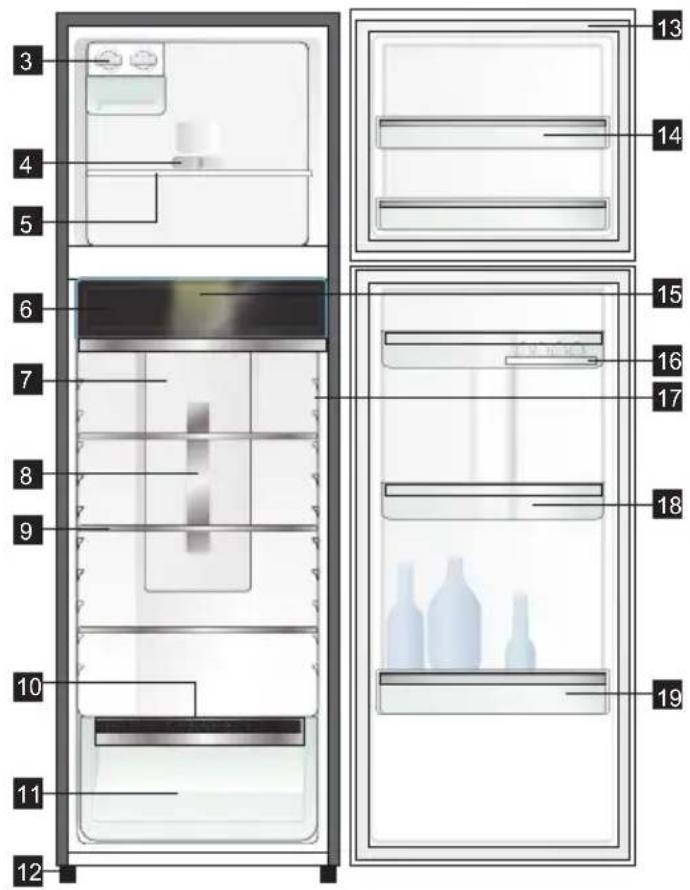
ETB3700 illustrated
The details of the refrigerator feature:
1 Door Crisper
2 Door Handles Feet
3 Ice Twist & Serve Gaskets
4 Temperature
5 Freezer Shelf
6
7 Multi Flow
8 Metal Cover Deoderizer
9 Shelves
10 Auto Humidity Control
11
12
13
14 Door Bins ShallowSlide Control Freezer
15 Refrigerator Light
16 Egg TrayTasteSeal Room
17 Refrigerator Temperature Control Panel
18 Door Bins Upper
19 Bottle Bin
Features may vary depending on model. Not all models will have features listed.
TOP MOUNT REFRIGERATOR FEATURES
- ETB3740K-A
- ETB3740K-H
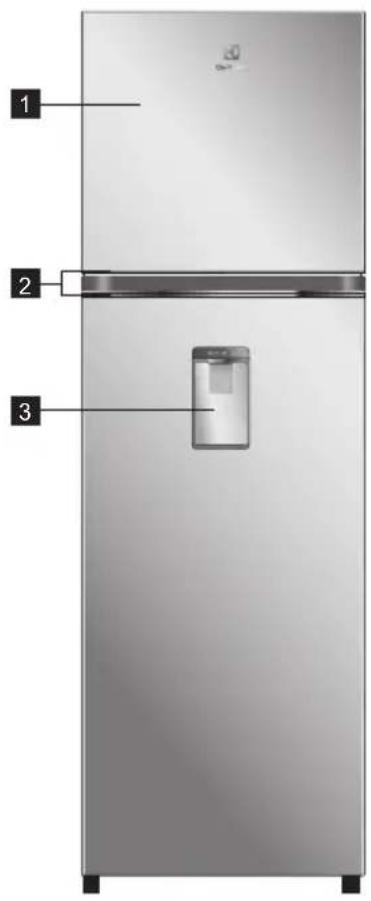
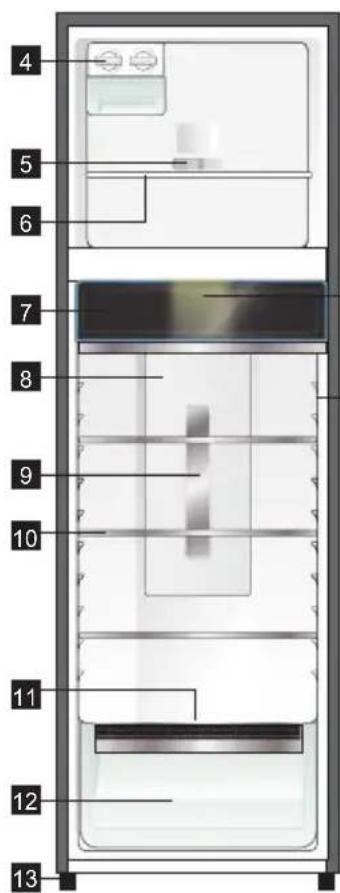
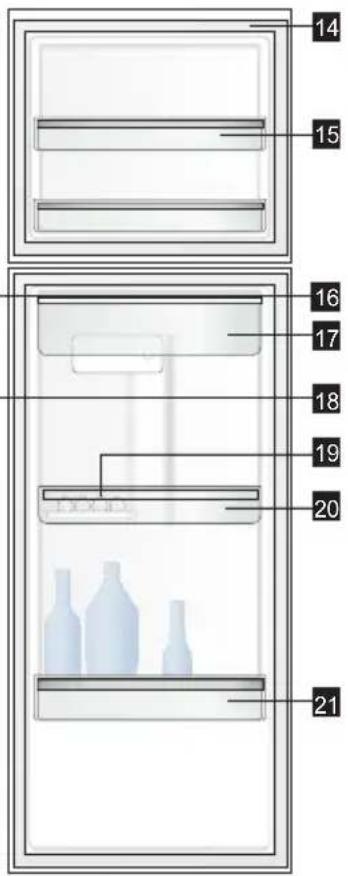
ETB3740 illustrated
The details of the refrigerator feature:
1 Door
2 Door Handles
3 Water Dispenser
4 Ice Twist & Serve Door Bins Shallow
5 Slide Control Freezer Temperature
6 Freezer Shelf
7 TasteSeal Room
8 Multi Flow
9 Metal Cover Deoderizer
10 Shelves
11 Auto Humidity Control
12 Crisper
13 Feet
14 Gaskets
15
16 Refrigerator Light
17 Water Tank
18 Refrigerator Temperature Control Panel
19 Egg Tray
20 Door Bin Upper
21 Bottle Bin
Features may vary depending on model. Not all models will have features listed.
TOP MOUNT REFRIGERATOR FEATURES
- ETB3760K-A
- ETB3760K-H
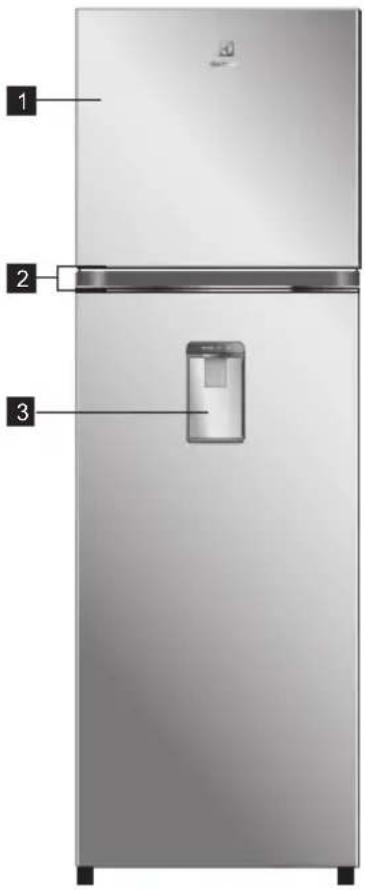
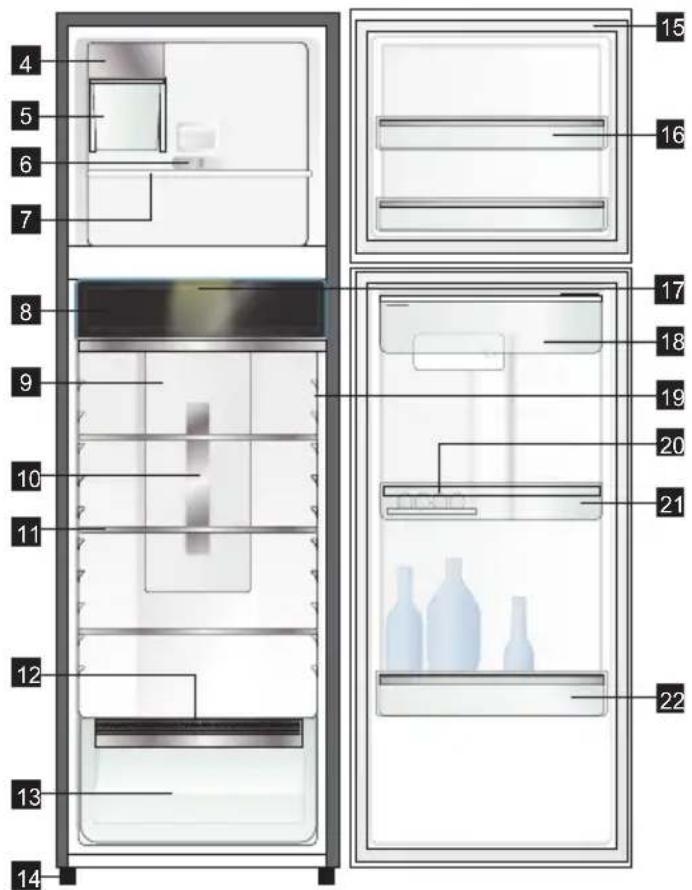
ETB3760 illustrated
The details of the refrigerator feature:
1 Door Auto Humidity Control
2 Door Handles Crisper
3 Water Dispenser
4
5
6 Slide Control Freezer Temperature
7 Freezer Shelf
8 TasteSeal Room
9 Multi Flow
10 Metal Cover Deoderizer
11 Shelves
12
13
14 Feet
15 GasketsAuto Ice Maker
16 Door Bins ShallowIce Bin
17 Refrigerator Light
18 Water Tank
19 Refrigerator Temperature Control Panel
20 Egg Tray
21 Door Bin Upper
22 Bottle Bins
Features may vary depending on model. Not all models will have features listed.
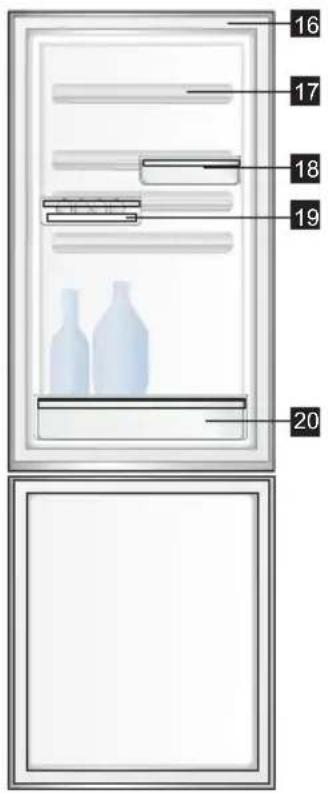
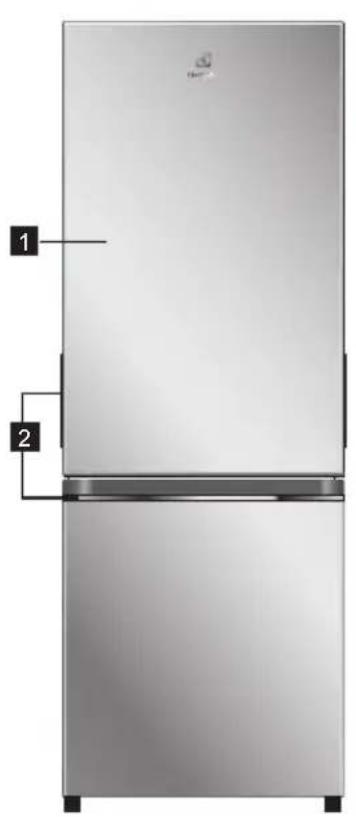
BOTTOM MOUNT REFRIGERATOR FEATURES
- EBB2802K-A
- EBB2802K-H
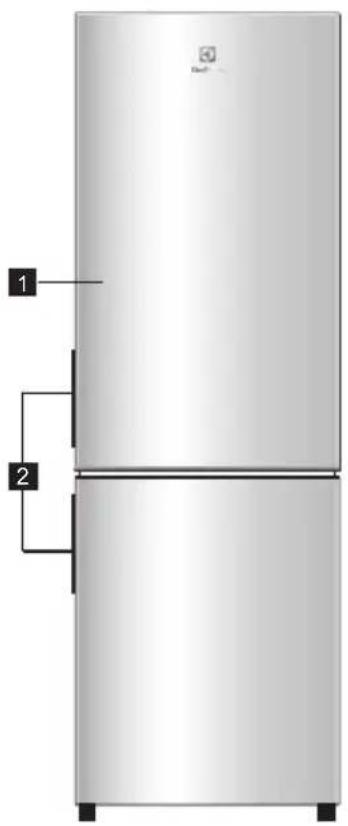
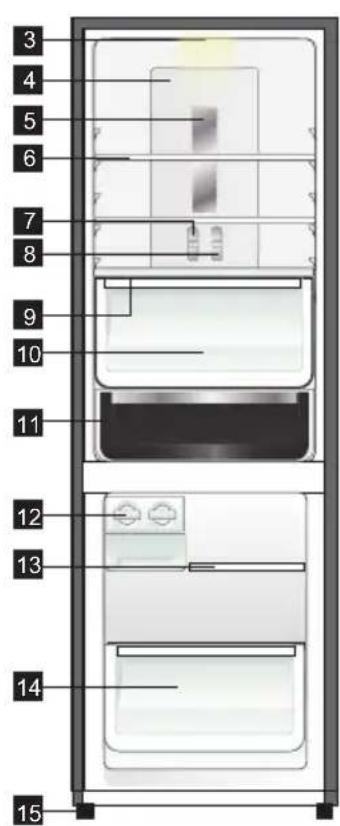
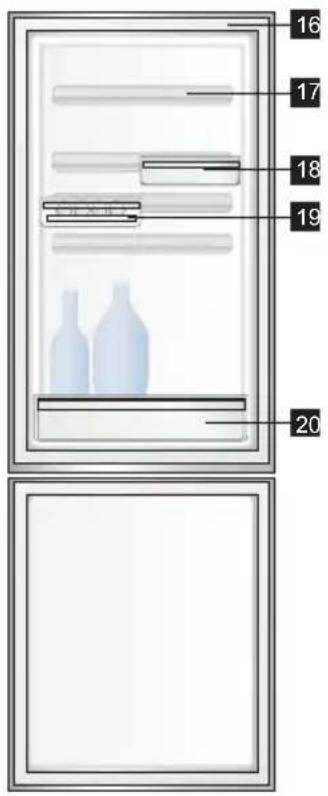
EBB2802 illustrated
The details of the refrigerator feature:
1 Door
2 Door Handles
3 Refrigerator Light
4 Multi Flow
5 Metal Cover Deoderizer
6 Shelves
7 Slide Control Refrigerator Temperature
8 Slide Control Freezer Temperature
9 Humidity Slide
10 Crisper
11 TasteSeal Room
12 Ice Twist & Serve
13 Freezer Shelf
14 Freezer Drawer Lower
15 Feet
16 Gaskets
17 FlexStor Rails
18 FlexStor Bins
19 Egg Tray
20 Bottle Bin
Features may vary depending on model. Not all models will have features listed.
BOTTOM MOUNT REFRIGERATOR FEATURES
- EBB3402K-A
- EBB3402K-H
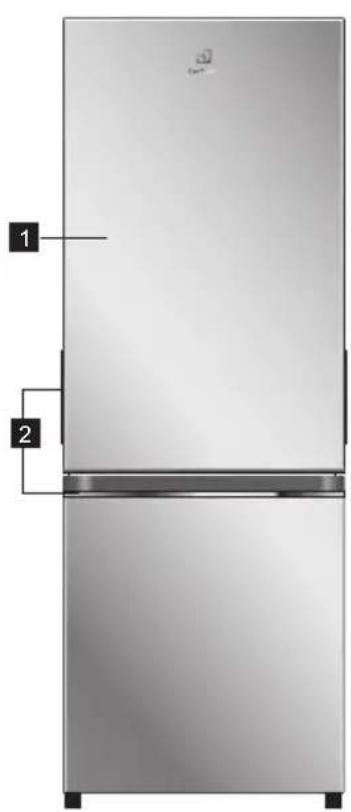
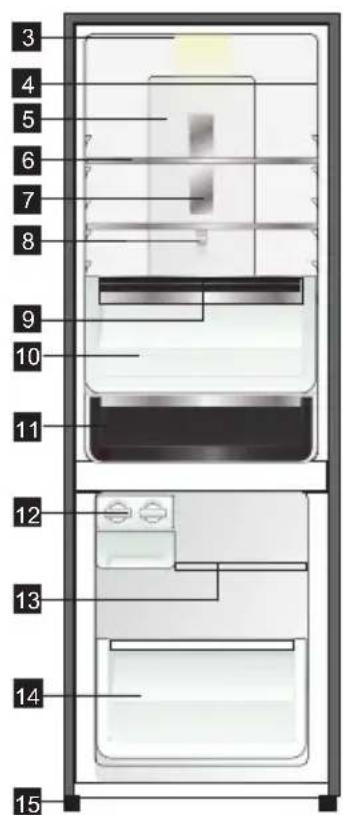
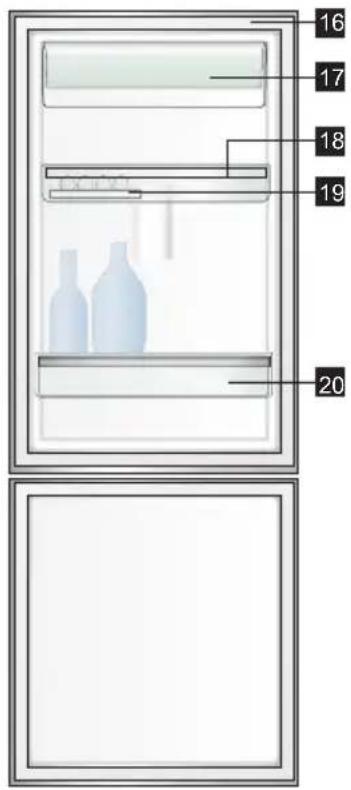
EBB3402 illustrated
The details of the refrigerator feature:
1 Door
2 Door Handles
3 Refrigerator Light
4 Refrigerator Temperature Control Panel
5 Multi Flow
6 Shelves
7 Metal Cover Deoderizer
8 Slide Control Freezer Temperature
9
10 Crisper
11 TasteSeal Room
12 Ice Twist & Serve
13 Freezer Shelf
14 Freezer Drawer Lower
15 Feet
16 Gaskets
17 Door Bin Dairy
18 Door Bin Upper
19 Egg TrayAuto Humidity Control
20 Bottle Bin
Features may vary depending on model. Not all models will have features listed.
BOTTOM MOUNT REFRIGERATOR FEATURES
- EBB3442K-A
- EBB3442K-H
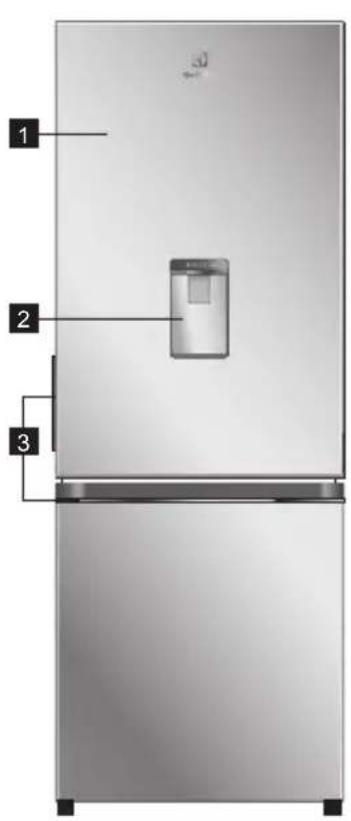
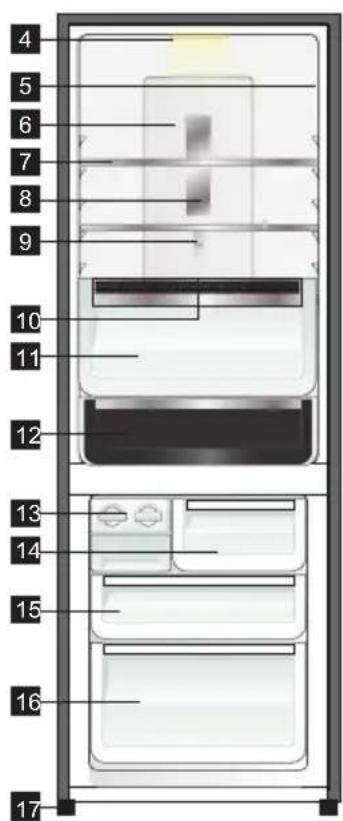
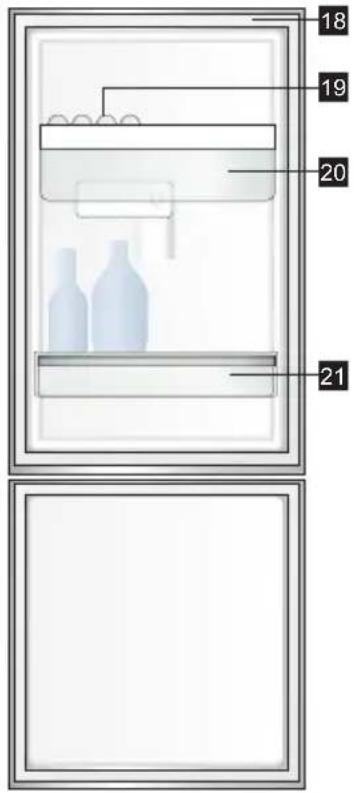
EBB3442 illustrated
The details of the refrigerator feature:
1 Door
2 Water Dispenser
3 Door Handles
4 Refrigerator Light
5 Refrigerator Temperature Control Panel
6 Multi Flow
7 Shelves
8 Metal Cover Deoderizer
9 Slide Control Freezer Temperature
10 Auto Humidity Control
11 Crisper
12 TasteSeal Room
13 Ice Twist & Serve
14 Drawer meat Box
15 Drawer Middle
16 Freezer Drawer Lower
17 Feet
18 Gaskets
19 Egg Tray
20 Water Tank
21 Bottle Bin
Features may vary depending on model. Not all models will have features listed.
BOTTOM MOUNT REFRIGERATOR FEATURES
- EBB3462K-A
- EBB3462K-H
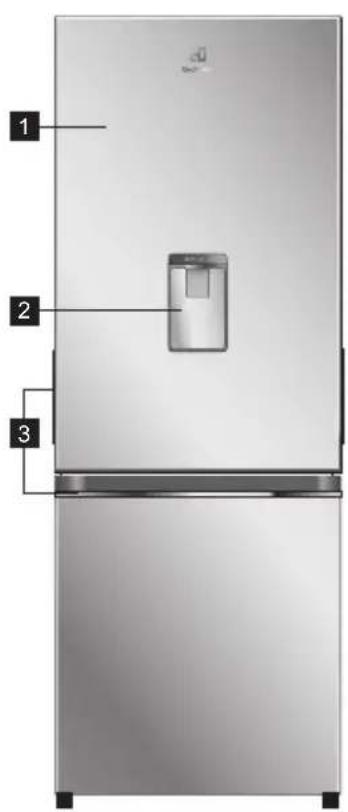
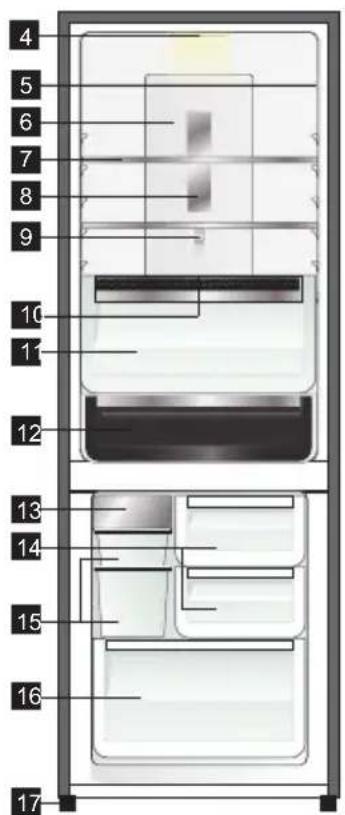
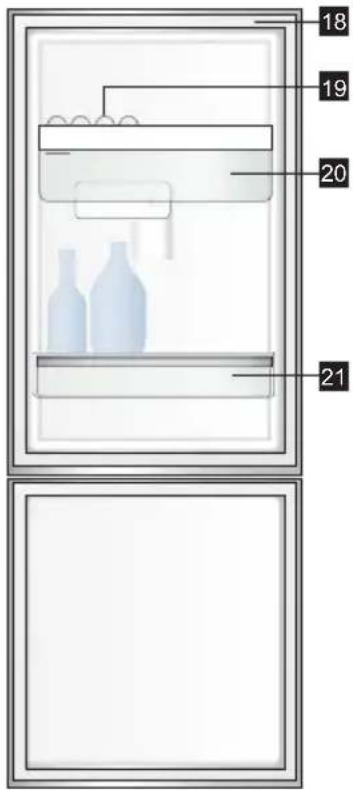
EBB3462 illustrated
The details of the refrigerator feature:
1 Door
2 Water Dispenser
3 Door Handles
4 Refrigerator Light
5 Refrigerator Temperature Control Panel
6 Multi Flow
7 Shelves
8 Metal Cover Deoderizer
9 Slide Control Freezer Temperature
10 Auto Humidity Control
11 Crisper
12 TasteSeal Room
13 Room Auto Ice Maker
14 Drawer Meat Boxes
15 Ice Bin Small/Large
16 Freezer Drawer Lower
17 Feet
18 Gaskets
19 Egg Tray
20 Water Tank
21 Bottle Bin
Features may vary depending on model. Not all models will have features listed.
BOTTOM MOUNT REFRIGERATOR FEATURES
- EBB3702K-A
- EBB3702K-H
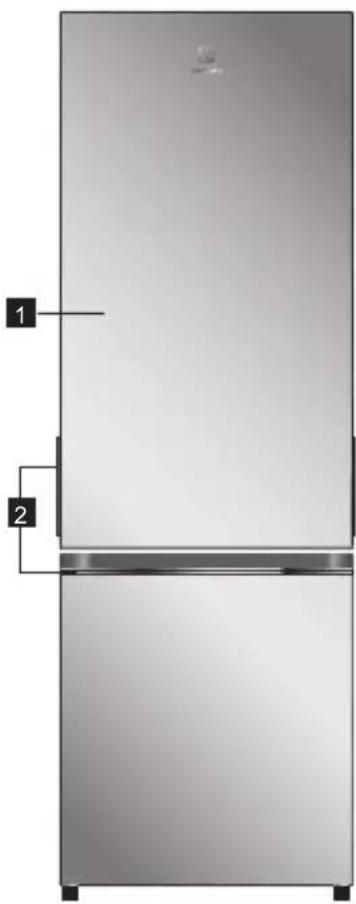
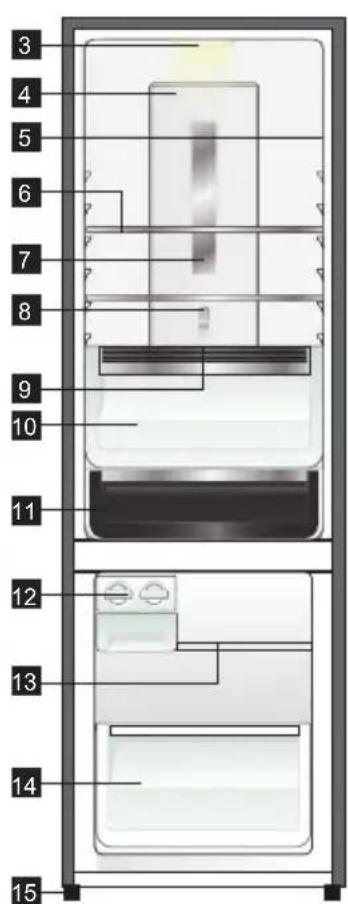
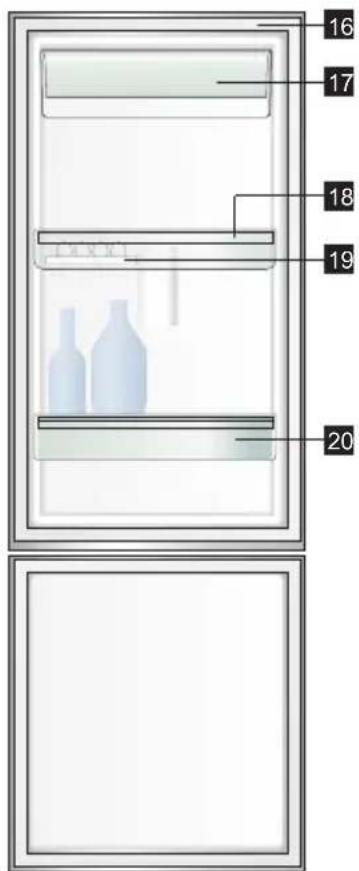
EBB3702 illustrated
The details of the refrigerator feature:
1 Door
2 Door Handles
3 Refrigerator Light
4 Multi Flow
5 Refrigerator Temperature Control Panel
6
7
8
9 Auto Humidity Control
10 Crisper
11 TasteSeal Room
12 Ice Twist & Serve
13 Freezer Shelf
14 Freezer Drawer Lower
16 GasketsShelves
17 Door Bin DairyMetal Cover Deoderizer
18 Door Bin UpperSlide Control Freezer
19 Egg Tray
20 Bottle Bin
Features may vary depending on model. Not all models will have features listed.
BOTTOM MOUNT REFRIGERATOR FEATURES
- EBB3742K-A
- EBB3742K-H
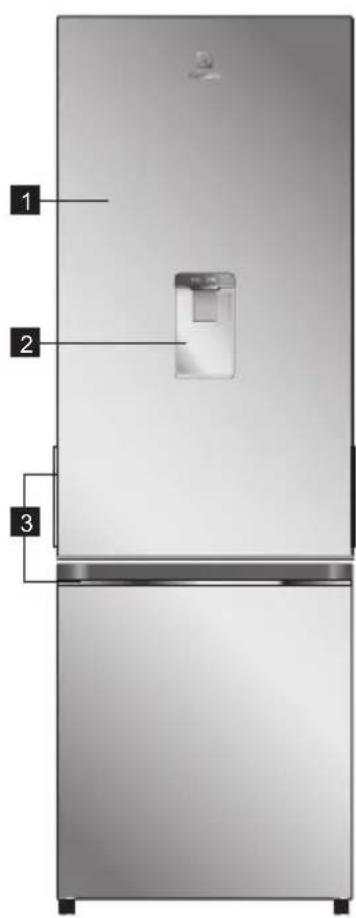
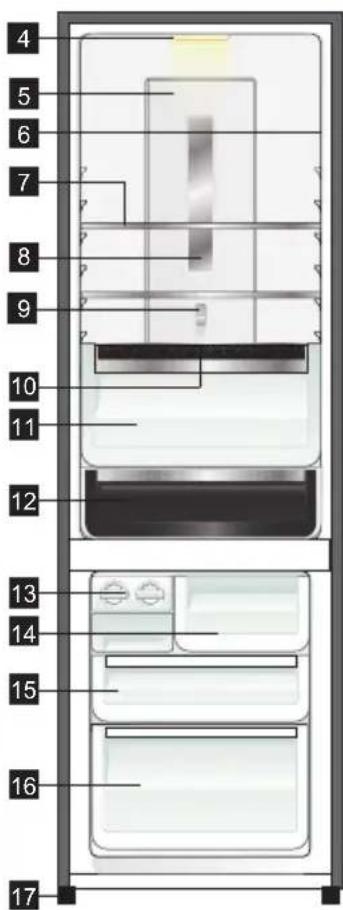
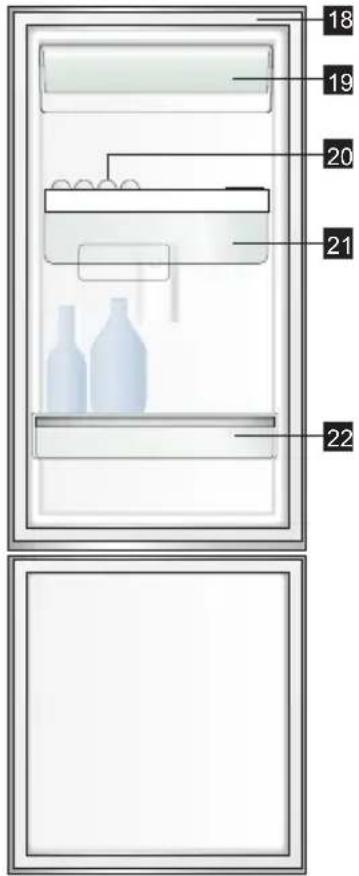
EBB3742 illustrated
The details of the refrigerator feature:
1 Door
2
3
4 Refrigerator Light
5 Multi Flow
6 Refrigerator Temperature Control Panel
7 Shelves Gaskets
8 Metal Cover Deoderizer
9 Slide Control Freezer Temperature
10 Auto Humidity Control
11 Crisper
12 TasteSeal Room
13 Ice Twist & ServeWater Dispenser
14 Freezer Drawer MeatDoor Handles
15 Freezer Drawer Middle
16 Freezer Drawer Lower
18
19 Door Bin Dairy
20 Egg Tray
21 Water Tank
22 Bottle Bin
Features may vary depending on model. Not all models will have features listed.
BOTTOM MOUNT REFRIGERATOR FEATURES
- EBB3762K-A
- EBB3762K-H
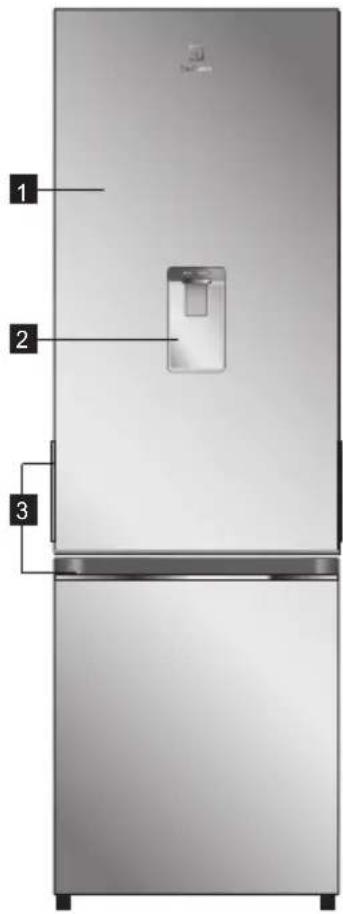
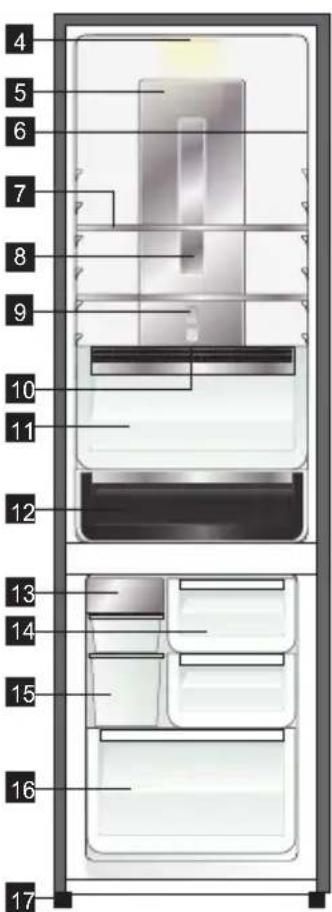
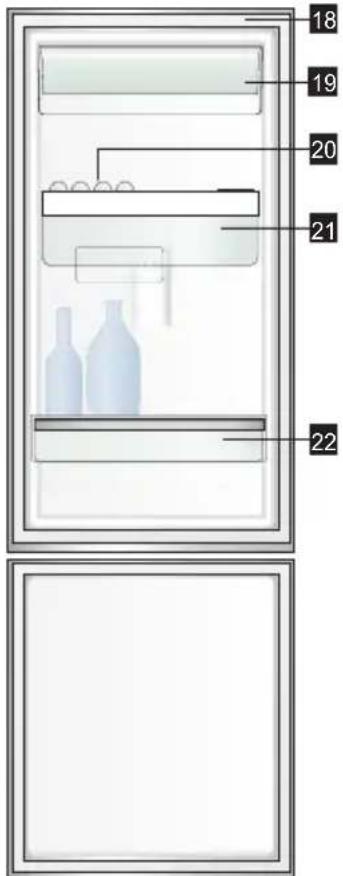
EBB3762K illustrated
The details of the refrigerator feature:
1 Door
2
3
4 Refrigerator Light
5 Multi Flow
6 Refrigerator Temperature Control Panel Fee
7 Shelves Gaskets
8 Metal Cover Deoderizer
9 Slide Control Freezer Temperature
10 Auto Humidity Control
11 Crisper
12 TasteSeal Room
13 Auto Ice MakerWater Dispenser
14 Drawer Meat BoxesDoor Handles
15 Bin Ice Small/Large
16 Freezer Drawer Lower
18
19 Door Bin Dairy
20 Egg Tray
21 Water Tank
22 Bottle Bin
Features may vary depending on model. Not all models will have features listed.
3. CONTROL PANEL.
3.1 TEMPERATURE CONTROL
When you first turn on the refrigerator, set both the refrigerator and freezer temperature control to normal. Please refer to the below section for information on adjusting refrigerator and freezer temperature.

When you set a temperature, you set an average temperature for the whole refrigerator cabinet.
Checking the softness of ice cream is a good indication that your freezer is the right temperature, while checking the temperature of water kept in the refrigerator is a good way of checking the temperature of the food compartment.
Temperatures inside each compartment may vary, depending on how much food you store and where you place it.
High or low room temperature may also affect the actual temperature inside the refrigerator.
When you change the temperature settings, make small adjustments and wait 24 hours before assessing whether you need to make any further changes.
DESCRIPTION OPERATION / PRIMARY FUNCTION
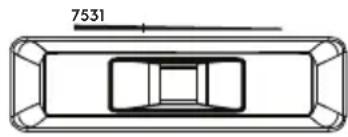
Top mount
natural_image
Technical line drawing of a rectangular frame with internal compartments and a dimension label '7531' (no text or symbols beyond the label)Freezer temperature adjustment.
- Select the freezer control.
- Slide the control to the left to set it to colder (No.7).
- Slide the control to the right to set less cold (No.1).
Bottom mount freezer
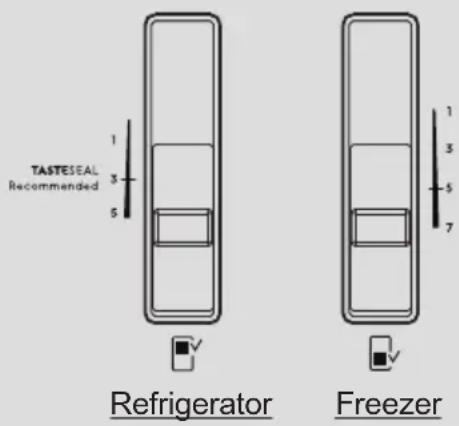
Refrigerator temperature adjustment.
- Select the refrigerator control.
- Slide the control down to set it to colder (No.5).
- Slide the control up to set less cold (No.1).
Freezer temperature adjustment.
- Select the freezer control.
- Slide the control down to set it to colder (No.7).
- Slide the control up to set less cold (No.1).
Recommended Freezer Setting
Room Temp. Setting
Below 15^ 7
Above 15^ 5
Only install refrigerator indoors where the room temperature is above 10^

Setting the freezer temperature to colder is not recommended for normal or very hot climate condition as this will limit the cooling capacity to other sections of the refrigerator. In very cold climate the freezer will need to be set colder.
3.2 ABOUT THE USER INTERFACE
ETB3400K-A
ETB3400K-H
ETB3440K-A
ETB3440K-H
ETB3700K-A
- ETB3700K-H
ETB3740K-A
ETB3740K-H
- EBB3402K-A
- EBB3402K-H
- EBB3442K-A
-
EBB3442K-H
-
EBB3702K-A
- EBB3702K-H
- EBB3742K-A
- EBB3742K-H
flowchart
graph TD
    A["REFRIGERATOR"] --> B["Colder"]
    A --> C["TASTESEAL Recommended"]
    A --> D["Less Cold"]
    E["TEMP"] --> F["Refrigerator temperature scale icons"]
    F --> G["Temperature adjustment"]
DESCRIPTION OPERATION / PRIMARY FUNCTION
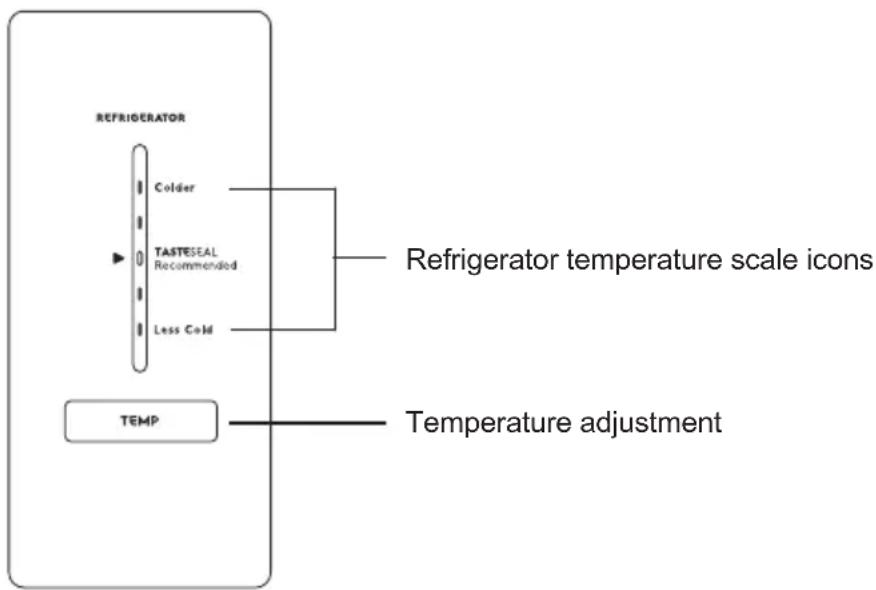
Refrigerator temperature scale icons
- Indicates the temperature setting of the refrigerator compartment.
Temperature adjustment Temperature Control
- Touch the 'TEMP' button to awaken control.
- Touch the 'TEMP' button to decrease the refrigerator temperature. There are 5 temperature settings indicated by the illumination sequence on the display. Once the coldest temperature is reached the display will return to the warmest setting with the next press.
ABOUT THE USER INTERFACE
ETB3460K-A
- EBB3462K-A
ETB3760K-A
- EBB3762K-A
- EBB3462K-H
- EBB3462K-H
ETB3760K-H
- EBB3762K-H
flowchart
graph TD
    A["Off"] --> B["Icemaker status indicator icon"]
    C["Fast"] --> B
    D["On"] --> B
    E["ICEMAKER"] --> F["Icemaker adjustment"]
    G["Colder"] --> H["Refrigerator temperature scale icons"]
    I["TASTESEAL Recommended"] --> H
    J["Less Cold"] --> H
    K["TEMP"] --> L["Temperature adjustment"]
    M["REFRIGERATOR"] --> L
DESCRIPTION OPERATION / PRIMARY FUNCTION
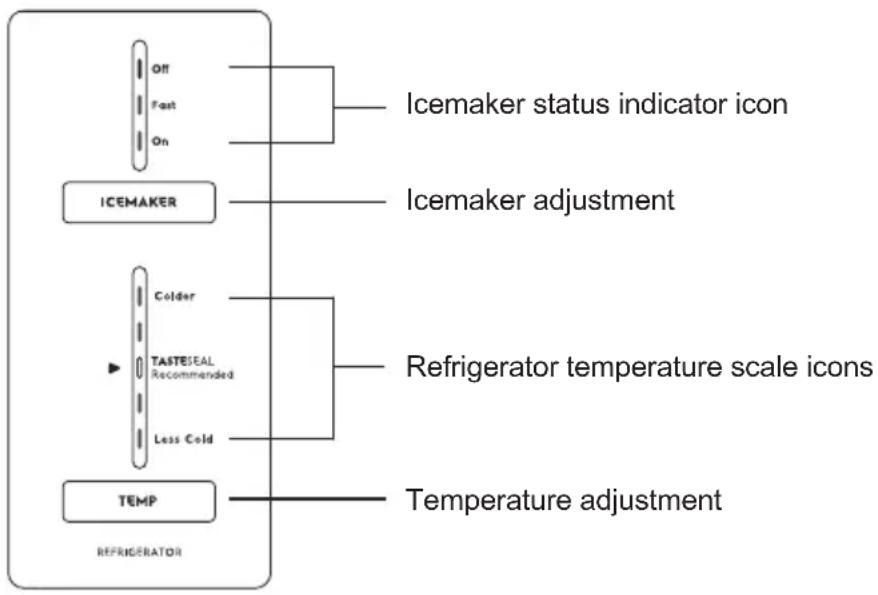
Icemaker status indicator icon
• Show operation status.
Icemaker adjustment
- This button selects the status of ice maker. (On, Off and activate Fast Ice)
Refrigerator temperature scale icons
- Indicates the temperature setting of the refrigerator compartment.
Temperature adjustment Temperature Control
- Touch the 'TEMP' button to awaken control.
- Touch the 'TEMP' button to decrease the refrigerator temperature. There are 5 temperature settings indicated by the illumination sequence on the display. Once the coldest temperature is reached the display will return to the warmest setting with the next press.
3.3 ERROR CODE & ALARMS
ERROR CODES
ERROR CODE WHAT IT MEAN ...
Communication error
LED_5 flashes with 1sec interval
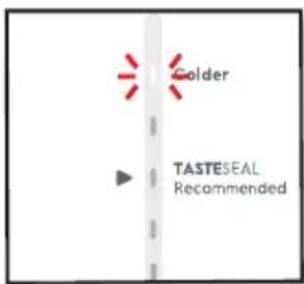
If you see the top temperature icon is flashing it means that the control has lost contact with the main control board.
The appliance will operate at its last known setting, all auxiliary functions will not work.
WHAT TO DO ...
Turn the unit off at the electric outlet for 5 minutes and then turn it back on.
Under most circumstances this will reset the display enabling normal function to continue.
If the error re-occurs then call for service.
Sensor - Open Circuit /
Short Circuit
Non-icemaker
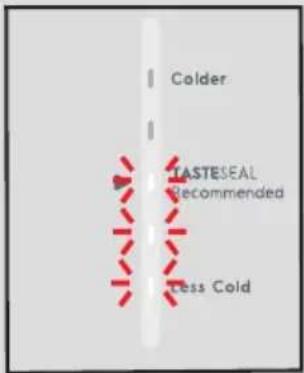
If you see any combination of the first, second and third icons are flashing it means that an error has been detected on a sensor.
The refrigerator will run in a default cycle to prevent food spoilage.
Call for service.
With icemaker
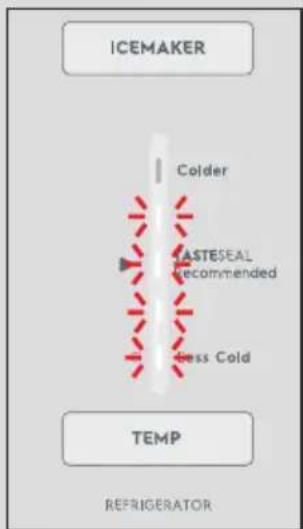
If you see any combination of the first, second, third and fourth and all temperature icons are flashing it means that an error has been detected on a sensor.
The refrigerator will run in a default cycle to prevent food spoilage.
Call for service.
ALARMS
ALARM ICON WHAT IT MEANS
Non-icemaker
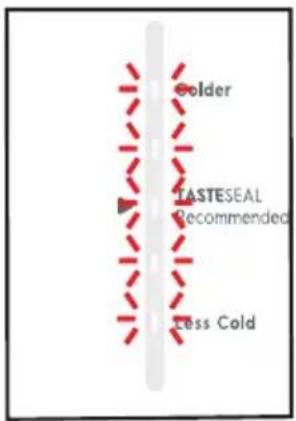
Activates if the refrigerator or freezer doors are left open for longer than 2 minutes.
An alarm will sound and the affected compartment icon will flash and the temperature and icons will fade on and off.
OPERATION
Alarm will sound and icon will flash indicating which door is open.
To silence the alarm for 8 minutes while the door is open press any button (the icons will continue to flash until door is closed).
With icemaker
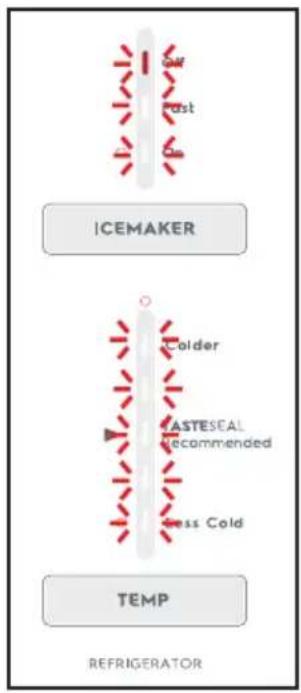
Activates if the refrigerator or freezer doors are left open for longer than 2 minutes.
An alarm will sound and the affected compartment icon will flash and the temperature and icons will fade on and off.
Alarm will sound and icon will flash indicating which door is open.
To silence the alarm for 8 minutes while the door is open press any button (the icons will continue to flash until door is closed).
4. INSTALLING YOUR NEW APPLIANCE
Clean the refrigerator thoroughly according to instruction, and wipe away any dust that has accumulated during shipping.
Check that the floor is level. If it is not then adjust the provided leveling leg so product is level and stable.
We recommend that you let your refrigerator run for two to three hours before you put any food in it. This will allow you to check that it is operating properly and that enough cool air is going to the freezer.
Clearance around your Top and Bottom Mount refrigerator;
- Allow a minimum of 30mm clearance on both sides of the refrigerator.
- Allow 50mm clearance at the back of the refrigerator.
- Allow a minimum of 10mm clearance above the hinge cover.
- If you do not have a cupboard with allowance for air flow above the refrigerator, the recommended clearance area on top increases to 90 mm.
- When positioned in a corner area, spacing of at 350mm on the hinge side will allow the doors to open enough to enable the removal of bins and shelves.
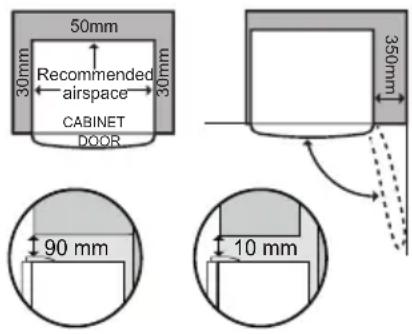
NOTE: In installation where both sides and the rear of the refrigerator are not enclosed by cabinetry e.g. the refrigerator is placed against a wall, the clearance between the rear of refrigerator and the wall should not be greater than 75mm.
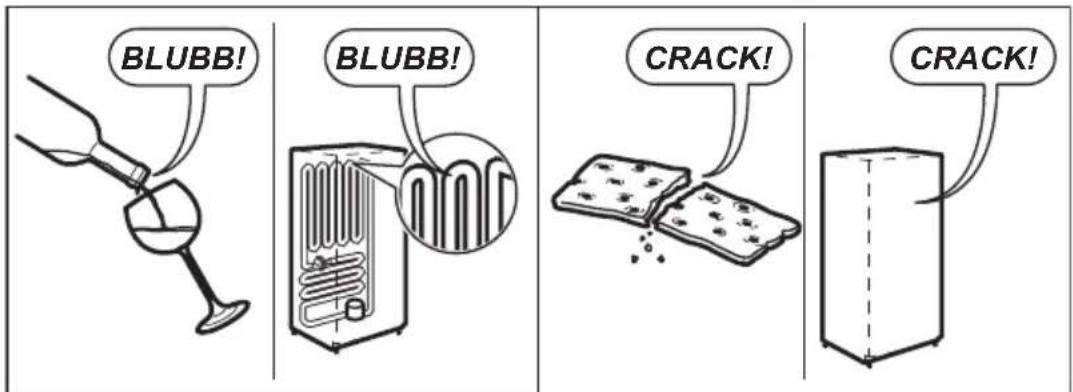
You refrigerator uses energy efficient components that may produce different noises (Refer “Noises” page for examples) to your old refrigerator. Occasionally a gurgling sound of refrigerator flowing or the sound of parts expanding and contracting can be heard. These noises are quite normal.
Installing your refrigerator
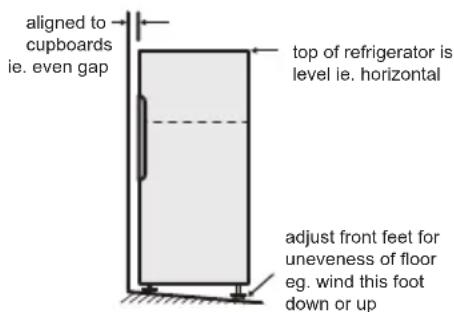
- Roll the refrigerator into place, the rollers are designed for forward or backward movement only, they are not castors. Moving the refrigerator sideways may damage your floor and the rollers. Before moving your refrigerator, ensure height adjusting nut and the stability foot are fully wound up off the floor.
- Wind the height adjusting nut under door hinge down until the refrigerator is tilted back by 10mm (see diagram).
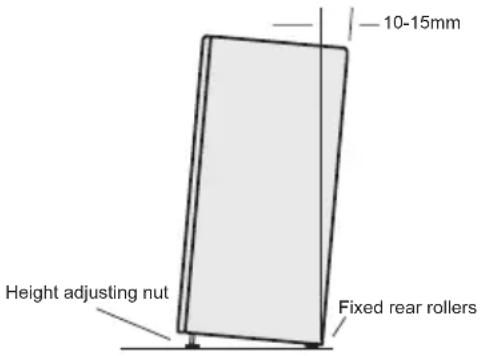
- Wind the height adjusting nut on the handle side down until the refrigerator is level and stable. If you have difficulty winding the nut or height adjusting foot down, have someone tilt the refrigerator back so you have better access.
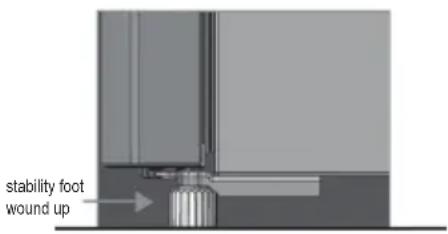
- Check the alignment of the refrigerator to the surrounding cupboards to see if it is level. You can adjust the level as detailed in step 2 and 3.
5. USING YOUR REFRIGERATOR
Refrigerators work by transferring heat from the food inside to the outside air. This operation makes the back and sides of the refrigerator feel warm or even hot particularly at start-up and on warm days – this is normal.
Avoid placing food against the air vents in the refrigerator as it affects efficient circulation. If the door is opened frequently, a light frosting will occasionally occur on the freezer's interior. This is normal and will clear after a few days. If the freezer door is accidentally kept open, a heavy frost will coat the inside walls and should be removed.
Your new refrigerator uses a high-speed compressor, along with other energy-efficient components, which may make unusual sounds and be more noticeable at night and quieter times. These sounds simply indicate your refrigerator is working how it should. They include:
- Compressor running noises; modern, high-efficiency compressors run much faster than older models.
• Air movement noise from the small fan motor:
• A gurgling sound, similar to water boiling;
• A popping noise, heard during automatic defrosting; and
- A clicking noise, prior to compressor start-up. Further details can be found in the Troubleshooting Guide.
• Automatic icemaker, while icemaker producing ice sounds of ice cubes falling in to ice bin pumping and/or water filling may be heard.

For bottom mount refrigerators (where freezer is below the fresh food compartment):
- Ensure all freezer drawer and shelves are pushed back completely to prevent them from keeping the door open.

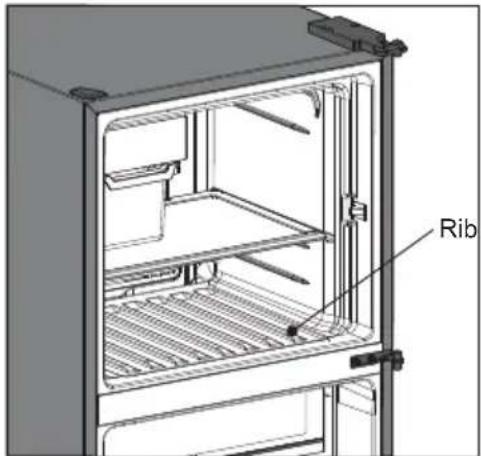
For top mount refrigerators (where the freezer is on top of the fresh food compartment).
- Don't place food forward of the ribs on the freezer floor, as it will obstruct the door from closing.
5.1 USING AND REMOVING FEATURES
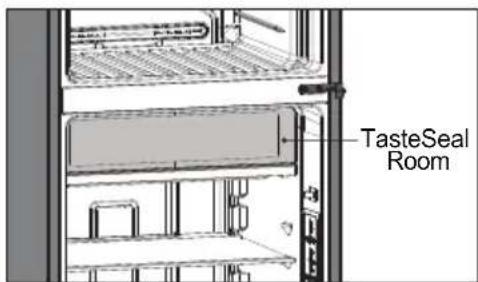
5.1.1 TasteSeal Room
Use the TasteSeal compartment to store meat, snack, beverage and dairy products. You can adjust TasteSeal temperature by adjusting the refrigerator temperature control.
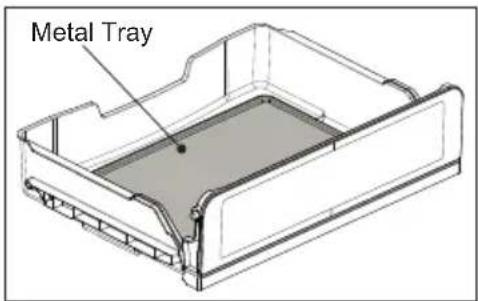
5.1.2 Metal Tray (Option for ETB3\*\* and EBB3\*\* models)
Metal tray locate in TasteSeal room and can lift off from plastic body for cleaning follow to instruction in this manual.
Avoid direct contact with food stuff that contain high acid or alkali and clean it immediately when found any stain.

CAUTION
Do not use in hot cooking or oven cooking stoves.
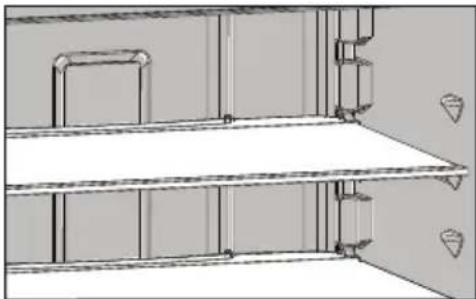
5.1.3 Glass Shelves
To remove the shelves, gently pull them forward until the shelf comes clear of the shelf guides.
To return the shelf, make sure there is nothing behind that may obstruct movement. Gently push the shelf, into the cabinet and back into position.
natural_image
Architectural line drawing of a two-story cabinet or shelf with structural beams and doors (no text or symbols)5.1.4 Deodorizer
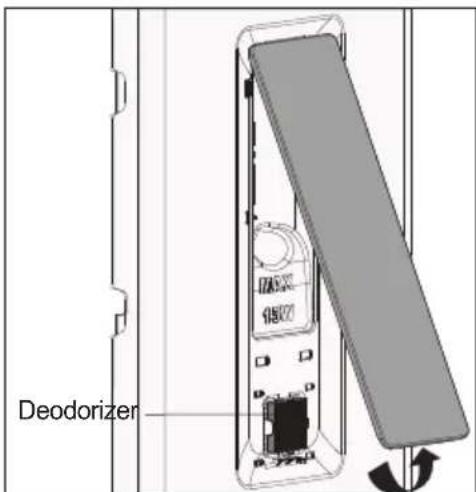
Your refrigerator is fitted with Deodorizer to assist with the removal of food odours inside your refrigerator. Keeping the food covered and wrapping it in plastic will also help to reduce the odours inside your refrigerator.
5.1.5 Crisper Drawer
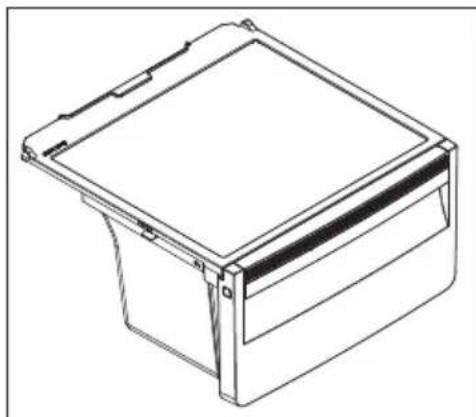
Crisper drawer is designed for storing fruits, vegetables, and other fresh produce. Crisper have an auto humidity membrane in front of crisper cover to maintain optimum humidity for longer fresh vegetables.
natural_image
Technical line drawing of a mechanical component with a square top and rectangular base (no text or symbols)- To empty food from the crisper. On some models it will be necessary to remove the bottle storage bins.
- Remove the crisper by pulling forward, then up and forward again.
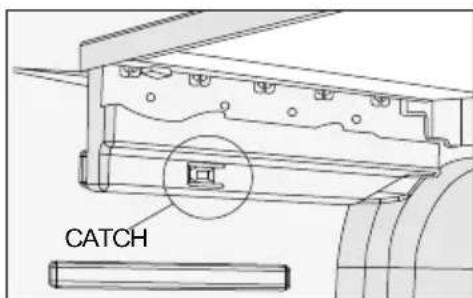
- For top mount models, remove the crisper shelf by lifting the catches on the left and right underside of the shelf and pulling the shelf forward.
Auto humidity membrane automatically releases excess moisture and maintains optimal humidity for your fresh vegetables, maintaining the taste, texture and freshness.
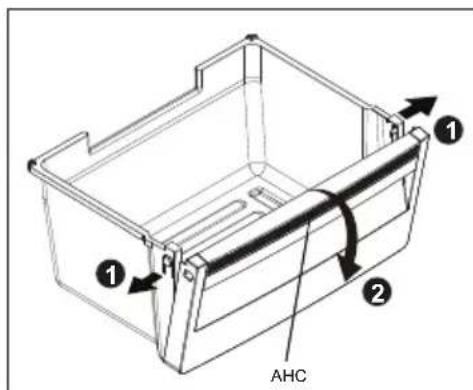
To remove the Auto humidity membrane part follow these step:
- Unclip the both side clips and,
- Lift off from crisper drawer.

It's not required to replace the Auto humidity membrane unless it becomes damaged or ruined. If the membrane becomes soiled or dirty, it can be washed with soap and water. Ensure membrane is dry before putting back in crisper drawer. Please contact our service provider when need to replace your AHC membrane.
5.1.6 Crisper bin
- Storing Vegetables Usethe crisper bin to store vegetables, fruits or small items. You can adjust the humidity inside the bin by sliding the humidity control. Model ETB2** and EBB2** have slide control.
5.1.7 Door storage bins
Both the refrigerator and freezer have door storage bins.
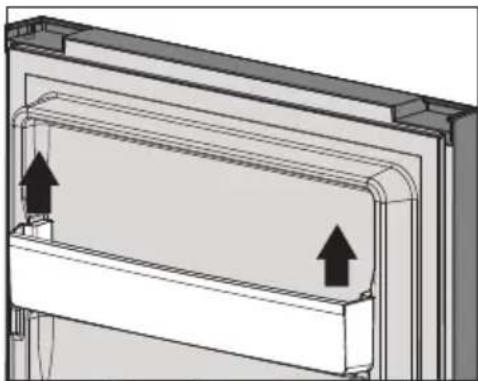
You can adjust the refrigerator bins to meet different storage needs. All the door bins are completely removable for cleaning. If you want to remove or adjust a bin, lift and unlock from lugs to remove. To replace, lift up and push bin down until the support lugs lock it in place.
natural_image
Technical diagram of a mechanical assembly with two upward-pointing arrows indicating motion or force directions (no text or symbols present)5.1.8 Water Tank

CAUTION
BEFORE REMOVE; to empty the water in the tank.
To remove the water tank and disassembly cleanable parts follow these steps:
- Press 2 clips on side of water tank to unlock water tank from lugs and hold on the tank.
- Pull out the water tank.
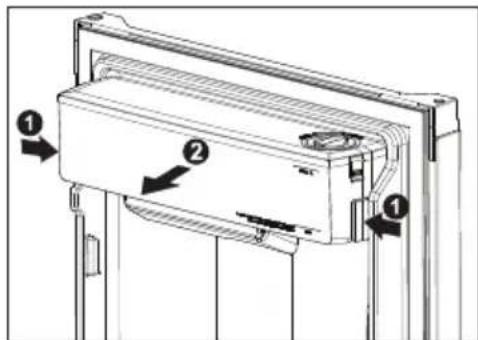
- Rotate tank cover lid up and off from the cover.
- Unclip the both side clips and lift off from water tank.
- Screw the water valve off from tank.
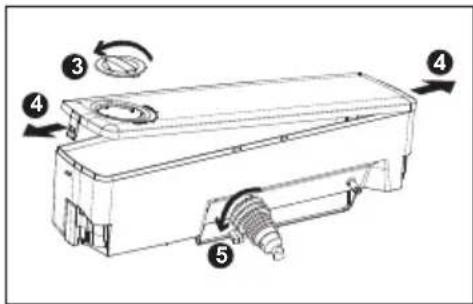
- Remove nozzle rubber and o-ring from water valve.
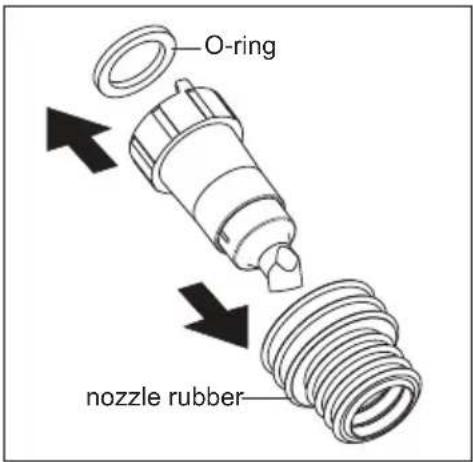
Reverse the step to assembly the water tank and return to its place.
NOTE: Screw in the water valve to water tank till stopper touch the rip and the water valve nozzle must be point down as picture.
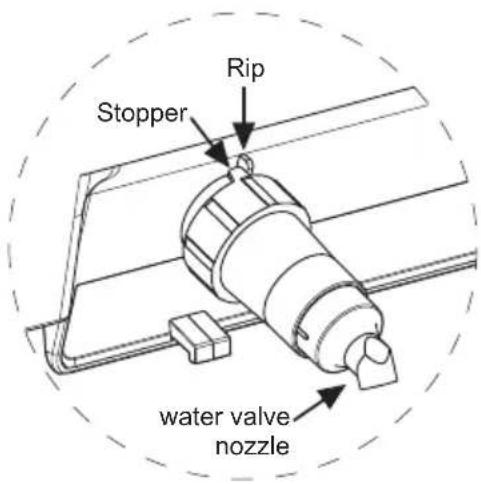

CAUTION
LED lighting
Your appliance is fitted with long life LED lighting. In the unlikely event the LED lights should fail, then the LED lights should be serviced by the manufacturer.
Refer to the warranty page for contact details.
6. Automatic Ice Maker
The automatic ice making function pumps water from the water tank located in the refrigerator and dispenses it into the automatic ice maker in the freezer.
The ice will then be dropped into the ice bin located beneath the ice maker. If the water tank is empty or lower than level, the ice maker will automatically turn off after 3 attempts at pumping water from the tank. The ice maker indicator on the user interface shows the operational status of the ice maker (Refer control instructions).
In case water tank is empty and ice maker show "off" status with red light, you simply can fill up water and just have to select "ICEMAKER" to be "on" again to turn on ice maker to continuous making ice.
Water Tank Refilling
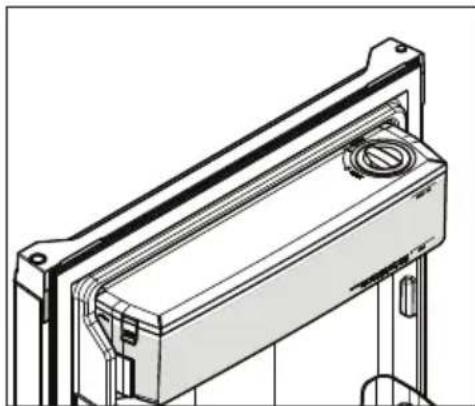
Step 1. Open the tank cover lid up and off from the cover.
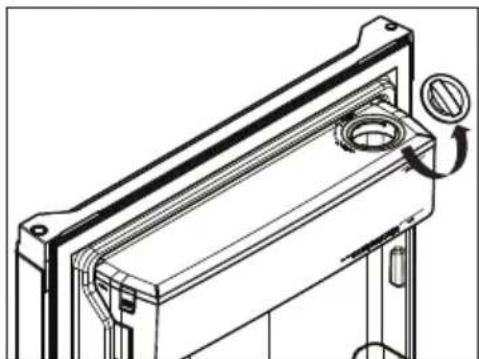
natural_image
Technical line drawing of a mechanical component with mounting flanges and a circular feature (no text or symbols)Step 2. Pour potable water through the lid at the top of the water tank.
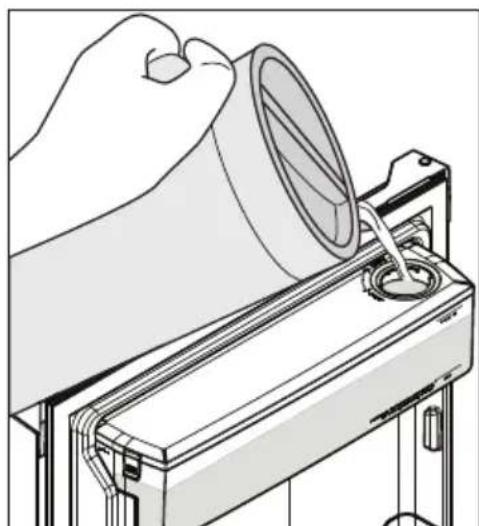
natural_image
Illustration of a hand pouring liquid into a mechanical component (no text or symbols visible)Step 3. Closed the tank cover lid.
natural_image
Technical line drawing of a mechanical housing or enclosure component (no text or symbols)
CAUTION
Do not fill the water tank with anything other than clean water (Filtered or Mineral water), soft drink, juice, tea or hot water etc, can damage your automatic icemaker. The water tank can withstand a maximum water temperature of 60^ C.

Tips and Useful Information
Remove and clean ice bin and water tank once a month, discarding unused ice and water. This will ensure fresh ice and smooth operation of your icemaker. Make sure your refrigerator is level to avoid uneven ice cubes.
It is recommended to always keep water level filled above the "Min" level indication to have water ready for your chilled drinks, and ready for ice making.
It is recommended to dispense water out in frist few glasses and/or ice production to flush out the system or any impurities in first time use or after installation.
7. CLEANING YOUR REFRIGERATOR

WARNING
BEFORE CLEANING: Turn the refrigerator off at the electric outlet and unplug the cord to prevent any chance of electrocuting yourself.
Doors and exterior (white and silver):
You should only clean the doors with lukewarm soapy water and a soft cloth.

CAUTION
Never use stainless steel cleaners, abrasive pads or other cleaners that will scratch the surface. Damage to the appliance after delivery is not covered by your warranty.
Interior
Clean the inside of your refrigerator regularly with a soft cloth, unscented mild soap and lukewarm water.
Thoroughly dry all surfaces and removable parts and avoid getting water on the controls. Replace removable parts, plug power cord in and switch the power on before returning the food.
Water Tank Assembly
Clean the inside of the water tank regularly with a soft cloth, unscented mild soap and rinse thoroughly with lukewarm water to completely remove any soap residue.
Door seals
Always keep door seals clean by washing them with a mild detergent and warm water, followed by a thorough drying.
Sticky food and drink can cause seals to stick to the cabinet and tear when you open the door.

CAUTION
Never use hot water, solvents, commercial kitchen cleaners, aerosol cleaners, metal polishes, caustic or abrasive cleaners, or scourers to clean your refrigerator. Many commercially available cleaning products and detergents contain solvents that will damage your refrigerator. Use only a soft cloth with an unscented mild soap and lukewarm water.
To clean a crisper or freezer bin with telescopic extension slides, simply wipe with a damp cloth and warm soapy water. Never immerse the cover in water, as this could affect the operation of the slide.
Switching off your refrigerator
If you switch off your refrigerator for an extended period, follow these steps to reduce the chances of mould:
- Remove all food.
- Remove the power plug from the electric outlet.
- Thoroughly clean and dry the Interior.
- Ensure that all the doors are wedged open slightly for air circulation.
8. FOOD STORAGE GUIDE
| CATEGORY FREEZ PRODUCT | REFRIGERATOR | STORAGE TIPS | ||
| Meat Sausages and Mince 1-2 Days 2-3 Months | Keep cold meat at the back of the refrigerator where it is coldest. | |||
| Plastic can cause meat to sweat if stored in refrigerator for more than a day. | ||||
| Roast can take up to 48 hours to defrost properly, transfer frozen past to the refrigerator 2 days before use. | ||||
| Poultry Chicken 2 Months1-2 Days | If poultry takes on a smell or colour you are unsure about it is best to throw it out. | |||
| Whole eggs are not suitable for freezing, slightly beaten eggs may be frozen for four months. | ||||
| Seafood Whole fish and fillets 2 Months2-3 Days | Store in an airtight container or foil. | |||
| Dairy | Milk | 7-10 Days | Not Suitable | If dairy takes on a smell or colour and you are unsure about it, it is best to throw it out. |
| Yoghurt | 7-10 Days | Not Suitable | ||
| Hard Cheeses | 2 Weeks – 2 Months | 2 Months (Grated) | Depending on the variety hard cheese can last from 2 weeks to 2 months. | |
| Soft Cheeses | 1-2 Weeks | Not Suitable | ||
| Butter | 12 Months8 Weeks | |||
| Fruit & Vegetables | Every fruit and vegetable has a different shelf life. Some stay fresh for a couple of days e.g beans, others can last for a couple of months e.g. onions. | 8-12 Months When freezing chop and blanch in small portions. | Keep vegetables in the crisper and away from the air vents to avoid freezing. | |
| Don't wash fruit and vegetables before storing them in the refrigerator as this can make them susceptible to rotting. | ||||
| Left Overs | Homemade meals | 3-4 Days | 2-6 Months | Store in sealed container. |
| Freeze meals in small portion sizes to limit wastage. | ||||

IMPORTANT
Please note, use this information as a guide only, actual storage times will vary depending on how you use your refrigerator, climatic conditions and the freshness of the food.
9. TROUBLESHOOTING
Appliance does not operate at desired temperature
In a modern frost free refrigerator / freezer, cold air is circulated around the various compartments through air vents using a high efficiency fan.
| CONCERN WHAT TO DO | |
| Refrigerator is too warm. | Ensure food is allowed to cool before placing inside the refrigerator.Ensure the appliance is set up as per instructions.Ensure that contents are not obstructing the cooling vents.Ensure the door is not held open or is being opened too frequently. |
| Freezer is too warm. Adjust temperature to a colder setting. | |
| Food is freezing in the refrigerator. | Adjust temperature to a warmer setting.Ensure that fruits and vegetables are stored in the crisper. Items with a high water content should not be placed near the cooling vents. |
| Unable to change temperature settings. | Refer to function guide in Controlling Your Refrigerator.Ensure that user interface is in "awake" mode before trying to adjust temperature settings. |
Appliance noise
Your new refrigerator may make sounds that your old one didn't make. Because the sounds are new to you, you might be concerned about them. Most of the new sounds are normal. Hard surfaces, like the floor, walls and cabinets, can make the sounds seem louder than they actually are. The following describes the kinds of sounds and what may be making
| CONCERN WHAT TO DO | |
| Motor noise (compressor) | Nothing. This is normal as your new refrigerator uses a variable speed compressor and fan that at start up and on warm days runs at a high speed to provide additional cooling.When less cooling is required the compressor and fan will run at a lower speed.Note that the compressor noise may seem louder at the start of the on cycle. |
| A clicking noise heard just before the compressor starts | Nothing. This is normal as your new refrigerator has an automatic switching action of the temperature control, turning the compressor on and off. |
| Occasional gurgling, similar to water boiling | Nothing. As each refrigeration cycle ends, you may hear a gurgling sound due to the refrigerant flowing in your refrigerator system. |
| Airflow noise | Nothing, this is normal as your new refrigerator uses high efficiency fans to circulate air. Fan speed and noise may increase during periods of heavy usage or hot weather. |
| Rattling and other noises | Ensure that the cabinet is level and stable, refer to Installation Instructions.Check the surroundings of the appliance to ensure there is nothing touching or placed on top of the appliance.Ensure that contents of the appliance are not placed in such a way that they are vibrating (such as bottles). |
Refrigerator operation
| CONCERN WHAT TO DO | |
| Appliance will not runIt is normal for the freezer fan not to operate during the automatic defrost cycle, or for a short time after the appliance is switched on. | Ensure that the cord is plugged into a live power outlet and outlet is switched on.Ensure that the household circuit breaker has not tripped or that the fuse has not blown.The appliance maybe in defrost mode, check again in half an hour. |
| Compressor motor seems to run too longAt normal room temperatures, expect your motor to run about 40% to 80% of the time. Under warmer conditions, expect it to run even more often. | Ensure that the doors are not held openCheck that large amounts of warm food have not just been placed inside the appliance.Note that the appliance will run more than normal just after you install it or when adjusting to temperature setting changes. |
| The exterior of the appliance is warm or hot to touchThis is normal because the appliance transfers heat from the inside out through the outer panels and the divider between the doors. | Ensure the appliance has the external clearances recommended in the section “Installing your new appliance”.The exterior of the cabinet will be much warmer on warmer days it may even feel hot to touch, as the appliance is working harder. |
| User interface will not respondTo ensure settings are not accidentally changed the user interface will go into sleep mode when not in use. Press any button to wake user interface | Check that the user interface is in awake mode, refer to section “About the user interface”.If the user interface is frozen turn the appliance off for five minutes for the memory to clear, then turn back on. |
| Alarms SoundingAlarm activates if the refrigerator or freezer doors are left open for longer than 2 minutes. | Check that all doors are fully closed.To silence the alarm for 8 minutes while the door is open press any button on user interface or close the door. |
| Frost build up Check that all doors are fully closed.Ensure that the doors are not opened too often.Ensure that the return air vents are not blocked with packaging.Ensure the seals are clean and not obstructed. | |
| Odours The interior may need cleaning, refer to cleaning guide.Ensure that food is stored correctly as some food, containers and wrapping can produce odours.Check appliance for old or unusual food. | |
| Lights not workingThe LED lighting is designed to dim automatically if the door is left opened for more than 5 minutes and turn off completely if the door is open for more than 7 minutes. Closing the door will reset the timer.The LED lighting is also designed to turn on gradually. | Ensure that the cord is plugged into a live power outlet and outlet is switched on.Ensure that the household circuit breaker has not tripped or that the fuse has not blown. |
Crisper operation
CONCERN WHAT TO DO
| Excess moisture build up in crisper | Ensure that the crisper is not over packed. |
| It is normal for there to be some moisture and humidity in the crisper bin. |
| Crisper bin can not be removed If crisper bin interferes with the door bins, remove door bins before removing crisper. Position cabinet so that the door can be fully opened. |
Freezing items in the crisper Adjust temperature to a warmer setting.
Automatic Ice maker system
CONCERN WHAT TO DO
| Ice maker does not produce ice or not enough ice | Ensure that the Ice Maker is switched on at the user interface refer to "About the User Interface" for details.Ensure water tank is full and contains clean water (if liquids other than clean water have been used, call Electrolux Customer Care).Ensure water tank is securely pushed into pump housing. |
| The icemaker is designed to produce a tray of ice approximately every 2 hours, depending on the conditions. | If the freezer compartment is too warm, refer to "freezer is too warm" then wait 24 hours for the freezer to reach ideal temperature.Turn the unit off at the mains and leave for 2 minutes then turn the appliance back on (this will reset the icemaker unit). Check for ice production after 24 hours.Check that there is no obstruction under the ice maker and ensure the ice bin is fitted correctly. |
Ice has bad odour or taste Cover food to ensure ice does not absorb foreign odours.
Interior of appliance or ice bin may require cleaning, refer to "Cleaning your refrigerator".
Discard stale ice monthly and allow ice maker to produce a fresh supply.
If you still require service
If you have a problem, and the problem persists after you have made the checks mentioned, contact your nearest Electrolux approved Service Centre or the dealer you bought the refrigerator from. Be ready to quote the model number, the 9-digit PNC and 8-digit serial number, which is stated on the label inside the refrigerator compartment.
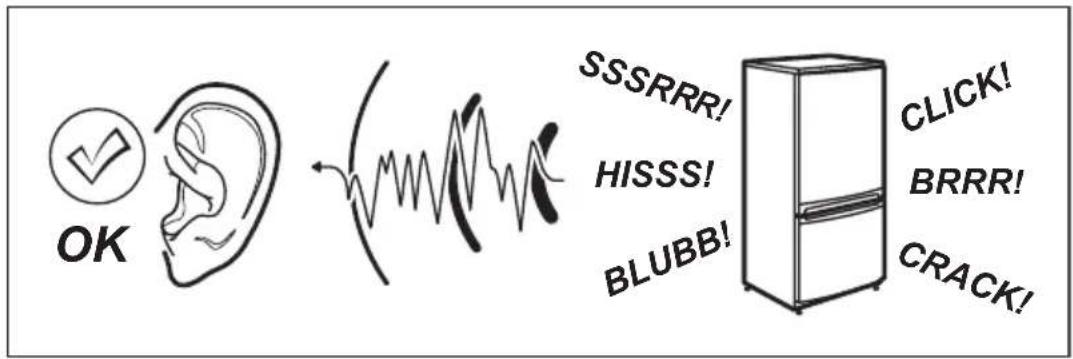
10. NOISES
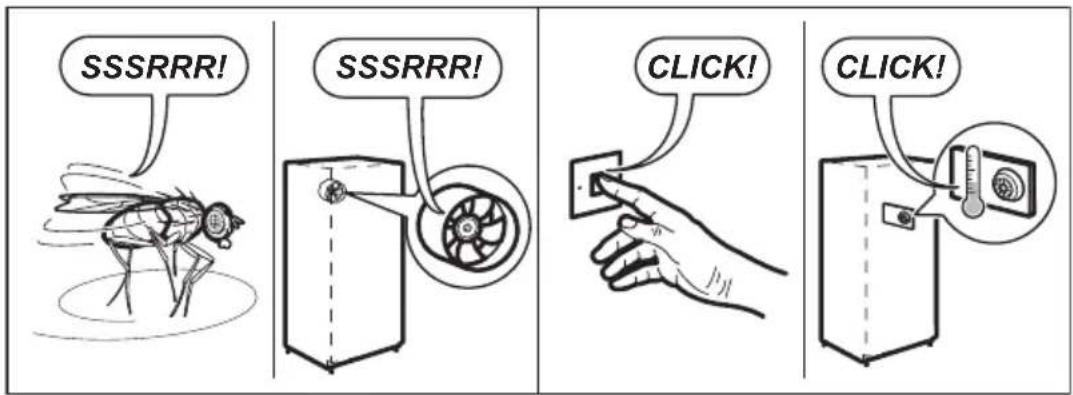
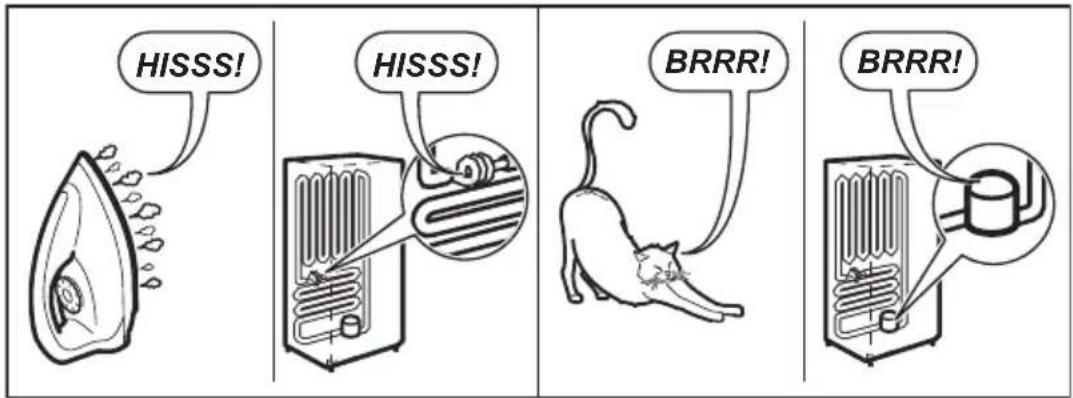
Appliance noise
Your new refrigerator may make sounds that your old one didn't make. Because the sounds are new to you, you might be concerned about them. Most of the new sounds are normal. Hard surfaces, like the floor, walls and cabinets, can make the sounds seem louder than they actually are. The following describes the kinds of sounds and what may be making them.
DAFTAR ISI
- INFORMASI KESELAMATAN.... 3
- DESKRIPSI PERANGKAT 5
- PANEL KONTROL 19
- MEMASANG PERANGKAT BARU 24
- MENGGUNAKAN LEMARI ES.... 25
- PEMBUAT ES OTOMATIS 29
- MEMBERSIHKAN LEMARI ES 30
- PANDUAN PENYIMPANAN MAKANAN 31
- PEMECAHAN MASALAH 32
- SUARA....35
KAMI MEMIKIRKAN ANDA
natural_image
Pure mechanical diagram showing a shaft and housing assembly without any text, numbers, or symbolsPERINGATAN UMUM
Ilustrasi ETB3400
Detail fitur lemari es:
1 Pintu
2 Gagang Pintu
3 Es Puntir & Sajikan
4 Pengatur Geser Suhu Freezer
5 Rak Freezer
6 Ruang TasteSeal
7 Multi-Aliran
8 Penutup Logam Deoderizer
9 Rak
10 Kontrol Kelembapan Otomatis
11 Crisper
12 Kaki
13 Gasket
14 Kotak Dangkal Pintu
15 Lampu Kulkas
16 Baki Telur
17 Panel Kontrol Suhu Kulkas
18 Kotak Pintu Atas
19 Kotak Botol
Ilustrasi ETB3460
Detail fitur lemari es:
1 Pintu
2 Gagang Pintu
3 Dispenser Air
4 Pembuat Es Otomatis
5 Kotak Es
6 Pengatur Geser Suhu Freezer
7 Rak Freezer
8 Ruang TasteSeal
9 Multi-Aliran
10 Penutup Logam Deoderizer
11 Rak
12 Kontrol Kelembapan Otomatis
13 Crisper
14 Kaki
15 Gasket
16 Kotak Dangkal Pintu
17 Lampu Kulkas
18 Tangki Air
19 Panel Kontrol Suhu Kulkas
20 Baki Telur
21 Kotak Pintu Atas
22 Kotak Botol
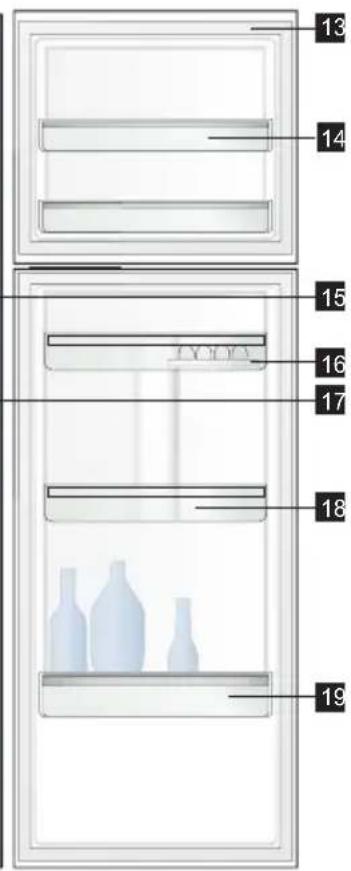
Ilustrasi ETB3700
Detail fitur lemari es:
1 Pintu
2 Gagang Pintu
3 Es Puntir & Sajikan
4 Pengatur Geser Suhu Freezer
5 Rak Freezer
6 Ruang TasteSeal
7 Multi-Aliran
8 Penutup Logam Deoderizer
9 Rak
10 Kontrol Kelembapan Otomatis
11 Crisper
12 Kaki
13 Gasket
14 Kotak Dangkal Pintu
15 Lampu Kulkas
16 Baki Telur
17 Panel Kontrol Suhu Kulkas
18 Kotak Pintu Atas
19 Kotak Botol
- ETB3740K-A
- ETB3740K-H
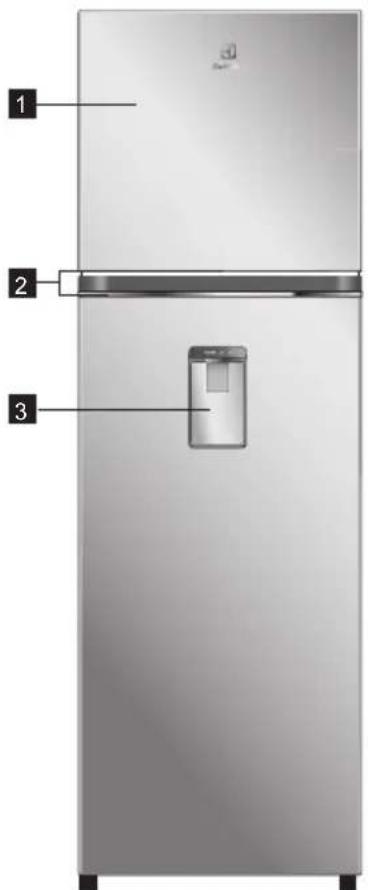
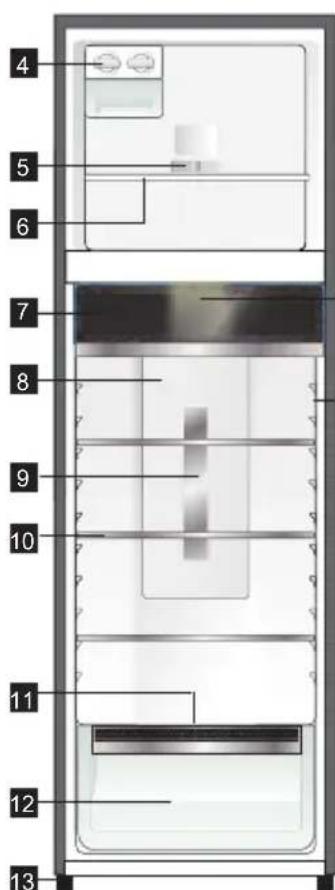
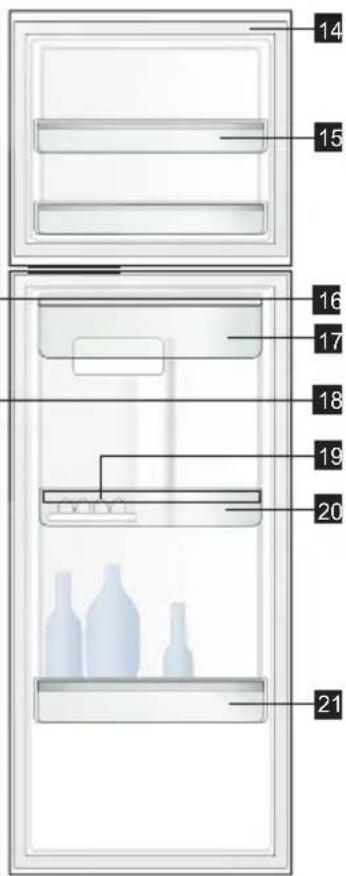
Ilustrasi ETB3740
Detail fitur lemari es:
1 Pintu
2 Gagang Pintu
3 Dispenser Air
4 Es Puntir & Sajikan
5 Pengatur Geser Suhu Freezer
6 Rak Freezer
7 Ruang TasteSeal
8 Multi-Aliran
9 Penutup Logam Deoderizer
10 Rak
11 Kontrol Kelembapan Otomatis
12 Crisper
13 Kaki
14 Gasket
15 Kotak Dangkal Pintu
16 Lampu Kulkas
17 Tangki Air
18 Panel Kontrol Suhu Kulkas
19 Baki Telur
20 Kotak Pintu Atas
21 Kotak Botol
Ilustrasi ETB3760
Detail fitur lemari es:
1 Pintu
2 Gagang Pintu
3 Dispenser Air
4 Pembuat Es Otomatis
5 Kotak Es
6 Pengatur Geser Suhu Freezer
7 Rak Freezer
8 Ruang TasteSeal
9 Multi-Aliran
10 Penutup Logam Deoderizer
11 Rak
12 Kontrol Kelembapan Otomatis
13 Crisper
14 Kaki
15 Gasket
16 Kotak Dangkal Pintu
17 Lampu Kulkas
18 Tangki Air
19 Panel Kontrol Suhu Kulkas
20 Baki Telur
21 Kotak Pintu Atas
22 Kotak Botol
Ilustrasi EBB2802
Detail fitur lemari es:
1 Pintu
2 Gagang Pintu
3 Lampu Kulkas
4 Multi-Aliran
5 Penutup Logam Deoderizer
6 Rak
7 Pengatur Geser Suhu Kulkas
8 Pengatur Geser Suhu Freezer
9 Tombol Geser Kelembapan
10 Crisper
11 Ruang TasteSeal
12 Es Puntir & Sajikan
13 Rak Freezer
14 Laci Freezer Bawah
15 Kaki
16 Gasket
17 Rel FlexStor
18 Kotak FlexStor
19 Baki Telur
20 Kotak Botol
- EBB3402K-A
- EBB3402K-H
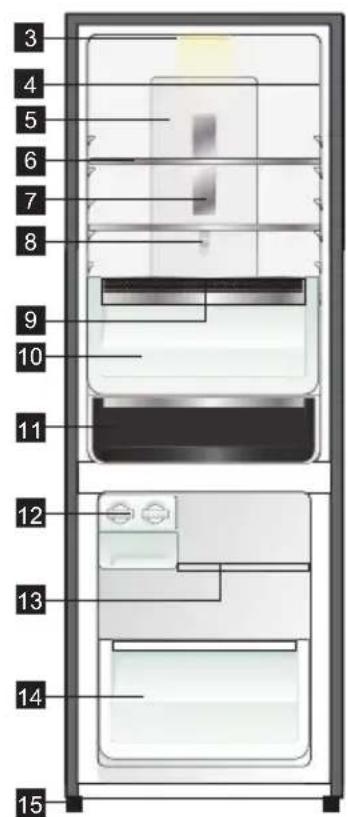
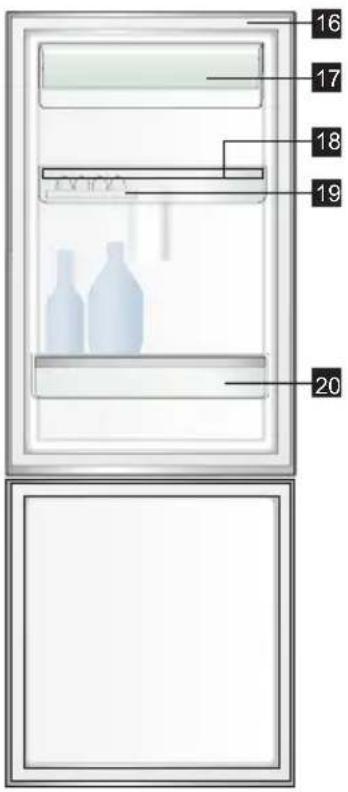
Ilustrasi EBB3402
Detail fitur lemari es:
1 Pintu
2 Gagang Pintu
3 Lampu Kulkas
4 Panel Kontrol Suhu Kulkas
5 Multi-Aliran
6 Rak
7 Penutup Logam Deoderizer
8 Pengatur Geser Suhu Freezer
9 Kontrol Kelembapan Otomatis
10 Crisper
11 Ruang TasteSeal
12 Es Puntir & Sajikan
13 Rak Freezer
14 Laci Freezer Bawah
15 Kaki
16 Gasket
17 Kotak Susu Pintu
18 Kotak Pintu Atas
19 Baki Telur
20 Kotak Botol
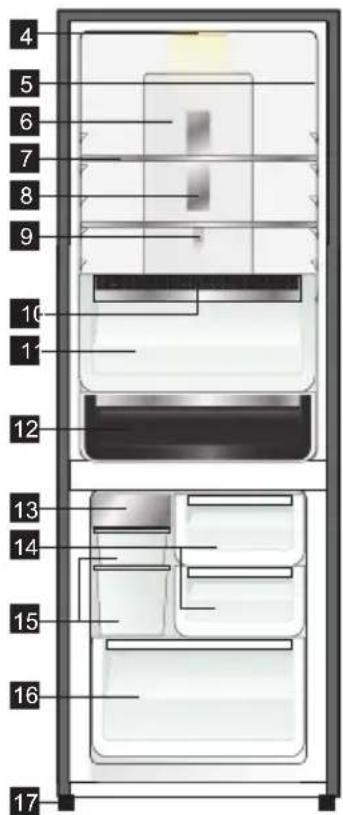
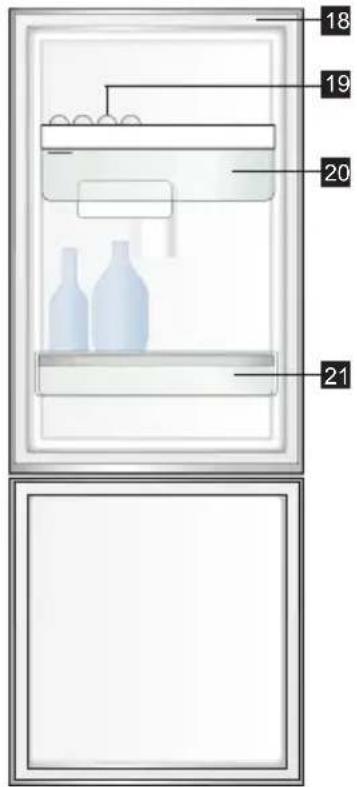
Ilustrasi EBB3462
Detail fitur lemari es:
1 Pintu
2 Dispenser Air
3 Gagang Pintu
4 Lampu Kulkas
5 Panel Kontrol Suhu Kulkas
6 Multi-Aliran
7 Rak
8 Penutup Logam Deoderizer
9 Pengatur Geser Suhu Freezer
10 Kontrol Kelembapan Otomatis
11 Crisper
12 Ruang TasteSeal
13 Pembuat Es Otomatis
14 Laci Kotak Daging
15 Kotak Es Besar/Kecil
16 Laci Freezer Bawah
17 Kaki
18 Gasket
19 Baki Telur
20 Tangki Air
21 Kotak Botol
- EBB3702K-A
- EBB3702K-H
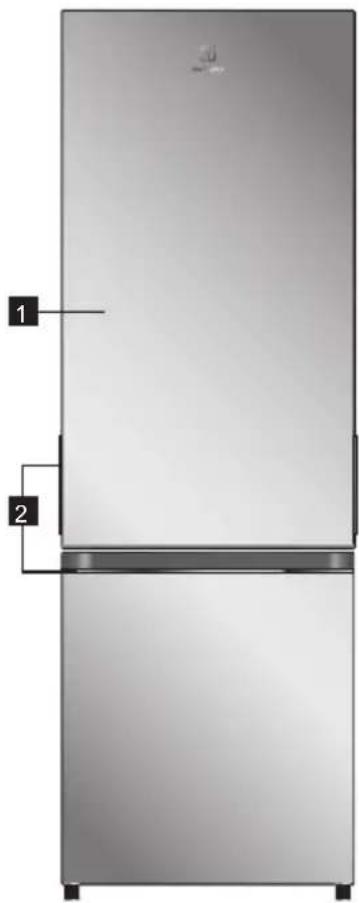
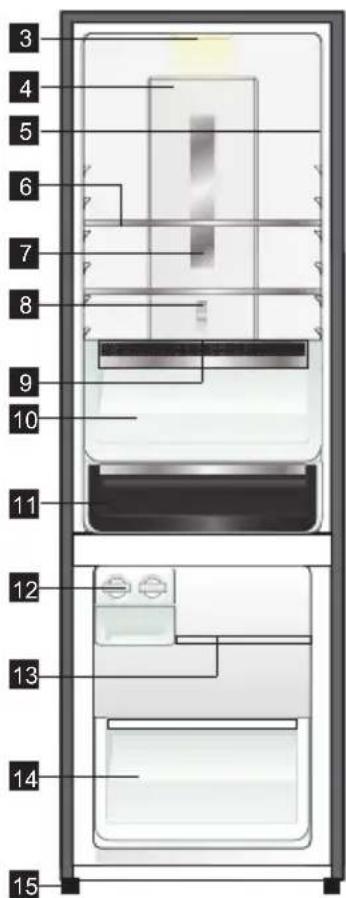
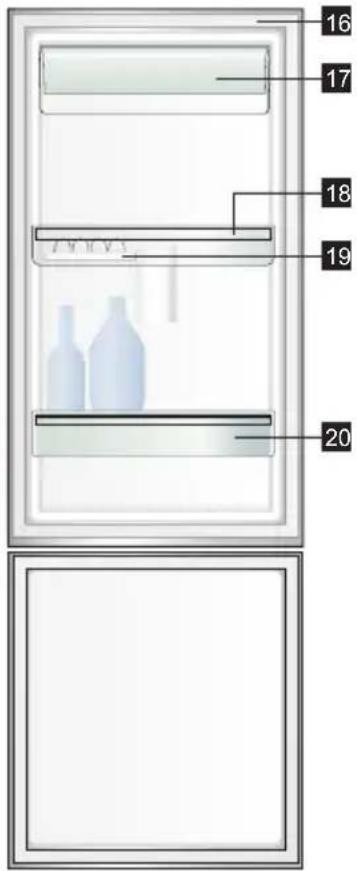
Ilustrasi EBB3702
Detail fitur lemari es:
1 Pintu
2 Gagang Pintu
3 Lampu Kulkas
4 Multi-Aliran
5 Panel Kontrol Suhu Kulkas
6 Rak
7 Penutup Logam Deoderizer
8 Pengatur Geser Freezer
9 Kontrol Kelembapan Otomatis
10 Crisper
11 Ruang TasteSeal
12 Es Puntir & Sajikan
13 Rak Freezer
14 Laci Freezer Bawah
15 Kaki
16 Gasket
17 Kotak Susu Pintu
18 Kotak Pintu Atas
19 Baki Telur
20 Kotak Botol
- EBB3742K-A
- EBB3742K-H
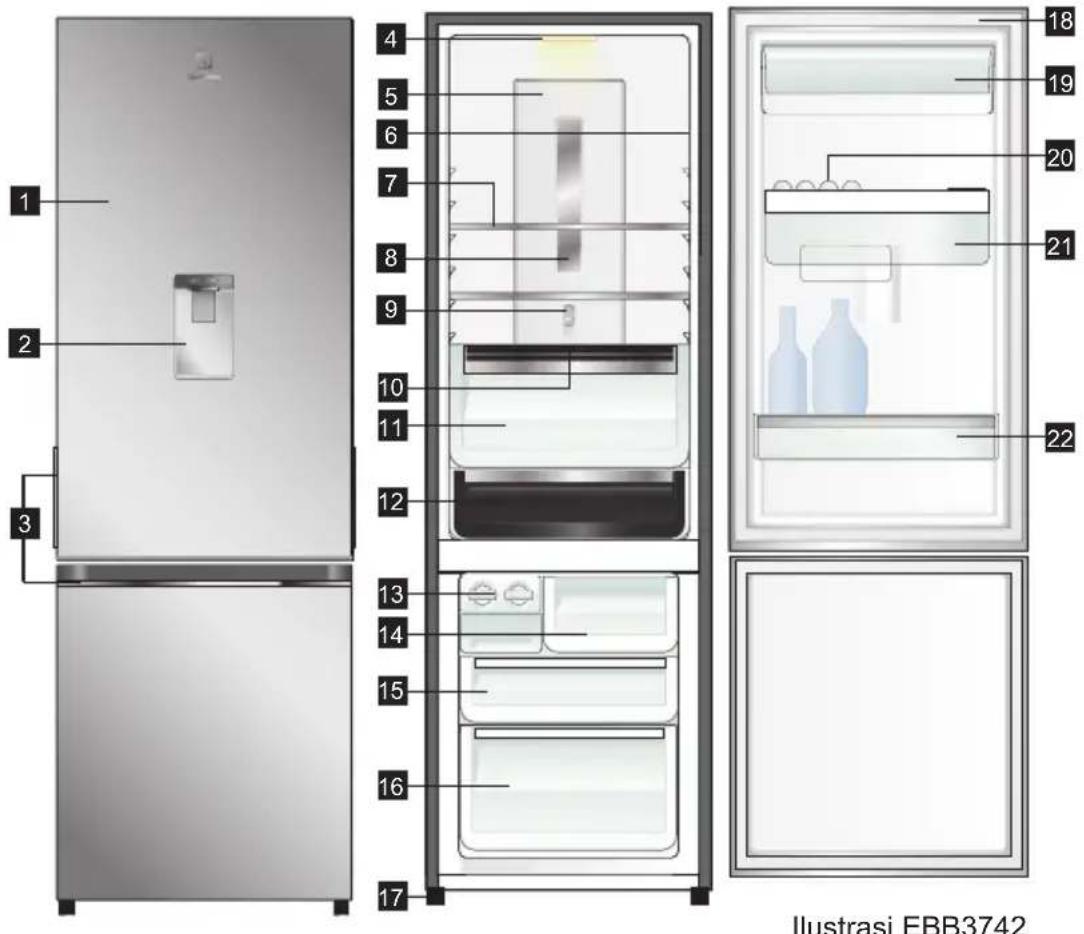
Detail fitur lemari es:
1 Pintu
2 Dispenser Air
3 Gagang Pintu
4 Lampu Kulkas
5 Multi-Aliran
6 Panel Kontrol Suhu Kulkas
7 Rak
8 Penutup Logam Deoderizer
9 Pengatur Geser Suhu Freezer
10 Kontrol Kelembapan Otomatis
11 Crisper
12 Ruang TasteSeal
13 Es Puntir & Sajikan
14 Laci Daging Freezer
15 Laci Tengah Freezer
16 Laci Freezer Bawah
17 Kaki
18 Gasket
19 Kotak Susu Pintu
20 Baki Telur
21 Tangki Air
22 Kotak Botol
- EBB3762K-A
- EBB3762K-H
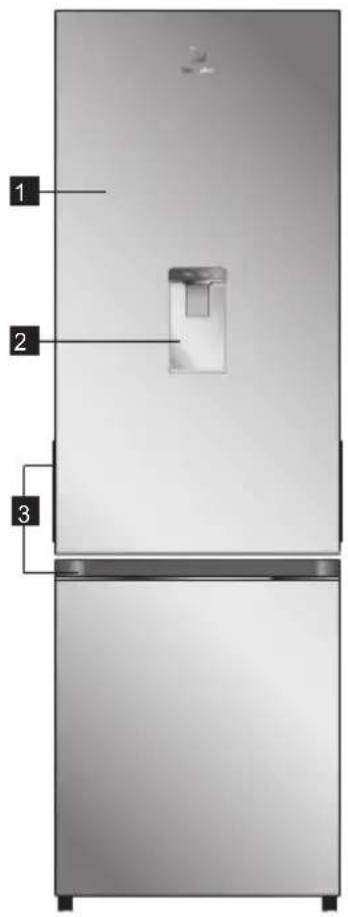
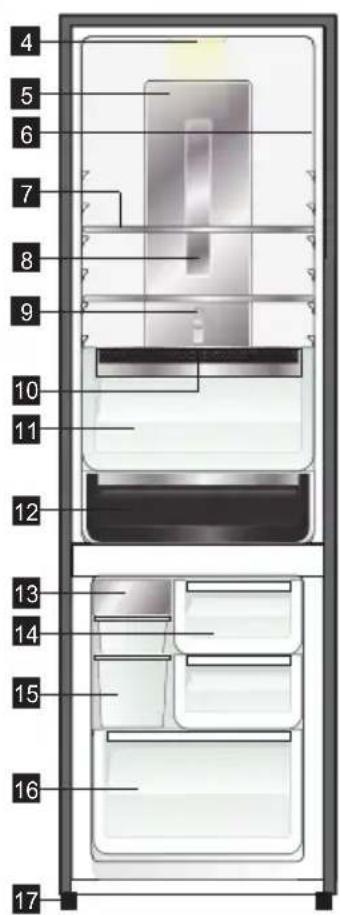
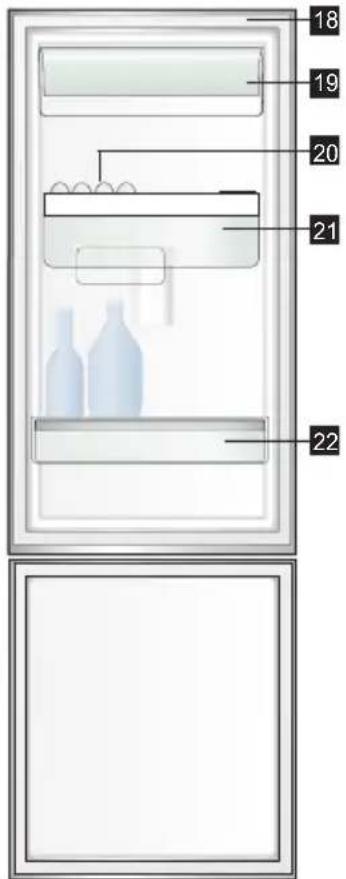
Ilustrasi EBB3762K
Detail fitur lemari es:
1 Pintu
2 Dispenser Air
3 Gagang Pintu
4 Lampu Kulkas
5 Multi-Aliran
6 Panel Kontrol Suhu Kulkas
7 Rak
8 Penutup Logam Deoderizer
9 Pengatur Geser Suhu Freezer
10 Kontrol Kelembapan Otomatis
11 Crisper
12 Ruang TasteSeal
13 Pembuat Es Otomatis
14 Laci Kotak Daging
15 Kotak Es Kecil/Besar
16 Laci Freezer Bawah
17 Kaki
18 Gasket
19 Kotak Susu Pintu
20 Baki Telur
21 Tangki Air
22 Kotak Botol
natural_image
Top-down schematic of a rectangular structure with internal compartments and numbered reference lines (no text or symbols)Penyesuaian suhu freezer.
5.1.3 Rak Kaca
natural_image
Architectural line drawing of a two-story building facade with windows and doorways (no text or symbols)5.1.4 Deodorizer
5.1.5 Laci Crisper
natural_image
Technical line drawing of a mechanical housing or enclosure component (no text or symbols)natural_image
Technical diagram of a mechanical assembly with two upward-pointing arrows indicating motion or force directions (no text or symbols present)5.1.8 Tangki Air

PERHATIAN
natural_image
Technical line drawing of a mechanical component with no visible text or symbolsnatural_image
Illustration of a hand pouring liquid into a mechanical component (no text or symbols visible)natural_image
Technical line drawing of a mechanical housing component (no text or symbols)
PERHATIAN
Pengoperasian Crisper
| 10.0 | |
| 10.0 | 10.0 |
| 10.0 | 10.0 |
| 10.0 | 10.0 |
| 10.0 | 10.0 |
| 10.0 | 10.0 |
| 10.0 | 10.0 |
| 10.0 | 10.0 |
| 10.0 | 10.0 |
| 10.0 | 10.0 |
| 10.0 10.0 | 10.0 |
| 10.0 10.0 | 10.0 |
| 10.0 10.0 | 10.0 |
| 10.0 10.0 | 10.0 |
| 10.0 10.0 | 10.0 |
| 10.0 10.0 | 10.0 |
| 10.0 10.5 | 10.0 |
| 10.0 10.5 | 10.0 |
| 10.0 10.5 | 10.0 |
| 10.0 10.5 | 10.0 |
| 10.0 11.5 | 10.0 |
| 10.0 11.5 | 10.0 |
| 10.0 11.5 | 10.0 |
| 10.0 12.5 | 10.0 |
| 10.0 12.5 | 10.0 |
| 10.0 12.5 | 10.0 |
| 10.0 13.5 | 10.0 |
| 10.0 13.5 | 10.0 |
| 10.0 13.5 | 10.0 |
| 10.0 14.5 | 10.0 |
| 10.0 14.5 | 10.0 |
| 10.0 14.5 | 10.0 |
| 10.0 15.5 | 10.0 |
| 10.0 15.5 | 10.0 |
| 10.0 16.5 | 10.0 |
| 10. 5 16.5 | 10. 5 |
natural_image
Repeating pattern of gray and white geometric shapes with no text or symbols- Enjoy peace of mind. Register your appliance today.
- CONTENTS
- WE'RE THINKING OF YOU
- CUSTOMER CARE AND SERVICE
- SAFETY INFORMATION
- WARNING
- GENERAL WARNINGS
- Environmental information.
- DESCRIPTION OF THE APPLIANCE
- TOP MOUNT REFRIGERATOR FEATURES
- The details of the refrigerator feature:
- BOTTOM MOUNT REFRIGERATOR FEATURES
- CONTROL PANEL.
- TEMPERATURE CONTROL
- DESCRIPTION OPERATION / PRIMARY FUNCTION
- Recommended Freezer Setting
- ABOUT THE USER INTERFACE
- ABOUT THE USER INTERFACE
- ERROR CODE & ALARMS
- ERROR CODES
- ERROR CODE WHAT IT MEAN ...
- WHAT TO DO ...
- ALARMS
- ALARM ICON WHAT IT MEANS
- OPERATION
- INSTALLING YOUR NEW APPLIANCE
- USING YOUR REFRIGERATOR
- USING AND REMOVING FEATURES
- TasteSeal Room
- Metal Tray (Option for ETB3\*\* and EBB3\*\* models)
- CAUTION
- Glass Shelves
- Deodorizer
- Crisper Drawer
- Crisper bin
- Door storage bins
- Water Tank
- Automatic Ice Maker
- Water Tank Refilling
- Tips and Useful Information
- CLEANING YOUR REFRIGERATOR
- Interior
- Water Tank Assembly
- Door seals
- Switching off your refrigerator
- FOOD STORAGE GUIDE
- IMPORTANT
- TROUBLESHOOTING
- Appliance does not operate at desired temperature
- Appliance noise
- Crisper operation
- Automatic Ice maker system
- If you still require service
- NOISES
- DAFTAR ISI
- KAMI MEMIKIRKAN ANDA
- PERINGATAN UMUM
- Detail fitur lemari es:
- Rak Kaca
- Laci Crisper
- Tangki Air
- PERHATIAN
Brand : ELECTROLUX
Model : ETB2502J-A
Category : Fridge