
T75E1200FL-2 - Washing machine Technika - Free user manual and instructions
Find the device manual for free T75E1200FL-2 Technika in PDF.


| Product Type | Freestanding Washing Machine |
| Model | T75E1200FL-2 |
| Brand | Technika |
| Capacity (kg) | 7.5 |
| Spin Speed (rpm) | 1200 |
| Energy Class | A+++ |
| Width (cm) | 60 |
| Height (cm) | 85 |
| Depth (cm) | 55 |
| Weight (kg) | 67 |
| Power Supply (V/Hz) | 220-240 / 50 |
| Power Consumption (kWh/cycle) | 0.75 |
| Water Consumption (L/cycle) | 50 |
| Noise Level Washing (dB) | 56 |
| Noise Level Spinning (dB) | 74 |
| Programs | Cotton, Synthetics, Delicates, Wool, Quick 15', Rinse & Spin, Drum Clean |
| Features | Delay Start, Child Lock, Incomplete Door Indicator, Spin Speed Selection |
| Maintenance | Clean filter regularly, descale every 3 months, leave door ajar after use |
| Safety | Child lock, overflow protection, imbalance control |
| Spare Parts | Available from authorized service centers (hoses, filters, belts, etc.) |
| Reparability Index | 7.5/10 |
Frequently Asked Questions - T75E1200FL-2 Technika
User questions about T75E1200FL-2 Technika
0 question about this device. Answer the ones you know or ask your own.
Ask a new question about this device
Download the instructions for your Washing machine in PDF format for free! Find your manual T75E1200FL-2 - Technika and take your electronic device back in hand. On this page are published all the documents necessary for the use of your device. T75E1200FL-2 by Technika.
USER MANUAL T75E1200FL-2 Technika
Instructions for Use and Installation
7.5kg Front-Load Washing Machine
T75E1200FL-5
Safety Instructions
■ Safety Instructions 2
Installation
■ Product Description 7
■ Installation 8
Operation
■ Quick Start 11
■ Before Each Wash 12
■ Detergent Dispenser 13
■ Control Panel 15
■ Program Options 16
■ Other Functions ...... 18
■ Programmes 20
■ Washing Programmes Table 21
Maintenance
■ Cleaning and Care 22
■ Trouble Shooting 25
■ Technical Specifications 26
■ Testing Methods 27
■ Warranty 28
- Safety Instructions
For your safety, the information in this manual must be followed to minimize the risk of fire or explosion, electric shock, or to prevent property damage, personal injury or loss of life. Explanation of the symbols.

Warning!
This combination of symbol and signal word indicates a potentially dangerous situation which may result in death or serious injury unless it's avoided.

Caution!
This combination of symbol and signal word indicates a potentially dangerous situation which may result in slight or minor injuries or damage to property and the environment.

Note!
This combination of symbol and signal word indicates a potentially dangerous situation which may result in slight or minor injuries.

Warning!
The electric shock!
- If the supply cord is damaged, it must be replaced by the manufacturer, its service agent or similarly qualified persons in order to avoid a hazard.
- The new hose-sets supplied with the appliance are to be used and old hose-sets should not be reused.
- Before any maintenance is performed on the device, unplug the appliance from the mains.
- Always unplug the machine and turn off the water supply after use. The max. Inlet water pressure, in pascals. The min. inlet water pressure, in pascals.
- To ensure your safety, power plug must be inserted into an earthed three-pole socket. Check carefully and make sure that your socket is properly and reliably earthed.
- Make sure that the water and electric devices are connected by a qualified technician in accordance with the manufacturer's instructions and local safety regulations.
Risk to children!
- This appliance is not intended for use by persons (including children) with reduced physical, sensory or mental capabilities or lack of experience and knowledge unless they are under supervision or instruction concerning use of the appliance by a person responsible for their safety.
- Children should be supervised to ensure that they do not play with the appliance.
- Animals and children may climb into the machine. Check the machine before every operation.
- Children should be kept away unless continuously supervised.
- Glass door may be very hot during the operation. Keep kids and pets far away from the machine during the operation.
Risk of explosion!
- Do not wash or dry articles that have been cleaned in, washed in, soaked in, or dabbed with combustible or explosive substances (such as wax, oil, paint, gasoline, degreasers, dry-cleaning solvents, kerosene, etc.) this may result in fire or explosion.
- Thoroughly rinse these items by hand before washing.

Caution!
Installing the product!
• This washing machine is for indoor use only.
- It isn't intended for built-in use.
- The openings must not be obstructed by a carpet.
- Washing machine shall not be installed in bathroom or very wet rooms with explosive or caustic gases.
- The washing machine with single inlet valve only can be connected to the cold water supply. The product with double inlet valves should be correctly connected to the hot water and cold water supply.
- Plug must be accessible after installation.
- Remove all packages and transport bolts before using the appliance. Otherwise, serious damage may result.
Risk of explosion!
- Your product is only for home use and is only designed for the textiles suitable for machine washing.
- Do not climb up and sit on top cover of the machine.
-
Do not lean against the machine door.
• Cautions during Handling Machine: -
Transport bolts shall be reinstalled to the machine by a specialized person.
- The accumulated water shall be drained out of the machine.
- Handle the machine carefully. Never hold each protruded part on the machine while lifting. Machine door can not be used as the handle during the conveyance.
- This appliance is heavy. Transport with care.
- Please do not close the door with excessive forces. If it is found difficult to close the door, please check if the clothes are put in or distributed well.
- It is forbidden to wash carpets.
Operating the appliance!
- Before washing clothes for the first time, the product shall be operated one full cycle without the clothes inside.
-
Flammable and explosive or toxic solvents are forbidden. Gasoline and alcohol etc. Shall not used as detergents. Please only select the detergents suitable for machine washing, especially for the drum.
-
Make sure that all pockets are emptied. Sharp and rigid items such as coin, brooch, nail, screw or stone etc. May cause serious damages to this machine.
- Please check whether the water inside the drum has been drained before opening its door. Please do not open the door if there is any water visible.
- Be careful of burning when the product drains hot washing water.
- Never refill the water by hand during washing.
- After the program is completed, please wait for two minutes to open the door.
Packaging/Old appliance
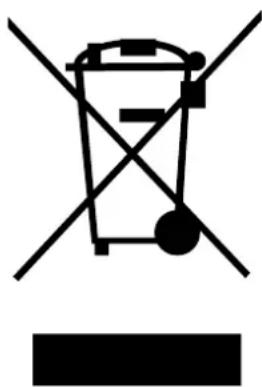
Correct Disposal of this product:
natural_image
Symbol of a trash bin crossed with two crossed lines and a solid black rectangle below (no text or labels)This marking indicates that this product should not be disposed with other household waste. To prevent possible harm to the environment or human health from uncontrolled waste disposal, recycle it responsibly to promote the sustainable reuse of material resources. To return your used device, please use the return and collection systems or contact the retailer where the product was purchased. they can take this product for environmental safe recycling.
Product Description
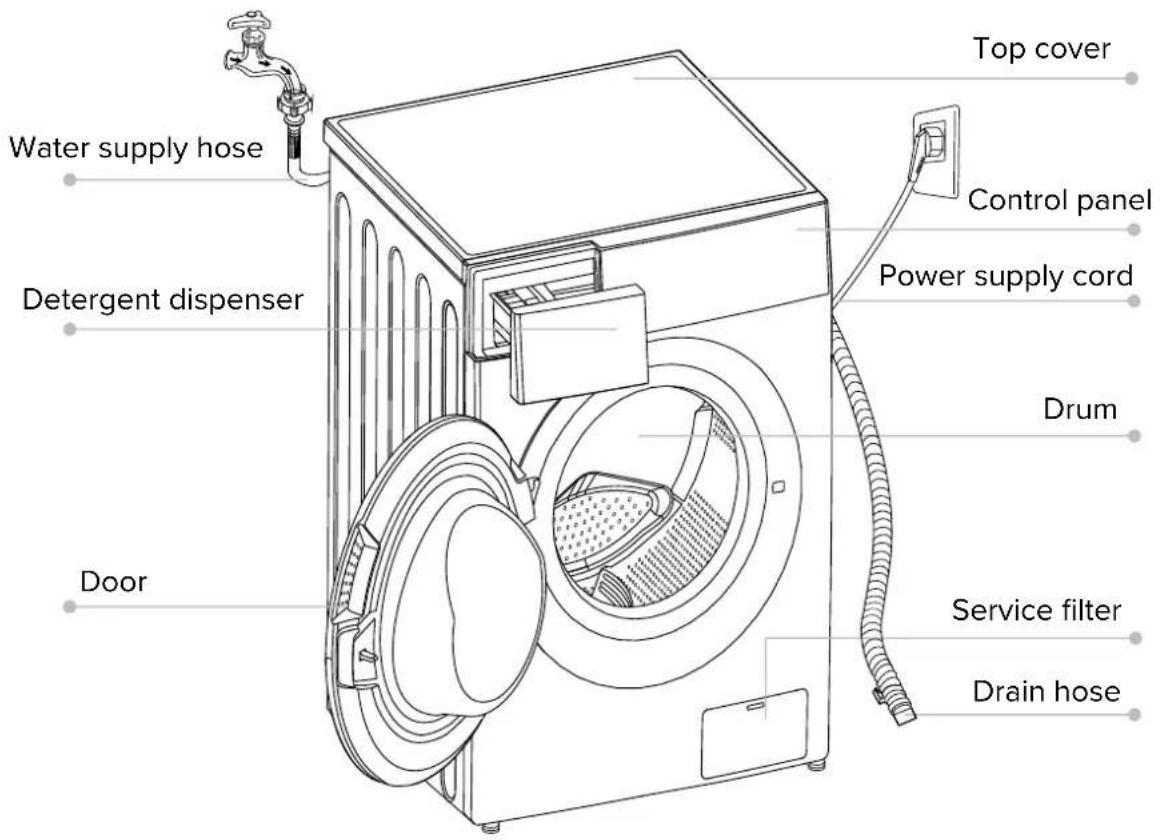
Note!
- The product line chart is for reference only, please refer to real product as standards.
Accessories

natural_image
Four-line diagram showing mechanical components: four circular heads, a ring with a handle, an arch-shaped bracket, and an open book (no text or symbols)Transport hole plug
Supply hose cold water
Drain hose support
Owner's Manual
Installation
Installation area

Warning!
- Stability is important to prevent the product from wandering!
- Make sure that the product should not stand on the power cord.
Before installing the machine, the location should be characterised by:
- Rigid, dry, and level surface
- Avoid direct sunlight
- Sufficient ventilation
- Room temperature is above 0'C
- Keep far away from the heat resources such as coal or gas
Unpacking the washing machine

Warning!
- Packaging material (e.g. Films, Styrofoam) can be dangerous for children.
-
There is a risk of suffocation! Keep all packaging well away from children.
-
Remove the cardboard box and styrofoam packing.
-
Lift the washing machine and remove the base packing. Make sure the small triangle foam is removed with the bottom one together. If not, lay the unit down with side surface, then remove the small foam from the unit bottom manually.
-
Remove the tape securing the power supply cord and drain hose.
-
Remove the inlet hose from the drum.
Remove transport bolts

Warning!
- You must remove the transport bolts from the backside before using the product.
- You'll need the transport bolts again if you move the product, so make sure you keep them in a safe place.
Please take the following steps to remove the bolts:
- Loosen 4 bolts with spanner and then remove them.
- Stop the holes with transport hole plugs.
- Keep the transport bolts properly for future use.


natural_image
Simple line drawing of a washing machine with a black X mark on its side (no text or symbols)
natural_image
Illustration of a box with an arrow pointing upward, and a magnified inset showing a small boat on water (no text or symbols)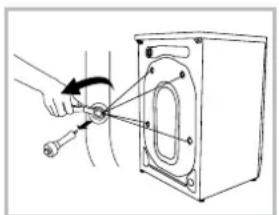
natural_image
Diagram of a hand holding a tool inside a device with arrows indicating rotation (no text or symbols)Leveling the washing machine

Warning!
- The lock nuts on all four feet must be screwed tightly against the housing.
- Check if the legs are closely attached to the cabinet. if not, please turn them to their original positions tighten the nuts.
- Loosen the lock nut turn the feet until it closely contacts with the floor.
- Adjust the legs and lock them with a spanner, make sure the machine is steady.

Connect Water Supply Hose

Warning!
• To prevent leakage or water damage, follow the instructions in this chapter!
- Do not kink, crush, modify or sever water inlet hose.
- For the model equips hot valve, connect it to hot water tap with hot water supply hose. Energy consumption will decrease automatically for some program.
Connect the inlet pipe as indicated, There are two ways to connect the inlet pipe.
- Connection between ordinary tap and inlet hose.

Loosen clamp nut and four bolts
Tighten clamp nut Press slide bushing, insert inlet hose into connecting base
Connection finished
- Connection between screw tap and inlet hose.

Tap with threads and inlet hose Special tap for washing machine
INSTALLATION
Connect the other end of inlet pipe to the inlet valve at the backside of product and fasten the pipe tightly clockwise.

Drain Hose

Warning!
- Do not kink or protract the drain hose.
- Position drain hose properly, otherwise damage might result of water leakage.
There are two ways to place the end of drain hose:
-
Put it into the water trough.
-
Connect it to the branch drain pipe of the trough.


Note!
- If the machine has drain hose support, please install it like the following.

natural_image
Line drawing of a kitchen sink with faucet and sink (no text or symbols)

Warning!
- When installing drain hose, fix it properly with a rope.
- If drain hose is too long, do not force it into washing machine as it will cause abnormal issues.
Quick Start
Caution!
- Before washing, please make sure it's installed properly.
- Before washing the first time, the washing machine shall be operated in one round of the whole procedures without clothes in as follows.
1. Before Washing


Note!
- Detergent only need to be added in “case I” after selecting pre-washing for machines with this function.
2. Washing


Note!
- If default is selected, step 3 can be skipped.
- The function button line chart is for reference only, please refer to real product as standard.
3. After Washing
Buzzer beep or "End" on display.
Before Each Wash
- The working condition of the washer should be(0-40)°C. if used under 0°C, the inlet valve and draining system may be damaged. If the machine is placed under condition of 0°C or less, then it should be transferred to normal ambient temperature to ensure the water supply hose and drain hose are not frozen before use.
- Please check labels and the explanation of using detergent before wash. Use non-foaming or less-foaming detergent suitable for machine washing properly.

natural_image
Line drawing of a sweater with a tag and tie (no text or symbols)Check the label
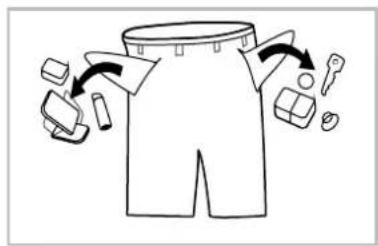
Take out the items out of the pockets

natural_image
Line drawing of two fabric pouches with ropes and a circular emblem on the cover (no text or symbols)Knot the long strips,zip or button

natural_image
Line drawing of a bag with internal objects, no text or symbols presentPut small clothes into the pillow slip

natural_image
Line drawing of a sweater with pleated design (no text or symbols)Turn easy-pilling and long-pile fabric inside out

natural_image
Simple line drawing of a basket with two bags and one bag being folded, no text or symbols presentSeparate clothes with different textures

Warning!
- When washing single clothes, it may easily cause great eccentricity and give alarm due to great unbalance. Therefore it is suggested to add one or two more clothes to be washed together so that draining can be done smoothly.
- Don't wash clothes that have touched kerosene, gasoline, alcohol or other flammable materials.
Detergent Dispenser
I Pre wash detergent
II Main wash detergent
Softener

Liquid detergent

Powder detergent

Pull out the dispenser
Caution!
- Detergent only need to be added in “case I” after selecting pre-washing for machines with this function.
| Programme | I | II | |
| Cotton | ○ | ● | ○ |
| Synthetic | ○ | ● | ○ |
| Baby Care | ○ | ● | ○ |
| Jeans | ○ | ● | ○ |
| Mix | ○ | ● | ○ |
| Colors | ○ | ● | ○ |
| Drain Only | |||
| Spin Only |
| Programme | I | II | |
| Rinse&Spin | ○ | ||
| Wool | ● | ○ | |
| Delicate | ● | ○ | |
| Quick(Quick15') | ● | ○ | |
| Rapid 45' | ● | ○ | |
| Sport Wear | ● | ○ | |
| Hand Wash | ● | ○ | |
| Cotton ECO | ● | ○ |
● Means must ○ Means optional
Option
Pre Wash
The Prewash function can get an extra wash before main wash, it is suitable for washing the dust rises to surface of the clothes; You need to put into detergent the Case (1) when selected.

Extra Rinse
The laundry will undergo an extra rinse cycle.

Speed Wash
The function can decrease the washing time.
Delay
Set the Delay function:
- Select a program
- Press the Delay button to choose the time (the delaying time is 0-24 H).
- Press [Start/Pause] to commence the delay operation.

flowchart
graph LR
    A["On/Off"] --> B["Choose the Programme"]
    B --> C["Delay"]
    C --> D["Settingtime"]
    D --> E["Start"]
Cancel the Delay function:
Press the [Delay] button until the display be 0H. It should be pressed before starting the program. If the program already started, should press the [On/Off] button to reset the program.
Caution!
- If there is any break in the power supply while the machine is operating a special memory stores the selected program and when the power is restarted, press the [ On/Off ] button the program will continue.
Remembers the frequently used programmes.
Press Spin 3sec. to remember the running program. The default is cotton.
Temp.
Extra Rinse
Press the button to regulate the temperature.
Spin
Speed Wash
Press the button to change the spin speed.
| Programme | Default Speed(rpm) |
| 1400 | |
| Cotton | 800 |
| Synthetic | 800 |
| Baby Care | 800 |
| Jeans | 800 |
| Mix | 800 |
| Colors | 800 |
| Drain Only | — |
| Spin Only | 1200 |
| Programme | Default Speed(rpm) |
| 1400 | |
| Rinse&Spin | 1200 |
| Wool | 800 |
| Delicate | 800 |
| Quick | 800 |
| Sport Wear | 1200 |
| Hand Wash | 800 |
| Cotton ECO | 1400 |
Caution!
- When the lights of spin speed (600, 800, 1000, 1200, 1400) are off means the spin speed is 0.

Mute the buzzer

flowchart
graph LR
    A["①"] --> B["▶II"]
    B --> C["Temp"]
    C --> D["Spin"]
    D --> E["Speaker"]
On/Off
Pressthe [Temp]&[Spin] buttonfor 3sec. the buzzeris mute.

Caution!
• After Muting the buzzer function, the sounds will not be activated any more.

Reload
This operation can be executed during the washing progress. When the drum is still rolling and there is large amount of water with high temperature in the drum. The state is unsafe and the door cannot be opened forcefully. To press [Start/Pause] for 3 sec. to reload, and start the clothes adding in the midway function. Please follow the steps as below:
- Wait until the drum stops rotating.
- The door lock is unlocked.
- Close the door when the clothes are reloaded and press the [Start/Pause] button.

Press[Start/Pause]
3sec.


Reloadthe clothes


Start

Caution!
- Don't use the Reload function when the water level is over the edge of the inner tub or the temperature is high.

Child Lock
To avoid mis operation by children.

flowchart
graph LR
    A["On/Off"] --> B["Start"]
    B --> C["Extra Rinse"]
    B --> D["Pre Wash"]
    C --> E["Press [Extra Rinse"] and["Pre Wash"] 3 sec. till buzzer beep]
    D --> F["Press [Function"] and["Select"] 3 sec. till buzzer beep]
    F --> G["Select"]
Caution!
- Press the two button 3 sec. also to be released the function.
- The "Child Lock" will lock all the buttons except [On/Off].
- Cut off the power supply, the kid's protection is to released.
- The child lock will remain effective when the power is resumed for some models.
Programs
Programs are available according to the laundry type.
| Programmes | |
| Cotton | Hard-wearing textiles, heat-resistant textiles made of cotton or linen. |
| Synthetic | Wash synthetic articles, for example: shirts, coats, blending.While washing the knitting textiles, detergent quantity shall be reduced due to its loose string construction and easily forming bubbles. |
| Baby Care | Washing the baby's clothes, it can make the baby's wear cleaner and make the rinse performance better to protect the baby skin. |
| Jeans | Specially for jeans. |
| Mix | Mixed load consisting of textiles made of cotton and synthetics. |
| Colors | Washing brightly colored clothes, it can protect the colors better . |
| Cotton Eco | To increase the washing effects, washing time is increased. |
| Hand Wash | As for few light dirty clothes, the default temperature of washing is cold. |
| Sport Wear | Washing the activewear. |
| Quick(Quick15') | Extra short programme approx, suitable for lightly soiled washing as a small amounts of laundry. |
| Delicate | For delicate, washable textiles, e.g. made of silk, satin, synthetic fibres or blended fabrics. |
| Wool | Hand or machine-washable wool or richwool textiles.Especially gentle wash programme to prevent shrinkage, longer programme pauses (textiles rest in wash liquor). |
| Spin Only | Extra spin with selectable spin speed. |
| Rinse&Spin | Extra rinse with spin. |
| Drain Only | Drain off the water. |
| Rapid45' | Washing few and not very dirty clothes quickly. |

Note!
• Reference to your product to select the programs.

Washing Programs Table
| Programme | Load(kg) | Temp. (°C) | Default Time | |||||
| 7.5 | 9.0 | 10.0 | Default | 7.5(C01) | 7.5(C03) | 9.0 | 10.0 | |
| 1400 | 1400 | 1600 | 1400 | |||||
| Cotton | 7.5 | 9.0 | 10.0 | 40 | 2:40 | 2:40 | 2:40 | 2:40 |
| Synthetic | 3.75 | 4.5 | 4.0 | 40 | 1:40 | 1:40 | 1:40 | 1:40 |
| Baby Care | 7.5 | 9.0 | 10.0 | 30 | 1:20 | 1:20 | 1:20 | 1:20 |
| Jeans | 7.5 | 9.0 | 10.0 | 60 | 1:45 | 1:45 | 1:45 | 1:45 |
| Mix | 7.5 | 9.0 | 10.0 | 40 | 1:13 | 1:13 | 1:13 | 1:13 |
| Colors | 3.75 | 4.5 | 5.0 | Cold | 1:10 | 1:10 | 1:10 | 1:10 |
| Drain Only | - | - | - | - | 0:01 | 0:01 | 0:01 | 0:01 |
| Spin Only | 7.5 | 9.0 | 10.0 | - | 0:12 | 0:12 | 0:12 | 0:12 |
| Rinse&Spin | 7.5 | 9.0 | 10.0 | - | 0:20 | 0:20 | 0:20 | 0:20 |
| Wool | 2.0 | 2.0 | 2.0 | 40 | 1:07 | 1:07 | 1:07 | 1:17 |
| Delicate | 2.5 | 2.5 | 2.5 | 30 | 0:50 | 0:50 | 0:50 | 0:50 |
| Quick | 2.0 | 2.0 | 2.0 | Cold | 0:15 | 0:15 | 0:15 | 0:15 |
| Sport Wear | 3.75 | 4.5 | 5.0 | 40 | 0:45 | 0:45 | 0:45 | 0:45 |
| Hand Wash | 2.0 | 2.0 | 2.0 | Cold | 1:00 | 1:00 | 1:00 | 1:00 |
| Cotton ECO | 7.5 | 9.0 | 10.0 | 60 | 5:00 | 4:57 | 4:56 | 4:58 |
• Energy test program: Cotton ECO.
Speed: the highest speed; Other as the default.
Half load for 7.5/9.0/10.0Kg machine: 3.75/4.5/5.0Kg.
- “Cotton ECO” is the standard washing programs to which the information in the label and the fiche relates, and they are suitable to clean normally soiled cotton laundry and that they are the most efficient programs in terms of combined energy and water consumptions for washing that type on cotton laundry, that the actual water temperature may differ from the declared cycle temperature.

Note!
- The parameters in this table are only for user's reference. The actual parameters maybe different with the parameters in above mentioned table.
■ Cleaning and Care

Note!
- Before your maintenance starts, please unplug the machine and close the tap.
Cleaning the Cabinet
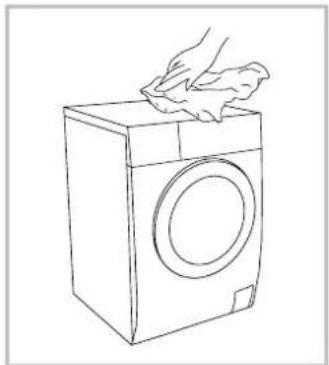
Proper maintenance on the washing machine can extend its working life. The surfaced can be cleaned with diluted non-abrasive neutral detergents when necessary. If there is any water overflow, use a wet cloth to wipe it off immediately. No sharp items are allowed.
natural_image
Line drawing of a hand cleaning a washing machine with a cloth (no text or symbols)
Note!
- Formic acid and its diluted solvents or equivalent are forbidden, such as alcohol solvent or chemical products, etc.
Cleaning the Drum
The rusts left inside the drum by the metal articles shall be removed immediately with chlorine-free detergents Never use steel wool.

Note!
- Don't put laundry in the washing machine during the drum cleaning.
Cleaning The Door Seal and Glass
Wipe the glass and seal after each wash to remove lint and stains. If lint builds up it can cause leaks. Remove any coins, buttons and other objects from the seal after each wash.

natural_image
Line drawing of a hand gripping a curved object (no text or symbols)Cleaning The Inlet Filter

Note!
- Inlet filter must be cleaned if there is less water.
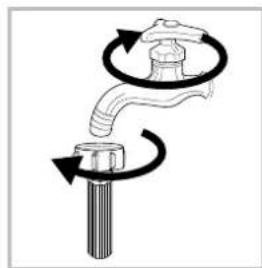
Washing the filter in the tap
- Close the tap.
- Remove the water supply hose from the tap.
- Clean the filter.
- Reconnect the water \supply hose.
natural_image
Diagram of a faucet with rotating arrows indicating clockwise motion (no text or symbols)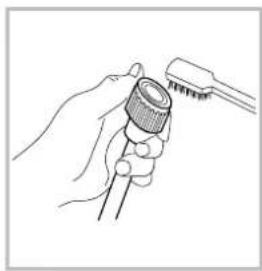
natural_image
Line drawing of a hand holding a pipette with a pipette tip (no text or symbols)Washing the filter in washing machine.
- Screw off the inlet pipe from the backside.
- Pull out the filter with long nose pliers and reinstall it back after being washed.
- Use the brush to clean the filter.
- Reconnect the inlet pipe.

natural_image
Hand holding a small mechanical component with a magnified inset showing rotational motion (no text or symbols)
natural_image
Line drawing of a hand holding a magnifying glass over a wall-mounted device (no text or symbols)
Note!
- If the brush is not clean, you can pull out the filter washed separately;
- Reconnect, turn on the tap.
Clean The Detergent Dispenser
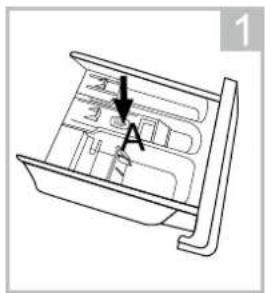
- Press down the arrow location on softener cover inside the dispenser drawer.
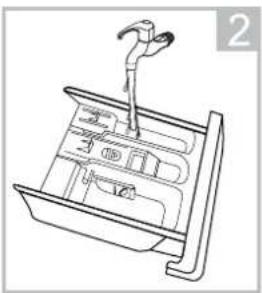
- Lift the clip up and take out softener cover and wash all grooves with water.
- Restore the softener cover and push the drawer into position.
natural_image
Technical line drawing of a mechanical component with internal compartments and a directional arrow (no text or symbols)Pull out the dispenser drawer with press the A
natural_image
Line drawing of a mechanical lever mechanism with no text or symbolsClean the dispenser drawer under water
natural_image
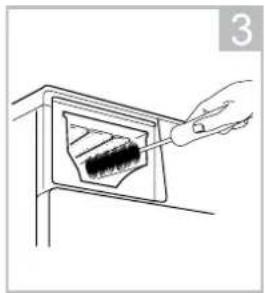
Line drawing of a hand using a tool to clean or inspect a dark object inside a transparent container (no text or symbols)Clean inside the recess with an old toothbrush

natural_image
Technical line drawing of a mechanical device with internal components and a handle (no text or symbols)Insert the dispenser drawer

Note!
- Do not use alcohol, solvents or chemical products to clean the machine.
Cleaning The Drain Pump Filter

Warning!
- Be careful of the hot water!
- Allow detergent solution to cool down.
- Unplug the machine to avoid electrical shock before washing.
- Drain pump filter can filter the yarns and small foreign matters from the washing
- Clean the filter periodically to ensure the normal operation of washing machine.
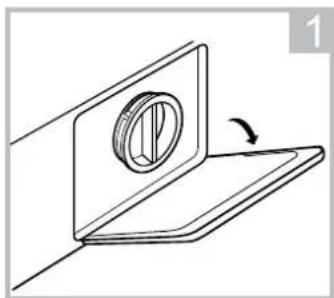
natural_image
Technical line drawing of a mechanical component with a circular feature and rotation arrow (no text or symbols)Open the lower cover cap

Rotate 90' and pull out the emergency drain hose, and take off the hose cap.

natural_image
Line drawing of a kitchen appliance with a plate, sink, and handle (no text or symbols)After water runs out, reset the drain hose.

natural_image
Hand holding a rotary knob on a control panel (no text or symbols visible)Open the filter by turning to the counter clockwise
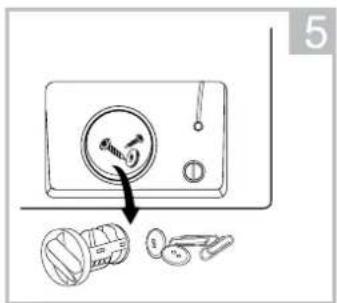
Remove extraneous matter
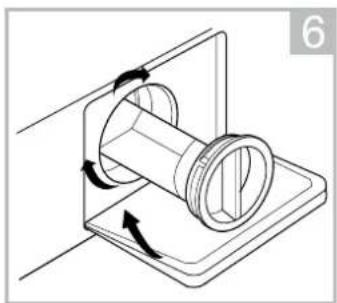
natural_image
Diagram of a mechanical component with rotational arrows indicating movement, no text or symbols presentClose the lower cover cap

Caution!
- Make sure that valve cap and emergency drain hose are reinstalled properly, cap plates should be inserted aligning to hole plates otherwise water may leak.
- Some machines don't have emergency drain hose, so step 2 and step 3 can be skipped. Rotate lower cover cap directly to make water run into basin.
- When the appliance is in use and depending on the program selected there can be hot water in the pump. Never remove the pump cover during a wash cycle, always wait until the appliance has finished the cycle, and is empty. When replacing the cover, ensure it is securely re-tightened.
Trouble Shooting
The start of the appliance does not work or it stops during the operation. First try to find a solution to the problem, If not, Contact the service centre.
| Description | Reason | Solution |
| Washing machine cannot start up | Door is not closed properly | Restart after the door is closedCheck if the clothes is stuck |
| Door can’t be opened | Washer's safety protection design is working | Disconnect the power, restart the product |
| Water leakage | The connection between inlet pipe or outlet hose is not tight | Check and fasten water pipesClean up outlet hose |
| Detergent residues in the box | Detergent is dampened or agglomerated | Clean and wipe the detergent box |
| Indicator or display does not light | Disconnect the power PC board or harness has connection problem | Check if the power is shut down and the power plug is connected correctly |
| Abnormal noise | Check if the fixing (bolts) have been removedCheck it’s installed on a solid and level floor |
| Description | Reason | Solution |
| E30 | Door is not closed properly | Restart after the door is closedCheck if the clothes is stuck |
| E10 | Water injecting problem while washing | Check if the water pressure is too lowStraighten the water pipeCheck if the inlet valve filter is blocked |
| E21 | Overtime water draining | Check if the drain hose is blocked |
| E12 | Water overflow | Restart the washer |
| EXX | Others | Please try again first, call up service line if there are still troubles |

Note!
• After the check, activate the appliance. If the problem occurs or the display shows other alarm codes again, contact the service.
■ Technical Specifications
Power Supply 220-240\~,50Hz
MAX. Current 10A
Standard water Pressure 0.5MPa\~1MPa
| Model | Washing | Dimension | Net Capacity | Rated Power (W*D*Hmm) | Weight | |
| T75E1200FL-5 | 7.5kg | 595* | 565*850 68kg | 2000W |

Testing Methods
ADDITIONAL INFORMATION FOR STANDARD PERFORMANCE TESTING: (AS/NZ 2040.1:2005+Amdt1 - 2007 + Amdt2 - 2009)
- Water connections: Cold & Hot water connection
- Water Supply Pressure: 320kPa
- Warm Wash Program: Cotton Eco Display : 4:57 Cold Wash Program: Cotton COld (No Temperature display is cold wash)
- Detergent Type: Drum detergent
- Detergent Quantity: Default
- Adding detergent: The detergent is dissolved and added as Paragraph B7.3 of AS/NZS 2040.1 The detergent shall be dissolved in 1L of water
- Anti-sudsing agent: Max
- test load mass: 7.5kg
- Water Consumption: 77L
- Test Voltage: 220-240V ^~ , 50Hz
MANUFACTURER GUARANTEE
This warranty is provided in Australia by Glen Dimplex Australia Pty Limited ABN 69 118 275 460 (Phone number 1300 556 816) and in New Zealand by Glen Dimplex New Zealand Limited NZBN 9429000069823 (Phone number 09 274 8265) in respect of the Technika product.
1. Technika Express Warranty
Subject to the exclusions below, we warrant that the product will not have any electrical or mechanical breakdowns within:
a) In the case of Technika products used for personal, domestic or household purposes, a period of 3 years from the date the product is purchased as a brand-new product from a retailer located in Australia / New Zealand.
b) In the case of Technika products used for purposes other than personal, domestic or household purposes (including business or commercial use), a period of 90 days from the date the product is purchased as a brand-new product from a retailer located in Australia /New Zealand. Technika products are designed and intended for domestic use only; and
c) All warranty repairs must be carried out by Glen Dimplex or their nominated service agent
Note: Warranty periods detailed above may vary in line with agreements with select retail and builder partners ang may differ between Australia and New Zealand.
The benefits conferred by this express warranty are in addition to the Consumer Guarantees referred to in section 3 and any other statutory rights you may have under the Australian / New Zealand Consumer Law and/or other applicable laws
2. Warranty exclusions
This express warranty does not apply where:
a) The product has been installed, used or operated otherwise than in accordance with the product manual or other similar documentation provided to you with the product;
b) The product requires repairs due to damage resulting from accident, misuse, incorrect installation, insect or vermin infestation, improper liquid spillage, cleaning or maintenance, unauthorized modification, use on an incorrect voltage, power surges and dips, voltage supply problems, tampering or unauthorized repairs by any persons, use of defective or incompatible accessories or exposure to abnormally corrosive conditions, events independent of human control which occurred after the goods left the control of Glen Dimplex;
c) The repair relates to the replacement of consumable parts such as fuses and bulbs or any other parts of the product which require routine replacement;
d) You are unable to provide us with reasonable proof of purchase for the product;
e) The breakdown occurs after the expiry of the express warranty period set out in section 1 or
f) The product was not purchased in Australia / New Zealand as a brand-new product.
3. Consumer guarantees
Our goods come with guarantees that cannot be excluded under the Australian / New Zealand Consumer Law. You are entitled to a replacement or refund for a major failure and for compensation for any other reasonably foreseeable loss or damage. You are also entitled to have the goods repaired or replaced if the goods fail to be of acceptable quality and the failure does not amount to a major failure.
4. How to make a claim
You may make a claim under this warranty through our website, contacting our customer care line or via email. Contact details for Glen Dimplex Australia and New Zealand can be found at the end of this document.
To make a valid claim under this warranty, you must:
a) Lodge the claim with us as soon as possible and no later than 14 days after you first become aware of the breakdown;
b) Provide us with the product serial number;
c) Provide us with reasonable proof of purchase for the product. This can take the form of a store receipt, new home handover form or other payment receipt documentation; and
d) If required by us, provide us (or any person nominated by us) with access to the premises at which the product is located at times nominated by us (so that we can inspect the product).
5. Warranty claims
If you make a valid claim under this warranty and none of the exclusions set out in section 2 apply, we will, at our election, either repair the product or replace the product with a product of identical specification (or where the product is superseded or no longer in stock, with a product of as close a specification as possible).
Goods presented for repair may be replaced by refurbished goods of the same type rather than being repaired. Refurbished parts may be used to repair the goods.
Products are designed and supplied for normal domestic use. We will not be liable to you under this warranty for business loss or damage of any kind whatsoever.
Glen Dimplex Australia Pty Ltd Glen Dimplex New Zealand Ltd
www.glendimplex.com.au
www.glendimplex.com.nz
Australia
New
Zealand
Ph: 1300 556 816 Ph: 09 274 8265
customer.care.ha@glendimplex.com.au nztechserv@gelndimplex.co.nz
READ THE INSTRUCTION BOOKLET BEFORE INSTALLING AND USING THE APPLIANCE.
The manufacturer will not be responsible for any damage to property or to persons caused by incorrect installation or improper use of the appliance.
The manufacturer is not responsible for any inaccuracies, due to printing or transcription errors, contained in this manual. In addition, the appearance of the figures reported is also purely indicative.
The manufacturer reserves the right to make changes to its products when considered necessary and useful, without affecting the essential safety and operating characteristics.
Glen Dimplex constantly seeks ways to improve the specifications and designs of their products. Whilst every effort is made to produce up to date literature, this document should not be regarded as an infallible guide. Actual product only should be used to derive cut out sizes.
All appliances must be installed by a qualified person/s with adherence to the relevant electrical, plumbing and building codes, with compliance being issued as required by state or national legislation.
Additionally, all upright cookers must have the anti-tilt device installed correctly in adherence to the relevant standards by a licenced installer.
For maximum effectiveness and efficiency all rangehoods should be installed with the use of ductwork, by a licenced installer with adherence to the relevant state and national building codes and regulations.
All Glen Dimplex appliances are for Domestic use only, and must be installed by a licence installer into Domestic Applications only, without exception and to the required Authorities guidelines. Any installation outside of this will VOID warranty. Alfresco areas are not a Domestic application.
TECHNIKA®
COOKING WITH PASSION
Distributed by:
Glen Dimplex Australia Pty Ltd Glen Dimplex New Zealand Ltd
For full terms and conditions, or to register your product warranty, please visit our website:
www.glendimplex.com.au www.glendimplex.com.nz
For service advice, please contact the Customer Care Centre by phone or email below.
Australia
New
Zealand
Ph: 1300 556 816 Ph: 09 274 8265
customer.care.ha@glendimplex.com.au nztechserv@gelndimplex.co.nz


- Instructions for Use and Installation
- Safety Instructions
- Installation
- Operation
- Maintenance
- - Safety Instructions
- Warning!
- Caution!
- Note!
- The electric shock!
- Risk to children!
- Risk of explosion!
- Installing the product!
- Operating the appliance!
- Packaging/Old appliance
- Product Description
- Accessories
- Installation area
- Unpacking the washing machine
- Remove transport bolts
- Leveling the washing machine
- Connect Water Supply Hose
- Drain Hose
- Quick Start
- Before Washing
- Washing
- After Washing
- Before Each Wash
- Detergent Dispenser
- Option
- Pre Wash
- Extra Rinse
- Speed Wash
- Delay
- Reload
- Child Lock
- Programs
- ■ Cleaning and Care
- Cleaning the Cabinet
- Cleaning the Drum
- Cleaning The Door Seal and Glass
- Cleaning The Inlet Filter
- Washing the filter in the tap
- Washing the filter in washing machine.
- Clean The Detergent Dispenser
- Cleaning The Drain Pump Filter
- Trouble Shooting
- ■ Technical Specifications
- Testing Methods
- MANUFACTURER GUARANTEE
- Technika Express Warranty
- Warranty exclusions
- Consumer guarantees
- How to make a claim
- Warranty claims
- READ THE INSTRUCTION BOOKLET BEFORE INSTALLING AND USING THE APPLIANCE.
Brand : Technika
Model : T75E1200FL-2
Category : Washing machine