
SRT 24HA3303U - Television STRONG - Free user manual and instructions
Find the device manual for free SRT 24HA3303U STRONG in PDF.


| Product Type | LED TV with DVB-T2/C/S2 and Android 6.0 |
| Brand | STRONG |
| Model | SRT 24HA3303U |
| Screen Size | 24 inches (diagonal) |
| Dimensions (W x D x H) | 550 x 144 x 353.6 mm |
| Net Weight | 3.8 kg |
| Power Supply | 100-240 V AC, 50/60 Hz |
| Power Consumption (Max) | 36 W |
| Power Consumption (Typical) | 19 W |
| Standby Power Consumption | < 0.5 W |
| Tuner | DVB-T2 (terrestrial), DVB-C (cable), DVB-S2 (satellite), ATV (PAL/SECAM) |
| Operating System | Android 6.0 Marshmallow |
| Wireless Connectivity | Built-in Wi-Fi 2.4 GHz (802.11 b/g/n) and Ethernet 10/100 Mbps |
| Connectors | 2 x HDMI (1 with ARC), 2 x USB, 1 x S/PDIF (coaxial), 1 x AV IN, 1 x CI+, 1 x ANT/CABLE IN, 1 x SAT IN, 1 x Ethernet, 1 x Headphone |
| Audio Output | 6 W + 6 W |
| PVR / Timeshift | Yes (requires USB storage) |
| Safety | Do not expose to rain or moisture. Keep at least 10 cm ventilation all around. Do not place objects filled with liquids on the TV. Use only attachments specified by manufacturer. |
| Cleaning | Clean the screen and casing with a soft, dry cloth. Do not use liquid cleaners or abrasive substances. |
| Environmental Conditions | Operating temperature: +5°C to +35°C; Storage temperature: -15°C to +45°C; Humidity: 20% to 80% non-condensing |
| Default Password | 0000 |
Frequently Asked Questions - SRT 24HA3303U STRONG
User questions about SRT 24HA3303U STRONG
0 question about this device. Answer the ones you know or ask your own.
Ask a new question about this device
Download the instructions for your Television in PDF format for free! Find your manual SRT 24HA3303U - STRONG and take your electronic device back in hand. On this page are published all the documents necessary for the use of your device. SRT 24HA3303U by STRONG.
USER MANUAL SRT 24HA3303U STRONG
LED TV with DVB-T2/C/S2
SRT 24HA3303U
SRT 32HA3303U
SRT 40FA3303U
natural_image
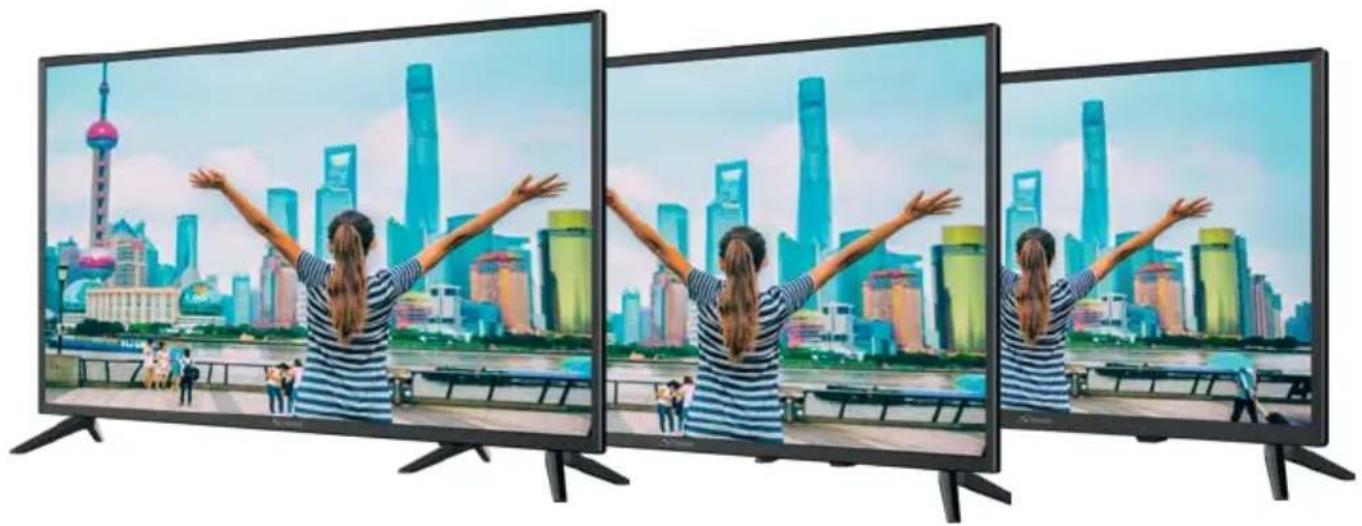
Three identical flat-screen TVs displaying a vibrant city skyline with Shanghai Oriental Pearl Tower, viewed from behind (no text or symbols visible)User manual
Fig. 3

Fig. 4

Fig. 5
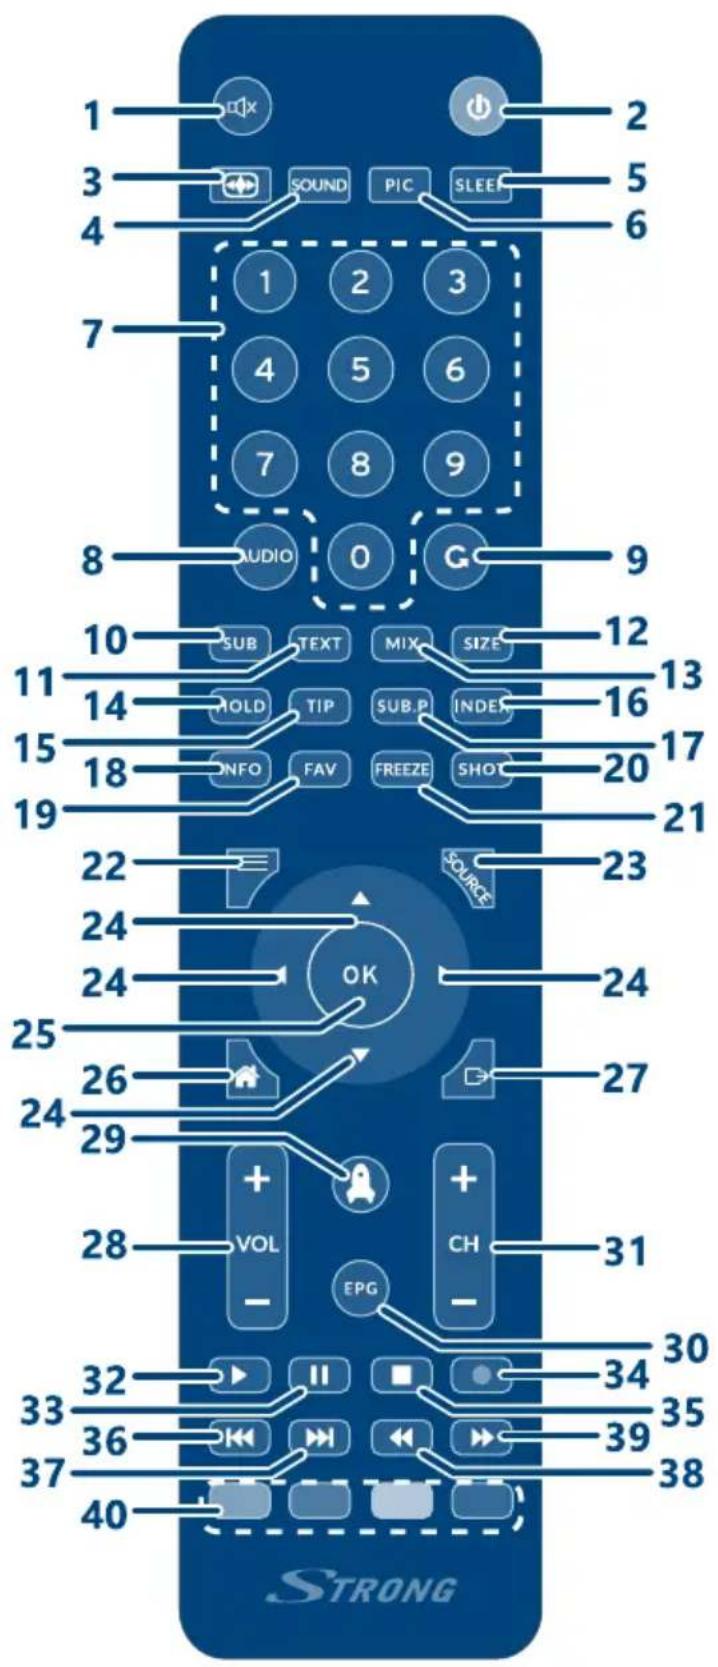
Fig. 6
ПІДТРИМКА
UA
support_ua@strong.tv
+380 (44) 238 61 50
www.strong.tv
Supplied by STRONG Austria
Represented by STRONG Ges.m.b.H.
Franz-Josefs-Kai 1
1010 Vienna, Austria
Email: support_at@strong.tv
Licenses
THIS PRODUCT IS LICENSED UNDER THE AVC PATENT PORTFOLIO LICENSE FOR THE PERSONAL AND NONCOMMERCIAL USE OF A CONSUMER TO (i) ENCODE VIDEO IN COMPLIANCE WITH THE AVC STANDARD ("AVC VIDEO") AND/OR (ii) DECODE AVC VIDEO THAT WAS ENCODED BY A CONSUMER ENGAGED IN A PERSONAL AND NON-COMMERCIAL ACTIVITY AND/OR WAS OBTAINED FROM A VIDEO PROVIDER LICENSED TO PROVIDE AVC VIDEO. NO LICENSE IS GRANTED OR SHALL BE IMPLIED FOR ANY OTHER USE. ADDITIONAL INFORMATION MAY BE OBTAINED FROM MPEG LA, L.L.C. SEE HTTP://WWW.MPEGLA.COM
This product contains one or more programs protected under international and U.S. copyright laws as unpublished works. They are confidential and proprietary to Dolby Laboratories. Their reproduction or disclosure, in whole or in part, or the production of derivative works therefrom without the express permission of Dolby Laboratories is prohibited. Copyright 2003-2009 by Dolby Laboratories. All rights reserved.
THIS PRODUCT IS SOLD WITH A LIMITED LICENSE AND IS AUTHORIZED TO BE USED ONLY IN CONNECTION WITH HEVC CONTENT THAT MEETS EACH OF THE THREE FOLLOWING QUALIFICATIONS: (1) HEVC CONTENT ONLY FOR PERSONAL USE; (2) HEVC CONTENT THAT IS NOT OFFERED FOR SALE; AND (3) HEVC CONTENT THAT IS CREATED BY THE OWNER OF THE PRODUCT. THIS PRODUCT MAY NOT BE USED IN CONNECTION WITH HEVC ENCODED CONTENT CREATED BY A THIRD PARTY, WHICH THE USER HAS ORDERED OR PURCHASED FROM A THIRD PARTY, UNLESS THE USER IS SEPARATELY GRANTED RIGHTS TO USE THE PRODUCT WITH SUCH CONTENT BY A LICENSED SELLER OF THE CONTENT. YOUR USE OF THIS PRODUCT IN CONNECTION WITH HEVC ENCODED CONTENT IS DEEMED ACCEPTANCE OF THE LIMITED AUTHORITY TO USE AS NOTED ABOVE.
SIMPLIFIED EU DECLARATION OF CONFORMITY
Hereby, STRONG declares that the radio equipment type LED TV is in compliance with Directive 2014/53/EU. The full text of the EU declaration of conformity is available at the following internet address: https://www.strong.tv/en/doc
Subject to alterations. In consequence of continuous research and development technical specifications, design and appearance of products may change. Android is a trademark of Google Inc. The Android robot is reproduced or modified from work created and shared by Google and used according to terms described in the Creative Commons 3.0 Attribution License. Manufactured under license from Dolby Laboratories. Dolby Audio and the double-D symbol are trademarks of Dolby Laboratories. The terms HDMI and HDMI High-Definition Multimedia Interface, and the HDMI logo are trademarks or registered trademarks of HDMI Licensing Administrator, Inc in the United States and other countries. All product names are trademarks or registered trademarks of their respective owners. © STRONG 2018. All rights reserved.
To obtain the best performance and safety, please read this manual carefully. Please keep this manual for future reference.
TABLE OF CONTENT
1.0 INSTRUCTION 3
1.1 Safety Instructions 3
1.2 Storage 4
1.3 Accessories 4
1.4 Equipment set-up 4
2.0 INSTALLATION 5
2.1 Default password: 0000 5
2.2 Front panel/underside 5
2.3 Rear panel 5
2.4 Side panel 5
2.5 Remote control 6
2.6 Installing the batteries 7
2.7 Using the remote control 7
3.0 FIRST TIME INSTALLATION (FTI)
3.1 OSD Language 7
3.2 Internet connection 7
3.3 FTI without DTV installation 8
3.4 DTV FTI installation 8
3.5 Satellite installation 8
3.6 Aerial or Cable installation 10
3.7 Channel scan 11
4.0 HOW TO USE THE ANDROID PLATFORM 11
4.1 TV 11
4.2 File 12
4.3 Apps 12
4.4 Settings 12
4.5 Some features of RCU usage 13
5.0 TV 13
5.1 Channel 14
5.2 Picture 17
5.3 Sound 17
5.4 Option 18
5.5 Lock 18
5.6 Electronic Programme Guide (EPG) 19
5.7 Teletext 19
5.8 Subtitles 19
5.9 PVR File System 19
5.10 Timeshift 20
5.11 Recording 20
6.0 FILE 21
6.1 File Manager 21
6.2 Picture 21
6.3 Movie 21
6.4 Music 22
6.5 Apps 22
7.0 APPS 22
7.1 Install/Uninstall applications manually 23
7.2 Google Play Store 23
7.3 List of pre-installed applications 23
8.0 SETTINGS 23
8.1 Network 23
8.2 Setting 23
8.3 Picture and Audio 24
8.4 About 24
8.5 More Settings 24
9.0 TROUBLESHOOTING 26
10.0 SPECIFICATIONS 27
1.0 INSTRUCTION
1.1 Safety Instructions
- Read all of the instructions before operating the set. Keep these instructions well for later use.
■ Only use attachments/accessories specified or provided by the manufacturer (such as the exclusive supply adapter, battery etc.).
■ Please refer to the information on the exterior back enclosure for electrical and safety information before installing or operating the apparatus.
■ To reduce the risk of fire or electric shock, do not expose this apparatus to rain or moisture.
The ventilation should not be impeded by covering the ventilation openings with items, such as newspaper, table-cloths, curtains, etc.
■ The apparatus shall not be exposed to dripping or splashing and no objects filled with liquids, such as vases, shall be placed on the apparatus.
■ The mark 7 indicates a risk of electric shock. The external wires must be installed by an instructed person or ready-made leads or cords must be used.
■ To prevent injury, this apparatus must be securely attached to the floor/wall in accordance with the installation instructions.
■ Danger of explosion if the battery is incorrectly replaced. Replace only with the same or equivalent types.
■ The battery (battery or batteries or battery pack) shall not be exposed to excessive heat such as sunshine, fire or the like.
■ Excessive sound pressure from earphones and headphones can cause hearing loss.
■ Listening to music at high volume levels and for extended durations can damage one's hearing.
In order to reduce the risk of damage to hearing, one should lower the volume to a safe, comfortable level, and reduce the amount of time listening at high levels.
The mains plug or appliance coupler is used as disconnect device, it shall remain readily operable. When not in use and during movement, please take care of the power cord set, e.g. tie up the power cord set with cable tie or something like that. It shall be free from sharp edges or similar which can cause abrasion of the power cord set. When put into use again, please make sure the power cord is not damaged. In case of damages, please get the power cord replaced by a similar one with the same specifications. The absence of a light indication on the apparatus does not mean that it is fully disconnected from the mains. To disconnect the apparatus completely, the mains plug must be pulled out.
- Attention should be drawn to environmental aspects of battery disposal. - No naked flame sources, such as lighted candles, should be placed on the apparatus.
■ To prevent the spread of fire, keep candles or other open flames away from this product at all times. ■ A USB terminal can provide a maximum of 500 mA.
■ Equipment with this symbol is a Class II or double insulated electrical appliance. It has been designed in such a way that it does not require a safety connection to electrical earth.
Operating Environment
■ Do not install this equipment in a confined space such as a bookcase or similar unit.
■ Do not use the set near damp, and cold areas, protect the set from overheating.
- Keep away from direct sunlight.
■ Do not use the set near dust place.
- Do not attach candle to accessible opening area, to avoid flammable foreign material from entering the TV.
WEEE Directive

Correct Disposal of this product. This marking indicates that this product should not be disposed with other household wastes throughout the EU. To prevent possible harm to the environment or human health from uncontrolled waste disposal, recycle it responsibly to promote the sustainable reuse of material resources. To return your used device, please use the return and collection systems or contact the retailer where the product was purchased. They can take this product for environmental safe recycling.
1.2 Storage
Your device has been carefully checked and packed before shipping. When unpacking it, make sure that all the parts are included and keep the packaging away from children. We recommend that you keep the carton during the warranty period, to keep your device perfectly protected in the event of repair or warranty.
1.3 Accessories
1x installation instruction
1x stand assembly instruction
2x stand feet
24", 32": 2x screws M4X14
40": 4x screws M4X14
1x safety instructions/warranty card
1x remote control
2x AAA batteries
1.4 Equipment set-up
Fig. 1
NOTE: The graphics are for representation only.
Install the display on a solid horizontal surface such as a table or desk. For ventilation, leave a space of at least 10 cm free all around the set. To prevent any fault and unsafe situations, please do not place any objects on top of the set. This apparatus can be used in tropical and/or moderate climates.
This user manual provides complete instructions for installing and using this TV.
The symbols serve as follows:
WARNING Indicates warning information.
NOTE Indicates any other additional important or helpful information.
MENU Represents a button on the remote control or the TV.
(Bold characters)
Move to Represents a menu item within a window.
(Italic characters)
2.0 INSTALLATION
2.1 Default password: 0000
2.2 Front panel/underside
Fig. 2
NOTE: The graphics are for representation only.
- Speakers
- Power indicator /remote sensor
- Joystick for select modes function of TV
- Power switch
2.3 Rear panel
NOTE: The graphics are for representation only.
Fig. 3
- ETHERNET Connect an RJ-45 cable from the router to access Internet services. Alternatively connect to Internet via the in-built Wi-Fi module.
- USB Connect a USB device for playback of multimedia files
- S/PDIF (COAX.) Use a coaxial cable to connect your TV to a compatible digital amplifier or Home theatre set.
- HDMI 2 Connect HDMI input signal from a signal source such as DVD, Blu-ray player or game console.
-
HDMI 1 (ARC) Connect HDMI input signal from a signal source such as DVD, Blu-ray player or game console or directly to a Digital Amplifier that supports the ARC function. This input is equipped with the ARC (Audio Return Channel) feature to implement audio connections and for a full Dolby audio support.
-
VIDEO/AUDIO L/R Connect devices like DVD or VCR using RCA cable.
-
SAT IN Connect a cable from satellite dish to the TV.
2.4 Side panel
NOTE: The graphics are for representation only.
Fig. 4
- HEADPHONE To connect headphones. Speakers will be muted when earphone is plugged in.
- CI+ Connect a Conditional Access Module (CAM).
- ANT/CABLE IN Connect a terrestrial antenna or cable connection from your provider to the TV.
- USB Connect a USB device for playback of multimedia files
2.5 Remote control
Fig. 5
| 1. | Press to mute or restore the volume. |
| 2. | Press to turn the TV on or standby. |
| 3. | Change aspect ratio. |
| 4. | SOUND Change sound mode. |
| 5. | SLEEP Select the sleep time, such as 10 min, 20 min, etc. |
| 6. | PIC Change picture mode. |
| 7. | 0~9 Choose channel directly. |
| 8. | AUDIO Press to select available audio languages. Selecting audio description, a narrator will describe what is happening on the screen for blind or visually impaired viewers. Press again to turn it off (depending on broadcast). |
| 9. | Press to go back to previous viewed channel. |
| 10. | SUB Enable/disable subtitles in DTV/USB mode. |
| 11. | TEXT Press to enter or exit the teletext menu. |
| 12. | SIZE Enlarge the teletext display. Press this button once to enlarge upper half of the screen. Press this button again to enlarge lower half of the screen. Press this button again to resume to normal screen size. |
| 13. | MIX Press this button to superimpose the teletext over the TV programme. Press again to return to normal teletext mode. |
| 14. | HOLD Press to hold the teletext page on screen without update and changes. Press again to release the hold state. |
| 15. | TIP In teletext mode, press to reveal the hidden information. |
| 16. | INDEX Press this button to display index page. In DTV mode displays list of records. |
| 17. | SUB.P Press this button to enter or exit subpage mode (if subpage is available). Pressbuttons to select a subpage. |
| 18. | INFO Display information about the current source. |
| 19. | FAV Press to view your assigned favourite list channels. Press ▲▼ to cycle through your assigned favourite channels, press OK to confirm. |
| 20. | SHOT To make screenshot of current screen. |
| 21. | FREEZE Press to freeze current video. |
| 22. | ≡ To access menu in DTV mode. In Android applications to access Options of application. |
| 23. | SOURCE Select the input source mode. |
| 24. | ▲▼ ◀▶ Navigate the menu. |
| 25. | OK Press to display Channel list in DTV mode. In Android applications to confirm selection. |
| 26. | ↗ Open Home screen of Android from any state of TV set. |
| 27. | ⇨ Exit the current menu. |
| 28. | VOL +/- Adjust the volume up or down. |
| 29. | ⚠ Run System optimization application. |
| 30. | EPG Press to display the current EPG information in DTV mode. |
| 31. | CH +/- Change programmes up or down. |
| 32. | ▶ Start/resume playback. |
| 33. | II Pause playback. In DTV mode starts Timeshift. |
| 34. | ● Press to start recording of current programme. |
| 35. | ■ Press to stop playback or recording/Timeshift. |
| 36. | ◀◀ Press to play the previous file. |
| 37. | ▶◀ Print to play the next file. |
| 38. | ◀◀ Print to fast reverse. |
-
▶ Press to fast forward.
-
COLOUR BUTTONS
Press to execute the prompt function in TV or DTV menu mode.
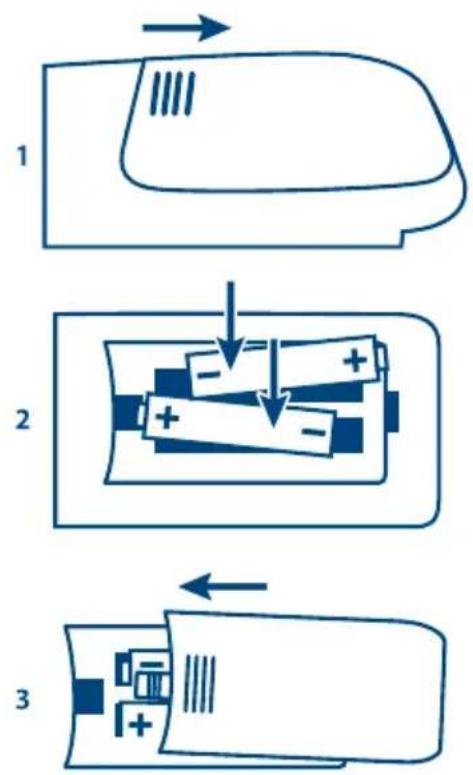
2.6 Installing the batteries
Fig. 6
NOTE: Pictures are only for reference. Actual items may differ.
Precautions for using the battery
Improper using of the battery will cause leakage. Carefully follow these instructions.
- Please note the batteries' polarity to avoid short circuit.
- When the battery's voltage is insufficient which affect the use range, you should replace it with a new battery. Remove the batteries from the remote control unit if you do not intend to use it for a long time.
- Do not use different types of batteries (for example Manganese and Alkaline batteries) together.
- Do not put the battery into fire, and charge or decompose the battery.
- Please dispose batteries abide by relevant environmental protection regulation.
2.7 Using the remote control
■ Use the remote control by pointing it towards the remote sensor. Items between the remote control and the remote sensor could block normal operation.
- Do not cause the remote control to vibrate violently. Also, do not splash liquid on the remote control, also do not put the remote control in a high humidity place.
- Do not place the remote control under direct sunlight which will cause deformation of the unit by heat.
- When the remote sensor is under direct sunlight or strong lighting, the remote control will not work. If so, please change the lighting or TV's position, or operate the remote control closer to the remote sensor.
3.0 FIRST TIME INSTALLATION (FTI)
After all connections have been made properly, switch on your TV.
NOTE: Please note, if your TV starting very first time or starting after returning to factory defaults, it will take approximately 5 minutes after switching ON of your TV to prepare it for the work. Please be patient.
3.1 OSD Language
The language selection will appear on screen.
Use ▲▼ to select the OSD Language of your preference. Confirm with OK on your remote control.
3.2 Internet connection
The next screen will depend on the Internet connection.
If you have connected the TV set to your home router using an Ethernet cable, then the Network setting screen appears confirming the connection. Press OK to continue the installation.
If you did not connect the TV set with an Ethernet cable, then the Choose Wi-Fi screen will appear. Select the network from the list or select Skip and press OK.
On the next screen, enter the password for the selected network by using the virtual keyboard. Once the password entered, select Done on the virtual onscreen keyboard and press OK. The next screen will confirm the connection to the Internet. You can proceed to the next step of the installation of re-pick Wi-Fi to select another network.
If you proceed to next step, the Setting completed screen will appear.
3.3 FTI without DTV installation
If you do not want to scan channels and make DTV installation during FTI, select Go to Home screen to finish installation and press OK to confirm your choice.
If you have selected Go to Home screen the Android Home Menu screen of TV will appear.
Please refer to chapter 4 to read more about how to use Android platform.
3.4 DTV FTI installation
If you want to scan channels and make DTV installation during FTI, select Continue to DTV installation and press OK to confirm your choice.
On the next screen appears Please select location.
Use ◀▶ to select your country from the list.
Once the country is selected, press ▼ to select Next and press OK.
On the appeared screen Select Antenna Type, make your choice of:
Antenna Type
Select Aerial if you wish to install Aerial channels. If you wish to install channels from connected Cable network, then select Cable. If you have connected your TV set to a Satellite dish, then select Satellite.
3.5 Satellite installation
If you have selected Satellite antenna type then you have to setup LNB according to your antenna system.
If you are using single LNB and it is Universal type 9750/10600, then you can skip LNB Setting and go directly to Search item to start scanning.
Otherwise, select LNB Setting and press OK.
LNB Setting
In this menu setup all settings according to physical parameters of your antenna system.
Satellite
Highlight it and press OK to display list of available satellites, use ▲▼ to select and OK to confirm.
Transponder
Second item represents transponder of selected satellite. Highlight it and press OK to display list of available transponders, use ▲▼ to select and OK to confirm.
LNB Power
Use ◀▶ to select value corresponded to LNB for selected satellite.
Long Cable Compensation
Select between ON and OFF. Set to ON if you have high losses in the cable due to its long length. It may help to get signal.
| LNB Type | Highlight this item and press OK to select between available types, according to your LNB for selected satellite. |
| 22kHz Tone | Set Auto for most of cases, especially Universal LNB. |
| Toneburst | Keep None if there are no Tone Burst switch in your antenna system. Otherwise, set accordingly to the physical antenna configuration. |
| DiSEqC 1.0 | Keep None if there are no DiSEqC 1.0 switch in your system. Otherwise, set port according to the physical antenna configuration. |
| DiSEqC 1.1 | Keep None if there are no DiSEqC 1.1 switch in your system. Otherwise, set port according to the physical antenna configuration. |
Signal Strength and Quality indicators will help you to verify that signal from selected satellite/transponder is of good quality.
Make settings for each satellite available in your antenna system.
Once you have completed all settings of LNB(s) - press ➔ to continue installation of satellite channels.
Channel Search
On next screen you can select between Auto Tuning and DTV Manual Tuning.
Auto Tuning
| Search Type | If you select Satellite then the TV will scan all transponders of Selected Satellites. If you select Transponder then the TV will scan Selected Transponders of selected satellite. |
| Satellite | Highlight this item and press OK to display list of satellites. Mark in the list satellites which you would like to scan automatically. The item would not be selectable if Search Type set to Transponder. |
| Transponder | Highlight this item and press OK to display list of transponders. Mark in the list transponders which you would like to scan automatically. The item would not be selectable if Search Type set to Satellite. |
| Scan Mode | Select between Free to install only free channels, Free+Scramble to install free and scrambled channels, Scramble to install only scrambled channels. |
| Service Type | Select between DTV to install only Digital TV channels, DTV+Radio to install TV and Radio channels, Radio to install only Radio channels. |
| Network Search | Set to Off to scan only transponders preinstalled in TV set. Set to On to scan transponders which can be discovered through network signaling. |
| Search Option | Set to Auto Scan for scanning according to above all settings. Set to Blind Scan for scanning in case of your selected satellite is not well defined. Blind scan mode searching transponder by special algorithm which make possible to discover new transponders. However, this search option is very time consuming. |
Once you have done all settings - select Search and press OK.
Manual DTV tuning.
This mode allows you to install channels from one transponder of selected satellite.
All search modes are similar to described in above chapter Auto scan.
TV set will search for channels and switch to first channel in the list at the end.
Enjoy watching Digital TV!
3.6 Aerial or Cable installation
For Aerial and Cable antenna type following settings are available:
| Channel Order | Selection of LCN will order channels according to numbering provided by the TV network operator. Select Service ID if you wish channels to be ordered in Frequency descending order. |
| Scan Mode | Select DTV to install only Digital TV and Radio channels or select ATV to install only Analogue TV channels. |
Select Search once you have completed the settings. Depending on the choice you have done TV set will display different next steps of installation.
3.6.1 Aerial installation
If you have selected Aerial installation then Auto search process will start directly once you have pressed OK on Search.
NOTE: If you have an active antenna, please check the user manual of the antenna for external power supply. The TV cannot supply power used for an active antenna.
3.6.2 Cable installation
If you have selected Cable installation then you will be guided to Auto Tune sub-menu.
You can select scan type parameter as Quick Scan or Full Scan.
Quick Scan selected by default and advised for quick normal search for provided channels.
You can do scan with all automatically detected settings or additionally specify required settings according to information from your cable TV provider.
Frequency Press BLUE button and enter (using 0 \~ 9) the main frequency used by your provider in MHz.
Modulation Press RED button to define modulation. Available options are: 16 QAM, 32 QAM, 64 QAM, 128 QAM and 256 QAM.
Symbol Press GREEN button and enter (using 0 \~ 9) the used Symbol rate in Ks/s from your provider.
Network ID Press YELLOW button and enter (using 0 \~ 9) the used Network ID from your provider.
NOTE: Please get and check information for settings for your cable system from your cable TV provider.
NOTE: Option Full Scan will scan all frequencies and could take approximately 20 minutes depending on your cable network.
Select Start Scan and press OK to continue.
3.7 Channel scan
The TV set will scan for TV and Radio (if available) channels.
After scan completed it will save all found channels and tune to the first channel in the list.
4.0 HOW TO USE THE ANDROID PLATFORM
After turning on your TV, Android Home Menu screen opens.
This menu organized into lines and consists of four parts: TV, File, Apps and Settings.
NOTE: Please note, new software releases may change look or functionality of some applications of your TV.
4.1 TV
This menu gives you access to list of sources or inputs, from which you will get information on your TV screen: DTV (Digital TV), ATV (Analogue TV), AV and few of HDMI inputs.
NOTE: After switching off/on circle your TV will start from selected in this menu input. i.e. if DTV application was active before you switch off your TV, after turning it on, your TV will return to DTV mode and start with previously selected channel.
4.1.1 DTV
After selecting this item, you can start watching Digital TV channels.
You can do various settings via the DTV settings menu.
To access the settings menu, press the≡ button.
| Channel | Gives you the possibility to scan channels in Auto or Manual mode, edit programmes (skip, lock, add to Favourite, delete, move), schedule an event and check the signal information. |
| Picture | Gives you the possibility to select picture mode between Standard, Soft, Vivid and User defined. You can as well select Colour temperature, Aspect ratio, Image noise reduction and MPEG noise reduction. |
| Sound | Select between Sound mode, Surround audio and S/PDIF output mode. |
| Option | Select preferred language for Audio and Subtitles, setup PVR file system, turn ON/OFF HDMI CEC and HDMI ARC, Enable/Disable System stand-by. You can also reset DTV to default in order to setup it again. |
| Lock | You can Enable/Disable System lock, change password, Block access to channels, setup parental guidance and set CI CAM PIN code. |
NOTE: Please refer to Chapter 5 for more detailed information about DTV part functionality.
4.1.2 ATV
After selecting this item you can start watching analogue TV channels.
You can do various settings via the ATV settings menu.
To access the settings menu, press≡ button. Settings are similar to the DTV settings.
4.1.3 AV, HDMI
Selection of these items will switch the TV set input accordingly. You can do various settings for selected input, similar to DTV settings described above.
4.2 File
This menu is for file management and for multimedia functions.
It gives you access to the internal storage and external storage devices connected via USB.
And also – for media files like pictures and photos, video and music files, stored there.
You can filter files to be displayed from your storage by their type: Picture, Movie, Music and Apps.
NOTE:
Please refer to Chapter 6 for more detailed information how to use file management and for multimedia functions.
4.3 Apps
This menu for applications of Android system.
It gives you access to pre-installed and manually installed Android applications on your TV.
You can add functionality for your TV by installing of new applications from the Google Play Store (requires a Google account), from other sources from internet or from connected USB devices.
List of pre-installed applications:
Google Play Store, Browser, YouTube, TV assistant, YoWindow and some other.
NOTE:
Please refer to Chapter 7 for more detailed information about application functionality.
4.4 Settings
This menu allows you to change settings of the Network, do General settings like Wallpaper, Screen saver, Language, etc), Picture and Audio settings, check system information in menu About, manage Date&Time setting and Accounts via Account menu.
NOTE:
Please refer to Chapter 8 for more detailed information about your TV settings.
4.5 Some features of RCU usage
Please take notes for useful features of some buttons on your RCU.
From any application you could use such buttons:
Use 🔗 to return to Home screen of Android from any application of TV set.
Use≡ to open menu (if available) of any application, including DTV.
Use ➕ to close any application, any pop-up window, exit or return to previous level of current menu, etc.
Use ☐, SOUND, PIC to make quick setting for screen and sound.
Use SLEEP to define the period of time to switch OFF your TV from the current moment.
Use SOURCE to select the input source like DTV, ATV, AV and HDMI (same as in TV line of Android main menu).
Use in case if your TV set start working slower because of high intensity of usage. Press this button to run System optimization application. In few seconds it will make some analysis, close inactive applications and empty memory for currently running application.
Use SHOT to save current screen as picture to screenshot folder of the TV. You will have access to these pictures from Picture part on File line of Android main menu on Home screen. They will be placed into internal TV storage to Pictures\Screenshots folder with name in format "Screenshot_date-time.png"
Normally use ▲▼ ◀▶ to navigate around list or menu. But in some applications they could have other functions, i.e. in DTV – to zap channels and to control volume, in Browser – to control position of mouse pointing arrow, etc.
5.0 TV
Select DTV or ATV input from the Android main menu to watch TV channels of digital or analogue type and confirm with OK to start this application.
Application gives you access to digital or analogue TV to watch channels and enjoy your favourite TV and radio programmes from TV sources (aerial, cable or several of satellites) of your choice.
In case if you skipped the DTV installation during FTI and enter application for the first time, application will start with installation (refer to chapter 3).
When the installation is completed, you can use TV set for watching of installed programmes.
Info Banner
While watching TV you can press INFO button to get information about current or next programme and event on broadcasting*.
Press INFO twice for technical details of currently broadcasted programme.
* Event information is displayed when available. Availability depends on the broadcast.
Changing channels
Following ways are possible for changing channels:
■ Via direct access using the 0\~9 buttons.
■ Via the CH+/CH- buttons.
■ Via the channel list using OK and ▲▼ buttons. Use ◀ button in the list to select TV list from the source like aerial, cable or satellite.
■ Via the favourite list using FAV button. Press FAV to view your assigned earlier favourite list or main list channels. Use ▲▼ to cycle through your assigned favourite channels, press OK to confirm.
■ Use ⬇ to return to previous viewed channel.
Selection of audio language
Some channels support a choice of audio formats and/or languages.
To select another audio stream, press AUDIO in viewing mode. A list with available audio streams will now be displayed.
Use ▲▼ to select a stream and confirm with OK.
The audio channel as stereo, left and right can be selected with the ◀▶ buttons.
The volume can be adjusted with ◀▶ or VOL+/VOL-.
TV Menu
You can use the menu of the TV application to make changes in channels viewing and set other options.
Press ≡ to open the menu of TV application.
It consists of submenus: Channel, Picture, Sound, Option and Lock.
5.1 Channel
This submenu provide possibility for searching for TV channels, editing stored channels, to create and modify schedule list for TV events and to get useful information about broadcasted programme.
It consists of such items: Antenna Type, Auto Tuning, DTV Manual Tuning, ATV Manual Tuning, Program Edit, Schedule List and Signal Information.
In same way, as it was for FTI procedure, you could select for antenna type from options Aerial, Cable or Satellite as type of tuner to be able to search and view channels from selected TV system source.
5.1.1 For Aerial antenna
Auto Tuning
This option makes full scanning of all frequencies for aerial broadcasting channels.
Select it to start scanning all frequencies for available channels. Please note, all stored earlier channels will be deleted.
Before start scanning you could define some parameters for scanning:
Channel Order: Set LCN (Logical Channel Numbering) to activate operator defined channel numbering or Service ID to store channels in found order. Sorting of channels in the channel list with LCN is not possible.
Search Type: Select DTV to search and store only digital channels, ATV to search and store only analogue channels and ATV+DTV to search and store both type of TV channels.
Country Settings: Select your Country and press OK to start scanning.
NOTE: If you want to watch both ATV and DTV types of channels, we recommended for best results to make scanning for each type separately.
NOTE: To watch analogue channels please select ATV input from the Android main menu. Channels of analogue and digital types could not be present in same channel list. Channel list type depends on selected input.
DTV Manual Tuning
This option allows you to scan just one frequency for digital aerial broadcasting channels by selecting frequency channel number.
Below in the screen you will find signal strength and quality bars for optimizing the best signals of your terrestrial antenna.
Select frequency channel number, adjust antenna for best signal level and quality, then select Search and press OK to start scanning
After scanning all channels on selected frequency will be updated according to scanning results.
ATV Manual Tuning
This option allows you to scan manually for analogue aerial broadcasting channels.
NOTE:
Selection of this option will switch application to ATV. To return to DTV application please select DTV in TV input sources.
Available options for scanning:
Store To: Define the number of position for selected channel.
Channel: Select channel number from the list of founded earlier channels.
Color System: Available options for this parameter: Auto, PAL, NTSC and SECAM.
Sound System: Available options for this parameter: DK, I, L, M and BG.
Select Search and press ◀▶ to start scanning in the direction of lower/upper frequencies till new channel will be detected.
If required, select Fine Tune and press ◀▶ to manually adjust frequency for selected channel to get better result.
Select Save and press OK to store current channel to defined position with selected parameters.
5.1.2 For Cable TV
Auto Tuning
This option make full scanning of all frequencies for cable TV channels.
Select it to start scanning all frequencies for available channels. All stored earlier channels will be deleted.
Before start scanning you could define some parameters for scanning:
Channel Order: Set LCN (Logical Channel Numbering) to activate operator defined channel numbering or Service ID to store channels in found order. Sorting of channels in the channel list with LCN is not possible.
Search Type: Select CADTV to search and store only digital channels, ATV to search and store only analogue channels and ATV+CADTV to search and store both type of TV channels.
Country Settings: Select your Country and press OK to start scanning.
DTV Manual Tuning
This option allows you to scan just one frequency for digital cable channels by entering frequency and define symbol rate and modulation for it.
Below in the screen you will find signal strength and quality bars.
Select Search and press OK to start scanning
After scanning all channels on selected frequency will be updated according to scanning results.
ATV Manual Tuning
This option allows you to scan manually for analogue cable channels.
NOTE:
Selection of this option will switch application to ATV. To return to DTV application please select DTV in TV input sources.
Available options for scanning:
Store To: Defile the number of position for selected channel
Channel: Select channel number from the list of founded earlier channels.
Color System: Available options for this parameter: Auto, PAL, NTSC and SECAM.
Sound System: Available options for this parameter: DK, I, L, M and BG.
Select Search and press ◀▶ to start scanning in the direction of lower/upper frequencies till new channel will be detected.
If required select Fine Tune and press ◀▶ to manually adjust frequency for selected channel to get better result.
Select Save and press OK to store current channel to defined position with selected parameters.
5.1.3 For Satellite
Auto Tuning and LNB Setting
Please read chapter 3.5 how to make settings for scanning of satellites channels.
DTV Manual Tuning
This mode allows you to install channels from one transponder of selected satellite.
Available options for scanning:
| Transponder | Highlight this item and press OK to display list of transponders. Select required transponder from the list. Using COLOUR buttons, here you could Add, Delete or Edit transponders. |
| Network | Select Off to scan only transponders preinstalled in TV set. Set to On to scan transponders, which can be discovered through network signaling. |
| Scan Mode | Select between Free to install only free channels, Free+Scramble to install free and scrambled channels, Scramble to install only scrambled channels. |
| Service Type | Select between DTV to install only Digital TV channels, DTV+Radio to install TV and Radio channels, Radio to install only Radio channels. |
Signal Strength and Quality indicators will help you to verify that signal from selected transponder is of good quality.
Select Search and press OK to start scanning
After scanning all channels from selected transponder will be updated according to scanning results.
5.1.4 Programme Edit
In the Program Edit menu you could make changes of stored in the TV channels.
Following changes can be made: using COLOUR buttons you could Delete, Skip, Move, Edit/Rename channel and include/exclude it to/from Favorite list.
5.1.5 Schedule List
In the Schedule List menu you could edit your schedule plan of watching or recording of events in future broadcasting.
You could set reminder for some event on selected channel starting at defined date and time. Available modes for reminders: Once, Weekly and Daily.
You will get pop-up window before 10 seconds to scheduled event. Within this time you could reject or confirm it. If no actions were performed, TV will zap to scheduled channel.
Also you could schedule recording of event, define additionally duration of recording.
It is possible to modify or delete scheduled earlier events.
Though we recommended for better and more accurate results to schedule events through EPG.
Please refer to chapter 5.6 for more details for EPG functions.
5.1.6 Signal Information
Provided information for signal of viewing channel in dependence of selected antenna type.
On the screen you will find signal strength and quality bars, as well as other useful information about current conditions for signal for terrestrial and satellite antenna.
5.2 Picture
This sub-menu provides possibility for setting picture parameters for better viewing of broadcasted programme.
Available parameters:
Picture Mode Available options are: Standard, Soft, Vivid and User – to define parameters for Contrast, Brightness, Hue, Sharpness, Saturation and Back Light manually.
Color Temperature Available options are: Nature, Cold, Warm and User – to define parameters for Red, Green and Blue colours manually.
Zoom Mode Available options are: Auto, 16:9, 4:3, Zoom1 and Zoom2.
Image Noise Reduction Available options are: Auto, Weak, Middle, Strong and Off.
MPEG Noise Reduction Available options are: Weak, Middle, Strong and Off.
5.3 Sound
This sub-menu provides possibility for setting sound parameters for better listening of broadcasted programme.
Available parameters:
Sound Mode Available options are: Standard, Music, Movie, Sports and User – to define Low and High Pitch parameters and also sound Balance manually.
Surround Available options are: Off or On – to switch off or on surround effect for sound.
Digital Output Available options are: Auto, PCM and Off.
5.4 Option
This sub-menu provides possibility for system setting.
Available parameters:
Audio Language Select your preferred main audio track language.
2nd Audio Language Select your preferred audio track language if first is not available.
Subtitle Select Off if you do not want subtitles to be shown or On to switch them on.
Subtitle Language Select your preferred main subtitles language.
2nd Subtitle Language Select your preferred subtitles language if first not is available.
PVR File System Refer to Chapter 5.9 for more details.
HDMI_CEC Select Off if you do not want operation of Consumer Electronic Control (CEC) or On to switch it on.
HDMI_ARC Select Off if you do not want operation of Audio Return Channel (ARC) or On to switch it on. This function will operate under CEC control.
System Standby Select Off if you do not want operation of System Standby function or On to switch it on. This function will operate under CEC control.
Restore To Default This function resets your DTV application parameters back to the default factory settings. Press OK. Select OK to confirm executing the factory reset. This option will delete all your channels, favourite lists and settings from the DTV. TV will switch off. After switch on it will start with the First Installation menu of the DTV part.
5.5 Lock
This sub-menu provide possibility for blocking TV system options with password.
Default password: 0000
Available parameters:
Lock System Select Off if you do not want operation of System Lock function or On to switch it on. You have to enter current password to change this parameter.
Set Password This option allows you to change password of your DTV application.
Block Program This option allows you to block (lock by password) selected from the list of programmes.
Parental Guidance Select the age rating for which the password shall be entered before watching a parental rating protected channel. Select OFF to disable*.
NOTE:
Correct working of this function highly depends on the information from the operator. It is recommended to set this parameter to the age of the youngest child who has access to watching TV. Whenever switching through channels which submit EPG based parental rate and the rate of current broadcast is higher than adjusted rate, it is required to enter the password for viewing this channel.
CI CAM Pin Code This option allows you to change PIN code of inserted into your TV CAM module.
5.6 Electronic Programme Guide (EPG)
The Electronic Programme Guide is a very useful function that allows you to view future event schedules and to mark events/movies for reminding or recording in time.
The Electronic Programme Guide (EPG) shows programme schedules and information for current programmes and coming programmes up to the next 7 days.
Press EPG button on RCU in viewing mode to open the EPG.
To change to other channel, select programme on this channel and press OK.
Use YELLOW button and press ◀▶ to select date for EPG information.
Use BLUE, RED or GREEN buttons to set a reminder for a programme or for programme recording and to see the list of scheduled events.
5.7 Teletext
Your TV includes a fully featured Teletext.
To access Teletext, press the TEXT button in viewing mode and use the 0\~9 buttons to input the number of the page you wish to see.
The coloured buttons of the remote control allow you to jump to selected pages directly, as indicated on the bottom of the Teletext screen.
Use the ▲▼ buttons to select one page up or down, use the SUB.P and ◀▶ buttons to select subpages.
Use MIX button to superimpose the teletext over the TV programme. Press it again to return to normal teletext mode.
Press ➕ or TEXT to get back to viewing mode.
5.8 Subtitles
Some channels support a choice of subtitle languages.
Press SUB in viewing mode to display a list of available subtitle languages.
Select your subtitle of choice with ▲▼ and press OK to confirm.
Press C→ to leave without making changes.*
NOTE: Availability of DVB/HoH subtitles depends on the broadcast. If subtitles are not supported, they can be activated via Teletext if available.
5.9 PVR File System
This sub-menu allows you to make settings for programme recording and for Timeshift function to storage devices.
Available parameters:
Select Disk This option allows you to select storage device for PVR functionality between Local Storage and connected to USB ports of your TV set storage devices.
Timeshift Size Available options are: 512M, 1G, 2G and 4G.
Format Start This option allows you to format storage device. Available options are Local Storage and connected to USB ports of your TV set storage devices.
Speed Check This option allows you to check speed of recording for selected storage device.
Always Timeshift
Select Off if you do not want to make continues recording and operating of Timeshift function or On to switch it on.
WARNING: Formatting will permanently delete ALL data stored on the connected device. Please make a backup copy of all data you wish to keep before entering the Format Start menu. STRONG cannot be held responsible for loss of data from USB devices used with this receiver.
NOTE: The free storage capacity and write/read speed of your USB device, SD card or hard disk drive must be sufficient to store the recorded TV programmes.
5.10 Timeshift
Timeshift allows you to pause live broadcasts and resume playback later.
Press II in viewing mode to activate Timeshift.
Timeshift sign will be shown on the upper left corner of your TV screen.
Press ▶ to resume Timeshifted playback.
Use multimedia buttons to control watching process.
Press ■ to return to live TV.
NOTE: Timeshift and its playback only work properly when a fast USB storage device such as a USB2.0 HDD is connected to the receiver. Timeshift and playback of HD content requires sufficient read/write speed of the used USB storage device.
NOTE: You could use FREEZE button just to freeze current video and get still picture on the screen without Timeshift function. Playback will start again after pressing on any key of your RCU. Broadcasting of sound will not stop.
5.11 Recording
Press ● to call for mediaplayer and to start recording.
Use multimedia buttons to control recording process.
A recording sign will be shown on the upper left corner of your TV screen.
To stop the recording, press ■. Select Confirm and press OK to stop recording and to save record to the list.
You can access the Record Manager via the INDEX button to find and to playback you made records.
NOTE: Please connect an USB storage device with sufficient free space before you start a recording.
6.0 FILE
This chapter provides more detailed description how to use file management and for multimedia functions.
6.1 File Manager
This application allows you to get know the content of selected storage device.
It gives you access to the internal storage and external storage devices connected via USB.
If you need more functionality from File manager, we recommending to install File manager of your choice from any application sources.
6.2 Picture
Select the Picture icon on File line of Android main menu on Home screen and press OK.
The gallery presents folders with pictures stored on your storage devices including pictures which have been downloaded from the web or other locations.
Press ▼ button for browsing folders/pictures collection.
Browse and view pictures:
- To open an album in the gallery use ◀▶ to step through the folders/pictures collection
- Press OK on selected folder. The folder gallery opens.
- Select a picture to show it in full on your screen and press OK.
- Use ◀▶ to select previous or next picture.
- By pressing OK and ◀▶ you could use additional menu to select function to start slideshow, to go to previous or next picture or to rotate current picture.
- Use OK to stop slideshow.
Press→ to return to the Home screen.
6.3 Movie
Select the Movie icon on File line of Android main menu on Home screen and press OK.
The gallery presents folders with video files stored on your storage devices including videos which have been downloaded from the web or other locations.
Press ▼ button for browsing folders/videos collection.
Browse and view video files:
- To open an album in the gallery use ◀▶ to step through the folders/video collection.
- Press OK on selected folder. The folder gallery opens.
- Select a file to show it in full on your screen and press OK.
- You could use multimedia buttons on your RCU to control playback. By pressing OK and ◀ you could use additional menu to select function to start/stop playback, to go to previous or next file, get access to playlist, to detailed file information or to make playback settings.
- Press ➔ to stop playback and to exit to file selection mode.
Press → to return to the Home screen.
If you have difficulties or inconveniences with using of built-in video player, we recommending to install video player of your choice from any application sources.
6.4 Music
Select the Music icon on File line of Android main menu on Home screen and press OK.
The gallery presents folders with music files stored on your storage devices including files which were downloaded from the web or from other locations.
Press ▼ button for browsing folders/music collection.
Browse and listening of music files:
- To open an album in the gallery use ◀▶ to step through the folders/music collection.
- Press OK on selected folder. The folder gallery opens.
- Select a file to listening and press OK.
- You could use VOL +/- to adjust the volume up or down.
- You could use multimedia buttons on your RCU to control.
- By pressing OK you could start/stop playback of selected track.
- With ◀▶ you could rewind playback backward or forward.
- Press ➔ to stop playback and to exit to file selection mode.
Press → to return to the Home screen.
If you have difficulties or inconveniences with using of built-in music player, we recommending to install music player of your choice from any application sources.
6.5 Apps
Select the Apps icon on File line of Android main menu on Home screen and press OK.
In case, if on your storage devices stored installation files of Android applications, you will see the list of available installation files.
Press ▼ button for browsing folders/applications collection.
Use ◀▶ to select file and press OK to start installation.
If installation process successfully completed, application will be included into the list and it will be available to use from Android system.
Press → to return to the Home screen.
7.0 APPS
Select the Apps line on Android main menu Home screen.
Use ◀▶ to scroll through available applications to select and press OK to start it.
NOTE: STRONG cannot guarantee and cannot be on responsible of the (mal-) function and working of third party apps. Please consider, that some applications functioning good only on devices with built-in touchscreen, microphone, camera, GPS, etc. and could work not correctly on this TV.
7.1 Install/Uninstall applications manually
In case, if on your install some of applications manually, you will see them in Installed App folder.
To uninstall applications, which were installed manually earlier, you could enter to App Manager folder.
Here you could see the amount of occupied space for each application.
Press ➔ to return to the Home screen.
7.2 Google Play Store
One of the sources for new Android applications is Google Play Store.
Click on the Google Play Store icon on Apps line of Android main menu on Home screen and press OK to start it. If you open it for the first time, please read and accept the terms of service to continue. You will be guided through the process steps by step.
You need to create a Google Account or enter your existing account and password to use this Store.
Once ready you can start using the Store market.
Browse for applications
You can browse for apps by category and sort them in different ways.
-
Click a top-level category, such as Apps or Games. Click on a subcategory to view its list of apps.
-
Scroll to view subcategories and click on the one you want to explore. Click to view top paid, top free or the most recent apps in this subcategory. Click on an app to open its details screen.
-
Select the action you want to perform with this application, for example Install, Detailed Description, etc.
7.3 List of pre-installed applications
Google Play Store, Browser, YouTube, TV assistant, YoWindow and some other.
These applications are the part of the system and will remain even after restoring of factory settings.
8.0 SETTINGS
Select the Setting line on Android main menu Home screen.
This part allows you to set all your important TV and Android system settings such as Network, Picture and Audio, Language and other. Also provided useful information about model and system.
Use ◀▶ to scroll through sub-menus to select and press OK to enter.
8.1 Network
In this sub-menu you can change or setup the connection method to the Internet:
■ by Cable (LAN RJ45 cable)
■ or wireless (Wi-Fi). Select and enter your network here, store passwords and/or other access parameters.
8.2 Setting
In this sub-menu you can make General settings for your system like:
■ change the name of your TV STRONG TV;
■ select wallpaper theme;
■ define screensaver activity. Available options are: 5 minutes, 10 minutes, 15 minutes, 20 minutes and Off;
■ select language for your OSD and menu;
■ select input method (for your on-screen keyboard);
■ grant or deny installation of applications from unknown sources;
■ restore whole system to factory default parameters (required password. Default password: 0000).
NOTE: Select this ONLY if you would like to restore all settings back to factory defaults. All personal data will be removed from the system, including information about your Google account, other accounts, system or app settings and app downloads. Also all settings in the DTV part will reset back to factory default, including all channel and favourite lists you have created.
8.3 Picture and Audio
In this sub-menu you can make settings for your TV screen and sound parameters.
Image parameter: to define Colour temperature (options are Normal, Warm and Cool) and manually adjust Backlight intensity, Brightness, Contrast and Saturation.
Sound Mode: Select between Standard, Music, Movie, Sports and User - to define parameters of Bass and Treble manually.
Keytone: Define Disable or Enable.
Turn on surround stereo channel:
Define Disable or Enable.
8.4 About
In this sub-menu you can get information about:
■ Product model;
■ Network info (name of connected router, IP and MAC addresses);
■ Hardware configuration;
■ Perform TV firmware update from USB storage;
■ Currently installed System version number.
NOTE: Upgrades will reset TV system back to the factory defaults. Make sure that you note accounts and apps you have installed before.
WARNING: During the upgrade and flash process, do not switch off the main power! Wait until the TV reboots and restarts automatically.
8.5 More Settings
This sub-menu organized into lines and consists of 3 parts: Device, Preferences and Personal. However, each line for now include only 1 item
■ Device: Apps;
■ Preferences: Date & Time;
■ Personal: list of registered in system accounts (or Add account if empty).
Apps
Divided into line for various types of installed applications:
■ Downloaded apps: for applications, which were installed manually by user;
■ System apps: complete list of applications and services, which are the part of the system;
■ Running apps: complete list of applications and services, which are now active in the system;
■ Permissions: list and quantity of permissions for each type of equipment and services of the system. Each type contains the list of applications which requested for this permission with possibility to grant or deny it to selected application.
Select required application for more information about memory usage and permissions for it and also to control this application, like Open, Force stop, Clear data, etc. (the list of available options depends on type of selected application).
Date & Time
Define the type of date and time synchronization of the system.
Parameter Automatic date and time define the source of synchronization:
■ Use network-provided time to get time of the system from your router/from internet;
■ Use TV-provided time: to get time of the system from TV broadcasted programmes;
■ Off: to define date and time manually.
Parameters Date and Time, depending on the source of synchronization, could be defined or corrected manually in terms of real current date and time.
Parameter Time additionally could help you to set correct time zone and to show time in 12- or 24-hour format.
Add account
Here you could create or enter account for Google Play Store.
NOTE: Please note, due to specificity of usage of some built-in and newly installed
3rd-party applications, i.e. Google Play Services, could happen, that active fields or on-screen buttons are not highlighted with selection. In this case, if you use only RCU, please try to find correct combination by pressing ▲▼
◀▶ and OK buttons to confirm selection. For example, during procedure of adding Google account after entering account name and password on confirmation screen we recommended to press ▼ button 3 times, then press ▶, then OK to proceed and to enter Google account.
NOTE: In case, if you have difficulties with using just RCU during entering text
or in working with Android menu, we recommended to use additionally connected to any USB port external mouse or keyboard (not supplied with TV set).
9.0 TROUBLESHOOTING
There may be many reasons that affect the correct operation of your TV set and of Android system. If TV does not work as you expect, please follow the steps outlined below. If after performing these operations the TV still does not work well, contact your dealer or service centre in your area or write an email to our support line via our website www.strong.tv.
If the DTV part shows problems with reception, first check if all cables and connectors still are in good condition. Check whether your dish/antenna still is fixed well and pointed optimally to the satellite of your choice. Check whether the satellite settings in the menus are still correct. If everything is OK with them, you can reset DTV part back to the factory settings and try to install everything again from the very beginning.
If you experience problems in the Android part, first check whether it is caused by an application. Try to clear the data or remove the app and check if this solves the problem.
If not successful you can reset the TV set back to the factory settings and try to install it again.
WARNING: Do not open the TV. It may cause a dangerous situation! Moreover, this action will damage the warranty seals and warranty repairs will be denied.
| Problem Possible reason Solution | ||
| Cannot turn on the TV set The power cable is not connected to the 230 V outlet | Check whether the power connector is completely plugged into the socket of outlet. | |
| No signal or weak signal, intermittent reception. | Cables might have loosened. Moisture might have entered into cables or connectors. Heavy rain or heavy storm at present. | Check the cable connections, LNB and other equipment connected between the LNB and the receiver or adjust the dish. Wait for rain/storm to subside. |
| The satellite dish is not pointing at the (correct) satellite(s) | Adjust the dish. Ask a local satellite specialist for advice. | |
| The satellite dish is too small Trees or buildings are blocking the path. | Change to a larger dish. Change the position of the dish. | |
| Scrambled service message in DTV | The channel is scrambled. Select an alternative channel. Use CAM module with smartcard with rights to watch this channel | |
| No internet connection/activities Make sure the wireless network | is connected and the security key for the encrypted network is correct. | |
| Make sure you select the correct IP address settings. | ||
| Your TV cannot display the entire picture/videocontent | Set the screen ratio on your TV as automatic or change the screen size in the system menu. | |
| The TV switches off after 3 hours of no commands of the remote control | The power saving Auto standby function is activated | Switch off the Auto Standby/Daydream function. |
| Forgotten your password Default | password is0000Contact your local Service | Hotline or send an email to our support via www.strong.tv |
| The external USB HDD does not start. | The power consumption is too high. | Connect an extra power supply adapter to your USB HDD device. |
| Timeshift intermittent playback | Too many USB devices connected | Disconnect e.g. the USB camera |
| A recording does not start HDD is | not selected in the menu Select the | recording device in the PVR settings menu. |
10.0 SPECIFICATIONS
Audio
Audio Output: 6 W + 6 W
Tuner
System: DTV: DVB-T2, DVB-C, DVB-S2
ATV: PAL/SECAM (BG/DK/1)
AV: PAL, NTSC
Channel coverage: DVB-T2: 174 MHz-230 MHz; 470 MHz-860 MHz
DVB-C: 50-858 MHz
DVB-S2: 950 MHz-2150 MHz
Connectors
1 x ANT/CABLE IN
1 x SAT IN
1 × Cl+
2×HDMI
2×USB
1 x S/PDIF (coax.)
1x AV IN
1x Ethernet
In-built Wi-Fi
1 x headphones
General data
Androidversion:6.0
Network Interfaces: Ethernet 10/100 Mbps Full Duplex
Wi-Fi 2.4 GHz Wi-Fi 802.11 b/g/n 1T1R up to 150 Mbps
Wi-Fi radio module frequency bandwidth,
MHz: 2400.0 - 2483.5
Wi-Fi transmitter maximum output power,
mW (dBm): 27.54 (14.40)
Operating voltage: 100 \~ 240 V AC 50/60 Hz
Power consumption: 24": max. 36 W, typ. 19 W
32" max. 111 W, typ. 32 W
40": max. 164 W, typ. 54 W
Power consumption in standby: 24", 32", 40": <0.5 W
Operating temperature: +5 °C \~ +35 °C
Storage temperature: -15 °C \~ +45 °C
Operating humidity: 20% \~ 80% RH, non-condensing
Storage humidity: 10% \~ 90% RH, non-condensing
Dimensions (WxDxH) in mm: 24": 550 x 144 x 353.6
32":730×144×456
40": 901 x 230.5 x 573.8
Net-weight: 24": 3.8 kg
32": 4.4 kg
40": 6.2 kg
Data Protection:
Please be aware that STRONG, its manufacturing partners, the application providers and the providers of the services may collect and use technical data and related information, including but not limited to technical information about this device, system and application software and peripherals. STRONG, its manufacturing partners, the application providers and the providers of the services may use such information to improve its products or to provide services or technologies to you, as long as it is in a form that does not personally identify you.
Additionally, please keep in mind that some services provided - already in the device or installed by you - may request a registration for which you have to provide personal data.
Beside that, please be aware that some services which are not pre-installed but can be installed may collect personal data even without providing additional warnings and that STRONG cannot be held liable for a possible breach of data protection by services not pre-installed.
- ПІДТРИМКА
- UA
- Licenses
- SIMPLIFIED EU DECLARATION OF CONFORMITY
- TABLE OF CONTENT
- INSTRUCTION 3
- INSTALLATION 5
- FIRST TIME INSTALLATION (FTI)
- HOW TO USE THE ANDROID PLATFORM 11
- TV 13
- FILE 21
- APPS 22
- SETTINGS 23
- TROUBLESHOOTING 26
- SPECIFICATIONS 27
- INSTRUCTION
- Safety Instructions
- Operating Environment
- WEEE Directive
- Storage
- Accessories
- Equipment set-up
- (Bold characters)
- INSTALLATION
- Default password: 0000
- Front panel/underside
- Rear panel
- Side panel
- Remote control
- Installing the batteries
- Precautions for using the battery
- Using the remote control
- OSD Language
- Internet connection
- FTI without DTV installation
- DTV FTI installation
- Satellite installation
- LNB Setting
- Channel Search
- Manual DTV tuning.
- Aerial or Cable installation
- Aerial installation
- Cable installation
- Channel scan
- HOW TO USE THE ANDROID PLATFORM
- TV
- DTV
- ATV
- AV, HDMI
- File
- Apps
- Settings
- Some features of RCU usage
- TV
- Info Banner
- Changing channels
- Selection of audio language
- TV Menu
- Channel
- For Aerial antenna
- Auto Tuning
- DTV Manual Tuning
- ATV Manual Tuning
- NOTE:
- For Cable TV
- For Satellite
- Auto Tuning and LNB Setting
- Programme Edit
- Schedule List
- Signal Information
- Picture
- Sound
- Option
- Lock
- Electronic Programme Guide (EPG)
- Teletext
- Subtitles
- PVR File System
- Timeshift
- Recording
- FILE
- File Manager
- Picture
- Browse and view pictures:
- Movie
- Browse and view video files:
- Music
- Browse and listening of music files:
- Apps
- APPS
- Install/Uninstall applications manually
- Google Play Store
- Browse for applications
- List of pre-installed applications
- SETTINGS
- Network
- Setting
- Picture and Audio
- About
- More Settings
- Apps
- Date & Time
- Add account
- TROUBLESHOOTING
- SPECIFICATIONS
- Audio
- Tuner
- Connectors
- General data
- Data Protection:
Brand : STRONG
Model : SRT 24HA3303U
Category : Television