
SR-500 - Camera accessory REVO - Free user manual and instructions
Find the device manual for free SR-500 REVO in PDF.


| Brand | REVO |
| Model | SR-500 |
| Product Type | Video Shoulder Support System |
| Weight | 2.55 pounds |
| Maximum Camera Load (with riser) | 4.4 pounds |
| Maximum Camera Load (with baseplate) | 6.6 pounds |
| Material | High-density plastic, foam padding |
| Components | Spring-loaded shoulder mount with chest brace, long universal camera baseplate, riser camera mount, quick-release plate, support strap |
| Chest Brace | Spring-loaded, padded, adjustable |
| Shoulder Mount | Padded, adjustable |
| Camera Mounting Screw | 1/4"-20 |
| Adjustability | Camera distance (forward/backward), offset (left/right) via baseplate or riser rotation |
| Support Strap | Included, adjustable, attaches to rings behind baseplate |
| Storage | Folds up for easy storage |
| Cleaning | Soft, dry cloth |
| Warranty | Limited one-year warranty |
| Intended Use | Handheld video stabilization for DSLR or camcorder |
Frequently Asked Questions - SR-500 REVO
User questions about SR-500 REVO
0 question about this device. Answer the ones you know or ask your own.
Ask a new question about this device
Download the instructions for your Camera accessory in PDF format for free! Find your manual SR-500 - REVO and take your electronic device back in hand. On this page are published all the documents necessary for the use of your device. SR-500 by REVO.
USER MANUAL SR-500 REVO
natural_image
Black mechanical device with articulated arm and base mount (no visible text or symbols)Video
Shoulder Support System
REVO™
Thank you for choosing Revo and congratulations on your purchase of the Revo SR-500 Video Shoulder Support System.
The Revo Video Shoulder Support System is a lightweight, affordable way to comfortably stabilize your camera while shooting video handheld with your DSLR or camcorder.
The adjustable padded chest brace, padded shoulder mount, and ergonomic design allow it to fit comfortably on your body and offer solid support for your camera. Made from high-density plastic and weighing just 2.55 pounds, the SR-500 unit folds up for easy storage. The included baseplate and riser with quick-release plate give you flexibility and adjustability. This mount supports a camera weighing up to 4.4 pounds using the included riser, or up to 6.6 pounds using the long universal camera baseplate.
Both the chest brace and he shoulder support are lined with comfortable foam padding, and the brace is spring-loaded to keep both the shoulder mount, and the chest brace comfortably and firmly pressed against your body, to provide solid support for your camera. This keeps both hands free for operating the camera—the camera stays securely in place in front of you, ready to shoot at any time. The camera can be offset by rotating the baseplate or the riser to the left or to the right.
Components
Spring-loaded shoulder mount with chest brace
Long universal camera mounting plate with 1/4" camera mounting screw
Riser camera mount
Quick-release plate with 1/4" camera mounting screw and video index pin
Support strap

natural_image
Line drawing of a mechanical lever mechanism (no text or symbols)


natural_image
Pure mechanical diagram of a T-junction pipe fitting without any text or symbolsThe SR-500 Video Shoulder Support System provides solid support for your camera by resting securely on your shoulder, using an extension arm with a padded brace on the end that presses firmly against your chest—your body forming the third side of a supportive triangle, and the camera directly in front of your eyes.
Adjusting the Support Strap
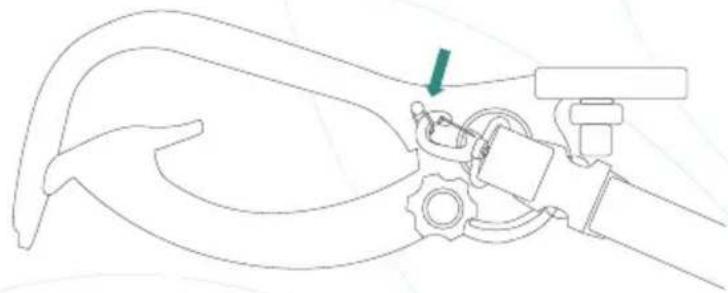
Before mounting the camera, attach the support strap to one of the rings on the shoulder mount, behind the camera mounting baseplate. Loosen the large knurled locking knob that controls the chest plate of the spring-loaded chest support.
natural_image
Line drawing of a mechanical device with a green arrow pointing to a component (no text or symbols)2 Place the SR-500 mount on your shoulder and wrap the support strap around your body and attach the loose end of the strap to the other attaching ring behind the camera mounting platform.

natural_image
Line drawing of a human figure holding a robotic arm with a green arrow indicating motion or force (no text or symbols)3 Adjust the strap so that the fit is snug but comfortable.
4 Detach one end of the support strap and remove the shoulder mount.
Mounting the Camera with the Baseplate
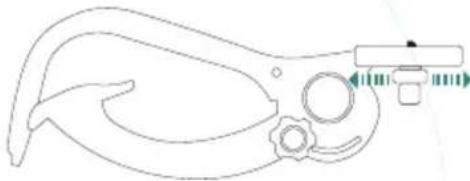
1 Slide the screw holding the camera baseplate back towards the shoulder mount. Tighten the screw until secure.
natural_image
Line drawing of a bird's head and neck anatomy (no text or labels)2 If you're mounting the camera directly on the baseplate, place the camera on the baseplate and attach it using the camera mounting screw. Tighten the screw firmly to secure the camera.

natural_image
Diagram of a camera assembly with a lens and adjustment lever (no text or symbols)Mounting the Camera with the Riser
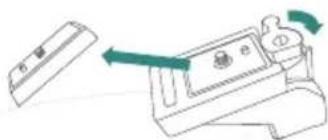
If you're using the riser instead of mounting the camera directly on the baseplate, remove the quick-release plate from the riser and attach it to the camera, tightening the screw securely.
natural_image
Diagram of a device with a handle and arrow indicating rotation or movement (no text or symbols)2 Place the riser on the camera baseplate and attach it by securely tightening the attachment screw.

natural_image
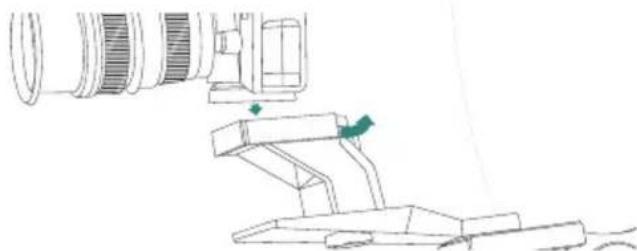
Mechanical assembly diagram showing a bracket being lifted by a tool, with no visible text or symbols3 Place the quick-release plate/camera assembly into position on the riser, being sure that the quick-release plate is properly seated, and close the latch to secure the plate and the camera on the riser.
natural_image
Technical line drawing of a camera assembly with no visible text or symbols4 With the camera now mounted, lift the shoulder mount onto your shoulder and wrap the support strap around your body to attach it to the ring behind the baseplate. With the weight evenly distributed between your shoulder and your chest, be sure that the mount is securely and comfortably on your shoulder, with the chest plate snugly and comfortably against your chest, supporting the camera. Tighten the large knurled knob that controls the chest plate of the spring-loaded chest support.

natural_image
Line drawing of a mechanical device with a green curved component and labeled parts (no text or symbols)Adjusting the camera
Once the camera is on the baseplate, you can fine-tune the camera position by loosening the screw and re-positioning the camera until it's in the position you desire.
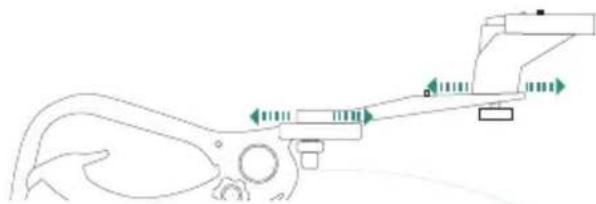
1 To adjust the distance of the camera from you, slightly loosen the 1/4"-20 baseplate screw and move the camera forwards or backwards. When the camera is in position, tighten the screw securely. For further adjustment, loosen the attachment screw for the riser slightly and slide the riser backwards or forwards. Retighten the attachment screw firmly.
natural_image
Diagram of a robotic arm with directional arrows indicating movement or force (no text or labels)2 The camera can be offset whether it's on the baseplate or on the riser. Loosen the attachment screw slightly and rotate the baseplate (or the riser) with the camera on it to the left or to the right. Tighten the attachment screw securely. Then, loosen the camera mounting screw slightly and turn the camera to the correct orientation. Tighten the attachment screw securely.

natural_image
Diagram of a mechanical or robotic device with no visible text, numbers, or symbolsWhen you're finished shooting, be sure to remove your camera from the shoulder mount. If the shoulder mount is placed on a flat surface resting on the camera, it could possibly cause stress or damage to the camera.
Visit RevoCinema.com for more information on our complete line of video mounting products.
Warnings
- Please read and follow these instructions, and keep this manual in a safe place.
- Handle the unit with care.
- Clean the unit with a soft, dry cloth.
- Use only parts provided by the manufacturer.
- Make sure everything is secure before proceeding.
- Make sure the item is intact and that there are no missing parts.
- Do not exceed the maximum load capacity.
- All photos are for illustrative purposes only.
Limited One-year Warranty
Revo provides a limited warranty that this product is free from defects in materials and workmanship to the original purchaser under normal use for a period of one (1) year from the original purchase date or thirty (30) days after replacement (the "Warranty Period"), whichever occurs later. Our responsibility with respect to this limited warranty shall be limited solely to repair or replacement, at its option, of any product which fails during normal consumer use.
To obtain warranty coverage during the Warranty Period, contact your place of purchase ("Seller") to obtain a return merchandise authorization ("RMA") number, and return to Seller the defective product along with proof of purchase and the RMA number.
This warranty does not extend to damage or failure which results from misuse, neglect, accident, alteration, abuse, improper installation or maintenance. EXCEPT AS PROVIDED HEREIN, REVO MAKES NEITHER ANY EXPRESS WARRANTIES NOR ANY IMPLIED WARRANTIES, INCLUDING BUT NOT LIMITED TO ANY IMPLIED WARRANTY OF MERCHANTABILITY OR FITNESS FOR A PARTICULAR PURPOSE. This warranty provides you with specific legal rights, and you may also have additional rights which vary from state to state.
Brand : REVO
Model : SR-500
Category : Camera accessory