
Sous Chef Stir MU3000 - Multicooker SUNBEAM - Free user manual and instructions
Find the device manual for free Sous Chef Stir MU3000 SUNBEAM in PDF.


| Product Type | Multicooker with stirring function |
| Brand | Sunbeam |
| Model | Sous Chef Stir MU3000 |
| Capacity (Liquid) | 4 L |
| Capacity (Rice) | 10 cups (uncooked) |
| Dimensions (approx.) | 30 x 30 x 25 cm |
| Weight (approx.) | 4 kg |
| Power Supply | 120 V AC (check local voltage) |
| Power Consumption (approx.) | 1000 W |
| Number of Cooking Menus | 6 (Slow Cook, Casserole, Sauté, Boil, Rice, Risotto) |
| Stir Arm Function | Yes, with ON/OFF button (default ON for Casserole, Sauté, Risotto; OFF for Rice and Slow Cook) |
| Auto Keep Warm | Yes, 30 minutes after cooking |
| Preheat Function | Yes for Sauté and Boil menus |
| Timer | Countdown or count up depending on menu |
| Pot Material | Non-stick aluminum |
| Pot/Lid/Stir Arm Dishwasher Safe | Yes |
| Safety Features | Automatic shut-off, dry error detection, cool-touch handles |
| Included Accessories | Rice measuring cup, serving spoon, glass lid |
| Warranty | 12 months replacement or repair |
| Country of Origin | China |
Frequently Asked Questions - Sous Chef Stir MU3000 SUNBEAM
User questions about Sous Chef Stir MU3000 SUNBEAM
0 question about this device. Answer the ones you know or ask your own.
Ask a new question about this device
Download the instructions for your Multicooker in PDF format for free! Find your manual Sous Chef Stir MU3000 - SUNBEAM and take your electronic device back in hand. On this page are published all the documents necessary for the use of your device. Sous Chef Stir MU3000 by SUNBEAM.
USER MANUAL Sous Chef Stir MU3000 SUNBEAM
natural_image
Exterior view of a modern stainless steel rice cooker with digital display and control buttons (no visible text or symbols)Contents
Sunbeam's Safety Precautions 2
Features of your Sous Chef Stir MultiCooker 4
The Control Panel 6
Cooking Menus 7
Cooking Menus Table 8
Slow Cook Menu 9
Casserole Menu 10
Sauté Menu 11
Boil Menu 13
Rice Menu 15
Rice Measurements 16
Risotto Menu 17
Care and Cleaning 18
Troubleshooting 19
Recipes 20
Important instructions – retain for future use.
Sunbeam's Safety Precautions
SAFETY PRECAUTIONS FOR YOUR MULTICOOKER
- Do not plug in or switch on the unit without having the aluminium pot inside the multi cooker unit.
- Do not operate the unit without food or liquid in the pot.
- Do not touch any metal surfaces of the product while it is in use as they will be hot.
- Be careful when lifting lid during and after cooking. Steam can result in serious burns. Never place face over multi cooker.
- Do not operate the unit on an inclined or uneven surface
- Do not move or cover the unit whilst in operation
- Do not immerse the base of the unit in water or any other liquid
- Use your unit well away from walls and curtains, and don't use in confined spaces.
-
Be careful touching the appliance after use, there may be residual heat on the heating element and metal surfaces.
-
Use handles and oven mitts to move the unit, the pot and the lid when hot.
- When lifting the lid, always tilt the lid away from you as steam is hot.
- Do not operate the unit when placed directly onto a bench top. Place a heat proof mat or chopping board underneath to protect the surface.
- Be careful when lifting and removing lid after cooking. Always tilt the lid away from you as steam is hot and can result in serious burns. Never place face over the unit.
- Unplug the unit when not in use and before cleaning. Allow the unit to cool before putting on or taking off parts to clean.
- To prevent damage to the unit do not use alkaline cleaning agents when cleaning. Instead, use a soft cloth and a mild detergent.
Sunbeam's Safety Precautions
Sunbeam is very safety conscious when designing and manufacturing consumer products, but it is essential that the product user also exercise care when using an electrical appliance. Listed below are precautions which are essential for the safe use of an electrical appliance:
- Read carefully and save all the instructions provided with an appliance.
- Always turn the power off at the power outlet before you insert or remove a plug. Remove by grasping the plug - do not pull on the cord.
- Turn the power off and remove the plug when the appliance is not in use and before cleaning.
- Do not use your appliance with an extension cord unless this cord has been checked and tested by a qualified technician or service person.
- Always use your appliance from a power outlet of the voltage (A.C. only) marked on the appliance.
- This appliance is not intended for use by persons (including children) with reduced physical, sensory or mental capabilities, or lack of experience and knowledge, unless they have been given supervision or instruction concerning use of the appliance by a person responsible for their safety.
- Children should be supervised to ensure that they do not play with the appliance.
- The temperature of accessible surfaces may be high when the appliance is operating.
-
Never leave an appliance unattended while in use.
-
Do not use an appliance for any purpose other than its intended use.
- Do not place an appliance on or near a hot gas flame, electric element or on a heated oven.
- Do not place on top of any other appliance.
- Do not let the power cord of an appliance hang over the edge of a table or bench top or touch any hot surface.
- Do not operate any electrical appliance with a damaged cord or after the appliance has been damaged in any manner. If damage is suspected, return the appliance to the nearest Sunbeam Appointed Service Centre for examination, repair or adjustment.
- For additional protection, Sunbeam recommend the use of a residual current device (RCD) with a tripping current not exceeding 30mA in the electrical circuit supplying power to your appliances.
- Do not immerse the appliance in water or any other liquid unless recommended.
- Appliances are not intended to be operated by means of an external timer or separate remote control system.
- This appliance is intended to be used in household and similar applications such as: staff kitchen areas in shops, offices and other working environments; farm houses; by clients in hotels, motels and other residential type environments; bed and breakfast type environments.
If you have any concerns regarding the performance and use of your appliance, please visit www.sunbeam.com.au or contact the Sunbeam Consumer Service Line.
Ensure the above safety precautions are understood.
Features of your Sous Chef™ Stir MultiCooker
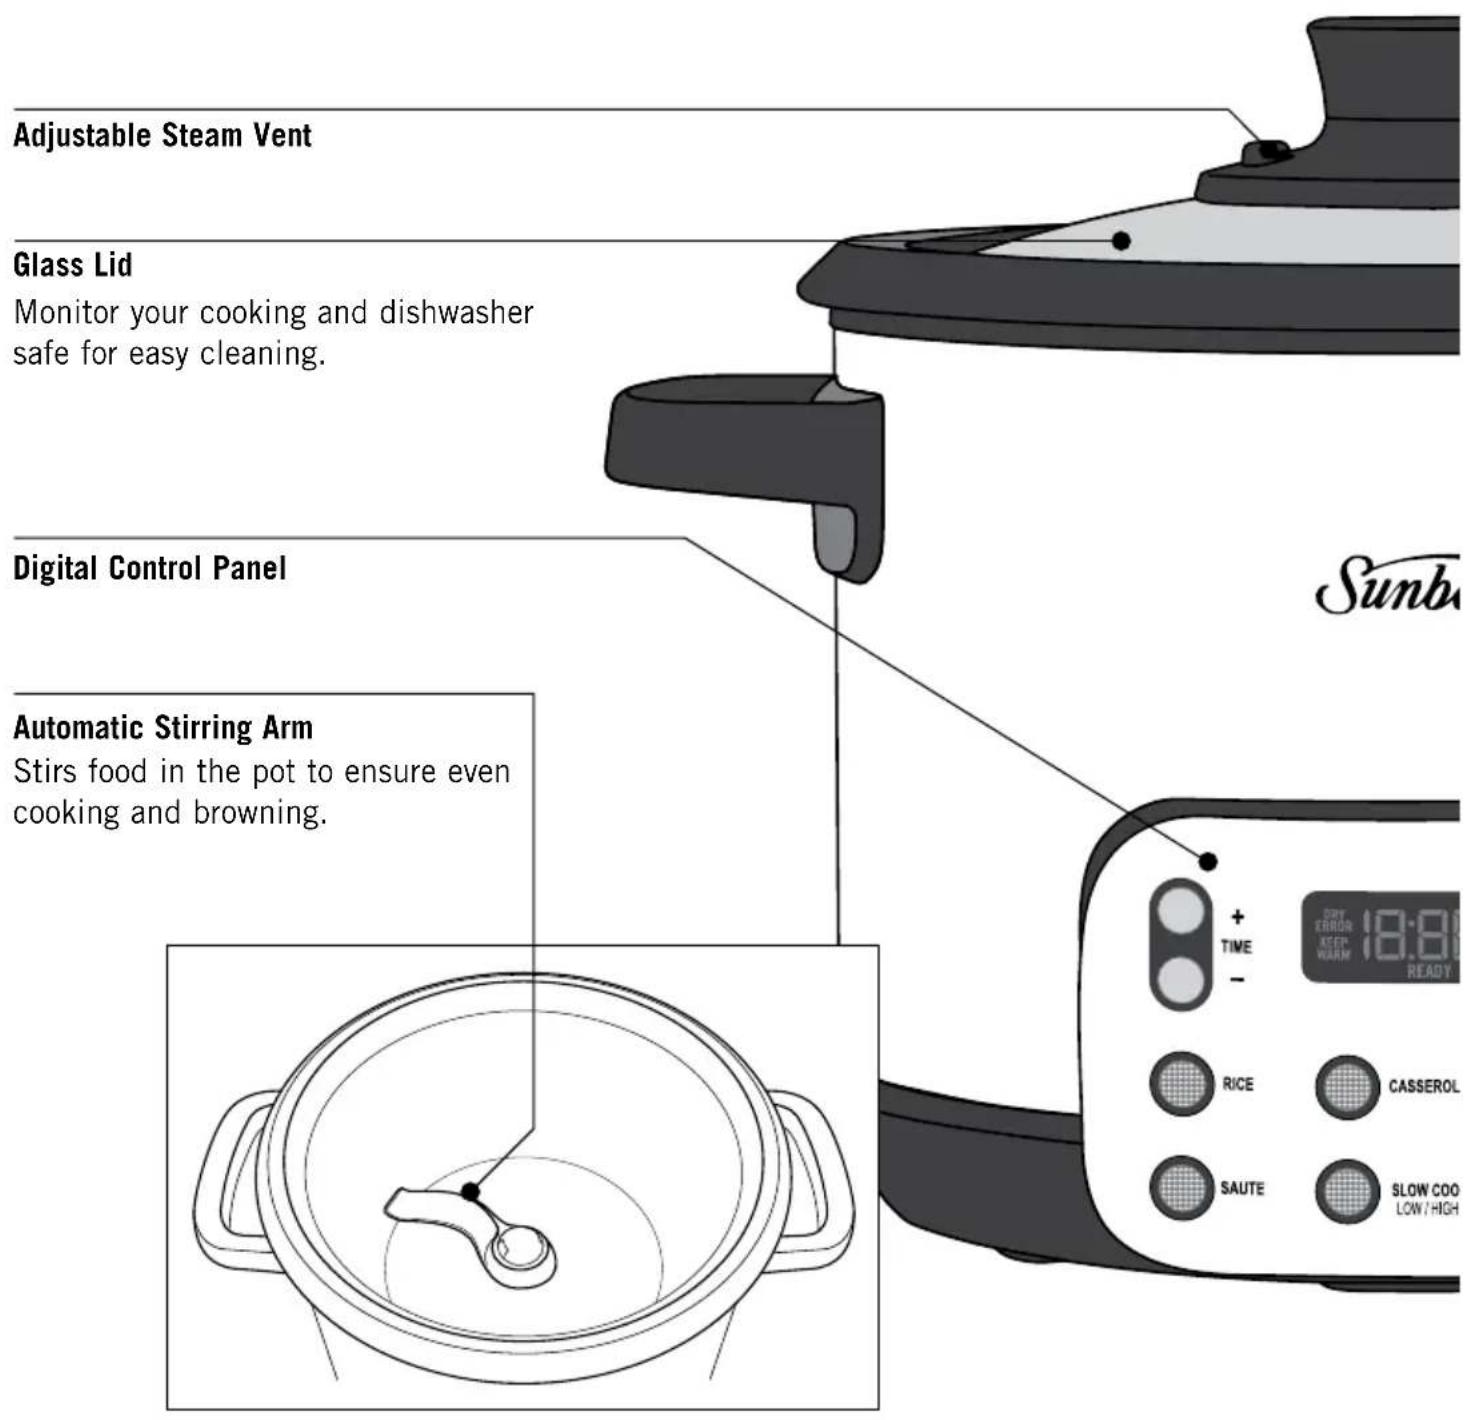
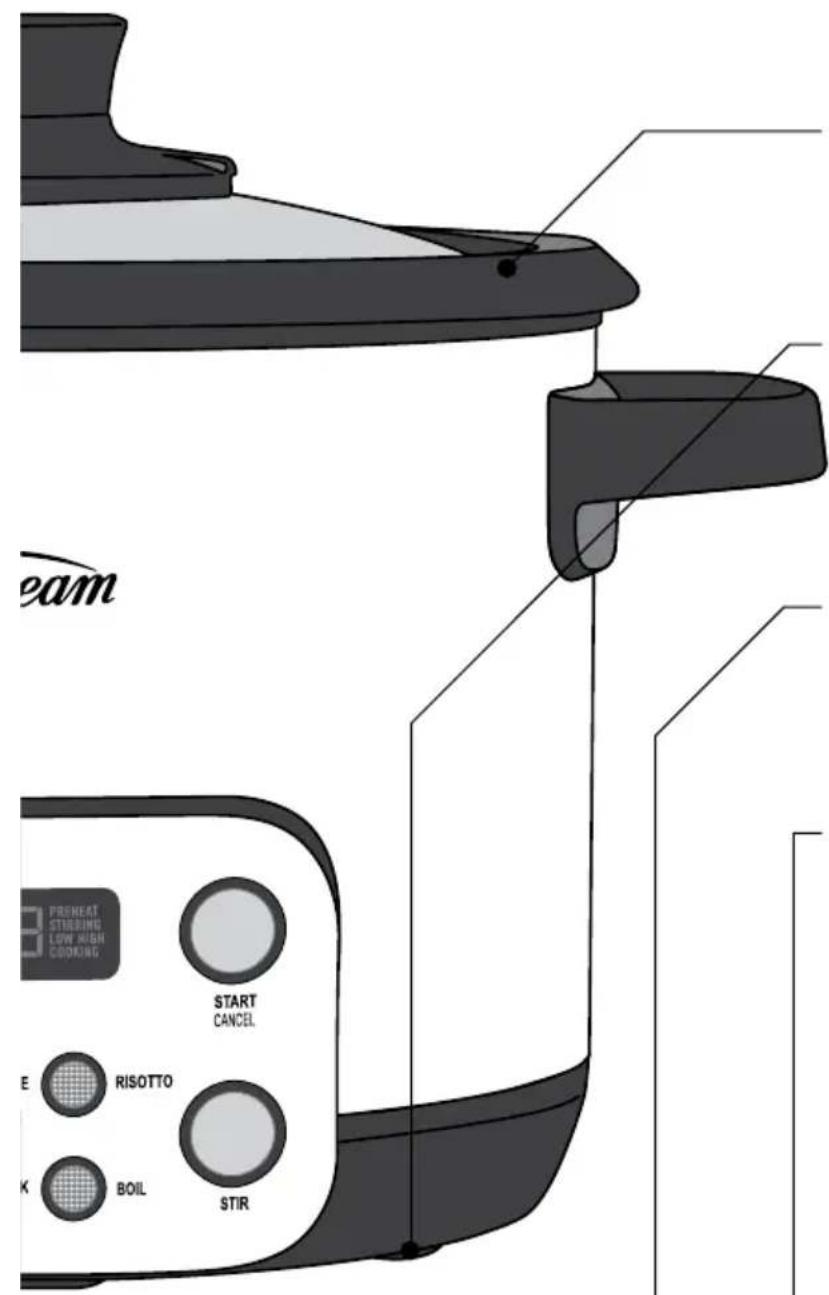
Non-stick Aluminium Pot
The pot is to be used inside the unit for all cooking modes. Dishwasher safe for easy cleaning. 4L liquid or 10 cup rice capacity.
Non-slip feet
Keeps the unit secure on the bench top during use and prevents scratching of bench top surfaces.
Rice Measuring Cup
Ensures accurate measuring of rice to achieve perfect results every time.
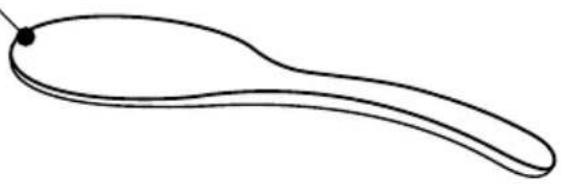
Serving Spoon
Ideal for stirring and serving. The plastic will not scratch the non-stick surface on the cooking pot.

natural_image
Simple line drawing of a sperm-like shape with a tail and body (no text or symbols)The Control Panel
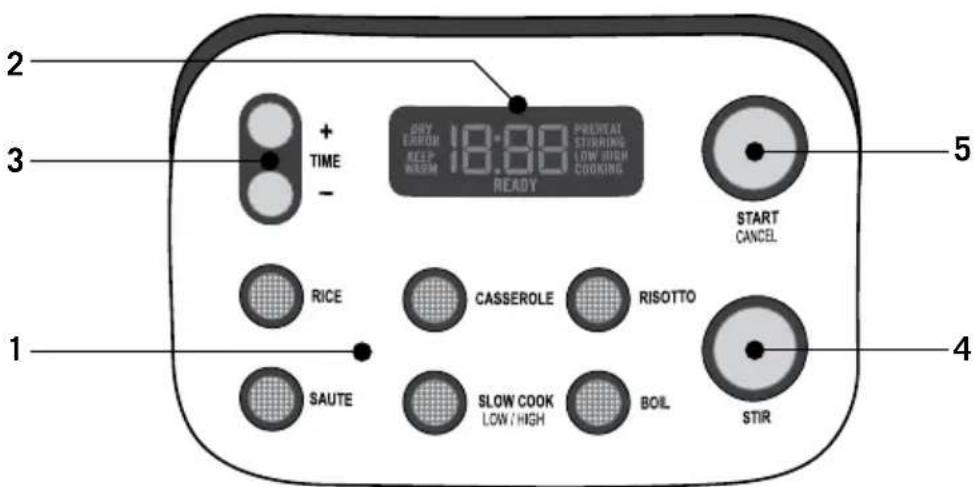
Use the control panel to select from the 6 cooking menus – Rice, Sauté, Risotto, Boil, Casserole and Slow Cook. Choose your cooking menu, customise the time setting, stir arm function and you're ready to start cooking.
1. Menu Buttons
Select one of the 6 cooking functions by pressing the corresponding button.
2. Indicator Screen
Displays remaining cooking time, if appliance is in Keep Warm mode, if temperature status is Preheating or Cooking and whether stir arm is On or Off.
3. Timer Buttons
Press the up and down buttons to set the cooking time.
4. Stir Button
Press to turn the stir arm ON/OFF.
Note: stir arm is not available in Rice cooking menu.
5. Start / Cancel button
Press the START button to begin the selected cooking mode once all settings have been chosen. Press the CANCEL button if you wish to clear all selected settings.
Cooking Menus
The Sous Chef™ Stir MultiCooker has 6 cooking menus.
Slow Cook
Use to cook tender, flavour filled meals cooked over a longer period of time.
LOW Setting. This is suitable for simmering and slow cooking.
HIGH Setting. This is for faster cooking. Typically 1 hour on HIGH = approximately 2 - 2.5 hours on LOW.
Casserole
Use to cook casseroles and stews at a gentle heat over a longer period of time to develop flavours while the stir arm rotates the ingredients.
Sauté
Use to sauté vegetables and brown small batches of meat. The stir arm rotates the food during cooking to ensure even browning. Use to cook ingredients before using other cooking modes such as Casserole, Risotto or Slow Cook.
Boil
Use when cooking soups, boiling pasta and cooking vegetables. When using to boil water the Sous Chef has a 3L capacity.
Rice
Use to cook rice, cous cous, quinoa and other grains. It has a 10 cup capacity and will automatically switch to Keep Warm mode once cooked. Refer to page 15 for cooking instructions.
Risotto
Use to cook all types of risotto. The stir arm gently stirs the ingredients during cooking to create a creamy consistency.
AUTO KEEP WARM Setting.
When cooking time is completed, the Sous Chef™ automatically switches to the Keep Warm setting to prevent overcooking and to keep your cooked food warm until serving. This setting is not hot enough to cook and is used to keep hot, cooked food warm for serving. The Keep Warm setting is an automatic function. For safety it can not be manually set to cook or warm up food.
Cooking Menus Table
| Cooking Mode | Rice Sauté Risotto Boil | Casserole Slow | Cook | ||
| Stir Arm | OFF Default ON Default | IT ON Default | OFF Default ON | Default OFF | |
| Temperature Setting | Auto Auto Auto Auto Auto | High Low | |||
| Preheat | No | Yes | No | Yes | No |
| Auto Keep Warm | 30 mins | OFF | OFF | OFF | 30 mins |
| Timer | OFF | Count up Count down | Count up Count down | Count up Count down | Count down |
| Time Increments | N/A | 1 to 5 mins | 1 to 5 mins | 1 to 15 mins | 15 mins |
| Default Cooking Time | Auto | N/A | N/A | N/A | 15 mins |
| Maximum Cooking Time | 1.5 hours | 1 hour | 1 hour | 3 hours | 3 hours |
| Maximum Recommended Capacity | 10 cups | N/A | 5 cups | 2L | 3L |
Note: the stir arm will automatically rotate for up to 10 seconds after the START button has been pressed. After this time it will default to the ON/OFF setting selected.
Slow Cook Menu
Stir Arm - default OFF
Temperature Settings - HIGH/LOW
Timer - countdown
Max Cooking Time – 12 hours
Auto Keep Warm - 30 mins
Max Recommended Capacity - 3L
Before using your Sous Chef™ for the first time, remove the aluminium pot, stir arm and glass lid and wash them in warm soapy water. Place the appliance on a flat, level surface and plug into a power supply.
- Place food inside the pot and place on the lid.
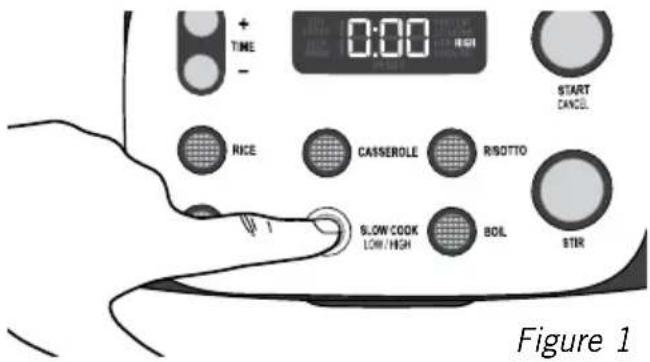
- Press the SLOW COOK menu button. Default setting is LOW temperature. Press SLOW COOK button again for HIGH temperature. The selected temperature will be displayed on the screen. See fig 1.
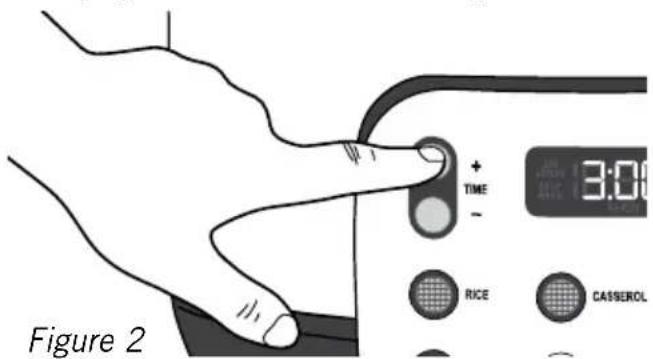
- Select the time by pressing the TIME buttons + and - until the desired time is displayed on the screen. See fig 2.
-
The stir arm is default set to OFF. To turn the stir arm ON press the STIR button.
-
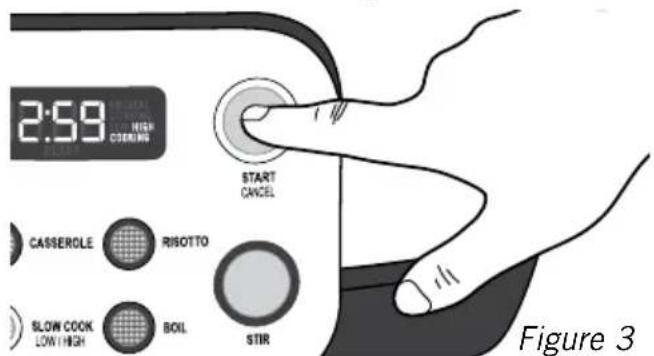
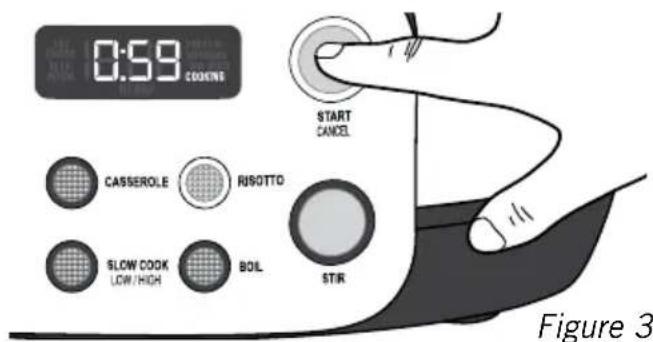
Press the START button. The screen will display 'COOKING' and the time will begin the count down. See fig 3.
- After the set time has elapsed the unit will beep 3 times and automatically switch to KEEP WARM mode which will display on the screen. See fig 4.

Figure 4
- After 30 minutes keep warm mode will end and only READY will display.
To Cancel a Program
To cancel or change your setting, press the CANCEL button. The unit will beep and screen will clear.
Casserole Menu
Stir Arm - default ON
Timer - countdown
Max Cooking Time – 3 hours
Auto Keep Warm - 30 mins
Max Recommended Capacity - 3L
Before using your Sous Chef™ for the first time, remove the aluminium pot, stir arm and glass lid and wash them in warm soapy water. Place the appliance on a flat, level surface and plug into a power supply.
- Place food/liquid inside the pot and place on the lid.
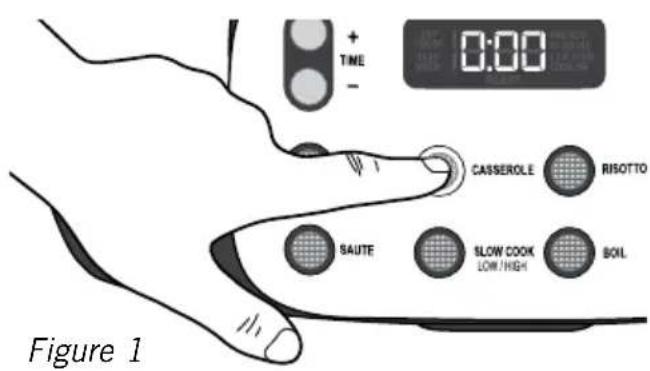
- Press the CASSEROLE menu button. See fig 1.
- Select the time by pressing the TIME buttons + and - until the desired time is displayed on the screen. See fig 2.
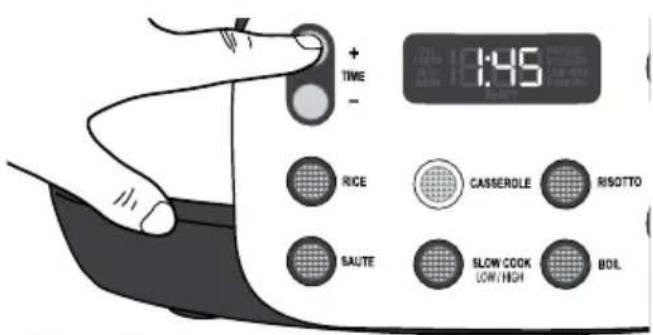
Figure 2
-
The stir arm is default set to ON. To turn the stir arm OFF press the STIR button.
-
Press the START button. The screen will display 'COOKING' and the time will begin the count down. See fig 3.
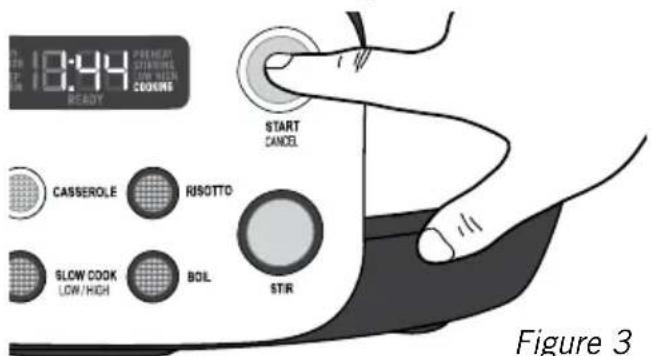
- After the set time has elapsed the unit will beep 3 times and automatically switch to KEEP WARM mode which will display on the screen. See fig 4.

Figure 4
- After 30 minutes keep warm mode will end and only READY will display.
To Cancel a Program
To cancel or change your setting, press the CANCEL button. The unit will beep and screen will clear.
Sauté Menu
Stir Arm - default ON Preheat - yes Timer - count up / countdown Max Cooking Time - 1 hour
Before using your Sous Chef™ for the first time, remove the aluminium pot, stir arm and glass lid and wash them in warm soapy water. Place the appliance on a flat, level surface and plug into a power supply.
- Press the SAUTÉ menu button. See fig 1.
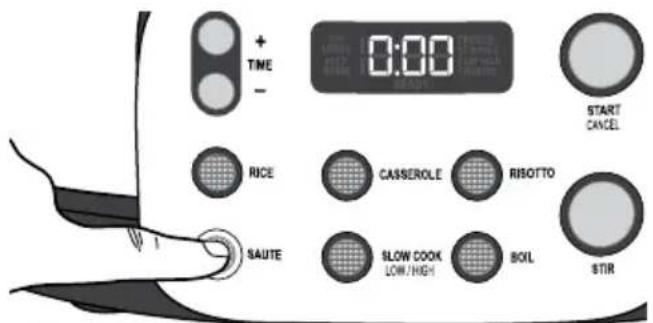
Figure 1
- Select the time by pressing the TIME buttons + and - until the desired time is displayed on the screen. See fig 2. If no time is selected the timer will start to count upwards from 0:00.
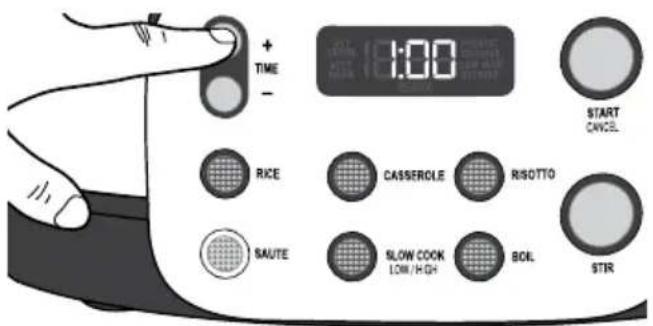
Figure 2
-
The stir arm is default set to ON. To turn the stir arm OFF press the STIR button.
-
Press the START button. The screen will display PREHEAT as the Sous Chef™ heats up. See fig 3.
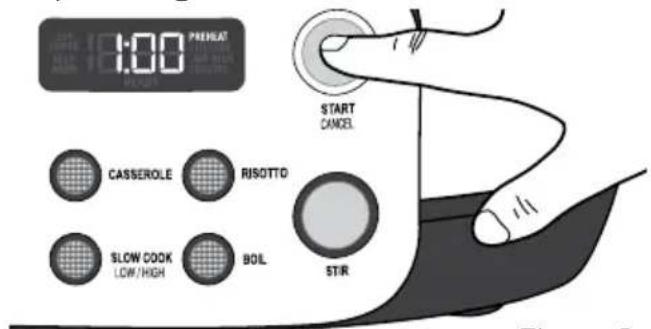
Figure 3
- Once temperature has been reached the screen will display 'COOKING' and the time will begin the count down if time has been set, or count up if no time has been set. See fig 4.

Figure 4
-
Place food inside the pot.
-
After the set time has elapsed, or the maximum time has been reached, the unit will beep 3 times and READY will display on the screen. See fig 5.

Figure 5
To Cancel a Program
To cancel or change your setting, press the CANCEL button. The unit will beep and screen will clear.
Boil Menu
Stir Arm - default OFF
Preheat - yes
Timer - count up / countdown
Max Cooking Time – 3 hours
Max Recommended Capacity - 2L
Before using your Sous Chef™ for the first time, remove the aluminium pot, stir arm and glass lid and wash them in warm soapy water. Place the appliance on a flat, level surface and plug into a power supply.
- Place food/liquid inside the pot and place on the lid.
- Press the BOIL menu button. See fig 1.
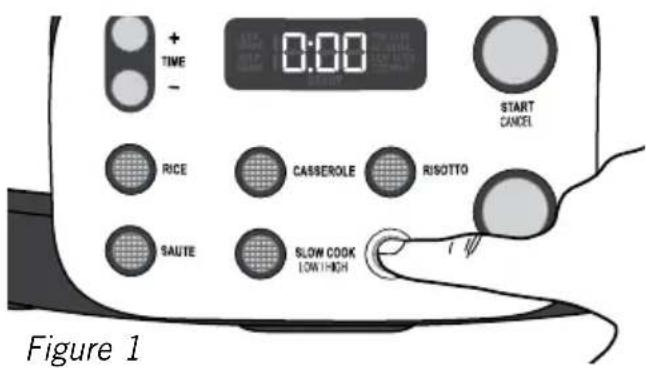
- Select the time by pressing the TIME buttons + and - until the desired time is displayed on the screen. See fig 2. If no time is selected the timer will start to count upwards from 0:00.
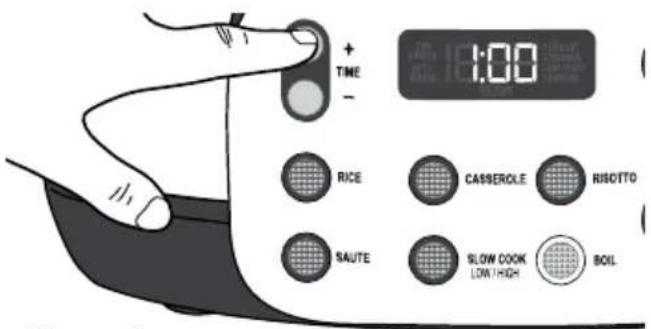
Figure 2
- To have the stir arm ON press the STIR button. Default for this setting is OFF.
- Press the START button. The screen will display PREHEAT as the Sous Chef™ heats up. See fig 3.
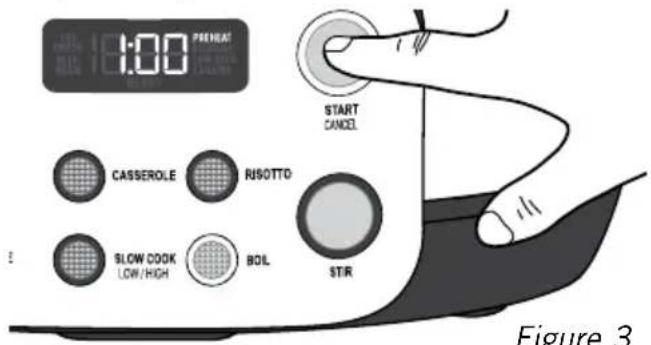
- Once temperature has been reached the screen will display 'COOKING' and the time will begin the count down if time has been set, or count up if no time has been set. See fig 4.

Figure 4
- After the set time has elapsed the unit will beep 3 times and READY will display on the screen. See fig 5.

Figure 5
To Cancel a Program
To cancel or change your setting, press the CANCEL button. The unit will beep and screen will clear.
Rice Menu
Max Cooking Time – Auto off up to 1.5 hours Auto Keep Warm – 30 mins Max Recommended Capacity – 10 cups
Before using your Sous Chef™ for the first time, remove the aluminium pot, stir arm and glass lid and wash them in warm soapy water. Place the appliance on a flat, level surface and plug into a power supply.
- Place food inside the pot and place on the lid.
- Press the RICE menu button. See fig 1.
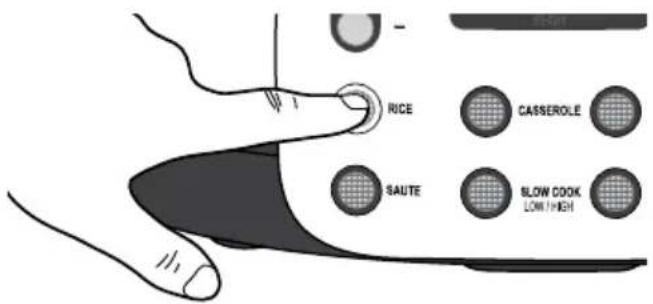
Figure 1
- Time is unable to be set in this mode. The Sous Chef™ will automatically turn off once rice is cooked or if 1.5 hours is reached.
- Stir arm is unable to be turned on in this mode.
- Press the START button. The screen will display 'COOKING'. See fig 2.
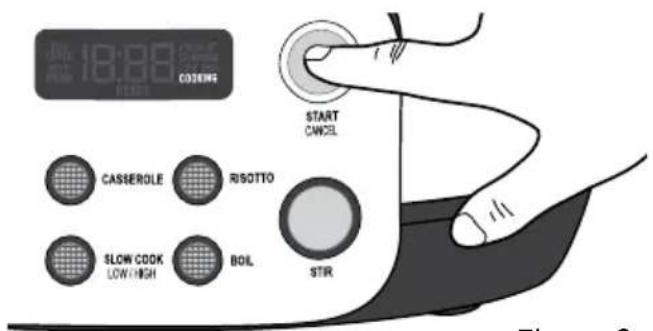
Figure 2
- Once the rice is cooked the unit will beep 3 times and automatically switch to KEEP WARM mode which will display on the screen. See fig 3.

Figure 3
- After 30 minutes keep warm mode will end and only READY will display. See fig 4.

Figure 4
To Cancel a Program
To cancel or change your setting, press the CANCEL button. The unit will beep and screen will clear.
Rice Measurements
| Uncooked rice quantity using cup provided | Rice Metric Measure | Water quantity using cup provided | Water Metric Measure |
| 2 300g 3 480ml | |||
| 3 450g 4 640ml | |||
| 4 600g 5 800ml | |||
| 5 750g 6 960ml | |||
| 6 900g 7 1120ml | |||
| 7 1050g 8 1280ml | |||
| 8 1200g 9 1440ml | |||
| 9 1350g 10 1600ml | |||
| 10 1500g 11 1760ml |
Risotto Menu
Stir Arm - default ON
Max Cooking Time - 1 hour
Max Recommended Capacity - 5 cups
Before using your Sous Chef™ for the first time, remove the aluminium pot, stir arm and glass lid and wash them in warm soapy water. Place the appliance on a flat, level surface and plug into a power supply.
- Place food inside the pot and place on the lid.
- Press the RISOTTO menu button. See fig 1.
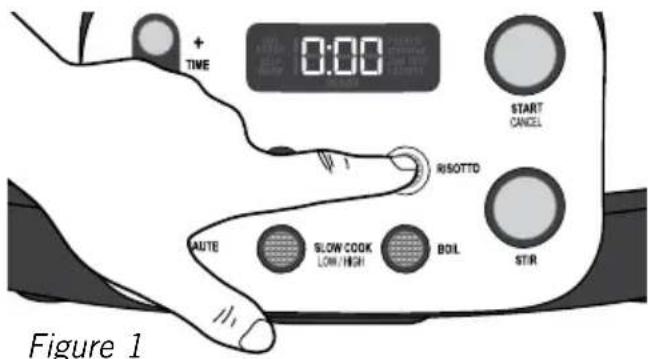
- Select the time by pressing the TIME buttons and until the desired time is displayed on the screen. See fig 2. If no time is selected the timer will start to count upwards from 0:00.
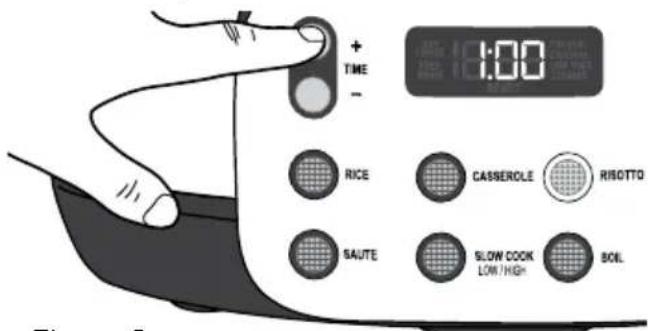
Figure 2
-
The stir arm is default set to ON. To turn the stir arm OFF press the STIR button.
-
Press the START button. The screen will display 'COOKING'. See fig 3.
- Once the risotto is cooked the unit will beep 3 times and READY will display on the screen. See fig 4.

Figure 4
To Cancel a Program
To cancel or change your setting, hold the CANCEL button. The unit will beep and screen will clear.
Care and Cleaning
Cleaning should only be carried out when the Sous Chef ^™ is switched off and the plug removed from the socket. Allow the unit to completely cool before cleaning.
Do not use the aluminium pot on the stovetop, inside a microwave oven or inside an oven. Use the pot only inside the Sous Chef unit.
Wash the aluminium pot, stir arm and glass lid in hot soapy water. To remove food that is cooked onto the bottom, soak the pot in warm water before cleaning. Rinse well and dry.
The aluminium cooking pot, stir arm and glass lid are dishwasher safe for added convenience.
Wipe the exterior of the Sous Chef ^™ with a damp cloth and polish dry. DO NOT use harsh abrasives, scourers, alkaline cleaners or chemicals to clean any part of the Sous Chef ^™ as these will damage the surfaces.
Troubleshooting
| Problem Possible Reason Solution | ||
| The screen is blank | The unit has no power Ensure | Sure Sous Chef is plugged into the power supply. |
| In sleep mode Press any button to activate appliance. | ||
| The Sous Chef has turned off | Auto Keep Warm period has ended | After the pre-set Keep Warm time has ended unit will turn off and READY will appear on the screen. |
| Maximum time has been reached | When the maximum cooking time in each mode is reached the unit will turn off and READY will appear on the screen. | |
| Stir arm does not work | Using on RICE mode Stir arm is disabled in RICE mode. Use another cooking function. | |
| Stir arm not selected Press the STIR button to turn on the stir arm. | ||
| Arm not fitted into pot correctly | Ensure the stir arm sits in the base of the pot and twist until locks into place. | |
| Pot not placed into unit correctly | Remove the pot and replace into unit making sure it sits evenly. | |
| Screen displays 'Dry Error' | Not enough liquid in the pot | Add liquid to the pot. |
| Pot is not placed into the unit correctly | Ensure the base of the pot is sitting flat against the heating element. | |
| Food isn't cooking in Sauté | Added ingredients into the pot too early | Wait until screen changes from PREHEAT to COOKING before adding ingredients. |
| Stir arm operates when not selected | Stir arm automatically rotates for up to 10 seconds after the START button is pressed | The rotating of the stir arm ensures the pot is placed into the multi cooker securely. |
| Error E1 appears on the screen | Internal issue with the Sous Chef | Contact Sunbeam as the unit requires servicing. |
| Error E2 appears on the screen | Internal issue with the Sous Chef | Contact Sunbeam as the unit requires servicing. |
All the recipes have been specifically created and tested by the Sunbeam Test Kitchen for the Sunbeam Sous Chef ^™ .
SLOW COOK
Lamb, Olive & Apricot Tagine
2kg lamb shoulder, trimmed and cut into 1 inch pieces
2 tablespoon flour
1 teaspoon paprika
1 teaspoon ground cumin
1 teaspoon ground ginger
1 large onion, diced
2 cloves garlic, finely sliced
4 carrots cut into 1 inch pieces
1 cup dried apricots
1 cup pitted green olives
1 cinnamon stick
Sea salt
Freshly ground black pepper
-
Mix together spices and flour and toss together with the lamb.
-
Set the appliance to SAUTÉ with the stir arm ON. Once heated, brown the lamb pieces in batches.
-
Remove lamb and cook the onion and garlic until translucent.
-
Add lamb back into the pot along with carrots, apricots, olives, cinnamon stick and 250ml water.
-
Set the appliance to SLOW COOK – HIGH with stir arm OFF. Cover and cook for 4 hrs, until lamb is tender. Adjust seasoning to your taste.
Serve with fresh coriander, lemon wedges and couscous.
Massaman Curry
1.5kg bolar blade beef, or any stewing cut, trimmed and cut into 4cm pieces
1 large brown onion, cut in to wedges
1 jar Massaman curry paste (approx. 200g)
500g baby potatoes, peeled
540ml coconut milk
270ml coconut cream
3 star anise
2 cinnamon sticks
4 cardamom pods, slightly crushed
2 tablespoon brown sugar
1 tablespoon fish sauce
12 cup roasted peanuts
-
Set the appliance to SAUTÉ with stir arm ON. Once heated, brown the meat in batches.
-
Remove meat and brown the onion.
-
Add curry paste and fry until fragrant, 1-2 mins.
-
Add meat back to the pot, along with potatoes, coconut milk, coconut cream, star anise, cinnamon sticks and cardamom pods. Set the appliance to SLOW COOK - LOW with stir arm OFF. Cover and allow to cook for 8 hrs, until the meat is tender.
-
Stir through brown sugar, fish sauce and peanuts.
Serve with rice and fresh coriander.
RICE
Plain Rice
- Using only the rice measuring cup provided, measure out the required quantity of rice (NOTE: rice cup measurements are not the same as metric cups. 1 rice cup is approximately 2/3 standard cup measurement). Make sure the rice is a level cup measure.
- Place measured rice in a sieve and wash rice thoroughly under cold water. Wash until the water runs clear. This removes excess starch which helps to achieve fluffier rice, and prevents rice grains sticking to the cooking pot.
- Place washed rice in the cooking pot. Add cold water to the cup level indicated on the inside of the cooking pot (example: add cold water to line 3 if using 3 cups of rice). Cover with lid.
- Set the appliance to RICE. The appliance will automatically stop cooking when the liquid is absorbed and the rice is cooked.
Pilaf Rice
1 onion, finely diced
1 tablespoon olive oil
2 cups basmati rice, rinsed well
Pinch of saffron strands
Chicken stock
- Set the appliance to SAUTÉ with stir arm ON. Once heated, add onion and oil in to the cooking pot and cook until transparent, approximately 7-8 mins.
- Set the appliance to RICE. Add rice, saffron strands and enough chicken stock to fill to the 2 cup level indicated on the inside of the cooking pot. Cover with the lid.
- The appliance will automatically stop cooking when the liquid is absorbed and rice is cooked.
SAUTÉ
Quick Tomato & Basil Pasta Sauce
2 tablespoons olive oil
1 medium brown onion, finely diced
2 cloves garlic, sliced
1kg ripe tomatoes, chopped
I small bunch of basil, leaves picked and shredded
1 tablespoon red wine vinegar
Sea salt
Freshly ground black pepper
-
Set the appliance to SAUTÉ with stir arm ON. Once heated cook onion and garlic in the olive oil until soft and translucent.
-
Add tomatoes to the pot and continue to cook for 15-20 mins until tomatoes have broken down.
-
Stir through basil leaves, red wine vinegar and season to taste.
Serve with your favourite pasta and a generous amount of parmesan.
Raisin, Almond & Parsley Couscous
60ml olive oil
55g ( 13 cup) pine nuts
1 medium brown onion, finely diced
1 litre (4 cups) chicken stock
500g (2½ cups) couscous
25g butter
95g ( 12 cup) raisins
12 bunch continental parsley, leaves picked and finely chopped
Sea salt
Freshly ground black pepper
- Set the appliance to SAUTÉ with stir arm ON. Once heated toast pine nuts until golden.
- Remove pine nuts and add onion and olive oil. Cook until soft and translucent.
- Turn the stir arm OFF and add chicken stock. Bring to a simmer.
- Add couscous and turn off the appliance. Allow to stand for 5 mins until stock has been absorbed.
- Use a fork to fluff up couscous then fold through butter, raisins and parsley. Season to taste.
Parmesan Creamed Corn
25g butter
2 tablespoons olive oil
4 corn cobs, kernels removed
12 cup cream
2 whole shallots, finely sliced
40g parmesan, finely grated
12 bunch flat leaf parsley, leaves removed and finely chopped
Tobasco
Sea salt
Freshly ground black pepper
-
Set the appliance to SAUTÉ with stir arm ON. Once heated melt butter and olive oil in the pot.
-
Add corn kernels and sauté until just tender, approximately 10 mins.
-
Add cream, bring to the simmer and add shallots.
-
Turn the appliance off. Fold in parmesan and parsley, add tobacco to your liking and adjust seasoning. Serve immediately.
Asian Style Vegetables
2 tablespoons vegetable oil
2 cloves garlic, finely sliced
2cm piece of ginger, peeled and grated
1 long red chilli (optional)
1 medium carrot, halved lengthways and cut diagonally in 12 cm slices
1 small head of broccoli, cut into small florets
100g bean shoots
4 shallots, trimmed and sliced
-
Set the appliance to SAUTÉ with stir arm ON. Once heated add oil and stir fry garlic, ginger and chilli (if using) for 1-2 mins.
-
Add all the vegetables to the pot and stir fry for 5 mins or until the vegetables are cooked to your liking.
-
Add soy sauce, sesame oil and lime juice and stir to combine.
RISOTTO
3 tablespoons butter
1 tablespoon vanilla bean paste, opened and seeds removed
325g Arborio rice
1 wineglass of sweet white wine
750ml full fat milk, warmed
100g white chocolate, finely chopped
1. Set the appliance to SAUTÉ with stir arm ON. Once heated melt 2 tablespoons of butter.
2. Add rice, sugar and vanilla bean seeds. Allow rice to cook for 1 min before adding wine and allow to cook until the wine has almost been absorbed, approximately 5 mins.
3. Add milk, put the lid on and change the setting to RISOTTO. Allow to cook until rice is soft but still hold its shape, approximately 30 mins.
4. Turn the appliance off, and fold through the remaining 1 tablespoon of butter and white chocolate. Allow to sit for a couple of mins before serving.
Lovely served with grilled stonefruit or berries.
Basic Risotto
1 litre stock (chicken, fish or vegetable), warmed
2 tablespoons olive oil
25g butter
1 large onion, finely diced
2 cloves garlic, finely sliced
2 sticks of celery, peeled and finely diced
400g Arborio rice
250ml of dry white wine
70g butter
115g parmesan cheese, freshly grated
Sea salt
Freshly ground black pepper
- Set the appliance to SAUTÉ with stir arm ON. Once heated add olive oil and butter to the pot. Add onion, garlic and celery and allow to cook until soft and translucent.
- Add rice and allow to fry for 1 min until it looks slightly translucent.
- Add wine and allow to cook into the rice. When the wine is almost absorbed, change the setting to RISOTTO.
- Add heated stock, cover with the lid and allow to cook for approximately 30 mins. The rice should be soft with a slight bite.
- Turn the appliance off and fold in butter and parmesan, adjust seasoning. Allow to sit for a few mins before serving.
CASSEROLE
Chicken Leek & Mushroom Stew with Dumplings
2 tablespoons olive oil
1 medium onion, finely diced
2 cloves garlic, finely sliced
1 large carrot, finely diced
2 sticks of celery, finely diced
2 leeks, cleaned and cut into 1cm pieces
200g mushrooms, sliced
1kg chicken breast cut into 2cm pieces
6 sprigs of thyme
300ml cream
2 cups chicken stock
2 tablespoons cornflour
Sea salt
Freshly ground black pepper
- Set the appliance to SAUTÉ with stir arm ON. Once heated, add olive oil, onion, garlic, carrot, celery and leeks and cook for 10 mins or until the vegetables start to soften.
- Add mushrooms, chicken and thyme, then cream and stock.
- Set the appliance to CASSEROLE and the timer to 1 hr. Cover and allow to cook.
- Make a slurry with cornflour and enough water to loosen it. Add slurry to the stew 5 mins before the time ends. The stew must come back to the boil and will thicken. Adjust seasoning as required.
Hungarian Goulash
1.5kg stewing beef (such as bolar blade, chuck), cut into 3cm pieces
13 cup plain flour
4 tablespoon olive oil
1 large brown onion, finely diced
2 large red capsicums, halved, deseeded and cut into 12 cm slices
2 garlic cloves, finely sliced
1 teaspoon caraway seeds (optional)
2 tablespoons sweet paprika
1 tablespoon gravy powder
2 bay leaves
400g can diced tomatoes
2 cups beef stock
Sea salt
Freshly ground black pepper
1. Set the appliance to SAUTÉ with stir arm ON.
2. Coat beef in flour (do not discard remaining flour). Heat half the oil in pot and cook beef in batches until browned. Transfer to a bowl.
3. Heat remaining oil and add onion, garlic and capsicum. Cook until the vegetables are just softened.
4. Return beef to the pot along with remaining flour, caraway seeds (if using), paprika, gravy powder, bay leaves, tomatoes and stock.
5. Set the appliance to CASSEROLE and the timer to 1 hr. Cover and allow to cook.
6. Adjust the seasoning to taste.
Serve with buttered noodles
Chorizo Breakfast Beans
250g chorizo, sliced into 12 cm pieces
1 tablespoon olive oil
1 medium Spanish onion, sliced
2 cloves garlic, finely sliced
1 capsicum, diced into 1cm pieces
1 long red chilli, finely sliced
2 x 400g canned diced tomatoes
1 bay leaf
1 x 400g beans
Sea salt
Freshly ground black pepper
- Set the appliance to SAUTÉ with stir arm ON. Once heated, add olive oil and fry chorizo until browned.
- Add onion, garlic and capsicum to the pot and fry until the vegetables are just soft.
- Set the appliance to CASSEROLE and add canned tomatoes and bayleaf, set the timer to 30 mins.
- Add beans and set the timer for a further 15 mins.
- Adjust the seasoning to taste
Crack eggs over the top of the stew and cook for an additional 10 mins with the lid on and stir arm OFF.
Serve with toasted bread.
Notes
Notes
12 Month Replacement Guarantee
This Sunbeam product is covered by a 12 month replacement or repair warranty, which is in addition to your rights under the Australian Consumer Law (if your product was purchased in Australia) or New Zealand Consumer Guarantees Act (if your product was purchased in New Zealand).
Should you experience any difficulties with your product during the warranty period, please contact our customer service line for advice on 1300 881 861 in Australia, or 0800 786 232 in New Zealand.
Australia
www.sunbeam.com.au 1300 881 861
Units 5 & 6,
13 Lord Street,
Botany NSW 2019
Australia
New Zealand
www.sunbeam.co.nz 0800 786 232
Level 6, Building 5, Central Park,
660-670 Great South Road, Greenlane, Auckland
New Zealand
Upon receipt of your claim, Sunbeam will seek to resolve your difficulties or, if the product is defective, advise you on how to obtain a replacement or refund.
To assist us in managing warranty claims, we recommend you register your product as soon as practicable after purchase by creating a MySunbeam account on our website and uploading a copy of your original receipt.
In order to make a claim under our warranty, you must have the original proof of purchase documentation for the product and present it when requested (if not already uploaded to our website).
Should your product develop any defect within 12 months of purchase because of faulty materials or workmanship, we will replace or repair it, at our discretion, free of charge. A product presented for repair may be replaced by a refurbished product of the same type rather than being repaired. Refurbished parts may be used to repair the product.
Our replacement or repair warranty only applies where a defect arises as a result of faulty material or workmanship during the warranty period. Your warranty does not cover misuse or negligent handling (including damage caused by failing to use the product in accordance with this instruction booklet), accidental damage, or normal wear and tear.
Your warranty does not:
• cover freight or any other costs incurred in making a claim, consumable items, accessories that by their nature and limited lifespan require periodic renewal (such as filters and seals) or any consequential loss or damage; or
• cover damage caused by:
- power surges, power dips, voltage supply problems, or use of the product on incorrect voltage;
- servicing or modification of the product other than by Sunbeam or an authorised Sunbeam service centre;
- use of the product with other accessories, attachments, product supplies, parts or devices that do not conform to Sunbeam specifications; or
- exposure of the product to abnormally corrosive conditions; or
- extend beyond 3 months if the product is used in commercial, industrial, educational or rental applications.
The benefits given to you by our warranty are in addition to other rights and remedies under law in relation to the product.
In Australia our goods come with guarantees that cannot be excluded under the Australian Consumer Law. You are entitled to a replacement or refund for a major failure and for compensation for any other foreseeable loss or damage. You are also entitled to have the goods repaired or replaced if the goods fail to be of acceptable quality and the failure does not amount to a major failure.
Our goods also come with guarantees that cannot be excluded under the New Zealand Consumer Guarantees Act.
If your warranty claim is not accepted, we will inform you and if requested to do so by you, repair the product provided you pay the usual charges for such repair. You will also be responsible for all freight and other costs.
Should your product require repair or service after the warranty period, contact your nearest Sunbeam service centre. For a complete list of Sunbeam's service centres, visit our website or call our customer service line for advice on 1300 881 861 in Australia, or 0800 786 232 in New Zealand.
Need help with your appliance?
Contact our customer service team or visit our website for information and tips on getting the most from your appliance.
| Australia | I visit | www.sunbeam.com.au |
| phone | 1300 881 861 | |
| Units 5 & 6, 13 Lord Street, Botany NSW 2019 Australia. |
| New Zealand | visit phone mail | www.sunbeam.co.nz0800 786 232Level 6, Building 5,Central Park,660–670 Great South Road,Greenlane, Auckland. |
Sunbeam Corporation PTY Limited | ACN 000 006 771
Sunbeam is a registered trade mark.
Sous Chef is a trade mark of Sunbeam Corporation.
Made in China to Sunbeam's specification.
Due to minor changes in design or otherwise,
the product you buy may differ slightly from the one shown here.
Approved by the appropriate electrical regulatory authorities.
©Sunbeam Corporation Limited 2016.
11/16
- Contents
- Important instructions – retain for future use.
- Sunbeam's Safety Precautions
- SAFETY PRECAUTIONS FOR YOUR MULTICOOKER
- Sunbeam is very safety conscious when designing and manufacturing consumer products, but it is essential that the product user also exercise care when using an electrical appliance. Listed below are precautions which are essential for the safe use of an electrical appliance:
- Features of your Sous Chef™ Stir MultiCooker
- Non-stick Aluminium Pot
- Non-slip feet
- Rice Measuring Cup
- Serving Spoon
- The Control Panel
- Menu Buttons
- Indicator Screen
- Timer Buttons
- Stir Button
- Start / Cancel button
- Cooking Menus
- Slow Cook
- Casserole
- Sauté
- Boil
- Rice
- Risotto
- AUTO KEEP WARM Setting.
- Cooking Menus Table
- Slow Cook Menu
- To Cancel a Program
- Casserole Menu
- Sauté Menu
- Boil Menu
- Rice Menu
- Rice Measurements
- Risotto Menu
- Care and Cleaning
- Troubleshooting
- Lamb, Olive & Apricot Tagine
- Massaman Curry
- Plain Rice
- Pilaf Rice
- Chicken stock
- Quick Tomato & Basil Pasta Sauce
- Raisin, Almond & Parsley Couscous
- Parmesan Creamed Corn
- Asian Style Vegetables
- Basic Risotto
- Freshly ground black pepper
- Chicken Leek & Mushroom Stew with Dumplings
- Hungarian Goulash
- Chorizo Breakfast Beans
- Notes
- Month Replacement Guarantee
- Australia
- New Zealand
- Your warranty does not:
- Need help with your appliance?
Brand : SUNBEAM
Model : Sous Chef Stir MU3000
Category : Multicooker