
Duos MU4000 - Multicooker SUNBEAM - Free user manual and instructions
Find the device manual for free Duos MU4000 SUNBEAM in PDF.


| Product Type | Sous Vide and Slow Cooker |
| Brand | Sunbeam |
| Model | Duos MU4000 |
| Capacity | 5.5 liters |
| Cooking Functions | Sous Vide (40°C – 90°C), Slow Cook (Low, High, Keep Warm) |
| Timer Range | Sous Vide: 1 to 24 hours; Slow Cook: High 2-8 hours, Low 4-16 hours |
| Temperature Increments | Sous Vide: 1°C; Slow Cook: preset Low/High |
| Control Panel | Digital with Menu, Temp/Time, Start/Cancel, and Power buttons |
| Display | Timer display screen |
| Removable Cooking Pan | Non-stick, dishwasher safe |
| Lid | Tempered glass, dishwasher safe |
| Accessories | Pouch rack for separating sous vide bags |
| Safety Features | Auto shut-off after 20 min if not started, non-slip feet |
| Power Supply | AC, voltage as marked on appliance (typical 220-240V) |
| Power Consumption | Approximately 1000W |
| Dimensions (approximate) | 30 cm (W) x 30 cm (D) x 25 cm (H) |
| Weight (approximate) | 5 kg |
| Cleaning and Care | Lid and cooking pan dishwasher safe; wipe exterior with damp cloth |
| Warranty | 12 months replacement or repair |
| Country of Manufacture | China |
Frequently Asked Questions - Duos MU4000 SUNBEAM
User questions about Duos MU4000 SUNBEAM
0 question about this device. Answer the ones you know or ask your own.
Ask a new question about this device
Download the instructions for your Multicooker in PDF format for free! Find your manual Duos MU4000 - SUNBEAM and take your electronic device back in hand. On this page are published all the documents necessary for the use of your device. Duos MU4000 by SUNBEAM.
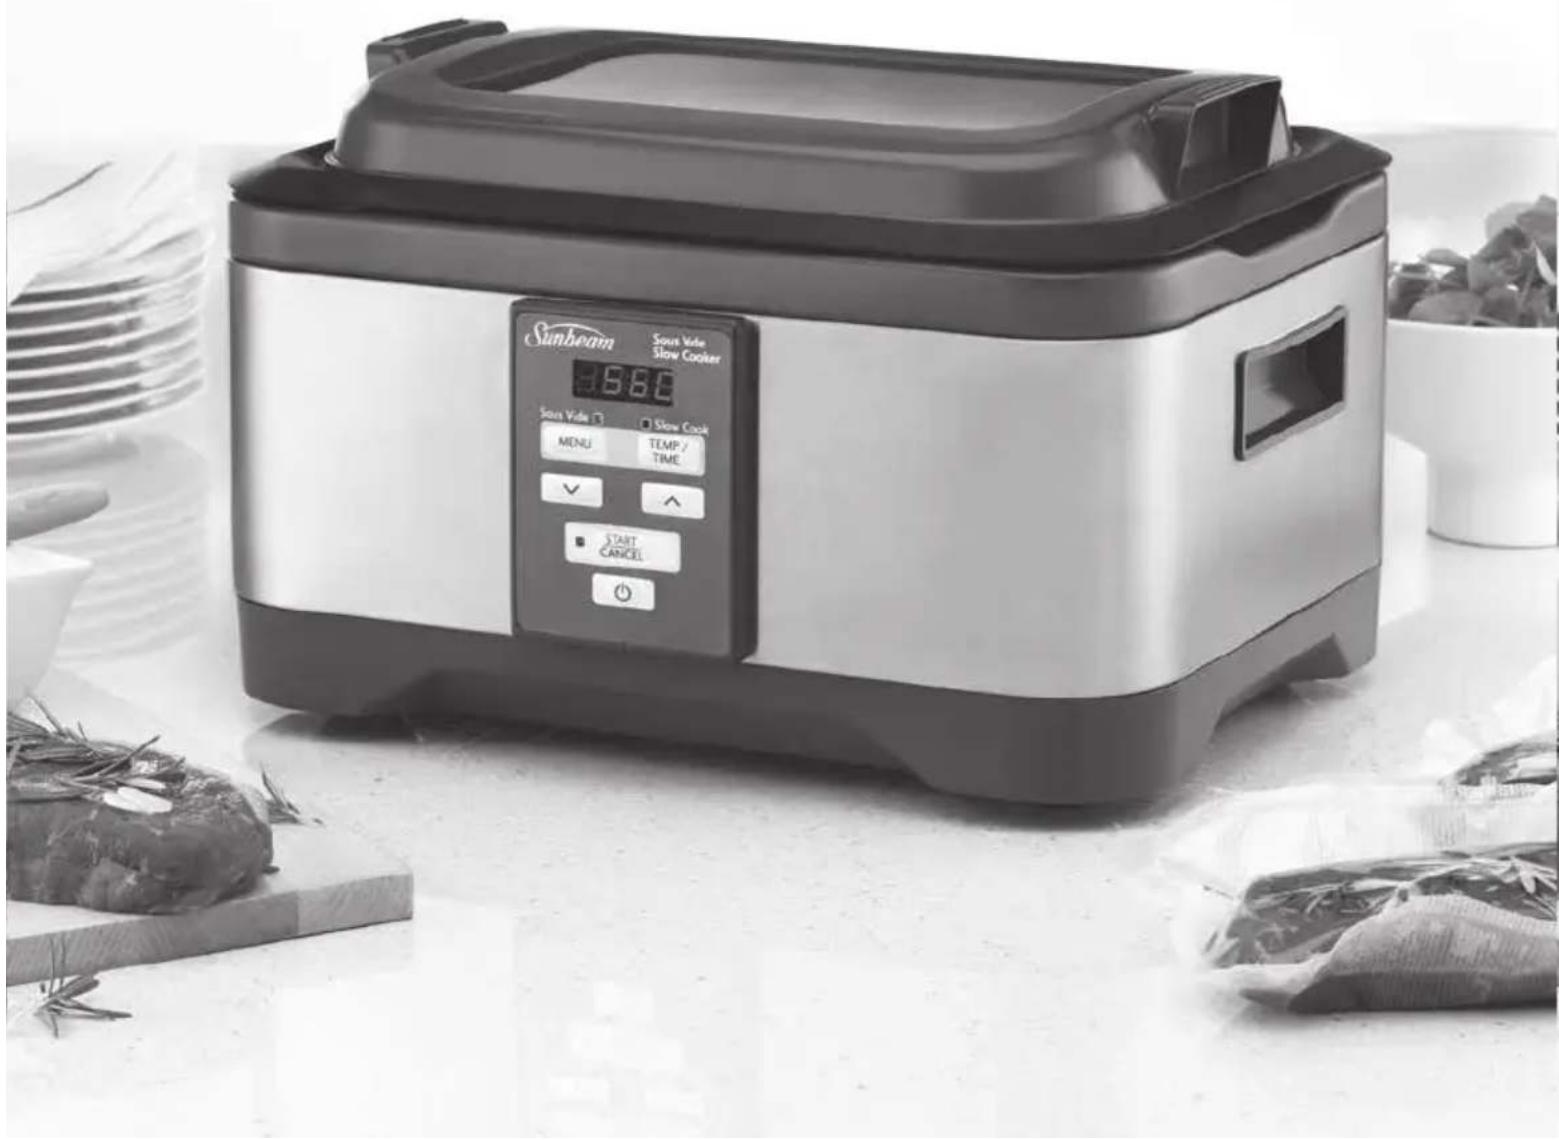
USER MANUAL Duos MU4000 SUNBEAM
Sous Vide and Slow Cooker
Instruction/Recipe Booklet
MU4000
Please read these instructions carefully and retain for future reference.
Contents
Sunbeam's Safety Precautions 2
Features of your Sunbeam Duos 4
The Control Panel 6
Cooking menus overview 7
Cooking menu settings table 10
How to use the Sous Vide menu 11
Sous Vide Temperature and Time Guide 12
How to use the Slow Cook menu 14
Care and Cleaning 15
Hints and Tips 16
Troubleshooting 18
Recipes 19
Important instructions – retain for future use.
Sunbeam's Safety Precautions
SAFETY PRECAUTIONS FOR YOUR SUNBEAM DUOS SOUS VIDE AND SLOW COOKER
- Do not plug in or switch on the unit without having the cooking pan inside the unit.
- Do not operate the unit on an inclined surface
- Do not move or cover the unit whilst in operation
- Do not immerse the base of the unit in water or any other liquid
- Use your unit well away from walls and curtains, and don't use in confined spaces.
- Do not touch any metal surfaces of the unit while it is in use as they will be hot.
- Use handles and oven mitts to move the unit, the cooking pan and the lid when hot.
-
Do not operate the unit without food or liquid in the cooking pan.
-
Be careful when lifting and removing lid after cooking. Always tilt the lid away from you as steam is hot and can result in serious burns. Never place face over the unit.
- Unplug the unit when not in use and before cleaning. Allow the unit to cool before putting on or taking off parts to clean.
- Do not use the pan on the stovetop, inside a microwave oven or inside an oven
- Do not use the cooking pan for food storage or place in the freezer.
- Do not operate the unit when placed directly onto a bench top. Place a heat proof mat or chopping board underneath to protect the surface.
Sunbeam's Safety Precautions
Sunbeam is very safety conscious when designing and manufacturing consumer products, but it is essential that the product user also exercise care when using an electrical appliance. Listed below are precautions which are essential for the safe use of an electrical appliance:
- Read carefully and save all the instructions provided with an appliance.
- Always turn the power off at the power outlet before you insert or remove a plug. Remove by grasping the plug - do not pull on the cord.
- Turn the power off and remove the plug when the appliance is not in use and before cleaning.
- Do not use your appliance with an extension cord unless this cord has been checked and tested by a qualified technician or service person.
- Always use your appliance from a power outlet of the voltage (A.C. only) marked on the appliance.
- This appliance is not intended for use by persons (including children) with reduced physical, sensory or mental capabilities, or lack of experience and knowledge, unless they have been given supervision or instruction concerning use of the appliance by a person responsible for their safety.
- Children should be supervised to ensure that they do not play with the appliance.
- The temperature of accessible surfaces may be high when the appliance is operating.
-
Never leave an appliance unattended while in use.
-
Do not use an appliance for any purpose other than its intended use.
- Do not place an appliance on or near a hot gas flame, electric element or on a heated oven.
- Do not place on top of any other appliance.
- Do not let the power cord of an appliance hang over the edge of a table or bench top or touch any hot surface.
- Do not operate any electrical appliance with a damaged cord or after the appliance has been damaged in any manner. If damage is suspected, return the appliance to the nearest Sunbeam Appointed Service Centre for examination, repair or adjustment.
- For additional protection, Sunbeam recommend the use of a residual current device (RCD) with a tripping current not exceeding 30mA in the electrical circuit supplying power to your appliances.
- Do not immerse the appliance in water or any other liquid unless recommended.
- Appliances are not intended to be operated by means of an external timer or separate remote control system.
- This appliance is intended to be used in household and similar applications such as: staff kitchen areas in shops, offices and other working environments; farm houses; by clients in hotels, motels and other residential type environments; bed and breakfast type environments.
If you have any concerns regarding the performance and use of your appliance, please visit www.sunbeam.com.au or contact the Sunbeam Consumer Service Line.
Ensure the above safety precautions are understood.
Features of your Sunbeam Duos™ Sous Vide and Slow Cooker
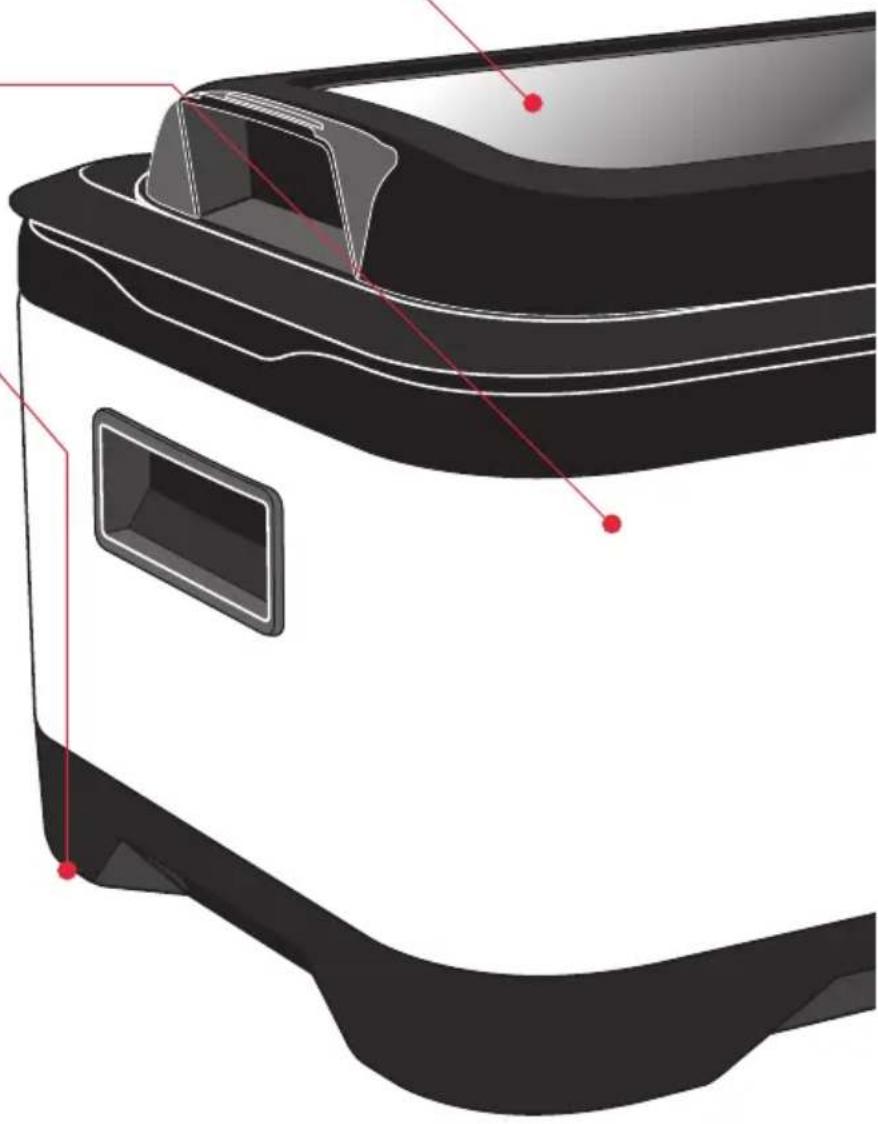
Tempered Glass Lid
5.5 litre working capacity
Non-slip feet
Keeps the unit secure on the bench top during use and prevents scratching of bench top surfaces.
natural_image
3D rendering of a car's front bumper and side panel, showing black and white body with red alignment lines (no text or symbols)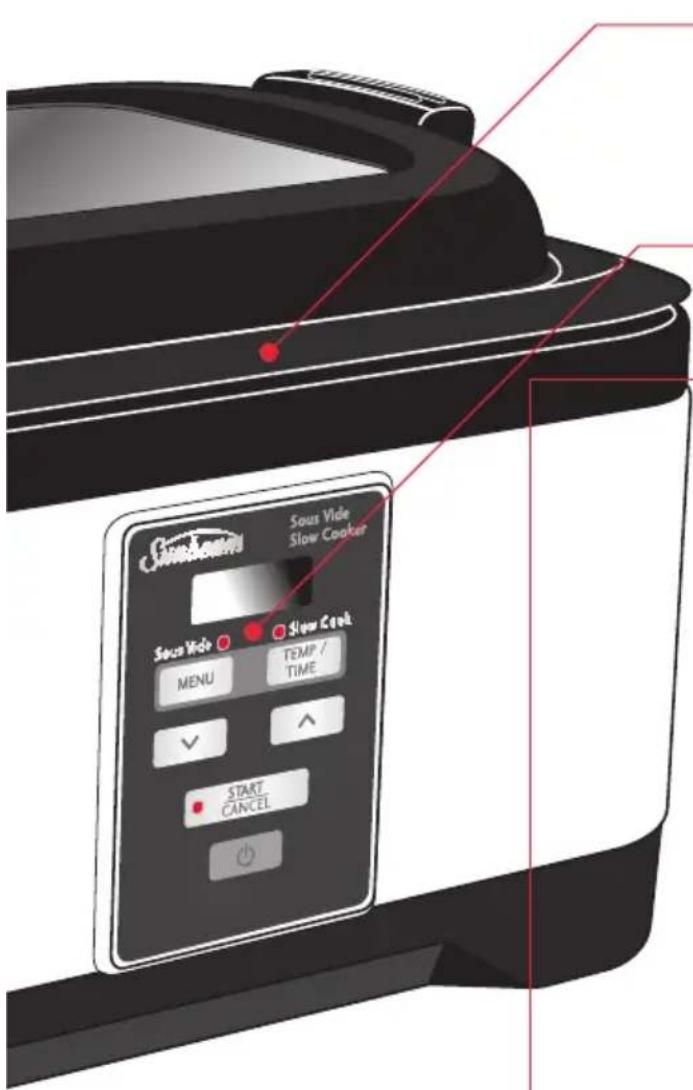
Non-stick Removable Cooking Pan
The removable cooking pan is non-stick, and dishwasher safe for easy cleaning.
Control Panel
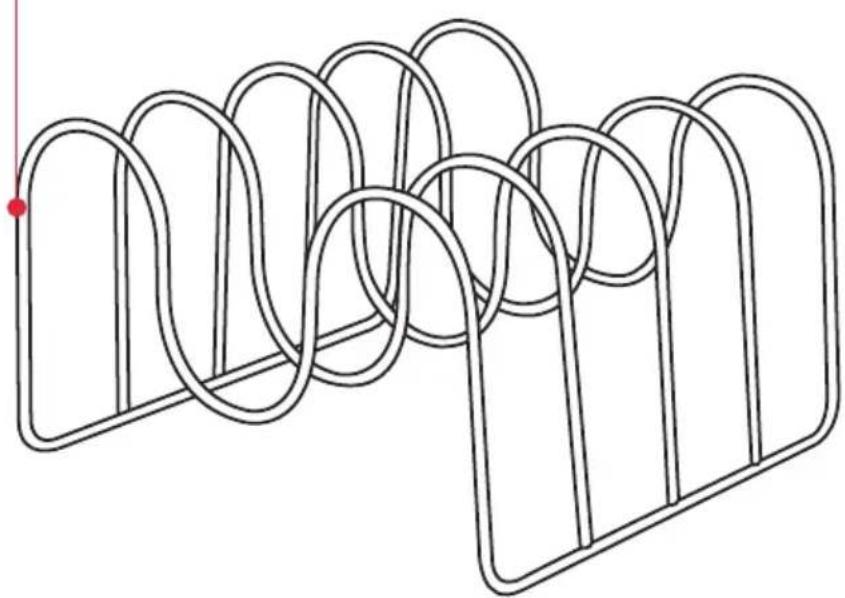
Pouch rack
Separates sous vide pouches for more even cooking.
natural_image
Pure line drawing of a coiled spring or rope structure without any text, numbers, or symbolsThe Control Panel
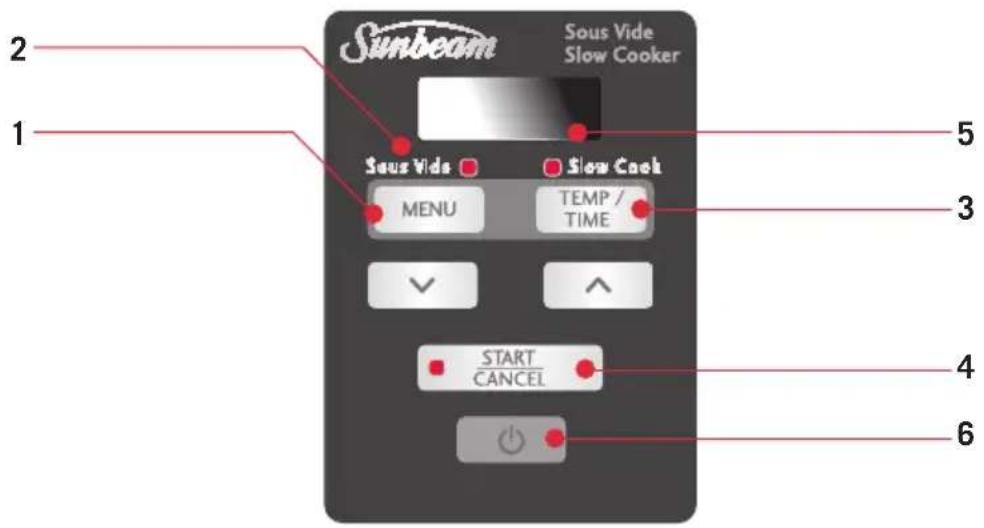
The control panel on the Sunbeam Duos Sous Vide and Slow Cooker is designed to ensure easy use. Choose your cooking menu, set the temperature and time, and start cooking.
1. Menu Button
Scroll to the Sous Vide menu or the Slow Cooker menu by pressing the MENU button.
2. Cooking Menu indicator
A light will display in the screen next to Sous Vide or Slow Cook menus, when the MENU button is selected.
Sous Vide Menu
The Sous Vide menu has heat settings from 40°C to 90°C.
Slow Cook Menu
The Slow Cook menu has three heat settings – LOW, HIGH and AUTO KEEP WARM.
3. Temp/ Time Button
After you've selected your cooking menu, set the temperature required by pressing the √ and ↑buttons. After you've selected the temperature, set the time required by pressing the TIME button, then the √ and ↑buttons.
4. Start/ Cancel button
Press the START button to begin the selected cooking menu once all settings have been chosen. Press and hold the CANCEL button for three seconds if you wish to change your setting.
5. Timer display screen
Will show the remaining time in the COOKING menus, or elapsed time in the slow cook KEEP WARM mode.
6. Power Button
Press to turn your Sunbeam Duos ON or OFF. Always unplug your unit when cooking is finished.
TIP: After starting your menu selection, if the START button has not been pressed after 20 minutes, the unit will switch off as a safety precaution.
Cooking Menus Overview
The Sunbeam Duos has 2 cooking menus.
Sous Vide Cooking
Sous Vide has been a popular cooking method in restaurants for several years. Sous Vide is a French term which means ‘under vacuum’ and describes food placed in vacuum sealed pouches and cooked in a water oven. Food slowly cooks at precise low temperatures over a long period of time to achieve succulent, superb tasting meals. Sealing foods inside pouches allows it to cook in its own juices in addition to any marinades, seasonings etc you wish to add. Vitamins, minerals and juices are retained within the food and natural flavours are intensified. This allows the food to be healthier, more tender and flavoursome. Meats cooked in a sous vide tend to be more tender, tougher and mostly cheaper yet flavour filled cuts of meats such as chuck steak can be used.
As sous vide cooking requires foods and meats to be sealed individually, yet cooked at the same time; it is perfect for families and entertaining when there are people with varied tastes and nutritional requirements.
It is difficult to overcook using the Sous Vide method, although textures can change slightly. As it's difficult to overcook, it allows food to be cooked ahead of time, perfect for family meals and entertaining.
Temperatures. The Sunbeam Duos has a 40^ C to 90^ C temperature range, with 1^ C increment selection. Different temperatures are required for different types of food and for different degrees of doneness. See the Sous Vide Temperature and Time Guide on page 12.
Time. The cooking time depends on the thickness of the food, rather than the weight of the food. The default cooking time is 1 hour. Time can be set from 1 hour to 24 hours. See the Sous Vide Temperature and Time Guide on page 12 for more information.
Ideal Foods for Sous Vide Cooking. Meats are ideal to cook using the sous vide method as they are more tender, succulent and flavour filled.
Red meats - Lamb, beef and pork.
Poultry - Chicken, turkey, duck.
Fish and Seafood - Fish, lobster tails, scallops.
Vegetables - Root Vegetables. Potato, carrot, parsnip, beets, turnips.
Vegetables - Tender Vegetables. Peas, asparagus, corn, broccoli, cauliflower, eggplant, onions, squash.
Fruit - Firm Fruits. Apple, pear.
Fruit - Tender Fruits. Mango, plum, apricot, peach, nectarine, papaya, strawberry.
Steps to Sous Vide cooking
Step 1. Seasoning your food
To enhance the flavour of your food, you may wish to marinade or add spices, herbs, butter or oil to your vacuum pouch prior to sealing.
Step 2. Vacuum sealing your food
Sous vide cooking requires food to be vacuum sealed inside pouches to ensure excess air and moisture are removed, so the natural taste and nutritional quality
of the food is captured. Vacuum sealing also assists in opening the pores in food such as meat, poultry and seafood so that marinades and seasonings are more readily absorbed for highlighted flavour.
Oxygen and moisture in air cause food to degrade and lose flavour, texture and nutritional value. Commercial quality vacuum systems remove air and moisture before sealing items airtight to create a commercial quality vacuum. We recommend Sunbeam FoodSaver vacuum sealers and FoodSaver bags and rolls.
Step 3. Cooking your food
When the water temperature has been reached in the sous vide, place the pouches carefully in the water. Ensure the pouches are fully submerged in water, and that water can easily circulate around the pouches for even cooking.
Step 4. Searing your food
When sous vide cooking is completed, you may wish to finish off by searing to improve the appearance and flavour of the food. This is particularly suited to meats. Remove the food from the pouch. Quickly sear meat in a hot pan. This will caramelise the fats and proteins for extra flavour.
Food Safety Guidelines for Sous Vide Cooking
CAUTION. Food cooked using the Sous Vide method of cooking is not recommended for consumption by those in an ‘at risk’ category (low immune deficiency);
- Pregnant women
- Small children
- Elderly
- Those suffering from illness/disease
The below guidelines regarding using the Sous Vide method will help to ensure good food hygiene safety.
Food Preparation
- All food items to be used for cooking using the Sous Vide method should be of the highest quality in freshness.
- Ensure that all meat, seafood, poultry and game have been stored at below 5°C before preparation begins. Using a digital food thermometer to check the temperature is recommended.
- Make sure that the food pouches are clean and have not been contaminated by dirt or other food contaminants.
- Use detergent and warm water, or a sanitizing solution to wash the food preparation area.
- Separate the raw ingredient preparation area from the finished product area
- Wash hands well before commencing any food preparation.
- Prepare foods to the recommended thickness according to the Sous Vide Temperature and Time Guide on page 12. Smaller cuts of meat will cook more quickly.
Cooking
- Use the Sous Vide Temperature and Time Guide for cooking times and temperatures.
- Ensure that the cooking pouch is completely sealed before cooking commences.
- Ensure that the cooking pouch is still completely sealed when cooking has finished.
Storage
- If the food is not going to be consumed immediately, plunge the pouch containing the food into iced water to reduce temperature quickly. Refrigerate until required.
Reheating
- Reheat food until internal temperature is above 75^ C.
Slow Cooking
Slow Cooking achieves flavour filled meals, and tender moist meats cooked to perfection. Slow Cooking provides healthy, simple and economical cooking. It requires minimal supervision, short preparation times and quick clean up times.
LOW Setting. This is suitable for simmering and slow cooking.
HIGH Setting. This is for faster cooking. Typically 1 hour on HIGH = approximately 2 - 2.5 hours on LOW.
KEEP WARM Setting. When slow cooking time is completed, the Sunbeam Duos automatically switches to the Keep Warm setting to prevent overcooking and to keep your cooked food warm until serving - perfect for busy families, those on the run and those who need flexible meal times. This setting is not hot enough to cook, and should only be used to keep hot, cooked food warm for serving.
Cooking Menu Settings Table
| Cooking Menu Sous Vide Slow Cook | ||
| Temperature | ||
| Settings 40°C to 90°C | HighLow(Warm) | |
| Default Cooking Temperature 50°C Low | ||
| Temperature Increments 1°C NA | ||
| Time | ||
| Settings 1 to 24 hours | High – 2 to 8 hoursLow – 4 to 16 hours | |
| Default Cooking Time 1 hour | High – 4 hoursLow – 8 hours | |
| Time Increments 10 mins 30 mins | ||
Note: On the slow cook setting, the maximum combined COOK/KEEP WARM time is 24 hours. For example if the slow cook time selected was 16 hours, the maximum keep warm time would be 8 hours.
How to use the Sous Vide menu
Place the Sunbeam Duos on a flat, level surface.
Plug in the unit. To turn the unit on, press the POWER button. The unit will beep, and the indicator lights and the screen will illuminate. The Sunbeam Duos will default to the Sous Vide menu, on the 50°C setting.
- Fill the cooking pan with the desired amount of water, and replace the lid. Ensure the water will cover the food pouches and is above the FILL line in the pan. View the Sous Vide Temperature and Time guide on page 12.
TIP: To speed up the time needed to reach the desired temperature, fill with warm water.
-
If the menu is not set to Sous Vide, set the cooking menu by scrolling through the MENU button until a light appears next to Sous Vide on the screen, and the temperature shows 50°C.
-
The default temperature is set to 50^ C. To change the temperature, press the √ and ▲ buttons until your desired temperature appears in the screen.
-
To select the time, press the TIME button, and then press the √ and ↑buttons, until your desired time appears in the LCD screen. Each button press will adjust the time by 10 minutes, or if the button is held this will change the time more quickly.
-
Once you have set the desired MENU, TEMP and TIME settings, press START. The unit will start to preheat.
-
The Sunbeam Duos needs to gain temperature before the food pouches can be placed in the sous vide pan. When the unit is gaining temperature, the red Sous Vide light will flash in the screen to indicate the set temperature has not yet been reached, and the time: symbol won't
flash to indicate the timer has not begun. When the selected temperature is reached, the unit will beep 3 times to indicate the set temperature has been reached, the Sous Vide light will stop flashing and the unit is ready for the food.
- Carefully remove the lid. With a pair of tongs gently place the sealed food pouches in the water ensuring the water level does not exceed the MAX line, and that the food is covered by water. Replace the lid. (For further information regarding sealing your food, see Cooking Menus Overview on page 7.)
TIP: You can slot the sealed food pouches vertically in the slots of the rack to ensure the food is separated and that water can circulate evenly.
- When the sealed food pouches are in the pan, press START so the timer can begin to countdown. The ▪ symbol will start flashing to indicate the timer has started and that the unit is counting down.
Tip: If you do not press START to activate the timer the unit will still work as normal at the set temperature and will cook for the maximum setting of 24 hours or until you switch the power off.
- After the set cooking time has elapsed, unit will beep 3 times and turn off.
TIP: During cooking, only lift the lid if necessary as sous vide uses low temperatures to cook, so the unit does not recover lost heat quickly. If condensation forms on the inside of the lid reducing your vision, carefully tilt the lid away from you so that the condensation falls back into the pan.
Sous Vide Temperature and Time Guide
The below table is a guide to setting the temperatures and times for your cooking. You may need to adjust for your individual tastes.
Cooking temperatures for Meat (Beef, Lamb and Pork):
RARE: 49°C
MEDIUM RARE: 56°C
MEDIUM: 60°C
MEDIUM WELL: 65°C
WELL: 71°C and up
Cooking temperatures for Poultry:
WITH BONE: 82°C
WITHOUT BONE: 64°C
Cooking temperature for Fish:
RARE: 47°C
MEDIUM RARE: 56°C
MEDIUM: 60°C
General temperature for Vegetables:
83^-87^
| FOOD | COOKING TEMPERATURE | COOKING TIME | HOLDING TIME (after cooking) | THICKNESS |
| BEEF & LAMB Tender Cuts Tenderloin, cutlets, sirloin, rib eye, rump, T-bone Tougher Cuts Blade, chuck, leg of lamb, shoulder, shanks, game meats | 49°C or higher 49°C or higher | 1 hour 2 hours | Up to 6 hours Up to 8 hours | 1-2cm 2-5cm |
| 49°C or higher | 8 hours | Up to 10 hours | 4-6cm | |
| PORK: Belly Ribs Pork Chops Pork Roast | 82°C 59°C 56°C or higher 56°C or higher | 10 hours 10 hours 4 hours 10 hours | Up to 12 hours Up to 12 hours Up to 6 hours Up to 12 hours | 3-6cm 2-3cm 2-4cm 5-7cm |
| POULTRY: | ||||
| Chicken breast with bone | 82°C | 2 hours | Up to 3 hours | 3-5cm |
| Chicken breast without bone | 64°C | 1 hour | Up to 2 hours | 3-5cm |
| Chicken thigh with bone | 82°C | 112 hours | Up to 3 hours | 3-5cm |
| Chicken thigh without bone | 64°C | 1 hour | Up to 2 hours | 3-5cm |
| Chicken legs | 82°C | 2 hours | Up to 3 hours | 5-7cm |
| Duck breast | 64°C | 2 hours | Up to 2 hours | 3-5cm |
| FISH: | ||||
| Lean fish | 47°C or higher | 1 hour | Up to 1 hour | 3-5cm |
| Fatty fish | 47°C or higher | 1 hour | Up to 1 hour | 3-5cm |
| SHELLFISH: | ||||
| Shrimp | 60°C | 1 hour | Up to 1 hour | 2-4cm |
| Lobster tail | 60°C | 1 hour | Up to 1 hour | 4-6cm |
| Scallops | 60°C | 1 hour | Up to 1 hour | 2-4cm |
| VEGETABLES: | ||||
| Root vegetables | 83°C or higher | 1 hour | Up to 2 hours | 1-5cm |
| Tender vegetables | 83°C or higher | 1 hour | Up to 2 hours | 1-5cm |
Note: Holding time represents the longest suggested period the food can remain in the Sunbeam Duos unit before the texture starts to change.
Note:
- Longer cooking times may result in an altered texture of finished foods.
-
These times and temperatures are guidelines. Further cooking may be required to achieve desired result.
-
All thicknesses are measured once the food has been vacuum sealed.
- Thinner cuts of meat will cook more quickly.
How to use the Slow Cook menu
Place the Sunbeam Duos on a flat, level surface.
Plug in the unit. To turn the unit on, press the POWER button. The unit will beep, and the indicator lights and the screen will illuminate. The Duos will default to the Sous Vide menu, on the 50°C setting.
- Place your food and liquid inside the removable cooking pan, and replace the lid.
- If the menu is not set to Slow Cook, set the cooking menu by scrolling through the MENU button until a light appears next to Slow Cook on the screen, and the temperature setting shows LO.
- The default temperature is set to LO. To change the temperature to high, press the √ and ▲ button, until HI appears in the LCD screen.
- To select the time, press the TIME button, and then press the √ and ↑buttons, until your desired time appears in the screen. Each button press will adjust the time by 30 minutes, or if the button is held this will change the time more quickly.
- Once you have set the desired MENU, TEMP and TIME settings, press START. The time will begin to countdown. The symbol will start flashing to indicate the unit is counting down.
- After the set cooking time has elapsed, unit will beep 3 times, and automatically switch to the KEEP WARM setting. The Slow Cook light will change to green to indicate it is in the KEEP WARM setting. The timer will begin to count up to show elapsed time in the KEEP WARM setting.
Tip: During cooking, only lift the lid if necessary as slow cook uses low temperatures to cook, so the unit does not recover lost heat quickly. If condensation forms on the inside of the lid reducing your vision, carefully tilt the lid away from you so that the condensation falls back into the pan.
Care and Cleaning
Cleaning should only be carried out when the Sunbeam Duos is switched off and the plug removed from the socket. Allow the water to cool, and then pour out. Do not leave water sitting in the pan. Allow the unit to completely cool before cleaning.
Do not use the removable cooking pan on the stovetop, inside a microwave oven or inside an oven. Use the pan only inside the Sunbeam Duos unit.
The lid and the removable cooking pan are dishwasher safe for added convenience. Place the lid on the upper rack of your dishwasher. To remove food that is cooked onto the bottom of the removable cooking pan, soak the pan in warm water before cleaning. Dry thoroughly before replacing the pan in the unit.
Wipe the exterior of the Sunbeam Duos with a damp cloth and polish dry. DO NOT use harsh abrasives, scourers or chemicals to clean any part of the Sunbeam Duos as these will damage the surfaces.
Do not immerse the Sunbeam Duos unit in water or place in a dishwasher.
Hints and Tips
With your Sunbeam Duos you can create a wide variety of meals. Various foods take different times to cook perfectly to your individual taste, so sometimes it may take a little trial and error to get the cooking times right for you.
Capacity
- Don't overfill or under fill your Sunbeam Duos unit. Ensure the level is between the FILL (minimum) and MAX markings on the inside of the cooking pan. When using the sous vide menu, always ensure that the water covers the food pouches. When using the slow cooker, always ensure that liquid covers the food.
- To speed up the time needed for the unit to reach the desired Sous Vide temperature, fill with warm (not hot) water.
Food
- Cuts of Meat. Sous Vide and Slow Cooking are perfect for the cheaper, tough cuts of meats, as the lengthy cooking process tenderises these cuts and enhances the flavours. Note that thinner cuts of meat will cook more quickly.
- Evenly cooked food. To ensure food cooks evenly in the same amount of time, we recommend food is cut to similar thicknesses/ sizes.
Lid
- Condensation can accumulate on the inside of the lid, reducing your vision. Carefully tilt the lid away from you so that the condensation falls back into the pan.
- Lifting the lid. Both sous vide and slow cooker cooking methods use low temperatures and therefore they do not recover lost heat quickly. If you need to lift the lid, do so quickly to minimise heat loss.
Food Safety Guidelines for Sous Vide Cooking CAUTION. Food cooked using the Sous Vide method of cooking is not recommended for consumption by those in an 'at risk' category (low immune deficiency);
- Pregnant women
- Small children
- Elderly
- Those suffering from illness/disease
Slow Cooking
- If you are slow cooking, you may wish to brown your meats first in a frypan. Browning meat prior to slow cooking not only gives your food great colour, it also seals in the juices and flavours and keeps the meat tender.
- Slow Cooking prevents evaporation, resulting in the flavours and juices being maintained. Keep this in mind when creating your own recipes, as you may not require as much liquid as you would when using other cooking methods.
Slow Cooked Roasts
- You can roast a whole chicken as well as whole pieces of meat, such as lamb, beef, veal and pork by using the Slow Cook menu.
- Roasts can be cooked without the addition of liquid as they will release juices while cooking. These juices are great to make sauces and gravies.
- Roasting in the Slow Cooker will not brown your meat or chicken, as roasting in an oven does. If you want your roast to be golden, we recommend browning the meat first for a few minutes in a frypan to sear the meat, and then slow cook.
- Approximate cooking times for well done:
LOW 2 hours per 500g
HIGH 1 hour per 500g
Note: Unlike roasting in your oven, meat cooked to well done in the slow cooker will still be very tender.
Slow Cooked Roast Chicken
- Wash the chicken in cold running water and pat dry with an absorbent paper towel. Rub with a little olive oil and season all over with salt and pepper (or any other spices you wish). Using a frypan, brown the chicken for a few minutes on each side until golden, then slow cook.
Note: Ensure chicken is cooked all the way through by inserting a skewer or knife into the meatiest part of the chicken. The juices will be clear when the chicken is cooked through. If the juices are pink, a little more cooking is required.
Slow Cooked Stocks
- With your Sunbeam Duos you can easily make stocks. Many slow cooker recipes use stock as part of the ingredients. A good stock is also the base of a great soup. Stocks can be bought at supermarkets; however, nothing beats the flavour of a homemade stock.
- Making your own stock is a great way to use up bones or carcasses that would normally be thrown away.
- There is no need to peel your vegetables when making a stock. Just ensure you wash them well before use.
- Fresh made stock will keep in the refrigerator for up to 4 days, but can be frozen for up to 3 months.
- Always label and date your stock before storing. It's a good idea to freeze stock in portioned sizes. So for example if you generally use stocks in stews, casseroles, curries etc, then freeze your stock in 1 cup portions. If you tend to use your stock more for gravies and sauces, then freeze it in smaller 14 cup portions or even in ice cube trays, so that you don't need to defrost large quantities at a time.
- To remove the excess fat, place the stock in the fridge overnight, then skim the solidified fat from the surface.
Troubleshooting
| Problem Possible Reason Solution | ||
| The screen is blank The unit has no power Check the cord is inserted into the machine, that the power is switched on at the power outlet, and that the POWER button on the unit has been pressed. | ||
| Sous Vide light on the control panel is flashing | Flashing indicates the unit is still gaining temperature | The flashing will stop when the set temperature is reached. By pressing the TEMP button you can see the current temperature which will give you an idea of how much longer before the set temperature is reached. |
Sous Vide Recipes
Sous Vide cooking is all about the main ingredient, and enhancing its natural flavour. The seasoning options to add to your main ingredient are endless. The Sunbeam Test Kitchen has included a handy chart of some great flavour combinations that can get you started.
| Item | Flavour Inspiration |
| Lamb(per approximately 500g) | 2 sprigs fresh rosemary and 1 teaspoon garlic powder |
| 2 sprigs fresh mint | |
| 2 sprigs fresh thyme | |
| 3 anchovies, finely chopped | |
| 1 teaspoon ground coriander, 1 teaspoon ground cumin | |
| 1 tablespoon Moroccan spice rub | |
| 2 tablespoons olive oil, 1 tablespoon lemon zest, 1 teaspoon garlic powder | |
| Beef(per approximately 500g) | 50g butter, 2 cloves crushed garlic, 2 sprigs fresh thyme |
| 50g butter, 2 cloves crushed garlic, 2 sprigs fresh parsley | |
| 50g butter, 2 tablespoons fresh chives, 1 tablespoon grainy mustard | |
| 1 tablespoon olive oil, 2 sprigs fresh thyme, 50g cooked bacon | |
| Chicken(per approximately 500g) | 2 slices lemon, 2 sprigs fresh thyme |
| 50g browned butter, 4 fresh sage leaves, salt and black pepper | |
| 20g butter, 2 sprigs fresh flat leaf parsley, 2 tablespoons capers | |
| Cook together 1 onion, 1 clove garlic, 12 cup chopped tomatoes, 14 cup fresh basil | |
| Stuff chicken breasts with 1 tablespoon ricotta, 1 tablespoon lemon zest | |
| White Fish(per approximately 500g) | 2 slices lemon, 2 sprigs fresh dill |
| 1 stalk lemon grass, 14 cup fresh basil leaves, 2 slices lime | |
| 1 tablespoon soy sauce, 1 teaspoon sesame oil, 2 sprigs fresh coriander | |
| 1 tablespoon fresh dill, 1 teaspoon smoked paprika, 1 teaspoon lemon rind, 12 teaspoon cayenne | |
| Item Flavour Inspiration | |
| Salmon(per approximately 500g) | 1 tablespoon soy sauce, 1 tablespoon honey,1 teaspoon grated ginger |
| 2 tablespoons maple syrup, 1 tablespoon soy sauce,1 teaspoon garlic powder | |
| 2 tablespoons teriyaki sauce, 1 teaspoon grated ginger,1 teaspoon garlic powder, 1 teaspoon chilli flakes | |
| Pork(per approximately 500g) | 1 tablespoon fennel seeds, 1 teaspoon sea salt,1 teaspoon black pepper |
| 14 cup apple sauce, 1 teaspoon sea salt,1 teaspoon black pepper | |
| 1 tablespoon lemon zest, 1 tablespoon fresh thyme,1 tablespoon fresh sage, 1 teaspoon sea salt,1 teaspoon black pepper | |
| 1 tablespoon ground cumin, 1 tablespoon ground coriander,1 teaspoon cinnamon, 1 teaspoon brown sugar,1 teaspoon chilli flakes | |
Chermoula Marinade
This marinade is great for chicken and beef.
12 cup olive oil
2 tablespoons freshly chopped coriander
2 tablespoons freshly chopped flat-leaf parsley
2 tablespoons lemon juice
1 tablespoon chili flakes
1 tablespoon ground cumin
1 tablespoon sweet paprika
2 bay leaves
2 cloves garlic, crushed
2 onions, chopped
12 preserved lemon, thinly sliced
1 cm ginger, peeled, grated
Salt and freshly ground black pepper, to taste
- Preheat unit to correct sous vide temperature.
- Combine all ingredients in a bowl. Season to taste with salt and pepper.
- Coat desired meat in marinade.
- Arrange meat in a single layer in the cooking pouch. Vacuum seal.
- Place pouch in unit once correct temperature has been reached. Cook for required time. (If not consuming immediately submerge the pouch in an ice bath until thoroughly chilled then refrigerate).
- Remove from bag.
TIP: if desired heat a small amount of oil in a fry pan over medium heat. Add meat and cook for 1-2 minutes on each side or until golden brown.
Portuguese Marinade
This is great for those that like a bit of spicy kick to their food. Great for chicken, beef or lamb.
3 slices lemon
12 cup olive oil
1 tablespoon chili paste
1 tablespoon fresh oregano, chopped
1 teaspoon powdered garlic
1 teaspoon powdered ginger
Salt and freshly ground black pepper, to taste
- Preheat unit to correct temperature.
- Combine all ingredients in a bowl. Season to taste with salt and pepper.
- Coat desired meat in marinade.
- Arrange meat in a single layer in the cooking pouch. Vacuum seal.
- Place pouch in unit once correct temperature has been reached. Cook for required time. (If not consuming immediately submerge the pouch in an ice bath until thoroughly chilled then refrigerate).
- Remove from bag.
TIP: if desired heat a small amount of oil in a fry pan over medium heat. Add meat and cook for 1-2 minutes on each side or until golden brown.
Teriyaki Marinade
This is especially good for steak.
2 tablespoons mirin
2 tablespoons sake
1 tablespoon caster sugar
Butter, for cooking
Salt and freshly ground black pepper, to taste
- Preheat unit to correct temperature.
- Place all ingredients in a small saucepan and bring to a simmer. Stir until sugar has dissolved. Allow to cool.
- Coat desired meat in marinade.
- Arrange meat in a single layer in the cooking pouch. Vacuum seal.
- Place pouch in unit and cook for required time. (If not consuming immediately submerge the pouch in an ice bath until thoroughly chilled then refrigerate).
- Remove from bag.
TIP: if desired heat a small amount of oil in a fry pan over medium heat. Add meat and cook for 1-2 minutes on each side or until golden brown.
Antipasti Plate
This is a great starter at a party.
Vacuum seal all the ingredients and cook.
Simple and easy.
Garlic Eggplants
2 eggplants, cut lengthways into 2cm slices
1 clove garlic, crushed
2 tablespoons olive oil
Salt and freshly ground black pepper, to taste
Red Capsicum and Basil
2 red capsicums, seeds removed, cut into quarters
2 sprigs fresh basil
2 tablespoons olive oil
Salt and freshly ground black pepper, to taste
1. Fill unit with water and preheat to 85^ C.
2. Place each set of ingredients into a cooking pouch. Vacuum seal.
3. Place pouch in the unit once correct temperature has been reached. Ensure the pouches are submerged in water.
4. Cook for 2 hours.
5. Remove from bag. Season to taste with salt and pepper. Serve.
TIP: Preheat a grill and quickly chargill the cooked eggplant for extra flavour.
Honey, Soy Chicken Wings
Serves: 6
2kg chicken wings
2cm ginger, peeled, grated
2 long red chilies, chopped
2 cloves garlic, crushed
2 tablespoons honey
1 tablespoon fish sauce
Salt and freshly ground black pepper, to taste
-
Fill unit with water. Preheat water to 67^ C.
-
Place all ingredients in a large bowl. Stir to combine.
-
Arrange chicken wings in a single layer in the cooking pouch. More than one pouch may be required. Vacuum seal.
-
Place pouch in unit once correct temperature has been reached. Ensure the entire pouch is submerged in water.
-
Cook for 2 hours. (If not consuming immediately submerge the pouch in an ice bath until thoroughly chilled, then refrigerate).
-
Remove chicken from pouch and discard the marinade.
-
Preheat barbeque or grill to medium heat. Add chicken wings and cook for 2-3 minutes on each side or until golden and crisp. Serve.
Coq au Vin
Serves: 4
4 chicken marylands
2 cloves garlic, crushed
2 cloves
2 sprigs fresh thyme
1 bay leaf
1 shallot, finely chopped
1 cup red wine
2 tablespoons olive oil
1 tablespoon balsamic vinegar
Salt and freshly ground black pepper, to taste
40g butter
1 onion, finely chopped
50g bacon, rind removed, chopped
-
Fill unit with water. Preheat water to 82^ C.
-
Place chicken, garlic, cloves, thyme, bay leaf, shallot, red wine, olive oil and balsamic oil in a large bowl. Season to taste with salt and pepper. Stir to combine.
-
Arrange chicken in a single layer in the cooking pouch. Pour in liquid. Vacuum seal.
-
Place pouch in unit once correct temperature has been reached. Ensure the entire pouch is submerged in water.
-
Cook for 8 hours. (If not consuming immediately submerge the pouch in an ice bath until thoroughly chilled, then refrigerate).
-
Remove chicken from pouch. Strain the sauce, reserve liquid.
-
Heat butter in a small saucepan over medium heat. Add onion and bacon, cook for 3-4 minutes or until softened. Add liquid and bring to a simmer. Serve sauce over chicken.
Chicken Cordon Bleu
Serves: 6
6 slices prosciutto
6 slices gruyere cheese
50g butter
6 sprigs fresh thyme
Salt and freshly ground black pepper
- Fill unit with water. Preheat to 64^ C.
- Cut 6 x 20cm squares of cling wrap. Place one chicken thigh fillet in the middle of each piece of cling wrap.
- Place one piece of prosciutto and cheese in the centre of each piece of chicken and bring the sides over to form a parcel. Season with salt and pepper.
- Fold in the edges of the cling wrap making sure the chicken is wrapped tightly and is holding a cylinder shape.
- Arrange chicken in the cooking pouch. Vacuum seal.
- Place the pouch in the unit once the correct temperature has been reached. Ensure the entire pouch is submerged in water.
- Cook for 1 12 hours. If not consuming immediately submerge the pouch in an ice bath until thoroughly chilled.
- Remove cling wrap from chicken.
- Melt butter in a large frypan over high heat. Add thyme and chicken. Cook for 3 -4 minutes or until chicken is golden. Serve immediately.
Spicy Pork Chops
Serves: 3
3 tablespoons brown sugar
1 tablespoon chilli powder
1 teaspoon ground coriander
1 teaspoon ground fennel
12 teaspoon cayenne pepper
6 pork chops, 2.5 cm thick
1 onion, finely chopped
1 cup chicken stock
12 cup ketchup
^1/_4 cup molasses
2 tablespoons apple cider vinegar
2 tablespoons worcestshire sauce
1 tablespoon American mustard
2 teaspoons tabasco sauce
Salt and freshly ground black pepper, to taste
- Fill unit with water. Preheat water to 60^ C.
- Place sugar, chilli, coriander, fennel, cayenne and pork in a bowl. Rub pork thoroughly with spice mix.
- Arrange pork in a single layer in the cooking pouch. More than one pouch maybe required. Vacuum seal.
- Place pouch in unit once correct temperature has been reached. Ensure the entire pouch is submerged in water.
- Cook for 45 minutes. (If not consuming immediately submerge the pouch in an ice bath until thoroughly chilled, then refrigerate).
- Remove pork from pouch and discard the liquid.
-
Place remaining ingredients in a saucepan and bring to a simmer over medium heat. Cook for 15 minutes or until thickened.
-
Preheat barbeque or grill to medium heat. Brush pork with sauce. Add pork chops and cook for 1-2 minutes on each side or until golden. Season to taste with salt and pepper. Serve with remaining sauce.
Red Wine Beef Cheeks
Serves: 6-8
2 tablespoons olive oil
2kg beef cheeks
2 carrots, peeled, chopped
2 celery stalks, chopped
2 onions, chopped
6 cloves garlic, crushed
1 tablespoon orange zest
4 fresh bay leaves
2 cloves
2 juniper berries
2 star anise
1 cup beef stock
1 cup red wine
Salt and freshly ground black pepper, to taste
-
Fill unit with water. Preheat to 86^ C.
-
Heat oil in a large frypan over medium-high heat. Add beef cheeks and cook for 3-4 minutes or until caramelised. Set aside.
-
To the same pan add carrot, celery, onion and garlic. Cook for 3-4 minutes or until tender. Add remaining ingredients and bring to the simmer.
-
Arrange beef checks and liquid in the cooking pouch. Vacuum seal.
-
Place pouch in unit once correct temperature has been reached. Ensure the entire pouch is submerged in water.
-
Cook for 6 hours. If not consuming immediately submerge the pouch in an ice bath until thoroughly chilled.
-
Separate beef cheeks from liquid. Strain liquid and place liquid in a small saucepan over medium heat. Bring to a simmer. Season to taste with salt and pepper. Serve beef cheeks with sauce.
Pork Belly
At the end of cooking, this pork belly doesn't need to be seared off. By cooking at a high temperature for an extended period time, the fat will break down making it very tender with an appealing mouth feel.
Serves: 4
3 tablespoons fennel seeds
1 tablespoon coriander seeds
2 teaspoons white pepper corns
1 tablespoon sea salt
1kg pork belly, 2.5cm thick skin scored
1. Fill unit with water. Preheat water to 82^ C.
2. Place fennel, coriander, pepper corns and salt in a mortar and pestle. Crush until a fine powder.
3. Rub pork thoroughly with spice mix.
4. Place pork in cooking pouch. Vacuum seal.
5. Place pouch in unit once correct temperature has been reached. Ensure the entire pouch is submerged in water.
6. Cook for 9 hours. (If not consuming immediately submerge the pouch in an ice bath until thoroughly chilled, then refrigerate).
7. Remove pork from pouch and discard the liquid. Serve.
Chinese Five Spice Duck Breast
Serves: 4
4 duck breasts
2 star anise, crushed
2 tablespoons soy sauce
1 tablespoon honey
2 teaspoons Chinese five-spice powder
1 teaspoon garlic powder
Salt and freshly ground black pepper, to taste
- Fill unit with water. Preheat water to 64^ C.
- Place all ingredients in a large bowl. Rub duck thoroughly with spice mix.
- Arrange duck in a single layer in the cooking pouch. More than one pouch may be required. Vacuum seal.
- Place pouch in unit once correct temperature has been reached. Ensure the entire pouch is submerged in water.
- Cook for 2 hours. (If not consuming immediately submerge the pouch in an ice bath until thoroughly chilled, then refrigerate).
- Remove duck from pouch and discard the liquid.
- Heat a large frypan over medium heat. Place duck skin side down for 2-3 minutes or until skin is golden and crisp. Allow to rest for 5 minutes. Serve.
Hazelnut and Coriander Spiced Salmon
Serves: 5
1 tablespoon coriander seeds
^1/4 cup hazelnuts, roasted, skins removed, chopped
^1/4 cup sesame seeds
1 teaspoon ground ginger
Salt and freshly ground black pepper, to taste
5 salmon fillets
2 tablespoons olive oil
50g butter, room temperature
- Fill unit with water. Preheat water to 56^ C for medium rare.
- Heat a small frypan over medium heat. Add coriander seeds and cook until fragrant.
- Add hazelnuts, coriander seeds, sesame seeds and ginger to a mortar and pestle. Season to taste with salt and pepper. Grind until a coarse powder.
- Arrange salmon in a single layer in the cooking pouch. More than one pouch may be required. Vacuum seal.
- Place pouch in unit once correct temperature has been reached. Ensure the entire pouch is submerged in water.
- Cook for 20 minutes. (If not consuming immediately submerge the pouch in an ice bath until thoroughly chilled, then refrigerate).
- Remove salmon from the pouch.
- Heat butter in a large frypan over medium heat. Add 2 tablespoons of spice mix and allow to cook for 1 minute before adding salmon fillets in batches. Sear salmon for 1 minute. Serve with an extra sprinkling of spice mix.
TIP: This salmon is great in salads.
Rosemary and Lamb Chops
Serves: 4
8 lamb cutlets
3 cloves garlic, crushed
3 sprigs fresh rosemary
^1/_4 cup olive oil
Salt and freshly ground black pepper, to taste
- Fill unit with water. Preheat water to 56^ C for medium rare.
- Place lamb, garlic, rosemary and oil in a large bowl. Stir to combine. Season to taste with salt and pepper.
- Arrange lamb in a single layer in the cooking pouch. More than one pouch maybe required. Vacuum seal.
- Place pouch in unit once correct temperature has been reached. Ensure the entire pouch is submerged in water.
- Cook for 2 hours. (If not consuming immediately submerge the pouch in an ice bath until thoroughly chilled, then refrigerate).
- Remove chops. Discard rosemary and garlic. Pat lamb dry.
- Heat a large frypan over medium-high heat. Add lamb chops and cook for 1 minute or until golden on each side. Serve.
Pea, Mint and Goats Cheese Risotto
Serves: 4
1 tablespoon olive oil
1 onion, chopped
1 clove garlic, crushed
3 cups vegetable stock
1 cup Arborio rice
20g butter
1 cup frozen peas, thawed
2 sprigs fresh mint
100g goats cheese
Salt and freshly ground black pepper, to taste
- Fill unit with water and preheat to 83^ C.
- Heat oil in a small saucepan over medium heat. Add onion and garlic cooking for 3-4 minutes or until tender.
- Place onion mixture, stock and rice in the cooking pouch. Vacuum seal.
- Place pouch in the unit once correct temperature has been reached. Ensure the entire pouch is submerged in water.
- Cook for 40 minutes. If not consuming immediately submerge the pouch in an ice bath until thoroughly chilled.
- Meanwhile melt butter in a small saucepan over medium heat. Add peas and mint and cook for 1-2 minutes or until just cooked.
- Remove risotto from the bag. Gently fold through peas and goats cheese. Season to taste with salt and pepper. Serve.
Honeyed Carrots
500g baby carrots
40g butter
1 tablespoon honey
Salt and freshly ground black pepper, to taste
- Fill unit with water. Preheat water to 83^ C.
- Place all ingredients in a bowl. Toss to combine.
- Arrange carrots in a single layer in the cooking pouch. Vacuum seal.
- Place pouch in unit once correct temperature has been reached. Ensure the entire pouch is submerged in water.
- Cook for 1 hour. (If not consuming immediately submerge the pouch in an ice bath until thoroughly chilled, then refrigerate).
- Heat carrots and cooking liquid in a large frypan over medium high heat. Cook for 3-4 minutes or until golden. Season to taste with salt and pepper. Serve.
Rosemary Infused Potatoes
3 large potatoes peeled and cut into 12 cm slices
2 tablespoons duck fat
2 sprigs fresh rosemary
Salt and freshly ground black pepper, to taste
1. Fill unit with water. Preheat water to 83^ C.
2. Place all ingredients in a bowl. Toss to combine.
3. Arrange potatoes in a single layer in the cooking pouch. Vacuum seal.
4. Place pouch in unit once correct temperature has been reached. Ensure the entire pouch is submerged in water.
5. Cook for 1 hour. (If not consuming immediately submerge the pouch in an ice bath until thoroughly chilled, then refrigerate).
6. Heat carrots and cooking liquid in a large frypan over medium heat. Cook for 3-4 minutes or until golden. Season to taste with salt and pepper. Serve.
Spiced Sweet Potatoes
This is a great recipe to make for a crowd.
Serves: 4-6
3 large sweet potatoes, peeled, cut into 2 cm cubes
1 tablespoon honey
1 teaspoon paprika
60g butter
Salt and freshly ground black pepper, to taste
- Fill unit with water and preheat to 85^ C.
- Place sweet potato in a single layer in the cooking pouch. Vacuum seal.
- Place pouch in the unit once correct temperature has been reached. Ensure the entire pouch is submerged in water.
- Cook for 30 minutes. Serve.
Tip: Place these potatoes in a hot oven for 10 minutes for a crispy finish, if desired.
Preserved Lemons
2 cups sea salt
1 tablespoon coriander seeds
1 tablespoon fennel seeds
2 fresh bay leaves
1 cinnamon stick
5 large lemons
1. Fill unit with water and preheat to 79^ C.
2. In a large bowl combine salt, coriander, fennel, bay leaves and cinnamon.
3. Cut lemon into quarters but not all the way through so the lemon still holds its shape.
4. Place the lemons into the salt mixture and stuff each lemon with the salt mixture.
5. Place lemons and remaining salt mixture in the cooking pouch. Vacuum seal.
6. Place pouch in the unit once correct temperature has been reached. Ensure the entire pouch is submerged in water.
7. Cook for 6 hours.
8. Remove lemons from the bag. Place lemons in a sterilized jar and cover with olive oil. Seal. Keep in a dark place or refrigerator for up to 1 year.
Port Poached Dates
Serves: 4
12 cup Tawney port
^1/_4 cup honey
1 vanilla pod, split
10 fresh dates
- Fill unit with water and preheat to 85^ C.
- Heat port, honey and vanilla in a small saucepan over medium heat. Bring to a simmer and allow to reduce by a third.
- Arrange dates in a single layer in the cooking pouch. Pour over port reduction. Vacuum seal.
- Place pouch in unit once correct temperature has been reached. Ensure the entire pouch is submerged in water.
- Cook for 1 hour. If not consuming immediately submerge the pouch in an ice bath until thoroughly chilled.
- Removed dates from pouch. Serve with cooking liquid.
Slow Cooker Recipes – Main Meals
All the recipes have been specifically created and tested by the Sunbeam Test Kitchen for the Sunbeam Duos Sous Vide and Slow Cooker. We hope you enjoy using your Sunbeam Duos.
Chicken Tagine
Serves: 6
2 tablespoons olive oil
800g chicken thigh fillets, sliced
3 cloves garlic, crushed
2 onions, chopped
2 teaspoons ground cinnamon
2 teaspoons ground cumin
1 teaspoon chilli powder
1 teaspoon ground turmeric
2 cups chicken stock
1 cup dried dates, pitted, chopped
2 tablespoons honey
1 cup fresh coriander, chopped
12 cup toasted almonds, chopped
Salt and freshly ground black pepper, to taste
- Heat oil in a large frypan over medium-high heat. Add chicken cooking until golden. Transfer to cooking pan.
- In the same frypan add garlic and onions. Cook for 3-4 minutes or until tender. Add spices, cooking until fragrant. Transfer to cooking pan. Add stock, dates and honey. Stir to combine. Place lid on unit.
- Press MENU and select SLOW COOK. Cook on HIGH for 3-4 hours or LOW for 6-8 hours.
- Stir through coriander and almonds. Season to taste with salt and pepper. Serve.
Butter Chicken
Serves: 6
2 tablespoons oil
800g chicken thigh fillets, sliced
40g butter
3 cloves garlic, crushed
1 onion, chopped
1 12 cups plain Greek yoghurt
^3/4 cup tandoori masala paste
^1/3 cup tomato paste
5 green cardamom pods
400ml can coconut milk
Steamed rice, to serve
Salt and freshly ground black pepper, to taste
- Heat oil in a large frypan over medium heat. Add chicken cooking until golden. Transfer to cooking pan.
- Melt butter in a large frypan over medium heat. Add garlic and onions cooking until tender. Transfer to cooking pan.
- Add remaining ingredients to slow cooker. Stir to combine. Place lid on unit.
- Press MENU and select SLOW COOK. Cook on HIGH for 3-4 hours or LOW for 6-8 hours. Season to taste with salt and pepper. Serve with rice.
Peanut Chicken
Serves: 6
800g chicken thigh fillets, halved
3 cloves garlic, crushed
1 red capsicum, seeds removed, chopped
1 onion, chopped
12 cup chicken stock
1 tablespoon ground cumin
12 teaspoon chilli flakes
1 12 cups crunchy peanut butter
^1/_3 cup satay sauce
^1/_4 cup lime juice
1 tablespoon corn flour
Steamed rice, to serve
Salt and freshly ground black pepper, to taste
-
Place chicken, garlic, capsicum, onion, stock, soy sauce, cumin and chili into the cooking pan. Stir to combine. Place lid on unit.
-
Press MENU and select SLOW COOK. Cook on HIGH for 3-4 hours or LOW for 6-8 hours.
-
Remove one cup of liquid from slow cooker. Add remaining ingredients and whisk until well combined. Add back to the pan, stir to combine. Cook for a further 30 minutes. Season to taste with salt and pepper. Serve over rice.
Asian Style Pork Belly
Serves: 6-8
1 kg pork belly, cut into 5cm cubes
2 cups chicken stock
12 cup brown sugar
^1/_4 cup kecap manis
14 cup rice wine
1 tablespoon fish sauce
2 teaspoons orange zest
2 cm fresh ginger, peeled, grated
2 cardamom pods, crushed
2 cloves garlic, crushed
1 long red chili, sliced
1 star anise
Salt and freshly ground black pepper, to taste
-
Place pork in cooking pan. Add remaining ingredients. Place lid on unit.
-
Press MENU and select SLOW COOK. Cook on HIGH for 3-4 hours or LOW for 6-8 hours.
-
Remove pork from sauce.
-
Place sauce in a medium saucepan over medium heat. Bring to a simmer and allow to reduce by half. Add pork and bring to a simmer. Serve over rice.
TIP: For crispy skin pork, heat a large frypan over medium-high heat. Add pork skin side down and cook for 3-4 minutes or until caramelised.
Spicy Pork Meatballs
Serves: 6-8
1.25kg pork mince
1 onion, finely chopped
1 long red chili, sliced
1 egg, lightly beaten
1 cup grated parmesan cheese
1 cup fresh breadcrumbs
12 cup chopped fresh flat-leaf parsley
2 tablespoons tomato paste
2 teaspoons smoked paprika
2 teaspoons chopped fresh oregano
1 teaspoon ground chilli powder
700ml jar passata (tomato puree)
^3/_4 cup beef stock
3 cloves garlic, chopped
Pasta, to serve
Salt and freshly ground black pepper, to taste
- In a large bowl combine pork, onion, chili, egg, cheese, breadcrumbs, parsley, tomato paste, paprika, oregano, and chilli powder. Roll into tablespoon sized balls. Transfer to cooking pan.
- Add passata, stock and garlic to cooking pan. Stir to combine. Place lid on unit.
- Press MENU and select SLOW COOK. Cook on HIGH for 3-4 hours or LOW for 6-7 HOURS. Season to taste with salt and black pepper. Serve over pasta.
Pork with Apple and Cider
Serves: 6-8
1.25kg boneless pork shoulder, cut in 5cm cubes
14 cup plain flour
2 tablespoons oil
30g butter
1 large leek, sliced
375mls apple cider
12 cup chicken stock
1 tablespoon chopped fresh tarragon
2 granny smith apples, peeled, core removed, diced
^1/_3 cup thickened cream
1 tablespoon seeded mustard
1 tablespoon corn flour
1 tablespoon lemon juice
Salt and freshly ground black pepper, to taste
1. Toss pork in flour.
2. Heat oil in a large frypan over medium heat. Add pork and cook until golden about 3-4 minutes. Transfer to cooking pan.
3. Melt butter in a large frypan over medium heat. Add leek cooking for 3-4 minutes or until softened. Transfer to cooking pan.
4. Add cider, stock, tarragon and apples to the cooking pan. Stir to Combine. Place lid on unit.
5. Press MENU and select SLOW COOK. Cook on HIGH for 3-4 hours or LOW for 6-8 hours.
6. Remove one cup of liquid from cooking pan. Add remaining ingredients and whisk until well combined. Add back to the pan, stir to combine. Cook for a further 30 minutes. Season to taste with salt and pepper. Serve.
Red Wine Lamb Shanks
Serves: 4
4 large lamb shanks
2 tablespoons plain flour
^1/_4 cup olive oil
3 red onions, chopped
2 stalks celery, chopped
2 carrots, peeled, chopped
3 tablespoons fresh thyme
2 cups chicken stock
12 cup red wine
1 bay leaf
1 tablespoon plain flour
30g butter, room temperature
Salt and freshly ground black pepper, to taste
- Toss lamb shanks in flour.
- Heat half of the oil in a large frypan over medium high heat. Add lamb shanks and cook for 3-4 minutes or until golden. Transfer to cooking pan.
- Add remaining oil to the same pan with onions, garlic, celery and carrots. Cook until tender, about 3-4 minutes. Add remaining ingredients whisking until smooth. Transfer to cooking pan. Place lid on unit.
- Press MENU and select SLOW COOK. Cook on HIGH for 3-4 hours or LOW for 6-8 hours. Season to taste with salt and pepper. Serve.
Easy Osso Bucco with Gremolata
Serves: 6
2kg osso bucco
1 / 4 cup plain flour
2 tablespoons olive oil
4 cloves garlic, crushed
2 onions, chopped
2 x 400g can crushed tomatoes
2 cups chicken stock
1 cup white wine
14 cup fresh basil
1 teaspoon lemon zest
Gremolata:
2 tablespoons freshly chopped flat-leaf parsley
2 garlic cloves, crushed
1 teaspoon lemon zest
Salt and freshly ground black pepper, to taste
- Toss osso bucco in flour.
- Heat oil in a large pan over medium-high heat. Add osso bucco and cook for 3-4 minutes or until golden. Transfer to cooking pan.
- To the same pan add garlic and onions. Cook for 3-4 minutes or until golden. Transfer to cooking pan. Stir thorough remaining ingredients. Place lid on unit.
- Press MENU and select SLOW COOK. Cook on HIGH for 3-4 hours or LOW for 6-8 hours. Season to taste with salt and pepper.
- Gremolata: Place all ingredients in a small bowl. Stir to combine. Sprinkle over osso bucco before serving.
Moroccan Beef
Serves: 6
1kg beef chuck, cubed
^1/_3 cup plain flour
3 tablespoons olive oil
2 cloves garlic, crushed
1 onion, sliced
1 tablespoon ground cumin
1 tablespoon ground coriander
1 teaspoon turmeric
^1/_4 teaspoon ground cinnamon
1 cup beef stock
415g can apricot halves in natural juice, reserve liquid
Couscous, to serve
Salt and freshly ground black pepper, to taste
-
Toss beef in flour.
-
Heat oil in a large frypan over medium heat. Add beef and cook for 3-4 minutes or until golden. Transfer to cooking pan.
-
Using the same pan add garlic and onion. Cook for 3-4 minutes or until softened. Add cumin, coriander, turmeric and cinnamon and cook until fragrant. Add stock and apricots. Bring to a simmer. Transfer to cooking pan. Place lid on unit.
-
Press MENU and select SLOW COOK. Cook on HIGH 3-4 hours or LOW 6-8 hours. Season to taste with salt and black pepper. Serve over couscous.
Mexican Beef Stew
This stew is great in burritos or tacos.
Serves: 6-8
4 dried ancho chilies
5 bay leaves
4 cloves garlic, crushed
1 large white onion, chopped
200g bacon, chopped
4 large tomatoes, chopped
1 cinnamon stick
1 granny smith apple, peeled, core removed, chopped
1 cup chopped fresh pineapple
1 12 teaspoons dried oregano
1.5kg beef chuck, cubed
1 tablespoon caster sugar
Salt and freshly ground black pepper, to taste
-
Place dried chillis in a bowl and cover with hot water. Soak until soft, about 25 minutes. Discard stems and seeds. Chop remaining chili.
-
Heat oil in a large pan over medium heat, Add bay leaves, garlic, onion and bacon. Cook for 5-6 minutes or until golden. Transfer to the cooking pan.
-
Add remaining ingredients to the cooking pan. Place lid on unit.
-
Press MENU and select SLOW COOK. Cook on HIGH or 3-4 hours or LOW for 6-8 hours. Season to taste with salt and pepper. Serve.
TIP: Ancho chilies can be found in most gourmet food stores.
Beef and Creamy Mushroom Casserole
Serves: 4-6
1kg beef chuck steak, cut into 5cm pieces
2 tablespoons plain flour
2 tablespoons olive oil
20g butter
2 onions, chopped
500g portabella mushrooms, sliced
200g button mushrooms, sliced
12 cup beef stock
12 cup red wine
^1/_4 cup tomato paste
2 teaspoons smoked paprika
1 cup sour cream
1 tablespoon corn flour
1 tablespoon lemon juice
Salt and freshly ground black pepper, to taste
-
Toss beef in flour.
-
Heat oil in a large frypan over medium-high heat. Add beef and cook for 3-4 minutes or until golden. Transfer to slow cooker.
-
Melt butter in a large frypan over medium heat. Add onions and mushrooms cooking for 5-6 minutes or until softened.
-
Add stock, red wine, tomato paste and paprika to the frypan. Bring to a simmer. Transfer to cooking pan. Place lid on unit.
-
Press MENU and select SLOW COOK. Cook on HIGH for 3-4 hours or LOW on 6-8 hours.
-
Combine sour cream and corn flour. Add to cooking pan, stirring to combine. Cook for a further 30 minutes or until thickened. Season to taste with salt and pepper and lemon juice. Serve.
Slow Cooked Creamy Polenta
This is a great ‘no stirring required’ polenta.
Serves: 4-6
4 cups milk
1 cup pouring cream
1 cup coarse polenta
1 cup grated parmesan cheese
50g butter
Salt and freshly ground black pepper, to taste
-
Spray the inside of slow cooker with cooking spray.
-
In a medium saucepan heat milk, cream and polenta. Bring to a simmer and allow to cook for 3-4 minutes. Transfer to cooking pan. Place lid on pan.
-
Press MENU and select SLOW COOK. Cook on HIGH for 3 hours or LOW for 6 hours. Once cooked whisk through parmesan cheese and butter. Season to taste with salt and pepper. Serve.
Chickpea and Pumpkin Curry
Serves: 4-6
1 tablespoon oil
2 onions, chopped
14 cup red curry paste
4 cardamom pods, crushed
1 stalk lemongrass
1 kg pumpkin, peeled, seeds removed, cubed
1 cup vegetable stock
400ml can coconut milk
400g can chickpeas, drained, rinsed
2 tablespoons lime juice
12 cup chopped fresh corriander
Salt and freshly ground black pepper, to taste
- Heat oil in a large frypan over medium high heat. Add onions cooking for 3-4 minutes or until tender. Add curry paste, cardamom pods and lemon grass and cook until fragrant. Transfer to cooking pan.
- Add pumpkin, stock and coconut milk. Stir to combine. Place lid on unit.
- Press MENU and select SLOW COOK. Cook on HIGH for 3 hours on LOW for 6 hours. Add chickpeas in the final 30 minutes of cooking.
- Stir through remaining ingredients. Season to taste with salt and pepper. Serve.
Moroccan Lentil and Chickpea Soup
Serves: 6
1 tablespoon olive oil
1 carrot, peeled, chopped
1 stalk celery, chopped
1 red onion, chopped
1 tablespoon ground coriander
1 tablespoon ground cumin
1 teaspoons ground ginger
12 teaspoon ground cinnamon
1 cup red lentils
1 cup green lentils
6 cups vegetable stock
12 cup fresh chopped coriander
2 tablespoons lemon juice
Salt and freshly ground black pepper, to taste
- Heat oil in a large frypan over medium heat. Add carrot, celery and onion cooking for 3-4 minutes or until softened. Add spices and cook until fragrant. Transfer to cooking pan.
- Add lentils and stock. Stir to combine. Place lid on unit.
- Press MENU and select SLOW COOK. Cook on HIGH for 3-4 hours or LOW for 6-8 hours. Stir through remaining ingredients. Season to taste with salt and pepper. Serve.
Slow Cooker Recipes – Desserts
Rice Pudding
Serves: 4
325g can sweetened condensed milk
5 cups milk
1 12 cups arborio rice
1 teaspoon vanilla essence
1. Place condensed milk and milk in the pan. Whisk to combine.
2. Stir through rice and vanilla essence. Place lid on unit.
3. Press MENU and select SLOW COOK. Cook on HIGH for 3-4 hours or LOW for 6-8 hours. Serve hot.
Tip: Add a cinnamon stick or a few cloves for a delicious twist.
Gingerbread and Golden Syrup Pudding
Serves: 8
3/4 cup golden syrup
2 cups plain flour
14 cup brown sugar
1 tablespoon ground ginger
100g butter, diced
^3/_4 cup milk
1 teaspoon baking soda
2 eggs
- Place an upside saucer in the base of the cooking pan.
- Lightly grease an 8 cup capacity pudding basin.
- Pour half of the golden syrup into the pudding basin. Set aside.
- In a large bowl combine flour, brown sugar and ginger.
- Rub butter into the flour mixture until mixture resembles breadcrumbs.
- In a jug combine milk, baking soda and eggs. Add to flour mixture with remaining golden syrup and stir until just combined. Pour into the prepared pudding basin.
- Cover the top of the basin with a piece of baking paper and then a piece of tinfoil. Place a pleat in the middle of the covers, then secure to the basin with a piece of string.
TIP: The pleat in the baking paper and tinfoil allows the pudding to rise.
- Place pudding basin on top of the upside down saucer in the cooking pan and add enough boiling water so that it rises until halfway up the pudding basin. Place lid on unit.
Slow Cooker Recipes – Desserts continued
- Press MENU and select SLOW COOK. Cook on HIGH for 3-4 hours or LOW for 6 hours. Invert pudding onto serving dish. Serve warm.
Notes
12 Month Warranty
This Sunbeam product is covered by a 12 month replacement or repair warranty, which is in addition to your rights under the Australian Consumer Law (if your product was purchased in Australia) or New Zealand Consumer Guarantees Act (if your product was purchased in New Zealand).
Should you experience any difficulties with your product during the warranty period, please contact our customer service line for advice on 1300 881 861 in Australia, or 0800 786 232 in New Zealand.
Alternatively, you can send a written claim to Sunbeam to:
Australia
Units 5 & 6, 13 Lord Street Botany NSW 2019 Australia
New Zealand
Level 6, Building 5, Central Park 660-670 Great South Road Greenlane, Auckland New Zealand
Upon receipt of your claim, Sunbeam will seek to resolve your difficulties or, if the product is defective, advise you on how to obtain a replacement or refund.
To assist us in managing warranty claims, we recommend you register your product as soon as practicable after purchase by creating a MySunbeam account on our website and send a copy of your original receipt to Sunbeam.
In order to make a claim under our warranty, you must have the original proof of purchase documentation for the product and present it when requested.
Should your product develop any defect within 12 months of purchase because of faulty materials or workmanship, we will replace or repair it, at our discretion, free of charge. A product presented for repair may be replaced by a refurbished product of the same type rather than being repaired. Refurbished parts may be used to repair the product.
Our replacement or repair warranty only applies where a defect arises as a result of faulty material or workmanship during the warranty period. Your warranty does not cover misuse or negligent handling (including damage caused by failing to use the product in accordance with this instruction booklet), accidental damage, or normal wear and tear.
Your warranty does not:
• cover freight or any other costs incurred in making a claim, consumable items, accessories that by their nature and limited lifespan require periodic renewal (such as filters and seals) or any consequential loss or damage; or
• cover damage caused by:
- power surges, power dips, voltage supply problems, or use of the product on incorrect voltage;
- servicing or modification of the product other than by Sunbeam or an authorised Sunbeam service centre;
- use of the product with other accessories, attachments, product supplies, parts or devices that do not conform to Sunbeam specifications; or
- exposure of the product to abnormally corrosive conditions; or
- extend beyond 3 months if the product is used in commercial, industrial, educational or rental applications.
The benefits given to you by our warranty are in addition to other rights and remedies under law in relation to the product.
In Australia our goods come with guarantees that cannot be excluded under the Australian Consumer Law. You are entitled to a replacement or refund for a major failure and for compensation for any other foreseeable loss or damage. You are also entitled to have the goods repaired or replaced if the goods fail to be of acceptable quality and the failure does not amount to a major failure.
Our goods also come with guarantees that cannot be excluded under the New Zealand Consumer Guarantees Act.
If your warranty claim is not accepted, we will inform you and if requested to do so by you, repair the product provided you pay the usual charges for such repair. You will also be responsible for all freight and other costs.
Should your product require repair or service after the warranty period, contact your nearest Sunbeam service centre. For a complete list of Sunbeam's service centres, visit our website or call our customer service line for advice on 1300 881 861 in Australia, or 0800 786 232 in New Zealand.
Need help with your appliance?
Contact our customer service team or visit our website for information and tips on getting the most from your appliance.
In Australia
Visit www.sunbeam.com.au
Or call 1300 881 861
In New Zealand
Visit www.sunbeam.co.nz
Or call 0800 786 232
is a registered trademark.
'Sunbeam Duos' is a trademark of Sunbeam Corporation.
Made in China.
Due to minor changes in design or otherwise,
the product may differ from the one shown in this leaflet.
© Copyright. Sunbeam Corporation Limited 2014.
ABN 45 000 006 771
Units 5 & 6, 13 Lord Street
Botany NSW 2019 Australia
Level 6, Building 5, Central Park
660-670 Great South Road
Greenlane, Auckland
New Zealand
Sunbeam Corporation is a division of GUD Holdings Ltd.
- Contents
- Important instructions – retain for future use.
- Sunbeam's Safety Precautions
- SAFETY PRECAUTIONS FOR YOUR SUNBEAM DUOS SOUS VIDE AND SLOW COOKER
- Sunbeam is very safety conscious when designing and manufacturing consumer products, but it is essential that the product user also exercise care when using an electrical appliance. Listed below are precautions which are essential for the safe use of an electrical appliance:
- Features of your Sunbeam Duos™ Sous Vide and Slow Cooker
- Tempered Glass Lid
- litre working capacity
- Non-slip feet
- Non-stick Removable Cooking Pan
- Control Panel
- Pouch rack
- The Control Panel
- Menu Button
- Cooking Menu indicator
- Sous Vide Menu
- Slow Cook Menu
- Temp/ Time Button
- Start/ Cancel button
- Timer display screen
- Power Button
- Cooking Menus Overview
- Sous Vide Cooking
- Steps to Sous Vide cooking
- Step 1. Seasoning your food
- Step 2. Vacuum sealing your food
- Step 3. Cooking your food
- Step 4. Searing your food
- Food Safety Guidelines for Sous Vide Cooking
- Food Preparation
- Cooking
- Storage
- Reheating
- Slow Cooking
- Cooking Menu Settings Table
- How to use the Sous Vide menu
- Sous Vide Temperature and Time Guide
- Cooking temperatures for Meat (Beef, Lamb and Pork):
- Cooking temperatures for Poultry:
- Cooking temperature for Fish:
- General temperature for Vegetables:
- Note:
- How to use the Slow Cook menu
- Care and Cleaning
- Hints and Tips
- Capacity
- Food
- Lid
- Food Safety Guidelines for Sous Vide Cooking CAUTION. Food cooked using the Sous Vide method of cooking is not recommended for consumption by those in an 'at risk' category (low immune deficiency);
- Slow Cooked Roasts
- Slow Cooked Roast Chicken
- Slow Cooked Stocks
- Troubleshooting
- Sous Vide Recipes
- Chermoula Marinade
- Portuguese Marinade
- Teriyaki Marinade
- Antipasti Plate
- Garlic Eggplants
- Red Capsicum and Basil
- Honey, Soy Chicken Wings
- Coq au Vin
- Chicken Cordon Bleu
- Spicy Pork Chops
- Red Wine Beef Cheeks
- Pork Belly
- Serves: 4
- Chinese Five Spice Duck Breast
- Hazelnut and Coriander Spiced Salmon
- Serves: 5
- Rosemary and Lamb Chops
- Pea, Mint and Goats Cheese Risotto
- Honeyed Carrots
- Rosemary Infused Potatoes
- Spiced Sweet Potatoes
- Preserved Lemons
- Port Poached Dates
- Slow Cooker Recipes – Main Meals
- Chicken Tagine
- Serves: 6
- Salt and freshly ground black pepper, to taste
- Butter Chicken
- Peanut Chicken
- Asian Style Pork Belly
- Spicy Pork Meatballs
- Serves: 6-8
- Pasta, to serve
- Pork with Apple and Cider
- Red Wine Lamb Shanks
- Easy Osso Bucco with Gremolata
- Gremolata:
- Moroccan Beef
- Mexican Beef Stew
- Beef and Creamy Mushroom Casserole
- Slow Cooked Creamy Polenta
- Chickpea and Pumpkin Curry
- Serves: 4-6
- Moroccan Lentil and Chickpea Soup
- Slow Cooker Recipes – Desserts
- Rice Pudding
- Gingerbread and Golden Syrup Pudding
- Slow Cooker Recipes – Desserts continued
- Notes
- Month Warranty
- Australia
- New Zealand
- Need help with your appliance?
- In Australia
- In New Zealand
- is a registered trademark.
Brand : SUNBEAM
Model : Duos MU4000
Category : Multicooker