
PP5501 - Vacuum Cleaner NuTone - Free user manual and instructions
Find the device manual for free PP5501 NuTone in PDF.


| Product Type | Central Vacuum Power Unit |
| Brand | NuTone |
| Model | PP5501 |
| Capacity | 6 US gallons (22.7 liters) |
| Power Supply | 120 VAC, 20-amp dedicated circuit |
| Motor | Motor with upper and lower foams and nuts (part no. 66368) |
| Filtration System | Disposable bag (Model 391) and foam motor filter |
| Bag Type | Disposable bag, model 391 (sold in sets of 3) |
| Safety Features | Grounded plug; circuit breaker reset button on side |
| Warranty | 5 years (3 years parts and labor, then parts only) |
| Usage | Indoor residential use only |
| Installation Requirements | Must be connected to a properly grounded outlet; requires dedicated 20-amp circuit |
| Maintenance | Replace disposable bag when suction decreases; clean foam motor filter as needed |
| Filter Type (Motor) | Foam motor filter (washable) |
| Included Components (Spare Parts) | Top cap assembly, motor, electronic board, rocker switch, gasket, etc. (see manual) |
Frequently Asked Questions - PP5501 NuTone
User questions about PP5501 NuTone
0 question about this device. Answer the ones you know or ask your own.
Ask a new question about this device
Download the instructions for your Vacuum Cleaner in PDF format for free! Find your manual PP5501 - NuTone and take your electronic device back in hand. On this page are published all the documents necessary for the use of your device. PP5501 by NuTone.
USER MANUAL PP5501 NuTone
PP5501, PP6501 & PP7001
IMPORTANT SAFETY INSTRUCTIONS
SAVE THESE INSTRUCTIONS
READ ALL INSTRUCTIONS BEFORE USING THIS APPLIANCE
When using an electrical appliance, basic precautions should always be followed, including the following:
WARNING ⚠️
To reduce the risk of fire, electric shock or injury:
- Do not use on wet surfaces or outdoors.
- Do not vacuum liquids or fine powders (such as drywall dust).
- Do not use to pick up flammable or combustible liquids such as gasoline or use in areas where they may be present.
- Do not pick up anything that is burning or smoking, such as cigarettes, matches, or hot ashes.
- Do not allow to be used as a toy. Close attention is necessary when used by or near children.
- Use only as described in this manual. Use only manufacturer's recommended attachments.
- Keep hair, loose clothing, fingers and all parts of body away from openings and moving parts.
- Turn off all controls before unplugging.
- Use extra care when cleaning on stairs.
- Do not handle plug or appliance with wet hands.
- Do not use with damaged cord or plug. If appliance is not working as it should, if it has been dropped, damaged, left outdoors, or dropped into water, return it to a Service Center.
- Keep your work area well lighted.
- Connect to a properly grounded outlet only. See grounding instructions shown on page 3.
TABLE OF CONTENTS
GROUNDING INSTRUCTIONS .... 3
DISPOSABLE BAG REPLACEMENT (MODEL 395)....4
SEALED HEPA PERMANENT FILTER (PP6501 AND PP7001 POWER UNITS ONLY) 5
- When performing installation, servicing or cleaning the unit, it is recommended to wear safety glasses and gloves.
CAUTION
- Do not put any object into openings. Do not use with any opening blocked; keep free of dust, lint, hair and anything that may reduce air flow.
- Ensure air flows freely and exhausts unobstructed from top or side outlet.
- Do not use without filter (or filters, according to the model) in place.
- Do not use to blow leaves or debris.
- Do not place any object on top of the unit.
- Do not install the unit horizontally.
- Do not use the pail as a wash bucket.
- Do not use the pail as a stool.
- Avoid picking up sharp objects.
- This appliance is for use on a standard 120 VAC, dedicated 20-amp minimum branch circuit.
- Do not unplug the unit by pulling on cord. To unplug, grasp the plug, not the cord.
- Store your vacuum cleaner indoors in a clean, dry area, away from extreme temperatures.
- Any servicing other than that recommended in this manual should be performed by an authorized service facility.
- We recommend that your unit be inspected by a specialized technician once a year.
REMOVAL & INSTALLATION OF PERMANENT FILTER (PP6501 & PP7001 POWER UNITS ONLY) . 5
MOTOR FOAM FILTER (ALL UNITS) ..... 6
REMOVAL & INSTALLATION OF SECONDARY HEPA FILTER (PP7001 POWER UNIT ONLY) 7
SERVICE PARTS 8-9
TROUBLESHOOTING GUIDE .. 10-11
WARRANTY 12
WARNING
Improper connection of the equipment-grounding conductor can result in a risk of electric shock. Check with a qualified electrician or service person if you are in doubt as to whether the outlet is properly grounded. Do not modify the plug provided with the appliance – if it will not fit the outlet, have a proper outlet installed by a qualified electrician.
Grounding Instructions – This appliance must be grounded. If it should malfunction or break down, grounding provides a path of least resistance for electric current, to reduce the risk of electric shock. This appliance is equipped with a cord having an equipment-grounding conductor and grounding plug. The plug must be plugged into an appropriate outlet that is properly installed and grounded in accordance with all local codes and ordinances.
WIRING
This appliance is for use on a standard 120 VAC, minimum dedicated 20-amp branch circuit with a NEMA 5-15R receptacle. Make sure that the power unit is connected to an outlet and has a grounding attachment plug that looks like the plug shown in illustration below. No adapter should be used with this power unit.

NOTE: Inlet leads to be connected to power unit low voltage tabs using crimp connectors (included in parts bag) and low voltage harness.
Open the inlet cover and insert the end of the hose into the inlet to turn on the vacuum.
For non-switched hoses, inserting the hose automatically turns on the power unit; removing the hose shuts off the power unit. Some hoses have switches which can be used to activate power unit. Unless using the utility valve (PP7001 unit only) the ON/OFF switch located on the power unit needs to be kept in the OFF position.
As you vacuum, dirt and dust are carried to the power unit where they remain in a bag or in the debris pail (according to the power unit model).
Use the cleaning tools as you would for any other vacuum cleaner. Avoid picking up very large debris or lengthy as these kinds of objects may become lodged in the hose or tubing.
WHEN TO CHANGE BAG OR EMPTY DEBRIS PAIL
With a 6 U.S. gallons capacity, under normal conditions the bag/debris pail requires changing/emptying approximately twice a year. If the bag/debris pail is full, you will notice a reduced suction from the system. Unless this loss of suction is caused by a blockage in the system, changing the bag or emptying the debris pail will solve the problem.
NOTE: Even if not filled to capacity, if the bag seems tightly stretched when removing the debris pail, changing the bag will prevent it from tearing.
HOW TO EMPTY DEBRIS PAIL (PP6501 AND PP7001 POWER UNITS ONLY)
To empty the debris pail, release both latches on sides of the unit by pulling out and then pushing up. Holding the pail by the latches, lower it from unit. Carry pail to trash receptacle and dispose of debris. Put the pail back in its place.
DISPOSABLE BAG REPLACEMENT (MODEL 391)
To remove the disposable bag, release both latches on sides of the unit by pulling out and then pushing up. Remove the pail from unit. Grasp the edges of the bag collar and pull down. The bag will slide off easily. Do not pull on the bag.
② Unfold the new bag.
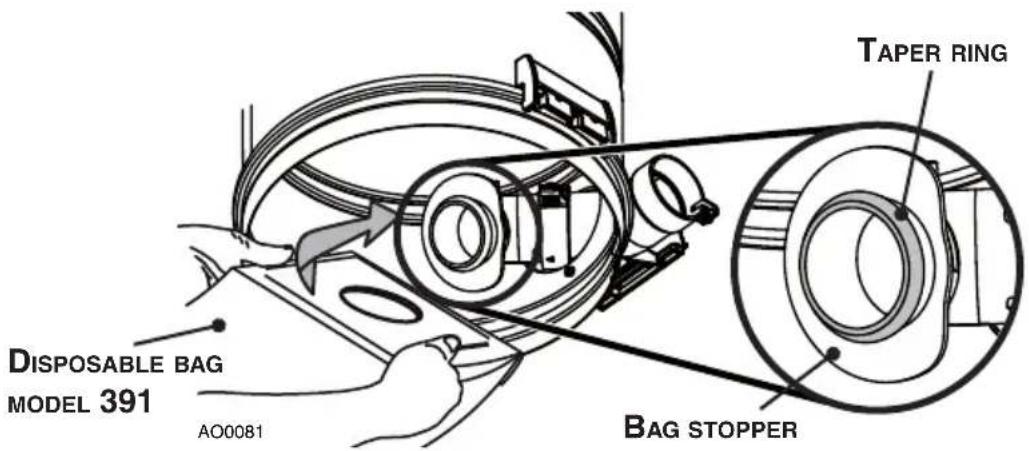
③ Grasp collar where indicated on the new bag and insert over bag adapter. Be careful not to tear the bag. Ensure the collar is positioned between the taper ring and the bag stopper on the bag adapter (see illustration below). Put the pail back in its place.
This filter protects the motor and stops small particles from escaping to the outside of the power unit without the need to replace it. The filter cleans itself by moving up when the power unit starts, and dropping down when the unit is turned off. Under normal use, there is no need to maintain this filter. It is possible to remove it to inspect the foam motor filter, or to replace it if ever it has been damaged (by sharp debris, for example).
REMOVAL AND INSTALLATION OF SEALED HEPA PERMANENT FILTER (PP6501 AND PP7001 POWER UNITS ONLY)
To remove:
Remove the pail from the unit. To remove the permanent filter, use pull tab (A) located on edge of filter to pull and loosen filter from inlet chamber wall. Squeeze from both sides of the filter to the center of the housing (see illustration at right). Then, carefully remove it from the unit.

To reinstall:
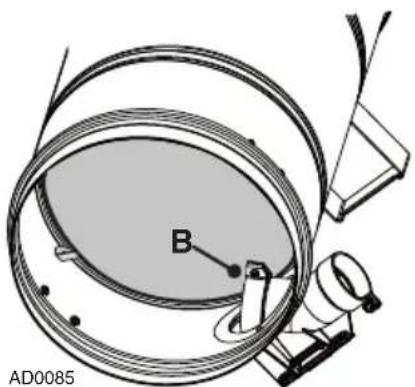
② Squeeze the filter in order to move it past the inlet opening (B) (see illustration at right). Let the filter bear against the unit wall by releasing the pressure. Make sure to place the rigid ring in its groove to ensure proper sealing.

NOTE: Make sure the filter is installed so that the pull tab (A) is accessible for future filter removal.

CAUTION
Be sure to reinstall filter properly. Appropriate location is critical to insure proper protection of the motor.
A foam motor safety filter, located at the top of the vacuum chamber provides protection against dirt being pulled into the motor if the disposable bag or sealed HEPA permanent filter should accidentally be torn. This filter should be checked and cleaned if necessary when replacement bag is installed, or when sealed HEPA permanent filter is removed (PP6501 and PP7001 units only). Simply brush filter clean. If the filter is excessively soiled, hand wash in a water and mild detergent solution, rinse and let it dry completely on a flat surface before reinstalling.
CAUTION
Operating the power unit without the foam motor filter will void the warranty.
REMOVING FOAM MOTOR FILTER
Remove the debris pail and disposable bag or permanent filter. Lift the center of the wire retaining the foam motor filter and slide the filter out of its location.
REINSTALLING FOAM MOTOR FILTER
To reinstall the foam motor filter, reverse the steps described above.

REMOVAL AND INSTALLATION OF SECONDARY HEPA FILTER (PP7001 POWER UNIT ONLY)
NOTE: This is a disposable HEPA filter; do not attempt to wash it since this will damage it. This HEPA filter should be replaced every 5 years. Proceed as follow:
① If installed, detach the exhaust line from the top of the unit.
② Disassemble upper part from lower part top cap assembly by pushing on the 4 retaining tabs (one by one) located on the lower part and pulling on upper part to disengage it.
NOTE: A small flat blade screwdriver can also be used to pry on the 4 retaining tabs, as shown in illustration A at the bottom of the page.

WARNING
Risk of warm surfaces and sharp edges. It is recommended to wear safety gloves while handling this HEPA filter.
③ Discard the used filter and replace with a new one (part no. S10941416). Be sure to install it with the gasket on top as shown in illustration B (at the bottom of the page), then snap in place the upper part of the top cap. If need be, reconnect the exhaust line to the top cap.

PP7001 UNIT PP5501 AND

REPLACEMENT PARTS AND REPAIRS
In order to ensure your unit remains in good working condition, you must use NuTone genuine replacement parts only. NuTone genuine replacement parts are specially designed for each unit and are manufactured to comply with all the applicable certification standards and maintain a high standard of safety. Any third party replacement part used may cause serious damage and drastically reduce the performance level of your unit, which will result in premature failing. NuTone also recommends to contact a NuTone authorized service center for all replacement parts and repairs.
| KEY NO. | PART NO. | DESCRIPTION | PP5501 | PP6501 PP7001 |
| 1 | S10941409 | PP7001 TOP CAP ASSEMBLY (INCLUDING ITEM 5) (UPPER PART) | ||
| S10941424 | PP5501 & PP6501 TOP CAP ASSEMBLY | 1 | 1 | |
| 2 S10941416 PP7001 EXHAUST HEPA FILTER 1 | ||||
| 3 S10941413 | PP7001 TOP CAP ASSEMBLY (INCLUDING ITEM 5) (LOWER PART) | |||
| 4 | 66368 | MOTOR WITH UPPER AND LOWER FOAMS AND NUTS | ||
| S10941418 | MOTOR WITH UPPER AND LOWER FOAMS AND NUTS | 1 | ||
| S10941419 | MOTOR WITH UPPER AND LOWER FOAMS AND NUTS | 1 | ||
| 5 S10941420 | ELECTRONIC BOARD WITH BOTTOM AND SIDE FOAMS | 1 | 1 | |
| 6 S99670649 ROCKER SWITCH 111 | ||||
| 7 | 66369 | MOTOR FOAM FILTER WITH FASTENER | 1 | 1 |
| 8 S10941400 GASKET 113 | ||||
| 9 | S10941415 | SEALED HEPA PERMANENT FILTER | 1 | |
| 10 | S99670648 | DEBRIS PAIL (INCLUDING KEY NO. 11) | 1 | 1 |
| 11 | S10941199 | ATCH AND SCREWS | 2 | 2 |
| 12 | S10941404 | LATCH KEEPER WITH SCREWS | 2 | 2 |
| 13 | S10941405 | BAG ADAPTER WITH NUT AND SCREW | 1 | 1 |
| 14 | S10941408 | UTILITY VALVE | 1 | 1 |
| 15 | S10941406 | INTAKE ELBOW WITH GASKET, SCREWS, AND NUTS | 1 | 1 |
| 16 | S99670650 | EXHAUST PORT WITH GASKET AND SCREWS | 1 | 1 |
| 17 | S30390555 | UNIT SUPPORT BRACKET | 1 | 1 |
| * | 391 | DISPOSABLE BAG (SET OF 3) | 1 | 1 |
*ITEM NOT SHOWN
NOTE: Order service parts by "Part No." — not by "Key No."
| PROBLEMS | POSSIBLE CAUSES | POSSIBLE REMEDY |
| 1. Loss or decrease of suction occurs. | Debris pail or disposable bag is completely full.Debris pail gasket damaged or missing.Obstruction in the hose. A blockage in the hose can be determined by inserting the hose into any wall inlet and, while power unit is running, check each additional inlet for normal suction by holding the palm of your hand over the open inlet. If normal suction is felt at all other inlets, insert the hose into a second inlet. If the blockage still exists it is located in the hose. However, if the blockage does not occur when the hose is changed, the blockage is probably located in the tubing system leading to the original inlet.Obstruction in the tubing system inside the walls.Sealed HEPA permanent filter or disposable bag torn.Wall inlet cover not properly sealed.Exhaust tubing or vent clogged. | Change the disposable bag or empty debris pail as described on page 5.Replace the debris pail gasket.Disconnect the hose from the wall inlet and insert a blunt instrument into the hose — slightly smaller in diameter — such as a flexible garden hose. Push the garden hose through the cleaning system hose until the obstruction has been cleared.Insert hose end into any inlet to make power unit running, then place the palm of your hand over the opposite end of the hose. When you can feel the suction increase, hold your hand over the hose end for a few seconds and then quickly remove your hand. This procedure repeated several times should clear the obstruction. If the blockage is not cleared, contact your nearest Service Center.Clean the interior or the unit and install a new permanent filter (or disposable bag).Check all wall inlet covers to be sure they are closed and sealed tightly.Inspect and remove any blockages. |
| 2. Power unit does not start or stops suddenly. | Defective inlet. Check other wall inlets.Power unit internal circuit breaker has been activated (the reset button is popped up).Blown fuse or tripped circuit breaker on house electrical panel.Defective hose.Power unit overcurrent protector has been activated. | Replace defective wall inlet.Push on the circuit breaker reset button located on the left side of the power unit. If this button pops up again, contact your authorized Service Center.Replace fuse or reset circuit breaker on house electrical panel.Replace hose as required.Unplug the power unit, wait at least 15 minutes and plug back the power unit. |
| 3. Power unit runs continuously when the hose is removed. | The unit power switch is in ON position.An electrical short has occurred somewhere in the system. | Set the unit power switch to OFF position.Perform a complete check of all wall inlets and power unit low voltage control leads connections. Contact your authorized Service Center. |
NUTONE CENTRAL VACUUM POWER UNIT LIMITED WARRANTY
NuTone warrants to the original consumer purchaser that its central vacuum power unit will be free from defects in materials and workmanship for five (5) years for PP5501 units, eight (8) years for PP6501 units and ten (10) years for PP7001 units. This warranty covers the parts and labor in an authorized service center for the first three (3) years of the warranty for PP5501 units, the first five (5) years of the warranty for PP6501 units, the first six (6) years of the warranty for PP7001 units. After these time periods, the parts only will be covered under this warranty. THERE ARE NO OTHER WARRANTIES, EXPRESSED OR IMPLIED, INCLUDING, BUT NOT LIMITED TO, IMPLIED WARRANTIES OF MERCHANTABILITY OR FITNESS FOR A PARTICULAR PURPOSE.
During these time periods, NuTone will, at its option, repair or replace the power unit or part without charge, which is found to be defective under normal use and service. THIS WARRANTY DOES NOT APPLY TO THE INSTALLATION OR THE PARTS USED IN THE INSTALLED TUBING SYSTEM. All central vacuum hoses, electric or air-driver brushes, filters, attachments and accessories are warranted for one (1) year from the original purchase date with the exception to consumables such as light bulbs and belts. We invite you to register your product on line at www.nutone.com/register. NuTone reserves the right to limit this warranty if the product is not registered.
This warranty does not cover (a) normal maintenance and service or (b) any products or parts which have been subject to misuse, negligence, accident, improper maintenance or repair (other than by NuTone or an authorized representative), faulty installation or installation contrary to recommended installation instructions.
The duration of any implied warranty is limited to the period as specified for the express warranty. NUTONE'S OBLIGATION TO REPAIR OR REPLACE, AT NUTONE'S OPTION, SHALL BE THE PURCHASER'S SOLE AND EXCLUSIVE REMEDY UNDER THIS WARRANTY. NUTONE SHALL NOT BE LIABLE FOR INCIDENTAL, CONSEQUENTIAL OR SPECIAL DAMAGES ARISING OUT OF OR IN CONNECTION WITH PRODUCT USE OR PERFORMANCE. Please do not return your unit to place of purchase. Please visit www.nutone.com for your closest service center. You may also call 1-888-336-3948 for the name of an authorized representative in your area. This warranty supersedes all prior warranties. Warranty service is to be completed by an authorized Service Center designated by NuTone. Where applicable, in home service will be made available only in areas where a contracted service provider offers service during the first three (3) years of the warranty for PP5501 units, during the first five (5) years of the warranty for PP6501 units and during the first six (6) years of the warranty for PP7001 units. If in home service is not available, the product will be repaired or replaced, at NuTone's discretion, by the nearest authorized service provider. The unit removal and reinstallation works are under the customer responsibility, and NuTone cannot be charged for them.
To qualify for warranty service, you must notify NuTone at the address or telephone number stated below. We will then forward you the authorized service center in your area. You will be required to present evidence of the original purchase date.
Date of Installation Builder or Installer
Model Number and Product Description
IF YOU NEED ASSISTANCE OR SERVICE
For the location of your nearest NuTone Independent Authorized Service Center:
Residents of the contiguous United States, dial toll free: 1-888-336-3948
Please be prepared to provide:
Product model number • Date and proof of purchase • The nature of the difficulty Residents of Alaska or Hawai should write to: NuTone Inc. Attn: Department of National Field Service, 926 West State Street, Hartford, WI 53027
SERIE PUREPOWER
UNIDADES DE
ASPIRACIÓN CENTRAL
PP5501, PP6501 Y PP7001

⚠ÚNICAMENTE PARA USO RESIDENCIAL △
BROAN-NUTONE LLC; HARTFORD, WISCONSIN WWW.NUTONE.COM 1-888-336-3948
REGISTRE SU PRODUCTO EN LÍNEA EN: WWW.NUTONE.COM/REGISTER


- PP5501, PP6501 & PP7001
- IMPORTANT SAFETY INSTRUCTIONS
- SAVE THESE INSTRUCTIONS
- READ ALL INSTRUCTIONS BEFORE USING THIS APPLIANCE
- WARNING ⚠️
- TO REDUCE THE RISK OF FIRE, ELECTRIC SHOCK OR INJURY
- TABLE OF CONTENTS
- GROUNDING INSTRUCTIONS .... 3
- CAUTION
- SERVICE PARTS 8-9
- TROUBLESHOOTING GUIDE .. 10-11
- WARRANTY 12
- WARNING
- WIRING
- WHEN TO CHANGE BAG OR EMPTY DEBRIS PAIL
- HOW TO EMPTY DEBRIS PAIL (PP6501 AND PP7001 POWER UNITS ONLY)
- DISPOSABLE BAG REPLACEMENT (MODEL 391)
- REMOVAL AND INSTALLATION OF SEALED HEPA PERMANENT FILTER (PP6501 AND PP7001 POWER UNITS ONLY)
- REMOVING FOAM MOTOR FILTER
- REINSTALLING FOAM MOTOR FILTER
- REMOVAL AND INSTALLATION OF SECONDARY HEPA FILTER (PP7001 POWER UNIT ONLY)
- RISK OF WARM SURFACES AND SHARP EDGES. IT IS RECOMMENDED TO WEAR SAFETY GLOVES WHILE HANDLING THIS HEPA FILTER
- REPLACEMENT PARTS AND REPAIRS
- NUTONE CENTRAL VACUUM POWER UNIT LIMITED WARRANTY
- IF YOU NEED ASSISTANCE OR SERVICE
- SERIE PUREPOWER
- UNIDADES DE
- ASPIRACIÓN CENTRAL
- PP5501, PP6501 Y PP7001
Brand : NuTone
Model : PP5501
Category : Vacuum Cleaner