NV352 - Vacuum Cleaner SHARK - Free user manual and instructions
Find the device manual for free NV352 SHARK in PDF.


| Product Type | Upright vacuum with detachable canister (Lift-Away) |
| Brand | Shark |
| Model | NV352 |
| Voltage | 120V (polarized plug) |
| Amperage | ~12A (typical) |
| Cord Length | ~30 ft (estimated) |
| Weight | ~12 lb (estimated) |
| Dirt Capacity | Dust cup (empty each use) |
| Filtration | Pre-motor foam & felt filters (washable); Post-motor HEPA filter (washable) |
| Cleaning Modes | Upright vacuum, Detachable canister, Above-floor cleaning |
| Brush Roll | Motorized floor brush (auto-shutoff when jammed), on/off switch |
| Suction Control | Suction release collar on handle |
| Attachments Included | Crevice tool, Dusting brush, Turbo brush, Accessory holder |
| Floor Nozzle | Motorized floor brush with indicator light |
| Extension Wand | Yes, included |
| Stretch Hose | Yes, on handle |
| Cord Storage | Quick cord release, upper and lower clips |
| Maintenance | Empty dust cup after each use; rinse pre-motor filters every 3 months; clean HEPA filter every 2 years |
| Safety Features | Motor protective thermostat (auto shut-off), polarized plug |
| Warranty | 5-year limited warranty |
| Repairability | User-replaceable filters, belt, brush roll; authorized service required for motor |
Frequently Asked Questions - NV352 SHARK
User questions about NV352 SHARK
0 question about this device. Answer the ones you know or ask your own.
Ask a new question about this device
Download the instructions for your Vacuum Cleaner in PDF format for free! Find your manual NV352 - SHARK and take your electronic device back in hand. On this page are published all the documents necessary for the use of your device. NV352 by SHARK.
USER MANUAL NV352 SHARK
natural_image
Purple-tinted image of a vacuum cleaner with no visible text or symbols on the device itself.IMPORTANT SAFETY INSTRUCTIONS
For Household Use Only
WHEN USING AN ELECTRICAL
APPLIANCE, BASIC SAFETY PRECAUTIONS SHOULD ALWAYS BE OBSERVED, INCLUDING THE FOLLOWING:
READ ALL INSTRUCTIONS BEFORE USING YOUR SHARK® NAVIGATOR LIFT-AWAY
POLARIZED PLUG:
To reduce the risk of electric shock, this appliance has a polarized plug (one blade is wider than the other). As a safety feature, this plug will fit into a polarized outlet only one way. If the plug does not fit fully into the outlet, reverse the plug. If it still does not fit, contact a qualified electrician.
DO NOT force into outlet or try to modify to fit.
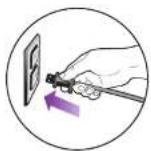
WARNING: To reduce the risk of electric shock or injury, do not use outdoors or on wet surfaces.
WARNING:
TO REDUCE THE RISK OF FIRE, ELECTRIC SHOCK OR INJURY:
GENERAL ELECTRICAL SAFETY:
-
Unplug from electrical outlet when not in use and before servicing.
-
DO NOT use vacuum with a damaged cord or plug. If appliance is not working as it should, has been dropped, damaged, left outdoors, or dropped into water, return it to EURO-PRO Operating LLC for examination, repair, or adjustment.
-
DO NOT pull or carry vacuum by the cord.
-
DO NOT unplug by pulling on cord; to unplug, grasp the plug, not the cord.
-
DO NOT handle plug or appliance with wet hands.
-
DO NOT run the vacuum over the power cord.
-
DO NOT use the cord as a handle.
-
DO NOT close a door on the cord.
-
DO NOT pull cord around sharp corners. The use of an extension cord is not recommended.
-
DO NOT leave appliance when plugged in.
-
Keep cord away from heated surfaces.
-
Turn off all controls before plugging or unplugging vacuum cleaner.
-
Always turn off this appliance before connecting or disconnecting motorized nozzle.
-
Store your appliance with the power cord secured around the two cord holders as shown
English
HOSE ATTACHMENTS:
- DO NOT use if air flow is restricted; if the air paths, the hose, or the accessories become blocked, turn the vacuum cleaner off. Remove all obstructions before you turn on the unit again.
- Keep the end of the hose and accessory openings away from face and body.
- Keep cleaning tools and hose suction openings away from hair, face, fingers, uncovered feet, or loose clothing.
- Only use manufacturer's recommended attachments.
GENERAL USE:
- Use only as described in this manual
- DO NOT put any objects into openings. DO NOT use with any opening blocked; keep free of dust, lint, hair, and anything that may reduce air flow.
- Keep your work area well lit.
- Keep the vacuum moving over the carpet surface at all times to avoid damaging the carpet fibers.
- DO NOT place vacuum on unstable surfaces such as chairs or tables.
- DO NOT allow young children to operate the vacuum or use as a toy. Close attention is necessary when used by or near children.
- DO NOT use vacuum cleaner if it has been dropped, damaged, left outdoors, or submerged in water. Return to EURO-PRO Operating LLC for examination, repair, or adjustment.
- DO NOT use without dust cup and/or filters in place.
DUST CUP/FILTERS/ACCESSORIES:
Before turning on the vacuum:
- Make sure that all filters are thoroughly dry after routine cleaning.
- Make sure that dust cup and all filters are in place after routine maintenance.
- Make sure accessories are free of blockages.
- Only use filters and accessories provided by EURO-PRO Operating LLC. [Failure to do so will void the warranty.]
GENERAL CLEANING:
- DO NOT pick up large-sized objects.
- DO NOT pick up hard or sharp objects such as glass, nails, screws or coins that could damage the vacuum cleaner.
- DO NOT pick up smoking or burning objects
- DO NOT pick up flammable or combustible materials such as lighter fluid, gasoline, or kerosene or use vacuum in areas where they may be present.
- DO NOT pick up toxic solutions such as chlorine bleach, ammonia, or drain cleaner.
- DO NOT use in an enclosed space where vapors are present from paint, paint thinner, moth-proofing substances, flammable dust or other explosive or toxic materials.
- DO NOT vacuum up any liquids.
- DO NOT immerse vacuum cleaner in water or other liquids.
- DO NOT use outdoors or on wet surfaces; use only on dry surfaces.
- Use extra care when cleaning on stairs
This manual covers model number:
NV351 26
NV332 20
Contents

Thank you for purchasing the Shark® Navigator Lift-Away.
Getting Started 6
Mode 1: Upright Vac 8
Mode 2: Detachable Canister 10
Above-Floor Cleaning 11
With Floor Nozzle 11
Storing 12
Maintenance 12
Emptying the Dust Cup 13
Cleaning the Pre-Motor Filters 13
Cleaning the Post-Motor HEPA Filter 14
Cleaning the Turbo Brush 14
Cleaning the Motorized Floor Brush 15
Checking for Blockages 15
Ordering Parts 16
Troubleshooting Guide 17
Warranty 18
Getting Started
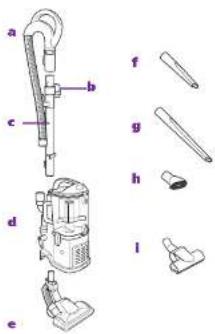
FIRST THING'S FIRST, YOU NEED TO KNOW WHAT'S IN THE BOX YOU JUST OPENED:
a Handle with Stretch Hose
b Accessory Holder
c Extension Wend
d Detachable Carister
- Hominal Class Back: Maxilla
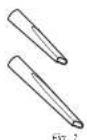


ACCESSORIES:
CREVICE TOOL
Reach deep into narrow spaces and clean between cushions, under radiators and baseboards and in hard to reach clefts and corners. (Fig. 1)
DUSTING BRUSH
Dust shelves, lamp shades, window blinds, books, furniture and other upholstered household items. (Fig. 2)
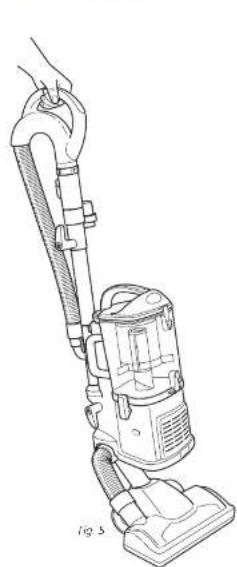
ACCESSORY HOLDER
Designed to hold the crevice tool and dusting brush. For quick access to tools when vacuuming and clearing around the house. (Fig. 3)

Your new Shark ^® Navigator Lift-Away vacuum cleaner can easily be configured into different cleaning modes to meet all your cleaning needs: upright vacuum and detachable canister - both with constant suction power.
natural_image
Line drawing of a vacuum cleaner with handle and base, labeled Fig 3 (no text or symbols on the device itself)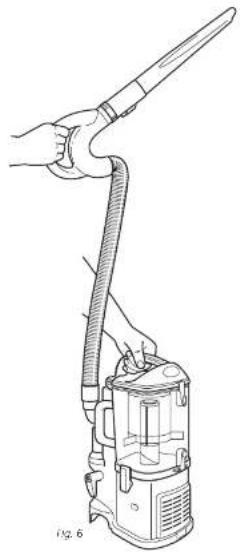
natural_image
Line drawing of a hand holding a tool next to a vacuum cleaner (no text or symbols present)MODES:
1 UPRIGHT VAC
Upright vacuuming - floors and carpets. (Fig. 5)
2 DETACHABLE CANISTER
Take the detachable canister with you around the
Mode 1: Upright Vac
To reduce the risk of electric shock, unplug the unit before assembling, adding or removing attachments or converting modes.
WARNING: The On/OFF switch is on the top of the detachable canister. Always ensure the power is OFF ("O" position) before plugging and unplugging.
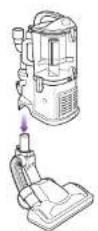
Fig 7 Fig 8 Fig 9
TO ASSEMBLE:
1 Place the floor nozzle on a level surface.
2 Align the tube of the floor nozzle with the tube on the detachable canister and lower until you hear the two pieces click into place. (Fig. 7)
When attaching the motorized floor brush, ensure that the latching mechanism is fully locked in place to ensure electrical connection has been made.
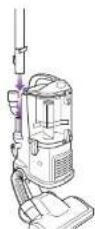
3 Attach the end of the extension ward to the tube on the back of the detachable canister until it
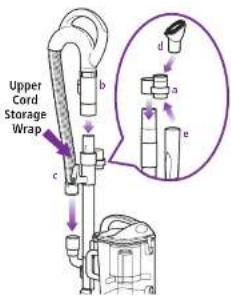
5 Push the handle (b) onto the toe of the extension wand until you hear it click into place. (Fig. 9)
6 Insert the end of the stretch hose (c) into the connector on the back of the detachable canister, (Fig. 9)
7 Store the dusting brush (d) and the crevice tool (e) on the mounts of the accessory holder, (Fig. 9)
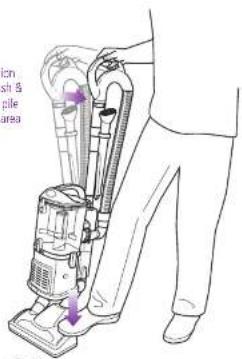
- Release suction for easier push & pull on high pile carpets and area rugs.
TO USE:
1 Rotate the cord release to quickly release the power cord.
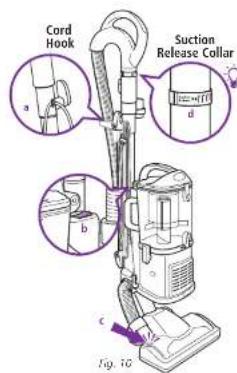
2 Secure the power cord in the cord hook (a) (Fig. 10)
II = Brush Roll OK
Bare Floor
QIT

3 Press the On/OFF switch (b) to the "1" position to vacuum bare floors (straight suction only) or to the "II" position to engage the motorized floor brush (for vacuuming carpets and rugs). (Fig. 10)
4 Gently press the floor nozzle down with your face while you grasp the handle and tilt it back towards you. (Fig. 11)
NOTE: The rotating brush on the motorized floor brush will not spin unless the nozzle is flat against the floor and the handle is tilted back.
5 Due to the huge suction power of this vacuum, it may become necessary at times to adjust the suction release (d) on the handle. (Fig. 10) If the vacuum seems difficult to push or pull or if it is lifting up area rugs, adjust the suction release by rotating the collar 90^ counterclockwise to open the valve. Rotate the collar clockwise to close the valve when you need high suction and for vacuuming floors.
6. Empty dust can after vacuum and periodically
Mode 2: Detachable Canister
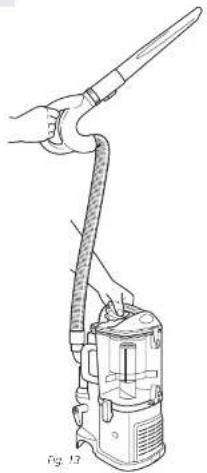
You can carry your vacuum cleaner in both modes by the carry handle located on top of the dust cup.
natural_image
Line drawing of a hand using a tool to lift a vacuum cleaner (no text or symbols present)LIFT AWAY DETACHABLE CANISTER FOR PORTABLE CLEANING
3 Attach desired accessory onto the end of either the extension wand or the handle.
Above-Floor Cleaning
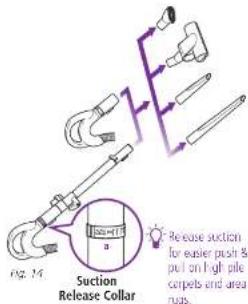
CLEAN ABOVE THE FLOOR IN UPRIGHT VAC OR DETACHABLE CANISTER MODE
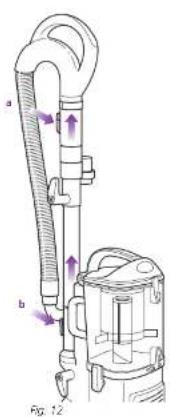
1 Press the handle release button and pull the handle up or press the extension ward release button and pull the extension ward up.
2 Attach desired accessory onto the end of either the extension wand or the handle. (Fig. 14)
3 Your vacuum has tremendous suction power. Adjust the amount of suction with the suction release on the handle. Open the valve (a) by rotating the collar 90° counterclockwise for low suction when doing light jobs such as drapes or fine surfaces. Close the valve (a) by rotating the collar clockwise 90° for high suction and when using the hand held turbo brush. (Fig. 14)
4 Press the On/OH switch to the "1" position to turn the vacuum on for above floor cleaning.
HURANTUT: Focus research in research
With Floor Nozzle
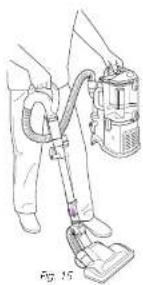
natural_image
Line drawing of a person using a vacuum cleaner device (no text or symbols present)CLEAN THE FLOOR IN DETACHABLE CANISTER MODE
1 Press the extension wand release button and pull the extension wand up.
2 Attach either floor nozzle onto the end of the extension ward. (Fig. 15)
3 Press the On/Off switch to the "1" position to turn the suction motor on.
NOTE: The rotating brush will not rotate in Detachable Canister mode.
Storing
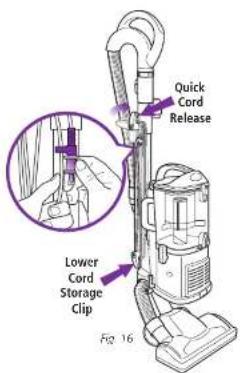
STORE YOUR VACUUM SAFELY
1 Convert your vacuum back to upright vac mode.
2 Rotate the upper quick cord release to its upright position and coi the power cord loosely around the two clips. Clip the plug onto the cord to secure. (Fig. 16)
3 Store the dusting brush and the device tool on the mounts on the accessory holder.
Maintenance
To reduce the risk of electric shock, undog the unit before performing any cleaning, maintenance, or troubleshooting checks.
Reassemble all parts securely before operating vacuum.
DO NOT operate the vacuum without the pre-motor filters and dust cup in pace.
DO NOT operate the vacuum with WET filters.
IMPORTANT: Make sure all filters are completely dry before inserting back into vacuum.
WARNING: Never insert sharp objects into any opening to clear an obstruction.
IMPORTANT: Damages caused while clearing or attempting to clear blockages are not covered under your product's limited warranty.
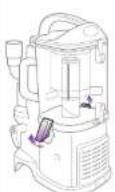
Sig. 17 Fig. 18
English
| COMPONENT | MAINTENANCE SCHEDULE | |
| 1 | Dust Cup | Empty each time you vacuum. |
| 2 | Pre-Motor Foam Filter | Rinse and air dry every 3 months under normal use. |
| 3 | Pre-Motor Felt Filter | Rinse and air dry every 3 months under normal use. |
| 4 | Post-Motor HEPA Filter | Clean once every 2 years or as needed. |
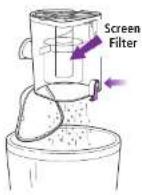
Fig. 19
Sig. 20
The dust cup needs to be emptied each time you. vacuum and periodically during cleaning, when the dust cup appears full.
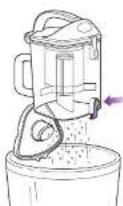
1 Undo the latches on the sides of the dust cup by lifting them up and outwards to remove the dust cup from the motor base. (Fig. 17)
2 Hold the dust cup over a trash receptacle and press the bottom door release button. (Fig. 18) Tap gently to empty contents. Press the door shut again until it clicks.
3 If needed, turn the dust cup upside down over the trash receptacle and press the top door release button. (Fig. 19) Tap gently to remove contents.
CLEANING THE PRE-MOTOR FILTERS
1 Remove the dust cup.
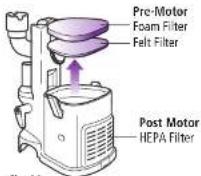
2 Pull the 2 filters out from the top of the motor base. (Fig. 20)
3 Rinse the filters thoroughly in lukewarm water until the water runs clear.
DO NOT put the filter in the washing machine or dishwasher.
NOTE: The material in the filter will discolor over time. This is NORMAL and will not affect the performance of the filter.
4 Squeeze out excess water and let air-dry for at least 24 hours before replacing. Do not use a hair dry or other heating methods to dry
Maintenance - cont'd
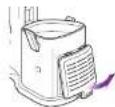
Fig. 21
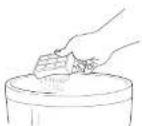
Fig. 22
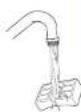
Fig. 27
CLEANING THE POST-MOTOR HEPA FILTER
1 Remove the filter cover from the front of the vacuum by pulling up on the tab and pulling the cover away from the vacuum. (Fig. 21)
2 Take out the HEPA filter by pulling it straight out.
3 Turn the filter over so that the dirty side is on the bottom and vigorously tap it clean against a garbage can to remove any dust. (Fig. 22)
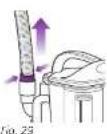
4 Wash the filter under the tap using lukewarm water with the dirty side face down until the water runs clear. (Fig. 23)
DO NOT put the filter in the washing machine or dishwasher.
NOTE: The material in the filter will discolor over time. This is NORMAL and will not affect the performance of the filter.
5 Allow the filter to air dry for 24 hours. Do not use a hair dryer or other heating methods to dry.
6 Once the HEPA filter is dry, replace it back into the vacuum.
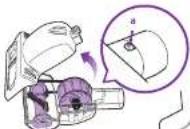
Fig. 24
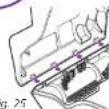
Fig. 25
CLEANING THE TURBO BRUSH (model NV351 only)
1 Slide the locking latch (a) forward and tilt the bottom cover upward to remove. (Fig. 24)
2 Carefully remove any blockage or debris and cut away any build-up of hair or string wrapped around the rotating bristle brush with scissors.
3 To reassemble, insert the tabs on the front edge of the bottom cover into the matching holes in the top half and tilt it back down until it clicks into place. (Fig. 25)
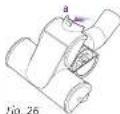
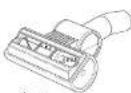
Fig. 27
CLEANING THE TURBO BRUSH (model NV352 only)
1 Slide the locking latch (a) forward and gently til a brush housing upward to open. (Fig. 26)
IMPORTANT: DO NOT force, it will not open all the way.
2 Carefully remove any blockage or debris.
3 Turn the turbo brush over to inspect the rotating brush and cut away any build-up of hair or string wrapped around the rotating bristle brush with
English

CLEANING THE MOTORIZED FLOOR BRUSH
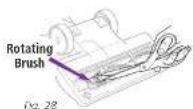
When your motorized floor brush needs clearing or locks onto an object, it automatically shuts down to prevent damage to your lifetime belt. The indicator light will illuminate red warning you to turn off the vacuum and clear blockage immediately. The light will reset itself once blockage has been cleared and power has been cycled on/off or vacuum has been locked in the upright position.
1 Detach the motorized floor brush from the detachable canister.
2 Inspect the opening underneath and the rotating brush. If a build-up of debris is present, remove it Carefully cut anything wound around the rotating brush with scissors. Avoid damaging or cutting the bristles. (Fig. 28)
CHECKING FOR BLOCKAGES
Blockages may cause your vacuum to overheat and shut down. To prevent this from happening, check potential blockage areas after heavy use or if you detect a loss of suction or poor cleaning performance.
1 Dust Cup
Dust cup may be full. Empty dust cup.
2 Pre-Motor & Post-Motor Filters
Pre-motor filters require washing every 3 months for optimum performance. The post-motor HEPA filter needs to be washed every 2 years.
Ensure that all the filters are clear
3 Accessories
- Check intake openings:
- Extension Wand
- Dusting Brush
Crevice Tool
Tokio 0.64
Maintenance - cont'd
Ordering Parts
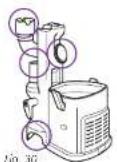
- Remove the dust cup and extension wand and separate the detachable canister from the motorized floor brush. Lock in all 4 openings for any blockages. (Fig. 30)
5 Motorized Floor Brush
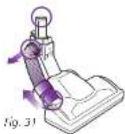
- Detach the hose on the motorized floor brush at the top by squeezing the tabs together and pulling out, and at the bottom by pulling out the connector. Inspect inside the 3 holes. (Fig. 31)
natural_image
Six numbered line drawings of household appliances or tools, including a tray, keyboard, and pen (no text or symbols)PART PART NO.
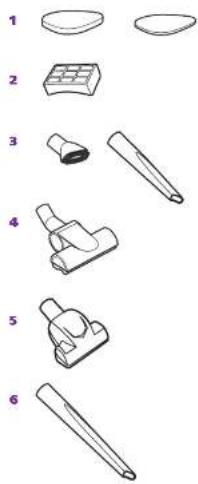
| 1 | Pre-Motor Filter Set XFF350 | |
| 2 | HEPA Filter XHF350 | |
| 3 | Dusting Brush 1121-FJ& Crevice Tool | |
| 4 | Turbo Brush (NV352) | 1117FC |
| 5 | Turbo Brush (NV351) | 119FF |
| 6 | 24" Crevice Tool (NV352) | 1124-FC |
Troubleshooting Guide
English
| PROBLEM POSSIBLE REASONS & SOLUTIONS | |
| Vacuum is not picking up dirt. | Check filters to see if they need cleaning. Follow instructions for rinsing and drying the filters before re-inserting back into the vacuum. (See "Maintenance" sections for instructions.)Dust cup may be full; empty dust cup.Check hose and hose connections for blockages; clear blockages if required.If dust cup is empty, and attachment inlets are clean, check for other blockages. (See "Checking for Blockages" for instructions.) |
| Vacuum lifts scatter rugs (lightweight, movable rugs). | Suction is powerful. Take care when vacuuming scatter-type rugs or rugs with pericately sewn edges. Open the suction release on the handle to decrease suction power.Move the On/Off switch to "I - Section Only" position to doengage the brush roll |
| Airflow is restricted. No suction or light suction. | Check filters to see if they need cleaning. Follow instructions for rinsing and drying the filters before re-inserting back into the vacuum.Dust cup may be full; empty dust cup.Check hose, hose connections, nozzles and accessories for blockages; clear blockages if required.Close the suction release on the handle to increase suction power.If dust cup is empty, and attachment inlets are clean, check for other blockages. |
| Brush roll does not spin | Immediately turn off and unplug vacuum, disconnect the nozzle and remove blockage before reconnecting and turning vacuum back on.Pull the handle toward you end release the floor nozzle to disengage the auto-off feature.Move the On/Off switch to the "II - Brush Roll On" position. |
| Vacuum turns off on its own. | This vacuum cleaner is equipped with a motor protective thermostat. If for some reason your vacuum overheats, the thermostat will automatically turn the unit off. Should this occur, perform the following steps to restart the motor thermostat:1. Move the On/Off switch to the "O" OFF position.2. Unplug the vacuum.3. Empty the dust cup and clean filters.4. Check for blockages in nose, accessories and inlet openings.5. Allow the unit to cool for a minimum of 45 minutes.6. Plug in the vacuum.7. Check the On/off switch to the "O" Off position. |
EURO-PRO FIVE-YEAR (5) LIMITED WARRANTY
EURO-PRO Operating LLC warrants this product to be free from material defects and workmanship for a period of five (5) years from the date of purchase when utilized for normal household use, subject to the following conditions, exclusions and exceptions.
The liability of EURO-PRO Operating LLC is limited solely to the cost of the repair or replacement of the unit at our option. This Limited Warranty does not cover normal wear of parts and does not apply to any unit that has been tampered with or used for commercial purposes. This Limited Warranty does not cover damage caused by misuse, abuse, negligent handling or damage due to faulty packaging or mishandling in transit. This Limited Warranty does not cover damage or defects caused by or resulting from damages from shipping or repairs, service or alteration to the product or any of its parts, which have been performed by a repair person not authorized by EURO-PRO Operating LLC.
If your appliance fails to operate properly while in use under normal household conditions within the warranty period, you may return the complete appliance and accessories with proof of purchase and date, freight prepaid. For customer service support, call 1-800-798-7398 or visit our website at www.sharkclean.com.
If the appliance is found by EURO-PRO Operating LLC to be defective, in EURO-PRO Operating LLC's sole discretion, we will repair or replace it free of charge. Proof of purchase date and a check made payable to EURO-PRO Operating LLC in the amount of \$19.95 to cover the cost of return shipping and handling must be included. * Non-durable parts including, without limitation, filters, brushes and electrical parts which normally require replacement are specifically excluded from warranty.
This Limited Warranty is extended to the original purchaser of the unit and excludes all other legal, implied and/or conventional warranties. The responsibility of EURO-PRO Operating LLC if any, is limited to the specific obligations expressly assumed by it under the terms of this Limited Warranty. In no event is EURO-PRO Operating LLC liable for incidental or consequential damages to anyone of any nature whatsoever. Some states do not permit the exclusion or limitation of incidental or consequential damages, so the above may not apply to you.
This Limited Warranty gives you specific legal rights, and you may also have other rights which vary from state to state or province to province.
*IMPORTANT: Carefully pack item to avoid damage in shipping. Be sure to include proof of purchase date and to attach a tag to item before packing including your name, complete address and phone number with a note giving purchase information, model number and what you believe is the problem with the item. We recommend you insure the package (as damage in shipping is not covered by your warranty). Mark the outside of your package "ATTENTION CUSTOMER SERVICE". We are constantly striving to improve our products, therefore the specifications contained herein are subject to change without notice.
Product Registration
Please visit www.sharkclean.com or call 1-800-798-7398 to register your new Shark® product within ten (£10) days of purchase. You will be asked to provide the store name, date of purchase and model number along with your name and address.
The registration will enable us to contact you in the unlikely event of a product safety notification. By registering you acknowledge to have read and understand the instructions for use, and warnings get forth in the accompanying
Notes
natural_image
Line drawing of a vacuum cleaner with handle and base, labeled Fig 5 (no text or symbols on the device itself)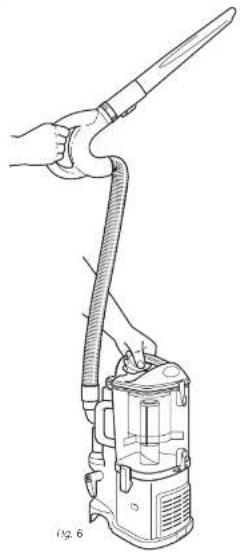
natural_image
Line drawing of a hand holding a handheld vacuum cleaner with a hose, no text or symbols presentMODOS:
1 ASPIRADORA VERTICAL
natural_image
Line drawing of a hand holding a tool next to a portable vacuum cleaner (no text or symbols)ASPIRADORA COMPACTA DESMONTABLE PARA LIMPIEZA PORTÁTIL
natural_image
Line drawing of a person using a vacuum cleaner with a device, labeled Fig. 15 (no text or symbols on the diagram itself)LIMPIE EL PISO EN MODO ASPIRADORA COMPACTA
natural_image
Six numbered line drawings of mechanical components or parts, including a tray, bracket, and rod (no text or symbols)PARTE PARTE NO.
Canada: Virginia St. Laurent, Quebec: H45 147
[Unreadable]
Fupin: 1-20-715-7315
(1) 2016年5月29日
www.sharfclean.com
Barnath © June 16, 2010
Exposed in China / American One
- IMPORTANT SAFETY INSTRUCTIONS
- For Household Use Only
- POLARIZED PLUG:
- WARNING:
- GENERAL ELECTRICAL SAFETY:
- English
- HOSE ATTACHMENTS:
- GENERAL USE:
- DUST CUP/FILTERS/ACCESSORIES:
- GENERAL CLEANING:
- Contents
- Getting Started
- FIRST THING'S FIRST, YOU NEED TO KNOW WHAT'S IN THE BOX YOU JUST OPENED:
- ACCESSORIES:
- CREVICE TOOL
- DUSTING BRUSH
- ACCESSORY HOLDER
- Mode 1: Upright Vac
- TO ASSEMBLE:
- TO USE:
- Mode 2: Detachable Canister
- Above-Floor Cleaning
- CLEAN ABOVE THE FLOOR IN UPRIGHT VAC OR DETACHABLE CANISTER MODE
- With Floor Nozzle
- CLEAN THE FLOOR IN DETACHABLE CANISTER MODE
- Storing
- STORE YOUR VACUUM SAFELY
- Maintenance
- CLEANING THE PRE-MOTOR FILTERS
- Maintenance - cont'd
- CLEANING THE POST-MOTOR HEPA FILTER
- CLEANING THE MOTORIZED FLOOR BRUSH
- CHECKING FOR BLOCKAGES
- Ordering Parts
- Motorized Floor Brush
- PART PART NO.
- Troubleshooting Guide
- EURO-PRO FIVE-YEAR (5) LIMITED WARRANTY
- Product Registration
- MODOS:
- ASPIRADORA COMPACTA DESMONTABLE PARA LIMPIEZA PORTÁTIL
- LIMPIE EL PISO EN MODO ASPIRADORA COMPACTA
- PARTE PARTE NO.
Brand : SHARK
Model : NV352
Category : Vacuum Cleaner