
Rayo S1 - Video projector CANON - Free user manual and instructions
Find the device manual for free Rayo S1 CANON in PDF.


| Product Type | Video Projector |
| Brand | Canon |
| Model | Rayo S1 |
| Projection Technology | DLP |
| Resolution | 1920 x 1080 (Full HD) |
| Brightness | 3000 ANSI Lumens |
| Contrast Ratio | 10000:1 |
| Lamp Life | Up to 3000 hours (Normal), 5000 hours (Eco) |
| Projection Size | 30 - 300 inches |
| Throw Ratio | 1.2 - 1.5:1 |
| Keystone Correction | Vertical ±30° |
| Zoom | 1.2x Manual |
| Connectivity | HDMI 1.4, VGA, USB-A, Audio Out |
| Noise Level | 30 dB (Eco mode), 35 dB (Normal) |
| Power Consumption | 200 W (Normal), 150 W (Eco) |
| Dimensions (W x D x H) | 300 x 200 x 100 mm |
| Weight | 2.5 kg |
| Operating Temperature | 5°C to 35°C |
| Lamp Type | UHP |
| Filter Cleaning | Every 100 hours of use |
| Spare Parts | Lamp (model: LC-RAYOS1), Air Filter |
| Warranty | 2 years |
Frequently Asked Questions - Rayo S1 CANON
User questions about Rayo S1 CANON
0 question about this device. Answer the ones you know or ask your own.
Ask a new question about this device
Download the instructions for your Video projector in PDF format for free! Find your manual Rayo S1 - CANON and take your electronic device back in hand. On this page are published all the documents necessary for the use of your device. Rayo S1 by CANON.
USER MANUAL Rayo S1 CANON
Portable Mini Projector
Rayo S1
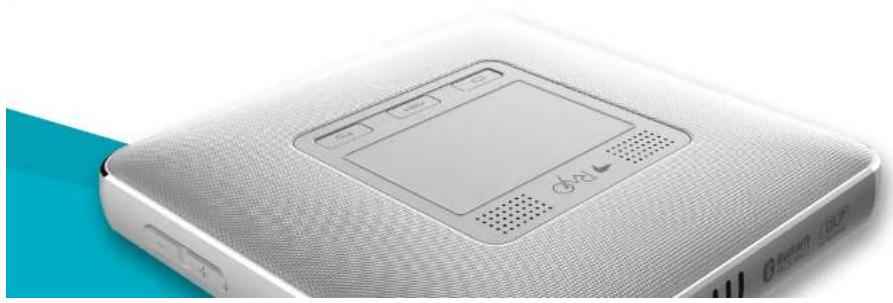
natural_image
Close-up of a white electronic device with a digital display and ventilation slots, no visible text or symbols.Contents
Before Use
Notices 4
For safe use
Do not use near a medical device, such as a pacemaker. 4
Do not use near a microwave oven. 4
Communication cannot be made if there are metals, steel, or concrete between the projector and a wireless device. 5
Do not use near a local area wireless station for identifying mobiles or specific low power wireless stations. 5
Safety Warnings and Caution 5
Installing
About the power supply
landing
Maintenance and repairs
Product characteristics
Bluetooth speaker function 8
Sub battery functions 8
Projector function 8
Focus adjustment 15
Volume button 15
Reset 16
Touchpad 16
Select/Run
Menu Displays
Moving the Screen Up and Down
Moving the Screen Left and Right
Bluetooth
Note on Bluetooth ^® Connections 19
Bluetooth® pairing 19
Bluetooth ^® pairing from the source device 20
Disabling Bluetooth ^® pairing with the source device 20
Using the Bluetooth ^® Speaker (Hands-free) 20
Bluetooth speaker (hands-free) button
Projector
Note on wireless connections 22
Home screen 23
About us
FCC CAUTION
42
Application (My App)
Using an application 34
Music
Video
Albums
FileExplorer
Calculator
Clock
APKinstaller
Downloads
EshareServer
Camera Connect
WPS Office
Product specification
Connecting a USB
Using the projector as a portable disk 38
Detecting a USB 38
Detecting a USB mouse 39
Using as a portable battery 39
Using an external speaker 40
Before Use
Notices
Product images and display screens in this manual are for illustrations purposes only and may differ from the actual product or screen. Furthermore, they are subject to change: new components can be added or deleted without prior notice for product quality improvement. We appreciate your kind understanding.
For safe use
The purpose of the following contents is to protect the safety of the user and to prevent property damage. Before using the product, make sure to read the user manual and familiarize yourself with all precautions and control methods.
Do not use near a medical device, such as a pacemaker.
Communication cannot be made if there are metals, steel, or concrete between the projector and a wireless device.
Communication cannot be made or the speed will be reduced if there is a wall or partitions made of metals, steel, or concrete between the projector and a wireless device. In this case, change the installation location of the projector and the wireless device or remove the partitions.
Do not use near a local area wireless station for identifying mobiles or specific low power wireless stations.
The following operate in the same frequency band as this product: Local area wireless stations for identifying mobiles that are used in consumer industry, such as in microwave ovens, scientific products, and medical devices and factory lines (license required); specific low power wireless stations (license not required); and amateur wireless stations (license required).
- Before using the product, make sure that there are no local area wireless stations for identifying mobiles, specific low power wireless stations, or amateur wireless stations near your location.
- If the product generates an electronic magnetic signal that is harmful to the local area wireless stations for identifying mobiles, immediately stop transmitting the signals and contact our customer center to consult on the necessary actions for avoiding interferences (e.g., partition installation).
Installing

Warning
- Do not install near flammable materials, such as alcohol or thinner. If it comes in contact with the electrical parts inside the product, it may cause fire or electrical shock.
- Do not place a metallic accessory or containers containing liquid on top of the product. If alien substance comes in contact with the electrical parts inside the product, it may cause fire or electrical shock. If it enters inside the product, immediately stop use by turning off the power of the main body and contact the seller.
- Do not use near a medical device. The electrical magnetic signals from the product can cause malfunctions or accidents.

Caution
- Do not install in the following places: It can cause fire, injury, or electrical shock. Unstable location/a vibrating location/location likely to be effected by rain or snow/high temperature location/near a flammable substance/location likely to block the air duct (near a wall, bed, sofa, long fur carpets, etc.)/location with bad ventilation/humidity or dusty location/location exposed to the direct sunlight or outdoors
- Do not connect to the terminal of the product accessories other than what is designated. It may cause fire or electrical shock.
About the power supply

Warning
- Do not do anything to damage, process, pull, or forcefully bend the power adapter. Moreover, do not place a heavy object on top of the power adapter. It may cause fire or electrical shock.
Handling

Warning
- Do not disassemble or remodel the product. It may cause fire or electrical shock.
- Keep the power adapter, cables, and electrical parts out of the reach of children. It may cause unexpected accidents.
- If you detect strange sounds, smells, heat, or smoke, turn the power off at the main unit supply, immediately stop the use and contact the seller. If you continue to use, it may be very dangerous and cause fire or electrical shock.
- Do not use a flammable spray near the product. If alien substances, such as gas come in contact with the electrical parts inside the product, it may cause fire or electrical shock.
- You cannot remove the battery from the product. Do not place the product near a source of fire or heat.
- Due to thermalization, the battery life will slowly reduce after purchase. If the duration of use is significantly shortened, you can replace or repair the battery.
- If you are using the projector for the first time, or have not used it for a long time, charge the battery sufficiently before use.
- If you do not use the product for a long time, store at room temperature of 0 - 40°C.
Maintenance and repairs

Warning
- Turn off the power when cleaning the product. It may cause fire or electrical shock.
Product characteristics
Bluetooth speaker function
You can use it as a Bluetooth speaker and since it has a microphone function, it can be used as a mic/speaker for audio conferences.
Sub battery functions
You can use it as a standalone sub battery. Connect it to a device that you want to charge.

Caution
While charging an iOS device, it is necessary to keep the power turned on for this product. While charging an Android device, it is not necessary to keep the power turned on for this product.
Projector function
Basic package
Check for In Box Accessories

Note
Please check whether the following accessories are included in the box: Accessories included in the box are subject to change without prior notice.
Main body
USB cable (1m)
Quick Guide
Type-A to Micro-USB


Name of Each Part
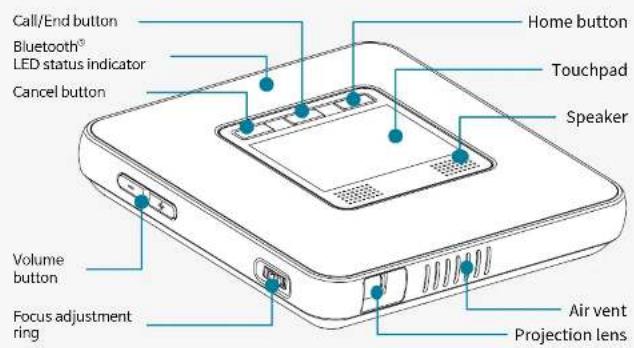
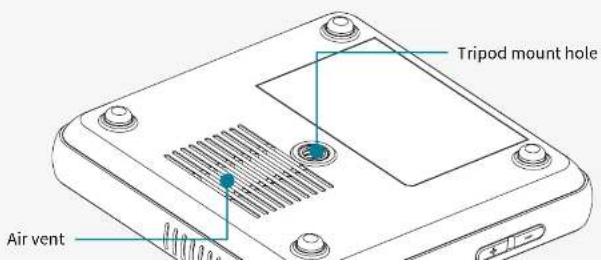
Button functions
| Button Function | |
Power switch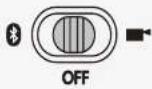 | Slide the switch to the right to turn on Projector mode.Slide the switch to the left to turn on Bluetooth ^® mode.Slide the switch to the center to turn the power off. |
Home | Projector mode: Press briefly to see the home screen display. |
Call/End | Projector mode: Same as the OK button function for selecting screens.Bluetooth ^® mode: You can make, receive, or end a call from your smart device. |
Cancel button | Press briefly to return to the previous screen. |
Basic contro
Charging functions
- Connect the micro USB charging jack to the power terminal of the projector.

Caution
- You must only use an authentic charger (DC 5V/2.4A). Use of a non-certified charger can cause a malfunction.
-
If you charge the product using a publicly available portable battery, make sure to check whether the rated output fits the projector specification before use. (Projector spec: 5V/2.4A)
If you use a charger with a rated output lower than the required specification, it can cause the main unit to malfunction. -
When the charging lamp turns green, disconnect the charger from the projector.

Note
- A red charging lamp means it is charging, a green charging lamp means charging is complete.


Note
- The charging or usage time may vary depending on the charging condition or the environment of use.
- The battery life decreases after purchase due to aging. You cannot exchange the battery included in the product. If the battery life is significantly shortened, due to aging, it can be replaced or repaired.
Turning On/Off
Turning on in Bluetooth® Mode

Note
• To use the Bluetooth function, slide the power switch to Bluetooth mode.
• If you turn on the device in Bluetooth mode, you cannot use Projector mode.
- For more information on how to turn on Projector mode, see "Turning on in Projector Mode" on page 14.
1. Check whether the device is turned off.
If the power switch is in the center, the device is turned off.

Turning on in Projector Mode

Note
• To use the Projection function, slide the power switch to the right (Projector mode).
• If you turn on the device in Projector mode, you cannot use Bluetooth mode.
- For more information on how to turn on Bluetooth mode, see "Turning on in Bluetooth® Mode" on page 13.
- Check whether the device is turned off.
If the power switch is in the center, the device is turned off.
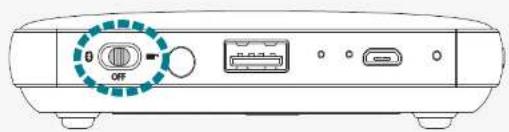
- Slide the power switch to the right (Projector mode ▶)
As the projector turns on, the screen will be projected via the projection lens.
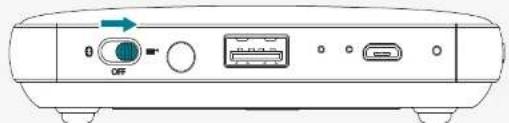
natural_image
Diagram of a device rear panel with labeled ports and an arrow indicating 'OFF' (no text or symbols beyond basic labels)
Important
- In Projector mode, slide the power switch to the center (OFF), and a confirmation dialog will appear on the projection screen. Select OK to turn off the power.
- If you select Cancel, you can continue to use Projector mode. When canceled, make sure to slide the power switch back to Projector Mode.

Note
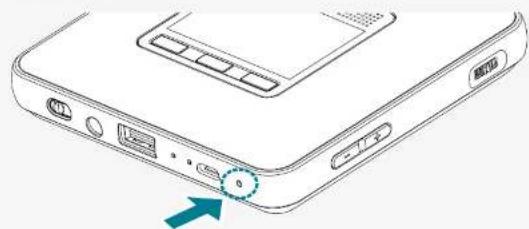
- If the device is not operating, reset by pressing the Reset button on the rear panel of the product.
• For more information on resetting, see "Reset" on page 16.
Focus adjustment
Turn the focus adjustment ring clockwise and counterclockwise until the projection screen becomes clear.

Note
- Gently turn the focus adjustment ring to set the focus. If you exert excessive force on the focus adjustment ring, it can cause damage or breakage.
• The projection may be out of focus if the projection distance is out of the range. - The larger the projection distance (distance between the product and the screen), the larger and darker the screen.
Reset
Reset the product if it is not operating or it is not powering off.
- Use a thin non-conducting tool, such as a toothpick, and press the Reset button for about one second.
natural_image
Line drawing of a device rear panel with ports and a highlighted connection point (no text or symbols)- The product will turn off and enter the reset status. The product is temporarily turned off and then on again.
Touchpad
You can control the touchpad to select a menu, run an application, click a button, or input via the keyboard on the projected screen.

Note
- Make sure that the touchpad does not come in contact with any electrical objects. Any flow of electrical current, such as an electrical shock can cause a malfunction or failure.
- Please note that the edge of the touchpad does not detect touch so it may not respond correctly to touch.
• Use your fingers to touch the touchpad.
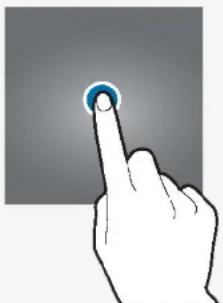
Select/Run
Gently tap the touchpad to run an application, select a desired menu, click displayed buttons on the screen, or for keyboard input.
natural_image
Hand cursor clicking a button on a screen (no text or symbols visible)Moving the Screen Up and Down
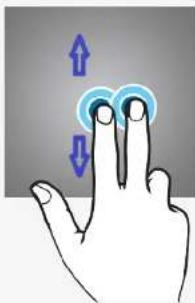
To move the screen up or down, use two fingers to tap and drag up or down.
natural_image
Hand gesture with finger and finger icons, showing blue arrows indicating movement (no text or symbols)Moving the Screen Left and Right
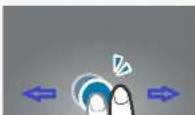
To move the screen left or right, two quick taps holding on second and then dragging left or right with one finger (like shown in picture). Or, tap the page arrows or the point on the page.
Bluetooth
Note on Bluetooth® Connections
- Bluetooth and Projector mode cannot be used together.
- During a Bluetooth connection, the quality of connection can vary depending on the connected device or environment.
- The wireless equipment can experience electromagnetic interference and any services related to personal safety cannot be provided.
- The company is not responsible for any problems resulting from loss, blocking, or misuse of data transmitted or received by using the Bluetooth function.
- You must make sure to check that the connecting device is trustworthy and verified for security before transmitting or receiving data. If there is an interfering object between devices that transmits and receives data, the effective network connectivity range can decrease.
- It may be incompatible with some devices, including devices not certified by Bluetooth SIG (Special Interest Group).
- Do not use the Bluetooth function for illegal activities (illegal copying, air transmission, or transmission for profits and etc.). The company is not liable for any problems resulting from these actions.
Bluetooth® pairing from the source device
- Turn on the Bluetooth function in the device to be connected.
- In the device search list for Bluetooth, select "MiniPJ BT SPK."
- If the projector name is not displayed in the search list, then turn on the option to display device names or restart the Bluetooth function.
- When the Bluetooth® connection is complete, the Bluetooth connection icon will be displayed on the status bar of the device.
Disabling Bluetooth® pairing with the source device
- On the Settings screen, select Bluetooth.
- The name of paired devices will be displayed.
- Tap the device name that you want to disable pairing for.
- Select Unregister.
Using the Bluetooth® Speaker (Hands-free)
The product can be used as a Bluetooth speaker. With its hands-free function, you can dial receive or send a call while connected to the Bluetooth speaker.
Bluetooth speaker (hands-free) button
- Pause/Play: While using the Bluetooth speaker, press the "Call/End" button.
• Volume up: Long press the "+" volume button.
• Volume down: Long press the “-” volume button. - Move to the previous track Short press the "1" volume button.
- Move to the next track Short press the “-” volume button.
- Make a call: Press the "Call/End" button twice.
- End a call: Press the "Call/End" button during a call.
- Answer a call: Press the "Call/End" button during an incoming call.
Projecto
Note on wireless connections
- The applications or processes running on the smart device can delay the transmission speed during a wireless connection.
- The performance of the wireless connection can vary depending on the OS type of your smart device and the wireless environment of your manufacturer.
- With "SoftAP" mounted on the product, you can set up a wireless connection without using a router. Before using the DLNA, make sure that a wireless supported smart device or laptop has a DLNA supported application or media players installed. For more details, see the user guide of your device.
- For smart devices running on Android OS, Android OS 4.2.2 or later is required to set up a mirroring connection.
- For iOS devices, iOS 8.0 or later is required to use the sharing function.
- When you set up a mirroring connection from a Windows computer, specifications for graphics, wireless LAN, hardware, and software of Windows 8.1 or later are required.
- At a DLNA-based wireless connection, the Internet connection of the smart device will use a 3G/4G connection.
- When you play a video from the middle after setting up a wireless connection to a smart device, buffering may occur depending on the type of a player on the device. So make sure to play from videos from the beginning.
- When you change the wireless connection mode (Bluetooth or Projector), make
Home screen
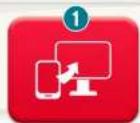
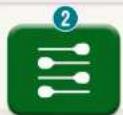
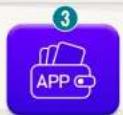
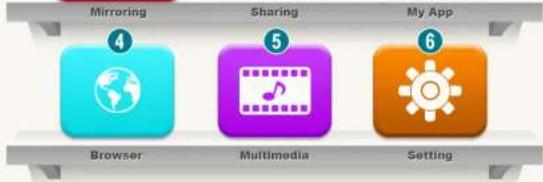
The Home screen is the start screen for running the main applications or features. Tap the icon on the Home screen to move to the desired page or the features window.

10:16 Thu 05-16-2019
flowchart
graph TD
    A["Mirroring"] --> B["4"]
    C["Sharing"] --> D["5"]
    E["My App"] --> F["6"]
    G["Browser"] --> H["Multimedia"]
    I["Setting"] --> J["Settings"]


Mirroring : Runs when connected to an Android or Windows OS installed


ing: Runs when connected to an iOS installed device.


App : Runs various applications that are installed.
Mirroring
Mirroring connection (Android OS)
- On the home screen, click the "Mirroring icon to switch to waiting mode."
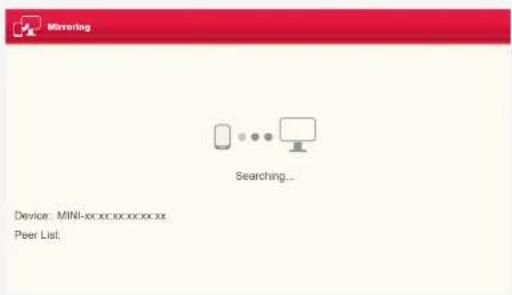

Note
• To use the mirroring function, turn on the Wi-Fi in Device Settings.
• Make sure that Wi-Fi is turned ON.
- Switch the smart device to Mirroring mode.
Turn on the Wi-Fi on the smart device. (No need for an Internet connection.)
3 Search for a connectable device from the smart device.
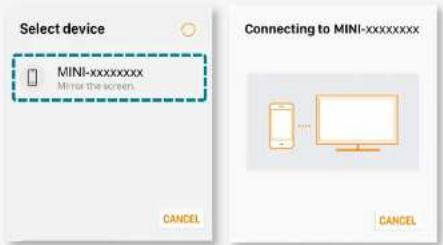
4 Select the same device name as the device name on the projection screen.

Note
- The access confirmation screen for a device to be connected to the projector will be displayed where you can choose to connect or disable the connection.
- If you select Connect and a connection is set up successfully, the screen of the smart device will be projected on the projector.
• After use, make sure to turn off the mirroring function on your smart device.
Mirroring connection (Windows OS)

Note
• To use the mirroring function, turn on the Wi-Fi in Device Settings.
• Make sure that Wi-Fi is turned ON.
- Turn on the Wi-Fi on your computer. (No need for an Internet connection.)
To launch the Charm bar on the computer, tap Device > Display.

Note
- Press the Windows key on the bottom left of the keyboard together with the K key to display the Device menu immediately.
- Different names are used depending on the OS version. For more details, see the user guide of your device.
2 On the display screen, select Projector.

Note
If there is a problem with the connection, proceed as follows:
-
On the display screen, click Add a Wireless Display.
-
Select this device name on the projector and select Delete Device.
3 Select Add Device and select the device name again. ※ The device name is shown as 'MINI-xxxx.' If the mirroring screen is displayed on the projector, the connection is complete.
Sharing
Sharing connection (iOS)
- On the home screen, click the "Sharing Eicon to switch to waiting mode."
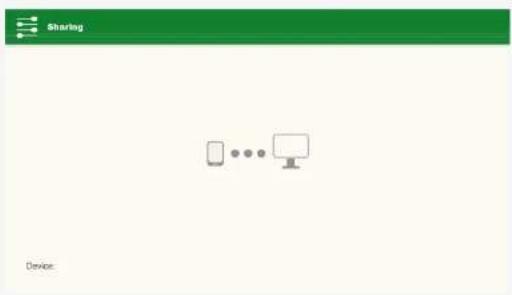
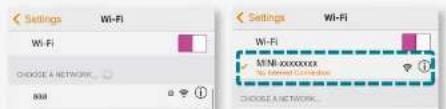
- In the Wi-Fi setting on the iOS device, select a name of device to connect and connect to the Wi-Fi network.
※ The device name is shown as 'MINI-xxxx.'
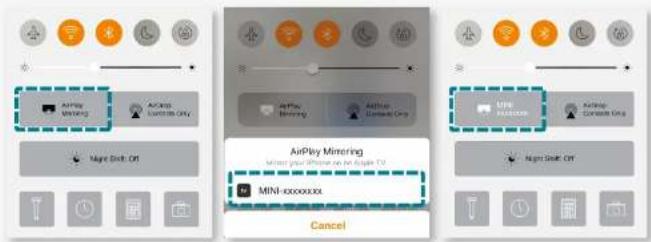
- After use, make sure to turn off the AirPlay mirroring function for iOS.

Note
Registering EShareServer
- Products are shipped after being registered on the EShareServer. However, you must register it again after updating the firmware.
• Personal information is not collected during registration.
Complete the registration as follows:
Prepare the Wi-Fi environment which can be used to access the Internet.
2 Click My App) EShareServer (E) to run the app. If correctly connected to the internet, registration is complete.
Browser
You can access the website to search for information or add it to your bookmarks. However, you must have a connection to the Internet before using a browser.
- Click the "Browser" icon on the Home screen to run the web browser application.

Note
It requires an Internet environment, such as a separate mobile Wi-Fi router.
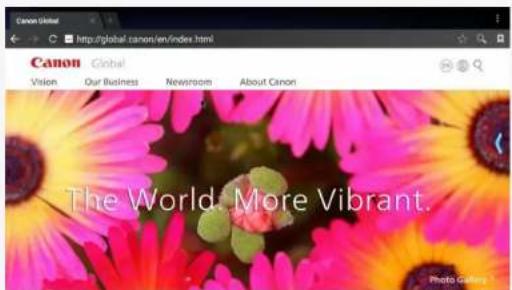
- Click the address bar.
- Enter a website address or keyword then click Move.
Multimedia
Click the "Multimedia" icon on the Home screen to move to the screen to run multimedia applications.
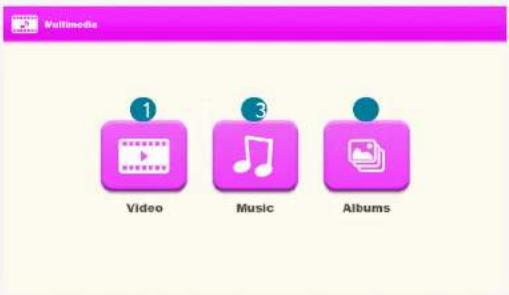
1 Video: You can see a list of videos and select a file to play.
Music: You can see a music library and select a file to play.
3 Albums: You can see a list of images and select a file to view.
Setting
Click the "Setting ✪icon on the Home screen to move to the screen to check or change the device settings.
Networking Setting
Wi-Fi Setting

Note
- You will be automatically connected to the Wi-Fi that was previously connected without having to enter the password.
-
To prevent being automatically connected to the previously connected Wi-Fi network, click on the Wi-Fi network on the list and select "FORGET."
-
Click the "Setting" icon on the Home screen and select "Network Settings" on the Setting window.
- Select "Wi-Fi Setting" in Network Setting and turn on the feature.
- Select the Wi-Fi you want to connect to from the list of available Wi-Fi network list. Enter the password for a locked connection.
- Click Connect to connect to the Wi-Fi network.
Hotspot Setting
You can connect with other devices using Hotspot. Enable or disable Hotspot for sharing the mobile data of your product with other devices or computers.
Language Setting
You can set the input environment displayed on the screen, such as languages and characters.

Note
Some options may not be available depending on the selected language.
Language Setting
Select the language to use in the application.
Input Selector
Select the keyboard to use to enter characters. Choose for each language being used.
Other Setting
Application Setting
Set the application.
Factory Reset Setting
Reset all settings to default.
Date And Time Setting
Set the method for displaying the date and time of the projector.
About us
About the machine
Check the device information.
Local upgrade

Note
- During file transmission, do not separate the USB memory. It can damage data and the product.
- Check if the build number of the software to update later than the currently installed version.
- For more information on how to turn on Projector mode, see "Turning on in Projector Mode" on page 14.
- If it is saved in the sub folders of the USB memory or the filename is different, then the update will not run.
• The USB memory must be already formatted in the FAT32 format. - During the update, the power of the device will turn off/on several times. Do not operate with the device until the update is complete.
- Please note that if you forcefully turn off the power, the software may be damaged.
Application (My App)
Click the "My App icon" on the Home screen to see information about the displayed application.
Using an application
Music
You can enjoy music from different categories and customize the playback environment.
1 Select [Music] on the My App screen.
2 Select a category and the music to play.
3 Select an album or image at the bottom of the screen to launch the Music Playing screen.
Video
You can play saved videos and customize the playback environment to your preference.
1 Select [Video] on the My App screen.
1 Select [Resource Manager] on the My App screen.

Note
• Built-in flash: You can check the files stored in the product.
• USB: You can check the files stored in the external memory.
• NetHood: You can access the shared folders on the same network.
2 Click Search to search for a file or folder.
Calculator
Select [Calculator] on the My App screen to use the calculator.
Clock
You can find Alarm settings, World time settings, Stopwatch, and Timer features.
Alarm
Alarm settings
Select [Clock] on the My App screen → and click the Alarm icon on the top left of the screen.
Deleting the alarm
1 Select [Clock] on the My App screen → and click the Alarm icon on the top left of the screen.
2 From the alarm list, click the trash bin icon for the alarm you wish to delete.
World time
Adding world time
1 Select [Clock] on the My App screen → and click the World Time icon on the top left of the screen.
2 Click the earth shaped icon on the bottom right of the screen.
3 Select a city of your choice.
The selected city will have a checked box on the left and is added to the list of selected cities on the top of the screen.
Deleting world time
1 Select [Clock] on the My App screen → and click the World Time icon on the top left of the screen.
2 Click the earth shaped icon on the bottom right of the screen.
3 From the list of selected cities, click [X] next to the city to delete.
Stopwatch
- Select iClean, on the Mr. Newhouse, and click the Chromatic Data on the top
APKinstaller
You can install the APK file from your product or a USB memory.
Downloads
The list of files downloaded from the Internet is displayed. You can install (for APK file), delete, or change the name.
EshareServer
This is a feature related to the usage registration required for using the mirroring feature in an iOS device. If the source device is not found for the sharing feature, the device registration through EshareServer may be incomplete. Click the EshareServer icon to register your device. Also, an additional Internet connection environment is required for EshareServer registration.
Camera Connect
You can set up a Wi-Fi connection to a Cannon digital camera to project images and videos from the camera on to the projector.

Note
We can deliver this feature for Consumer digital consensus that recommends Wi-Fi connectivity.
Connecting a USB
Using the projector as a portable disk
The product can be detected as a portable disk. Also, by controlling the connected computer, you can exchange files between the product and the computer.

Note
- During file transmission, make sure that the connection to the USB cable (Micro-USB to USB-A) included in the box is maintained. A disconnection can cause damage in the product and data.
-
You may experience problems while connecting from the USB-HUB. Directly insert the USB to the USB port.
• USB-Type A cannot be used for this feature. -
Turn on the device in Projector mode.

Note
For more information on how to turn on Projector mode, see "Turning on in Projector Mode" on page 14.
-
Connect the product and the computer with the included USB cable (Micro-USB to USB-A).
-
Connect a USB memory to the USB terminal of the product (USB-A).
- When the USB memory is detected as external memory, you will have permission to read and write data within the USB memory.
Detecting a USB mouse
- Turn on the device in Projector mode.
- Connect the projector to a USB mouse.
- When a mouse is recognized, it can be used just like your touchpad.
Using as a portable battery

Note
While charging an iOS device, it is necessary to keep the power turned on for this product. While charging an Android device, it is not necessary to keep the power turned on for this product.
- Connect the product and the device to charge using the USB cable. (Micro-USB terminal on the main unit)

Note
Using an external speaker
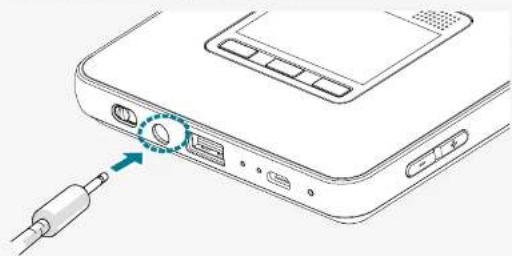
You can connect external speakers to the product to generate audio output.

Note
-
When you connect to external speakers, the internal speakers will not operate.
• You must use external speakers only.
• Make sure to disconnect the external speakers when not in use. -
Connect the external speakers to the audio terminal.
natural_image
Line drawing of a device rear panel with a USB port and cable connector (no text or symbols)- Check for correct sound output from the connected external speakers.
Troubleshooting
When the power does not turn on
- Press the reset button to turn the power on. For more information on resetting, see "Reset" on page 16.
- Check the battery level.
When you cannot connect to a wireless network
- Check the Wi-Fi environment.
- If your device cannot connect to Wi-Fi, press the reset button and try connecting again.
When the screen is trapezoid
- Adjust the location so that the screen and the product's projection light are perpendicular.
If the product is not operating or it does not power off
- Press the reset button for a second. For more information on resetting, see "Reset" on page 16.
When you cannot play a video after a DLNA connection
- Check if the media player of your smart device supports DLNA.
Legal notice
Registered trademark
DLNA is a unique trademark or registered trademark of DLNA.org.
Wi-Fi is a trademark or registered trademark of www.wi-fi.org.
Bluetooth ^® is a trademark or registered trademark of Bluetooth.org.
Android is a trademark or registered trademark of Google Inc.
AirPlay is a trademark for Apple Inc., which is registered in the USA and other countries.
Windows is trademark or registered trademark for Microsoft Corporation in the USA, Japan and other countries.
Other company names or product names are trademarks or registered trademarks of each company.
FCC (Federal Communications Commission)
Projector Model Rayo S1
FCC ID: 2AR9TRAYOS1
This device complies with part 15 of the FCC Rules. Operation is subject to the following two conditions: (1) This device may not cause harmful interference, and (2) this device must accept any interference received, including interference that may cause undesired operation.
FCC CAUTION
This equipment may generate or use radio frequency energy. Changes or modifications to this equipment may cause harmful interference unless the modifications are expressly approved in the manual. The user could lose the authority to operate this equipment if an unauthorized change or modifications is made.
This equipment has been tested and found to comply with the limits for a Class B digital device, pursuant to part 15 of the FCC Rules. These limits are designed to provide reasonable protection against harmful interference in a residential installation. This equipment generates, uses and can radiate radio frequency energy and, if not installed and used in accordance with the instructions, may cause harmful interference to radio communications. However, there is no guarantee that interference will not occur in a particular installation.
If this equipment does cause harmful interference to radio or television reception, which can be determined by turning the equipment off and on, the user is encouraged to try to correct the interference by one or more of the following measures:
• Reorient or relocate the receiving antenna.
- Increase the separation between the equipment and receiver.
- Connect the equipment into an outlet on a circuit different from that to which the receiver is connected.
- Consult the dealer or an experienced radio/TV technician for help.
This transmitter must not be co-located or operated in conjunction with any other antenna or transmitter.
This equipment complies with FCC radiation exposure limits set forth for an uncontrolled environment and meets the FCC radio frequency (RF) Exposure Guidelines. This equipment should be installed and operated keeping the radiator at least 8 inches or more away from person's body.
Canon U.S.A., Inc.
Latin America Group
1 Canon Park
Melville, NY 11747
U.S.A.
Phone: +1 631-330-5000
https://www.cla.canon.com/
Product specification
| Product name | Projector | ||
| Model name | Rayo S1 | ||
| Optics | Display | DMD | |
| Resolution | WVGA (854x480) | ||
| Maximum input resolution | Full HD (1920x1080) | ||
| Light source | RGB LED | ||
| Brightness | 100 lumens | ||
| Screen size | 3.3 ft | ||
| Focus adjustment | Manual | ||
| Aspect ratio | 16:9 | ||
| Screen offset | 100 % | ||
| Contrast ratio | 800:1 | ||
| Throw ratio | 1.6:1 | ||
| Input | USB | USB Type-A | |
| Bluetooth® | BT4.0 | ||
| Output | Audio | ∅3.5mm jack | |
| Internal speaker | 3W (Woofer) | ||
| Wireless specification | Responsive OS | iOS, Android, Windows OS | |
| Specification | Frequency | 2.4GHz/5GHz | |
| Channel | 802.11 a/b/g/n | ||
| Adapter Specification | Adapter Type | Switching power supply | |
| Model Name | S012CDU0500240 | ||
| Manufacture | TEN PAO INDUSTRIAL CO LTD | ||
| Input | 100-240V a.c, 50-60Hz, 0.4A | ||
| Output | DC 5V 1A | ||
| Dimension | Size (WxDxH) | 4.1 x 4.1 x 0.8 inches | |
| Weight | 0.52 lb | ||
| Environment | Operating temperature | 32~104 °F | |
| Operating humidity (relative) | 0~80 %(No dew condensation) | ||
| Battery capacity | Capacity | 14.06Wh (3.7V, 3,800mAh) | |
| Charging time | Max 4 hours | ||
| Usage time | Max 2 hours | ||
| Frequency range | WLAN | 2412 MHz ~ 2472 MHz (20 dBm) / 5180 MHz ~ 5240 MHz (23 dBm) / 5745 MHz ~ 5825 MHz (27 dBm) | |
| BT | 2.4 GHz ~ 2.48 GHz | ||
Canon U.S.A., Inc. Latin America Group
One Canon Park
Melville, NY 11747
U.S.A.
Phone: +1 631-330-5000
https://www.cla.canon.com/
UMQM-0004-000
- Portable Mini Projector
- Rayo S1
- Contents
- Before Use
- For safe use
- Product characteristics
- Bluetooth
- Projector
- Application (My App)
- Product specification
- Connecting a USB
- Notices
- Do not use near a local area wireless station for identifying mobiles or specific low power wireless stations.
- Installing
- Warning
- Caution
- About the power supply
- Handling
- Maintenance and repairs
- Bluetooth speaker function
- Sub battery functions
- Projector function
- Basic package
- Check for In Box Accessories
- Button functions
- Basic contro
- Charging functions
- Note
- Turning On/Off
- Turning on in Bluetooth® Mode
- Check whether the device is turned off.
- Turning on in Projector Mode
- Important
- Focus adjustment
- Reset
- Touchpad
- Select/Run
- Moving the Screen Up and Down
- Moving the Screen Left and Right
- Note on Bluetooth® Connections
- Bluetooth® pairing from the source device
- Disabling Bluetooth® pairing with the source device
- Using the Bluetooth® Speaker (Hands-free)
- Bluetooth speaker (hands-free) button
- Projecto
- Note on wireless connections
- Home screen
- Mirroring
- Mirroring connection (Android OS)
- Sharing
- Sharing connection (iOS)
- Registering EShareServer
- Browser
- Multimedia
- Setting
- Networking Setting
- Wi-Fi Setting
- Hotspot Setting
- Language Setting
- Input Selector
- Other Setting
- Application Setting
- Factory Reset Setting
- Date And Time Setting
- About us
- About the machine
- Local upgrade
- Using an application
- Music
- Video
- Calculator
- Clock
- Alarm
- Alarm settings
- Deleting the alarm
- World time
- Adding world time
- Deleting world time
- Stopwatch
- APKinstaller
- Downloads
- EshareServer
- Camera Connect
- Using the projector as a portable disk
- Detecting a USB mouse
- Using as a portable battery
- Using an external speaker
- Troubleshooting
- When the power does not turn on
- When you cannot connect to a wireless network
- When the screen is trapezoid
- If the product is not operating or it does not power off
- When you cannot play a video after a DLNA connection
- Legal notice
- Registered trademark
- FCC (Federal Communications Commission)
- FCC CAUTION
- Canon U.S.A., Inc.
- Latin America Group
Brand : CANON
Model : Rayo S1
Category : Video projector