
FU-888SV - Air purifier SHARP - Free user manual and instructions
Find the device manual for free FU-888SV SHARP in PDF.


| Product Type | Air Purifier with Plasmacluster Ionizer |
| Model | FU-888SV |
| Brand | Sharp |
| Dimensions (W x D x H) | 380 x 196 x 540 mm |
| Weight | 6.5 kg |
| Power Supply | AC 220-240V, 50/60Hz |
| Power Consumption | 65 W (max) |
| Air Flow (CADR) | 240 m³/h |
| Recommended Room Size | Up to 26 m² |
| Filtration System | Pre-filter, Washable HEPA (H14), Activated Carbon, Plasmacluster Ionizer |
| Fan Speeds | Low, Medium, High, Turbo |
| Noise Level | 20 - 48 dB(A) |
| Timer | 1, 2, 4, 8 hours |
| Air Quality Sensor | Dust and odor sensor with LED indicator |
| Filter Life | HEPA: 2 years, Activated Carbon: 2 years |
| Maintenance | Pre-filter vacuum every 2 weeks; HEPA wash every 3 months; carbon filter replace every 2 years |
| Safety Features | Auto shut-off when front panel opened, child lock |
| Spare Parts | Replacement filters: FZ-F80SHF (HEPA), FZ-F80SDF (Activated Carbon) |
| Repairability Index | 8.5/10 |
| Warranty | 2 years |
Frequently Asked Questions - FU-888SV SHARP
User questions about FU-888SV SHARP
0 question about this device. Answer the ones you know or ask your own.
Ask a new question about this device
Download the instructions for your Air purifier in PDF format for free! Find your manual FU-888SV - SHARP and take your electronic device back in hand. On this page are published all the documents necessary for the use of your device. FU-888SV by SHARP.
USER MANUAL FU-888SV SHARP
natural_image
Illustration of a remote control panel with a scroll wheel (no text or symbols visible)The unit controls the ratio of negative cluster ions and positive cluster ions depending on the condition of the room.
- Clean mode
Approximately the same amount of positive and negative cluster ions are discharged. This mode is effective for removing mold fungus in the air.
- Refresh mode
In this mode, the ratio of negative cluster ions is increased. Negative ions are ions that can be found most in the natural environment such as near waterfalls, etc., and have a characteristic of gently refreshing the body.
HEPA Filter
• High-efficiency particulate air filter
Stamina-power carbon
- Powerful deodorization by large particles of columnar charcoal.
CONTENTS
SAFETY PRECAUTIONS ...... E-2
- CAUTIONS CONCERNING THE USAGE. OF THIS PRODUCT ....E-3
- CAUTIONS CONCERNING . THE INSTALLATION ....E-3
PARTS NAMES ......E-4
- ACCESSORIES ....E-5
INSTALLATION E-6
• HOW TO PUT THE UNIT ON A TABLE .....E-6
• HOW TO MOUNT THE UNIT ON A WALL.....E-7
PREPARATION...... E-8
• INSTALLING THE FILTERS.....E-8
- INSERTING BATTERIES INTO THE REMOTE CONTROL ....E-8
• HOW TO USE THE REMOTE CONTROL ...E-9
OPERATION E-10
- Do not use the unit if the power cord or plug is damaged or the connection to the wall outlet is loose.
Electrical shock, short circuit and/or fire may occur as a result.
- Do not damage, break, coat, forcefully bend, pull, twist, bundle, pinch or place heavy objects on the power cord.
If the power cord is damaged, fire and/or electrical shock may occur as a result.
- Do not operate at voltage other than AC 220\~240V.
Fire and/or electrical shock may occur as a result.
- Do not modify by yourself. Repair and disassembly of this product are to be performed by authorized service personnel only.
Fire, electrical shock and/or injury may occur as a result.
For repair, contact your dealer or the nearest Sharp Service Center.
• Periodically remove dust from the power plug
Accumulated dust on the power plug may cause bad insulation from humidity, etc.
Fire and/or electrical shock may occur as a result.
- When cleaning the unit, be sure to remove the power plug from the wall outlet.
In addition, never handle the power plug with wet hands.
Electrical shock and/or injury may occur as a result.
- Do not use in any place where oil content in the air, such as cooking oil, is high.
Cracking of the unit surface may occur as a result.
- Do not wipe the unit with benzene or paint thinner. Also, do not spray insecticides on the unit.
Cracking, electrical shock and/or fire may occur as a result.
- Do not operate the unit when using fuming type insecticides.
Chemical ingredients may accumulate inside the unit and then discharge from the exhaust port when the unit operates. Discharge of such chemicals may affect your health.
- Do not let the unit intake flammable objects or cigarette ignited with fire.
The unit may ignite as a result.
- Do not use the unit where it is humid, such as in a bathroom, etc., or where the unit may get wet.
Electrical shock and/or malfunction may occur as a result.
CAUTIONS CONCERNING THE USAGE OF THIS PRODUCT
- Do not block the intake and exhaust ports.
- Do not use the unit near or on hot objects, such as a stove, etc. Also, do not use the unit where it may come into contact with steam.
- Do not lay the unit down.
Deformation, malfunction and/or overheating of the motor may occur as a result. - Do not use the unit in a kitchen, etc., where there is generation of lampblack.
- Do not use detergent when cleaning the unit.
The unit surface may become damaged or cracked.
In addition, the sensors may malfunction as a result.
- When transporting the unit, always hold the handle on the back of the unit.
Holding the front panel when carrying may cause it to detach, thus dropping the unit and resulting in injury.
CAUTIONS CONCERNING THE INSTALLATION
DO NOT USE THE REMOTE CONTROL IN THE FOLLOWING LOCATIONS
- Location where there are inverter lighting equipment or electronic light sensor device
The remote control may not operate properly. In this case, move the unit away from such lighting facility or change the facing direction. - Location exposed to direct sunlight
The unit may not be able to receive signals from the remote control
The unit may not be able to respond to the signals of the remote control if the ends of fluorescent lighting become black or lights flicker due the depletion of service life; however, this is not a malfunction of the remote control or the main unit. In this case, replace the lighting with new fluorescent tubes.
TAKE CAUTION TO THE FOLLOWING DURING INSTALLATION
- Keep a distance of at least 2m away from televisions and radios
It can interrupt the receiving signal - Keep a distance of at least 60cm away from the wall
The motor may overheat, causing malfunction as a result. - Avoid to install at locations where the sensor is exposed to direct blowing air. The unit may not operate properly.
- Avoid to install at locations where the intake or exhaust port will be blocked by curtains, etc. Curtains, etc., may become dirty or malfunction may occur as a result.
EFFECTIVE USAGE
• Stable surface with good ventilation
- Near smoking area
PARTS NAMES
MAIN UNIT DISPLAY
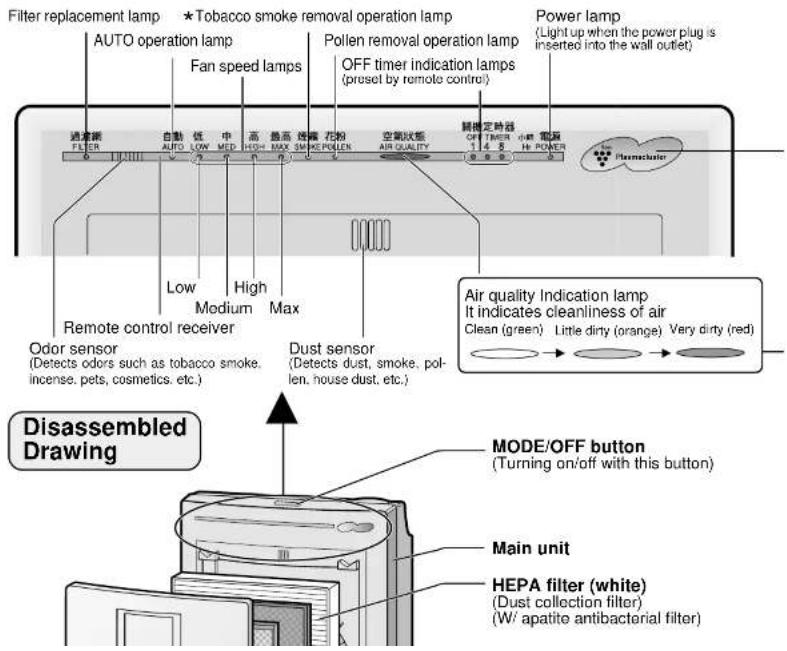
CLUSTER ION LAMP
Cluster ion operation can be selected using the remote control.
Blue light
When the cluster ion operation is in the Clean mode or AUTO cluster ion mode and the air in the room is dirty, the light turns on and the unit will operate in the Clean mode.
Green light
When the cluster ion operation is in the Refresh mode or AUTO cluster ion mode and the air in the room is clean, the light turns on and the unit will operate in the Refresh mode.
Light off
No cluster ions are generated.
If the lamp is bright when sleeping, or if the ion generation noise is annoying, turn off the cluster ion operation.
ABOUT THE DUST SENSOR
- The dust sensor displays a clean sign depending on the relative change of the environment at the time the power plug is inserted in the wall outlet and after.
- When the air is extremely dirty at the time. When the power plug is inserted, the dust sensor display may light up in green. (this is the initial setting of the sensor) Please switch to manual operation under this situation.
BACK

ACCESSORIES
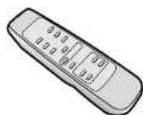
Remote control
(1 piece)
Battery
(AA battery X
2 pieces)

When using on tabletop
Stand
(1 piece)
Thumbscrew
(2 pieces)
Located on
the bottom part of the


INSTALLATION
HOW TO PUT THE UNIT ON A TABLE
MOUNTING THE STAND
1 Remove the front panel.
- At the same time, also remove the prefilter, stamina-power carbon and the HEPA filter. Front panel
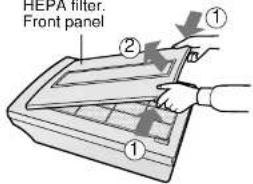
2 Place the unit with its front side facing down on a flat and stable surface.
- Place a soft cloth, etc., to prevent damaging the unit.

3 Insert the tabs of the stand into the holes of the main unit and fix the stand using the included thumbscrews
HOW TO MOUNT THE UNIT ON A WALL
CAUTIONS
WHEN MOUNTING THIS PRODUCT TO A WALL
- Choose strong point on the wall with firm piller or timber etc. for mounting.
- Never mount the unit to a thin wall or plasterboard of insufficient strength. The unit may drop as a result.
- When mounting the unit to a wall, remove the front panel and hold the main unit. Holding the front panel may cause it to become detached, thus dropping the unit and resulting in bodily injury.
- Do no install where there is generation of lampblack, such as in a kitchen, etc. The unit surface may crack or the sensors may malfunction as a result.
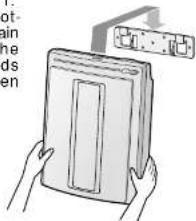
1 Choose the mounting location Leave space around the bracket by referring to the illustration below. The unit cannot be mounted if there is insufficient spacing around the bracket.

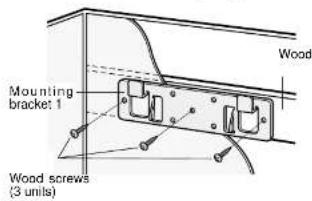
2 Inatall mounting bracket 1 on the wall
- Install it after consulting a specialist and you can get the confirmation of the strength. - Mount the bracket using the included wood screws (long screws) so that it levels.
Use 4 wood screws (long screws)

Use 3 wood screws (long screws)
4 Place the 2 cushion gum

5 Mount the main unit
(1) Align the horizontal positions of mounting brackets 1 and 2 and hook the bracket 2 to bracket 1. (2) Hold the bottom of the main unit, pull the unit towards you and then pull down.
natural_image
Illustration of hands holding a rectangular device with a lid, next to an open cylindrical component (no text or symbols visible)6 Check the installation
- Check to make sure that the tabs on mounting bracket 2 are securely mounted to the tabs on mounting bracket 1. - Check that the power cord is not pinched.
PREPARATION
INSTALLING THE FILTERS
To maintain the quality of the filters, they are pre-installed in the main unit and covered with plastic bags. Be sure to remove the filters from the plastic bags before using the unit.
1 Remove the filters
1 Place the unit with its front side facing up
Place the unit on a flat surface, and make sure that the stand does not contact the surface.

2 Remove the front panel
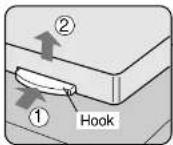
Press the hook on the bottom of the front panel and lift up to remove.

3 Take out the pre-filter, and then take out the stamina-power carbon (black) and HEPA filter (white) from the plastic bags.

INSERTING BATTERIES INTO THE REMOTE CONTROL
2 Install the filter
1 Takeout the HEPA filter from the plastic bag and install it into the main unit with the display facing upward.
Insert in the direction so that the tabs on the HEPA filter are facing toward you. Proper operation cannot be achieved if the filter is installed on a wrong side.
2 Takeout the stamina-power carbon from the plastic bag and install it in the main unit.
Make sure the tabs on the HEPA filter remain visible.
3 Install the pre-filter Insert the 4 tabs of the pre-filter into the holes of the main unit.
4 Fill in the usage start date on the replacement label affixed on the back of the front panel and then mount the front panel.
The date is a reference for filter replacement.


Back of front panel

—HOW TO USE THE REMOTE CONTROL
OPERATION
For the first 30 seconds after the power plug is inserted into the wall outlet, the unit will check the conditions of the air. If operation is set to ON during this time, the Clean sign lamp will alternately flash in green, orange and red. During this time, the Cluster ion lamp will light blue and the unit will be in the Clean mode.
MAIN UNIT OPERATION
Operations available with main unit
• AUTO operation
- Low operation
• Medium operation
- High operation
- Maximum one
• *Tobacco smoke removal
operation
- Pollen removal operation
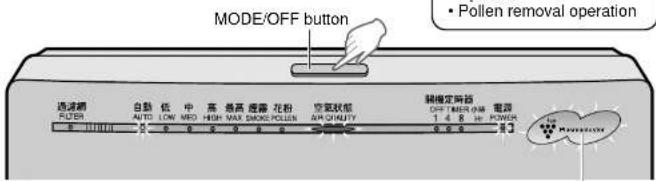
The unit will start operation when the MODE/OFF button is pressed.
(The unit will start operation in AUTO mode)
• During operation, the cluster ion lamp will light up.
(Cluster ion mode is set to be AUTO in the initial operation)
Various operation modes suitable for different conditions are available.

AÜTO operation
The fan speed is automatically switched (High, Medium, Low) depend
ing on the air quality detected by the dust sensor.
Low operation
- To start operation, press the ON/OFF button. A short beep will be heard and operation will start from the AUTO mode.
- To stop operation, press the ON/OFF button again. Operation stops with a long beep sound.
Operations available with remote control
- Manual fan speed operation
- AUTO fan speed operation
- Low operation
- Max operation
• *Tobacco smoke removal operation
• Pollen removal operation - OFF timer setting
- Cluster ion selection
AUTO cluster ion
Clean mode Refresh mode
Transmitter
Manual (fan speed) button
The fan speed can be switched between Low, Medium, High and Max.
Low operation button
Operation will be in the Low mode with little discharged air.
\*Tobacco smoke removal operation button
Unit will operate effectively against smoking cigarettes, etc.
ON/OFF button
Used to start AUTO operation (short beep) and stop operation (long beep).
Filter reset button
Press this button after replacing the filters.
It is dented not to push it by mistake.
Press the filter reset button with the point of the ball-point pen and so on. A remote controller is sometimes
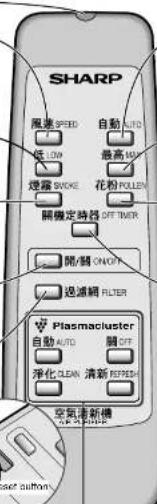
AUTO (fan speed) button
The fan speed switched automatically depending on the amount of pollution in the air.
Max operation button
Used to quickly clean the air in the room.
Pollen removal operation button
The unit operates effectively against pollen in the air.
OFF timer button
Used to set the OFF timer. Every time this button is pressed, the setting will be switched as shown below.
1 hour
4 hours
8 hours Cancel
• The remaining time is indicated by the lamp as time passes.
• The unit will stop operation when the timer is up.
CARE AND MAINTENANCE
(To maintain the best performance of this product, please clean the unit periodically.)
When cleaning, be sure to remove the power plug from the wall outlet. In addition, never handle the power plug with wet hands.
Electrical shock and injury may occur as a result.
MAIN UNIT
Clean off the dirt on the main unit and the installing surface as frequent as possible. Stubborn dirt may be difficult to remove.
Wipe dry with a soft cloth
For stubborn dirt, wipe with a soft cloth dampened with water or warm water of 40^ C or less.
Do not use volatile chemicals
Benzene, paint thinner, polishing powder, etc., may damage the unit surface.
Do not use detergents
Detergents may damage the unit surface.
Do not splash water
Never apply water on the unit.
ODOR SENSOR DUST SENSOR
The sensitivity of the sensors will become unstable if the odor or dust sensor is dirty or blocked.
Remove dust on the surfaces of the sensor openings using a vacuum cleaner.
FILTERS
Clean using the nozzle of a vacuum cleaner without removing the pre-filter.

NOTE
Never wash or clean the HEPA filter or stamina-power carbon using the nozzle of a vacuum cleaner directly. This will greatly decrease the performance of the filters.
REPLACING THE FILTERS
The filter replacement period is indicated by the filter replacement lamp.
(The lamp will light up in about 5 years, when using the unit for 12 hours daily.)
- The operation hours are saved in memory even when removing the power plug for transportation to another room, etc.
The filter replacement lamp is to be used only as a guide.
If dust or odors cannot be removed easily, replace the filters.
Guide for replacing the filters
• HEPA filter About 5 years after opening
• Stamina-power carbon About 5 years after opening
The replacement period is subject to smoking 10 cigarettes per day and the dust collection/deodorization ability is reduced by half than that of new filters.
The replacement period differs depending on the operation hours and location of installation.
(According to Japan Electrical Manufacturers' Association JEM1467)
Depending on the usage environment, odor may be noticed from the exhaust port in several months.
(For understanding the product. Refer E-1)
REPLACING THE FILTERS
1 See page 8 "Installing the filters" for the replacement procedures.
2 After replacing the filters:
Be sure to press the Filter button on the remote control with the power plug inserted in the wall outlet. A short beep will be heard and the operation hours stored in the memory will be reset. If the filter replacement lamp is on, the lamp will turn off.
3 Fill in the usage start date of the filters on the date label included with the replacement filters. Affix the label on the surface of the replacement label that is already on the back of the front panel.
TROUBLESHOOTING
Before calling for repair, check the symptoms below for possible remedies, since the problem may not be a malfunction of the unit.
| SYMPTOM REMEDY (not a malfunction) | |
| The remote control does not function | Have the batteries depleted?Are the batteries inserted with correct polarity?Is a fluorescent lighting in the room flickering? |
| Odors and smoke cannot be removed easily | Are the filters covered with heavy dust? |
| The Clean sign lights up in green even when the air is dirty | Is the opening of the dust sensor blocked or clogged?Was the air already dirty when the power plug was inserted into the wall outlet? (Refer E-5) |
| The Clean sign lights up in orange or red even when the air is clean | The sensitivity of the sensor becomes unstable when the opening of the dust sensor is dirty or is clogged.Clean the dust around the sensor opening using a vacuum cleaner. (Refer E-12) |
| The cluster ion lamp remains green (blue) and does not change | During the Clean mode (or Refresh mode), the cluster ion lamp color will not change. |
| A sound is heard from the unit | This is the sound that is emitted when the unit is in the Refresh mode.If the sound is annoying, switch the unit to the Clean mode.This is the sound that is emitted when the unit is generating cluster ions.If the sound is annoying, such as when sleeping, etc., set the Cluster ion mode to OFF. |
| Tick, tick, tick | |
| The discharged air smells | The ozone generated by the cluster ion generator may have an odor. However, the amount of ozone generated is very little and is harmless to the human body. Furthermore, the ozone decomposes quickly so it does not accumulate in the room. |
| The unit does not operate even when smoking cigarettes | Is the unit installed in a location that is difficult for the sensors to detect cigarette smoke?If the odor or dust sensor openings blocked or clogged?(In this case, clean the openings.) (Refer E-12) |
The applicable floor surface area is the surface area
中文
功能
離子簇控製離子簇控製
natural_image
Illustration of hands holding a rectangular device with a lid, next to a small electronic device (no text or symbols visible)6 檢查安裝情況。檢查安裝情況。
natural_image
Line drawing of a hand using a tool to press or install a grid on a rectangular device (no text or symbols)注意注意

- - Clean mode
- - Refresh mode
- HEPA Filter
- Stamina-power carbon
- CONTENTS
- CAUTIONS CONCERNING THE USAGE OF THIS PRODUCT
- CAUTIONS CONCERNING THE INSTALLATION
- DO NOT USE THE REMOTE CONTROL IN THE FOLLOWING LOCATIONS
- TAKE CAUTION TO THE FOLLOWING DURING INSTALLATION
- EFFECTIVE USAGE
- PARTS NAMES
- CLUSTER ION LAMP
- Blue light
- Green light
- Light off
- ABOUT THE DUST SENSOR
- BACK
- ACCESSORIES
- INSTALLATION
- HOW TO PUT THE UNIT ON A TABLE
- MOUNTING THE STAND
- HOW TO MOUNT THE UNIT ON A WALL
- CAUTIONS
- WHEN MOUNTING THIS PRODUCT TO A WALL
- Inatall mounting bracket 1 on the wall
- Place the 2 cushion gum
- Mount the main unit
- Check the installation
- PREPARATION
- INSTALLING THE FILTERS
- Remove the filters
- Place the unit with its front side facing up
- Remove the front panel
- Take out the pre-filter, and then take out the stamina-power carbon (black) and HEPA filter (white) from the plastic bags.
- Install the filter
- OPERATION
- MAIN UNIT OPERATION
- Transmitter
- Manual (fan speed) button
- Low operation button
- \*Tobacco smoke removal operation button
- ON/OFF button
- Filter reset button
- AUTO (fan speed) button
- Max operation button
- Pollen removal operation button
- OFF timer button
- CARE AND MAINTENANCE
- MAIN UNIT
- Wipe dry with a soft cloth
- Do not use volatile chemicals
- Do not use detergents
- Do not splash water
- ODOR SENSOR DUST SENSOR
- FILTERS
- NOTE
- REPLACING THE FILTERS
- Guide for replacing the filters
- TROUBLESHOOTING
- 中文
- 功能
- 離子簇控製離子簇控製
- 檢查安裝情況。檢查安裝情況。
- 注意注意
Brand : SHARP
Model : FU-888SV
Category : Air purifier