RF/321 - Cooker Ramtons - Free user manual and instructions
Find the device manual for free RF/321 Ramtons in PDF.


| Product Type | Freestanding Cooker |
| Brand | Ramtons |
| Model | RF/321 |
| Dimensions (H x W x D) | 85 x 60 x 60 cm |
| Weight | 45 kg |
| Power Supply | 220-240 V, 50/60 Hz |
| Fuel Type | Gas hob, Electric oven |
| Number of Burners | 4 gas burners |
| Oven Type | Electric |
| Oven Capacity | 65 liters |
| Oven Functions | Bake, Grill, Rotisserie |
| Energy Efficiency Class | A |
| Control Type | Rotary knobs |
| Safety Features | Flame failure device, Oven door lock |
| Cleaning | Enamel interior, Easy-clean |
| Additional Features | Adjustable feet, Storage drawer |
| Accessories Included | Grill tray, Baking tray, Rotisserie rod |
| Installation Type | Freestanding |
| Color | White / Silver |
| Warranty | 1 year |
Frequently Asked Questions - RF/321 Ramtons
User questions about RF/321 Ramtons
0 question about this device. Answer the ones you know or ask your own.
Ask a new question about this device
Download the instructions for your Cooker in PDF format for free! Find your manual RF/321 - Ramtons and take your electronic device back in hand. On this page are published all the documents necessary for the use of your device. RF/321 by Ramtons.
USER MANUAL RF/321 Ramtons
User and Service Instructions Guide
For
SAFETY INSTRUCTIONS
WARNING: The appliance and its accessible parts become hot during use. Care should be taken to avoid touching heating elements.
• Children under 8 Year of age must be kept away from the appliance unless they are continuously supervised.
- This appliance can be used by children aged from 8 years and above and persons with reduced physical, sensory or mental capabilities or lack of experience and knowledge if they have been given supervision or instruction concerning use of the appliance in a safe way and understand the hazards involved.
• Children must not play with the appliance.
- Cleaning and user maintenance shall not be made by children without supervision.
WARNING: Unattended cooking on a hob with fat or oil can be dangerous and may result in fire.
NEVER try to extinguish a fire with water, but switch off the appliance and then cover flame e.g. with a lid or a fire blanket.
WARNING: Danger of fire: do not store items on the cooking surfaces.
- During use the appliance becomes hot. Care should be taken to avoid touching heating elements inside the oven.
WARNING: Accessible parts may become hot during use. Young children must be kept away.
- Do not use harsh abrasive cleaners or sharp metal scrapers to clean the oven door glass since they can scratch the surface, which may result in shattering of the glass.
• The internal bottom surface of the drawer can get hot.
- The oven must be switched off before removing the guard, after cleaning, the guard must be replaced in accordance with the instructions.
- Only use the temperature probe recommended for this oven.
- Do not use a steam cleaner for cleaning operations
- Any spillage should be removed from the lid before opening.
- The hob surface must be allowed to cool down before closing the lid. WARNING: Avoid possibility of electric shock 0 ensure the appliance is
prevent the appliance slipping off the base.
- The means for disconnection must be incorporated in the fixed wiring in accordance with the wiring rules.
- The instructions state the type of cord to be used, taking into account the temperature of the rear surface of the appliance.
- If the supply cord is damaged, it must be replaced by a special cord or assembly available from the manufacturer or its service agent. CAUTION: In order to avoid a hazard due to inadvertent resetting of the thermal cutout, this appliance must not be supplied through an external switching device, such as a timer, or connected to a circuit that is regularly switched on and off by the utility.
- This appliance must be installed in accordance with the regulations in force and only used in a well ventilated space. Read the instructions before installing or using this appliance.
• These instructions are only valid if the country symbol appears on the appliance. If the symbol does not appear on the appliance, it is necessary to refer to the technical instructions which will provide the necessary instructions concerning modification of the appliance to the conditions of use of the country2.
- Prior to installation, ensure that the local distribution conditions 4nature of the gas and gas pressure5 and the adjustment of the appliance are compatible.
- The adjustment conditions for this appliance are stated on the label 4or data plate5.
- This appliance is not connected to a combustion products evacuation device. It shall be installed and connected in accordance with current installation regulations. Particular attention shall be given to the relevant requirements regarding ventilation.
• The use of a gas cooking appliance results in the production of heat and moisture in the room in which it is installed. Ensure that the kitchen is well ventilated: keep natural ventilation holes open or install a mechanical ventilation device 4mechanical extractor hood5. Prolonged intensive use of the appliance may call for additional ventilation, for example opening of a window, or more effective ventilation, for
Dear Customer,
Thank you for purchasing of this product.
Before starting to use your appliance, reading of this guide helps you to get familiar with the features of the appliance and use it effectively and safely. We suggest that you please carefully read the manual. If you follow our suggestions you will obtain the best possible results from your appliance and you will be in a position to prevent possible faults and malfunctions.
Your appliance was carefully and thoroughly checked before leaving the factory and is presented to you ready to operate and without any deficiency.
At the end of the instructions manual you will find various instructive illustrations of the application's parts. Do not neglect to look at these instructive illustrations.

TABLE OF CONTENS
SAFETY INFORMATION and WARNING 06
INSTALLATION 07
Cabinet dimensions
F204
Installing the gas hose
Electrical connections
GETTING TO KNOW YOUR APPLIANCE 08
Technical specifications
General view 50x55 09
Control panel and work table
General view 60x60 10
Control panel and work table
USING THE APPLIANCE 11
Before first use the appliance
For gas oven
For electrical oven
For hot plates
Using of the gas burners
Lighting of the sun burners
Lighting of the van burners with flame failure device 12
Recommendation
Using of the hot plate
General suggestions for hot plate
USING OF THE ELECTRIC OVEN 13
Gas oven with thermostat
Gas oven without thermostat
Grill 14
Grill with refrigerator
Turbo oven
SAFETY INFORMATION AND WARNINGS
(!) You must read this warnings carefully before installing or using the appliance.
- Remove all tape packaging from the appliance before using it for the first time.
•The appliance is adjusted to 220-230 Volts, 50-60 Hz. If the voltage in your neighborhood is 110 Volts, consult a qualified electrician.
•The fuse of the socket must be 16 Amper or more. If yours is different consult a qualified electrician.
• The appliance must be earthed.
• The electric cable and gas tube of the appliance must not come into contact with hot surfaces of the appliance.
• Do not test the gas leakage with a match or lighter, you can check it with soap foam. - Keep all flammable materials (e.g. curtions, furnishing, clothing) away from the appliance.
• Do not touch the glass panel of the oven door while the oven is still hot. Keep pets and children away from the oven when it is in operation. - Ensure the installation site is well ventilated.
- Be careful not to trap a finger or hand in the hinges of the oven lid or in the oven door. Keep children at a safe distance.
• Do not use the drop down door as a step to reach above cabinets and do not put heavy weights on the opened oven door. Do not let children sit on or play with the oven door.
•The drawer at the base of the oven can be used to keep cooked meals warm. Never place combustible items (e.g. plastic bags, paper, explosive materials) into this drawer.
• Do not use the appliance if it is in contact with water.
• Always turn pan handles the side or the back of the hob.
(!) This appliance should only be repaired and serviced by an authorised Service Engineer and only approved spare parts should be used.
7.1.17 4.4.4. 2 1 1.0. 2.
INSTALLATION


Cabinet dimensions
The distances between appliance and adjacent walls must be as follows.
• Minimum vertical distance separating the appliance from adjacent horizontal walls located above it must be 750 mm.
- Minimum horizontal distance separating the sides and back of the appliance from adjacent vertical walls must be 20 mm.

Foot
• There are four adjustable feet which can be used to move the application up / down.
- Screw the adjustable feet clockwise to make the appliance higher and counter clockwise to lower the appliance
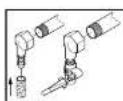
Installing the gas hose
- This appliance is adjusted to work with LPG, if you want to use it with Natural Gas, contact with your service.
• Heat the gas hose and push into the inlet.
• Later heat the cuff and fix on the hose.
(!) Never apply a flame to check gas leakages.
Electrical connections
- Ensure that the electrical supply complies with the Type stated on the reating plate.
• The demand is adjusted to 220,720 Volts -50,401t. The four of the market

GETTING TO KNOW YOUR APPLIANCE
This section contains the illustrations of your appliance in order to make you familiar with its features.
This instructions manual was prepared for two separate oven models, 50x55 and 60x60. Before using the appliance we suggest you please carefully read the sections concerned with your particular oven.
Technical specifications
| 50 x 55 60 x 60 | ||
| Size | 850x500x550 mm. | 840x600x630 mm. |
| Oven volume | 50 dm3 | 60 dm3 |
| Net weight | 41 Kg. | 48 Kg. |
| Electric supply | 220 - 230 V; 50 - 60 Hz. | |
| Thermostat range | 50 - 300 °C | |
| Ignition | Automatic Electric Ignition | |
| Timer | 0 - 90 min. With manoal positions | |
| Auxiliary burner | 1,0 kW - 73 g/h / 0,090 m3/h | |
| Normal burner | 1,7 kW - 127 g/h / 0,160 m3/h | |
| Strong burner | 2,7 kW - 196 g/h / 0,250 m3/h | |
| Small hot plate | 1,0 kW - 145 o | |
| Big hot plate | 1,5 kW - 180 o | |
| Rapid hot plate | 2,0 kW - 180 o | |
General view
50 x 55
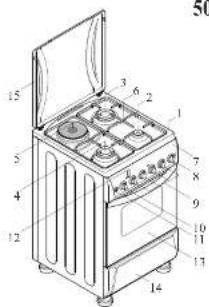
01 - Cooktop
02 - Auxiliary Burner
03 - Strong Burner
04 - Normal Burner
05 - Hot Plate
06 - Left & Right Grid
07 - Control Panel
08 - Timer Knob
09 - Control Knobs
10 - Oven / Grill Knob
11 - Ignition Button
12 - Indicator Lights
13 - Drop Down Oven Door
14 - Drawer
15 - Lid ( Metal / Glass )


01 - Ignition Button
02 - Ovcn / Grill Knob
03 - Front Left Burner Knob
04 - Rear Left Burner Knob
05 - Rear Left Burner Knob
06 - Front Right Burner Knob
07 - Timer Knob
08 - Indicator Lights
09 - Auxiliary Burner
10 - Normal Burner
11 - Strong Burner
General view

60 x 60
01 - Cooktop
02 - Auxiliary Burner
03 - Normal Burner
04 - Strong Burner
05 - Left Grid
06 - Right Grid
07 - Control Panel
08 - Control Knobs
09 - Timer Knob
10 - Oven / Grill Knob
11 - Ignition
12 - Indicator Lights
13 - Drop Down Oven Door
14 - Drawer
15 - Lid ( Metal / Glass )
Control panel and work table
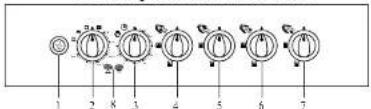

01 - Ignition Button
02 - Oven / Grill Knob
03 - Timer Knob
04 - Front Left Burner Knob
05 - Rear Left Burner Knob
06 - Rear Left Burner Knob
07 - Front Right Burner Knob
08 - Indicator Lights
09 - Auxiliary Burner
10 - Normal Burner
11 - Strong Burner
12

USING THE APPLIANCE
Before first use of the appliance
- The heating elements in your appliance are initially covered with a protective coating which should be burnt off before the usage.
- Before first use, the appliance should be heated without food. During this time, an unpleasant odour may be emitted. This is quite normal.
- The following procedure is carried out before using the oven for the first time.
• The room should be well-ventilated during this process. - Remove all packaging both inside and outside of the appliance before using it.
For gas oven
- Leave the oven door open and let the oven operate for 45 minutes. Then, turn off your oven and let it cool down.
For electrical oven
- Leave the oven door open and heat the oven at 300 °C temperature setting for 45 minutes. Then, switch off the oven and let it cool down.
For hot plates
- Turn the hot plate control knob to the high heating position (3 on the hot plate control knob).
• Leave it on for 30 minutes. - Wipe over with a clean cloth when your appliance is completely cool.
Using of the gas burners

• Off
Low flame
High flame

Correct and false usage of burner hat is shown in.
Gas burner control knob is shown in.
Lighting of the gas burners
• By electric ignition: Damage and turn the control book of the knener. Duch
Lighting of the gas burners with flame failure device
- By electric ignition - Depress and turn the control knob of the burner and depress simultaneously ignition button to light the burner. Keep the control knob depressed for 10 seconds after lighting.
- By manuel lighting - Bring a lighted match close to the top of burner. Depress and turn the control knob of the burner and keep the control knob depressed for 10 seconds after lighting.
(!) Ensure that the burner is fully lighting. If the burner does not light after 10 seconds or extinguishes, you should turn the knob "0" setting and wait a few minutes before the second lighting attempt.
Recommendation - In order to obtain maximum performance from the burners, use pans that fits the following diameters :
• Strong burner 22 - 28 cm.
• Normal burner 14 - 22 cm.
• Auxiliary burner 10 - 14 cm.
Using of the hot plate

• Off
1 Low heating
2 Medium heating
3 High heating
- Turn the knob to adjust your hot plate to the desired setting. When the hot plate is switched on, the indicator on the control panel lights up. When the cooking process is finished bring the knob back to the "0" position.
• The hot plate has 3 temperature settings : 1, 2, 3.
General suggestions for hot plate


• Use pans with smooth and solid bases which make true contact with the hot plate surface. This enables you to use heat more effectively.
- When cooking and warming please choose cookware that fits the respective hot plate. If the pan diameter is smaller than the hot plate; a lot of energy will be wasted. Furthermore any boiled over food or liquid may land on the
USING OF THE ELECTRIC OVEN

Bottom heating
Top heating
Bottom & Top heating
□ Grill heating
E Turnspit

Lamp
Turbo
Turbo & lamp
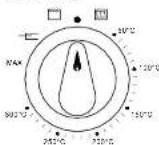
Bottom heating - Turn the oven/grill control knob and set it to the bottom heating symbol, then turn the thermostat knob clockwise and set it to the required temperature.
Top heating - Turn the oven/grill control knob and set it to the top heating symbol, then turn the thermostat knob clockwise and set it to the required temperature.
Bottom & Top heating - Turn the oven/grill control knob and set it to bottom & top heating symbol, then turn the thermostat knob clockwise and set it to the required temperature.
• In this setting you should pre-heat the oven.
- Pre-heat the oven until the indicator light switches off. This will take up about 10 minutes.

Gas oven with
Thermostat knob

Gas oven without
Thermostat knoh
Gas oven with thermostat - The oven temperature is controlled by a thermostat; you can turn the control knob to the desired temperature level. Temperature levels are between 140 °C and 270 °C.
Gas oven without thermostat - The oven temperature
is controlled by turning the oven control knob.
Temperature levels are between 140 °C and 270 °C.
Grill
- You should place the heat deflector panel to protect the control panel and control knobs and do not fully close oven door.
• Always pre-heat the grill for 5 minutes for best cooking results.
• Turn the oven/grill control knob to the grill symbol and adjust the thermostat knob to the required temperature. - Adjust the rack and tray height position to allow for different thicknesses of foods.

Grill with rotisserie
• To correctly use the rotisserie apply the following.
• Prepare the item to be cooked as appropriate to the skewer fork.
• To fit the rotary skewer support, locate the skewer support into thr tray holes.
- Turn the oven/grill knob to the turnspit symbol and set the thermostat knob to the required temperature.
Turbo oven
- A fan in the rear wall of the oven circulates the air over all surfaces of the oven. This makes better cooking. Turbo oven control knob shown in.
COOKING TABLE TURBO OVEN THERMOSTATIC OVEN
| Food Type | Time Duration | Heat Degree | Time Duration | Shelf Position | Heat Degree |
| Cookie | 20 - 30 m. | 170 - 180 °C | 25 - 35 m. | 1 - 2 - 3 | 170 - 180 °C |
| Pastry | 20 - 25 m. | 150 - 160 °C | 20 - 30 m. | 1 - 2 - 3 | 150 - 160 °C |
| Flour food | 25 - 30 m. | 170 - 180 °C | 30 - 35 m. | 1 - 2 - 3 | 170 - 180 °C |
| Cake | 20 - 25 m. | 150 - 160 °C | 20 - 30 m. | 1 - 2 - 3 | 150 - 160 °C |
| Biscuit | 25 - 30 m. | 170 - 180 °C | 20 - 25 m. | 1 - 2 - 3 | 170 - 180 °C |
| Lamb | 25 - 30 m. | 210 - 220 °C | 25 - 30 m. | 1 - 2 - 3 | 210 - 220 °C |
| Mutton | 35 - 45 m. | 230 - 240 °C | 35 - 45 m. | 1 - 2 - 3 | 230 - 240 °C |
| Veal | 45 - 50 m. | 240 - 250 °C | 45 - 50 m. | 1 - 2 - 3 | 240 - 250 °C |

CLEANING and CARE
(!) Before cleaning, ensure that the plug is removed from the electrical supply socket, all control knobs are in the "OFF" position, and the appliance has cooled completely.
Cleaning materials
- Do not use caustic pastes, abrasive cleaning powders, or any hard implements as they will damage the surfaces.
- Before using any cleaning materials on your appliance, check that they are suitable and that their use is recommended by the manufacturer.
Oven cavity
• The enamelled oven cavity is best cleaned while the oven is still warm.
- Wipe the oven over with a soft cloth soaked in warmy soapy water.
Oven door
- To clean the glass oven door, use a glass cleaner. Rinse and polish with a dry cloth.
- Do not clean the oven door while the glass panels are warm. ( In order to prevent glass panel from shattering )
Accessories
- It is best to soak the accessories in household detergent immediately after use. Any leftover dirt can then be easily removed by using a brush or cleaning sponge.
Control panel and knobs
The cooktop
- Clean up any spills or spatters with a damp cloth. Clean the control panel with a mild liquid dish detergent and soft cloth, rub control panel lightly.
- It is best cleaned while it is still warm, as spillage can be removed more easily than if it is left to cool. Use a soft cloth wrung out in warm water.
The hot plates
The gas burners
- Use detergent and warm water to clean the enamelled pan. Rinse and polish with a dry cloth.
The glass lid
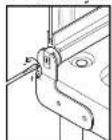
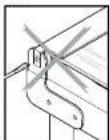
- The glass lid can be easily removed and replaced from its place for cleaning. - Removal of glass lid is shown in.

The oven door
• The oven door can be easily removed and replaced from its place for cleaning too.
- Open door fully.
- There is a small ring on each hinge. Pull the ring over the claw-like hook which is part of the hinge mechanism. Do not forget to do this on both hinges before the next step.
- Raise the door slightly and pull it straight outwards away the oven. The door will come completely off.
- When replacing the door, locate it back into the hinge holes. Pull it down fully and slip the rings of the claw-like hooks.
TROUBLESHOOTING
If the appliance is not working correctly. Before contacting with your local service center, carry out the following checks.

Slight odour or small amount of smoke when using the appliance for the first time.
• This is normal and should cease after a short period.
The burners does not working properly
- Check whether gas connection is correct.
- Check that the correct control knob has been turned on.
The hotplate does not heat up
- Check that the appliance is plugged in and the electrical connection is
The hotplate is not giving satisfactory results
- Check that hot plate is clean and dry.
- Check that the cooking pan is the correct size for the hotplate.
- Check that the cooking pan has a flat bottom.
The oven does not heat up
- Check cooking function / temperature has been selected.
- Check that the appliance is plugged in and the electrical connection is switched on.
The oven is not giving satisfactory results
- Incorrect cookware or cookware of improper size is being used.
- Oven / grill thermostat is defective.
Food does not grill properly
• The oven control knob is not set at grill.
- Shelf position is not correct.
• Cookware is not suited for grilling.
- Oven / grill thermostat is defective.
Steem settle on the food and the oven cavity
- Leave the dishes inside the oven no longer than 15-20 minutes after cooking has completed.
If after these checks, the appliance is still not operating correctly, contact with your nearest after sales service centre.
TIPOVER PROTECTION
GB

GB Wall Mounting fixture

GB Screw (provide)
(4,8 mm × 32mm)

GB Dowel (provide)

-A-

natural_image
Line drawing of a washing machine with side panels and control panel, shown against a tiled wall (no text or symbols)
natural_image
Technical line drawing of a mechanical housing with a circular component and an arrow pointing to it (no text or symbols present)- User and Service Instructions Guide
- SAFETY INSTRUCTIONS
- TABLE OF CONTENS
- SAFETY INFORMATION AND WARNINGS
- INSTALLATION
- Cabinet dimensions
- Foot
- Installing the gas hose
- Electrical connections
- GETTING TO KNOW YOUR APPLIANCE
- USING THE APPLIANCE
- Before first use of the appliance
- For gas oven
- For electrical oven
- For hot plates
- Using of the gas burners
- Lighting of the gas burners
- Lighting of the gas burners with flame failure device
- Using of the hot plate
- General suggestions for hot plate
- USING OF THE ELECTRIC OVEN
- Grill
- Grill with rotisserie
- Turbo oven
- CLEANING and CARE
- Cleaning materials
- Oven cavity
- Oven door
- Accessories
- Control panel and knobs
- The cooktop
- The hot plates
- The gas burners
- The glass lid
- The oven door
- TROUBLESHOOTING
- The hotplate is not giving satisfactory results
- The oven does not heat up
- The oven is not giving satisfactory results
- Food does not grill properly
- Steem settle on the food and the oven cavity
- TIPOVER PROTECTION
Brand : Ramtons
Model : RF/321
Category : Cooker