RG/518 - Cooker Ramtons - Free user manual and instructions
Find the device manual for free RG/518 Ramtons in PDF.


| Product Type | Freestanding Cooker |
| Brand | Ramtons |
| Model | RG/518 |
| Width | 60 cm (approx.) |
| Height | 85 cm (approx.) |
| Depth | 60 cm (approx.) |
| Weight | 45 kg (approx.) |
| Power Source | Electric / Gas (check model variant) |
| Oven Type | Conventional (without fan) or Fan-assisted (check manual) |
| Number of Burners (if gas) | 4 or 5 (typical) |
| Oven Capacity | 100 liters (approx.) |
| Functions | Baking, grilling, top heating, bottom heating |
| Cleaning | Manual cleaning with mild detergent and soft cloth; avoid abrasive cleaners |
| Safety | Automatic ignition, flame failure device (if gas), child lock (if applicable) |
| Spare Parts | Knobs, oven door latch, burner caps, grill pan, baking tray available from authorized service centers |
| Repairability | Serviceable by qualified technicians; spare parts available for 5+ years |
| Energy Class | A/A+ (typical for modern cookers) |
| Warranty | 1 year (standard, check local terms) |
Frequently Asked Questions - RG/518 Ramtons
User questions about RG/518 Ramtons
0 question about this device. Answer the ones you know or ask your own.
Ask a new question about this device
Download the instructions for your Cooker in PDF format for free! Find your manual RG/518 - Ramtons and take your electronic device back in hand. On this page are published all the documents necessary for the use of your device. RG/518 by Ramtons.
USER MANUAL RG/518 Ramtons
Table Top Gas Cooker with Patent Burner
Printed on recycled paper
Keep your environment clean
WSC
ISO14001
WSC
ISO9001


Attention
Please read these instructions carefully before using. Please keep them in a safe place for future reference.
Dear Customer:
Congratulations on the purchase our table top gas cooker. We are certain that this new, modern, functional and practical appliance, built with the very highest quality materials, will meet your requirements in the best possible way.
This Cooker is easy to use. It is, however, important to thoroughly read the instruction in this handbook in order to obtain the best results. Retain this booklet for future reference.
The Manufacture shall not be held responsible for any damages to persons or property caused by incorrect installation or use of the appliance.
INDEX
Features 2
Whirlwind technology 2
Name of parts 2
Caution 4
Before use 6
How to use 7
Care and maintenance 8
Trouble-shooting guide 9
Specifications 9
After-sale service 10
The Manufacture shall not be held responsible for any inaccuracies in this handbook due to printing or transcription errors, also the designs in the figures are purely indicative. The Manufacturer also reserves the right to make any modifications to the products as may be considered necessary or useful, also in the interests of the user, without jeopardizing the main functional and safety features of the products themselves.
FEATURES
• High quality auto-ignition, catching fire 100%.
- The whole meticulous curl make the stove body more smooth.
- Patent trivet, convenient and applicable.
- Patent design burner, efficient combustion, strong flame, less gas.
- Furnished with advanced pulse ignition and safety system, cutting off the gas supply immediately for unexpected extinction, more safe and convenient for using. (For some items)
WHIRLWIND TECHNOLOGY
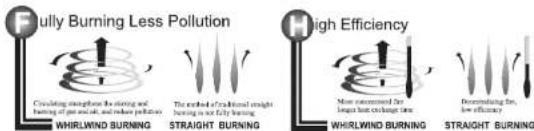


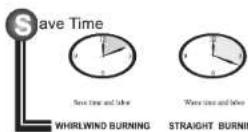
NAMES AND PARTS
| 1 | Surface | 6 | Gas connected |
| 2 | Side Panel | 7 | Stick |
| 3 | Trivet | 8 | Rubber leg |
| 4 | Burner | 9 | Safety Device |
| 5 | Knob |

CAUTION
- Be careful to avoid getting burned by touching the top panel of the gas cooker, as it gets very hot near the burners when in use.
- Make sure the room is well-ventilated. Never use the gas cooker for long periods of time (over 10 minutes) in a small room or in a closed-off space without the ventilation, by the ventilation fan or opening the windows.(Fig. 4)
- If a gas leak is found, close the main gas valve, open up all windows, and call your dealer. Do refrain from turning an electric switch on or off, lighting a match, or using a lighter.(Fig. 7)
- The gas cylinder should stand away at least 0.5m from the cooker.(Fig. 8)
- When using different kind of gas. The cooker must be renovated by professional person. Otherwise, do not use it.
- Knob is designed for anti-clockwise ignition, so that to prevent children act.
- In the event of a burn back (i.e. where the gas burns back on the jet), turn off the valve and light again. Should the problem persist take the unit back to your dealer for checking.



- Be careful to avoid getting burned by touching the top panel of the gas cooker, as it gets very hot near the burners when in use.
- Make sure the room is well-ventilated. Never use the gas cooker for long periods of time (over 10 minutes) in a small room or in a closed-off space without the ventilation, by the ventilation fan or opening the windows.(Fig. 6)
- If a gas leak is found, close the main gas valve, open up all windows, and call your dealer. Do refrain from turning an electric switch on or off, lighting a match, or using a lighter.(Fig. 7)
- The gas cylinder should stand away at least 0.5m from the cooker.(Fig. 8)
- When using different kind of gas. The cooker must be renovated by professional person. Otherwise, do not use it.
- Knob is designed for anti-clockwise ignition, so that to prevent children act.
- In the event of a burn back (i.e. where the gas burns back on the jet), turn off the valve and light again. Should the problem persist take the unit back to your dealer for checking.

BEFORE USE
- Confirm that you have the right model for your type of gas supply.
- When unpacking, make sure that all of the parts of the gas cooker are included. Assemble the parts as show in.(Fig. 9)
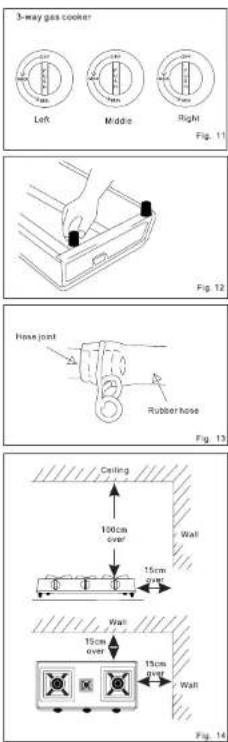
- Place the gas control knob onto the gas cock axis and push it inwards firmly. (Fig. 10)(Fig. 11)
- Attach the rubber legs to the cooker by turning the cooker upside down and screwing them into the openings on the cooker bottom.(Fig. 12)
- Install the burners.
- Place the trivets on top of the burner. the trivets can be adjusted but turning the screws and then the pan can be put on the trivets steadily.
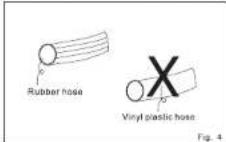
- Push the rubber hose onto the hose joint as far as it will go. Do not use a vinyl plastic hose, as this can be dangerous. Secure the hose with both sides of hose clamp.(Fig.13) see to it that the rubber hose does not touch a part of the gas cooker nor lies underneath it.
- When choosing a place to put the gas cooker, be sure to pick a spot that is firm and level. The gas cooker need plenty of space and air. Allow at least 15cm of space on the sides and 100cm above the unit. (Fig.14) if the space is less than 15cm from the in-flammable walls, be sure to provide a heat insulation board. Also be sure to keep paper, oil, and all other inflammable objects away from the gas cooker.
HOW TO USE
1. To light the burners:
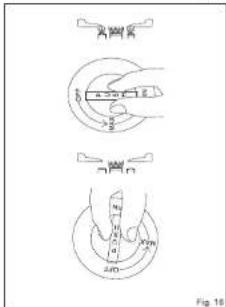
a.Open the main gas valve, push the gas control knob in and turn it towards the MAX position (counter-clockwise) until you hear the ignition click. Make sure that the burner has been lit.(Fig.15) in this position, double burner will light up both the small and large burners. To use only the small burner, release the gas control knob and turn it further to the MIN position. (Fig.16) b.To adjust the flame size,set the gas control knob to a suitable position between MAX (full flame size) and MIN position (small flame size)

2. Air flow adjustment:
The burners usually need no air flow adjustment.
If they should ever burn improperly, the air flow can be controlled by adjusting the air damper inside the gas cooker(under the control knob). After the gas has been ignited, adjust the air damper until slightly rounded, vigorous blue flames appear.(Fig.17,18,19)
3. If the burner do not ignite at the same time:
This may be the result of air in the gas hose, turn the gas control knob back to OFF and try again until the burner ignite.
4. To turn the burners off:
Turn the gas control knobs back to OFF position until you hear a click. Make sure the burner is put out and turn off the main gas valve as well.
CARE AND MAINTENANCE
Before you check and care for your gas cooker, make sure to turn off the main gas valve, and wait for a period not to get burnt.
- Check the gas hose regularly for wear or leaks. It must be replaced


natural_image
Pure mechanical part diagram without any text, numbers, or symbolsoccasionally. Keep it away from heater sources, and keep it clean.
- Wipe the stainless steel top and body with a dry cloth. if it is difficult to clean, use soapy water and then dry thoroughly with a dry cloth.
- Wash the trivet in water dry thoroughly before replacing.
- The electronic ignition will not function if it is wet. Be careful not to spill water, soup, etc. On it.(Fig. 20)
- For better service and a longer service life, keep the gas cooker clean.
● Warning: Do not wash the glass top in water when the top is hot
TROUBLE-SHOOTING GUIDE
| TROUBLE | CAUSE | REMEDY |
| It does not ignite. | Main gas valve remains closed.Rubber hose is bent.No gas supply.Electronic ignition is wet. | Open it.Put it right, or replace it.Replace gas cylinder.Clean and dry them. |
| It smell of gas | Gas leak from pipeRubber hose is damaged.Burner is not lit. | Examine pipe using soup water, and replace it.Replace it.Re-ignite it. |
| Combustion is Abnormal | Lack of gas supply.Flame ports are clogged.Burner is not in its correct position. | Replace gas cylinder.Clean them.Place it right position. |
SPECIFICATIONS
| Model | 1-Burner | 2-Burner | 3-Burner | 4-Burner | |
| Gas | L.P.Gas or N.G. | ||||
| Ignition system | Electronic ignition(PZT) or pulse ignition | ||||
| Hose | Φ9.5 Mm rubber hose | ||||
| Rated pressure(Pa) | L.P.G | 2800 | 2800 | 2800 | 2800 |
| N.G. | 2000 | 2000 | 2000 | 2000 | |
| Thermal efficiency | Above 65% | Above 65% | Above 65% | Above 65% | |
AFTER-SALE SERVICE
When you find something wrong with your gas cooker, make checkups by referring to the "trouble-shooting guide". If you can not find out the cause of the trouble from such, get into contact with your dealer.
Brand : Ramtons
Model : RG/518
Category : Cooker