
004-954 - Light therapy Marquant - Free user manual and instructions
Find the device manual for free 004-954 Marquant in PDF.


| Product Type | Light Therapy Lamp |
| Brand | Marquant |
| Model | 004-954 |
| Dimensions (approx.) | 30 x 20 x 15 cm |
| Weight | 1 kg |
| Power Supply | 220-240 V, 50/60 Hz |
| Light Source | LED (10,000 lux at 30 cm) |
| Main Functions | Brightness adjustment, timer (15-90 min), color temperature settings |
| Maintenance & Cleaning | Wipe with soft dry cloth; do not use abrasive cleaners |
| Safety Features | Overheat protection, UV-free, flicker-free light |
| Usage Instructions | Place at 30-50 cm distance; use in morning for best results |
| Spare Parts & Repairability | Spare bulbs and adapters available; repairable by authorized service centers |
| Certifications | CE, RoHS compliant |
| Warranty | 2 years |
Frequently Asked Questions - 004-954 Marquant
User questions about 004-954 Marquant
0 question about this device. Answer the ones you know or ask your own.
Ask a new question about this device
Download the instructions for your Light therapy in PDF format for free! Find your manual 004-954 - Marquant and take your electronic device back in hand. On this page are published all the documents necessary for the use of your device. 004-954 by Marquant.
USER MANUAL 004-954 Marquant
natural_image
Digital 80Hz alarm clock with white and gold tones, no visible text or symbols on the device itself.

KLOCKRADIO
Rat en hill and organ for each.
Care for the environment!
Must not be discarded with household waste. This product contains electrical or electronic components that should be recycled. Leave the product for recycling at the designated station e.g. the local authority's recycling station.
Jula reserves the right to make changes. In the event of problems, please contact our customer service www.jula.com

Tilverkare/ Produsert/ Produenci/ Manufacturer
Jula AB, Box 163, 512-24 SKARA
Distr. balé / Distr. balé / Oyapalán / Distr. balé / Iula Poland Sp. 2010, U
EU DECLARATION OF CONFORMITY
EU FÖRSÄKRAN OM ÖVERENSSTÄMMELSE
EU SAMSVARSERKLÆRING DEKLARACJA ZGODNOŚCI UE

Jula AB, Box 363, SE-532 24 SKARA, SWEDEN
This declaration of conformity is issued under the sole responsibility of the manufacturer
RoHS Directive 2011/65/EU
EN 50581:2012
This product was CE marked in year -18
Closso
2018 44 94

SÄKERHETSANVISNINGAR
INNSTILLING AV KLOKKESLETT
INNSTILLING AV ALARM
- Irykk på knappen för aktivere/deaktivere alarmmodus. Symbolel vises/forsvinner på displayet.
- Hold knappen time for å aktivere alarminstillingsmodus. Tallene for time blinker.
- Check that the mains voltage corresponds to the rated voltage.
- Do not expose the product to rain or moisture – risk of fire and/or electric shock.
- Never open the casing – risk of electric shock. Service must only be carried out by qualified personnel.
- Do not expose the product to extreme temperatures or high relative humidity to ensure normal functionality and a long life span.
- Do not put the product in a bathroom, or near a cooker or heater.
- If the product is not working properly, take it to the nearest service centre. Do not attempt to repair it yourself.
- Only use the supplied mains adapter.
- This product is not intended
or by persons who are not familiar with how the product is used, unless they are supervised or receive instructions concerning its use from someone who is responsible for their safety.
- Keep children under supervision to make sure they do not play with the product.
TECHNICAL DATA
| Rated voltage 230 V | ~50 Hz |
| Batteries | 3xAAA |
| Diameter 170 mm | |
| Depth 130 mm | |
| Cord length 1.2 m |
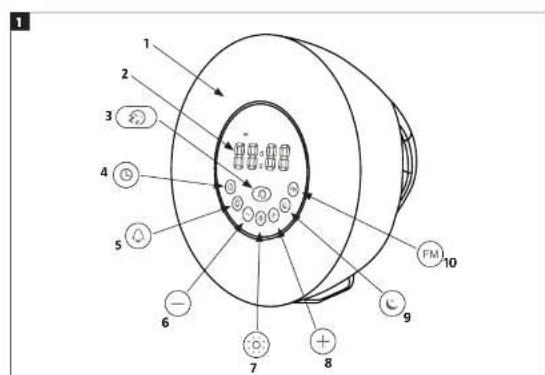
DESCRIPTION
| FRONT |
| 1. Nurnination |
| 2. Time |
| 3. Shape function |
| 4. Aequal time |
| 5. Alarm |
| 6. Reduce |
| 7. Light |
| 8. Increase |
| 9. Smooth |
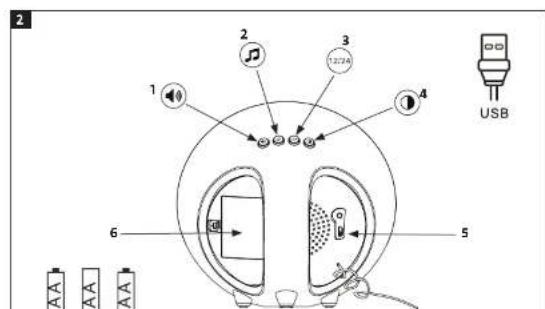
BACK
- Volume
- Natural sound
- Selection of 12 or 24 hour display
- Brightness of time display
FIG. 2
S. USB port
-
Battery compartment
-
Battery positioning
FIG. 3
USE
USB
• To start, connect the USB cable to the mains adapter and clock radio. Plug the mains adapter into a power point.
- The clock radio has reserve batteries that save the settings in the event of a power cut.
INSERTING THE BATTERIES
- Open the battery compartment.
- insert 3 AA batteries with the correct polarity (solid separately).
- Replace the battery compartment cover.
NOTE:
- The functionality of the clock radio is limited when running on the batteries.
- The alarm function and radio can be used.
- The light functions cannot be used when running on the batteries.
- Remove the batteries if the clock radio is
SETTING THE TIME
The digits start flashing when the mains adapter is plugged in.
Setting the hour
- Set the hour with the buttons and
- Press the button to confirm

Setting the minutes
- Set the minutes with the buttons and
- Press the button to confirm. Press the button ⑧ gain if the digits start flashing.
Selection of 12 or 24 hour display
Press the button to switch between 12 and 24 hour display.
NOTE:
The 12 hour display shows AM or PM.
BRIGHTNESS
Press the button Ⓞ set the display
brightness:
1. LOW
2. High
3 off.
FM RADIO
-
Press the button to start/switch off the FM radio.
-
Press the buttons of to select an PM station.
- Press the button ⏻ set the volume 1-15.
NOTE:
The time is not shown when the radio is on.
SETTING THE ALARM
- Press the button to enable/disable alarm mode. The symbol now on/off on the display.
- Press the button to enable alarm setting mode. The digits for the hour flash.
Setting the hour
- Set the hour with the buttons and,
- Press the button to confirm.
Setting the minutes
- Set the minutes with the buttons add
- Press the button to confirm.
- Press the button again if the digits stop flashing.
Natural sound
- Press the button to choose alarm signal.
- Choose sound 1-7 with or.
- Press the button to confirm.
Sounds 1–5 play for 5 seconds when chosen.
SIMULATION OF SUNRISE
The waking light goes on with low intensity 30 minutes before the set alarm, after which the brightness gradually increases to full intensity at the set alarm.
The set natural sound or radio plays for 2 minutes.
When the alarm signal goes on
- Press the button to switch off the alarm for 5 minutes. After 5 minutes the alarm goes on again for 2 minutes.
- Press any button except to switch off the alarm.
- Press the button to switch off the waking light.
Setting the time for simulated
sunset
- Press the button to enable/disable sunset mode.
The symbol go/cor/off on the display. - Press the button to enable settings mode. The digits for the hour flash
Setting the hour
- Set the hour with the buttons or ⊕ ⊖
- Press the button 10 confirm
Setting the minutes
- Set the minutes with the buttons of
- Press the button to confirm.
LIGHT
- Press the button to switch on the light.
- Set the brightness (1-10) with the buttons ④ or ⊖
- Press again to enable automatic colour changing.
- Use be to choose green, red, blue, violet, orange, indigo.
- Press the button a third time to switch off the light.
- 30 minutes before the set time for sunset the light goes on at full intensity, after which the brightness is gradually reduced until the light goes off at the set time.
- The light can be switched off at any time during the simulated sunset by pressing the button.
IMPORTANT:
- Do not press two or more buttons at the same time.
- Wait at least 1 second before pressing the next button, otherwise there is a risk of malfunctioning.
- In the event of malfunction, pull out the mains adapter, wait 3 seconds and connect the mains adapter again.
- The time display goes off automatically after 15 minutes. Press any button to show the time.
- KLOCKRADIO
- SÄKERHETSANVISNINGAR
- INNSTILLING AV KLOKKESLETT
- INNSTILLING AV ALARM
- BACK
- 2
- USE
- USB
- INSERTING THE BATTERIES
- NOTE:
- SETTING THE TIME
- Setting the hour
- Setting the minutes
- Selection of 12 or 24 hour display
- BRIGHTNESS
- FM RADIO
- SETTING THE ALARM
- Natural sound
- SIMULATION OF SUNRISE
- When the alarm signal goes on
- Setting the time for simulated
- sunset
- LIGHT
- IMPORTANT:
Brand : Marquant
Model : 004-954
Category : Light therapy