
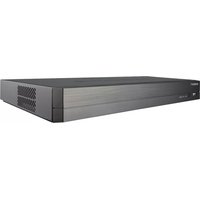
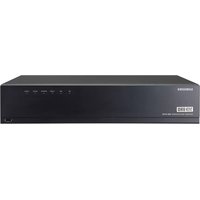
XRN-3010A - Video recorder Hanwha - Free user manual and instructions
Find the device manual for free XRN-3010A Hanwha in PDF.


| Product Type | Network Video Recorder (NVR) |
| Brand | Hanwha |
| Model | XRN-3010A |
| Video Channels | 8 channels (IP cameras) |
| Maximum Recording Resolution | Up to 8MP per channel |
| Video Compression | H.265, H.264, MJPEG |
| Hard Drive Bays | 2 x SATA (supports up to 10TB each) |
| RAID Support | RAID 0, 1 (optional) |
| Network Interface | 1 x RJ45 10/100/1000 Mbps |
| Audio Support | 1 channel audio input, 1 channel audio output |
| Alarm I/O | 4 alarm inputs, 2 alarm outputs |
| USB Ports | 2 x USB 2.0 (front), 1 x USB 3.0 (rear) |
| Dimensions (W x D x H) | 440 x 297 x 44 mm (1U rackmount) |
| Weight | Approx. 3.5 kg (without HDDs) |
| Power Supply | AC 100-240V, 50/60 Hz, max 60W |
| Operating Temperature | 0°C to 40°C |
| Humidity | 20% to 85% (non-condensing) |
| Remote Access | Via web browser, mobile app (iOS/Android) |
| Playback Features | Search by time, event, motion; smart search |
| Recording Modes | Continuous, scheduled, motion, alarm |
Frequently Asked Questions - XRN-3010A Hanwha
User questions about XRN-3010A Hanwha
0 question about this device. Answer the ones you know or ask your own.
Ask a new question about this device
Download the instructions for your Video recorder in PDF format for free! Find your manual XRN-3010A - Hanwha and take your electronic device back in hand. On this page are published all the documents necessary for the use of your device. XRN-3010A by Hanwha.
USER MANUAL XRN-3010A Hanwha
The product records video and audio from network cameras to a hard disk, and enables playback from the hard disk. It also provides remote monitoring environment for video and audio over the network using a remote computer.
- User-friendly UI
• Supports a range of 4K camera resolutions (38/0X2160, 4098X2160, 4000X3000) - Outputs a 4K high definition image using HDMI
- Record and play video
- Record and play audio
• Supports ONVIF Profile S standard and RTP / RTSP protocols
• Display the HDD operation status by HDD SMART - HDD overwrite enabled
- Backup using USB 2.0, 3.0 protocols and external HDD
■ Simultaneous play of 16 channels - Various Search Modes (Time, Event, Smart, Text, Backup, ARB)
• Various Recording Modes (Normal, Event, Scheduled Recording) - Alarm Input / Output
• Remote Monitoring function by Windows Network Viewer
• Live monitoring of the network camera
• Installation Wizard Function (Easy Setup, Quick Setup)
- Supports the smartphone remote monitoring feature by P2P support (XRN-2010A/2011A/3010A/1610A/1810SA)
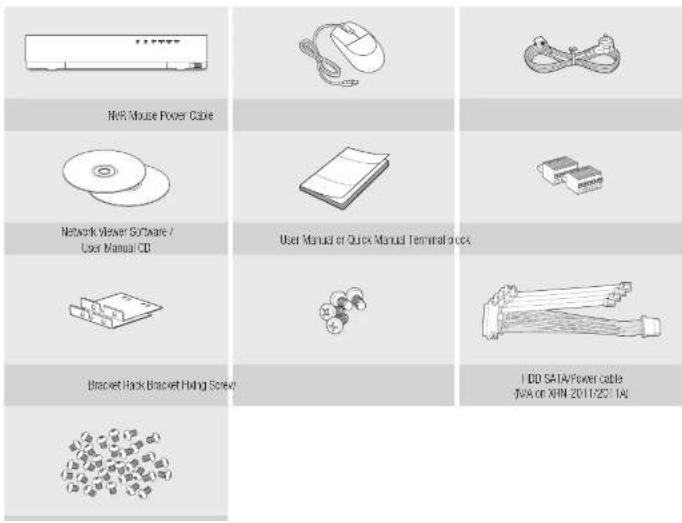
Package Contents

■ The appearance of the components may differ from the image shown.
- Accessory category and quantity may differ depending on sales region.
- For some regions, HDD is not pre-installed. HDD Fixing Screw, SAVA Power Cable, SAVA data cable and SAVA power/data cable quantity vary depending on the model.
XRN-2010/2011/2010A/2011A/3010/3010A
- If you are adding a new or previously used HDD to this product in addition to the HDD(s) originally installed, format the new HDD manually in the set before use. To learn how to format, see "Device/Format" in the Wieneret MVR User Manual.
1 Remove the screws located on the left/right side and on the back side first, then remove the cover.

3 Mount HDDs to the bracket and fix it with screws.

2 Remove the screws on the left/right side (4 screws) and remove the bracket.
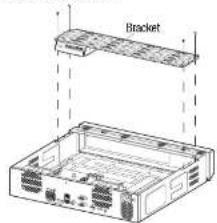
4 Connect the cable to the HDD by matching the HDD SATA/power cable number to the HDD position number on the bracket. ■ For the HDD location number on the bracket, please refer to the figure below.

5 Mount the bracket on which an additional HDD is mounted on the NVR, secure it with screws and connect the SATA/power cable to the connector on the main board by matching the number.
- For the connector numbers, please refer to the figure below.

natural_image
Technical line drawing of a server rack with internal components and wiring (no text or symbols)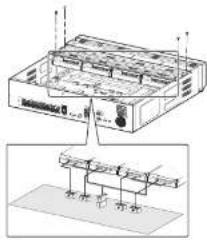
6 Check for any problems in the connection terminal and the wiring in the product, close the cover and fix it with screws.

XRN-2011/2011A
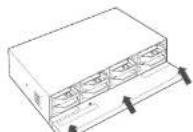
1 Open the front cover and check the HDD installation bracket.
■ Release the USB connection before opening the front cover to prevent damage to the USB port.

2 Push the latch to the right and remove the HDD bracket.
Take care not to scratch your hands when removing the HDD bracket.

3 Align and insert HDD into the bracket home. Alter inserting one side, push and insert the other side slightly.

4 Align the bracket with the HDD installed with the enclosure latch, and push the bracket in the direction of the board.
- Push it until you hear the latch lock sound. If the HDD is not completely connected, it may be detected.

5 Push the front cover upwards and close it.
Install Wizard
1 Select the language
Select your preferred language.
2 Set Password
Set a password.

※ Click ☐ on to see the password rule. Check the password setting rules.
2-1. Setting Camera Password
You can change the password of the camera one step.
If the password of the camera is the default password set in the factory, enter a new password to change it. The password will be changed, and the new password will be registered.
If the password of the camera is not the default password set in the factory, enter the current camera password. The current camera password will be registered.
- New Password : Input a new password according to the password setting rules.
- Confirm Password : Input the new password again.
- A camera password registered with OMIF and RTSP cannot be changed.
3 Set up Network
- DHCP server : If the DHCP server is set to enable, an IP is automatically assigned to the camera.
• Network 1 (Camera): Connects to the camera and receives the video feed from the camera.
• Network 2 (AI) : Network for a remote viewer (SSM, Smart Viewer, Webviewer)
- Network 1 / Network 2 Setup
- IP Type : Choose the network connection method.
- IP Address, Subnet Mask, Gateway, DNS
※ For more details on network settings refer to the I hear manual
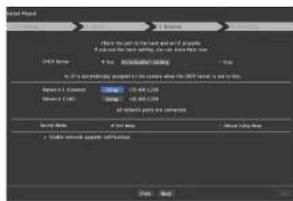

4 Set Date & Time
Set the time and date and click the
5 Camera Registration
When the installation wizard finishes, the camera is automatically registered.
5-1. When detected cameras are less than or equal to the number of channels supported by NVR, all the detected cameras are automatically registered and the registered camera information (fps and recording days) is displayed.
▶ Select
▶ When you select
5-2. Adjust the recording framerate
Changes the recording frame rate for all cameras at once.
Please note that the estimated recording days vary depending on the frame rate.

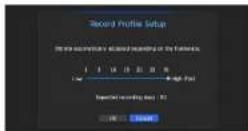
< Figure 5-2 > < Figure 5-1 >
5-3. If the detected cameras exceed the number of channels supported by NVR, select cameras to register manually and register them.
Select a camera to register and click the
Additional camera registration
In the
Menu → Device → Camera → Cam Registration → Auto
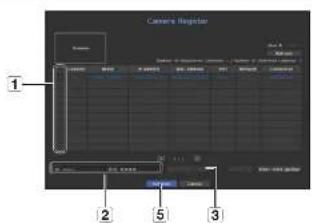
To register a camera, follow these steps:
(1) Select the camera to register (you can select multiple cameras). window to enter of the selected network camera. (If you do not register a new ID/PW, then the default ID/PW combination is used.) - Click an item on the table to see a preview (you must change the ID and Password in step "2" if the camera account changes). This section outlines how to configure and view the recording settings for each channel. • FULL: Records all the frames received from the camera. [2] Shows the transmission size of the recording data for each channel. The orange colored channel indicates the case where the (2) input data load is greater than the (3) permitted data load. If you set the (3) permitted data load to greater than the (2) input data loads, it will be changed to orange. From the setup menu, you can configure the camera settings (resolution, frame rate, and quality) and other functional settings. Menu → Device → Camera → Camera setup Camera function settings: You can configure the camera settings or the live movie format to change the settings in the camera itself. From the channel setup menu, you can change the camera name shown in live mode. Menu → Device → Camera → Channel setup You can use the same layout set on the live screen for the Search Time function in order to perform a search using the channel sequence and combination configured by the user. - For more information about the detailed setting method for each stage, refer to the user manual. Live channel layout settings (1) Open the channel layout setup menu. 1) The initial search option is set to 1 These are the various functions available for playback. Hover over them and a tool tip will be prompted. Control the playback by referring to the tool tip.
(Ex : Skip Backward) Right-click on the live screen and select Right-click on the live screen and you can access various functions that NVR provides. Hover over an icon and a brief definition of term for each function is prompted. You can check product information/user manual/firmware information/FAQ/HDD compatibility list, etc. on the website or mobile app on your smartphone. This function is provided only for products that support P2P function. For products that support the P2P function, refer to the "NVR products supporting each feature" in the Wilsonet NVR manual.
When using P2P service, NVR can be used by connecting to mobile web viewer. ① When 2 When the connection is successful, search for WiseNet Mobile from the smart phone, and then install and run it.
- When Add a device > OR code is selected, the MVR OR code can be scanned. 4) After this, it automatically connects to NVR and can be monitored easily with a smart phone when running WiseNet mobile app saved in the smart phone. - P2P's service period expires in 5 years. If you want to extend it after expiration, contact your vendor. Hanwha Techwin cares for the environment at all product manufacturing stages, and is taking measures to provide customers with more environmentally friendly products. The Eco mark represents Hanwha Techwin's devotion to creating environmentally friendly products, and indicates that the product satisfies the EU RoHS Directive. Correct Disposal of This Product (Music Electrical & Electronic Equipment) Applicable in the European Union and other European countries with separate collection systems 6, Pangyo-ro 319 beon-gil, Bundang-gu, Seongnam-si, Gyeonggi-do, 463-400 Rep. of KOREA Tel: +82.70.7147.8753 Fax: +82.31.8018.3740 http://hanwha-security.com 500 Frank W. Burr Blvd. Suite 43 Teaneck, NJ 07666 Toll Free: +1.877.213.1222 Direct: +1.201.325.6920 Fax: +1.201.373.0124 www.hanwhasecurity.com Heriot House, Heriot Road, Chertsey, Surrey, KT16 9DT, United Kingdom Tel: +44.1932.57.8100 Fax: +44.1932.57.8101 www.hanwha-security.eu No.11, Weiliu Rd., Micro-Electronic Industrial Park, Jingang Road Tianjin 300385, China Tel: +86.22.2388.7788 www.hanwha-security.cn JAFZA View 18, 20th floor, office 2001, 2002, 2003, Downtown Jebel Ali, Dubai, United Arab Emirates http://hanwha-security.com
12 Click the
3 Click
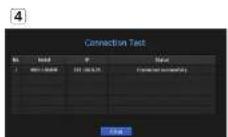
(4) Check the connection results.
[5] If the channel connected successfully, click
Configuring the Recording
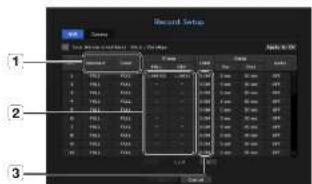

- KEY: Records only the key frames received from the camera. In general, one or two frames per second are recorded, but you can adjust this in the camera settings.
• OFF: Turns off recording.
- If the sum of input data for each channel is greater than the max level for the camera, then 4. The recording exceeding icon and the alarm message will be displayed. In this case, for the channel exceeding the input limit will record the main frame(s or two per second) only.Setting Up the Camera

Setting Up a Channel


Configure and run layout


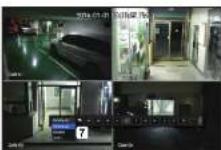
2 Click
3 Enter a name for the selected channels (e.g., Parking lot).
4 Select the channels that you want to add to the layout (e.g., 1, 2, 3, 4).
(5) Choose a split mode to apply (e.g., 4-way split).
6 Click
(7) Choose a layout to view it on the screen (e.g., change to Parking lot).
flowchart
graph TD
    A["Parking lot"] --> B["Parking lot"]
    A --> C["Elevator"]
    A --> D["Stairs"]
    B --> E["10"]
    B --> F["25"]
    B --> G["30"]
    B --> H["40"]
    B --> I["50"]
    B --> J["60"]
    B --> K["70"]
    B --> L["80"]
    B --> M["90"]
    B --> N["100"]
    C --> O["100"]
    D --> P["100"]
    E --> Q["100"]
    F --> R["100"]
    G --> S["100"]
    H --> T["100"]
    I --> U["100"]
    J --> V["100"]
    K --> W["100"]
    L --> X["100"]
    M --> Y["100"]
    N --> Z["100"]
    O --> AA["100"]
    P --> AB["100"]
    Q --> AC["100"]
    R --> AD["100"]
    S --> AE["100"]
    T --> AF["100"]
    U --> AG["100"]
    V --> AH["100"]
    W --> AI["100"]
    X --> AJ["100"]
    Y --> AK["100"]
    Z --> AL["100"]
2-1 Search

② Select a channel for each selected group.
3 Move the time bar to view the preview screen as shown in Figure 4.
5 Press the 2-2 Play

2 You can configure specific functions in (1) through playback settings. Ex) Jump to play: 10 minutes, 30 minutes, 1 hour, 24 hours, etc.
3 Displays functions that are operating in split mode and during other playback.3 Backup
Use the basic guide
Show shortcut menu

Use product information

flowchart
graph TD
    A["http://hanwha-security.com"] --> B["Video Recoder"]
    C["手机"] --> B
    D["https://hanwha-security.com"] --> B
    B --> E["Product Selection Interface"]
    E --> F["User Selected"]
    F --> G["Search User: 1.42"]
Using P2P Service

3 When the QR code is scanned, the device ID that can be seen in NVR is automatically converted to mobile viewer ID, and the mobile viewer can be used right away when the ID/password of NVR is entered.
flowchart
graph LR
    A["Mobile Device"] --> B["QR Code"]
    B --> C["Add Device"]
    C --> D["ADD DEVICE Help"]


Head Office
Hanwha Techwin America
Hanwha Techwin Europe
Hanwha Techwin(Tianjin) Co,Ltd
Hanwha Techwin Middle East FZE
- Package Contents
- XRN-2011/2011A
- Install Wizard
- Select the language
- Set Password
- 2-1. Setting Camera Password
- Set up Network
- Set Date & Time
- Camera Registration
- 5-2. Adjust the recording framerate
- Additional camera registration
- Configuring the Recording
- Setting Up the Camera
- Setting Up a Channel
- Configure and run layout
- 2-1 Search
- 2-2 Play
- Backup
- Use the basic guide
- Show shortcut menu
- Use product information
- Using P2P Service
- Head Office
- Hanwha Techwin America
- Hanwha Techwin Europe
- Hanwha Techwin(Tianjin) Co,Ltd
- Hanwha Techwin Middle East FZE
Brand : Hanwha
Model : XRN-3010A
Category : Video recorder