
PROFLEX3YEAR - Software Licenses and Extensions Proflex - Free user manual and instructions
Find the device manual for free PROFLEX3YEAR Proflex in PDF.


| Product Type | Software License & Extension |
| Model | PROFLEX3YEAR |
| Brand | Proflex |
| Category | Licenses and Software Extensions |
| Main Function | Connect Proflex Signage touch panels to Exchange environment for real-time meeting room calendar synchronization |
| Key Features | Supports Exchange Online (Office365) and on-premise Exchange 2010 SP1+; Application Impersonation for calendar management; AES 256-bit encryption for credentials |
| System Requirements | Exchange Administrator rights; Room Resources created in Exchange; Proflex Connection Manager server |
| Compatibility | Exchange Online (Office365), Exchange 2010 SP1 or later (on-premise) |
| Installation | Requires configuration steps: create Outlook Room Resources, create Proflex Exchange Account, add Application Impersonation rights |
| Security | AES 256-bit encryption for stored credentials; password policy extension recommended for dedicated account |
| User Access | Exchange Global Administrator and Exchange Administrator rights required for setup |
| Validation Tool | Available at www.proflexsignage.com/test-settings to verify Exchange Account and Room Resource Email |
| Documentation | User manual included with setup instructions (10 pages PDF) |
| Support | Free user manual and instructions; online validation tool |
Frequently Asked Questions - PROFLEX3YEAR Proflex
User questions about PROFLEX3YEAR Proflex
0 question about this device. Answer the ones you know or ask your own.
Ask a new question about this device
Download the instructions for your Software Licenses and Extensions in PDF format for free! Find your manual PROFLEX3YEAR - Proflex and take your electronic device back in hand. On this page are published all the documents necessary for the use of your device. PROFLEX3YEAR by Proflex.
USER MANUAL PROFLEX3YEAR Proflex
v08
CONTENTS
Introduction 3
Architectural Overview 3
For whom 4
Technical requirements 4
Getting started 4
Step 1: Create the Outlook Room Resource(s) 5
Step 2 Create the Proflex Exchange Account 6
Adding Application Impersonation Rights 7
Add Application Impersonation Rights in Exchange Online 7
Add Application Impersonation Rights using PowerShell 9
Step 3: Validate the required Proflex Exchange Settings 10
Introduction
Proflex Signage touch panels can be easily connected to your Exchange environment. Thus ensuring that meeting room bookings that are made through Outlook Calendar appear on the touch panel(s). Vice versa bookings that are made on the spot at the touch panel(s) are synchronized with the calendars of the corresponding room resources.
The system is always up to date, in realtime and without double bookings
Architectural Overview
The Proflex Connection Manager provides the connectivity between the individual Proflex touch panels and the corresponding room resource calendars in your Exchange environment.
![graph LR A["Touch Panel 1"] -->|Room resource email| B["Proflex Connection Manager"] C["Touch Panel 2"] -->|Room resource email| B D["Touch"] -->|Room resource email| B B -->|Proflex Exchange account| E["Exchange"]](/content/2026/05/926319/images/34ab7ae356fd0f24b8ebae18849b10d59b1b60a2e9e4a8e1e38571187e3a45f5.jpg)
For whom
To perform the necessary steps you need Exchange Administrator rights because you need to create a Proflex Exchange Account within Exchange and you need to have the rights to define Outlook Room Resources in Exchange.
Technical requirements
The Proflex Connection Manager can connect to Room Resources in Exchange Online (Office365) and on premise Exchange 2010 sp1 or later versions.
Getting started
You need to perform the following steps to connect the Proflex Connection Manager to your Exchange environment:
- Step 1: Create the Outlook Room Resources)
- Step 2: Create the Proflex Exchange Account
• Step 3: Validate the Proflex Settings - Step 4: Configure Additional Settings
Step 1: Create the Outlook Room Resource(s)
Each Proflex touch panel that you setup will be connected to an Outlook Room Resource using the Email Address of the Room Resource. You need to get this Room Resource Email Address from Exchange. Login to your Exchange environment as a Global Administrator and navigate to the Rooms & equipment page:
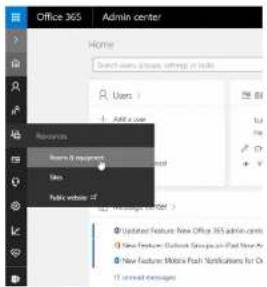
On the Rooms & equipment page you can see the Email Addresses of your Room Resources:

Step 2: Create the Proflex Exchange Account
Proflex Signage needs access to the Room Resource Calendars in Exchange through a Proflex Exchange Account with Impersonation Rights. When you setup the Proflex environment for the first time you will need to enter the Proflex Exchange Account credentials.
Note:
- The Exchange Account credentials are stored securely in Proflex using AES 256 bit encryption.
- You can use an existing account, however we recommend you create a dedicated account for Proflex so that you can ensure that the login details are not changed by mistake and it enables you to monitor the behavior of the Proflex application.
- Consider extending or even disabling the Password Policy for this account. Otherwise you will have to change the Password on the Prollex touch panel when it expires.
Login to your Exchange environment as a Global Administrator and navigate to the User screen to Add or Edit a User Account. The following screen shows you the required properties for the Proflex Exchange Account:

Adding Application Impersonation Rights
For Proflex to be able to manage the Room Resource Calendars you need to configure ApplicationImpersonation for the Proflex Exchange Account. This must be done in your Exchange environment. If you are using Exchange Online follow the steps described in the section Adding ApplicationImpersonation Rights in Exchange Online. If you are using an on-premise Exchange follow the steps described in Adding ApplicationImpersonation Rights using Powershell
Add Application Impersonation Rights in Exchange Online
Login to your Exchange environment as a Global Administrator and navigate to your Exchange Admin Center:

Add a New Group (e.g. Room Signage Impersonation), Add the Role ApplicationImpersonation and Add the Proflex Exchange Account as a Member:
Roomsignage Impersonation

Add Application Impersonation Rights using PowerShell
- Run PowerShell as an Administrator
- Check the PowerShell version by typing the following cmdlet:
\$PSVersionTable
• An empty response means you are using version 1.0.
• For versions 2.0 and newer you should see a detailed answer.
- We recommend to keep PowerShell updated to avoid compatibility problems. To download the newest version of PowerShell please visit this Microsoft website.
-
If Exchange Server is in a remote location (for example hosted) or you are connecting to Office 365, learn how to connect to remote Exchange via Powershell. To manage permissions locally (MS Exchange Server on-premises or when logged on to remote Exchange via Remote Desktop, etc.) execute the commands below in Exchange Management Shell.
-
Check if the account in question already has impersonation rights assigned.
Get-ManagementRoleAssignment -RoleAssignee "
- Where
Step 3: Validate the required Proflex Exchange Settings
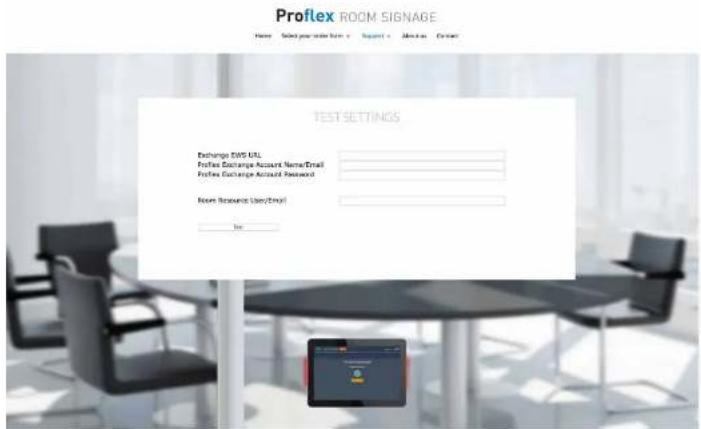
Before you start configuring the Proflex touchpanel you must validate the Proflex Exchange Account and Room Resource Email Address(es). This validation is done using the validation tool at www.proflexsignage.com/test-settings



- CONTENTS
- INTRODUCTION
- ARCHITECTURAL OVERVIEW
- FOR WHOM
- TECHNICAL REQUIREMENTS
- GETTING STARTED
- STEP 1: CREATE THE OUTLOOK ROOM RESOURCE(S)
- STEP 2: CREATE THE PROFLEX EXCHANGE ACCOUNT
- ADDING APPLICATION IMPERSONATION RIGHTS
- ADD APPLICATION IMPERSONATION RIGHTS IN EXCHANGE ONLINE
- ADD APPLICATION IMPERSONATION RIGHTS USING POWERSHELL
- PSVERSIONTABLE
- STEP 3: VALIDATE THE REQUIRED PROFLEX EXCHANGE SETTINGS
Brand : Proflex
Model : PROFLEX3YEAR
Category : Software Licenses and Extensions