TOT625 - Oven Tisira - Free user manual and instructions
Find the device manual for free TOT625 Tisira in PDF.


| Product Type | Electric Oven |
| Model | TOT625 |
| Brand | Tisira |
| Dimensions (W x D x H) | 595 x 575 x 595 mm |
| Cavity Capacity | 70 L (gross) |
| Power Supply | 220-240 V~ / 50 Hz |
| Rated Power | 2100 W |
| Number of Functions | 5 |
| Cooking Functions | Light, Defrost, Bottom Element, Natural Convection, Fan-Assisted Convection |
| Temperature Range | 50°C – 250°C (select functions) |
| Timer Type | Mechanical Manual Timer |
| Control Type | Knobs (Function Selector, Thermostat, Timer) |
| Oven Light | Yes, E14 25W bulb (300°C compatible) |
| Cooling Fan | Thermostatically controlled |
| Door Type | Removable for cleaning |
| Child Lock | No (only on TOC619 model) |
| Cleaning Recommendation | Lukewarm water, avoid abrasive cleaners or steam cleaners |
| Installation Type | Built-in (under bench or tower cabinet) |
| Required Cut-out Dimensions | Refer to manual for exact dimensions |
| Electrical Connection | Plug supplied (10A) or direct connection with circuit breaker |
| Warranty | Contact Arisit Pty Limited (Australia/NZ) for service |
Frequently Asked Questions - TOT625 Tisira
User questions about TOT625 Tisira
0 question about this device. Answer the ones you know or ask your own.
Ask a new question about this device
Download the instructions for your Oven in PDF format for free! Find your manual TOT625 - Tisira and take your electronic device back in hand. On this page are published all the documents necessary for the use of your device. TOT625 by Tisira.
USER MANUAL TOT625 Tisira
IMPORTANT // Please ensure that you read through this user manual prior to installation and use. This manual contains important information to ensure optimal performance and keep you safe. Please retain your proof of purchase, as this will be required in the event that you require warranty service. Remember to keep this manual for future reference.
Contents
Contents
Warning & Safety Instructions 3 - 4
Product Specifications 5
Product Overview 6
Operating Instructions 7 - 10
Maintenance 11 - 12
Installation 13 - 15
Contact Details 16
Warning & Safety Instructions
IMPORTANT // To ensure best performance, avoid risk of damage or accidents. Please read the operating instructions prior to first time use.
To maintain the efficiency and safety of this appliance, we recommend that you do the following:
- Only call the Service Centers authorized by the manufacturer.
• Always use original spare parts. - In case of damage to the power cord, a special purpose cord or component bought from the manufacturer or maintenance department shall be used for replacement.
When handling the appliance, we recommend you always use the purpose provided handles recessed into the sides of the oven to prevent harming people or damaging the appliance itself.
WARNING // Accessible parts may become hot when the grill is in use. Children should be kept away.
WARNING // This appliance is not intended for use by persons (including children) with reduced physical, sensory or mental capabilities, or lack of experience and knowledge, unless they have been given supervision or instruction concerning use of the appliance by a person responsible for their safety.
WARNING // Children should be supervised to ensure that they do not play with the appliance.
The following items are potentially dangerous, and therefore appropriate measures must be taken to prevent children
Warning & Safety Instructions
Avoid the following:
- Touching the appliance with wet parts of the body.
• Using the appliance when barefoot - Pulling on the supply cable to unplug it from the electrical outlet.
- Improper or dangerous operations;
- Obstructing the ventilation or heat dissipation slots.
- Allowing power supply cables of small appliances to come into contact with the hot parts of the appliance.
- Exposing the appliance to atmospheric agents such as rain or sunlight.
- Using the oven for storage purposes;
• Using flammable liquids near the appliance - Using adapters, multiple sockets and /or extension leads.
- Attempting to install or repair the
the entire assembly. Only use temperature probes recommended for this oven.
- If in doubt about the soundness of the appliance after removing it from its packaging.
• If the power supply cable has been damaged or needs to be replaced. - If the appliance breaks down or functions poorly; ask for original spare parts.
NOTICE // The manufacturer may not be held responsible for any damage due to: Incorrect installation, improper, incorrect and irrational use.
- Steam cleaner cannot be used to clean the oven.
- Only use the appliance to cook food and nothing else.
- Disconnect the appliance from the electrical mains if it is not functioning
Product Specifications
Model: TOT615 & TOT625 (5 Function Electric Oven)
| Dimensions W595 x D575 x H595mm | |
| Voltage / Frequency 220-240V~ / 50Hz | |
| Power 2100W | |
| Capacity 70L (Gross) |
Model: TOC619 (9 Function Electric Oven)
| Dimensions W595 x D575 x H595mm | |
| Voltage / Frequency 220-240V~ / 50Hz | |
| Power 3000W | |
| Capacity 70L (Gross) |
Product Overview
Control Panel
Model: TOT615 & TOT625

- Function Selector
- Manual Timer
- Thermostat
Control Panel
Model: TOC619

Operating Instructions
IMPORTANT // Prior to first time use, it is recommended that you select the Natural Convection function and set it to work at its highest temperature (250°C) for half an hour without anything inside the oven and with its door shut.
At the end of this process, open the oven door and leave it open for a few minutes to allow fresh air to circulate inside the oven.
This procedure will remove the unpleasant odour that is caused by bonding agents used to protect the oven cavity during the enamel coating stage.
NOTICE // Your oven is equipped with a thermostatically controlled cooling fan that will switch on when required to cool the oven. This fan may continue to run even after the oven is switched off, but it will automatically turn off when the cavity is sufficiently cool. Warm air is discharged from the front of the oven during the

1. Adjusting The Clock (TOC619 only)
After connecting the unit to the power, the zero hour "0:00" will be visible on the display.
- Press "☐", the hour digits will flash.
- Turn the knob "K2" to adjust the hour (24h
Operating Instructions
2. Selecting The Cooking Function
Note: 5F Function/9F Function Over Model)
Note: Default temperatures presented on this table does not apply to the 5 Function oven models
| Function Description | |
 | LIGHT - The light function enables the user to observe the progress of cooking without opening the door. The oven light remains on in all cooking functions. |
 | DEFROST - The circulation of air at room temperature enables quicker thawing of frozen food (without using any heating elements). It's a gentle but quick way to speed up the defrosting time and thawing of ready-made dishes and cream filled products. |
| [BATT] | BOTTOM ELEMENT - A concealed element in the bottom of the oven provides heat focused to the base of the dishes in the oven without browning them. This is ideal for slow cooking dishes such as casseroles, stews, pastries and pizzas where a crispy base is desired. The temperature can be set within the range of 60-120°C. The default temperature for this function is 60°C filled products. |
| [ATX6] | NATURAL CONVECTION - The top and bottom elements work together to provide conventional cooking. The temperature can be set within the range of 50-250°C. The default temperature for this function is 220°C. |
| [S76S] | FAN-ASSISTED CONVECTION - The combination of the fan and top and bottom heating elements provides more even heat transference, saving up to 40% of energy. Dishes tend to be lightly browned on the outside and still moist on the inside when using this function. |
| SF | NOTE: This function is suitable for grilling or roasting big pieces of meat at a higher temperature. The temperature can be set within the range of 50-250°C. The default temperature for this function is 220°C. |
Operating Instructions
Model: TOT615 & TOT625
- Turn the Function Selector to choose the desired cooking function.
- Turn the Thermostat knob to adjust the temperature. Not applied to the Light and Defrost functions.
- Turn the Manual Timer anti-clockwise to the 'ON' position.
Model: TOC619
- Turn the Function Selector knob ("K1") to choose the desired cooking function.
- Turn the Thermostat knob ("K2") to adjust the temperature. Not applied to the Light and Defrost functions.
NOTE // The default temperature of the function selected is displayed prior to any temperature adjustments.
- Press " ▶" to start cooking. The
NOTE // (TOC619 only) The temperature on the display will flash until the set temperature is reached inside the oven. The current temperature inside the oven cavity can be checked by pressing the buttons "☐" and "☐" simultaneously
The intervals between two values of time and temperature are as follows:
Time
From 0 to 30min – intervals of 1 minute. From 30min to 9h – intervals of 5 minutes.
Temperature
From 0 to 250°C – intervals of 5°C. Exception – Grill function intervals are of 30°C.
3. Setting The Timer
Model: TOT615 & TOT625
This model is equipped with a mechanical
Operating Instructions
- Turn the knob "K1" to adjust the timer. This function is available after the cooking process has started.
- After selecting the desired cooking time, press "☐" to set the timer. If "☐" is not pressed within 3 seconds, the previous set time will be displayed.
NOTE // To check what the time is on the oven clock during a cooking process, please press "☐". The current time will be displayed for a few seconds.
4. Setting The Reminder
The Reminder function can only be used when the oven is in standby to remind you to start the cooking process or as a timer during other activities in the kitchen. For example, while boiling eggs on your cooktop.
- Press“☐” to finish setting the reminder. The colon “:” should be flashing now.
NOTE // The reminder will beep 10 times when the set time is reached and the symbol "☐" should disappear from the display.
NOTE // The reminder function can be cancelled at any time by pressing "☐".
5. Child Lock (TOC619 only)
This appliance is equipped with a child lock system that prevents accidental operation by an unsupervised child.
To lock the oven functions, press "☐" and "☐" simultaneously for 3 seconds. You will hear a long "beep", which indicates that the child-lock has been activated and the symbol "☐" will be displayed.
Model: TOT615 & TOT625
Maintenance
ATTENTION // Before cleaning your oven, or performing maintenance, turn the appliance off and disconnect it from the power supply.
Cleaning your oven frequently will extend its life. When cleaning your oven:
- Keep in mind that the enamelled or stainless steel parts should be washed with lukewarm water and without using any harsh abrasive powders, corrosive substances or metal scrapers as they can damage the surface treatment of the oven parts.
- Do not use a steam cleaner.
- To protect against the risk of electrical shock, do not immerse the unit, cord or plug in water or other liquids.
- Do not clean the appliance while it is still hot. The internal and external surfaces of the oven should preferably be cleaned by damp cloth when the oven has cooled down.
with aluminium foil as the consequent accumulation of heat could compromise the cooking and even damage the enamel.
- Do not use harsh abrasive cleaners or sharp metal scrapers to clean the oven door glass since they can scratch the surface, which may result in shattering of the glass.
If the grease spots and dirt marks are particularly tough to remove, a special product for oven cleaning can be used. Follow the instructions provided by the manufacturer on the product packaging.
- How To Remove The Oven Door
The oven door can be removed for a more thorough cleaning.
Maintenance

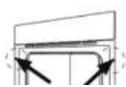
- Lift up and turn the small levers (B) situated on the two hinges (A).

natural_image
Line drawing of a mechanical assembly with a lever and pivot point (no text or symbols)- Grip the door on its sides, as shown on the image below, and start to shut it slowly until the levers (doorstops) engage in the slots of the oven door (B). Do not try to close the door completely as it could damage the doorstops.
- Pull the door towards you, pulling it out from the hinge supports.
- To reinstall the door, please follow these instructions in reverse making sure that the slots on the hinges (C) are sitting properly on the base of the hinge supports.
2. Replacing The Oven Light Bulb
WARNING // Ensure that the appliance is switched off before replacing the light bulb to avoid the possibility of electric shock.
This oven is fitted with a standard E14 25W oven light bulb (300°C).
Installation
IMPORTANT // This appliance must be installed by a qualified professional and in accordance with the instructions presented in this manual. The manufacturer will not be held responsible for any damage caused by incorrect installation.
ATTENTION // Before installing the appliance, ensure that the power supply is turned off.
1. Electrical Connection
This oven must be connected to a 220-240V\~/50Hz power supply.
The 5-function ovensare fitted with a 10A plug and its rated power is 2100W.
The 9-function oven is supplied with a 15A plug and its rated power is 3000W. The ovens can also be permanently connected to he fixed wiring as follows.
NOTE // When connecting the cable directly to the mains, install an omnipolar circuit breaker with a minimum contact gap of 3mm, which should be sized according to the load and should comply with current regulations (the earth wire should not be interrupted by the circuit breaker).
WARNING // If the supply cord is damaged, it must be replaced by the manufacturer or its service agent or a similarly qualified person in order to avoid a hazard.
NOTE // Position the mains supply cable so that it is never subject to high temperatures.
Installation
2. Fitting The Oven Into The Kitchen Cabinet
This appliance can be installed as an under bench unit or into an oven tower cabinet.
The panels of the adjacent cabinetry must be made of heat-resistant materials. In particular, cabinets using veneer finish panels must be assembled with adhesives suitable for temperatures of up to 120°C.
The figures below present the dimensions of the appliance and cabinet cut-out for installation of the built-in oven.
IMPORTANT // In order to function correctly, the oven requires an adequate supply of cool air.
- There should be a gap of approximately 45mm at the rear of the shelf on which the oven rests.
TOT615, TOT625 & TOC619

Installation

OVERALL DIMENSIONS

CUT-OUT DIMENSIONS
CONTACT DETAILS
AUSTRALIA
ARISIT PTY LIMITED
40-44 Mark Anthony Drive, Dandenong South, VIC 3175, Australia
© P // 1300 762 219
F//03 9768 0838
consumer.care@arisit.com
NEW ZEALAND
ARISIT PTY LIMITED
PO Box 68-140
Newton, Auckland 1145,
New Zealand
© P // 09 306 1020
F//093020077
sales@aristonappliances.co.nz
TO RA IS COMMITTED TO ONGOING RESEARCH AND DEVELOPMENT.
EVERY EFFORT HAS BEEN MADE TO ENSURE ALL INFORMATION IN THE USER MOHOLE IS CONNECT AT TIME OF HOME TO TWINS.
DIMENSIONS SHOULD BE USED AS A REFERENCE ONLY AND ACTUAL.
MANUFACTURER RESERVES THE RIGHT TO CHANGE SPECIFICATIONS
WITHOUT NOTICE.
- Contents
- Warning & Safety Instructions
- Avoid the following:
- Product Specifications
- Product Overview
- Operating Instructions
- Adjusting The Clock (TOC619 only)
- Selecting The Cooking Function
- Model: TOT615 & TOT625
- Model: TOC619
- Time
- Temperature
- Setting The Timer
- Setting The Reminder
- Child Lock (TOC619 only)
- Maintenance
- Replacing The Oven Light Bulb
- Installation
- Electrical Connection
- Fitting The Oven Into The Kitchen Cabinet
- CONTACT DETAILS
- AUSTRALIA
- ARISIT PTY LIMITED
- NEW ZEALAND
Brand : Tisira
Model : TOT625
Category : Oven