
TFGT905X - Cooker Tisira - Free user manual and instructions
Find the device manual for free TFGT905X Tisira in PDF.


| Product Type | Freestanding Gas Cooker |
| Model | TFGT905X |
| Brand | Tisira |
| Fuel Type | Natural Gas (factory set) or Universal LPG (convertible) |
| Number of Burners | 5 (1 Wok, 1 Rapid, 2 Semi-rapid, 1 Auxiliary) |
| Wok Burner Output (Natural Gas) | 15.00 MJ/h (injector 1.75 mm) |
| Wok Burner Output (LPG) | 12.80 MJ/h (injector 1.0 mm) |
| Rapid Burner Output (Natural Gas) | 11.00 MJ/h (injector 1.50 mm) |
| Rapid Burner Output (LPG) | 10.80 MJ/h (injector 0.88 mm) |
| Semi-rapid Burner Output (Natural Gas) | 6.60 MJ/h each (injector 1.16 mm) |
| Semi-rapid Burner Output (LPG) | 6.30 MJ/h each (injector 0.68 mm) |
| Auxiliary Burner Output (Natural Gas) | 3.80 MJ/h (injector 0.88 mm) |
| Auxiliary Burner Output (LPG) | 3.80 MJ/h (injector 0.53 mm) |
| Oven Functions | Conventional (top & bottom), Fan Bake, Top Oven (Grill), Lamp |
| Digital Timer | 6-button programmable with start/finish time setting |
| Safety Features | Flame failure device on all burners, anti-tilting chain |
| Electrical Connection | 240V, 15A, earthed plug |
| Gas Connection | 1/2" BSP male, adjustable pressure |
| Oven Door | Removable for cleaning |
| Storage Drawer | Yes, for storage |
| Warranty | 2 years parts and labour (Australia & New Zealand) |
Frequently Asked Questions - TFGT905X Tisira
User questions about TFGT905X Tisira
0 question about this device. Answer the ones you know or ask your own.
Ask a new question about this device
Download the instructions for your Cooker in PDF format for free! Find your manual TFGT905X - Tisira and take your electronic device back in hand. On this page are published all the documents necessary for the use of your device. TFGT905X by Tisira.
USER MANUAL TFGT905X Tisira
IMPORTANT // Please ensure that you read through this user manual prior to installation and use. This manual contains important information to ensure optimal performance and keep you safe. Please retain your proof of purchase, as this will be required in the event that you require warranty service. Remember to retain this manual for future reference.
HELLO
CONGRATULATIONS ON THE SELECTION OF THIS TISIRA APPLIANCE. TISIRA APPLIANCES HAVE BEEN SPECIFICALLY DESIGNED FOR AUSTRALIAN AND NEW ZEALAND KITCHENS.
Please read through this user manual carefully as it contains information that will ensure that your appliance is installed correctly, important operating & care instructions and also some advice of what you need to do if this appliance is not performing as intended.
CONTENTS
HELLO 2
CONTENTS 3
WARNINGS 4
OPERATING INSTRUCTIONS 5-10
MAINTAINING YOUR COOKER 11-12
INSTALLATION 13-14
CONNECTIONS 15-17
PRODUCT SPECIFICATIONS 18
WARRANTY TERMS & CONDITIONS 19
CONTACT DETAILS 20
WARNINGS
• DO NOT MODIFY THIS APPLIANCE.
• DO NOT SPRAY AEROSOLS IN THE VICINITY OF THIS APPLIANCE WHILE IT IS IN OPERATION.
- DO NOT STORE OR USE FLAMMABLE MATERIALS IN THE APPLIANCE STORAGE DRAWER OR NEAR THIS APPLIANCE.
- NOT FOR USE IN MARINE CRAFT, CARAVANS OR MOBILE HOMES. (UNLESS EACH BURNER IS FITTED WITH A FLAME SAFEGUARD)
- WHERE THIS APPLIANCE IS INSTALLED IN MARINE CRAFT OR IN CARAVANS, IT SHALL NOT BE USED AS A SPACE HEATER.
• Servicing should be carried out only by authorised personnel.
- Do not remove the plug by pulling the cable.
- In order to prevent accidental tipping of the appliance, for example by a child climbing onto the open oven door, the anti-tilting chain must be installed. Refer to the instructions on page 14.
• To avoid burns, young children should be kept away.
- This appliance is not intended for use by persons (including children) with reduced physical, sensory or mental capabilities, or lack of experience and knowledge, unless they have been given supervision or instruction concerning use of the appliance by a person responsible for their safety.
• Children should be supervised to ensure that they do not play with the appliance.
- Accessible parts may become hot when the grill is in use. Children should be kept away.
OPERATING INSTRUCTIONS
DESCRIPTION OF SYMBOLS

Front Left Burner
Rear Left Burner

Rear Right Burner
Front Right Burner

Central Burner


- Trivets
- Burner Cap
- Diffuser
- Ignition Candle
- Flame Failure Device
INSTRUCTIONS FOR USE OF COOKTOP
■ To ignite a humor push in the knob and rotate
OPERATING INSTRUCTIONS
USE THE CORRECT COOKWARE.
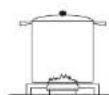
● Cookware should be centralised on the burner when in use.
- Do not use round bottomed pans (e.g. woks) without appropriate wok support recommended by the manufacturer.
- Adjust the flame according to the size of your cookware, not allowing the flame to extend past the edge of the pan.
| Burner | Min ∅Saucepan(mm) | Max ∅Saucepan(mm) |
| Auxiliary 90 160 | ||
| Semi-rapid 130 | 180 | |
| Rapid 150 260 | ||
| Wok-Burner 210 | 260 |


OPERATING INSTRUCTIONS
INSTRUCTIONS FOR USE OF OVEN
When adjusting or positioning your shelf, please ensure the following:
- Ensure that the shelf / tray is located between the two wire sideracks. [see point 1]
- The shelf stops should be facing downwards and towards the rear. [see point 2]
- The guard rail should always be located at the rear of the oven (see point 3)
BEFORE USING THE OVEN FOR THE FIRST TIME:
- Remove all the special film covering the oven door glass.
- Heat the empty oven at maximum temperature for 45 minutes.

OPERATING INSTRUCTIONS
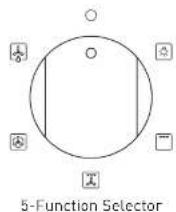
USING THE OVEN FUNCTION SELECTOR
LAMP FUNCTION
The lamp can be turned on with no heating elements and will turn on with all oven functions.
CONVENTIONAL COOKING
Conventional cooking utilises the top and bottom elements. This function is recommended for use with the middle shelf position and is good for slow cooking casseroles, etc.
FAN BAKE
Fan Bake mode is ideal for delicate foods such as desserts. In this mode, the oven uses the bottom element and oven fan. It is recommended to use the lower shelf position with this mode.
TOP OVEN
Top Oven cooking is recommended for use to brown the top food at the end of course.
OPERATING INSTRUCTIONS
6 BUTTON DIGITAL TIMER
SETTING THE TIME
To set the time, hold down the symbol while using the '-' and '+' symbols to adjust the time up and down.
MANUAL SETTING
To remove the 'AUTO' indicator on the screen, press the 🔊 symbol. This then activates the manual operation mode.

AUTOMATIC SETTING
To set the start and finish times:
- Press the 📋 button and use the '-' and '+' buttons to set the desired start time of cooking
- Press the 📋 button and use the '-' and '+' buttons to set the desired finish time for the cooking period
TABLE OF COOKING TIMES
The table below provides examples of the function, temperature, tray position and estimated cooking times for various types of food.
IMPORTANT // Please note that this table is a guide only and times can vary according to the type of food, volume and quantity of food being cooked.
Tray Positions

| Function Food to be cooked | Weight (kg) | Tray Position | Preheating Time (Mins) | Temperature (°C) | Cooking time (mins) | |
Conventional Cooking | Duck 1 3 15 200 65-75 | |||||
| Roast Veal or Beef 1 3 15 200 70-75 | ||||||
| Roast Pork 1 3 15 200 70-80 | ||||||
| Biscuits - 3 15 180 15-20 | ||||||
| Tarts 1 3 15 180 30-35 | ||||||
T   | Browning Food | - | 3-4 | - | 220 | 15 |
Gr   | Soles and Cuttlefish | 1 | 4 | 5 | Max | 8-10 |
| Squid and Prawn | 1 | 4 | 5 | Max | 6-8 | |
| Cod Fillet | 1 | 4 | 5 | Max | 10 | |
| Grilled Vegetables | 1 | 3-4 | 5 | Max | 10-15 | |
| Cutlets | 1 | 4 | 5 | Max | 15-20 | |
| Veal Steak | 1 | 4 | 5 | Max | 15-20 | |
| Hamburgers | 1 | 4 | 5 | Max | 7-10 | |
| Mackerels | 1 | 4 | 5 | Max | 15-20 | |
| Toasted Sandwiches | - | 4 | 5 | Max | 2-3 | |
| Fan-assisted | ||||||
MAINTAINING YOUR COOKER
MAINTENANCE AND CLEANING
Before any operation disconnect the appliance from the power supply and wait for it to cool down.
- Do not use steam for cleaning.
- Wash the enamelled parts with lukewarm water and detergent.
- Wash the diffusers frequently with boiling water and detergent make sure to remove any deposits which could block the flame outlet.
- Rinse the stainless steel parts well with water and dry them with a soft cloth.
- To clean the hob use slightly damp sponges and wiping cloths: if too much water is used it could penetrate the internal parts and damage electrical parts.
The trivets of the hob can be washed in the dishwasher.
For persistent stains use normal non-abrasive detergents, or hot vinegar. - Clean the glass parts with hot water and a soft cloth.
To prevent lighting difficulties, carefully clean the ignition candles regularly.
It is necessary to clean the oven after each use.
Once the oven is cold, you will be able to remove the fat deposits with a sponge or a cloth damp with warm soapy water or a common detergent.
MAINTAINING YOUR COOKER
CLEANING THE OVEN DOOR
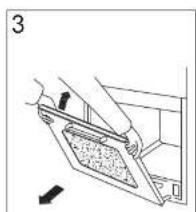
For a more thorough clean, the oven door can be removed by proceeding as follows:
- Open the door fully
- Lift up the small levers located on the two hinges
- Grip the door on the two external sides and close the door halfway
- Pull the door towards you, pulling it out of its seat
- To replace door, reverse this sequence




INSTALLATION
The manufacturer declines any and all responsibilities for damages to things or injuries to persons or animals deriving from incorrect installation or use of the equipment.
INSTRUCTIONS FOR INSTALLATION
WARNING:
- Prior to installation, ensure that the local distribution conditions [nature of the gas and gas pressure] and the adjustment of the appliance are compatible
- The adjustment conditions for this appliance are stated on the data plate or under the product specifications section on page 18
- There shall be adequate ventilation of the room when a rangehood is used at the same time as appliances burning gas. When a rangehood is not in use, ensure that natural ventilation outlets are open.
- This appliance shall be installed only by authorised persons and in accordance with the manufacturer's installation instructions, local gas fitting regulations [AS5601], municipal building codes, electrical wiring regulations, and local water supply regulations.


INSTALLATION
INSTALLING THE ANTI-TILTING CHAIN
The cooker is supplied with an anti-tilting chain to prevent the appliance from tilting forward and accidentally damaging the gas pipe. The anti-tilting chain should be fitted as follows:

- Take the expansion with hook and make an adequate hole in the wall behind, at the same height as the chain fixing area.
In situations where the cooker is installed between two cabinets:
- Drill a 16mm hole in each cabinet, at the same height as the chain.
- Feed the chain through the left and right holes respectively.
- Move cooker to desired position.
- Tighten and fix chains to back-side of cabinet.
COMBUSTIBLE SURFACES
Any adjoining wall surface situated within 200mm from the edge of any hob burner must be a suitable non-combustible material for a height of 150mm for the entire length of the hob.
Any combustible construction above the hotplate must be at least 600mm above the top of the burner and no construction shall be within 450mm above the top of the
CONNECTIONS
ELECTRICAL CONNECTION
Equipment type: Free standing (Class 1) Insulation class: Class 1
The appliance is fitted with an approved 15 Amp flexible cord and plug which must be connected to a correctly earthed socket outlet.
CONNECTION OF THE SUPPLY CABLE TO THE MAINS
Connect the supply cable to a plug suitable for the load indicated on the rating plate of the product. In case of a direct connection to the mains (cable without plug), it is necessary to insert a suitable omnipolar
switch before the appliance, with minimum opening between contacts of 3 mm (the grounding wire should not be interrupted by the switch).
Before connecting to the mains, make sure that:
- All components used to make the electrical connection are adequate to withstand the maximum load required (see rating plate).
- The supply system is regularly grounded, according to the regulations in force.
- The socket or the omnipolar switch can easily be reached after the installation of the oven.


CONNECTIONS
GAS CONNECTION
The gas connection is male 1/2" BSP and is situated 55mm from the right and 560mm from the floor.
Loosen the tie-in down and connect one terminal of the pipe with the gas elbow between 1-1.2m long.
The hose should not be subjected to abrasion, kinking or permanent deformation and should be able to be inspected along its entire length after installation.
Unions compatible with the hose fittings must be used and connections tested for gas leaks.
The flexible tube shall be fitted in such a way that it cannot come into contact with a moveable part of the housing unit (e.g. a drawer) and does not pass through any space susceptible of becoming congested.
The fixed consumer piping outlet should be at approximately the same height as the cooker connection point, pointing downwards and
NATURAL GAS
This appliance leaves the factory set to operate using Natural Gas.
Make sure that the Natural Gas regulator supplied with the appliance is installed and, with the triple ring burner operating at its maximum, adjust the test point pressure to 1.0kPa.
UNIVERSAL LPG
To convert from Natural Gas to Universal LPG, ensure that the Natural Gas regulator is replaced by the Test Point Assembly supplied with the appliance. Adjust the test point pressure to 2.75kPa.


CONNECTIONS
SETTING THE MINIMUM FLAME
The flame on the small output is regulated by the factory.
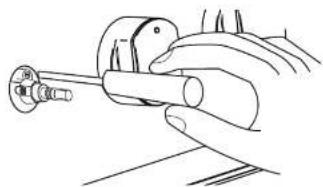
When the injectors have been replaced or there are special mains pressure conditions, it may be necessary to regulate the minimum flame again. The operations necessary to set the minimum flame are as follows:
- Light the burner.
- Turn the knob to the minimum position.
-
Take out the knob (and gasket if there is one)
-
For burners with safety valve make sure that the regulation obtained is sufficient to maintain heating of the thermocouple. If it is not, increase the minimum.
Before leaving check all connections for gas leaks with soap and water.
WARNING // Do not use a naked flame for detecting leaks.
Ignite all burners both individually and combined to ensure correct operation of gas valves, burners and ignition.
ABNORMAL OPERATION
If the appliance cannot be adjusted to perform correctly, it is an abnormal situation and you should contact the authorised service provider.
Any of the following are considered to be abnormal operation and may require servicing:
PRODUCT SPECIFICATIONS
BURNERS AND NOZZLE SPECIFICATIONS
Gas consumption - Nominal gas consumption measured in MJ/h as per tables below.
| TFGT905XTFGC908XTFGC908B | Natural Gas Universal LPG | |||||
| Inj. diam.(mm) | MJ/h | Gas press(kPa) | Inj. diam.(mm) | MJ/h | Gas press(kPa) | |
| Wok burner x 1 1.75 15 | 00 1.00 1.0 | 12.80 2.75 | ||||
| Rapid burner x 1 1.50 1 | 1.00 1.00 0.88 | 10.80 2.75 | ||||
| Semi-rapid burner x 2 | 1.16 6.60 1.00 | 0.68 6.30 | 2.75 | |||
| Auxiliary burner x 1 | 0.88 3.80 | 1.00 0.53 | 3.80 2.75 | |||
| Total NHGC | 43.00 | 40.00 | ||||
| TFGC608X | Natural Gas Universal LPG | |||||
| Inj. diam.(mm) | MJ/h | Gas press(kPa) | Inj. diam.(mm) | MJ/h | Gas press(kPa) | |
| Wok burner x 1 1.75 15 | 00 1.00 1.0 | 12.80 2.75 | ||||
| Semi-rapid burner x 2 | 1.16 6.60 1.00 | 0.68 6.30 | 2.75 | |||
| Auxiliary burner x 1 | 0.88 3.80 | 1.00 0.53 | 3.80 2.75 | |||
WARRANTY TERMS & CONDITIONS
These Terms and Conditions apply only to Tisira products distributed in Australia and New Zealand by Arisit Pty Limited.
- This warranty applies for a period of 2 years parts and labour, Australia and New Zealand, commencing from date of purchase.
- Evidence of the date of purchase must be shown to the technician, when he calls, to obtain benefit under this warranty
-
This warranty applies only to the original purchaser/hire purchaser of this appliance and cannot be assigned or transferred. Failure to produce documentary proof of the date of original acquisition by the original purchaser will result in a charge being levied for work done, labour and parts supplied.
-
This warranty does not apply to:
a) Serviceable items such as filters, fuses, light bulbs, door seals, drive belts, external hoses, etc.
b) Damage to body work, paint work, glass, trivets and plastic items (such as, but not limited to windows, covers, baskets, trays, worktops, door handles, control and kick -
This warranty will not apply where:
a) The fault is caused by accident, misuse, oversuds, an infestation of vermin, fire, flood or the use of products not approved by Arisit Pty. Limited.
b) There has been a failure to comply, with the manufacturer's operating and installation instructions.
c) Service, modification or repair has been carried out by anybody other than an approved Tisira Service Technician.
d) The appliance has been used/installed anywhere other than a private dwelling, or where it has been used other than for domestic use.
e) The appliance is subject to a rental agreement.
-
Any defective part that has been replaced becomes the property of Arisit Pty Limited.
-
This warranty applies only to Tisira appliances purchased and installed in Australia and New Zealand.
B. Loss of use of the appliance or consequential loss of any nature is not covered.
- A charge may be levied at the discretion of Arisit Prd limited if the call is deemed unnecessary.
Arisit Service Division or Authorised Service Agent, the cost of delivery to the nearest Service Division or travel costs for a technician or Authorised Service Agent shall be for the account of the Purchaser. Where a built-in appliance is located or installed outside the Arisit Authorised Service Agent's normal service area, additional travel and labour costs shall be the account of the Purchaser
- Arisit Pty Limited shall not under any circumstances be responsible in terms of this warranty for the replacement or repair of any part of the equipment which may have been damaged in transit, during and after installation or imperfections after installation.
- Losses caused by act of God, failure to obtain spare parts, strikes or lockouts are not covered.
- Service is offered during normal working hours only, also appliances to a have clear access in a serviceable area
- This warranty does not effect your statutory rights.
- Our goods come with guarantees that cannot be excluded under the Australian Consumer Law. You are entitled to a replacement or refund for a major failure and for compensation for any other reasonably foreseeable loss or damage. You are also entitled to have the goods repaired

CONTACT DETAILS
AUSTRALIA
ARISIT PTY LIMITED
40-44 Mark Anthony Drive, Dandenong South, VIC 3175, Australia
P // 1300 762 219
F // 03 9768 0838
consumer.care@arisit.com
NEW ZEALAND
ARISIT PTY LIMITED
PO Box 68-140
Newton, Auckland 1145, New Zealand
P // 09 306 1020
F//09 302 0077
sales@aristonappliances.co.nz
TISRA IS COMMITTED TO ONIONO RESEARCH AND DEVELOPMENT, EXTERIOR FORT HAG BEEN MADE TO ENCASE ALL INFORMATION IN THIS USER MANUAL IS CORRECT AT TIME OF GOURD TO PRINT. DIMENSIONS SHOULD BE USED AS A REFERENCED ONLY AND ACTUAL DIMENSIONS SHOULD BE TAKEN FROM THE PHYSICAL PRODUCT ONLY
MANUFACTURER RESERVES THE RIGHT TO CHANGE SPECIFICATIONS WITHOUT NOTICE


- HELLO
- CONTENTS
- WARNINGS
- OPERATING INSTRUCTIONS
- USE THE CORRECT COOKWARE
- INSTRUCTIONS FOR USE OF OVEN
- BEFORE USING THE OVEN FOR THE FIRST TIME
- USING THE OVEN FUNCTION SELECTOR
- LAMP FUNCTION
- CONVENTIONAL COOKING
- FAN BAKE
- TOP OVEN
- 6 BUTTON DIGITAL TIMER
- SETTING THE TIME
- MANUAL SETTING
- AUTOMATIC SETTING
- TABLE OF COOKING TIMES
- MAINTAINING YOUR COOKER
- MAINTENANCE AND CLEANING
- CLEANING THE OVEN DOOR
- INSTALLATION
- INSTRUCTIONS FOR INSTALLATION
- WARNING
- INSTALLING THE ANTI-TILTING CHAIN
- COMBUSTIBLE SURFACES
- CONNECTIONS
- ELECTRICAL CONNECTION
- CONNECTION OF THE SUPPLY CABLE TO THE MAINS
- GAS CONNECTION
- NATURAL GAS
- UNIVERSAL LPG
- SETTING THE MINIMUM FLAME
- ABNORMAL OPERATION
- PRODUCT SPECIFICATIONS
- BURNERS AND NOZZLE SPECIFICATIONS
- WARRANTY TERMS & CONDITIONS
- THESE TERMS AND CONDITIONS APPLY ONLY TO TISIRA PRODUCTS DISTRIBUTED IN AUSTRALIA AND NEW ZEALAND BY ARISIT PTY LIMITED
- CONTACT DETAILS
- ARISIT PTY LIMITED
Brand : Tisira
Model : TFGT905X
Category : Cooker