
BM 1000 - Bread maker WHIRLPOOL - Free user manual and instructions
Find the device manual for free BM 1000 WHIRLPOOL in PDF.


| Product Type | Bread maker |
| Brand | Whirlpool |
| Model | BM 1000 |
| Power Supply | 220-240 V, 50 Hz |
| Power Consumption | 600 W (typical) |
| Capacity | 1 lb (450 g) loaf |
| Number of Programs | 12 preset programs |
| Programs Included | Basic, French, Wholewheat, Quick, Ultra Fast, Dough, Jam, Cake, Noodle, Bake, and 2 others |
| Crust Color Options | Light, Medium, Dark |
| Delay Timer | Yes, up to 13 hours |
| Keep Warm Function | Yes, automatic 1 hour after baking |
| Memory Function | Yes, resumes within 10 minutes of power interruption |
| Bread Pan | Non-stick coating, removable |
| Viewing Window | Yes, in lid |
| Safety Features | Overheat protection (shows H:HH or L:LL errors) |
| Cleaning Instructions | Wipe with damp cloth; do not immerse in water; avoid abrasive cleaners |
| Accessories Included | Bread pan, kneading blade |
| Dimensions (approx.) | 30 x 25 x 30 cm (width x depth x height) |
| Weight (approx.) | 4 kg |
Frequently Asked Questions - BM 1000 WHIRLPOOL
User questions about BM 1000 WHIRLPOOL
0 question about this device. Answer the ones you know or ask your own.
Ask a new question about this device
Download the instructions for your Bread maker in PDF format for free! Find your manual BM 1000 - WHIRLPOOL and take your electronic device back in hand. On this page are published all the documents necessary for the use of your device. BM 1000 by WHIRLPOOL.
USER MANUAL BM 1000 WHIRLPOOL
SENSING THE DIFFERENCE

A. 自附安全等级 有附安全等级
This manual contains important information regarding safety, the use and maintenance of your bread maker. Read the manual and keep it in an easily accessible place for future consultation.
PRECAUTIONS AND ADVICE
- Check that the voltage of wall outlet corresponds to the one shown on the rating plate before use.
- Do not operate the appliance when it is damaged in any manner.
- If the supply cord is damaged, it must be replaced by the manufacturer, its service agent or similarly qualified person in order to avoid a hazard.
- Do not touch hot surfaces during operation. When the bread making process is completed, use gloves to operate.
- To protect against electric shock, do not immerse cord, plugs, or housing in water or any other liquid.
- Disconnect from outlet when not in use, before putting on or taking off parts, and before cleaning.
- Do not let cord hang over edge of table or hot surface.
- The use of accessories not recommended by the appliance manufacturer may cause injuries.
- This appliance is not intended for used by persons (including children) with reduced physical, sensory or mental capabilities, or lack of experience and knowledge, unless they have been given supervision or instruction concerning use of the appliance by a person responsible for their safety.
- Children should be supervised to ensure that they do not play with the appliance.
- Do not operate it on or near a hot gas or electric burner, or in a heated oven.
-
This appliance should be used on a flat heat resistant surface
-
Suitable ambient temperature range for operating this appliance is 15^ - 34^ . If the temperature is too high or too low, it will affect bread fermentation. The bread size & quality will vary as the ambient temperature varies.
- This appliance is designed solely for domestic use. Follow the cooking methods indicated in the instruction manual. Do not operate the appliance for other than its intended use.
- Do not use outdoor.
- The appliance is not intended to be operated by means of an external timer or separate remote-control system.
B. OPERATING INSTRUCTIONS
BEFORE THE FIRST USE
The appliance may emit a little smoke and a characteristic smell when you turn it on for the first time. This is normal and will soon stop. Make sure the appliance has sufficient ventilation.
- Please check whether all parts and accessories are complete and free of damage. (For details about accessories, please refer to the Quick User Guide.)
- Clean all the parts according to the section "Cleaning and Maintenance".
- Place the bread pan in place. Then set the bread maker on BAKE mode and bake empty for about 10 minutes in order to remove the smell.
- Disconnect the power. Allow it to be fully cool before cleaning again.
CONTROL PANEL
| Light MEDIUM DARK |
AFTER START UP
As soon as the bread maker is plugged into the power supply, a beep will be heard and the LCD display will be shown as diagram 1. As long as the symbol “:” does not flash constantly, the bread maker is ready.
LIGHT MEDIUM DARK

Diagram 1
START/ STOP
To start a program, press the "START/STOP" button once for approximately 2 seconds. A short beep will be heard and the symbol " : " in the time display begins to flash and the program starts. Any other button is inactivated except the "START/STOP" button after a program has begun.
To stop the program, press the "START/STOP" button for approximately 2 seconds, then a long beep will be heard, it means that the program has been switched off.
MENU/AUTO PROGRAM
It is used to set different programs.
Each time it is pressed, the program will vary. Press the button discontinuously, the 12 menus will be cycled to show on the LCD display. Select your desired program.
The functions of the 12 menus will be explained below.
| 1. BASIC | Kneading, rising and baking involved. Nuts & fruits can be added to increase flavor. |
| 2. FRENCH | Kneading, rising and baking involved. Rising time may take longer and is suitable for making bread that is more crispy and with a brown crust. |
| 3. WHOLEWHEAT | The baking process is basically the same as basic bread but the ingredients are different. A longer preheat times is required for the whole wheat flour to fully absorb the water content in the past 50 minutes.pan. |
| 10. CAKE | Kneading, rising and baking is involved. |
| 11. NOODLE | The required dough is prepared through kneading and rising. |
| 12. BAKE | The bake setting is bake only which can be used to increase the baking time on selected settings. |
COLOR
Press the "COLOR ▶" button to select the desired color for the crust: Light, Medium or Brown.
This button is not applicable for some programs, which are listed as follow: Dough, Jam, Cake and Noodle.
DELAY TIME FUNCTION
If you do not want the bread maker to start working immediately, you can use the "TIME ▲" or "TIME▼" button to set the delay time.
Note: The delay time should include the baking time of the program. That is, at the completion of delay time, hot bread can be served.
The procedure of delay time function is as follow:
-
Select the baking menu and degree of browning.
-
Then press the "TIME" "TIME" button to increase or decrease the delay time at the increment of 10 minutes. The maximum delay is 13 hours.
Example: It is 8:30pm now, if you would like your bread to be ready by 7am the next morning, i.e. in 10 hours and 30 minutes. Select your desired menu and degree of browning, then press the "TIME ▲" or "TIME ▼" button to add the time until 10:30 as shown on the LCD display. Then press the START/STOP button to activate the delay program. The time symbol ":" will start flashing and countdown will start to show the remaining time. Fresh bread will be ready at 7 in the morning, if you do not want to take out the bread immediately, the bread can be kept
MEMORY FUNCTION
If the power supply has been interrupted during the course of making bread, the process of making bread will be continued automatically within 10 minutes, even without pressing "START/STOP" button.
If the interruption time exceeds 10 minutes, the memory cannot be kept, you must discard the ingredients in the bread pan, add the ingredients into the bread pan again, and the bread maker must be restarted.
C. HOW TO MAKE BREAD

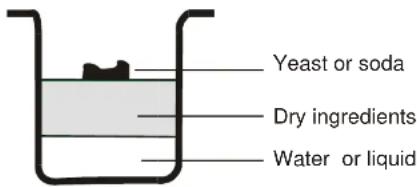
Note: The maximum quantity of the flour should not exceed 280g while the yeast should not exceed 9g.
-
Place the bread pan in position, and then turn it clockwise until they click in position.
-
Close the lid gently and plug the power cord into a wall outlet.
-
Press the "MENU" ▲ "MENU ▼" button until your desired program is selected.
-
Press the "COLOR ▶" button to select the desired crust color (if applicable).
-
Set the delay time by pressing "TIME ▲" or "TIME ▼" button. This step may be skipped if you want the bread maker to start working immediately.
-
Press the "START/STOP" button to start working.
-
Once the process has been completed, beeps will be heard. You can press "START/STOP" button for approximately 2 seconds to stop the process and take out the bread.
-
If you have not pressed the "START/STOP" button at the end of operation, the bread will be kept warm automatically for 1 hour. When keep warm is completed, beeps will be heard.
Note: When the bread maker is not in use, disconnect the appliance.
D. CLEANING AND MAINTENANCE
- Disconnect the machine from the power outlet and let it cool down before cleaning.
- Bread pan: wipe the inside and outside of the bread pan with wet cloth, do not use any sharp or abrasive agents in order to protect the non-stick coating.
- Kneading blade: If the kneading blade is difficult to remove, soak the bread pan in warm water for about 30 minutes. Then wipe the blade carefully with a cotton damp cloth.
- Lid & viewing window: wipe the inside and outside of lid with a wet cloth but never immerse the lid into water for cleaning.
- Housing: gently wipe the outer surface of housing with a wet cloth. Do not use any abrasive cleaner for cleaning, as this would degrade the high polish of the surface. Never immerse the housing into water for cleaning.
- Before the bread maker is packed for storage, ensure that it has completely cooled down, clean and dry, and the lid is closed.
E. INTRODUCTION OF BREAD INGREDIENTS
1. Bread flour
Bread flour (can also be called high-gluten flour) has high content of gluten; it has good elasticity and can keep the size of the bread from collapsing after rising. As its gluten content is higher than common flour, it can be used for making bread of larger size and better inner fiber. Bread flour is the most important ingredient of making bread.
2. Plain flour
Plain flour is a blend of hard and soft wheat; it is suitable for making express bread and cake.
3. Whole-wheat flour
Whole wheat flours are arranged from again. It contains wheat skin and gluten. Whole wheat flours in biceps and
7. Sugar
Sugar is a very important ingredient to increase sweetness and color of the bread. It is also considered as nourishment for the yeast. White sugar is largely used. Brown sugar, powder sugar or cotton sugar may also be used if specified.
8. Yeast
During rising, the yeast will produce carbon dioxide. The carbon dioxide will expand bread and make the inner fiber soften. To increase the activity of yeast, sugar and carbohydrate in flour is required as nourishment. There are three types of yeast: fresh yeast, active dry yeast and instant yeast. Instant yeast is usually used with bread maker. For better result during rising, active dry yeast can be used too. However, the speed of rising for instant yeast will be faster than active dry yeast and smaller amount will be required.
1 tsp. active dry yeast = 3/4 tsp. instant yeast
1.5 tsp. active dry yeast = 1 tsp. instant yeast
2 tsp. active dry yeast = 1.5 tsp. instant yeast
Yeast must be stored in the refrigerator, as the fungus in it will be killed at high temperature. Before using, check the production date and storage life of your yeast. Store it back to the refrigerator as soon as possible after each use. Usually the failure of bread rising is caused by bad yeast.
The ways described below will check whether your yeast is fresh and active.
- Pour 1/2 cup of warm water (45-50°C) Into a measuring cup.
- Put 1 tsp. of white sugar into the cup and stir, then sprinkle 2 tsp. of yeast over the water.
- Place the measuring cup in a warm place for about 10min. Do not stir the water.
• The froth should be up to 1 cup. Otherwise the yeast is dead or inactive.
9. Salt
13. Soda
It is similar to baking powder. It can also be used in combination with baking powder. No rising time is required. It utilizes chemical principle to soften the bread during heating.
14. Water and other liquid
Water is an essential ingredient for making bread. Ideal water temperature should be between 20^ C to 25^ C. However, for “Ultra Fast” menu, the water temperature should be between 45^ C to 50^ C.
Water can be replaced with fresh milk or water mixed with 2% of milk powder, which will enhance bread flavor and improve crust color. Some recipes may add juice for the purpose of enhancing bread flavor, e.g. apple juice, orange juice, lemon juice and so on.
F. RECIPES
- Basic Bread:
| Ingredients | 1Pound |
| Water | 160g |
| Butter | 24g |
| Salt | 7g |
| Sugar | 24g |
| High Gluten Flour | 250g |
| Yeast | 1.5g |
- French Bread:
| Ingredients | 1Pound |
| Water | 160g |
| Butter | 24g |
| Salt | 7g |
| Sugar | 18g |
| High Gluten Flour | 250g |
| Yeast | 2g |
- Whole Wheat Bread:
| Ingredients | 1Pound |
| Water | 160g |
| Butter | 24g |
| Salt | 7g |
| Whole wheat Flour | 55g |
| High Gluten Flour | 140g |
- Quick Bread:
| Ingredients | 1Pound |
| Water(40-50°C) | 160g |
| Butter | 24g |
| Salt | 10g |
| Sugar | 24g |
| High Gluten Flour | 250g |
- Ultra Fast Bread:
| Ingredients | 1Pound |
| Water (40-50°C) | 160g |
| Butter | 24g |
| Salt | 7g |
| Sugar | 36g |
| High Gluten Flour | 250g |
| Yeast | 6g |
- Dough:
| Ingredients | |
| Water | 160g |
| Butter | 24g |
| Salt | 10g |
| High Gluten Flour | 250g |
| Sugar | 24g |
| Yeast | 3g |
- Jam:
| Ingredients | |
| Shredded strawberry | 2 Cups |
| Sugar | 120g |
| Pudding powder | 80g |
- Cake:
| Ingredients | |
| Butter | 72g |
| Sugar | 72g |
| Egg | 2 |
| Self raising flour | 125g |
| Flavoring essence | 3g |
| Lemon juice | 12g |
| Yeast | 3g |
- Noodle:
| Ingredients | |
| Water | 170g |
| High Gluten Flour | 250g |
G. PROGRAM CYCLE TIMETABLE
| Knead 1 | Rise 1 | Knead 2 | Rise 2 | Rise 3 | Bake | Total Time | Keep warm | Add fruits/nuts | Delay | ||
| Basic 0:10 0:20 0:15 0:25 1:45 1:05 4:00 1:00 0:42 13:00 | |||||||||||
H. TROUBLE SHOOTING GUIDE
| Problem | Cause | Solution | |
| 1 | Smoke comes out from ventilation hole when baking | Some Ingredients are adhered to the heat element or nearby. | Unplug the bread maker and clean the heat element. |
| For the first use, oil remained on the surface of the heat element. | For the first use, bake empty for about 10 minutes. | ||
| 2 | Bread bottom crust is too thick | The bread has been kept warm and left in the bread pan for a long time. Thus, water has been lost. | Take the bread out as soon as possible without keeping it warm. |
| 3 | It is very difficult to take the bread out | Kneader adheres tightly to the shaft in bread pan. | After taking the bread out, put hot water into the bread pan for 10 minutes. Then take out the kneader for cleaning. |
| 4 | Stirred ingredients are not even and are not baked properly | Selected auto program is incorrect | Select the proper auto program. |
| During operation, the “START/ STOP” button is being pressed. Thus, operation is ceased. | If the operation is ceased for a long time, the bread maker should be restarted and start from scratch. However, if the cease is less than 30 minutes, operation can be continued by selecting the right program. | ||
| During operation, lid has been opened for several times. Thus, bread is dry and without crust color. | Don’t open the lid during the last rising. | ||
| 5 | Display “H:HH” is shown after pressing “START/STOP” button | The temperature in the bread maker is too high for making bread. | Press “START/STOP” button and unplug the bread maker. Take the bread pan out and open lid until the bread maker cools down. |
| Display “L:LL” is shown after pressing “START/STOP” button | The temperature in the bread maker is too low for making bread. | Press “START/STOP” button and unplug the bread maker. Place the bread maker into environment of higher temperature for use | |
| Display “E:E0”/“E:E1” is shown after pressing “START/STOP” button | The Bread maker is broken down and requires repair. | Please contact repairing service. | |
| 6 | Motor noises can be heard but the dough is not being stirred. | Bread pan is fixed improperly or dough is too large to be stirred | Check whether bread pan is fixed properly and dough is made according to recipe and the ingredients are weighed accurately |
| 7 | Bread size is too large after rising | Too much yeast/ flour is added or the environment temperature is too high. | Check the mentioned factors; reduce the amount of yeast/ flour according to the true reason |
| 8 | Bread size is too small after rising or has not risen | No yeast is added or the amount of yeast is not enough. Or yeast may have a poor activity as water temperature is too high or yeast is mixed together with salt. | Check the amount and performance of yeast. |
| 11 | Bread weight is heavy and is too dense | Too much flour or short of water | Reduce flour or increase water content |
| Too much fruit ingredients or whole wheat flour | Reduce the amount of corresponding ingredients and increase the amount of yeast | ||
| 12 | Middle part is hollow after cutting bread | Excessive water or no salt | Reduce amount of water content and check if salt is added |
| Water temperature is too high | Check water temperature | ||
| 13 | Dry powder is adhered to the bread surface | There is strong glutinosity ingredients in bread such as butter and banana etc. | Do not add strong glutinosity ingredients into bread. |
| Ingredients are not adequately stirred or water is not sufficient | Check amount of water and the mechanical construct of the bread maker | ||
| 14 | Crust is too thick and baking color is too dark | Different recipes or ingredients will have different effect on the bread being made. Crust color will be darker as the amount of sugar increases. | If crust color is too dark because of excessive sugar, press “START/STOP” to interrupt the program 10-15 minutes ahead of the intended finish time.Before taking the bread out, you should keep the bread or cake in the bread pan for about 20 minutes with the lid on. |
- PRECAUTIONS AND ADVICE
- OPERATING INSTRUCTIONS
- BEFORE THE FIRST USE
- CONTROL PANEL
- AFTER START UP
- LIGHT MEDIUM DARK
- START/ STOP
- MENU/AUTO PROGRAM
- COLOR
- DELAY TIME FUNCTION
- MEMORY FUNCTION
- CLEANING AND MAINTENANCE
- INTRODUCTION OF BREAD INGREDIENTS
- Bread flour
- Plain flour
- Whole-wheat flour
- Sugar
- Yeast
- Salt
- Soda
- Water and other liquid
- RECIPES
Brand : WHIRLPOOL
Model : BM 1000
Category : Bread maker