
AQUOS LC-40LX530H - Television SHARP - Free user manual and instructions
Find the device manual for free AQUOS LC-40LX530H SHARP in PDF.


| Product Type | LCD Television |
| Model | Sharp AQUOS LC-40LX530H |
| Screen Size (Diagonal) | 40 inches |
| Resolution | 1920 x 1080 pixels (Full HD) |
| Video Colour Systems | PAL / SECAM / NTSC 3.58 / NTSC 4.43 / PAL 60 |
| TV Standard (Analogue) | PAL: B/G, D/K, I; SECAM: B/G, D/K, K/K1; NTSC: M |
| TV Standard (Digital) | DMB-T/H |
| Audio Amplifier | 10 W x 2 |
| Speakers | 15 x 3.4 cm, 2 pieces |
| HDMI Inputs | 3 (HDMI 1, 2, 3) |
| Component Inputs | 2 (INPUT 6, INPUT 7) |
| Composite Inputs | 2 (INPUT 4, INPUT 5) |
| PC Input | 15-pin mini D-sub (shared audio with HDMI 1) |
| USB Port | USB 2.0 |
| Headphone Jack | 3.5 mm stereo |
| RS-232C Port | 9-pin D-sub male |
| Power Requirement | AC 220 V, 50 Hz |
| Power Consumption (Typical) | 100 W |
| Power Consumption (Standby) | 0.50 W |
| Weight (Without Stand) | 13.7 kg |
| Weight (With Stand) | 18.5 kg |
| Operating Temperature | 0°C - 40°C |
| OSD Languages | English, Simplified Chinese, Traditional Chinese |
Frequently Asked Questions - AQUOS LC-40LX530H SHARP
User questions about AQUOS LC-40LX530H SHARP
0 question about this device. Answer the ones you know or ask your own.
Ask a new question about this device
Download the instructions for your Television in PDF format for free! Find your manual AQUOS LC-40LX530H - SHARP and take your electronic device back in hand. On this page are published all the documents necessary for the use of your device. AQUOS LC-40LX530H by SHARP.
USER MANUAL AQUOS LC-40LX530H SHARP
LC-40LX530H LC-46LX530H
LC-40LX530H LC-46LX530H
2 分拆底座支柱组件示意图。

當使用複合視頻連接線時
(市面有售)
錄影機/遊戲機/攝錄機
遥控器

1 POWER (電源備用 / 打開)
打開和開掉电源。(請參閱第14頁。)
20-9
選擇範圍。(請參閱第27頁。)
3 S(因回)
Quick shoot (Fine Motion Advanced)
flowchart
graph TD
    A["Block A: A-TV A-TV 01"] --> B["Channel A"]
    B --> C["Block B: A-TV A-TV 01"]
    C --> D["Channel B"]
    D --> E["Output Channel B"]
在接收到單聲道廣播信號時
natural_image
Person in a dive boat creating large waves, no visible text or symbols用於全屏顯示操作的按鈕
Thank you for your purchase of the SHARP LCD colour TV product. To ensure safety and many years of trouble-free operation of your product, please read the Important Safety Precautions carefully before using this product.
Contents
| Page | |
| Dear SHARP customer | 1 |
| Contents | 1 |
| Precautions for daily use | 2 |
| Trademarks | 2 |
| Important safety precautions | 3 |
| Supplied accessories | 4 |
| Preparation | 5 |
| Before turning on the power | 7 |
| Connecting external devices | 8 |
| Remote control unit | 9 |
| Part names | 10 |
| A-TV(Analogue TV)/D-TV(Digital TV)/AV input mode menu items | 12 |
| PC input mode menu items | 13 |
| Turning the TV on/off | 14 |
| Supplying electric power to the antenna | 14 |
| Initial auto installation | 14 |
| Checking signal information | 14 |
| Auto installation | 15 |
| Programme setup | 15 |
| Menu operation | 18 |
| Picture menu | 18 |
| Audio menu | 19 |
| ECO menu | 20 |
| Page | |
| Setup menu | 20 |
| Option menu | 22 |
| Digital setup menu | 25 |
| Programme guide | 26 |
| Info | 26 |
| A-TV (Analogue TV)/D-TV (Digital TV)buttons | 27 |
| Switching the analogue audio format | 27 |
| Switching the digital audio format | 28 |
| EPG (Electronic Program Guide) | 29 |
| TEXT | 30 |
| Picture and still image | 30 |
| Wide Mode | 30 |
| Connecting a PC | 31 |
| PC compatibility chart | 32 |
| RS-232C commands list | 32 |
| Connecting a USB device | 33 |
| Appendix | 37 |
| Specifications | 38 |
| Dimensional drawings | 39 |
| Clearing the password | 40 |
Precautions.for.daily.use
Observe the following items
Maintenance of the cabinet
- When cleaning the cabinet, use a soft cloth (made of cotton, floss, etc.) to clean gently.
Do not use a dry or damp rag mixed with chemicals, as this could cause the ingredients of the cabinet body to deteriorate
or crack.
- Be careful not to use an abrasive cloth for cleaning or clean with excessive force, as this could scratch the surface of the
cabinet.
- If the cabinet is greatly soiled, clean with a soft cloth (made of cotton, fles, etc.) soaked with a small amount of diluted
neutral detergent and wrung out, and then clean with a soft dry cloth
- Because the cabinet is made of plastic, solvents such as benzene or thinner could cause it to deteriorate, or make its
coaling came off. Therefore do not use such solvents to clean the cabinet.
- Because plasticizer is included in the plastics, deterioration or the coating peeling off could occur when the cabinet comes
into contact with some substances. Therefore keep it away from volatile substances such as insecticide. In addition, do not
let it come into contact with objects made of rubber, resin, etc. for a long time.
Maintenance of the LCD panel
• Before cleaning the LCD panel, be sure to turn off the TV set and unplug the power cord from the outlet.
- When cleaning the LCD panel, use a dry and soft cloth (made of cotton, floss, etc.) to clean the surface of the LCD panel gently. For protecting the LCD panel, do not clean with a dirty cloth, detergent, or a dry or damp rag mixed with chemicals, as this could cause peeling of the panel surface.
- Be careful not to clean with an abrasive cloth or with excessive force, as this could cause the panel surface to be scratched.
- If the LCD panel is greatly soled, clean it gently with a soft cloth (made of cotton, floss, etc.) soaked with a small amount of
water Do not clean with excessive force, so as to avoid the scratch of the panel surface.
- If dust sticks on the surface of the LCD panel, clean the panel with a commercially available cleaning brush /anti-static
- 2016, 385, 2016, 2017, 2018, 2019, 2020, 2021, 2022, 2023, 2024, 2025, 2026, 2027, 2028, 2029, 2030, 2031, 2032, 2033, 2034, 2035, 2036, 2037, 2038, 2039, 2040, 2041, 2042, 2043, 2044, 2045, 2046, 2047, 2048, 2049, 2050, 2051, 2052, 2053, 2054, 2055, 2056, 2057, 2058, 2059, 2060, 2061, 2062, 2063, 2064, 2065, 2066, 2067, 2068, 2069, 2070, 2071, 2072, 2073, 2074, 2075, 2076, 2077, 2078, 2079, 2080, 2081, 2082, 2083, 2084, 2085, 2086, 2087, 2088, 2089, 2090, 2091, 2092, 2093, 2094, 2095, 2096, 2097, 2098, 2099, 2100
Trademarks
- TruSurround HD, SRS and Symbol are trademarks of SRS Labs, Inc.
TruSurround HD technology is incorporated under license from SRS Labs, Inc.
- SRS TruSurround HD ^TM creates an immersive, feature-rich surround sound experience from two speakers, complete with
rich bass, high frequency detail and clear dialog.
• Manufactured under license from Dolby Laboratories.
"Dolby" and the double-D symbol are trademarks of Dolby Laboratories.
• "HDMI, the HDMI Logo, and High-Definition Multimedia Interface are trademarks or registered trademarks of HDMI
Licensing LLC in the United States and other countries.
- DivX® is a registered trademark of DivX, Inc., and is used under license.
- ABOUT DIVX VIDEO: DivX® is a digital video format created by DivX, Inc. This is an official DivX Certified® device that
plays DivX video. Visit divx.com for more information and software tools to convert your files into DivX video.
- ABOUT DIVX VIDEO-ON-DFMAND: This DivX Certified® device must be registered in order to play purchased DivX
Important.safety.precautions
- Cleaning — Unplug the AC cord from the AC outer before cleaning the product. Use a clamp cloth to clean the product. Do not use loud cleaners, aerosol cleaners or chemical cloth to clean it, as such materials may damage the product.

- Water and moisture — Do not use the product near water, such as bathtub, washbasin, kitchen sink, laundry tub, swimming pool end in a wet basement.

- Do not place vases or any other water-fied containers on this product. The water may spill onto the product causing fire or electric shock.

- Stand - Do not place the product on an unstable cart, stand, tripod or table. Doing so can cause the product to tell, resulting in serious personal injuries as well as damage to the product. Use only a cart, stand, tripod, brocket or table recommended by the manufacturer or sold with the product. When mounting the product on a wall, be sure to follow the manufacturer's instructions. Use only the mounting hardware recommended by the manufacturer.

- When reccating the product placed on a cart, it must be moved with utmost cart. Sudden slopes, excessive force and uneven floor surface can cause the product to fall from the cart.

- Ventilation - The vents and other openings in the balance are designed for ventilation. Do not cover or block these vents and openings since insufficient ventilation can cause overheating and/or shorter the life of the product. Do not place the product on a bed, sofa, rug or other similar surface, since they can block ventilation openings. This product is not designed for built-in installation; do not place the product in an enclosed place such as a bookcase or rack, unless proper ventilation is provided or the

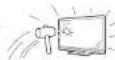
- The LCD panel used in this product is made of glass. Therefore, it can break when the product is struck forcefully with a sharp object. If the LCD panel is broken, we careful not to be injured by broken glass.
- Heat sources — Keep the product away from heat sources such as radiators, heaters, stoves and other heat-generating products (including molters)

• To prevent the, never once any type of candle or asked flames on the top or near the TV set.

• To prevent fire or shock hazard, do not place the AC power cord under the TV ad or other heavy items.

- Do not place heavy objects on this product or stand on it. Doing so could cause injury if the product overlares. Take special care near children and pets.

- Unplug the power cord before you move the TV set. If not unplugged beforehand, the power cord may become damaged and cause electric shock.

The LCD panel is a very high technology product with 2.073.600 pixels, giving you fine picture delays. Due to the very large number of pixels, occasionally a few non-active pixels may appear on the screen as a fixed point of bruc, groon or red. This is within product specifications and does not constitute a fault.
Precautions when transporting the TV - When transporting the TV, never carry it by
Supplied.accessories
Make sure the following accessories are provided with the product.
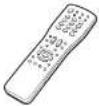
| Remote.control.unit | “AAA”.size.battery.(×2) | Operation.manual |
 Page 9 Page 9 | 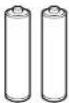 Page 10 Page 10 |  |
| Stand.unit | ||
LC-40LX530H Stand Stand |    Stand unit Short screws (×3) Long screws (×3)Page 6 Stand unit Short screws (×3) Long screws (×3)Page 6 | |
| Stand.unit | ||
| LC-46LX530H[IMAGE]Stand Stand unit |    Short screws (×4) Long screws (×4)Page 6 Short screws (×4) Long screws (×4)Page 6 | |
Preparation
Handling and precautions with the wall-mounted TV
- You can mount the TV on the wall using the optional bracket.
- For details, refer to the instructions supplied with the optional bracket.
CAUTION
- This TV should be mounted on a wall only with a wall mount bracket recommended by SHARP. The use of other wall mount brackets may result in an unstable installation and may cause serious injuries.
- Installing the TV requires special skills that should only be performed by qualified service personnel. Customers should not attempt to do the work themselves. SHARP bears no responsibility for Improper mounting or mounting that results in accident or injury.
Using a SHARP recommended bracket to mount the TV
- You can ask a qualified service professional about using a SHARP recommended bracket to mount the TV to the wall.
- Carefully read the instructions that come with the bracket before beginning work.
NOTE
- If you want to mount the TV on the wall, use the screws provided with the wall-mount bracket to affix the bracket to the rear of the TV.
Attaching the stand
- Before attaching (or detaching) the stand, unplug the AC power cord from the AC power outlet.
- Before performing work, spread cushioning over the base area to lay the TV on. This will prevent it from being damaged.
CAUTION
- Attach the stand in the correct direction.
- Be sure to follow the instructions. Incorrect installation of the stand may result in the TV falling over.
Preparation (Continued)
LC-40LX530H LC-46LX530H
1
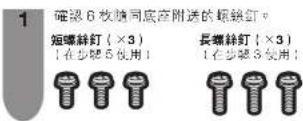
Confirm the 6 screws supplied with the stand. Short.screws.(×3) Long.screws.(×3) (used in step 5) (used in step 3)


2
Delach the stand unit as show below.

3
Attach the stand post onto the base with the 3 long screws.

4
Insert the stand into the openings on the bottom of the TV (Hold the stand in case of dropping).


I amed and held on the 3-day average into the 2
1
Confirm the 8 screws supplied with the stand. Short.screws.(×4) Long.screws.(×4) (used in step 5) (used in step 3)


2
Delach the stand unit as show below.

3
Attach the stand post onto the base with the 4 long screws.
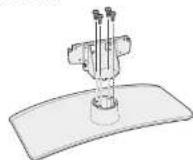
4
Insert the stand into the openings on the bottom of the TV (Hold the stand in case of dropping).
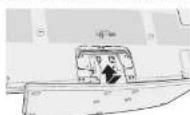
5
Insert and tighten the 4 short screws into the 4 holes on the rear of the stand.

Before turning on the power
Before turning on the power
Notes on installing the TV
- Avoid direct sunlight and place the TV in a well-ventilated location.
- Place the TV in a level location.
- Do not turn on the power of the TV before connecting the AC cord.
- If there are any protective plastic sheets on the TV cabinet, please take them off before connecting.
1
Connecting the antenna cable
To enjoy a clearer picture, use an outdoor antenna. The following is a brief explanation of the types of connections that are used for coaxial cable.

2
Connecting external devices
See page 8 for connecting external equipment, such as a VCR and DVD player.
3
Connecting the AC cord
TV (rear view)
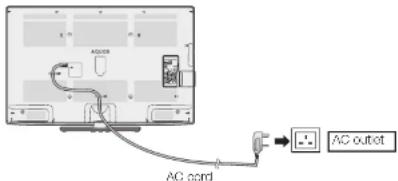
- Place the TV close to the AC outlet, and keep the power plug within reach.
Connecting.external.device
You can connect many types of external equipment to your TV, like a VCR, game console, camorder, DVD player, Digital TV Set Top Box (STB) and PC. To view external source images, select the input source from TV/VIDEO on the remote control unit or TV/VIDEO on the TV.
CAUTION
- To protect all equipment, always turn off the TV before connecting to a VCR, game console, camcorder, DVD player, Digital TV Set Top Box (STB), PC or other external equipment.
- Refer to the relevant operation manual (VCR, DVD player, etc.) carefully before making connections.
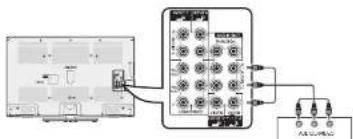
Connecting.a.VCR,.game.console.or.camcorder
A VCR, game console, camcorder and some other audiovisual equipment can be conveniently connected using the INPUT 4/INPUT 5 (Composite), INPUT 6/INPUT 7 (Component) terminals.
When.using.component.cable.. (commercially.available)
VCR/Game.console/Camcorder
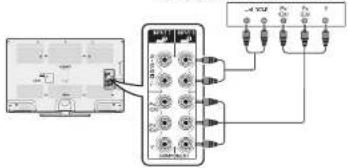
When.using.composite.cable.. (commercially.available)
VCR/Game.console/Camcorder

flowchart
graph TD
    A["Device 1"] --> B["Control Unit"]
    B --> C["Sensor 1"]
    B --> D["Sensor 2"]
    B --> E["Sensor 3"]
    B --> F["Sensor 4"]
    B --> G["Sensor 5"]
    B --> H["Sensor 6"]
    B --> I["Sensor 7"]
Connecting.a.DVD.player/Digital.TV.Set.Top.Box.(STB)
You can use the HDMI 1/HDMI 2/HDMI 3 (HDMI), INPUT4/INPUT5(Composite) INPUT 6/INPUT 7 (Component) terminals when connecting to a DVD player/Digital TV Set Top Box (STB) and other audiovisual equipment.
NOTE
- When using a DVI-HDMI conversion adaptor, input the audio signal from the HDMI1/PC AUDIO INPUT terminal.(See page 22.)
When. using. HDMI-certified. cable. (commercially.available)
When.using.component.cable (commercially.available)


Remote.control.unit

1. POWER.(STANDBY/ON)
To switch the power on and off. (See page 14.)
2.0-.9
Select the channel. (See page 27.)
- S.(Flashback) Press ☑ to return to the previous selected channel or external input mode.
4. MPX
Select the sound multiplex mode. (See page 27.)
5. (Mute)
Press × → Mules sound.
Press 📄 again → Restores sound
Mute will be canceled after 30 minutes. However, the TV
will not suddenly output loud sound as the volume level will be set to 0 automatically. Increase the volume level by closing VOL.
pressing VOL + VOL + VOL
6. VOL + VOL
(VOL+) increase the volume
(VOL 1) Increase the volume.
VOL-7 EPG
- EPG D-TV only: To display EPG (Electronic Programme Guide) screen. (See pages 28 to 30.)
B. INFO
D-TV only: Display the programme information. (See page 20.)
9. EXIT
Return to the default screen.
10. TV/VIDEO.(INPUT.SOURCE)
Select an input source.
11. DISPLAY
Display the channel or input information.
12. TEXT
D-TV only to display MHEG-5 broadcasts, See page 30.
13. CHA/CHV
TV input mode: Select the channel.
(CHA) Increase the channel number.
(CHV) Decrease the channel number.
14. GUIDE
D-TV only: Display the programme list. (See page 26.)
15. MENU
Display the menu screen.(See page 18.)
16. ▲/▼/◄► , (Cursor)
Select a desired item on the setting screen.
ENTER
Execute a command.
17. RETURN
MENU mode: Return to the previous menu screen.
18. Colour.Buttons.(R/G/Y/B)
D-TV and USB only: The coloured buttons are used to select correspondingly to the coloured items in the menu screen. See page 15 to 18 and page 20 to 20 and page
Remote control unit (Continued)
Inserting.the.battery
Before using the TV for the first time, insert two "AAA" size batteries (supplied). When the batteries become depleted and the remote control falls to operate, replace the batteries with new "AAA" size battery.
1 Open the battery cover.
2 Insert the supplied "AAA" size batteries.
3 Close the battery cover.
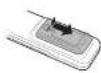
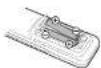
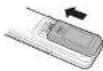
- Place batteries with their terminals corresponding to the (+) and (−) indications in the battery compartment.
CAUTION
- Do not mix batteries of different types. Different types of batteries have different characteristics.
- Do not mix old and new batteries. Mixing old and new batteries can shorten the life of new batteries or cause chemical leakage in old batteries.
- Remove batteries as soon as they have worn out. Chemicals that leak from batteries can cause a rash. If you find any chemical leakage, wipe thoroughly with a cloth.
- The batteries supplied with this product may have a shorter life expectancy due to storage conditions.
- If you will not be using the remote control unit for an extended period of time, remove the batteries from it.
- Batteries (batteries pack or batteries installed) shall not be exposed to excessive heat such as sunshine, fire or the like.
Part.names
TV.(Front/.Side)

natural_image
Line drawing of a computer monitor with a stand and keyboard (no text or symbols)![POWER (On/Off) button MENU button TV/VIDEO button CH /V [Channel up/down] buttons VOL +/- [Volume up/down] buttons](/content/2026/05/925824/images/6f993ed2360dda45edba80c5fdb35e75d72610e0b5305dc681e9747d5269efcd.jpg)
Part names (Continued)
TV.(Rear)
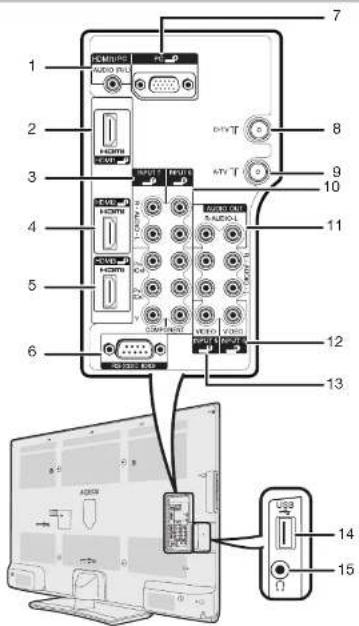
1 HDMI 1/PC (AUDIO) terminal*
2 HDMI 1 terminal
3 INPUT 7(Component) terminal
9 A-TV (Analogue antenna) terminal
10 INPUT 6Component terminal
- AUDIO OUT terminal
A-TV(Analogue TV)/D-TV(Digital TV)/AV input mode menu items
List of A-TV/D-TV/AV menu items to help you with operations
Picture
Setup
| AV mode | 18 |
| OPC (Optical Picture Control) | 19 |
| Backlight | 19 |
| Contrast | 19 |
| Brightness | 19 |
| Colour | 19 |
| Tint | 19 |
| Sharpness | 19 |
| Advanced | |
| Colour temp | 19 |
| Quick shoot | 19 |
| Film mode | 19 |
| Active contrast | 19 |
| 3D-Y/C | 19 |
| Monochrome | 19 |
| DNR | 19 |
| Reset | 18 |
| Auto installation | 15 |
| Analogue programme setup | 16 |
| Digital programme setup | 15 |
| Child lock | 20 |
| Input skip | 21 |
| Input label | 21 |
| Position | 21 |
| HDMI auto view | 21 |
| WSS | 21 |
| 4:3 mode | 22 |
| Quick start | 22 |
| Language | 22 |
| Identification | 22 |
| Reset | 22 |
Audio
Option
| Treble | 19 |
| Bass | 19 |
| Balance | 19 |
| SRS TS HD | 19 |
| Bass enhancer | 19 |
| Reset | 19 |
| PC audio select | 22 |
| Output volume select | 23 |
| Auto volume | 23 |
| Clear voice | 23 |
| Audio only | 23 |
| Game play time | 23 |
| Colour system | 23 |
| DivX Reg. Code | 24 |
| Version up | 24 |
Power control
Digital setup
No signal off 20
Audio language 25 Subtitle language 25
PC input mode menu items
List of PC menu items to help you with operations
Picture
AV mode 18
OPC (Optical Picture Control) 19
Backlight 19
Contrast 19
Brightness 19
Advanced Colour temp 19
Reset 18
Audio
Treble 19
Bass 19
Balance 19
SRS TS HD 19
Bass enhancer 19
Reset 19
Power control
Power management 20
No operation off 20
Ecology 20
Setup
Input skip 21
Input label 21
Quick start 22
Language 22
Identification 22 Reset 22
Reset 22
Option
Output volume select 23
Auto Volume 23
Audio only 23
Audio output 23
Fine sync.
Input signal 24
Auto sync. 23
H-Position 24
V-Position 24
Clock 24
Phase 24 Reset 24
Reset 24 DivX Reg. Code 24
Version un 24
Digital
Digital setup
Audio language 25
Subtitle language 25
Hearing impaired 25
Time zone 25
Summer time 25
Turning.the.TV.on/off
Turning.on/off.the.power
•.To.turn.on.the.power
Press POWER on the TV. (After a few seconds, an image appears with sound.)
•.To.turn.off.the.power
Switch it off by pressing POWER on the TV.
Standby.mode
•.To.standby.mode
If the TV is switched on, you can switch it to standby mode by pressing POWER on the remote control.
•.Switching.on.from.standby.mode
Under standby mode, press POWER on the remote control.
NOTE
- If you are not going to use this TV for a long period of time, be sure to remove the AC cord from the AC outlet.
- Minor power is consumed when the unit is in standby mode.
Supplying.electric. power.to.the.antenna
When you set-up the D-TV antenna for the first time, or connect the antenna to a community antenna, you need to proceed to set the antenna by following this manual.


Press D-TV to access D-TV mode.
Davon MENT and the MENT operator solution
Selected.item Description
| Yes Select "Yes" when your antenna is set-up and connected independently. |
| No Select "No" when you do not need to supply voltage to your antennas, i.e. when your antenna is connected to a community antenna. (The factory default setting of this function is "No".) |
Initial.auto.installation
When the TV powers on for the first time after purchase, the initial auto installation wizard appears. Follow the menus and make the necessary settings one after another.

Press POWER on the TV.
- The initial auto installation wizard appears.

Press ▲/▼ to select the desired language, and then press ENTER.
Press ◀/▶ to select "HOME" or "STORE", and then press ENTER.
- HOME: "STANDARD" will be the default value for the "AV mode" setting.
- STORE: "DYNAMIC (Fixed)" will be the default value for the "AV mode" setting. If the "AV mode" is changed, the TV will automatically switch back to "DYNAMIC (Fixed)" when there is no further change to TV setting for 30 minutes. When selecting "STORE", press ◀▶ to select "Yes" or "No" to confirm.
Press ▲/▼/◄/► to select "D-TV", "A-TV" or
"A-TV + D-TV", and then press ENTER. Press ▲/▼ to select the desired sound system, and then press ENTER.
- Sound system is selectable when the signal search is set to "A-TV" or "A-TV - D-TV" mode only.
• Auto installation will be executed. - You do not need to do anything during the auto search.
Checking.signal. information
If you install a D-TV antenna for the first time or relocate it, you should adjust the alignment of the antenna to receive a good reception while checking the antenna return screen.
Checking signal information (Continued)
Checking.signal.information
Press ▲/▼ to select "Signal information"


Position and align the antenna so that the maximum possible values for "Signal strength" and "Signal quality" are obtained.
NOTE
- The values of "Signal strength" and "Signal quality" indicate when to check the appropriate alignment of the antenna,
Auto.installation
You can run auto installation again, even after setting up the preset channels.

Press MENU and the MENU screen displays.

Press ◀/▶ to select "Setup".

Press ▲/▼ to select "Auto installation", and then press ENTER.

If you have already set the password, enter it here.

- See page 20 for setting a password.


Press ◀/▶ to select "Yes", and then press ENTER.

Press ▲/▼ to select the desired language, and then press ENTER. Press ▲/▼/▲/▶ to select "D-TV", "A-TV" or
Programme.setup
Digital.settings
You can reconfigure D-TV services settings automatically or manually.

Press MENU and the MENU screen displays.

Press ◀/▶ to select "Setup".

Press ▲/▼ to select "Digital programme setup", and then press ENTER. If you have already set the password, enter it here. • See page 20 for setting a password.


Press ▲/▼ to select the desired menu item, and then press ENTER.

Press ◀/▶ to select "Yes", and then press ENTER.
■Auto.search.(Digital)
Use this menu to add new services automatically after auto installation has been completed.
■Manual.search.(Digital)
Add new services within a specified frequency band. - Press ◀/▶ to select the frequency and then press ENTER.
■Manual.adjust.(Digital)
Configure various settings for each service using the Colour (R, G, B) buttons.
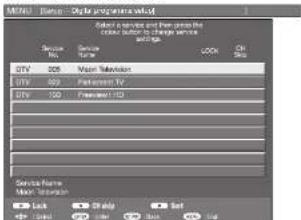
Programme setup (Continued)
The.item.position.of.services.can.be.sorted
① Press ▲/▼ to select the service whose item position you want to move, and then press B.
| DTV 035 Macr Television |
| DTV 022 Parliament TV |
| DTV 100 Wireless I HD |
② Press ▲/▼ to move it to the desired position, and then press ENTER.
| DTV 130 Premier UK HD | |
| DTV 922 Parlansport TW | |
| DTV 005 | Mac TV television |
③ Repeat steps ① and ② until all desired service items are sorted.
Analogue.settings
. Auto.search.(Analogue)
You can also automatically search by performing the procedure below. This is the same function as programme auto search in auto installation.
1 Press MENU and the MENU screen displays.
2 Press ◀/▶ to select "Setup".
3 Press ▲/▼ to select "Analogue programme setup", and then press ENTER.
4 If you have already set the password, enter it here.
• See page 20 for setting a password.
-
5 Press ▲/▼ to select "Auto search", and then press ENTER.
6 Press ▶▶ to select "Yes", and then press ENTER.
Press ▶/▼ to select the desired sound system, and then press ENTER.
You do not need to do anything during the auto search. Press MENU to exit.
Search
The next channel will be searched in order.

Fine
You can adjust the frequency to your desired position.
NOTE
- Adjust while checking the background picture as a
reference. - Instead of pressing ◄ to adjust the frequency, you can set by directly entering the frequency number of the channel with 0.-9.
- When setting a frequency on the "Fine" screen, the last
figure of the frequency needs to be "0" or "5".
EXAMPLE
• 179.25 MHz: Press 1→.7→.9→.2→.5
• 49.25 MHz: Press 4.→.9.→.2.→.5.→.ENTER
Colour.system
Select the optimum colour system to receive. (Auto, PAL, SECAM, NTSC 3.58, NTSC 4.43, PAL-60)
Sound.system.(Broadcasting.system) Select the optimum sound system (Broadcasting system) to receive. (B/G, D/K, I, M)
Label
You can change individual channel names.
- Press ▲/▼/▲: To select each character of the new
name for the channel, and then cross ENTER.
Repeat until the name is fully spelt out.

- The name can be 5 characters or less. Select "END" to set the channel name.
Booster
Enhance the picture quality during weak signal. It is
Programme setup (Continued)
Sort (Analogue)
Channel position can be sorted freely.
1 Repeat steps 1 to 4 in Auto search.
2 Press ▲/▼ to select "Sort", and then press ENTER.
3 Press ◀/▶ to select "Yes", and then press ENTER.
4 Press ▲/▼/◄/► to select the channel you want to move, and then press ENTER.
5 Move it to the desired position by pressing ▲/▼/◀/▶, and then press ENTER.
6 Repeat the steps 4 and 5 until all desired channels are sorted.
■ Erase programme (Analogue)
The individual programme can be erased.
1 Repeat steps 1 to 4 in Auto search.
2 Press ▲/▼ to select "Erase programme", and then press ENTER.
3 Press ◀/▶ to select "Yes", and then press ENTER.
4 Press ▲/▼/◄/► to select the channel you want to erase, and then press ENTER.
5 Press ENTER to erase the channel.
6 Repeat the step 4 and 5 until all desired channels are erased.
Menu operation
1
Press MENU and the MENU screen displays.
2
Press ◀/▶ to select the desired menu. (Picture, Audio, ECO, Setup, Option, Digital setup)
3
Press ▲/▼ to select the desired menu item. Press ENTER to proceed if necessary.
4
Press ▲/▼ or ◀/▶ to select the desired item or adjust the item to the desired level. Press ENTER if necessary.
5
Press EXIT or MENU to exit from the menu.

Using the control panel of the TV
You can also operate the Menu using the control panel of the IV.
Button operations on the control panel correspond to the ones on the remote control as shown below.

| TV control panel buttons | Remote control buttons |
| MENU MENU | |
| TV/VIDEO ENTER | |
| CH ∧ | ▲ |

The bar above is an operational guide for the remote control. The bar will change in accordance with each menu setting screen.
Picture menu
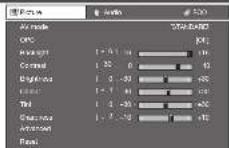
AV mode
"AV mode" gives you several viewing options to choose from to best match the system environment, which can vary due to factors like room-brightness, type of programme watched or the type of image input from external equipment.
| Selected item | Description |
| STANDARD | For a rightly defined image in a normally bright room. |
| MOVIE | For a move. |
| GAME | For game play. |
| PC | For PC (Available only when inputting at HDMI or PC signal.) |
| USER | Allows the user to customise settings as desired. You can set the mode for each input source. |
| DYNAMIC (FIXED) | Changes the image and sound settings to the factory preset values. No adjustments are allowed. |
| DYNAMIC | For a clear-cut image emphasising high contrast for sports viewing. |
■ OPC (Optical Picture Control) setting
You can set the TV to automatically adjust the screen to suitable backlight brightness according to the lighting conditions.
| Selected Item | Description |
| On:Display | Displays the CPC effect on the screen while adjusting the brightness of the screen. |
| On Automatically adjusts. | |
| Off The brightness is fixed at the value set in "Backlight". | |
NOTE
- Make sure no object constructs the OPC sensor, which could affect its ability to sense surrounding light.
- In order to get a better picture quality, "OPC" and "Backlight" functions may not work when the TV set is at a relatively low temperature. It is not a problem, and these functions will be active when the temperature becomes normal.
■ Picture adjustments
| Selected item | ◀ button | ▶ button |
| Backlight The screen dims The screen brightens | ||
| Contrast For less contrast For more contrast | ||
| Brightness For less brightness For more brightness | ||
| Colour For less colour intensity | For more colour intensity | |
| Tint Skin tones become purplish | Skin tones become greenish | |
| Sharpness For less sharpness For more sharpness | ||
NOTE
- For resetting all adjustment items to factory preset values, press ▲/▼ to select "Reset", press ENTER, press ◀/► to select "Yes", and then press ENTER.
Advanced
Colour temp. (Colour Temperature)
Adjusts the colour temperature to give the best white image.
| Selected Item Description | |
| High | White with bluish tone |
| Mid-High | |
| Middle | ↓ |
| Mid-Low | |
| Low | White with reddish tone |
Quick shoot (Fine Motion Advanced)
3D-Y/C
Provides high quality images with minimal dot crawl and cross colour noise. (On, Off)
NOTE
- 3D-Y/C is not selectable depending on the input signal type.
- 3D Y/C may not operate depending on the input signal type or noisy Input signal.
Monochrome
For viewing images in monochrome. (On, Off)
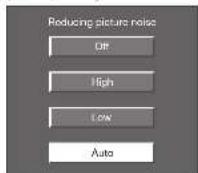
DNR (Digital Noise Reduction)
Reduces noise on screen and produces a clearer video image. ("Off", "High", "Low", "Auto")
Audio menu
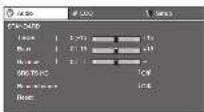
Audio adjustments
| Selected item | ◀ button | ▶ button |
| Treble For weaker trouble For stronger trouble | ||
| Bass For weaker bass For stronger bass | ||
| Balance Decrease audio from the right speaker | Decrease audio from the left speaker | |
■ SRS TruSurround (TS) HD™
You can enjoy SRS TruSurround HD ^™ sound, the same as if you were in a movie theatre.
Selected Item Description
ECO menu
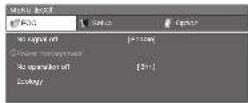
No signal off
You can set the TV to automatically power off in about 15 minutes after the TV goes into a state of receiving no programme signals, such as the end of a broadcast day. (Enable, Disable)
- Five minutes before the power shuts down, the remaining time displays every minute.
NOTE
- "Disable" is the factory preset value.
- When a TV programme finishes, but the TV receives signal input, this function may not operate.
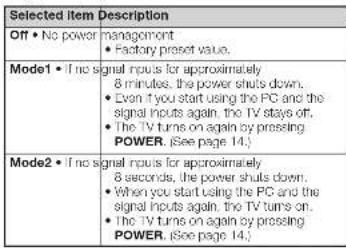
■ Power management (PC input mode only)
You can set the TV to automatically power off when no image is displayed on PC.
No operation off
You can set the TV to automatically power off when no TV operation is performed for 30 minutes or more than 3 hours.
(30 min., 3 hr., Disable)
- Five minutes before the power shuts down, the remaining
Setup menu

■ Child lock (A-TV and D-TV input mode only)
Allows you to use a password to protect certain settings from being accidentally changed.
Setting a password
1 Repeat steps 1 to 2 in Menu operation (See page 18).
2 Press ▲/▼ to select "Child lock", and then press ENTER.
3 If you have already set the password, enter it here.
4 Press ▲/▼ to select "Change password", and then press ENTER.
5 Enter the 4-digit number as a password using 0 - 9.

6 Enter the same 4-digit number as in step 5 to confirm.
NOTE
Setup menu (Continued)
Parental rating
This function allows TV channels to be restricted. It prevents children from watching violent or sexual scenes that may be considered inappropriate.
1 Repeat steps 1 to 3 in Setting a password.
2 Press ▲/▼ to select "Parental rating", and then press ENTER.
3 Press ▲/▼ to select your desired rating, and then press ENTER.
| Selected item | Description |
| No block | Cancel the restriction. |
| Block 5-18 age and below | Select desired age to restrict, (Example) If "Block 13 age and below" is selected, programmes rated for ages of 13 or more are restricted. |
Input skip
This setting allows you to skip the HDMI or PC input on the "Input Source" menu.
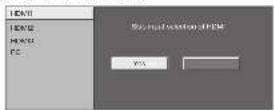
Input label
You can assign each input source a label as you prefer.
1 Press TV/VIDEO to select the desired input source.
2 Press MENU and the MENU screen displays.
(1)
3 Press ◀/▶ to select "Setup".
-
4 Press ▲/▼ to select "Input label", and then press ENTER.
5 Press ▲/▼/◄/► to select letters, and then press ENTER to label the input source. • When you want to change the input label that you have already assigned to the default name, press ◀/► to move to "CLEAR" on the "Input Label" screen, and then press ENTER.
6 Repeat the above until the name is fully spell out. • The name can be 6 characters or less. • When you want to set an input source name of less than 6 characters, press RETURN to exit from the labelling menu.
NOTE
- You cannot change labels if the input source is A-TV and D-TV.
Position
For adjusting a picture's horizontal and vertical position.
| Selected item Description |
| H-Position Centres the image by moving it to the left or right. |
| V-Position Centres the image by moving it up or down. |
| Reset Reset position to factory preset values. |
NOTE
- Adjustments are stored separately according to input source.
Setup menu (Continued)
4:3 mode
The WSS signal has 4:3 auto-switching that allows you to select between Panorama and Normal.
| Selected Item | Description |
| Panorama Wide | image without side bars |
| Normal Normal | range keeping 4:3 or 16:9 aspect ratio |
WSS signal 4:3 screen
4:3 mode "Panorama" 4:3 mode "Normal"


Quick start
You can reduce the TV's start-up time after turning on the power with the remote control unit.
| Selected Item Description | |
| On The TV quickly starts up from standby, more of power consumption is required during standby. | |
| Off Power consumption is small during standby. |
Language
You can also select a language from setup menu. Select from 3 languages: English, Traditional Chinese and Simplified Chinese.
Identification
You can check the current version of the software on the screen.
Reset
If complex adjustments are made and the settings cannot be restored to normal, you can reset the settings to the factory preset values.
NOTE
- If you execute "Reset", all the settings such as Picture, Audio. Programme and Language will be reset to the factory preset value.
Option menu
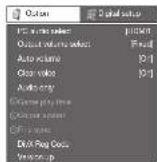
PC audio select
When connecting devices with HDMI cable to the HDMI1 terminal, and inputting analogue audio signals from the HDMI1/PCI(AUDIO) terminal.
| Selected item | Description |
| HDMI1 When co | infecting devices with HDMI cable to the HDMI terminal. |
| PC When connecting | ing devices with HDMI cable to the HDMI terminal, and inputting analogue audio signals from the HDMI1/PCI/AUDIO terminal. |
NOTE
- Set this to "PC" when connecting devices with HDMI cable to the HDMI 1 terminal and inputting analogue audio signals from the HDMI1/PC(AUDIO) terminal. If "HDMI1" is set, there will be no sound output.
- Set this to "HDMI1" when connecting devices with HDMI cable to the HDMI1 terminal only.
Option menu (Continued)
Output Volume Select
Allows you to select what controls the audio output. 1 Press MENU and the MENU screen displays.



Press ◀/▶ to select "Option".
Press ▲/▼ to select "Output Volume Select", and then press ENTER.
Press ◀/▶ to select "Fixed" or "Variable", and then press ENTER.

| Selected item | Description |
| Fixed • Sound via speakers is adjusted with VOL +/- on the remote control unit or the TV.• Sound via the AUDIO OUT terminals is adjusted and constantly outputs. | |
| Variable • Sound via the AUDIO OUT terminals is adjusted with VOL +/- on the remote control unit or the TV.• Sound via speakers/headphone is muted . | |
NOTE
- The "Audio" menu cannot be operated when "Variable" is selected.
Auto volume
Different sound sources, fairly often do not have the same volume level, for example the changing from movie to the advertisements. Auto volume solves this problem and equalises the volume levels. (On, Off)
Audio only
When listening to music from a music programme, you can set the display off and enjoy audio only.
Selected item Description
On Audio is output without screen image. Off Both screen images and audio are output.
NOTE
- When you make operations that change the picture on the TV such as by changing the input source, the Audio only function is set to "Off".
Game play time
This function displays the elapsed game time so you do not lose track of the time.
To display the elapsed time, select "GAME" under "AV mode" for the input mode of the terminal connected to the game console before starting the game.
Selected item Description
On When using | IDMI 1-3, INPUT 4-7 the AV MODE is change to "Game", the elapsed time is displayed every 30 minutes. Off There is no display.
Colour system
You can change the colour system to one that is compatible with the image on the screen. (Auto, PAL, SECAM, NTSC 3.58, NTSC 4.43, PAL-60)
NOTE
- Factory preset value is "Auto". - If "Auto" is selected, colour system for input signal is automatically set. If an image does not display clearly, select another colour system (e.g. PAL, NTSC 4.43). - "Colour system" is selectable only when inputting an S-VIDEO or composite signal.
■ Fine sync. (PC input mode only)
Adjusting the PC image automatically
Auto sync.
This function enables the screen to be automatically adjusted to its best possible condition when the analogue terminals of the TV and PC are connected with a commercially available RGB cable, etc.
NOTE
Option menu (Continued)
Adjusting the PC image manually
Ordinarily you can easily adjust the picture as necessary to change image position using Auto sync. In some cases, however, manual adjustment is needed to optimise the image.
| Selected Item Description |
| H-Position Centres the image by moving it to the left or right. |
| V-Position Centres the image by moving it up or down. |
| Clock Adjusts when the image flickers with vertical stripes. |
| Phase Adjusts when characters have low contrast or when the image flickers. |
NOTE
- For resetting all adjustment items to the factory preset values, press ▲/▼ to select "Reset", press ENTER, press ◀/▶ to select "Yes", and then press ENTER.
- Images may not be displayed properly depending on the settings and/or input signals.
Input signal
- Some input signals may have to be registered manually to display properly.
- The pairs of input signals (resolutions) in the list below are not distinguishable when received. In such case, you have to set the correct signal manually. After setting once, it will display when the same signal (resolution) is input again.
$$ 1 2 8 0 \times 7 6 8 \quad 1 3 6 0 \times 7 6 8 $$
NOTE
- You can only select the "Input Signal" on the Setup menu when receiving one of the 2 input signals listed above.
DivX® setup
This is the function to confirm your registration code.
1
Press MENU and the MENU screen displays.

Version up
This function is only for SHARP qualified service personnel to update to the latest software using a USB device. Updating the software should be made through the USB terminal.
CAUTION
- In a problem arises, ask SHARP qualified service personnel.
1 Insert the USB device containing the software update file.
2 Press MENU and the MENU screen displays.
3 Press ◀/▶ to select "Option".
4 Press ▲/▼ to select "Version up", and then press ENTER.
5 Press ◀/▶ to select "Yes", and then press ENTER.

CAUTION
- Be sure to insert the USB device correctly into the terminal.
6 Start the update operation.
• This operation may take a while.
7 After completing the update, please plug the AC power cord again.
CAUTION
- If the data is not compatible with the system, an error message appears on the screen. Repeat steps 3 and 4 after pressing ENTER.
- When an error message displays, check to see it:
• The USB device is inserted firmly.
- There is only one software update file in the USB memory.
• No data for undetected the cyclone oxide in the LSR
Digital setup menu
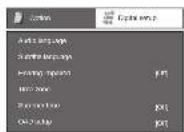
■ Selecting the audio language
Set up to two preferred multi audio languages to
display if the audio languages are available.
1 Press MENU and the MENU screen displays.
2 Press ◀/▶ to select "Digital setup".
3 Press ▲/▼ to select "Audio language", and then press ENTER.
4 Press ▲/▼ to select "1st Language" or "2nd Language", and then press ENTER.
5 Press ◀/▶ to select the desired language, and then press ENTER.
NOTE
- This function depends on audio language information from broadcasters.
Switching subtitle languages
Each time you press 📄 on the remote control, the subtitle switches.

flowchart
graph TD
    A["Set "Hearing impaired" to "On""] --> B["(Hearing impaired) 1st Language"]
    B --> C["Off"]
    C --> D["Set "Hearing impaired" to "Off""]
    D --> E["1st Language 2nd Language"]
    E --> F["2nd Language"]
■ Selecting subtitle language
1 Press MENU and the MENU screen displays.
2 Press ◀/▶ to select "Digital setup".
3 Press ▲/▼ to select "Subtitle language", and then press ENTER.
4 Press ▲/▼ to select "1st Language" or "2nd Language", and then press ENTER.
5 Press ◀/▶ to select the desired language, and then press ENTER.
NOTE
- If subtitles for the selected language are not included in a received broadcast, subtitles will not be shown for that language.
Time zone
This function enables you to select your local time zone.
1 Press MENU and the MENU screen displays.
2 Press ◀/▶ to select "Digital setup".
3 Press ▲/▼ to select "Time zone", and then press ENTER.
4 Press ◀/▶ to select the desired time zone and then press ENTER.
- The function lets you select the right time zone in case the time displayed in the EPG does not match the local time of your area.
Summer time
When the summer time is set to "On", the Standard Time is plus one hour. (Auto, On, Off)
OAD setup
- This function is for automatically download the data for the version update software over digital broadcasts when the "OAD setup" is set to "On".
- To download, follow the instructions when the download message appears during a digital broadcast.
CAUTION
Programme guide
You can check the current schedule of D-TV events and view detailed information about current events.
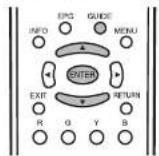
1
Press GUIDE to display the programme guide list.
2
Press ▲/▼ to display your desired programme, and then press ENTER.
- When you press ENTER, the TV jumps to the channel.

3
Press R to view programme information.
4
Press RETURN or MENU to exit.
Info

While watching D-TV you can check the extended programme information on the screen using INFO on the remote control.

General INFO screen
(1) Service name
② Title
③ Date for the current programme
④ Time for the current programme
⑤ Video system
⑥ Audio system
(7) Parental rating
- If there is more information, pressing ▲/▼ allows you to go to the next page or return to the previous page.
- You can cancel this info by pressing INFO or EXIT.
A-TV (Analogue TV)/D-TV (Digital TV)buttons
Use the following buttons on the remote control to operate the menu.

A-TV: Press to switch to analogue TV mode. After switching from digital TV or external input mode to analogue TV mode, the TV jumps to the most recently viewed analogue channel.
D-TV: Press to switch to digital TV mode. After switching from analogue TV or external input mode to digital TV mode, the TV jumps to the most recently viewed digital TV channel.
When you watch the TV for the first time When the TV powers on for the first time after purchase, perform the auto installation.
A-TV (Analogue TV)
You can run the auto installation to set channels automatically.

To watch the analogue TV, select "Auto installation" from Setup menu. (See page 15.)

After setting the channels, you can select a channel using CH ∧∨ or 0 - 9 on the remote control unit.
D-TV
When the TV accesses to D-TV mode for the first time.
Switching the analogue audio format
You can switch between multiple audio modes when watching a multiple audio or stereo broadcast programme.

In the NICAM TV broadcasts
When receiving a stereo signal
Each time you press MPX, the mode switches
between NICAM STEREO and MONO.
Stereo mode

When receiving a bilingual signal
Each time you press MPX, the mode switches among NICAM CH A, NICAM CH B, NICAM CH AB and MONO.
Bilingual mode
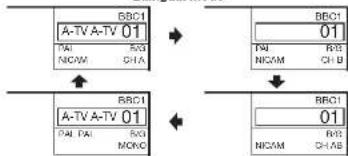
flowchart
graph TD
    A["BBC1\nA-TV-A-TV 01\nPAI RIO\nNICAM CHA"] --> B["->"]
    C["BBC1\nA-TV-A-TV 01\nPAI PAI RIO\nNICAM CHB"] --> D["->"]
    E["BBC1\n01\nPAI RIO\nNICAM CHB"] --> F["->"]
When receiving a monaural signal
Each time you press MPX, the mode switches between NICAM MONO and MONO.
Monaural mode

Switching the analogue audio format (Continued)
In the TV mode of A2 TV broadcasts
When receiving a stereo signal
Each time you press MPX, the mode switches between STEREO and MONO.
Stereo mode

When receiving a bilingual signal
Each time you press MPX, the mode switches among CH A, CH B and CH AB.
Bilingual mode

flowchart
graph TD
    A["BSC1\nA-TV A-TV 01\nPAL\nNCAM"] --> B["BSC-01\nPAL\nBVG\nCHB"]
    B --> C["BSC1\nA-TV 01\nPAL\nBVG\nCHAB"]
    C --> A
When receiving a monaural signal
When you press MPX, "MONO" displays.
Monaural mode

NOTE
- "BBC1", "01" and "PAL" are tentative network name, channel and colour system.
Switching the digital audio format
When receiving digital TV broadcast that contains multi sound modes, you can press MPX button to switch between different audio languages.
NOTE
- Selectable items vary depending on the received broadcasts.
EPG
EPG setup
What is an EPG?
An "EPG (Electronic Programme Guide)" is a programme schedule, which is displayed on the TV screen. The EPG is broadcasted together with D-TV. The TV screen shows the EPG when the viewer presses EPG on the remote control, provided that the TV is receiving the digital broadcasting signal. The EPG enables you to search for a programme, do timer view the programme schedule in detail.
Basic Operation
■ Display the EPG screen
① Press EPG.

④

②
② Press R/G to select the date you want to search.
③ Press ◀/▶ to select the desired service name.
④ Press ▲/▼ to select the desired programme.
■ Close the EPG screen
⑤ Press EPG again or MENU to exit.
NOTE
• The time displayed on the EPG is information sent by the TV station.
Reminder timer setting
You can schedule a reminder for future programmes. Channel will automatically change on time as scheduled.
1 Press EPG.
2 Press ▲/▼/◄/►/R/G to select the programme you want to watch.

Press ENTER to display the reminder schedule list.

EPG (Continued)
Viewing the reminder schedule list
1 Press EPG.
2 Press Y to display the reminder schedule list.
3 Press ▲/▼ to display next or previous
4 Press MENU or EPG to exit.
Cancelling the reminder timer setting
1 Press EPG.
2 Press Y to display the reminder schedule list.
3 Press ▲/▼ to select a programme you want
to cancel
4 Press Rto delete a programme from reminder list.
5 Press MENU or EPG to exit.
Text
MHEG-5 data broadcast is scheduled in Hong Kong. You can watch a MHEG-5 data broadcast after pressing the TEXT button.
Picture and still image
You can freeze a motion picture on the Display.
Wide Mode
Auto Selection
If you set "WSS" and *4:3 mode" in the Setup menu, the optimum WIDE mode is automatically chosen for every broadcast containing the WSS information.
"WSS" menu
To enable Auto Selection, set "WSS" in the Setup menu to "On". (See page 21.)
"4:3 mode" menu
To set the type of the wide screen, select "Panorama" or "Normal" in the 4:3 mode menu. (See page 22.)


4:3 mode set to "Panorama" 4:3 mode set to "Normal"
NOTE
- If the broadcast signal contains no WSS information, Auto Selection will not function even when the WSS option is enabled.
Manual Selection
You can select different picture sizes that account for the kind of each picture.
1 Press WIDE.
• The WIDE MODE menu displays.
• The menu lists the wide mode options selectable
for the type of video signal currently received.
- As you toggle down the options, each mode is immediately reflected on the IV.
2 Press WIDE or ▲/▼ while the WIDE MODE menu displays on the screen.
| Selected item | Description |
| Normal For 4:3 | "standard" pictures. A slot bar appears on each side. |
| Zoom14:9 For | 4:9 letterbox pictures. A thin side bar appears on each side, and you may also see bars on the top and bottom with some programmes. |
| Panorama In this mode the picture is progressively stretched toward each side of the screen. | |
Connecting a PC
Use the PC terminals to connect a PC.
Analogue Connection

Signal names for 15-pin mini D-sub connector

| Pin No. | Signal name Pin No. | Signal name Pin No. | Signal name | |
| 1 | B GND |Ground@Not connected | 1 | ||
| 2 | G GND (Ground)IDA | 12 | ||
| 3 | B GND |Ground|ID | 13 | ||
PC compatibility chart
| Resolution | Horizontal Frequency | Vertical Frequency | VESA Standard | |
| VGA 640 | × 480.3 | 5 kHz 60 Hz | √ | |
| SVGA 800 | × 600.37 | 9 kHz 60 Hz | √ | |
| XGA 1021 | × 768.5 | 4 kHz 60 Hz | √ | |
| WXCA | 1280 × 768 | 47.8 kHz 60 Hz | - | |
| 1360 × 768 | 47.7 kHz 60 Hz | √ | ||
| SXGA | 1280 × 1024 | 84.0 kHz 60 Hz | √ | |
| SXCA+ | 1400 × 1050 | 85.3 kHz 60 Hz | √ | |
NOTE
- This TV has only limited PC compatibility, correct operation can only be guaranteed if the video card conforms exactly to the VESA 601 Hz standard. Any variations from this standard will result in picture distortions.
DDC is a registered trademark of Video Electronics Standards Association. Power Management is a registered trademark of Sun Microsystems, Inc. VGA and XGA are registered trademarks of International Business Machines Corp
RS-232C commands list
Commands
- Commands not indicated here are not guaranteed to operate.
| CONTROL ITEM | COMMAND | PARAMETER | CONTROL CONTENTS | ||||
| POWER SETTING | P | D | W | R | G | - | POWER OFF (STANDER) |
| INPUT SELECTION A | I | T | G | D | - | - | INPUT SWITCHING (TOGGLE) |
| I | T | V | D | - | - | A-TV CHANNEL (FRED) | |
| I | D | T | V | - | - | D-TV CHANNEL (FRED) | |
| I | A | V | D | - | - | HDVI(1/2/3),INPL T4/5/6/7,PC 8 | |
| CHANNEL | D | C | C | H | * | - | A-TV DIRECT CHANNEL (7-99) |
| C | H | U | P | - | - | A-TV CHANNEL, UP | |
| C | H | D | W | - | - | A-TV CHANNEL DOWN | |
| D | T | V | D | * | - | D-TV DIRECT CHANNEL (1-99B) | |
| D | T | U | P | - | - | D-TV CHANNEL, UP | |
| D | T | D | W | - | - | D-TV CHANNEL DOWN | |
| AV MODE SELECTION | A | V | M | D | G | - | TOGGLE |
| A | V | M | D | T | - | STANDARD | |
| A | V | M | D | T | - | MOVE | |
| A | V | M | D | 3 | - | GAME | |
| A | V | M | D | 4 | - | USER | |
| A | V | M | D | S | - | DYNAMIC (FIXED) | |
| CONTROL SEM | COMMAND | PARAMETER | CONTROL CONTENTS | ||||
| VOLUME | V | O | L | M | * | - | VOLUME (0-80) |
| POSITION | H | P | O | S | * | - | H-POSITION (A) (0-10-10) |
| H | P | O | S | * | - | H-POSITION (PC) (0-180) | |
| V | P | O | S | * | - | V-POSITION (A) (0-20-20) | |
| V | P | O | S | * | - | V-POSITION (PC) (0-132) | |
| C | L | O | K | * | - | C-LOCK (0-180) | |
| P | H | S | E | * | - | PHASE (0-16) | |
| WIDE MODE | W | I | D | E | 0 | - | TGGLE (A) |
| W | I | D | E | 1 | - | NORMAL (A) | |
| W | I | D | E | 2 | - | ZOOM 14.9 (A) | |
| W | I | D | E | 3 | - | PANORAMA (A) | |
| W | I | D | E | 4 | - | FULL (A) | |
| W | I | D | E | 5 | - | CINEMA 16.9 (A) | |
| W | I | D | E | 6 | - | CINEMA 14.9 (A) | |
| W | I | D | E | 7 | - | NORMAL (PC) | |
| W | I | D | E | 9 | - | FULL (PC) | |
| W | I | D | E | 10 | - | DOT BY DOT (AWPC) | |
Connecting a USB device
Connect a USB device to the TV as shown below.

- The TV automatically switches to the USB mode when a USB device is inserted in the USB terminal.
- Depending on the USB device, the TV may not be able to recognise the contained data.
- Use only alphanumeric characters for naming files.
- File names over 80 characters may vary depending on character set may not be displayed.
- Do not connect and disconnect a USB device from the TV repeatedly.
USB Movie and Photo viewer/Music Player
In this mode, you can enjoy viewing photos and listening to music and viewing videos from external USB devices. Select "USB media" from the "Input Source" menu to enter this mode.
NOTE
- You cannot enter this mode when there is no USB device connected to the TV.
- "wide mode" is fixed during the USB mode.
■ Selecting modes and devices

1
Press ◀/▶ to select between "Movie mode", "Movie mode" and "Photo mode".
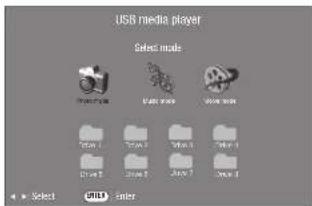
NOTE
- You do not need to select the drive in step 2 when there is only one drive in the connected USB device.
- 16 is the maximum number of drives that can be displayed.
Movie mode
1
Press ◀/▶ to select "Movie mode", and then press ENTER.
2
Press ▲/▼ to select the desired folder or directory, and then press ENTER.
3
Press ▲/▼ to select the desired movie.
Buttons for Movie mode
| Buttons Description | |
| ENTER | Display the movie in full screen |
| ▲▼ (Cursor) | Select a desired item. |
| ◀▶ (Cursor) | Page up/down |
| Return | Return to the mode list. |

Viewing movie

natural_image
Person paddling a river in mid-air, wearing gear and cap (no visible text or symbols)Buttons for full screen display operation
| Buttons Description | |
| ENTER | Play/Fause the movie. |
| ▲ (Cursor) | Go to the previous file. |
| ▼ (Cursor) | Go to the next file. |
| ▶ (Cursor) | The FWD speed changes every time you press ▶ After playing to the end the player goes to the next file and starts to play. |
| ◀ (Cursor) | The REW speed changes every time you press ◀ After going back to the beginning the answer starts to play the same file. |
| Return | Return to the movie list screen. |
| B button | Reverse/hide the guide display. |
| R button | Each time you press R button on the remote control, the subtle switches. |
| G button | Each time you press G button on the remote control, the audio switches. |
| Y button | Each time you press Y button on the remote control, the VIDEO switches. |
Music mode

1 Press ◀/▶ to select "Music mode", and then press ENTER.
2 Press ▲/▼ to select the desired folder, and then press ENTER.
3 Press ▲/▼ to select the desired music, and then press ENTER.
Buttons for music mode
| Buttons | Description |
| ENTER | When selecting a music the Play the music. |
| ▲/▼ (Cursor) | Select a desired item. |
| ◀ (Cursor) | Page up. |
| ▶ (Cursor) | Page down. |
| Return | Return to the mode list. |
| R button | Stop music. |
| G button | Play-Pause music. |
| B button | Audio only. |
NOTE
- When there are invalid music files, the X mark will be displayed for the 1s.
- The displayed play time may differ slightly from the actual play time depending on the likes.
Photo mode
Viewing thumbnails

1 Press ◀/▶ to select "Photo mode", and then press ENTER.
2 Press ▲/▼/◄► to select the desired folder, and then press ENTER.
3 Press ▲/▼/◄► to select the desired photo.
Buttons for thumbnail operations
| Buttons Description | |
| ENTER | Display the photo in full screen. |
| ▲/▼/◄► (Cursor) | Select a cleaned lamp. |
| B button | Slide show. |
| R button | Page up. |
| G button | Page down. |
| Y button | Boxing 30M. |
NOTE
- When there are invalid photo files, the X mark will be displayed for the file.
- You can see the file name, shooting data, file size and pixel size of the selected photo in the lower-left corner of the screen (shooting data is only available in the EXIF file format).
■ Viewing photos in full screen
Buttons for full screen display operation
| Buttons Description | |
| ◀/▶ (Cursor) | Co to the previous next photo in the same directory. |
■ Selecting BGM (Background Music)
1 Press ◀/▶ to select "Photo mode", and then press ENTER.
2 Press Y button, and press ▲/▼ to select the desired folder, and then press ENTER.
3 Press ▲/▼ to select the desired music, and then press Y button.
4 Press RETURN to return to photo selection mode, and press ▲/▼/◄/► to select the desired folder, and then press ENTER.
5 Press ▲/▼/◄/► to select the desired photo, and then press B button ( Slide show ), then BGM playing with the photo.
NOTE
- Background Music (BCM); function is available only when the slide shows on.
List of files compatible with USB mode
| USB device | USB Memory USB card reader (Mass Storage class) |
| File system | FAU/FA132/NIFS |
| Photo file format | JPEG (jpg) (DGF2.0 compliant) |
| Music file format | MFS (tmp3)Bitrate: 52 k, 40 k, 48 k, 56 x, 64 k, 80 k, 96 x, 112 k, 128 k, 160 k, 192 k, 224 k, 260 k, 320 kbpsSampling frequency: 37 k, 44 k, 48 kHz |
| Video file format | ||||||
| File extension | File type V | Video decoder Resolution | Audio decoder | Frame rate (fps) | Bit rate (Mbsp) | |
| *.avi | AVI | Dwx 3.11/4/4 12/5.x/6 | 1920×1080 | MP3/Doby Digital plus | 6-30 8 | |
| Xwd 1920×1080 6-30 8 | ||||||
| H.264 1920×1080 6-30 20 | ||||||
| MPEG2 1920×1080 6-30 8 | ||||||
| *.mkv MKV | H.264 | 1920×1080 | MP3/Doby Digital plus -30 8 | 6-30 20 | ||
| MPEG2 | 1920×1080 6-30 8 | |||||
| MPEG1 | 1920×1080 6-30 8 | |||||
| *.mp4 MP4 | Dwx 3.11/4/4 12/5.x/6 | 1920×1080 | MP3/Doby Digital plus | 6-30 8 | ||
| Xwd 1920×1080 6-30 8 | ||||||
| H.264 1920×1080 6-30 30 20 | ||||||
| *.voa VOB | MPEG2 1920×1080 | MP3/Doby Digital plus | 24/25/30 20 | |||
| *.mcg/mpeg PS | MPEG2 1920×1080 | MP3/Doby Digital plus | 24/25/30 20 | |||
| MPEG1 1920×1080 24/25/30 20 | ||||||
| *.rmv.mnvc | RM | FM codec | 1280×720 | Real Audio | 24/25/30 | 10 |
| *.ls*trp* lp | TS | H.264 1920×1080 | MP3/Doby Digital plus | 6-30 20 | ||
| MPEG2 1920×1080 24/25/30 20 | ||||||
| *.divx | Divx | Divx 3.11/4/4.12/5.x/6 | 1920×1080 | MP3/Doby Digital plus | 6-30 20 | |
| *.cat | DAT | MPEG2 1920×1080 | MP3/Doby Digital plus | 6-30 8 | ||
| MPEG1 1920×1080 6-30 8 | ||||||
NOTE
• Progressive format jpeg files are not supported.
- Files in USB 1.1 devices may not be played properly.
• Operation using USB hubs is not guaranteed.
Appendix
Troubleshooting
The problems described below are not always caused by malfunctions. Check the TV again before having the TV serviced.
| Problem Possible Solution | |
| No power. Check if you pressed POWER on the remote control unit. (See page 14.)If the indicator on the TV lights up red, press POWER.Is the AC cord disconnected?I has the power been turned on? (See page 14.) | |
| Unit cannot be operated. | External influences such as lighting, static electricity, etc., may cause improper operation. In this case, operate the unit after first turning the TV power off or unplugging the AC cord and ro-plugging it in after 1 or 2 minutes. |
| Remote control unit does not operate. | Is battery inserted with polarity (+,-) aligned? (See page 10.)Is battery worn out? (Replace with new battery.)Are you using it under strong or fluorescent lighting?Is a fluorescent light shining on the remote control sensor? |
| Picture is cut off. Is the image position correct? (See page 21.)Are screen mode adjustments such as picture size made correctly? (See page 21,24,30.) | |
| Strange colour, light colour, or dark, or colour misalignment. | Adjust: the picture lone. (See page 19.)Is the room too bright? The picture may look dark in a room that is too bright.Check the colour system setting. (See page 23.)Check the input signal setting. (See page 24.)Check the HDMI auto view setting. (See page 21.) |
| Power is suddenly turned off. | The unit's internal temperature has increased.Remove any objects blocking the vent or clean.Check the ECO setting. (See page 20.)Is the slow timer been set? (See page 9.) |
| No picture. Is the connection to external equipment correct? (See page 8.)Has the input signal setup been performed correctly after connection? (See page 14.)Is the correct input selector?Is the picture adjustment correct? (See page 18-19.)Is the antenna connected properly? (See page 7.)Is "On" selected in "Audio only"? (See page 23.) | |
| No sound. Is the volume too low? (See page 9.)Make sure that headphones are not connected. | |
| The TV sometimes makes a cracking sound. | This is not a malfunction. This nappons when the cabinet slightly expands and contracts according to changes in temperature. This does not affect the TV's performance. |
Troubleshooting-Digital broadcasting
The error message about reception of broadcast
| The example of an error message displayed on a screen | Error code | Possible Solution |
| • Failed to receive broadcast. | E202 | • Check the antenna cable. Check that the antenna is correctly set up. |
Specifications
| Item\Model | LC-40LX530H LC-46LX530H | |||
| Resolution 2.07/3.600 pixels (1920 × 1080) | ||||
| Video Colour System PAL/SECAM/NTSC 3.58/NTSC 4.43/PAL 60 | ||||
| TV Function | TV-Standard | Analogue FAL: B/G, D/K, I SECAM: B/G, D/K, K/K . NTSC:M | ||
| Digital DMB-T/H(MHFC-D) | ||||
| Receiving Channel | VHFA/UHF 44.25 - 863.25 MHzCATV S1 - 841ch (including Hyperband) | |||
| Digital terrestrial broadcast 470 MHz - 862 MHz | ||||
| TV-Tuning System Auto Presel 99 ch | ||||
| Stereo/Bilingual NICAM: B/G, I, D/K A2 stereo: B/G | ||||
| Audio amplifier 10 W × 2 | ||||
| Speakers | 15 × 3.4 cm 2pcs | |||
| Terminals Rear | A-TV/Analog antenna | UHF/VHF 75 Ω DIN type | ||
| D-TV(Digital antenna) | UHF/VHF 75 Ω DIN type | |||
| HDVI 1 | HDVI input(480I, 576I, 480P, 576P, 720P/50Hz, 720P/60Hz, 1080I/50Hz, 1080I/60Hz, 1080P/24Hz, 1080P/50Hz, 1080P/60Hz), AUDIO in (common use with PC INPUT) #3.5 mm jack | |||
| HDVI 2 | HDVI input(480I, 576I, 480P, 576P, 720P/50Hz, 720P/60Hz, 1080I/50Hz, 1080I/60Hz, 1080P/24Hz, 1080P/50Hz, 1080P /60Hz); | |||
| HDVI 3 | HDVI input(480I, 480P, 576I, 576P, 720P/50Hz, 720P/60Hz, 1080I/50Hz, 1080I/60Hz, 1080P/24Hz, 1080P/50Hz, 1080P/60Hz); | |||
| INPUT 4 | VIDEO in. AUDIO in | |||
| INPUT 5 | VIDEO in. AUDIO in | |||
| INPUT 6 | COMPONENT in (180I, 576I, 480P, 576P, 720P/50Hz, 720P/60Hz, 1080I/50Hz, 1080I/60Hz), AUDIO in | |||
| INPUT 7 | COMPONENT in (180I, 576I, 480P, 576P, 720P/50Hz, 720P/60Hz, 1080I/50Hz, 1080I/60Hz), AUDIO in | |||
| PC input | 1s pin mini D-sub, AUDIO in (common use with HDMI 1); #3.5 mm jack | |||
| AUDIO OUT | Audio Output | |||
| RS-232C | B pin D-sub male connector | |||
| Side | USB | USB 2.0 | ||
| Headphone | D 3.5 mm stereo | |||
| OSD language | English/Simplified Chinese/Traditional Chinese | |||
| Power Requirement | AC 220 V, 50 Hz | |||
| Power Consumption (Standby) | 100 W (0.50 W) | 115 W (0.50 W) | ||
| Weight | without stand 13.7 kg | 18.3 kg | ||
| with stand | 18.5 kg | 21.6 kg | ||
| Operating Temperature | 0°C - 40°C | |||
- As a part of policy of continuous improvement, SHARP reserves the right to make design and specification changes for product improvement without prior notice. The performance specification figures indicated are nominal values of production units. There may be some deviations from these values in individual units.
Dimensional drawings
Unit mm
LC-40LX530H


LC-46LX530H
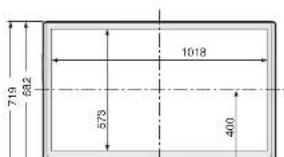

Clearing the password
If you forget the password, clear the password using the following procedures.
1 Press MENU to display the MENU screen, and then press ◀/▶ to select "Setup".
2 Press ▲/▼ to select "Child lock", and then press ENTER and the password input screen display.
3 If you enter "3001" using 0 - 9, the "Child lock" setting menu will be displayed.
4 Enter the 4-digit number as a password using 0 - 9. The new password is now set.


The Password is

NOTE
- As a precautionary measure, make a note of your password above, remove it from this manual, and keep it in a familiar place.
- LC-40LX530H LC-46LX530H
- 當使用複合視頻連接線時
- (市面有售)
- 遥控器
- POWER (電源備用 / 打開)
- Quick shoot (Fine Motion Advanced)
- 在接收到單聲道廣播信號時
- Contents
- Precautions.for.daily.use
- Observe the following items
- Maintenance of the cabinet
- Maintenance of the LCD panel
- Trademarks
- Important.safety.precautions
- Supplied.accessories
- Preparation
- Handling and precautions with the wall-mounted TV
- CAUTION
- Using a SHARP recommended bracket to mount the TV
- NOTE
- Attaching the stand
- Preparation (Continued)
- 1
- 2
- 3
- 4
- 5
- Before turning on the power
- Notes on installing the TV
- Connecting the antenna cable
- Connecting external devices
- Connecting the AC cord
- Connecting.external.device
- Connecting.a.VCR,.game.console.or.camcorder
- Connecting.a.DVD.player/Digital.TV.Set.Top.Box.(STB)
- POWER.(STANDBY/ON)
- 2.0-.9
- MPX
- (Mute)
- pressing VOL + VOL + VOL
- VOL + VOL
- VOL-7 EPG
- INFO
- EXIT
- TV/VIDEO.(INPUT.SOURCE)
- Select an input source.
- DISPLAY
- TEXT
- CHA/CHV
- GUIDE
- MENU
- ▲/▼/◄► , (Cursor)
- ENTER
- RETURN
- Colour.Buttons.(R/G/Y/B)
- Remote control unit (Continued)
- Inserting.the.battery
- Part.names
- TV.(Front/.Side)
- Part names (Continued)
- A-TV(Analogue TV)/D-TV(Digital TV)/AV input mode menu items
- PC input mode menu items
- Turning.the.TV.on/off
- Turning.on/off.the.power
- Standby.mode
- Supplying.electric. power.to.the.antenna
- Initial.auto.installation
- Checking.signal. information
- Checking signal information (Continued)
- Checking.signal.information
- Auto.installation
- Programme.setup
- Digital.settings
- ■Auto.search.(Digital)
- ■Manual.search.(Digital)
- ■Manual.adjust.(Digital)
- Programme setup (Continued)
- The.item.position.of.services.can.be.sorted
- Analogue.settings
- Auto.search.(Analogue)
- Search
- Fine
- EXAMPLE
- Colour.system
- Label
- Booster
- Sort (Analogue)
- ■ Erase programme (Analogue)
- Menu operation
- Using the control panel of the TV
- Picture menu
- AV mode
- ■ OPC (Optical Picture Control) setting
- Advanced
- 3D-Y/C
- Monochrome
- DNR (Digital Noise Reduction)
- Audio menu
- ■ SRS TruSurround (TS) HD™
- ECO menu
- No signal off
- ■ Power management (PC input mode only)
- No operation off
- Setup menu
- ■ Child lock (A-TV and D-TV input mode only)
- Setting a password
- Setup menu (Continued)
- Parental rating
- Input skip
- Input label
- Position
- 4:3 mode
- Quick start
- Language
- Identification
- Reset
- Option menu
- PC audio select
- Option menu (Continued)
- Output Volume Select
- Auto volume
- Audio only
- Selected item Description
- Game play time
- Colour system
- ■ Fine sync. (PC input mode only)
- Adjusting the PC image automatically
- Auto sync.
- Adjusting the PC image manually
- Input signal
- DivX® setup
- Version up
- Digital setup menu
- ■ Selecting the audio language
- Switching subtitle languages
- ■ Selecting subtitle language
- Time zone
- Summer time
- OAD setup
- Programme guide
- Info
- General INFO screen
- A-TV (Analogue TV)/D-TV (Digital TV)buttons
- A-TV (Analogue TV)
- D-TV
- Switching the analogue audio format
- In the NICAM TV broadcasts
- When receiving a bilingual signal
- When receiving a monaural signal
- Switching the analogue audio format (Continued)
- In the TV mode of A2 TV broadcasts
- When receiving a stereo signal
- Switching the digital audio format
- EPG
- EPG setup
- What is an EPG?
- Basic Operation
- ■ Display the EPG screen
- ■ Close the EPG screen
- Reminder timer setting
- Press EPG.
- EPG (Continued)
- Text
- Picture and still image
- Wide Mode
- Auto Selection
- "WSS" menu
- "4:3 mode" menu
- Manual Selection
- Press WIDE.
- Press WIDE or ▲/▼ while the WIDE MODE menu displays on the screen.
- Connecting a PC
- Commands
- Connecting a USB device
- USB Movie and Photo viewer/Music Player
- ■ Selecting modes and devices
- Movie mode
- Photo mode
- Viewing thumbnails
- ■ Viewing photos in full screen
- Buttons for full screen display operation
- ■ Selecting BGM (Background Music)
- Appendix
- Troubleshooting
- Troubleshooting-Digital broadcasting
- Dimensional drawings
- Clearing the password
- The Password is
Brand : SHARP
Model : AQUOS LC-40LX530H
Category : Television