
BDW86S-F - Dishwasher Bellini - Free user manual and instructions
Find the device manual for free BDW86S-F Bellini in PDF.


| Product Type | Dishwasher |
| Brand | Bellini |
| Model | BDW86S-F |
| Color | Silver |
| Installation Type | Built-in |
| Dimensions (HxWxD) | 85 x 60 x 60 cm |
| Weight | 40 kg |
| Rated Voltage | 220-240 V ~ 50 Hz |
| Power Consumption | 1900 W |
| Energy Efficiency Class | A |
| Number of Place Settings | 12 |
| Noise Level | 49 dB(A) |
| Number of Programs | 6 |
| Programs | Eco, Intensive, Normal, Quick, Glass, Soak |
| Control Type | Electronic with LED display |
| Water Connection | Cold water only |
| Water Pressure | 0.04-1.0 MPa |
| Salt and Rinse Aid Dispenser | Yes |
| Filter System | Self-cleaning micro-filter |
| Child Lock | Yes |
| Delay Start | Up to 24 hours |
| Cutlery Basket | Yes |
| Safety Features | Water protection system, overflow protection |
| Maintenance | Clean filters regularly, use dishwasher salt and rinse aid |
| Spare Parts Availability | Available from authorized service centers |
Frequently Asked Questions - BDW86S-F Bellini
User questions about BDW86S-F Bellini
0 question about this device. Answer the ones you know or ask your own.
Ask a new question about this device
Download the instructions for your Dishwasher in PDF format for free! Find your manual BDW86S-F - Bellini and take your electronic device back in hand. On this page are published all the documents necessary for the use of your device. BDW86S-F by Bellini.
USER MANUAL BDW86S-F Bellini
Mar 2016
45cm Dishwasher

natural_image
Technical line drawing of an open kitchen appliance with internal components (no text or symbols)Quick operation guide
For detailed operating method read the corresponding content on the instruction manual.
SwitchontheappliancePress the On/OI button to switchontheappliance, Open the door.

Mechanical indicator C.
Electricindicatoroncontrol panel(ifprovided).
Loadthebaskets
Scrapeoflanylargeamountofleftoverlood. Soitenremnantsofburniloodinpans,
thenloadthebaskets. Refertothedishwasherloading instructions.

Selectaprogramme
PresstheProgrammebuttonuntiltheselectedprogrammelightsup.
(SeethesectionentitledOperationinginstruction)

Runningthedishwasher
Closethedoor.turnonthewaterlap.Themachinewillstartworking
afterabout10seconds.
- Changingtheprogramme
• 1. Arunningcyclecanonlybemodifiedifithasbeenrunningforashortime.Otherwisethedetergent
mayhavealreadybeenreleasedandthewaterairedrained. If this is the case, the detergent
dispensermustberefiled
-
Press herunning program but for more than second cancellation canceller running programme.
-
Select an new programme
-
The job of a person will need
-
Medicil Washer Whinstarter Tosecond.
WARNING!

Read this Manual
DearCustomer.
Please carefully read this manual before using the dishwasher, it will help you to use and maintain the dishwasher properly.
- Keepittorefertoitatalaterdate.
Passitonto any subsequent owner of the appliance.
This manual contains sections on safety Instructions, Operating Instructions, Installation Instructions and Troubleshooting Tips, etc.
This appliance is intended to be used in household and similar applications such as:
- staff kitchen areas in shops, offices and other working environments;
farmhouses:
- by clients in hotels, motels and other residential type environments;
- bedandbreakfasttypeenvironments.

Before Calling for Service
- Toreview the section on troubleshooting Tips
1) Safety Information....1
2) Operating Instructions....2
Control Panel....2
Dishwasher Features....2
3) Prior using for the first time....3
A. Fill the Rinse Aid Dispenser....3
B. Function of Detergent 4
4) Loading the Dishwasher Basket......6
AttentionbeforeorafterloadingtheDishwasher
Baskets....6
Loading the upper Basket....7
Loading the Lower Basket....7
Cutlery Basket......8
5) Starting a washing programme....9
WashCycleTable....9
Turning on the Appliance....10
Change the Programme....10
AttheEneoftheWashCycle....10
6) Maintenance and cleaning....11
FilteringSystem....11
Caring for the Dishwasher....12
1. IMPORTANT SAFETY INFORMATION READ ALL OF THE INSTRUCTIONS BEFORE USING

WARNING!
When using your dishwasher, follow the precautions listed below:

GROUNDING INSTRUCTIONS
This appliance must be grounded. In the event of a malfunction or breakdown, grounding will reduce the risk of an electric shock by providing a path of least resistance of electric current. This appliance is equipped with accordance having an equipment grounding conductor and grounding plug.
■ Theplugmustbepluggedintoanappropriateoutlet thatisinstalledandgroundedinaccordancewith allocalcodesandordinances.
▲WARNING!
■ Improperconnectionoftheequipment-grounding conductorcanresultintheriskofanelectricshock.
Checkwithaqualifiedelectricianorservice representativeifyouareindoubtwhetherthe appliancesproperlygrounded.Donotmodifythe plugprovidedwiththeappliance;Ifitdoesnotfit theoutlet.Haveaproperoutletinstalledbya qualifiedelectrician.

WARNING! PROPER USE
■ Donotabuse, siton, or standard the door or dish rack of the dish washer.
■ Donottouchthehealingelementduringor immediatelyafteruse.
(Thisinstructionisonlyapplicabletomachines withavisualheatingelement.)
■ Donotoperateyourdishwasherunlessall enclosurepanelsareproperlyinplace.Open thedoorverycarefullyifthedishwasheris operating,therelsarlskofwatersquirtingout.
■ Donotplaceanyheavyobjectsthe onorstandon doorwhenitisopen. The appliance could tip forward.
■ When loading items to be washed:
1) Localesharpitems so that they are not likely to damagethedoor seal;
2) Warming: Knives and other utensils with
- Keepchildrenawayfromdetergentandrinseaid,keep childawayfromtheopendoorofthedishwasher,therecouldstillbesomedetergentleftinside.
This appliance is not intended for use by persons (including children with reduced physical, sensory or mental capabilities, or lack of experience and knowledge, unless they have been given supervision or instruction concerning use of the appliance by a person responsible for the safety.
■ Childrenshouldbesupervisedtoensurethattheydo notplaywiththeappliance.
■ Dishwasher detergents are strongly alkaline, they can be extremely dangerous if swallowed. Avoid contact with skin and eyes and keep children away from the dishwasher when the door is open.
■ The door should not be left open, since this could increase the risk of tripping
2. Operation Instruction

IMPORTANT Toget the best performance from your dishwasher, read alloperating instructions before using it for the first time.
Control Panel
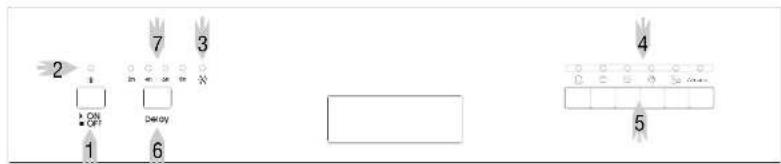
1 ON/OFF Button: To turn on/off the power supply.
2 Power Light: To be on when the ON/OFF Button is Presseddown.
3 Rinse Aid Warning Light : To be on when the rinseaddispenserneedstoberefilled.
4 Program indicator light.
5 Program Button: To select washing program when press the button.
6 Delayed Start Button: Press this button to set the delayed hours for washing. There are 4 choices.
7 Delay indicator: different indicator means different delay time.
Dishwasher Features

3.Prior using for the first time
Before using your dishwasher for the first time:
A Filltherinseaidispenser
B Fillindetergent
A. Fill the Rinse Aid Dispenser
RinseAidDispenser
Therinse aids released during the final rinse top prevent water from forming droplets on your dishes, which can leaves spots and streaks. It also improves drying by allowing water to rollof the dishes. Your dishwasher is designed to use silver rinse aids. The rinse aid dispenser is located inside the door next to the detergent dispenser. To fill the dispenser, open the cap and pour the rinse aid into the dispenser until the level indicator turns completely black. The volume of their rinse aid container is about 110ml.
FunctionofRinseAid
Rinse aid is automatically added during the last rinse, ensuring thorough rinsing, and spot and streak free drying.
Attention!
Only use branded rinse aid for dishwasher. Never fill the rinse aid dispenser with any other substances (e.g. Dishwasher cleaning agent, liquid detergent). This would damage the appliance.
When to Refill the Rinse Aid Dispenser
If there is no rinse-aid warning light in the control panel, you can judge the amount of rinse-aid by the color of the opticallevel
indicator "C" located next to the cap. When the rinse-aid container is full, the whole indicator will be dark. As the rinse-aid
diminishes, the size of the dark dot decreases. You should never let the rinse aid get below 1 / 4 full.
As the rinse aid diminishes, the size of the blackdot
on the rinse aid level indicator changes, as illustrated below.
Full
3/4full
1/2full
1/4full-Shouldrefilltoeliminatespotting
Empty

NOTE: Clean up any rinse aid spilled while during filling with an absorbent cloth to avoid excessive foaming during thenextwash. Don't forget to replace the cap before you close dishwasher door.
Adjusting Rinse Aid Dispenser

The rinse aid dispenser has six or four settings. Always start with the dispenser set on "4". If spots and poor drying are a problem, increase the amount of rinse aid dispensed by removing the dispenser lid and rotating the dial to "5". If the dishes still are not drying properly or are show spots, adjust the dial to the next higher lever until your dishes are spot-free. The recommended setting is "4". (Factoryvalueis '4'.)
NOTE:
Increase the dose if there are drops of water or limespots on the dishes after washing. Reduce it if there are sticky whitish stains on your dishes or a bluish film on glassware or knifeblades.
B. Function of Detergent
Detergents with its chemical ingredients are necessary to remove dirt, crush dirt and transport it out of the dishwasher. Most of the commercial quality detergents are suitable for this purpose.
Detergents
There are 3 sorts of detergents
- With phosphate and with chlorine
- With phosphate and without chlorine
- Without phosphate and without chlorine
Normally new pulverised detergent is without phosphate. Thus the water softener function of phosphate is not given. In this case we recommend to fill salt in the salt container even when the hardness of water is only 6 ^d H. If detergents without phosphate are used in the case of hard water often white spots appear on dishes and glasses. In this case please add more detergent to reach better results. Detergents without chlorine do only bleach a little. Strong and coloured spots will not be removed completely. In this case please choose a program with a higher temperature.
Concentrated Detergent
Based on their chemical composition, detergents can be split in two basic types: conventional alkaline detergents with caustic components
AmountofDetergenttoUse


NOTE:
■ If the lid is closed: press release button. The lid will spring open.
■ Always add the detergent just before starting each wash cycle.
■ Only use branded detergent aid for dishwasher.
▲ WARNING!
Dishwasher detergent is corrosive! Take care to keep it out of reach of children.
ProperUseofDetergent
Use only detergent specifically made for the use in dishwashers. Keep your detergent fresh and dry.
Don't put powdered detergent into the dispenser until you're ready to wash dishes.
Fillin Detergent
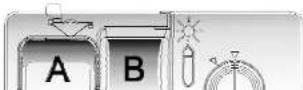
Fill the detergent dispenser with detergent.
The marking indicates the dosing levels, as
illustratedontheright:
-
4. Loading the Dishwasher Baskets
Recommendation
■ Considerbuyingutensilswhich are identified as dishwasher-proof.
■ Use a mild detergent that is described as 'kind todishes'. If necessary, seek further information from the detergent manufacturers.
■ For particular items, select a program with as low atemperature as possible.
■ To prevent damage, take glass and cutlery out of the dishwasher as soon as possible after the program has ended.
For washing in the dishwasher the following cutlery/dishes
Arenotsuitable
■ Cutlerywithwooden, hornchina or mother-of-pearlhandles
■ Plastic items that are not heat resistant
■ Oldercutlerywithgluedpartsthatarenot temperatureresistant
■ Bondedcutleryitemsordishes
■ Pewterorcooperitems
■ Crystalglass
■ Steelitemssubjecttorusting
■ Woodenplatters
■ Items made from synthetic fibres
Are of limited suitability
■ Some types of glasses can become dullafteralargenumberofwashes
■ Silver and aluminum parts have a tendency to discolour during washing
■ Glazed patterns may fade if machine washed frequently
Attention before or after loading the Dishwasher Baskets
(For best performance of the dishwasher, follow these loading guidelines. Features and appearance of baskets and cutlery baskets may vary from your model.)
Scrape off any large amounts of leftover food. Soften remnants of burnt food in pans. It is not necessary to rinse the dishes under running water.
Place objects in the dishwasher in following way:
- Items such as cups, glasses, pots/pans, etc. are faced downwards.
- Curved items, or ones with recesses, should be loaded aslant so that water can run off.
- All utensils are stacked securely and can not tip over.
- All utensils are placed in the way that the spray arms can rotate freely during washing.
Loading the Upper Basket
The upper basket is designed to hold more delicate and lighter dishware such as glasses, coffee and tea cups and saucers, as well as plates, small bowls and shallow pans (as long as they are not too dirty).
Position the dishes and cookware so that they will not be moved by the spray of water.

Loading the Lower Basket
We suggest that you place large items and items that are the most difficult to clean into the lower basket such as: pots, pans, lids, serving dishes and bowls, as shown in the figure below. It is preferable to place serving dishes and lids on the side of the racks in order to avoid blocking the rotation of the top spray arm.
Please be reminded that:
Pots, serving bowls, etc, must always be placed top down.
Deep pots should be slanted to allow water to flow out.
The Bottom Basket features folding spikes so that larger or more pots and pans can be loaded.

Adjusting the Upper Basket
The height of the upper basket can be adjusted in order to create more space for large utensils both for the upper/lower basket. The height of the upper basket can be adjusted by placing the wheels on different height of the rails. Long items, serving cutlery, salad servers and knives should be placed on the shelf so that they do not obstruct the rotation of the spray arms. The shelf can be folded back or be removed when not required for use.

Folding Spikes of Lower Basket
For better stacking of pots and pans, the spikes can be folded down as show in the picture right.

natural_image
Mechanical assembly diagram showing two views of a mechanical component with no visible text or symbols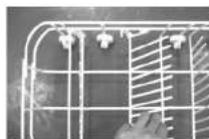
Cutlery Basket
Cutlery should be placed in the cutlery basket with the handles at the bottom. If the rack has side baskets, the spoons should be loaded separately into the appropriate slots, especially long utensils should be placed in the horizontal position at the front of the upper basket as shown in the picture.
IN

1 Forks
2 Soup spoons

5. Starting a washing program
Wash Cycle Table
| Program | Cycle Selection Information | Description of Cycle | Detergent pre/maln | Running time(min) | Energy (Kwh) | Water (l) | Rinse Aid |
| Intensive[HZ06] | For the heaviest soiled loads, such as pots, pans, casserole dishes and dishes that have been sitting with dried food on them for a while. | Pre-wash( ) 0 °CPre-washWash (65 °CRinseRinseRinse (55 °CDrying) | 5/20 g. | 120 | 1.20 | 18 | |
Heavy | For heavily soiled loads, such as pots, plates, glasses and lightly soiled pans, standard daily cycle. | Pre-wash(50 °CWash (50 °CRinseRinse (65 °CDrying) | 5/20 g. | 150 | 1.0 | 12 | |
 (1) 0978 2007.(1) (1) 0978 2007.(1) | Standard daily cycle soiled loads, such as plates, glasses, bowls anormally soiled pans. | Pre-washPre-washWash (55 °CRinse (50 °CDrying) | 5/20 g. | 120 | n0.64 | 012.2 | |
Rinse | For dishes that need to be rinsed and dried only. | Wash(65°C)Rinse (50 °CDrying) | 15 g. | 60 | 0.6 | 9 | |
Rapid | A shorter wash for lightly soiled loads that do not need drying. | Wash (40 °CRinseRinse (45 °C) | 15 g. | 30 | 0.4 | 10 | |
| All in one | For commonly soiled loads, such as pots, plates, glasses and lightly soiled pans. | Pre-wash (50 °CWash(50°C)Rinse (45 °C) | 3in1 | 150 | 1.0 | 12 |
Turning On the Appliance
Starting a cycle wash
■ Draw out the lower and upper basket, load the dishes and push them back.
It is commended to load the lower basket first, then the upper one (see the section entitled "Loadingthe Dishwasher").
■ Pour in the detergent (see the section entitled "Detergent and Rinse Aid").
Insert the plug into the socket. The power supply is 220-240 VAC /50 HZ, the specification of the socket is 10A250VAC. Makesure that the watersupply is turned onto full pressure.
- Close the door, and select the desired programme by pressing the corresponding button, then the dishwasher will start to work in 3 seconds.
Change the Program...
Premise:
You can modify the washing program. When the dishwasher just runs for a short time. Otherwise, the detergent may have already been released, and the appliance may have already drained the washwater. If this is the case, the detergent dispenser must be refilled (see the section entitled "LoadingtheDetergent").
2 Press the button of desired program more than 3 seconds until it's Indicator is on, after 10 seconds the machine will keep working. E nitled "Starting a wash cycle...").

NOTE: If you open the door during washing, the machine will pause. When you close the door,
the machine will keep on working after 10 seconds.
The programlights show the state of the dishwasher:
a) All program lightsoff----standby
b) One of the program lights on----pause
c) One of the program lights blinking---- run

NOTE: If all the lights begin to glimmer, that indicates the machine is out of order, please turn
off the main power and water supply before calling a service.
Forgot to Add a Dish?
Aforgottendishcanbeaddedatanytimebeforethedetergentcupopens.
¶ Openthodooralittletostopthewashing.
Loadtheforgottendlshes.
2 Afterthesprayarmsstopworking,youcanopenthedoor completely.
4! Closethedoor, the dishwasher will start running again after 10 seconds.
6. Maintenance and Cleaning
Filtering System
The filter prevents larger remnants of food or other objects from getting inside the pum. The residues may block the filter, in this case they must be removed.

The filter system consists of a coarse filter, a flat (Main filter) And a microfilter(Fine filter).
Mainfilter 1
Food and soil particles trapped in this filter are pulverized by a special jet on the lower spray arm and washed down to drain.
Coarsefilter 2
Larger Items, such as pieces of bones or glass, that could block the drain are trapped in the coarse filter. To remove the items caught by the filter, gently squeeze the tap on the top of this filter and liftout.
Finefilter 3
This filter holds soil and food residues in the sumparea and prevents it from being redeposit on the dishes during wash cycle.
Filterassembly
The filter efficiently removes food particles from the wash water, allowing it to be recycled during the cycle. For best performance and results, the filter must be cleaned regularly. For this reason, it is a good idea to remove the larger food particles trapped in the filter after each wash cycle by rinsing the semicircular filter and cup under running water. To remove the filter device, pull the cup handle in the upward direction.
WARNING!
■ The dishwasher must never be used without the filters.
■ Improper replacement of the filter may reduce the performance level of the appliance and damaged dishes and utensils.
Remarks:
- Inspect the filters for blocking after every time the dishwasher has been used.
- By unscrewing the coarse filter, you can remove the filter system. Remove any food remnants and clean the filters underrunning water.

NOTE: The entire filter assembly should be cleaned once a week.
Cleaning the Filter
To clean the coarse filter and the fine filter, use a cleaning brush. Reassemble the filter parts as shown in the figures on the last page and reinsert the entire assembly in the dishwasher, positioning it in its seat and pressing downwards.

WARNING!
Whencleaning the filters, don't knock on them. Otherwise, the filters could be contorted and the performance of the dishwasher could be decreased.
Caring for the Dishwasher
The control panel can be cleaned by using a lightly dampened cloth. After cleaning, make sure to dry it thoroughly.
For the exterior, use a good appliance polish wax. Never use sharp objects, scouring pads or harsh cleaners on any part of the dishwasher.
Cleaning The Door
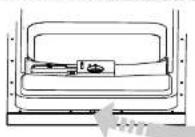
To clean the edge around the door, you should use only a soft warm, damp cloth. To avoid penetration of water into the door lock and electrical components, do not use aspray cleaner of any kind.

WARNING!
■ Never use a spray cleaner to clean the door panel as it may damage the door lock and electrical components.
■ Abrasive agents or some paper towels should not be used because of the risk of scratching or leaving spots on the stainless steel surface.
How to Keep Your Dishwasher in Shape
■ After Every Wash
After every wash, turn off the water supply to the appliance and leave the door slightly open so that moisture and odours are not trapped inside.
■ Remove the Plug
Before cleaning or performing maintenance, always remove the plug from the socket.
■ No Solvents or Abrasive Cleaning
Toclean the exterior and rubber parts of the dishwasher, do not use solvents or abrasive cleaning products. Only use a cloth with warm soapy water. To remove spots or stains from the surface of the interior, use a cloth dampened with water an a little vinegar, or a cleaning product made specifically for dishwashers.
■ When not in Use for a LongTime
It is recommend that you run a washcycle with the dishwasher empty and then remove the plug from the socket, turn off the water supply and leave the door of the appliance slightly open. This will help the door seals to last longer and prevent odours from forming within the appliance.
■ Moving the Appliance
If the appliance must be moved, try to keep it in the vertical position. If absolutely necessary, it can be positioned on its back.
Seals
One of the factor that cause odourstoform in the dishwasher is food that remains trapped in the seals. Periodic cleaning with a damp sponge will prevent this from occurring.
7. Installation instruction
Positioning the Appliance
Position the appliance in the desired location. The back should rest against the wall behind it, and the sides, along the adjacent cabinets or walls. The dishwasher is equipped with water supply and drain hoses that can be positioned either to the right or the left sides to facilitate proper installation.
Levelling the Appliance
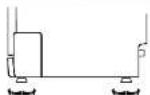
Once the appliance is positioned for levelling, the height of the dishwasher may be altered via adjustment of the screwing level of the feet. In any case, the appliance should not be inclined more than 2°.
About Power Connection
WARNING!
■ Improperconnectionoftheequipmentearthingconductorcanresultintheriskofan electricshock.
■ Checkwithaqualifiedelectricianorservicerepresentativelfyouareindoubtwhetherthe applianceisproperlyearthed.
■ Donotmodifytheplugprovidedwiththeappliance.Iftheplugdoesnotfitproperlytothe outlet,pleasehaveaqualifiedelectriciantoinstallaproperoutlet.
How to Connect the safety supply hose

The appliance must be connected to the water mains using new hose-sets. The old hose-sets should not be reused.
Waterpressure must be between 0.04 MPa and 1 MPa. If the pressure is below the minimum consult our Service Department for advice.
1 Pull The safety supply hoses completely out from storage compartment located at rear of dishwasher.
2 Tighterthescrewsofthesafetysupplyhosetothefaucetwiththread3/4inch.
3 Turnwaterfullyonbeforestartingthedishwasher.
ABOUT THE SAFETY SUPPLY HOSE.
The safety supply hose consists of the double walls. The hose's system guarantees its intervention by blocking the flow of water in case of the supply hose breaking and when the air space between the supply hose itself and the outer corrugated hose is full of water.
▲WARNING!
A hose that attaches to a sink spray can burst if it is installed on the same water line as the dishwasher. If your sink has one, it is recommended that the hose be disconnected and the hole plugged.
How to Disconnect the safety supply hose
1 Turnofthewater.
2 Release the water pressure by depressing the pressure release button. This relieves water pressure and protects you, and the room, from severesplashing.


How to Drain Excess Water From Hoses
If the sink is 1000 higher from the floor, the excess water in hoses cannot be drained directly into the sink. It will be necessary to drain excesswater from hoses into a bowl or suitable container that is held outside and lower than the sink.
Water Outlet
Connect the water drain hose. The drain hose must be correctly fitted to avoid water leaks. Ensure that the water drain hose is not kinked or squashed.
ExtensionHose
If you need a drain hose extension, make sure to use a similar drain hose. It must be no longer than 4 metres; otherwise the cleaning effect of the dishwasher could be reduced.
SyphonConnection
The waste connection must be at a height of between 40 cm (minimum) and 100 cm (maximum) from the bottom of the dish. The water drain hose should be fixed by a hose clip. The free end of the hose must not be immersed in water.
Start of Dishwasher
8. Troubleshooting Tips
Before Calling for Service
Review the charts on the following pages may save you from calling for service.

| Problem | Possible Causes What To Do | |
| Dishwasher doesn't start | Fuseblown,orthe circuitbreakeracted | Replacefuseorresetcircuitbreaker.Removeanyother appliancessharingthesamecircuitwiththedishwasher |
| Powersupplyisnot turnedon | Makesurethedishwasheristurnedonandthedooris closedsecurely Makesurethepowercordisproperlypluggedintothewallsocket. | |
| Errorcode:E1; Waterpressureislow | Checkthatthewatersupplyisconnectedproperlyandthewateristurnedon. | |
| Doorofdishwasher nolproperlyclosed. | Makesuretoclosethedoorproperlyandlatchit. | |
| water not pumped form dishwasher | Kinkindrainhose | Checkdrainhose. |
| Filterclogged | Checkcoarsethefilter "Cleaning" (see filled) | |
| Kitchensinkclogged | Checkithekitchensinklornakesureltisdrainingwell. Iftheproblemisthekitchensinknotdraining,youmayneedaplumberratherthanaservicemanfordishwashers. | |
| Suds in the tub | Improperdetergent | Useonlythespecialdishwasherdetergentloavoidsuds.Ifthisoccurs,openedlishwasherandletsudsevaporate.Add1gallonofcoldwatertothetub.Closeandlatchthedishwasher,thenStartthe"soak"washcyclelodrainoutthewater.Repeatifnecessary. |
| Spilledrinse-aid | Alwayswipeuprinse-aidspillsimmediately. | |
| Stained tub interior | Detergentwith colourantwasused | Makesurethatthedetergentistheonewithout colourant. |
| White film on | Hardwaterminerals | Tocleantheinterior,useadampspongewith |

Unsatis -factory washing result
Unsatis-factory drying result
| Problem | Possible Causes | What To Do |
| The dishes are not clean | Thedisheswerenot loadedcorrectly. | Seenotesin"LoadingtheDishwasherBaskets". |
| Theprogrammewas notpowerfulenough. | Selectamoreintensiveprogramme.See"WashCycleTable." | |
| Notenoughdetergent wasdispensed. | Usernoredetergent,orchangeyourdetergent. | |
| Itemsareblocking thepathofspayarms.r | Rearrangetheitemssothatthespaycanrotatefreely.r | |
| Thefiltercombination in the base of wash cabinetisnotcleanor isnotcorrectlyfitted. Thismaycause thespayarmjets togetblocked. | Cleanand/orfitthefiltercombinationcorrectly.Cleanthespayarmjets.See"CleaningtheSpray Arms". | |
| Cloudiness on glassware | Combinationofsoft waterandtoomuch detergent. | Uselessdetergentifyouhavesoftwaterandselect ashortestcycletowashthoglasswareandtoget themclean. |
| Black or gray marks on dishes | Aluminumutensils haverubbedagainst dishes. | Useamilidabraslvecleanertoeliminatethosemarks. |
| Detergent left in dispenser cups | Dishesblock detergentcups. | Re-loadingthedishesproperly. |
| The dishes are not drying | Improperloading | Loacthedishwasherassuggestedinthedirections. |
| Toolittlerinse-aid | Increasetheamountofrinse-aid/refiltherinse-aid dispenser. | |
| Dishesareremoved toosoon | Donotemptyyourdishwasherimmediatelyafter washing.Openthedoorslightlysothatthesteamcan escape.Beginunloadingthedishwasheronlyoncet hedishesarebarelywarmtothetouch.Emptythelow basketfirst.Thispreventswaterformdroppingoff dishesIntheupperbasket. | |
| Wrongprogram hasheanselected | Inshortprogramthewashingtemperatureislower.Thisleolnowerecleaningperformance Choose |
Technical Information

WARRANTY
1.1 In this warranty:
1.1.1 Australian Consumer Law means the law as set out in Schedule 2 of the Competition and Consumer Act 2010:
1.1.2 Company means GSM Sales Pty Ltd ABN 53 007 682 475 of 142-144 Fullarton Road, Rose Park SA 5067 Email admin@gsmsales.com.au; \$XVI = RUI1 =
1.1.3 Consumer means a "consumer" as that term is defined in Section 3 of the Australian Consumer as the original purchaser of a Bellini product;
1.1.4 Consumer Guarantees means the guarantees under the Australian Consumer Law;
1.1.5 You means the Consumer.
1.2 Nothing in this warranty affects any person's rights under the Australian Consumer Law. The benefits to any Consumer under this warranty are in addition to the rights and remedies available under any Consumer Guarantees.
1.3 Subject to the other clauses of this warranty, the Company warrants to the Consumer that the Bellini product will be free of manufacturing defects and will perform to the Company's specifications.
1.4 The benefit of this warranty extends only to the Consumer as original purchaser of a Bellini product which is installed in a residential property.
1.5 This warranty commences on the date of purchase of the Bellini product by the Consumer and continues for the benefit only of the Consumer until the expiry of two (2) years (Warranty Period).
1.6 If within the Warranty Period a manufacturing defect is discovered in the Bellini product or it fails to perform to the Company's specifications as a result of some defect in materials, components or workmanship (Defect) then the Company will, at its option, repair the Bellini product or supply a replacement Bellini product free of charge. A replacement Bellini product may differ from the original product purchased by the Consumer.
1.7 This warranty will not apply to any Bellini product:
1.7.1 Installed by any person other than a qualified tradesperson; or
170.011.11.
1.8 You must provide proof of your purchase of the Bellini product and the date of purchase in order to obtain the benefit of this warranty.
1.9 If you live outside the service area of the Company or one of its service agents, this warranty does not cover the cost of transport of the Bellini product for service nor the service agent's traveling costs to and from your home.
1.10 If you are required to transport the Bellini product to the Company or its service agent, you must ensure it is safely disconnected by a qualified tradesman and securely packed and insured. The Company does not accept any responsibility for loss or damage of the Bellini product prior to it being received by the Company or its service agent.
1.11 You will be responsible for all costs of returning a Bellini product to the Company and for redelivery of the Bellini product by the Company (whether it is the original or a repaired and/or a replacement Bellini product) and for any other expenses you incur in claiming under this warranty.
1.12 The Company or its service agent will examine any Bellini product and if the Company determines that it is defective through no fault of the Owner and is otherwise undamaged, the Company will repair or replace the Bellini product in accordance with this warranty.
DO NOT SEND IN THIS WARRANTY
Fill out the following details and file with your purchase invoice.
RETAIN & FILE WITH YOUR RECEIPT
Your Purchase Receipt/Invoice is proof of date of purchase. If you are unable to establish the date of purchase, or if the fault is not covered by this warranty, or if the product is found to be in working order, you will be required to bear all service call charges.
GSM Sales Pty Ltd reserves the right to discontinue items, modify designs and change specifications without incurring obligation.
Whilst every effort is made to ensure that descriptions, specifications and other information in this publication is correct, no warranty is given in respect thereof and the company shall not be liable for any errors therein.


- 45cm Dishwasher
- Quick operation guide
- Read this Manual
- DearCustomer.
- Before Calling for Service
- IMPORTANT SAFETY INFORMATION READ ALL OF THE INSTRUCTIONS BEFORE USING
- GROUNDING INSTRUCTIONS
- ▲WARNING!
- WARNING! PROPER USE
- Operation Instruction
- 3.Prior using for the first time
- Fill the Rinse Aid Dispenser
- RinseAidDispenser
- FunctionofRinseAid
- Attention!
- When to Refill the Rinse Aid Dispenser
- Adjusting Rinse Aid Dispenser
- NOTE:
- Function of Detergent
- Detergents
- Concentrated Detergent
- AmountofDetergenttoUse
- ▲ WARNING!
- Fillin Detergent
- Loading the Dishwasher Baskets
- Recommendation
- For washing in the dishwasher the following cutlery/dishes
- Arenotsuitable
- Are of limited suitability
- Attention before or after loading the Dishwasher Baskets
- Loading the Upper Basket
- Loading the Lower Basket
- Adjusting the Upper Basket
- Folding Spikes of Lower Basket
- Cutlery Basket
- Starting a washing program
- Turning On the Appliance
- Starting a cycle wash
- Change the Program...
- Premise:
- Forgot to Add a Dish?
- Maintenance and Cleaning
- Filtering System
- Mainfilter 1
- Coarsefilter 2
- Finefilter 3
- Filterassembly
- WARNING!
- Remarks:
- Cleaning the Filter
- Caring for the Dishwasher
- Cleaning The Door
- How to Keep Your Dishwasher in Shape
- ■ After Every Wash
- ■ Remove the Plug
- ■ No Solvents or Abrasive Cleaning
- ■ When not in Use for a LongTime
- ■ Moving the Appliance
- Seals
- Installation instruction
- Positioning the Appliance
- Levelling the Appliance
- About Power Connection
- How to Connect the safety supply hose
- ABOUT THE SAFETY SUPPLY HOSE.
- How to Disconnect the safety supply hose
- How to Drain Excess Water From Hoses
- Water Outlet
- ExtensionHose
- SyphonConnection
- Start of Dishwasher
- Troubleshooting Tips
- Technical Information
- WARRANTY
- DO NOT SEND IN THIS WARRANTY
- RETAIN & FILE WITH YOUR RECEIPT
Brand : Bellini
Model : BDW86S-F
Category : Dishwasher