Portable USB Turntable BV-T002 - Portable turntable Bauhn - Free user manual and instructions
Find the device manual for free Portable USB Turntable BV-T002 Bauhn in PDF.


| Product Name | Portable USB Turntable |
| Brand | Bauhn |
| Model | BV-T002 |
| Type | Portable turntable with USB and Bluetooth? No, only USB |
| Power Supply | AC adapter 5V 1.2A (provided) |
| Speed Settings | 33 1/3, 45, 78 RPM |
| Built-in Speakers | 2 x 3W |
| Output Interfaces | RCA jacks (left/right), headphone jack (3.5mm), USB port |
| Input Interfaces | AUX input jack (3.5mm) |
| USB Recording | Converts vinyl or AUX to MP3 on USB flash drive |
| Stylus Replacement Interval | Every 50-60 hours of play |
| Auto Stop | Yes, switchable ON/OFF |
| Headphone Jack | Yes, 3.5mm |
| Carry Case | Included with handle and lock |
| Package Contents | Turntable, 45 RPM adaptor, power adaptor |
| Safety Features | FCC compliant, do not immerse in water |
| Mode Selection | Turntable, USB, AUX (via MODE button) |
| LED Indicator | Red (USB), Blue (Turntable), Purple (AUX), Flashing when recording |
| Platter Material | Not specified, assumed standard |
| Dimensions | Not specified |
| Weight | Not specified |
Frequently Asked Questions - Portable USB Turntable BV-T002 Bauhn
User questions about Portable USB Turntable BV-T002 Bauhn
0 question about this device. Answer the ones you know or ask your own.
Ask a new question about this device
Download the instructions for your Portable turntable in PDF format for free! Find your manual Portable USB Turntable BV-T002 - Bauhn and take your electronic device back in hand. On this page are published all the documents necessary for the use of your device. Portable USB Turntable BV-T002 by Bauhn.
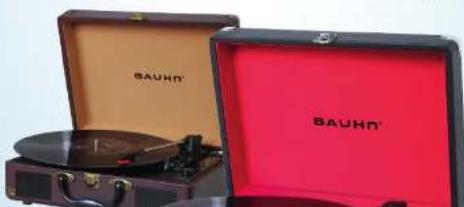
USER MANUAL Portable USB Turntable BV-T002 Bauhn
EFFORTLESS TECHNOLOGY
PORTABLE USB
TURNTABLE
XXXXXXXXXXXX
English.....03
Español ..... xx
Contents
Important safeguards....3
Items in this package ....4
Specifications ....4
Product description 5
Initial setup 6
Essential setup 6
Stereo system connection 6
Aux input connection....6
Turntable operation....6
Platter auto-stop....7
LED indicator....7
Converting records or AUX IN signals to USB ....7
Using headphones 8
Maintenance....8
Cleaning 8
Stylus replacement....9
Transport 9
Responsible disposal 9
FCC statement 10
Important safeguards
Important safeguards
READ ALL INSTRUCTIONS
Read this user manual thoroughly before first use, even if you are familiar with this type of product. Keep the user manual in a safe place for future reference, along with the completed warranty card, purchase receipt and carton. If applicable, pass these instructions on to the next owner of the appliance. The safety precautions enclosed herein reduce the risk of fire, electric shock and injury when correctly adhered to:
- Only use the appliance as described in this user manual. Any other use is not recommended and may cause fire, electric shock or injury. This appliance is intended for domestic use only and not intended for commercial use.
- Improper installation and the use of accessories not recommended by the appliance manufacturer may result in fire, electric shock or personal injury and will invalidate your warranty. We assume no responsibility for any eventual damages caused by improper or faulty use.
- This appliance should be operated only by the type of power source indicated on the marking label or in this user manual.
- Do not overload wall outlets, extension cords, or integral convenience receptacles as this can result in a risk of fire or electric shock.
- To protect against fire and electric shock, do not immerse the cord, plug, or the appliance itself in water or other liquid. Do not expose the electrical connections to water. Make sure all electrical connections are clean and dry before switching on.
- The cord should be run in such a way that there will be no risk of anyone pulling it inadvertently or tripping over it.
- Do not kink, bend, squash, strain or damage the power cord and protect it from sharp edges and heat. Do not let the cord touch hot surfaces.
- Do not operate the appliance if the power supply cord or plug has been damaged or malfunctioned in any way. A damaged cord or plug must be replaced by the manufacturer or a qualified person in order to avoid a hazard. In case of damage, contact the after sales support line for advice.
- Unplug the appliance from the power outlet when not in use and before cleaning, servicing, maintenance or moving the appliance.
- This appliance is not intended to be operated by means of an external timer or separate remote control system.
- There are no user-serviceable parts inside. Do not attempt to service this product. Please call our after sales support for instructions.
- Children should be supervised to ensure they do not play with the appliance.
- Always carry/hold the appliance by its handle. Never carry this appliance by the power cord.
- Treat your cartridge and stylus with care. The stylus in particular is delicate. No
Items in this package
Items in this package
- Unpack the turntable but keep all packaging materials until you have made sure your new turntable and its accessories are undamaged and in good working order.
Warning: Plastic wrapping can be a suffocation hazard for babies and young children, so ensure all packaging materials are out of their reach.
-
Make sure you find the following items in the package:
-
Turntable
- 45 RPM adaptor
- Power adaptor
Specifications
Power supply: AC adapter 5 V 1.2 A (provided)
Speed: 33 1/3, 45 or 78 RPM
Speaker: 2×3 W speakers
Design and specifications are subject to change without notice.
Product description
Product description

-
Turntable
-
Record spindle
3.45 RPM adaptor
-
Tone arm
-
Tone arm lever
-
AUX input jack
-
LED indicator
-
USB port
-
PLAY/REC button
-
Speed control switch
-
MODE button
-
Auto stop switch
-
STOP button
-
Power ON/OFF / Volume control dial
-
Hold down clip
-
Stylus cartridge
-
Built-in speaker
-
Carry case lock
-
Carry case handle
-
DC input jack
Initial setup
Initial setup
Essential setup
-
Place the turntable on a flat and level surface which is free from vibration.
-
Remove the tie-wrap that is holding the tone arm 4
- Plug the connector end of the DC adaptor cable into the DC input jack 22 on the back of the turntable.
- Plug the DC adaptor into an appropriate wall outlet. The turntable is now ready for use.
Stereo system connection
The RCA jacks 24 can be directly connected with a pair of active/powered speakers or the input jacks of your stereo system. Make sure the red plug connects with the right channel and the white plug connects with the left channel.
Aux input connection
To play music from your audio device through the turntable's speakers, connect an audio cable (3.5 mm, not provided) between your audio device and the AUX input jack 6 of the turntable.
Turntable operation
- Open the turntable carry case and place the record of your choice onto the turntable 1.
If required, place the 45 RPM adaptor 3 on the record spindle. - Rotate the power ON/OFF dial 16 clockwise to turn on the power.
- Choose the desired playing speed (33 1/3, 45 or 78 RPM) using the speed control switch 10.
- Remove the protective cap from the stylus cartridge 18 by gently pulling it towards the front of the turntable.
- Release the tone arm 4 from the arm rest by releasing the hold down clip 17
- Use the tone arm lever 5 to lift up the tone arm.
- Gently move the tone arm over the record where play is desired to begin.
- Set the tone arm lever back to the down position. The tone arm will lower slowly onto the second and begin to play.
LED indicator
- Replace the protective cap on the stylus cartridge and close the hold down clip.
- Rotate the power on/off dial anti-clockwise to the OFF position to switch off the turntable.
Platter auto-stop
If the auto stop switch 14 is set to the ON position, the platter will stop spinning automatically when the record plays to the end. If the platter stops playing before the end of the record, set the auto stop switch to the OFF position. This will ensure the record plays to the end.
LED indicator
You can select among three operation modes (Turntable, USB and AUX in) with the MODE button 13. Refer to the LED indicator 7 for the selected mode.
| LED Indicator Mode | |
| Red USB | |
| Blue Turntable | |
| Purple AUX IN | |
| Blue (flashing) Converting record tracks to USB flash drive | |
| Purple (flashing) Converting AUX IN signals to USB flash drive | |
Converting records or AUX IN signals to USB
You can convert the tracks on a record or music on other audio devices (connected to the AUX input jack) into MP3 format and save the files on a USB flash drive.
NOTE: The analog recording is viewed as a single track, even if the original medium contains several tracks. If you want to sub-divide the recording into individual tracks, stop the recording after each track and start a new recording for the next track. A "music" directory is created in which the files are saved in numerical order.
- Insert a USB flash drive (not provided) into the USB port 8
- Place a record on the turntable.
For AUX IN recording, connect the audio device to the AUX input jack 6 with an audio cable (3.5 mm, not provided). Then press the MODE button 13 to select the AUX IN mode. The LED indicator 7 turns purple. - Press and hold the PLAY/REC button 9 to start the recording. The LED indicator flashes slowly.
Using headphones
- To listen to your recordings, press the MODE button until the LED indicator turns red.
The turntable is now in the USB mode.
7. Press the PLAY/REC button to start the playback from the USB flash drive.
8. Press the STOP button to stop the playback.
Using headphones
Connect headphones (not provided) to the headphone jack 23 for private listening.
WARNING: Do not adjust the headphone volume too high. There is danger of hearing impairment.
Maintenance
WARNING:
- Avoid the use of chemical solutions and cleaning products because these may damage the device surface or markings.
- Do not immerse the turntable or the power cord in water or other liquids. DO NOT allow any moisture or liquid to enter the turntable. Never rinse the turntable with water.
- Do not use hard, scouring or abrasive cleaners to clean the carry case.
- Never clean records and the stylus cartridge with normal cleaning cloth or unsuitable cleaning agents.
- Do not touch the stylus tip with your fingers. Avoid bumping the stylus on the turntable mat or a record's edge.
Cleaning
- Switch off and unplug the turntable from the power outlet before cleaning.
- Only wipe the body of the turntable with a soft, dry cloth.
- If dust has collected on the stylus cartridge 18, remove it with a suitable soft brush. Dust the stylus from time to time using a very soft brush dipped in alcohol (brushing from back to front of the cartridge).
- Clean your records with an anti-static cloth to gain maximum enjoyment from them and to make them last. Cleaning brushes and cloths for records are available in specialty retail shops.
Transport
Stylus replacement
For best quality performance, your stylus (needle) should be replaced periodically (approximately every 50–60 hours of play time). Replacement of stylus is also recommended as soon as you notice a deterioration of sound quality. Use of a worn out stylus may damage your records.
WARNING: If not done correctly, separating the stylus assembly from the cartridge can cause damage to the cartridge. Use only identical replacement parts. Never directly touch the stylus during replacement.
- Lock the tone arm and remove the protective cap from the stylus cartridge 18 L
- Hold the bottom of the stylus cartridge and push down on the top edge of the stylus assembly to detach it (see Fig. 1).
- Carefully remove the stylus assembly from the cartridge (see Fig. 2).
- Hold the front tip of the new stylus assembly and insert its rear edge on the cartridge (see Fig. 3).
- Carefully and gently push the tone arm and the stylus assembly together (see Fig. 4).
The new stylus is now ready for use (see Fig. 5).




Transport
Before transporting the turntable, always replace the protective cap on the stylus cartridge 18 and lock the tone arm 4 with the hold down clip 17.
Responsible disposal
At the end of its working life, do not throw this device out with your household trash. Electrical and electronic products contain substances that can have a detrimental effect on the environment and human health if disposed of inappropriately. Observe any local regulations regarding the disposal of electric products and dispose of it appropriately for recycling. Contact your local authorities for advice on disposal recycling facilities in your area.
FCC statement
FCC statement
This device complies with Part 15 of the FCC Rules. Operation is subject to the following two conditions: (1) this device may not cause harmful interference, and (2) this device must accept any interference received, including interference that may cause undesired operation.
WARNING! Changes or modifications to this unit not expressly approved by the party responsible for compliance could void the user's authority to operate the equipment.
NOTE: This equipment has been tested and found to comply with the limits for a Class B digital device, pursuant to Part 15 of the FCC Rules. These limits are designed to provide reasonable protection against harmful interference in a residential installation. This equipment generates uses and can radiate radio frequency energy and, if not installed and used in accordance with the instructions, may cause harmful interference to radio communications.
However, there is no guarantee that interference will not occur in a particular installation. If this equipment does cause harmful interference to radio or television reception, which can be determined by turning the equipment off and on, the user is encouraged to try to correct the interference by one or more of the following measures:
- Reorient or relocate the receiving antenna.
- Increase the separation between the equipment and receiver.
- Connect the equipment into an outlet on a circuit different from that to which the receiver is connected.
- Consult the dealer or an experienced radio/TV technician for help.
USA
DISTRIBUTED BY • DISTRIBUIDO POR:
ALDI INC., BATAVIA, IL 60510
WWW.ALDI.US
AFTER SALES SUPPORT •
CEBUTIN PACVENTA
53557

- PORTABLE USB
- TURNTABLE
- CONTENTS
- IMPORTANT SAFEGUARDS
- READ ALL INSTRUCTIONS
- ITEMS IN THIS PACKAGE
- SPECIFICATIONS
- INITIAL SETUP
- ESSENTIAL SETUP
- STEREO SYSTEM CONNECTION
- AUX INPUT CONNECTION
- TURNTABLE OPERATION
- PLATTER AUTO-STOP
- LED INDICATOR
- CONVERTING RECORDS OR AUX IN SIGNALS TO USB
- USING HEADPHONES
- MAINTENANCE
- WARNING
- CLEANING
- STYLUS REPLACEMENT
- TRANSPORT
- RESPONSIBLE DISPOSAL
- FCC STATEMENT
Brand : Bauhn
Model : Portable USB Turntable BV-T002
Category : Portable turntable