
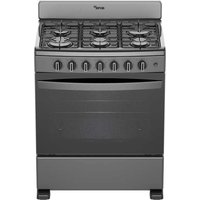
AF5431B - Cooker Acros - Free user manual and instructions
Find the device manual for free AF5431B Acros in PDF.


| Product Type | Freestanding Gas Range |
| Brand | Acros |
| Model | AF5431B |
| Fuel Type | LP Gas (convertible to Natural Gas with conversion kit) |
| Ignition System | Electronic ignition with manual backup |
| Oven Type | Gas oven with thermal control or thermostat (depending on model) |
| Oven Temperature Range | 120°C – 250°C (approximately) |
| Cooktop Burners | Standard aluminum burners and super burner (on some models) |
| Griddle | Enamel steel or non-stick griddle included (varies by model) |
| Width | 30 inches (76.2 cm) |
| Electrical Requirements | 105 – 140 V~, 60 Hz, grounded outlet |
| Operating LP Gas Pressure | 2.75 kPa (27.5 mbar) |
| Operating Natural Gas Pressure | 1.76 kPa (17.6 mbar) |
| Gas Hose Length | Maximum 1.25 m |
| Weight | Approximately 70 kg (estimated) |
| Number of Oven Rack Positions | 5 |
| Oven Light | 40 W appliance bulb |
| Safety Features | Gas leak detection instructions, anti-tip recommendation, electrical grounding |
| Warranty | 1 year (limited), spare parts available for 5 years in select countries |
| Cleaning Recommendations | Soap and water; avoid abrasive cleaners; clean burner caps and grates regularly |
Frequently Asked Questions - AF5431B Acros
User questions about AF5431B Acros
0 question about this device. Answer the ones you know or ask your own.
Ask a new question about this device
Download the instructions for your Cooker in PDF format for free! Find your manual AF5431B - Acros and take your electronic device back in hand. On this page are published all the documents necessary for the use of your device. AF5431B by Acros.
USER MANUAL AF5431B Acros
STM W11283004 Rev. A No. Parte W11282974 Rev. A
ESTUFAS A GAS 30"
| Range safety | 24 |
| Electrical Specifications for Power Supply | 24 |
| Range installation | 24 |
| Recommendations | 25 |
| Location Requirements | 25 |
| Gas Supply Requirements | 26 |
| Connect the Gas Supply Line | 26 |
| Electrical Requirements | 29 |
| Accessories Installation | 29 |
natural_image
Close-up of a hand using a screwdriver to adjust or install a component inside a storage unit (no visible text or symbols)
natural_image
Close-up of a mechanical assembly with a metallic component and tool, no visible text or symbols
natural_image
Close-up of hands operating a cylindrical mechanical component with a flange (no visible text or symbols)IMPORTANTE
natural_image
Two-panel image showing hands performing a manual valve installation or repair procedure (no visible text or symbols)RECOMENDACIONES:
natural_image
Close-up of a mechanical device with internal components and a directional arrow (no visible text or symbols)
Congratulations for your new appliance!
You just purchased a new appliance, designed and manufactured following the most advanced techniques, Whirlpool guaranteed!
We strongly recommend you to read the instructions on this manual before using your range. Please keep this literature in a safe place for further reference; it will help you to keep your range in good conditions for years.
Range safety
Your safety and the safety of others are very important.
We have provided many important safety messages in this manual and your appliance. Always read and obey all safety messages.

This is the safety alert symbol.
This symbol alerts you to potential hazards that can kill or hurt you and others.

DANGER

WARNING
All safety messages will follow the safety alert symbol and either the word "DANGER" or "WARNING". These words mean:
You can killed or seriously injured if you don't immediately follow instructions. You can be killed or seriously injured if you don't follow instructions.
All safety messages will tell you what the potential hazard is, tell you how to reduce the chance of injury, and tell you what can happen if the instructions are not followed.
Don't store gasoline or other flammable liquids close from your appliance.
Do not block the openings of the oven rack
Do not use your range to warm rooms, because this is dangerous.
Don't install your range over a carpet or any flammable material. If the ground under the range is synthetic, make sure it withstand at least 95^ without damage.
For your safety: If you smell gas
Open the windows.
Don't touch the electrical switches.
Turn off all flames by turning of the valve of the gas supply line.
Contact your gas supply provider company immediately.
Don't use your range to warm up the room, it's dangerous.
Check the local regulations. Make sure there is power supply available. See section Electrical Requirements. ALL ELECTRICAL WORK MUST BE DONE BY A QUALIFIED ELECTRICIAN.
Recommendations
- It's the installer's responsibility to fulfill with the spaces specified in this manual.
- The location of the range should be away from the elements and over a flat resistant surface.
- Don't install your range over a carpet or any flammable material. If the ground under the range is synthetic, make sure it withstand at least 95°C without damage.
-
Keep the areas surrounding the range free from gasoline and other flammable liquids and vapors.
-
Don't get to close from the flames on the burners, don't use loose clothing when operating the cooktop.
- Provide the correct maintenance to the appliance.
- Use this range for household use only, this is not a commercial appliance.
- If you need to move your range, don't lift or take it from the handles. Always open the oven door, lift from the upper part of the cavity and move.
WARNING
Risk of Injury due to Overweight
Use two or more people to move and install your product. Failure to do so may cause damage to your spine or injured.
"THIS APPLIANCE SHOULD NOT BE INSTALLED IN BATHROOMS OR BEDROOMS"
Installation
- Remove the adhesive tape and packaging materials.
- Identify and separate all the parts of the appliance.
-
The best location for your new range should be in a place protected from wind flow and with enough space to open the door oven.
-
Don't install cabinets or other furniture over the range.
- If hood will be installed, make sure it is at least 61 cm from the range.
- If the range has accessories that need a power supply, make sure the installation is close from a wall outlet.
Location Requirements
Minimum spaces for installation (these spaces should be followed)

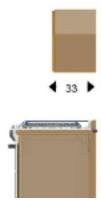
Gas Supply Requirements
- This stove is prepared to work with a moving LP gas tank or a fixed LP gas tank.
- To use your stove with natural gas you should contact Whirlpool Service to change the nozzle and make the necessary adjustments. See the "Service" section in page 31.
- The qualified technician should make the conversion on the nozzles of each cooktop burner; the technician must test the connection and the gas pressure in the oven, the values should be like the following:
OPERATING LP GAS PRESSURE
2.75 kPa; 2750 Pa; 27.5 mbar; 28 cm WATER COLUMN
OPERATING NATURAL GAS PRESSURE
1.76 kPa; 1760 Pa; 17.6 mbar; 18 cm WATER COLUMN
NOTE: The gas type used for this range is LP. If you wish to use Natural gas with this range you will need a conversion kit according to the following table. This kit can be ordered from the Authorized Whirlpool Solution Center. If you don't follow these indications your stove will generate soot and will require cleaning service which is not covered by the warranty of this product.
| Modelo Kit de Gas LP à Gas Natural | |
| LAF5431- LAF5333 | W10613659 |
| LAF7701 - LAF5572 | W10873425 |
| LAF6272 - LAF5372 | W10873377 |
Connection
GAS SUPPLY
INSTALLATION USING LP GAS FROM A CYLINDER
IMPORTANT:
• This stove is prepared to work with LP gas.
- Before the installation, make sure that local gas distribution conditions (Nature of gas and pressure) and technical specifications of this range are compatible.
• The technical specifications for this range are on the identification label on the back of this product.
• The area where the stove will be installed, should provide the correct ventilation conditions required by local regulations.
• This range is set to be installed on a location between 0 to 3800 meters above sea level.
• The gas hose should not get in contact with the back of the stove.
• The flexible PVC hose (reinforced polyester, ^3/8^ ) for gas must withstand temperatures above 120°C and must be
- The flexible PVC hose (reinforced polyester, 3/8") for gas must withstand temperatures above 120°C and must be approved by the local regulations and be within the validity period.
Use the hose only for domestic use. Make sure the hose is resistant to abrasion and chemicals.
The hose must be replaced before the expiration date indicated by the supplier or at least before 5 years of use.
The gas hose should not cross behind the back of the stove after installation.
The hose should be protected against direct exposition to sun light.
The hose shouldn't exceed a length of 1.25 m.
- Screwdriver
Installation procedure
-
Put one of the metal clamps on one of the ends of the hose and connect this end of the hose to the gas supply located on the part back of the range (Fig. 1).
-
Use a screwdriver to tighten the metallic clamp around the hose (Fig. 2).
-
Place the other bracket on the other end of the gas hose and connect the other end of the hose to valve in the gas cylinder. Tighten the metal bracket with the screwdriver (Fig. 3).

natural_image
Close-up of a gloved hand holding a medical device with a label (no readable text or symbols)
natural_image
Close-up of a hand using a screwdriver to adjust or install a server rack component (no visible text or symbols)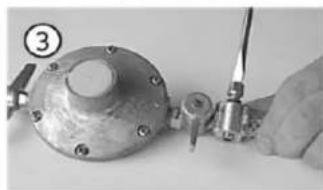
natural_image
Close-up of a hand using a tool to adjust or install a metallic mechanical component (no visible text or symbols)- It is not recommended to place the gas cylinder next to the range. In case of problems, consult your Whirlpool Service Center.
IMPORTANT: The installation must be performed by qualified personnel.
INSTALLATION USING NATURAL GAS or LP GAS FROM A PIPE LINE
IMPORTANT:
• This stove is prepared to work with LP gas.
• The technical specifications for this range are on the identification label on the back of this product.
• In order to connect this range to Natural gas or LP gas, it is necessary that the gas supply valve it's located behind
the range and use the correct installation materials, approved by the local regulations.
- The operations to convert your range to Natural Gas or LP gas from a pipe line must be performed by a qualified installer from the Whirlpool Service Center.
RECOMMENDATIONS
- After the gas supply has been installed, check that there is no leakage by applying soapy water to all connections and joints of the hose and pipes. If you see bubbles coming out, the installation was not carried out correctly and must be installed again.
• The hose or pide should not be bent, tense or too close to heat sources. - If the installation it's not new, clean the pipes to prevent the range nozzles from clogging.
- To facilitate the movement of the appliance, the installer should make a coil with the flexible copper piping and install a shutoff valve in the supply line. The valve should be installed separate from the range and accessible for whoever is operating the range.
This valve must be outside of the range and accessible for the people using the appliance.
IMPORTANT
- After finishing the range conversion, the installer must tape a plate indicating the new conditions of the gas supply for the appliance.
WARNING
Explosion Hazard
Electrical Requirements
- If the range has accessories that need a power supply, make sure the installation is close from a wall outlet.
- The plug has to be connected to a power supply of 105 - 140 V \~. Make sure the installation is properly grounded.
- When the gas installation is done, connect the range to the electric supply.
WARNING
Electrical Shock Hazard
Do not use an extension cord.
Don't use the product without ground prong.
Don't use universal plugs.
Unplug the power supply before giving maintenance.
Do not remove ground prong.
Failure to follow these instructions can result in death, fire, or electrical shock.

Accessory Installation
Installation of back panel (in some models.)
If your appliance is equipped with a back panel, follow these steps for installation:

The supporting bracket should be in this position for a correct installation on the back panel.
A. Butterfly nuts
B. Screws
C. Screws
D. Supporting brackets
- Remove the packaging materials from the back panel of the range.
- You will find 2 bolts and a bag with the installation (2 screws with 2 butterfly nuts and 4 standard screws) taped to the back of the back panel.
- Put the back panel over the cooktop, slide it until the back end, check the screw holes of the panel and the cooktop are aligned.
- Put the 2 screws (B) with the 2 butterfly nuts (A) following the image above.


- Once you have finished the test, turn off all the burners.
If for any burner the flame doesn't light up after 5 seconds or you can't hear the click of the spark, follow these steps:
a) Turn the knob back to the OFF position (release the electronic ignition button if your range is equipped with this button).
b) Make sure the range is connected to the power supply. The electronic ignition system won't work if the range is unplugged.
c) Make sure the gas supply line is open (tank or shutoff valve).
Check the gas lines are not kinked, bended or damaged) Repeat steps 1 or 2 depending the cause of the failure.
Even when the power is down, the burners can still be lighted up. For this case, follow these steps:
- Light up a match and hold it close from the burner that you want to use.
- Turn the knob to the Hi position (maximum flame), the flame should light up.
Oven burner
Depending on the model, your range may have an oven burner controlled by a thermal control (thermal grades) or by a thermostat.

The oven knob can be found with the symbol
The model with thermal control should have the following settings around the knob: from 120°C - 149°C up to 235°C - 250°C.
If the range is equipped with manual or electronic ignition, depending on the model, the settings around the knob will go from 150°C to 250°C.
To test the burner, follow these steps:
Model with thermal control or thermostat with manual control. (in some models).
-
Open the oven door.
-
Light up a match and hold it close from the oven burner.
- Push and turn the oven knob to its original or desired temperature 235°C-250°C, for thermostat models set to 150°C.
- Close the oven door and open the grill door. The flame should flow from all over the openings on the burner. Normally the flame should look blue, steady and 1 cm tall. Otherwise see the section "Flame Adjustment", "Oven Burner Flame".
- After the oven burner checkup and adjustment of the flame, turn the knob to the off position.
- After all these steps your oven is ready for use.
If the flame doesn't light up check the following:
a) Turn the knob to the off position (initial position) and make sure the gas supply valve is open. Check the gas piping looking for
Kinks of other damage on the line
(b) Respect the procedure from step 2
Adjusting the flames
Flame on cooktop burners
When converting your range from LP gas to Natural gas, you will
need to adjust some components to get the best performance from
your appliance.
The values with solid and (see images on the right) have to be
Solid rod

B
A. Shelf
B. Bumer opening
Oven Burner Flame
The different altitudes from the sea level, the variations on the gas supply line and the type gas conversion may cause the need to adjust the primary air intake in the oven burner for an adequate air-gas blend, and therefore a better performance of the burner.
The oven burner flame should be blue colored and steady, follow these steps to adjust the flame:
-
Check the range is cold and all the cooktop burners are in the OFF position.
-
Unplug the range or turn off the power supply. Remove the shelf on the bottom of the oven. Grab the shelf from both sides on the back part (see image below), pull out and remove.
-
Locate the screw that holds the burner to the frontal range chassis and use a small flat screwdriver to remove it. Place the screw in a safe place.
-
Hold the burner and pull it off to release the back part from the nozzle, try not to pull the pigtail on the back if your range is equipped with electronic ignition.
-
To adjust the air, loose the air regulator screw located behind the burner and turn to open or close the air window (see image).
-
If the flame is yellow you need to open the window. When the flame is noisy or levitates our of the burner you need to slightly close the window.
-
When the adjustment has been done, tighten the air regulator screw and set the burner to its original position, align with the nozzle on the back and make sure the pigtail is set to the back of the range.
-
Place the screw with the washer holding the frontal range frame and the burner. Tighten the screw.
-
Connect the power cable or turn on the power supply.
-
Turn on the burner again following the steps on section "Testing your Range", "Oven Burner". If the flame is steady and blue, the range is ready to use. Otherwise wait until the range is cold and return to step 3.
-
When the oven burner has been adjusted and placed inside the oven, replace the bottom shelf to its original location. Continue with the oven burner testing.
NOTE: Don't block the air outlet of the oven, don't wrap or cover the vents in the oven shelf.


A. Oven burner
B. Screw
C. Air regulator
Range Use
Cooktop Controls
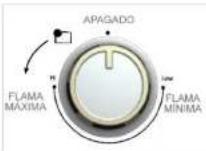
The electronic ignition burners turn on the outer burner automatically when the knob is turned to Hi (High flame). See "Testing your Range",
"Cooktop Burners".
Before turning ON one of the burners, place the cookware with food over the cooktop. Don't turn on a bumer with an empty cookware or without it.
To set the burner temperature:
-
Push and turn the knob to the left. The burners will click but only the active burner will turn on.
-
Turn the knob to any position between Hi (maximum flame) and Low (minimum flame) or Hi (maximum flame), Medium (medium flame) and (minimum flame). The click will stop.
Use this table to set the temperature levels.
| Setting Recommended use | |
| HI (max flame) | Start cooking food.Boil liquids. |
| MED (medium flame) | Keep a quick boiling.Deeply fry food. |

Opening on gas line
The gas should flow freely through the line gas opening for the burner to turn on correctly.
Keep this zone free of dirt and debris, avoid the entrance of spills, food, cleaning products or any other materials.
Always use the burner caps to protect the gas line from liquid spills.
Burner openings
A good flame should look blue, not yellow. Keep the openings free from dirt and debris, avoid the entrance of spills, food, cleaning products or any other materials.
- Don't block the combustion air flow and the vents around the borders or the burner grates.
- Don't cover your range with aluminum foil or other material that could affect the performance of your range.
Burner Types and Features:
Standard aluminum burner and super burner (in some models.)


A. Burner cap
B. Alignment tabs
C. Ignition spark
D. Burner base
E. Gas line opening
Griddle
Among the accessories included with your appliance you will find the griddle, the type of griddly may vary depending on the model of your range;
- The enamel steel / enamel non-stick griddle can be placed over the central burner or over any of the side burners.
BEFORE USING FOR THE FIRST TIME:
Wash the griddle with water and soap and dry. Put a coat of vegetable oil and clean the excess with a paper towel.
- Don't leave the griddle empty nearby the cooktop burners.
- Don't preheat the griddle. Damage can happen to the non-stick surface.
- The griddle shouldn't be used to cook, grill or in the microwave.
• To avoid splashing fat when cooking, use moderate oil and fat. - Don't cut meat or other food directly in the griddle, you could damage the non-stick coating.
- Avoid using metal utensils.
Oven Use
Cookware
For an even cooking, the hot air must be able to flow around the food.
Leave a 5 cm space around the cookware and the oven walls. Use this table as a reference:
Amount of cookware Location in the oven rack
- Centered in the rack
2 Side by side or slightly in zigzag.
3 or 4 In opposite corners of the rack. Make sure any dish is directly over another.
Oven knob
Model with thermal control or thermostat with manual control

Manual sliding
The oven has 5 different rack positions. There is a bump in the oven rails that stop the rack
from falling when they are slide out.
To change the position of the racks follow these steps:
-
Pull the oven rack out until the bump.
-
Lift the rack from the front.
-
Pull out again to release the rack.
-
Choose the new rack position.
-
Place the shelf and push it until the bump.
-
Lift the rack from the front.
-
Push the rack again until you can feel the back wall of the oven with the rack.
Your range is equipped with an oven light, this is a very important feature that allows you to
check the food without opening the door.
The oven light turns on when the light button is pressed next to the knob on the end.
To turn off the light, press the button again.
When the light bulb is blown, replace it following these steps:
- Unplug the range cable or disconnect the power supply.
- Remove the light bulb unscrew counterclockwise.
- Replace with a new especial 40 Watts light bulb for appliances.
- Reconnect the range or turn on the power supply.

Range Care and cleaning
Your range is designed and manufactured to last many years of service, however, it's very important to provide care and cleaning to keep your appliance in good conditions.
Care recommendations:
Follow these recommendations:
Cooktop
- Don't leave the burners of your cooktop ON for long periods of time.
- Don't put a lot of weight the grates on the cooktop with overloaded cookware. The maximum load is 20 kgs.
- Avoid dropping the grates over the cooktop, don't drop cookware over the grates.
Oven door
• Never use the oven door as a step to reach a cabinet or high locations, an accident may happen.
- Close the oven door gently, otherwise you could damage the oven sealings and therefore reduce the performance of the oven.
- Don't try to remove or disassemble the oven door for any reason.
- Don't allow the children to play around the range.
General cleaning
It's very important to keep your range clean to keep an optimum performance, follow these recommendations for cleaning;
- Before cleaning the range, make sure all the controls are in the off position and make sure the cooktop and oven are cold. Always follow the instructions of the cleaning products.
• Unless otherwise is noted, we recommend to use water, soap and a soft cloth or a sponge to clean the range. - Don't use caustic soda or cleaning products with this ingredient to clean the range. If you don't follow this direction, permanent
Cooktop burners
Before cleaning, make sure all the controls are off and the oven and cooktop are cold. Don't use oven cleaners, bleach or oxide removers.
Control knob
Cleaning method: • Damp cloth

- Do not use abrasive cleaners or steel wool.
- NOT immerse in water or soak knobs
- If for some reason there was a spill on the knobs, dry immediately with a dry and clean cloth.
Outer glass door
Cleaning method:
• Glass cleaner and paper towels or nonabrasive plastic scrubber.
- Apply the cleaner with a soft cloth or sponge, not directly on panel.
Control panel
Cleaning method:
• Product cleaner and a soft cloth or sponge.
- Apply to soft cloth or sponge, not directly on panel.
Do not use abrasive cleaners, steel wool pads, gritty washcloths or some paper towels as they may damage the panel.
Oven cavity
The walls and ceiling have a smooth coating oven for cleaning follow the suggested cleaning method.
Remove the pan from the oven, following these simple steps:
• Take the tray and pull up.
• After you pull and remove.
Cleaning method:
• Non-abrasive plastic scouring pad with soap and water.
- Clean as soon as cooktop to cool.
- Do not use commercial cleaners.
Oven racks
You can remove the grills for a better cleaning of these accessories.
Cleaning method:
• Non-abrasive plastic scouring pad and mildly abrasive liquid cleaner.
- Clean as soon cool grills.
Griddle
Cleaning method:
- Do not use abrasive materials, plastic or metal fibers to clean, use soapy water and a sponge.
Standard burner and super burner (in some models.)
To keep the cooktop burners fully functional, it's necessary to perform periodic cleaning or clean every time a liquid spills over the burner.
Follow these steps:
1. Remove the grates.
2. Remove the cap, the burner and wash with soapy water and a sponge. Rinse deeply and dry.


Troubleshooting
Before calling to Service, prove the solutions here suggested
| Problem | Check over | Solution |
| Nothing works | If wiring is properly connected and polarized energy supply | Connect to a properly grounded |
| Has blown a fuse in the house or tripped circuit breaker | Replace fuse or reconnect the circuit | |
| If there is gas in your home, check if other gas appliances that use work | Call your gas supplier | |
| If the stove is properly connected to the gas supply | See the operating instructions or contact an expert. | |
| Burners do not work | If there is gas in your home, check if other gas appliances that use work | Call your gas supplier |
| If clogged burner orifice | Remove the burners and See the operating instructions of burners. | |
| Burner flames are uneven, yellow and / or noisy | If you are properly positioned the burner caps | Check burner operation section. |
| Type of gas being used at home (LP Gas). | If not using LP gas, the conversion must be made, contact an authorized service technician. | |
| The burner makes popping | That is not the burner wet or cap. | Let it dry |
| The spark plug does not trigger | The heater is connected to a power source | Connect to properly grounded power |
| There sparking and will not turn | Call an authorized service | |
| Excessive heat around cookware on cooktop | The size of the cooking utensil | Check the location and size of pan. |
| The oven does not work or does not light | Cooking time and temperature selected | See recipe and preheat schedule. |
| Type of gas being used at home (LP Gas). | If not using LP gas, the conversion must be made, contact an authorized service technician. | |
| The heater is connected to a power source | Connect to a properly grounded | |
| The activation of the knob | See the operation section of oven | |
| The oven burner flames are uneven, yellow and / or noisy | Type of gas being used at home (LP Gas). | If not using LP gas, the conversion must be made, contact an authorized service technician. |
| The oven temperature is too high or too low | The calibration setting oven temperature | See the section "Adjust oven burner flame." |
Diagramas Eléctricos/ Wiring diagrams
Modelos/ Models: LAF5572 - LAF7701

— CERTIFIED MANUFACTURER SERVICE— WHIRLPOOL SERVICE
KitchenAid
MAYTAG
Whirlpool
acros
EVERYTHING YOU NEED WHEN YOU NEED IT THE MOST
Remember to read all the specifications of this use and care guide manual. Please contact us if you need assistant or service. We recommend you to have the followings items before making the call:
- Your invoice, receipt, or sealed guarantee will be necessary to claim your product guarantee.
- Model and serial number of your appliance, which can be located in the label of the product.
Contact:
CERTIFICATE OF WARRANTY
BIG APPLIANCES
WARRANTY VALID ONLY IN THE COUNTRY OF PURCHASE
IMPORTANT: For it to be used, this Certificate of Warranty must be submitted along with original purchase invoice of the warranted product. In Colombia, invoice will be required only where local laws so allow.
SUGGESTION: Please register your product through the different means of contact of our Customer Service Center in each country, indicated in section 6 of this Certificate of Warranty.
1. Manufacturer/Importer/Distributor/Warrantor:
For the purposes of this Certificate of Warranty, the Warrantor of warranted products will be:
In Argentina: Whirlpool Argentina S.R.L.; In Chile: Whirlpool Chile Ltda; in Colombia: Whirlpool Colombia S.A.S.; in Ecuador: Whirlpool Ecuador S.A.; in El Salvador: Whirlpool El Salvador S.A. de C.V.; in Guatemala: Whirlpool Guatemala S.A.; in Peru: Whirlpool Peru S.R.L.; in Puerto Rico: Whirlpool Corporation. In the countries mentioned above, the Warranty granted through this Certificate of Warranty is limited to products distributed and/or sold by the aforementioned entities, in the respective countries.
In the countries listed in section 6 below, except for Argentina, Chile, Colombia, Ecuador, El Salvador, Guatemala, Peru and Puerto Rico, this Warranty is not valid without the signature and seal of the applicable Distributor who, for the purposes hereof, shall be directly liable to the final consumer and therefore considered Warrantor.
2. Technical specifications, installation, use, maintenance and repair conditions:
Technical specifications for the correct identification of the product, for the adequate installation and operation thereof, conditions and specifications of use and repair, indications of the place where this warranty may be effected and the way in which the Warranty granted on this Certificate of Warranty – including any contacts required for the acquisition or purchase of legitimate parts – are detailed herein and in the applicable User Manual this document is an integral part of.
Warranty claims may be submitted personally and/or by telephone and/or by email to the Warrantor's Assistance Center.
3. Warranty validity conditions, extended warranty and Beneficiary/Holder rights
- The Beneficiary/Holder of the warranty contained in this Certificate of Warranty is entitled to demand Warrantor who in turn agrees to provide the Beneficiary/Holder, fee of charges, with the qualified labor and spare parts required to repair and have the warranted product in good operational conditions – the model and serial number of which are indicated In section 5 hereof and/or In the product label and/or in the User Manual included with the product this Certificate is an integral part of – any time the product requires intervention due to inconveniences or operating failure of the product or any part thereof and whenever the product fails under normal use conditions.
- The term of the warranty granted hereby shall be one (1) year commencing on the date final consumer originally purchased the warranted product. During such period, Warrantor shall ensure free repair of the product in the terms indicated above.
- Warrantor agrees to repair the warranted product in a thirty (30) working days, period commencing on the date repair claim is received, except for any occasional delay in spare part shipping, whenever such spare parts must be brought from overseas or in the event of a lack of supply and/or existence of such spare parts for reasons beyond Warrantor's control and in the event an applicable local regulation exists, the term stipulated therein shall apply. In any case, Beneficiary/Holder will be timely informed about any occasional delays that may affect the repair period of the warranted product.
- Beneficiary/Holder of the Warranty contained in this Certificate may assign such Warranty along with the warranted product during the term, in which case, Warrantor will only acknowledge the remaining warranty term to the new Beneficiary.
- The validity and effectiveness of the Warranty granted hereby are subject only to home use of the warranted product, in compliance with other conditions established under this Certificate and to the use of warranted product under normal conditions in accordance with the specifications, terms and conditions contained in the User Manual this Certificate of Warranty is part of.
CERTIFICATE OF WARRANTY BIG APPLIANCES
• Damages caused by strikes, falls, scratches and/or marks.
- Failure of light bulbs or lamps in products with interior lighting.
- Failure, damage and/or defects caused and/or resulting of the transportation and/or manipulation and/or intervention of technicians and/or person and/or any third party non authorized by Warrantor.
- General maintenance of product, use instruction or installation not derived from failure and/or not encompassed in repairs derived from warranty enforceability.
- Shipping/transportation and/or delivery costs incurred in order to have the Product repaired when such costs have not been authorized by Warrantor.
- Replacement of accessories that come with the product.
IMPORTANT WARNING: Whenever the warranted product is repaired and/or manipulated by technical service unauthorized by Warrantor or whenever such repair is made using unoriginal spare parts, this Warranty shall be void.
For gas powered appliances, this Warranty shall be void whenever the warranted product is not installed in accordance with currently applicable technical provisions, regulations and standards, including those applicable to the corresponding installation service provider and in compliance with the User Manual. Products must be installed by personnel legally qualified to install this type of products. It is the consumer's responsibility to verify that the company and/or the people directly hired to install gas powered appliances, have the credentials required under the applicable standards and regulations. Warrantor does not assume any responsibility for any direct and/or indirect personal and/or material damages to purchaser, consumer and/or third parties related to the warranted product as a consequence of neglecting the indications established in the User Manual of the product covered by the warranty that this Certificate of Warranty is an integral part of, and particularly derived from noncompliance with the applicable control standards and regulations regarding home facilities.
This Warranty does not constitute and shall not be construed as an extension or additional term to the terms and conditions of the product warranty legally established under local laws. This Warranty neither extends nor grants to the Beneficiary/Holder thereof any rights other than those expressly indicated herein. This without prejudice to the Legal Warranty acknowledged by each country, which shall be effective in accordance with the terms and conditions set under the applicable local laws in case any differences may arise.
The warranty granted through this Certificate of Warranty shall be legally enforceable only during the term stipulated under the law. In this regard, it shall be conventional in regards with any term granted beyond the minimum term required under the regulations applicable in each country.
Any technical intervention/service/repair requested by Beneficiary/Holder within the effective term of this Warranty which does not derive from faults in the quality and suitability of the product, in accordance with the Warranty terms and scope, shall be borne by the Beneficiary/Holder hereof. In this regard, services including: preventive maintenance, additional installations and/or any similar services as well as those derived from the exclusions mentioned in section 4 above, shall be borne by the Warranty Beneficiary/Holder.
For Argentina, Chile, Colombia, Ecuador, El Salvador, Guatemala, Peru and Puerto Rico, Warrantor shall provide spare part for a five (5) year term commencing on Product purchase date, provided no regulations requires provision for a different term—shorter or longer—in which case the term stipulated under such regulation shall apply.
- Identification of the warranted product
| IDENTIFICATION AND DESCRIPTION OF PRODUCT |
| Name of purchaser/beneficiary of warranty: |
| Identity document: |
| Address/Phone number: |
CERTIFICATE OF WARRANTY BIG APPLIANCES
CHILE
Warrantor: Whirlpool Chile Ltda.
Address: Alcantara 44, piso 7, Las Condes, Santiago de Chile
For Whirlpool and Consul brand products in Santiago de Chile and from mobile phones, please call +56 2 753 2600
From the rest of the country, for Whirlpool and Consul products, please call national hotline 01800 201736
Customer service hours: Please call Monday through Friday from 8:00 to 18:00 and Saturday from 8:00 to 14:00
E-mail: contactochile@whirlpool.com - For KitchenAid products, please call +56 2 207 4522
COLOMBIA
Warrantor: Whirlpool Colombia S.A.S.
Address: Calle 99 10-19 Piso 6. Bogotá D.C. – Colombia
For Whirlpool brand products in Bogota, please call 4048565 and from the rest of the country, please call national hotline 01 8000 112365
For KitchenAid products, please call national hotline 01 8000 115243
Customer service hours: Please call Monday through Friday from 8:00 a.m. to 6:00 p.m. and Saturday from 8:00 a.m. to 2:00 p.m.
E-mail: contactocolombia@whirlpool.com - Visit our websites: www.whirlpool.com.co and www.kitchenaid.com.co
COSTA RICA
Please check warrantor's data on label placed by Distributor.
If you have any question regarding official Distributors or their data, please contact us through the media indicated below.
For Whirlpool brand products in San Jose, please call 4000 1423 and national hotline 8000 571023
For KitchenAid products, please call national hotline 0 8000 571029
Customer service hours: Please call Monday through Friday from 8:00 a.m. to 6:00 p.m. and Saturday from 8:00 a.m. to 2:00 p.m.
E-mail: contactocostarica@whirlpool.com - Visit our websites: www.whirlpool-ca.com and www.kitchenaid-ca.com
ECUADOR
Warrantor: Whirlpool Ecuador S.A.
For Whirlpool and KitchenAid brand products, please call national hotline 1800 344782
Customer service hours: Please call Monday through Friday from 8:00 a.m. to 6:00 p.m. and Saturday from 8:00 a.m. to 2:00 p.m.
E-mail: contactoecuador@whirlpool.com - Visit our websites: www.whirlpool.com.ec and www.kitchenaid.com.ec
EL SALVADOR
CERTIFICATE OF WARRANTY BIG APPLIANCES
NICARAGUA
Please check warrantor's data on label placed by Distributor.
If you have any question regarding official Distributors or their data, please contact us through the media indicated below.
E-mail: contactonicaragua@whirlpool.com
PANAMA
Please check warrantor's data on label placed by Distributor.
If you have any question regarding official Distributors or their data, please contact us through the media indicated below.
In the city of Panama: 8336294.
For Whirlpool brand products, please call 833 6294 in the City of Panama or national toll-free telephone number 08000 570058 from the rest of the
country. KitchenAid brand products hotline: 008000570081
Customer service hours: Please call Monday through Friday from 8:00 a.m. to 6:00 p.m. and Saturday from 8:00 a.m. to 2:00 p.m.
E-mail: contactopanama@whirlpool.com - Visit our websites: www.whirlpool-ca.com and www.kitchenaid-ca.com
PERU
Warrantor: Whirlpool Peru S.R.L.
Registered address: Av. Benevides 1890, Miraflores, Lima
For products distributed by Whirlpool Peru S.R.L. please call 511-3110014.
Customer service hours: Please call Monday through Friday from 9:00 to 18:00 and Saturday from 9:00 to 13:00
E-mail: contactoperu@whirlpool.com - Visit our websites: www.whirlpool.com.pe and www.kitchenaid.com.pe
PUERTO RICO
Warrantor: Whirlpool Corporation
Registered address: Palmas Industrial Park, Carr 869 Corner Street A, Lot 17, Cataño PR 00962
In the city of San Juan: 1+787+999-7400
Customer service hours: Please call Monday through Friday from 8:00 a.m. to 5:00 p.m.
E-mail: contactopuertorico@whirlpool.com - Visit our websites: www.whirlpool.com and www.kitchenaid.com
DOMINICAN REPUBLIC
Please check warrantor's data on label placed by Distributor.
If you have any question regarding official Distributors or their data, please contact us through the media indicated below.
National toll-free phone number: 01 809 2009990
Customer service hours: Please call Monday through Friday from 8:00 am to 5:00 pm

- ESTUFAS A GAS 30"
- IMPORTANTE
- RECOMENDACIONES:
- Congratulations for your new appliance!
- Range safety
- Your safety and the safety of others are very important.
- DANGER
- WARNING
- For your safety: If you smell gas
- Recommendations
- Risk of Injury due to Overweight
- Installation
- Location Requirements
- Gas Supply Requirements
- OPERATING LP GAS PRESSURE
- kPa; 2750 Pa; 27.5 mbar; 28 cm WATER COLUMN
- OPERATING NATURAL GAS PRESSURE
- kPa; 1760 Pa; 17.6 mbar; 18 cm WATER COLUMN
- Connection
- GAS SUPPLY
- INSTALLATION USING LP GAS FROM A CYLINDER
- IMPORTANT:
- Installation procedure
- INSTALLATION USING NATURAL GAS or LP GAS FROM A PIPE LINE
- IMPORTANT
- Explosion Hazard
- Electrical Requirements
- Electrical Shock Hazard
- Accessory Installation
- Adjusting the flames
- Flame on cooktop burners
- Oven Burner Flame
- Range Use
- Cooktop Controls
- To set the burner temperature:
- Opening on gas line
- Burner openings
- Griddle
- BEFORE USING FOR THE FIRST TIME:
- Oven Use
- Cookware
- Oven knob
- Manual sliding
- Range Care and cleaning
- Care recommendations:
- Cooktop
- Oven door
- General cleaning
- Cooktop burners
- Control knob
- Outer glass door
- Control panel
- Oven cavity
- Oven racks
- Standard burner and super burner (in some models.)
- Troubleshooting
- Diagramas Eléctricos/ Wiring diagrams
- — CERTIFIED MANUFACTURER SERVICE— WHIRLPOOL SERVICE
- EVERYTHING YOU NEED WHEN YOU NEED IT THE MOST
- CERTIFICATE OF WARRANTY
- BIG APPLIANCES
- WARRANTY VALID ONLY IN THE COUNTRY OF PURCHASE
- Manufacturer/Importer/Distributor/Warrantor:
- Technical specifications, installation, use, maintenance and repair conditions:
- Warranty validity conditions, extended warranty and Beneficiary/Holder rights
- CERTIFICATE OF WARRANTY BIG APPLIANCES
- CHILE
- COLOMBIA
- COSTA RICA
- ECUADOR
- EL SALVADOR
- NICARAGUA
- PANAMA
- PERU
- PUERTO RICO
- DOMINICAN REPUBLIC
Brand : Acros
Model : AF5431B
Category : Cooker